Deployment Guide Citrix ADC VPX on Azure - Autoscale™
Contributors
Author: Blake Schindler, Solutions Architect
Overview
Citrix ADC is an application delivery and load balancing solution that provides a high-quality user experience for web, traditional, and cloud-native applications regardless of where they are hosted. It comes in a wide variety of form factors and deployment options without locking users into a single configuration or cloud. Pooled capacity licensing enables the movement of capacity among cloud deployments.
As an undisputed leader of service and application delivery, Citrix ADC is deployed in thousands of networks around the world to optimize, secure, and control the delivery of all enterprise and cloud services. Deployed directly in front of web and database servers, Citrix ADC combines high-speed load balancing and content switching, HTTP compression, content caching, SSL acceleration, application flow visibility and a powerful application firewall into an integrated, easy-to-use platform. Meeting SLAs is greatly simplified with end-to-end monitoring that transforms network data into actionable business intelligence. Citrix ADC allows policies to be defined and managed using a simple declarative policy engine with no programming expertise required.
Citrix VPX
The Citrix ADC VPX product is a virtual appliance that can be hosted on a wide variety of virtualization and cloud platforms:
-
Citrix Hypervisor™
-
VMware ESX
-
Microsoft Hyper-V
-
Linux KVM
-
Amazon Web Services
-
Microsoft Azure
-
Google Cloud Platform
This deployment guide focuses on Citrix ADC VPX on Microsoft Azure
Microsoft Azure
Microsoft Azure is an ever-expanding set of cloud computing services built to help organizations meet their business challenges. Azure gives users the freedom to build, manage, and deploy applications on a massive, global network using their preferred tools and frameworks. With Azure, users can:
-
Be future-ready with continuous innovation from Microsoft to support their development today—and their product visions for tomorrow.
-
Operate hybrid cloud seamlessly on-premises, in the cloud, and at the edge—Azure meets users where they are.
-
Build on their terms with Azure’s commitment to open source and support for all languages and frameworks, allowing users to be free to build how they want and deploy where they want.
-
Trust their cloud with security from the ground up—backed by a team of experts and proactive, industry-leading compliance that is trusted by enterprises, governments, and startups.
Azure Terminology
Here is a brief description of the key terms used in this document that users must be familiar with:
-
Azure Load Balancer – Azure load balancer is a resource that distributes incoming traffic among computers in a network. Traffic is distributed among virtual machines defined in a load-balancer set. A load balancer can be external or internet-facing, or it can be internal.
-
Azure Resource Manager (ARM) – ARM is the new management framework for services in Azure. Azure Load Balancer is managed using ARM-based APIs and tools.
-
Back-End Address Pool – These are IP addresses associated with the virtual machine NIC to which load is distributed.
-
BLOB - Binary Large Object – Any binary object like a file or an image that can be stored in Azure storage.
-
Front-End IP Configuration – An Azure Load balancer can include one or more front-end IP addresses, also known as a virtual IPs (VIPs). These IP addresses serve as ingress for the traffic.
-
Instance Level Public IP (ILPIP) – An ILPIP is a public IP address that users can assign directly to a virtual machine or role instance, rather than to the cloud service that the virtual machine or role instance resides in. This does not take the place of the VIP (virtual IP) that is assigned to their cloud service. Rather, it is an extra IP address that can be used to connect directly to a virtual machine or role instance.
Note:
In the past, an ILPIP was referred to as a PIP, which stands for public IP.
-
Inbound NAT Rules – This contains rules mapping a public port on the load balancer to a port for a specific virtual machine in the back-end address pool.
-
IP-Config - It can be defined as an IP address pair (public IP and private IP) associated with an individual NIC. In an IP-Config, the public IP address can be NULL. Each NIC can have multiple IP-Configs associated with it, which can be up to 255.
-
Load Balancing Rules – A rule property that maps a given front-end IP and port combination to a set of back-end IP addresses and port combinations. With a single definition of a load balancer resource, users can define multiple load balancing rules, each rule reflecting a combination of a front-end IP and port and back end IP and port associated with virtual machines.
-
Network Security Group (NSG) – NSG contains a list of Access Control List (ACL) rules that allow or deny network traffic to virtual machine instances in a virtual network. NSGs can be associated with either subnets or individual virtual machine instances within that subnet. When an NSG is associated with a subnet, the ACL rules apply to all the virtual machine instances in that subnet. In addition, traffic to an individual virtual machine can be restricted further by associating an NSG directly to that virtual machine.
-
Private IP addresses – Used for communication within an Azure virtual network, and user on-premises network when a VPN gateway is used to extend a user network to Azure. Private IP addresses allow Azure resources to communicate with other resources in a virtual network or an on-premises network through a VPN gateway or ExpressRoute circuit, without using an Internet-reachable IP address. In the Azure Resource Manager deployment model, a private IP address is associated with the following types of Azure resources – virtual machines, internal load balancers (ILBs), and application gateways.
-
Probes – This contains health probes used to check availability of virtual machines instances in the back-end address pool. If a particular virtual machine does not respond to health probes for some time, then it is taken out of traffic serving. Probes enable users to track the health of virtual instances. If a health probe fails, the virtual instance is taken out of rotation automatically.
-
Public IP Addresses (PIP) – PIP is used for communication with the Internet, including Azure public-facing services and is associated with virtual machines, Internet-facing load balancers, VPN gateways, and application gateways.
-
Region - An area within a geography that does not cross national borders and that contains one or more data centers. Pricing, regional services, and offer types are exposed at the region level. A region is typically paired with another region, which can be up to several hundred miles away, to form a regional pair. Regional pairs can be used as a mechanism for disaster recovery and high availability scenarios. Also referred to generally as location.
-
Resource Group - A container in Resource Manager that holds related resources for an application. The resource group can include all resources for an application, or only those resources that are logically grouped.
-
Storage Account – An Azure storage account gives users access to the Azure blob, queue, table, and file services in Azure Storage. A user storage account provides the unique namespace for user Azure storage data objects.
-
Virtual Machine – The software implementation of a physical computer that runs an operating system. Multiple virtual machines can run simultaneously on the same hardware. In Azure, virtual machines are available in various sizes.
-
Virtual Network - An Azure virtual network is a representation of a user network in the cloud. It is a logical isolation of the Azure cloud dedicated to a user subscription. Users can fully control the IP address blocks, DNS settings, security policies, and route tables within this network. Users can also further segment their VNet into subnets and launch Azure IaaS virtual machines and cloud services (PaaS role instances). Also, users can connect the virtual network to their on-premises network using one of the connectivity options available in Azure. In essence, users can expand their network to Azure, with complete control on IP address blocks with the benefit of the enterprise scale Azure provides.
Use Cases
Compared to alternative solutions that require each service to be deployed as a separate virtual appliance, Citrix ADC on Azure combines L4 load balancing, L7 traffic management, server offload, application acceleration, application security, and other essential application delivery capabilities in a single VPX instance, conveniently available via the Azure Marketplace. Furthermore, everything is governed by a single policy framework and managed with the same, powerful set of tools used to administer on-premises Citrix ADC deployments. The net result is that Citrix ADC on Azure enables several compelling use cases that not only support the immediate needs of today’s enterprises, but also the ongoing evolution from legacy computing infrastructures to enterprise cloud data centers.
Datacenter Expansion with Autoscale
In an application economy where applications are synonymous with business productivity, growth, and customer experience, it becomes indispensable for organizations to stay competitive, innovate rapidly and scale to meet customer demands while minimizing downtime and to prevent revenue losses.
When an organization outgrows the on-prem data center capacity, instead of thinking about procuring more hardware and spending their capex budget, they are thinking about expanding their presence in the public cloud. With the move to the public cloud, when selecting the right ADC for the user public cloud deployments, scale and performance are important factors. There is always a need to scale applications in response to fluctuating demand. Under provisioning may lead to lost customers, reduced employee productivity, and lower revenue. Right sizing the user infrastructure on demand is even more important in the public cloud where over provisioning is costly.
In response to the need for greater performance and scalability in the public cloud, Citrix ADC remains the best option. The best-in-class solution lets users automatically scale up to 100 Gbps/region and because of its superior software architecture, it delivers a latency advantage of 100 ms on a typical eCommerce webpage compared to other ADC vendors and cloud provider options.
Benefits of Autoscaling
High availability of applications. Autoscaling ensures that your application always has the right number of Citrix ADC VPX instances to handle the traffic demands. This is to ensure that your application is up and running all the time irrespective of traffic demands.
Smart scaling decisions and zero touch configuration. Autoscaling continuously monitors your application and adds or removes Citrix ADC instances dynamically depending on the demand. When demand spikes upward, the instances are automatically added. When the demand spikes downward, the instances are automatically removed. The addition and removal of Citrix ADC instances happens automatically making it a zero-touch manual configuration.
Automatic DNS management. The Citrix ADM Autoscale feature offers automatic DNS management. Whenever new Citrix ADC instances are added, the domain names are updated automatically.
Graceful connection termination. During a scale-in, the Citrix ADC instances are gracefully removed avoiding the loss of client connections.
Better cost management. Autoscaling dynamically increases or decreases Citrix ADC instances as needed. This enables users to optimize the costs involved. Users save money by launching instances only when they are needed and terminate them when they are not needed. Thus, users pay only for the resources they use.
Observability. Observability is essential to application dev-ops or IT personnel to monitor the health of the application. The Citrix ADM’s Autoscale dashboard enables users to visualize the threshold parameter values, Autoscale trigger time stamps, events, and the instances participating in Autoscale.
Autoscaling of Citrix ADC VPX in Microsoft Azure using Citrix ADM Autoscaling Architecture
Citrix ADM handles the client traffic distribution using Azure DNS or Azure Load Balancer (ALB).
Traffic Distribution using Azure DNS
The following diagram illustrates how the DNS based autoscaling occurs using the Azure traffic manager as the traffic distributor:
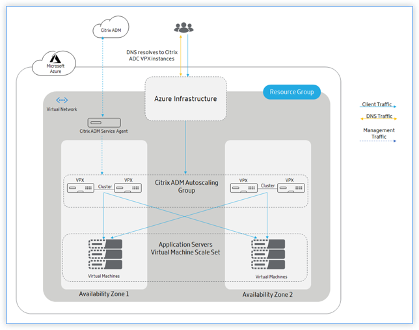
In DNS based autoscaling, DNS acts as a distribution layer. The Azure traffic manager is the DNS based load balancer in Microsoft Azure. Traffic manager directs the client traffic to the appropriate Citrix ADC instance that is available in the Citrix ADM autoscaling group.
Azure traffic manager resolves the FQDN to the VIP address of the Citrix ADC instance.
Note:
In DNS based autoscaling, each Citrix ADC instance in the Citrix ADM autoscale group requires a public IP address.
Citrix ADM triggers the scale-out or scale-in action at the cluster level. When a scale-out is triggered, the registered virtual machines are provisioned and added to the cluster. Similarly, when a scale-in is triggered, the nodes are removed and de-provisioned from the Citrix ADC VPX clusters.
Traffic Distribution using Azure Load Balancer
The following diagram illustrates how the autoscaling occurs using the Azure Load Balancer as the traffic distributor:
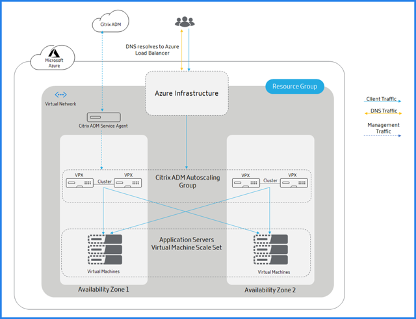
Azure Load Balancer is the distribution tier to the cluster nodes. ALB manages the client traffic and distributes it to Citrix ADC VPX clusters. ALB sends the client traffic to Citrix ADC VPX cluster nodes that are available in the Citrix ADM autoscaling group across availability zones.
Note:
Public IP address is allocated to Azure Load Balancer. Citrix ADC VPX instances do not require a public IP address.
Citrix ADM triggers the scale-out or scale-in action at the cluster level. When a scale-out is triggered the registered virtual machines are provisioned and added to the cluster. Similarly, when a scale-in is triggered, the nodes are removed and de-provisioned from the Citrix ADC VPX clusters.
Citrix ADM Autoscale Group
Autoscale group is a group of Citrix ADC instances that load balance applications as a single entity and trigger autoscaling based on the configured threshold parameter values.
Resource Group
Resource group contains the resources that are related to Citrix ADC autoscaling. This resource group helps users to manage the resources required for autoscaling. For more information, see: Manage Azure Resources by using the Azure Portal.
Azure Back-end Virtual Machine Scale Set
Azure virtual machine scale set is a collection of identical VM instances. The number of VM instances can increase or decrease depending on the client traffic. This set provides high-availability to your applications. For more information, see: What are Virtual Machine Scale Sets?.
Availability Zones
Availability Zones are isolated locations within an Azure region. Each region is made up of several availability zones. Each availability zone belongs to a single region. Each availability zone has one Citrix ADC VPX cluster. For more information, see: Regions and Availability Zones in Azure.
Availability Sets
An availability set is a logical grouping of a Citrix ADC VPX cluster and application servers. Availability Sets are helpful to deploy ADC instances across multiple isolated hardware nodes in a cluster. With an availability set, users can ensure a reliable ADM autoscaling if there is hardware or software failure within Azure. For more information, see: Tutorial: Create and Deploy Highly Available Virtual Machines with Azure PowerShell.
The following diagram illustrates the autoscaling in an availability set:
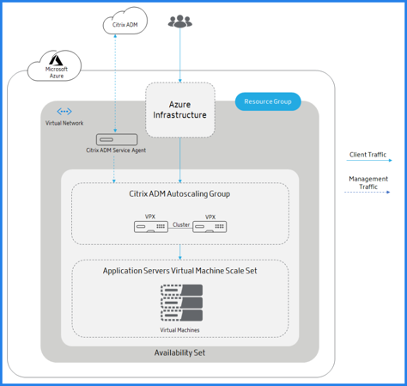
The Azure infrastructure (ALB or Azure traffic manager) sends the client traffic to a Citrix ADM autoscaling group in the availability set. Citrix ADM triggers the scale-out or scale-in action at the cluster level.
How Autoscaling Works
The following flowchart illustrates the autoscaling workflow:
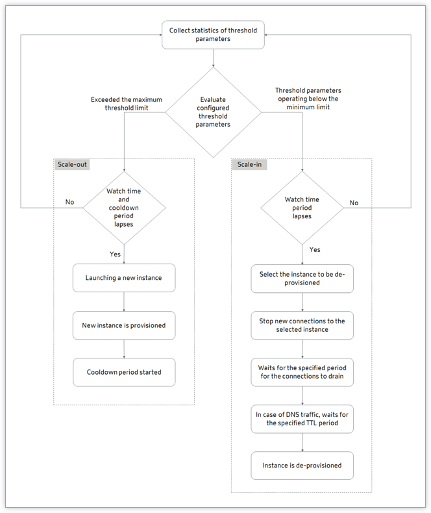
The Citrix ADM collects the statistics (CPU, Memory, and throughput) from the autoscale provisioned clusters for every minute.
The statistics are evaluated against the configuration thresholds. Depending on the statistics, scale out or scale in is triggered. Scale-out is triggered when the statistics exceed the maximum threshold. Scale-in is triggered when the statistics are operating below the minimum threshold.
If a scale-out is triggered:
-
A new node is provisioned.
-
The node is attached to the cluster and the configuration is synchronized from the cluster to the new node.
-
The node is registered with Citrix ADM.
-
The new node IP addresses are updated in the Azure traffic manager.
If a scale-in is triggered:
-
The node is identified for removal.
-
Stop new connections to the selected node.
-
Waits for the specified period for the connections to drain. In DNS traffic, it also waits for the specified TTL period.
-
The node is detached from the cluster, deregistered from Citrix ADM, and then de-provisioned from Microsoft Azure.
Note:
When the application is deployed, an IP set is created on clusters in every availability zone. Then, the domain and instance IP addresses are registered with the Azure traffic manager or ALB. When the application is removed, the domain and instance IP addresses are deregistered from the Azure traffic manager or ALB. Then, the IP set is deleted.
Example Autoscaling Scenario
Consider that users have created an autoscale group named asg_arn in a single availability zone with the following configuration.
-
Selected threshold parameters – Memory usage.
-
Threshold limit set to memory:
-
Minimum limit: 40
-
Maximum limit: 85
-
-
Watch time – 2 minutes.
-
Cooldown period – 10 minutes.
-
Time to wait during de-provision – 10 minutes.
-
DNS time to live – 10 seconds.
After the autoscale group is created, statistics are collected from the autoscale group. The autoscale policy also evaluates if any autoscale event is in progress. If autoscaling is in progress, wait for that event to complete before collecting the statistics.
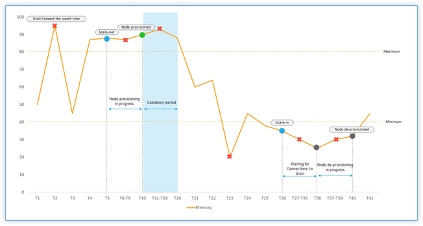
The Sequence of Events
-
Memory usage exceeds the threshold limit at T2. However, the scale-out is not triggered because it did not breach for the specified watch time.
-
Scale-out is triggered at T5 after a maximum threshold is breached for 2 minutes (watch time) continuously.
-
No action was taken for the breach between T5-T10 because node provisioning is in progress.
-
The node is provisioned at T10 and added to the cluster. The cooldown period is started.
-
No action was taken for the breach between T10-T20 because of the cooldown period. This period ensures the organic growing of instances of an autoscale group. Before triggering the next scaling decision, it waits for the current traffic to stabilize and average out on the current set of instances.
-
Memory usage drops below the minimum threshold limit at T23. However, the scale-in is not triggered because it did not breach for the specified watch time.
-
Scale-in is triggered at T26 after the minimum threshold is breached for 2 minutes (watch time) continuously. A node in the cluster is identified for de-provisioning.
-
No action was taken for the breach between T26-T36 because Citrix ADM is waiting to drain existing connections. For DNS based autoscaling, TTL is in effect.
Note:
For DNS based autoscaling, Citrix ADM waits for the specified Time-To-Live (TTL) period. Then, it waits for existing connections to drain before initiating node de-provisioning.
-
No action was taken for the breach between T37-T39 because node de-provisioning is in progress.
-
The node is removed and de-provisioned at T40 from the cluster.
All the connections to the selected node were drained before initiating node de-provisioning. Therefore, the cooldown period is skipped after the node de-provision.
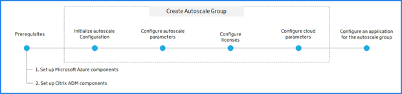
Autoscale Configuration
Citrix ADM manages all the Citrix ADC VPX clusters in Microsoft Azure. Citrix ADM accesses the Azure resources using the Cloud Access Profile.
The following flow diagram explains the steps involved in creating and configuring an Autoscale group:
Set up Microsoft Azure Components
Perform the following tasks in Azure before users Autoscale Citrix ADC VPX instances in Citrix ADM.
Create a Virtual Network
-
Log on to the user Microsoft Azure portal.
-
Select Create a resource.
-
Select Networking and click Virtual Network.
-
Specify the required parameters.
-
In Resource group, users must specify the resource group where they want to deploy a Citrix ADC VPX product.
-
In Location, users must specify the locations that support availability zones such as:
-
Central US
-
East US2
-
France Central
-
North Europe
-
Southeast Asia
-
West Europe
-
West US2
-
Note:
The application servers are present in this resource group.
-
-
Click Create.
For more information, see Azure Virtual Network here: What is Azure Virtual Network?.
Create Security Groups
Create three security groups in the user virtual network (VNet) - one each for the management, client, and server connections. Create a security group to control inbound and outbound traffic in the Citrix ADC VPX instance. Create rules for incoming traffic that users want to control in the Citrix Autoscale™ groups. Users can add as many rules as they want.
-
Management: A security group in the user account dedicated for management of Citrix ADC VPX. Citrix ADC has to contact Azure services and requires Internet access. Inbound rules are allowed on the following TCP and UDP ports.
-
TCP: 80, 22, 443, 3008–3011, 4001
-
UDP: 67, 123, 161, 500, 3003, 4500, 7000
-
For more information, see Azure Virtual Network here: What is Azure Virtual Network?.
Create Security Groups
Create three security groups in the user virtual network (VNet) - one each for the management, client, and server connections. Create a security group to control inbound and outbound traffic in the Citrix ADC VPX instance. Create rules for incoming traffic that users want to control in the Citrix Autoscale groups. Users can add as many rules as they want.
-
Management: A security group in the user account dedicated for management of Citrix ADC VPX. Citrix ADC has to contact Azure services and requires Internet access. Inbound rules are allowed on the following TCP and UDP ports.
-
TCP: 80, 22, 443, 3008–3011, 4001
-
UDP: 67, 123, 161, 500, 3003, 4500, 7000
Note:
Ensure that the security group allows the Citrix ADM agent to be able to access the VPX.
-
-
Client: A security group in the user account dedicated for client-side communication of Citrix ADC VPX instances. Typically, inbound rules are allowed on the TCP ports 80, 22, and 443.
-
Server: A security group in the user account dedicated for server-side communication of Citrix ADC VPX.
For more information on how to create a security group in Microsoft Azure, see: Create, Change, or Delete a Network Security Group.
Create Subnets
Create three subnets in the user virtual network (VNet) - one each for the management, client, and server connections. Specify an address range that is defined in the user VNet for each of the subnets. Specify the availability zone in which users want the subnet to reside.
-
Management: A subnet in the user Virtual Network (VNet) dedicated for management. Citrix ADC has to contact Azure services and requires internet access.
-
Client: A subnet in the user Virtual Network (VNet) dedicated for the client side. Typically, Citrix ADC receives client traffic for the application via a public subnet from the internet.
-
Server: A subnet where the application servers are provisioned. All the user application servers are present in this subnet and receive application traffic from the Citrix ADC through this subnet.
Note:
Specify an appropriate security group to the subnet while creating a subnet.
For more information on how to create a subnet in Microsoft Azure, see: Add, Change, or Delete a Virtual Network Subnet.
Subscribe to the Citrix ADC VPX License in Microsoft Azure
-
Log on to the user Microsoft Azure portal.
-
Select Create a resource.
-
In the Search the marketplace bar, search Citrix ADC and select the required product version.
-
In the Select a software plan list, select one of the following license types:
-
Bring your own license
-
Enterprise
-
Platinum
Note:
-
If users choose the Bring your own license option, the Autoscale group checks out the licenses from the Citrix ADM while provisioning Citrix ADC instances.
-
In Citrix ADM, the Advanced and Premium are the equivalent license types for Enterprise and Platinum respectively.
-
-
Ensure the programmatic deployment is enabled for the selected Citrix ADC product.
- Beside Want to deploy programmatically? click Get Started.
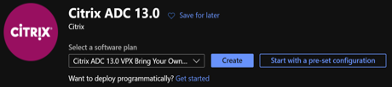
- In Choose the subscriptions, select Enable to deploy the selected Citrix ADC VPX edition programmatically.
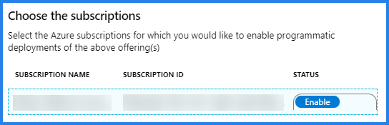
Important:
Enabling the programmatic deployment is required to Autoscale Citrix ADC VPX instances in Azure.
-
Click Save.
-
Close Configure Programmatic Deployment.
-
Click Create.
Create and Register an Application
Citrix ADM uses this application to Autoscale Citrix ADC VPX instances in Azure.
To create and register an application in Azure:
-
In the Azure portal, select Azure Active Directory. This option displays the user organization’s directory.
-
Select App registrations:
-
In Name, specify the name of the application.
-
Select the Application type from the list.
-
In Sign-on URL, specify the application URL to access the application.
-
-
Click Create.
For more information on App registrations, see: How to: Use the Portal to Create an Azure AD Application and Service Principal that can Access Resources.
Azure assigns an application ID to the application. The following is an example application registered in Microsoft Azure:
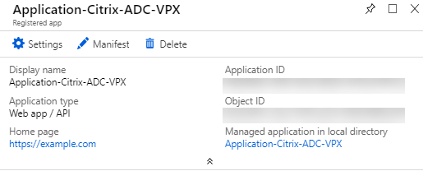
Copy the following IDs and provide these IDs when users are configuring the Cloud Access Profile in Citrix ADM. For steps to retrieve the following IDs, see: Get Values for Signing in.
-
Application ID
-
Directory ID
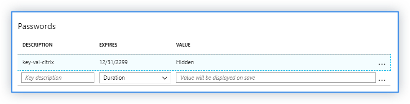
-
Key
- Subscription ID: Copy the subscription ID from the user storage account.
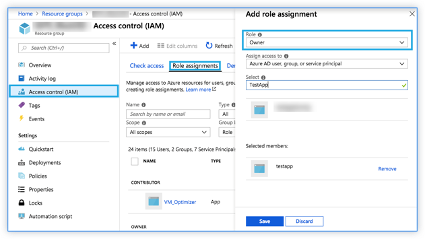
Assign the Role Permission to an Application
Citrix ADM uses the application-as-a-service principle to Autoscale Citrix ADC instances in Microsoft Azure. This permission is applicable only to the selected resource group. To assign a role permission to the user registered application, users have to be the owner of the Microsoft Azure subscription.
-
In the Azure portal, select Resource groups.
-
Select the resource group to which users want to assign a role permission.
-
Select Access control (IAM).
-
In Role assignments, click Add.
-
Select Owner from the Role list.
-
Select the application that is registered for autoscaling Citrix ADC instances.
-
Click Save.
Set up Citrix ADM Components
Perform the following tasks in Azure before users Autoscale Citrix ADC VPX instances in Citrix ADM:
Provision Citrix ADM Agent on Azure
The Citrix ADM service agent works as an intermediary between the Citrix ADM and the discovered instances in the data center or on the cloud.
-
Navigate to Networks > Agents.
-
Click Provision.
-
Select Microsoft Azure and click Next.
-
In the Cloud Parameters tab, specify the following:
-
Name - specify the Citrix ADM agent name.
-
Site - select the site users have created to provision an agent and ADC VPX instances.
-
Cloud Access Profile - select the cloud access profile from the list.
-
Availability Zone - Select the zones in which users want to create the Autoscale groups. Depending on the cloud access profile that users have selected, availability zones specific to that profile are populated.
-
Security Group - Security groups control the inbound and outbound traffic in the Citrix ADC agent. Users create rules for both incoming and outgoing traffic that they want to control.
-
Subnet - Select the management subnet where users want to provision an agent.
-
Tags - Type the key-value pair for the Autoscale group tags. A tag consists of a case-sensitive key-value pair. These tags enable users to organize and identify the Autoscale groups easily. The tags are applied to both Azure and Citrix ADM.
-
-
Click Finish.
Alternatively, users can install the Citrix ADM agent from the Azure Marketplace. For more information, see: Install Citrix ADM Agent on Microsoft Azure Cloud.
Create a Site
Create a site in Citrix ADM and add the VNet details associated with the user Microsoft Azure resource group.
-
In Citrix ADM, navigate to Networks > Sites.
-
Click Add.
-
In the Select Cloud pane,
-
Select Data Center as a Site type.
-
Choose Azure from the Type list.
-
Check the Fetch VNet from Azure check box.
This option helps users to retrieve the existing VNet information from the user Microsoft Azure account.
- Click Next.
-
-
In the Choose Region pane,
-
In Cloud Access Profile, select the profile created for the user Microsoft Azure account. If there are no profiles, create a profile.
-
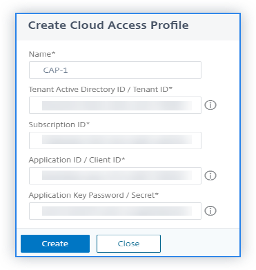
To create a cloud access profile, click Add.
-
In Name, specify a name to identify the user Azure account in Citrix ADM.
-
In Tenant Active Directory ID / Tenant ID, specify the Active Directory ID of the tenant or the account in Microsoft Azure.
-
Specify the Subscription ID.
-
Specify the Application ID/Client ID.
-
Specify the Application Key Password / Secret.
-
Click Create.
For more information, see: Install Citrix ADM Agent on Microsoft Azure Cloud and Mapping Cloud Access Profile to the Azure Application.
-
In Vnet, select the virtual network containing Citrix ADC VPX instances that users want to manage.
-
Specify a Site Name.
-
Click Finish.
-
Mapping Cloud Access Profile to the Azure Application
| Citrix ADM Term | Microsoft Azure Term |
|---|---|
| Tenant Active Directory ID / Tenant ID | Directory ID |
| Subscription ID | Subscription ID |
| Application ID / Client ID | Application ID |
| Application Key Password / Secret | keys or Certificates or Client Secrets |
Attach the Site to a Citrix ADM Service Agent
-
In Citrix ADM, navigate to Networks > Agents.
-
Select the agent for which users want to attach a site.
-
Click Attach Site.
-
Select the site from the list that users want to attach.
-
Click Save.
Step 1: Initialize Autoscale Configuration in Citrix ADM
-
In Citrix ADM, navigate to Networks > AutoScale Groups.
-
Click Add to create Autoscale groups.
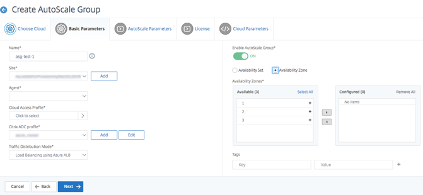
The Create AutoScale Group page appears.
-
Select Microsoft Azure and click Next.
-
In Basic Parameters, enter the following details:
-
Name: Type a name for the Autoscale group.
-
Site: Select the site that users have created to Autoscale the Citrix ADC VPX instances on Microsoft Azure. If users have not created a site, click Add to create a site.
-
Agent: Select the Citrix ADM agent that manages the provisioned instances.
-
Cloud Access Profile: Select the cloud access profile. Users can also add or edit a Cloud Access Profile.
-
Device Profile: Select the device profile from the list. Citrix ADM uses the device profile when it requires users to log on to the Citrix ADC VPX instance.
Note:
Ensure the selected device profile conforms to Microsoft Azure password rules, which can be found here: Password Policies that only Apply to Cloud User Accounts.
-
Traffic Distribution Mode: The Load Balancing using Azure LB option is selected as the default traffic distribution mode. Users can also choose the DNS using Azure DNS mode for the traffic distribution.
-
Enable AutoScale Group: Enable or disable the status of the ASG groups. This option is enabled, by default. If this option is disabled, autoscaling is not triggered.
-
Availability Set or Availability Zone: Select the availability set or availability zones in which users want to create the Autoscale groups. Depending on the cloud access profile that users have selected, availability zones appear on the list.
-
Tags: Type the key-value pair for the Autoscale group tags. A tag consists of a case-sensitive key-value pair. These tags enable users to organize and identify the Autoscale groups easily. The tags are applied to both Microsoft Azure and Citrix ADM.
-
-
Click Next.
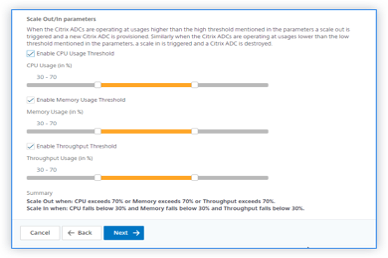
Step 2: Configure Autoscale Parameters
-
In the AutoScale Parameters tab, enter the following details.
-
Select one or more than one of the following threshold parameters whose values must be monitored to trigger a scale-out or a scale-in.
-
Enable CPU Usage Threshold: Monitor the metrics based on the CPU usage.
-
Enable Memory Usage Threshold: Monitor the metrics based on the memory usage.
-
Enable Throughput Threshold: Monitor the metrics based on the throughput.
-
Note:
- Default minimum threshold limit is 30 and the maximum threshold limit is 70. However, users can modify the limits.
- Minimum threshold limit must be equal or less than half of the maximum threshold limit.
- Users can select more than one threshold parameter for monitoring. Scale-out is triggered if at least one of the threshold parameters is above the maximum threshold. However, a scale-in is triggered only if all the threshold parameters are operating below their normal thresholds.
-
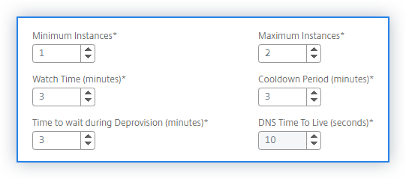
Minimum Instances: Select the minimum number of instances that must be provisioned for this Autoscale group.
The default minimum number of instances is equal to the number of zones selected. Users can only increment the minimum instances in the multiples of the specified number of zones.
For example, if the number of availability zones is 4, the minimum instances are 4 by default. Users can increase the minimum instances by 8, 12, 16.
-
Maximum Instances: Select the maximum number of instances that must be provisioned for this Autoscale group.
The maximum number of instances must be greater than or equal to the value of the minimum instances. The maximum number of instances cannot exceed the number of availability zones multiplied by 32.
Maximum number of instances = number of availability zones * 32
-
Watch-Time (minutes): Select the watch-time duration. The time for which the scale parameter’s threshold has to stay breached for scaling to happen. If the threshold is breached on all samples collected in this specified time then a scaling happens.
-
Cooldown period (minutes): Select the cooldown period. During scale-out, the cooldown period is the time for which evaluation of the statistics has to be stopped after a scale-out occurs. This period ensures the organic growing of instances of an Autoscale group. Before triggering the next scaling decision, it waits for the current traffic to stabilize and average out on the current set of instances.
-
Time to wait during Deprovision (minutes): Select the drain connection timeout period. During scale-in action, an instance is identified to de-provision. Citrix ADM restricts the identified instance from processing new connections until the specified time expires before de-provision. In this period, it allows existing connections to this instance to be drained out before it gets de-provisioned.
-
DNS Time To Live (seconds): Select the time (in seconds). In this period, a packet is set to exist inside a network before a router discards the packet. This parameter is applicable only when the traffic distribution mode is DNS using the Microsoft Azure traffic manager.
-
Click Next.
Step 3: Configure Licenses for Provisioning Citrix ADC Instances
Select one of the following modes to license Citrix ADC instances that are part of the Autoscale Group:
-
Using Citrix ADM: While provisioning Citrix ADC instances, the Autoscale group checks out the licenses from the Citrix ADM.
-
Using Microsoft Azure: The Allocate from Cloud option uses the Citrix product licenses available in the Azure Marketplace. While provisioning Citrix ADC instances, the Autoscale group uses the licenses from the marketplace.
If users choose to use licenses from Azure Marketplace, specify the product or license in the Cloud Parameters tab.
For more information, see: Licensing Requirements.
Use Licenses from Citrix ADM
To use this option, ensure that users have subscribed to Citrix ADC with the Bring your own license software plan in Azure. See: Subscribe to the Citrix ADC VPX License in Microsoft Azure.
-
In the License tab, select Allocate from ADM.
-
In License Type, select one of the following options from the list:
-
Bandwidth Licenses: Users can select one of the following options from the Bandwidth License Types list:
- Pooled Capacity: Specify the capacity to allocate for every new instance in the Autoscale group.
From the common pool, each ADC instance in the Autoscale group checks out one instance license and only as much bandwidth as is specified.
- VPX Licenses: When a Citrix ADC VPX instance is provisioned, the instance checks out the license from the Citrix ADM.
-
Virtual CPU Licenses: The provisioned Citrix ADC VPX instance checks out licenses depending on the number of CPUs running in the Autoscale group.
-
Note:
When the provisioned instances are removed or destroyed, the applied licenses return to the Citrix ADM license pool. These licenses can be reused to provision new instances during the next Autoscale.
-
In License Edition, select the license edition. The Autoscale group uses the specified edition to provision instances.
-
Click Next.
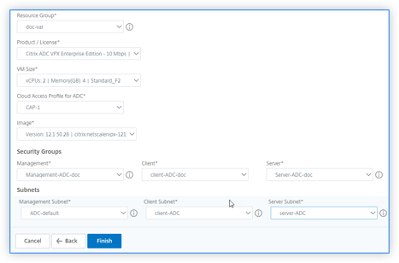
Step 4: Configure Cloud Parameters
-
In the Cloud Parameters tab, enter the following details:
-
Resource Group: Select the resource group in which Citrix ADC instances are deployed.
-
Product / License: Select the Citrix ADC product version that users want to provision. Ensure that programmatic access is enabled for the selected type. For more information, see: Subscribe to the Citrix ADC VPX License in Microsoft Azure.
-
Azure VM Size: Select the required VM size from the list.
Note:
Ensure that the selected Azure VM Size has a minimum of three NICs. For more information, see: Autoscaling of Citrix ADC VPX in Microsoft Azure using Citrix ADM.
-
Cloud Access Profile for ADC: Citrix ADM logs in to the user Azure account using this profile to provision or de-provision ADC instances. It also configures Azure LB or Azure DNS.
-
Image: Select the required Citrix ADC version image. Click Add New to add a Citrix ADC image.
-
Security Groups: Security groups control the inbound and outbound traffic in a Citrix ADC VPX instance. Select a security group for Management, Client, and Server traffic. For more information on management, client, and server security groups, see: Create Security Groups.
-
Subnets: Users must have three separate subnets such as Management, client, and server subnet to Autoscale Citrix ADC subnets. Subnets contain the required entities for autoscaling. Select For more information, see: Create Subnets.
-
-
Click Finish.
Step 5: Configure an application for the Autoscale group
-
In Citrix ADM, navigate to Networks > Autoscale Groups.
-
Select the Autoscale group that users created and click Configure.
-
In Configure Application, specify the following details:
-
Application Name - Specify the name of an application.
-
Domain Name - Specify the domain name of an application.
-
Zone Name - Specify the zone name of an application.
This domain and zone name redirects to the virtual servers in Azure. For example, if users host an application in app.example.com, the app is the domain name and example.com is the zone name.
- Access Type - Users can use ADM autoscaling for both external and internal applications. Select the required application access type.
-
-
Choose the required StyleBook that users want to deploy configurations for the selected Autoscale group.
If users want to import StyleBooks, click Import New StyleBook.
- Specify the values for all the parameters.
The configuration parameters are pre-defined in the selected StyleBook.
-
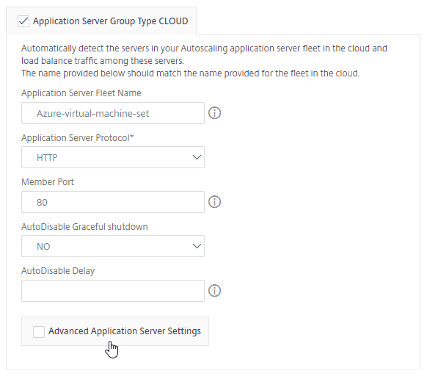
Check the Application Server Group Type CLOUD check box to specify the application servers available in the virtual machine scale set.
-
In Application Server Fleet Name, specify Autoscale setting name of your virtual machine scale set.
-
Select the Application Server Protocol from the list.
-
In Member Port, specify the port value of the application server.
Note:
Ensure AutoDisable Graceful shutdown is set to No and AutoDisable Delay field is blank.
- If users want to specify the advanced settings for the user application servers, check the Advanced Application Server Settings check box. Then, specify the required values listed under Advanced Application Server Settings.
-
-
If users have standalone application servers in the virtual network, check the Application Server Group Type STATIC check box:
-
Select the Application Server Protocol from the list.
-
In Server IPs and Ports, click + to add an application server IP address, port, and weight, then click Create.
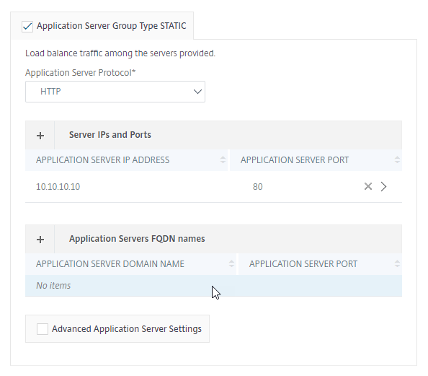
-
-
Click Create.
Modify the Autoscale Groups Configuration
Users can modify an Autoscale group configuration or delete an Autoscale group. Users can modify only the following Autoscale group parameters:
-
Maximum and minimum limits of the threshold parameters
-
Minimum and maximum instance values
-
Drain connection period value
-
Cooldown period value
-
Watch duration value
Users can also delete the Autoscale groups after they are created.
When an Autoscale group is deleted, all the domains and IP addresses are deregistered from DNS and the cluster nodes are de-provisioned.
For more detailed information on provisioning Citrix ADC VPX instances on Microsoft Azure, see Provisioning Citrix ADC VPX Instances on Microsoft Azure.
ARM (Azure Resource Manager) Templates
The GitHub repository for Citrix ADC ARM (Azure Resource Manager) templates hosts Citrix ADC custom templates for deploying Citrix ADC in Microsoft Azure Cloud Services. The templates in this repository are developed and maintained by the Citrix ADC engineering team.
Each template in this repository has co-located documentation describing the usage and architecture of the template. The templates attempt to codify the recommended deployment architecture of the Citrix ADC VPX, or to introduce the user to the Citrix ADC or to demonstrate a particular feature / edition / option. Users can reuse / modify or enhance the templates to suit their particular production and testing needs. Most templates require sufficient subscriptions to portal.azure.com to create resource and deploy templates. Citrix ADC VPX Azure Resource Manager (ARM) templates are designed to ensure an easy and consistent way of deploying standalone Citrix ADC VPX. These templates increase reliability and system availability with built-in redundancy. These ARM templates support Bring Your Own License (BYOL) or Hourly based selections. Choice of selection is either mentioned in the template description or offered during template deployment. For more information on how to provision a Citrix ADC VPX instance on Microsoft Azure using ARM (Azure Resource Manager) templates, visit Citrix ADC Azure Templates.
For more information on how to add Azure autoscale settings, visit: Add Azure Autoscale Settings.
For more information on how to deploy a Citrix ADC VPX instance on Microsoft Azure, refer to Deploy a Citrix ADC VPX Instance on Microsoft Azure.
For more information on how a Citrix ADC VPX instance works on Azure, visit How a Citrix ADC VPX Instance Works on Azure.
Prerequisites
Users need some prerequisite knowledge before deploying a Citrix VPX instance on Azure:
-
Familiarity with Azure terminology and network details. For information, see the Azure terminology in the previous section.
- Knowledge of a Citrix ADC appliance. For detailed information about the Citrix ADC appliance, see: Citrix ADC 13.0.
- Knowledge of Citrix ADC networking. See: Networking.
Azure Autoscale Prerequisites
This section describes the prerequisites that users must complete in Microsoft Azure and Citrix ADM before they provision Citrix ADC VPX instances.
This document assumes the following:
-
Users possess a Microsoft Azure account that supports the Azure Resource Manager deployment model.
-
Users have a resource group in Microsoft Azure.
For more information on how to create an account and other tasks, see Microsoft Azure Documentation.
Limitations
Running the Citrix ADC VPX load balancing solution on ARM imposes the following limitations:
-
The Azure architecture does not accommodate support for the following Citrix ADC features:
-
Clustering
-
IPv6
-
Gratuitous ARP (GARP)
-
L2 Mode (bridging). Transparent virtual server are supported with L2 (MAC rewrite) for servers in the same subnet as the SNIP.
-
Tagged VLAN
-
Dynamic Routing
-
Virtual MAC
-
USIP
-
Jumbo Frames
-
-
If users think that they might have to shut down and temporarily deallocate the Citrix ADC VPX virtual machine at any time, they should assign a static Internal IP address while creating the virtual machine. If they do not assign a static internal IP address, Azure might assign the virtual machine a different IP address each time it restarts, and the virtual machine might become inaccessible.
-
In an Azure deployment, only the following Citrix ADC VPX models are supported: VPX 10, VPX 200, VPX 1000, and VPX 3000. For more information, see the Citrix ADC VPX Data Sheet.
-
If a Citrix ADC VPX instance with a model number higher than VPX 3000 is used, the network throughput might not be the same as specified by the instance’s license. However, other features, such as SSL throughput and SSL transactions per second, might improve.
-
The “deployment ID” that is generated by Azure during virtual machine provisioning is not visible to the user in ARM. Users cannot use the deployment ID to deploy a Citrix ADC VPX appliance on ARM.
-
The Citrix ADC VPX instance supports 20 Mb/s throughput and standard edition features when it is initialized.
-
For a XenApp and XenDesktop® deployment, a VPN virtual server on a VPX instance can be configured in the following modes:
-
Basic mode, where the ICAOnly VPN virtual server parameter is set to ON. The Basic mode works fully on an unlicensed Citrix ADC VPX instance.
-
SmartAccess mode, where the ICAOnly VPN virtual server parameter is set to OFF. The SmartAccess mode works for only 5 Citrix ADC AAA session users on an unlicensed Citrix ADC VPX instance.
Note:
To configure the SmartControl feature, users must apply a Premium license to the Citrix ADC VPX instance.
-
Azure-VPX Supported Models and Licensing
In an Azure deployment, only the following Citrix ADC VPX models are supported: VPX 10, VPX 200, VPX 1000, and VPX 3000. For more information, see the Citrix ADC VPX Data Sheet.
A Citrix ADC VPX instance on Azure requires a license. The following licensing options are available for Citrix ADC VPX instances running on Azure. Users can choose one of these methods to license Citrix ADCs provisioned by Citrix ADM:
-
Using ADC licenses present in Citrix ADM: Configure pooled capacity, VPX licenses, or virtual CPU licenses while creating the autoscale group. So, when a new instance is provisioned for an autoscale group, the already configured license type is automatically applied to the provisioned instance.
- Pooled Capacity: Allocates bandwidth to every provisioned instance in the autoscale group. Ensure users have the necessary bandwidth available in Citrix ADM to provision new instances. For more information, see: Configure Pooled Capacity.
Each ADC instance in the autoscale group checks out one instance license and the specified bandwidth from the pool.
-
VPX licenses: Applies the VPX licenses to newly provisioned instances. Ensure users have the necessary number of VPX licenses available in Citrix ADM to provision new instances.
When a Citrix ADC VPX instance is provisioned, the instance checks out the license from the Citrix ADM. For more information, see: Citrix ADC VPX Check-in and Check-out Licensing.
-
Virtual CPU licenses: Applies virtual CPU licenses to newly provisioned instances. This license specifies the number of CPUs entitled to a Citrix ADC VPX instance. Ensure users have the necessary number of Virtual CPUs in Citrix ADM to provision new instances.
When a Citrix ADC VPX instance is provisioned, the instance checks out the virtual CPU license from the Citrix ADM. For more information, see: Citrix ADC Virtual CPU Licensing.
When the provisioned instances are destroyed or de-provisioned, the applied licenses are automatically returned to Citrix ADM.
To monitor the consumed licenses, navigate to the Networks > Licenses page.
Using Microsoft Azure subscription licenses: Configure Citrix ADC licenses available in the Azure Marketplace while creating the autoscale group. So, when a new instance is provisioned for the autoscale group, the license is obtained from Azure Marketplace.
Supported Citrix ADC Azure Virtual Machine Images
Supported Citrix ADC Azure Virtual Machine Images for Provisioning
Use the Azure virtual machine image that supports a minimum of three NICs. Provisioning Citrix ADC VPX instance is supported only on the Premium and Advanced editions. For more information on Azure virtual machine image types, see: General Purpose Virtual Machine Sizes.
The following are the recommended VM sizes for provisioning:
-
Standard_DS3_v2
-
Standard_B2ms
-
Standard_DS4_v2
Port Usage Guidelines
Users can configure more inbound and outbound rules on the Citrix Gateway while creating the Citrix ADC VPX instance or after the virtual machine is provisioned. Each inbound and outbound rule is associated with a public port and a private port.
Before configuring NSG rules, note the following guidelines regarding the port numbers users can use:
-
The Citrix ADC VPX instance reserves the following ports. Users cannot define these as private ports when using the Public IP address for requests from the internet. Ports 21, 22, 80, 443, 8080, 67, 161, 179, 500, 520, 3003, 3008, 3009, 3010, 3011, 4001, 5061, 9000, 7000. However, if users want internet-facing services such as the VIP to use a standard port (for example, port 443) users have to create port mapping by using the NSG. The standard port is then mapped to a different port that is configured on the Citrix ADC VPX for this VIP service. For example, a VIP service might be running on port 8443 on the VPX instance but be mapped to public port 443. So, when the user accesses port 443 through the Public IP, the request is directed to private port 8443.
-
The Public IP address does not support protocols in which port mapping is opened dynamically, such as passive FTP or ALG.
-
High availability does not work for traffic that uses a public IP address (PIP) associated with a VPX instance, instead of a PIP configured on the Azure load balancer. For more information, see: Configure a High-Availability Setup with a Single IP Address and a Single NIC.
-
In a Citrix Gateway deployment, users need not configure a SNIP address, because the NSIP can be used as a SNIP when no SNIP is configured. Users must configure the VIP address by using the NSIP address and some nonstandard port number. For call-back configuration on the back-end server, the VIP port number has to be specified along with the VIP URL (for example,
url: port).
Note:
In the Azure Resource Manager, a Citrix ADC VPX instance is associated with two IP addresses - a public IP address (PIP) and an internal IP address. While the external traffic connects to the PIP, the internal IP address or the NSIP is non-routable. To configure a VIP in VPX, use the internal IP address (NSIP) and any of the free ports available. Do not use the PIP to configure a VIP. For example, if the NSIP of a Citrix ADC VPX instance is 10.1.0.3 and an available free port is 10022, then users can configure a VIP by providing the 10.1.0.3:10022 (NSIP address + port) combination.
In this article
- Contributors
- Overview
- Citrix VPX
- Microsoft Azure
- Azure Terminology
- Use Cases
- Datacenter Expansion with Autoscale
- Benefits of Autoscaling
- Autoscaling of Citrix ADC VPX in Microsoft Azure using Citrix ADM Autoscaling Architecture
- How Autoscaling Works
- Autoscale Configuration
- Step 1: Initialize Autoscale Configuration in Citrix ADM
- Step 2: Configure Autoscale Parameters
- Step 3: Configure Licenses for Provisioning Citrix ADC Instances
- Step 4: Configure Cloud Parameters
- Step 5: Configure an application for the Autoscale group
- Modify the Autoscale Groups Configuration
- ARM (Azure Resource Manager) Templates
- Prerequisites
- Azure Autoscale Prerequisites
- Limitations
- Azure-VPX Supported Models and Licensing
- Supported Citrix ADC Azure Virtual Machine Images
- Port Usage Guidelines