Deployment Guide Citrix ADC VPX on Azure - GSLB
Contributors
Author: Blake Schindler, Solutions Architect
Overview
Citrix ADC is an application delivery and load balancing solution that provides a high-quality user experience for web, traditional, and cloud-native applications regardless of where they are hosted. It comes in a wide variety of form factors and deployment options without locking users into a single configuration or cloud. Pooled capacity licensing enables the movement of capacity among cloud deployments.
As an undisputed leader of service and application delivery, Citrix ADC is deployed in thousands of networks around the world to optimize, secure, and control the delivery of all enterprise and cloud services. Deployed directly in front of web and database servers, Citrix ADC combines high-speed load balancing and content switching, HTTP compression, content caching, SSL acceleration, application flow visibility, and a powerful application firewall into an integrated, easy-to-use platform. Meeting SLAs is greatly simplified with end-to-end monitoring that transforms network data into actionable business intelligence. Citrix ADC allows policies to be defined and managed using a simple declarative policy engine with no programming expertise required.
Citrix VPX
The Citrix ADC VPX product is a virtual appliance that can be hosted on a wide variety of virtualization and cloud platforms:
-
Citrix Hypervisor™
-
VMware ESX
-
Microsoft Hyper-V
-
Linux KVM
-
Amazon Web Services
-
Microsoft Azure
-
Google Cloud Platform
This deployment guide focuses on Citrix ADC VPX on Microsoft Azure
Microsoft Azure
Microsoft Azure is an ever-expanding set of cloud computing services built to help organizations meet their business challenges. Azure gives users the freedom to build, manage, and deploy applications on a massive, global network using their preferred tools and frameworks. With Azure, users can:
-
Be future-ready with continuous innovation from Microsoft to support their development today and their product visions for tomorrow.
-
Operate hybrid cloud seamlessly on-premises, in the cloud, and at the edge—Azure meets users where they are.
-
Build on their terms with Azure’s commitment to open source and support for all languages and frameworks, allowing users to be free to build how they want and deploy where they want.
-
Trust their cloud with security from the ground up—backed by a team of experts and proactive, industry-leading compliance that is trusted by enterprises, governments, and startups.
Azure Terminology
Here is a brief description of the key terms used in this document that users must be familiar with:
-
Azure Load Balancer – Azure load balancer is a resource that distributes incoming traffic among computers in a network. Traffic is distributed among virtual machines defined in a load-balancer set. A load balancer can be external or internet-facing, or it can be internal.
-
Azure Resource Manager (ARM) – ARM is the new management framework for services in Azure. Azure Load Balancer is managed using ARM-based APIs and tools.
-
Back-End Address Pool – IP addresses associated with the virtual machine NIC to which load is distributed.
-
BLOB - Binary Large Object – Any binary object like a file or an image that can be stored in Azure storage.
-
Front-End IP Configuration – An Azure Load balancer can include one or more front-end IP addresses, also known as a virtual IPs (VIPs). These IP addresses serve as ingress for the traffic.
-
Instance Level Public IP (ILPIP) – An ILPIP is a public IP address that users can assign directly to a virtual machine or role instance, rather than to the cloud service that the virtual machine or role instance resides in. This does not take the place of the VIP (virtual IP) that is assigned to their cloud service. Rather, it is an extra IP address that can be used to connect directly to a virtual machine or role instance.
Note:
In the past, an ILPIP was referred to as a PIP, which stands for public IP.
-
Inbound NAT Rules – This contains rules mapping a public port on the load balancer to a port for a specific virtual machine in the back-end address pool.
-
IP-Config - It can be defined as an IP address pair (public IP and private IP) associated with an individual NIC. In an IP-Config, the public IP address can be NULL. Each NIC can have multiple IP-Configs associated with it, which can be up to 255.
-
Load Balancing Rules – A rule property that maps a given front-end IP and port combination to a set of back-end IP addresses and port combinations. With a single definition of a load balancer resource, users can define multiple load balancing rules, each rule reflecting a combination of a front-end IP and port and back end IP and port associated with virtual machines.
-
Network Security Group (NSG) – NSG contains a list of Access Control List (ACL) rules that allow or deny network traffic to virtual machine instances in a virtual network. NSGs can be associated with either subnets or individual virtual machine instances within that subnet. When an NSG is associated with a subnet, the ACL rules apply to all the virtual machine instances in that subnet. In addition, traffic to an individual virtual machine can be restricted further by associating an NSG directly to that virtual machine.
-
Private IP addresses – Used for communication within an Azure virtual network, and user on-premises network when a VPN gateway is used to extend a user network to Azure. Private IP addresses allow Azure resources to communicate with other resources in a virtual network or an on-premises network through a VPN gateway or ExpressRoute circuit, without using an internet-reachable IP address. In the Azure Resource Manager deployment model, a private IP address is associated with the following types of Azure resources – virtual machines, internal load balancers (ILBs), and application gateways.
-
Probes – This contains health probes used to check availability of virtual machines instances in the back-end address pool. If a particular virtual machine does not respond to health probes for some time, then it is taken out of traffic serving. Probes enable users to track the health of virtual instances. If a health probe fails, the virtual instance is taken out of rotation automatically.
-
Public IP Addresses (PIP) – PIP is used for communication with the Internet, including Azure public-facing services and is associated with virtual machines, internet-facing load balancers, VPN gateways, and application gateways.
-
Region - An area within a geography that does not cross national borders and that contains one or more data centers. Pricing, regional services, and offer types are exposed at the region level. A region is typically paired with another region, which can be up to several hundred miles away, to form a regional pair. Regional pairs can be used as a mechanism for disaster recovery and high availability scenarios. Also referred to generally as location.
-
Resource Group - A container in Resource Manager that holds related resources for an application. The resource group can include all resources for an application, or only those resources that are logically grouped.
-
Storage Account – An Azure storage account gives users access to the Azure blob, queue, table, and file services in Azure Storage. A user storage account provides the unique namespace for user Azure storage data objects.
-
Virtual Machine – The software implementation of a physical computer that runs an operating system. Multiple virtual machines can run simultaneously on the same hardware. In Azure, virtual machines are available in various sizes.
-
Virtual Network - An Azure virtual network is a representation of a user network in the cloud. It is a logical isolation of the Azure cloud dedicated to a user subscription. Users can fully control the IP address blocks, DNS settings, security policies, and route tables within this network. Users can also further segment their VNet into subnets and launch Azure IaaS virtual machines and cloud services (PaaS role instances). Also, users can connect the virtual network to their on-premises network using one of the connectivity options available in Azure. In essence, users can expand their network to Azure, with complete control on IP address blocks with the benefit of the enterprise scale Azure provides.
Use Cases
Compared to alternative solutions that require each service to be deployed as a separate virtual appliance, Citrix ADC on Azure combines L4 load balancing, L7 traffic management, server offload, application acceleration, application security, and other essential application delivery capabilities in a single VPX instance, conveniently available via the Azure Marketplace. Furthermore, everything is governed by a single policy framework and managed with the same, powerful set of tools used to administer on-premises Citrix ADC deployments. The net result is that Citrix ADC on Azure enables several compelling use cases that not only support the immediate needs of today’s enterprises, but also the ongoing evolution from legacy computing infrastructures to enterprise cloud data centers.
Global Server Load Balancing (GSLB)
Global Server Load Balancing (GSLB) is huge for many of our customers. Those businesses have an on-prem data center presence serving regional customers, but with increasing demand for their business, they now want to scale and deploy their presence globally across AWS and Azure while maintaining their on-prem presence for regional customers. Customers want to do all of this with automated configurations as well. Thus, they are looking for a solution that can rapidly adapt to either evolving business needs or changes in the global market.
With Citrix ADC on the network administrator’s side, customers can use the Global Load Balancing (GLB) StyleBook to configure applications both on-prem and in the cloud, and that same config can be transferred to the cloud with Citrix ADM. Users can reach either on-prem or cloud resources depending on proximity with GSLB. This allows for a seamless experience no matter where the users are located in the world.
Deployment Types
Multi-NIC Multi-IP Deployment (Three-NIC Deployment)
-
Use Cases
-
Multi-NIC Multi-IP (Three-NIC) Deployments are used to achieve real isolation of data and management traffic.
-
Multi-NIC Multi-IP (Three-NIC) Deployments also improve the scale and performance of the ADC.
-
Multi-NIC Multi-IP (Three-NIC) Deployments are used in network applications where throughput is typically 1 Gbps or higher and a Three-NIC Deployment is recommended.
-
Multi-NIC Multi-IP (Three-NIC) Deployments are also used in network applications for WAF Deployment.
-
Multi-NIC Multi-IP (Three-NIC) Deployment for GSLB
Customers would potentially deploy using three-NIC deployment if they are deploying into a production environment where security, redundancy, availability, capacity, and scalability are critical. With this deployment method, complexity and ease of management are not critical concerns to the users.
Azure Resource Manager (ARM) Template Deployment
Customers would deploy using Azure Resource Manager (ARM) Templates if they are customizing their deployments or they are automating their deployments.
Deployment Steps
When users deploy a Citrix ADC VPX instance on a Microsoft Azure Resource Manager (ARM), they can use the Azure cloud computing capabilities and use Citrix ADC load balancing and traffic management features for their business needs. Users can deploy Citrix ADC VPX instances on Azure Resource Manager either as standalone instances or as high availability pairs in active-standby modes.
But users can deploy a Citrix ADC VPX instance on Microsoft Azure in either of two ways:
-
Through the Azure Marketplace. The Citrix ADC VPX virtual appliance is available as an image in the Microsoft Azure Marketplace. Citrix ADC ARM templates are available in the Azure Marketplace for standalone and HA deployment types.
-
Using the Citrix ADC Azure Resource Manager (ARM) json template available on GitHub. For more information, see the GitHub repository for Citrix ADC Azure Templates.
How a Citrix ADC VPX Instance Works on Azure
In an on-premises deployment, a Citrix ADC VPX instance requires at least three IP addresses:
-
Management IP address, called NSIP address
-
Subnet IP (SNIP) address for communicating with the server farm
-
Virtual server IP (VIP) address for accepting client requests
For more information, see: Network Architecture for Citrix ADC VPX Instances on Microsoft Azure.
Note:
VPX virtual appliances can be deployed on any instance type that has two or more cores and more than 2 GB memory.
In an Azure deployment, users can provision a Citrix ADC VPX instance on Azure in three ways:
-
Multi-NIC multi-IP architecture
-
Single NIC multi IP architecture
-
ARM (Azure Resource Manager) templates
Depending on requirements, users can deploy any of these supported architecture types.
Multi-NIC Multi-IP Architecture (Three-NIC)
In this deployment type, users can have more than one network interfaces (NICs) attached to a VPX instance. Any NIC can have one or more IP configurations - static or dynamic public and private IP addresses assigned to it.
Refer to the following use cases:
-
Configure a High-Availability Setup with Multiple IP Addresses and NICs
-
Configure a High-Availability Setup with Multiple IP Addresses and NICs by using PowerShell Commands
Configure a High-Availability Setup with Multiple IP Addresses and NICs
In a Microsoft Azure deployment, a high-availability configuration of two Citrix ADC VPX instances is achieved by using the Azure Load Balancer (ALB). This is achieved by configuring a health probe on ALB, which monitors each VPX instance by sending health probes at every 5 seconds to both primary and secondary instances.
In this setup, only the primary node responds to health probes and the secondary does not. Once the primary sends the response to the health probe, the ALB starts sending the data traffic to the instance. If the primary instance misses two consecutive health probes, ALB does not redirect traffic to that instance. On failover, the new primary starts responding to health probes and the ALB redirects traffic to it. The standard VPX high availability failover time is three seconds. The total failover time that might occur for traffic switching can be a maximum of 13 seconds.
Users can deploy a pair of Citrix ADC VPX instances with multiple NICs in an active-passive high availability (HA) setup on Azure. Each NIC can contain multiple IP addresses.
The following options are available for a multi-NIC high availability deployment:
-
High availability using Azure availability set
-
High availability using Azure availability zones
For more information about Azure Availability Set and Availability Zones, see the Azure documentation: Manage the Availability of Linux Virtual Machines.
High Availability using Availability Set
A high availability setup using an availability set must meet the following requirements:
-
An HA Independent Network Configuration (INC) configuration
-
The Azure Load Balancer (ALB) in Direct Server Return (DSR) mode
All traffic goes through the primary node. The secondary node remains in standby mode until the primary node fails.
Note:
For a Citrix VPX high availability deployment on the Azure cloud to work, users need a floating public IP (PIP) that can be moved between the two VPX nodes. The Azure Load Balancer (ALB) provides that floating PIP, which is moved to the second node automatically in the event of a failover.
In an active-passive deployment, the ALB front-end public IP (PIP) addresses are added as the VIP addresses in each VPX node. In an HA-INC configuration, the VIP addresses are floating and the SNIP addresses are instance specific.
Users can deploy a VPX pair in active-passive high availability mode in two ways by using:
-
Citrix ADC VPX standard high availability template: use this option to configure an HA pair with the default option of three subnets and six NICs.
-
Windows PowerShell commands: use this option to configure an HA pair according to your subnet and NIC requirements.
This section describes how to deploy a VPX pair in active-passive HA setup by using the Citrix template. If you want to deploy with PowerShell commands, see Configure a High-Availability Setup with Multiple IP Addresses and NICs by using PowerShell Commands.
Configure HA-INC Nodes by using the Citrix High Availability Template
Users can quickly and efficiently deploy a pair of VPX instances in HA-INC mode by using the standard template. The template creates two nodes, with three subnets and six NICs. The subnets are for management, client, and server-side traffic, and each subnet has two NICs for both of the VPX instances.
Complete the following steps to launch the template and deploy a high availability VPX pair, by using Azure Availability Sets.
-
From Azure Marketplace, select and initiate the Citrix solution template. The template appears.
-
Ensure deployment type is Resource Manager and select Create.
-
The Basics page appears. Create a Resource Group and select OK.
-
The General Settings page appears. Type the details and select OK.
-
The Network Setting page appears. Check the VNet and subnet configurations, edit the required settings, and select OK.
-
The Summary page appears. Review the configuration and edit accordingly. Select OK to confirm.
-
The Buy page appears. Select Purchase to complete the deployment.
It might take a moment for the Azure Resource Group to be created with the required configurations. After completion, select the Resource Group in the Azure portal to see the configuration details, such as LB rules, back-end pools, health probes. The high availability pair appears as ns-vpx0 and ns-vpx1.
If further modifications are required for the HA setup, such as creating more security rules and ports, users can do that from the Azure portal.
Next, users need to configure the load-balancing virtual server with the ALB’s Frontend public IP (PIP) address, on the primary node. To find the ALB PIP, select ALB > Frontend IP configuration.
See the Resources section for more information about how to configure the load-balancing virtual server.
Resources:
The following links provide additional information related to HA deployment and virtual server (virtual server) configuration:
Related resources:
-
Configure a High-Availability Setup with Multiple IP Addresses and NICs by using PowerShell Commands
High Availability using Availability Zones
Azure Availability Zones are fault-isolated locations within an Azure region, providing redundant power, cooling, and networking and increasing resiliency. Only specific Azure regions support Availability Zones. For more information, see: Regions and Availability Zones in Azure.
Users can deploy a VPX pair in high availability mode by using the template called “NetScaler 13.0 HA using Availability Zones,” available in Azure Marketplace.
Complete the following steps to launch the template and deploy a high availability VPX pair, by using Azure Availability Zones.
-
From Azure Marketplace, select and initiate the Citrix solution template.
-
Ensure deployment type is Resource Manager and select Create.
-
The Basics page appears. Enter the details and click OK.
Note:
Ensure that an Azure region that supports Availability Zones is selected. For more information about regions that support Availability Zones, see: Regions and Availability Zones in Azure.
-
The General Settings page appears. Type the details and select OK.
-
The Network Setting page appears. Check the VNet and subnet configurations, edit the required settings, and select OK.
-
The Summary page appears. Review the configuration and edit accordingly. Select OK to confirm.
-
The Buy page appears. Select Purchase to complete the deployment.
It might take a moment for the Azure Resource Group to be created with the required configurations. After completion, select the Resource Group to see the configuration details, such as LB rules, back-end pools, health probes, in the Azure portal. The high availability pair appears as ns-vpx0 and ns-vpx1. Also, users can see the location under the Location column.
If further modifications are required for the HA setup, such as creating more security rules and ports, users can do that from the Azure portal.
ARM (Azure Resource Manager) Templates
The GitHub repository for Citrix ADC ARM (Azure Resource Manager) templates hosts Citrix ADC Azure Templates for deploying Citrix ADC in Microsoft Azure Cloud Services. All templates in the repository are developed and maintained by the Citrix ADC engineering team.
Each template in this repository has co-located documentation describing the usage and architecture of the template. The templates attempt to codify the recommended deployment architecture of the Citrix ADC VPX, or to introduce the user to the Citrix ADC or to demonstrate a particular feature, edition, or option. Users can reuse, modify, or enhance the templates to suit their particular production and testing needs. Most templates require sufficient subscriptions to portal.azure.com to create resource and deploy templates.
Citrix ADC VPX Azure Resource Manager (ARM) templates are designed to ensure an easy and consistent way of deploying standalone Citrix ADC VPX. These templates increase reliability and system availability with built-in redundancy. These ARM templates support Bring Your Own License (BYOL) or Hourly based selections. Choice of selection is either mentioned in the template description or offered during template deployment.
For more information on how to provision a Citrix ADC VPX instance on Microsoft Azure using ARM (Azure Resource Manager) templates, visit Citrix ADC Azure Templates.
Citrix ADC GSLB and Domain Based Services Back-end Autoscale™ with Cloud Load Balancer
GSLB and DBS Overview
Citrix ADC GSLB supports using DBS (Domain Based Services) for Cloud load balancers. This allows for the auto-discovery of dynamic cloud services using a cloud load balancer solution. This configuration allows the Citrix ADC to implement Global Server Load Balancing Domain-Name Based Services (GSLB DBS) in an Active-Active environment. DBS allows the scaling of back end resources in Microsoft Azure environments from DNS discovery. This section covers integrations between Citrix ADC in the Azure Auto Scaling environments. The final section of the document details the ability to set up a HA pair of Citrix ADCs that span two different Availability Zones (AZs) specific to an Azure region.
Domain-Name Based Services – Azure ALB
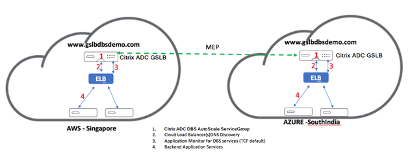
GLSB DBS utilizes the FQDN of the user Azure Load Balancer to dynamically update the GSLB Service Groups to include the back-end servers that are being created and deleted within Azure. To configure this feature, users point the Citrix ADC to their Azure Load Balancer to dynamically route to different servers in Azure. They can do this without having to manually update the Citrix ADC every time an instance is created and deleted within Azure. The Citrix ADC DBS feature for GSLB Service Groups uses DNS-aware service discovery to determine the member service resources of the DBS namespace identified in the Autoscale group.
Diagram: Citrix ADC GSLB DBS Autoscale Components with Cloud Load Balancers
Configuring Azure Components
-
Log in to the user Azure Portal and create a new virtual machine from a Citrix ADC template
-
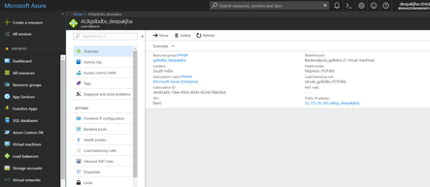
Create an Azure Load Balancer
-
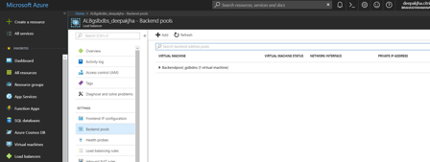
Add the created Citrix ADC back-end Pools
-
Create a Health Probe for port 80.
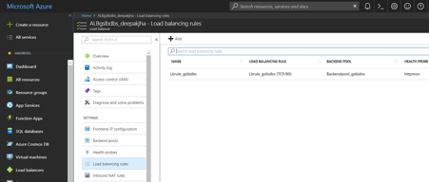
Create a Load Balancing Rule utilizing the front-end IP created from the Load Balancer.
-
Protocol: TCP
-
Backend Port: 80
-
Backend pool: Citrix ADC created in step 1
-
Health Probe: Created in step 4
-
Session Persistence: None
-
Configure Citrix ADC GSLB Domain Based Service
The following configurations summarize what is required to enable domain-based services for autoscaling ADCs in a GSLB enabled environment.
Traffic Management Configurations
Note:
It is required to configure the Citrix ADC with either a nameserver or a DNS virtual server through which the ELB /ALB Domains are resolved for the DBS Service Groups. For more information on name servers or DNS virtual servers, please visit: DNS nameServer
-
Navigate to Traffic Management > Load Balancing > Servers
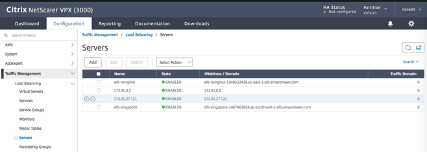
-
Click Add to create a server, provide a name and FQDN corresponding to the A record (domain name) in Azure for the Azure Load Balancer (ALB)
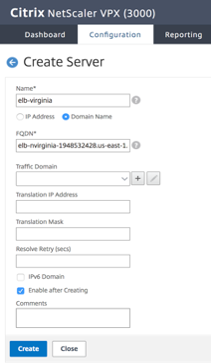
-
Repeat step 2 to add the second ALB from the second resource in Azure.
GSLB Configurations
-
Click the Add button to configure a GSLB Site
-
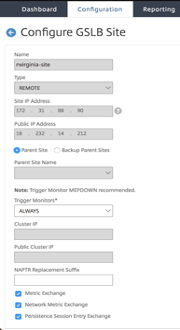
Name the Site.
Type is configured as Remote or Local based on which Citrix ADC users are configuring the site on. The Site IP Address is the IP address for the GSLB site. The GSLB site uses this IP address to communicate with the other GSLB sites. The Public IP address is required when using a cloud service where a particular IP is hosted on an external firewall or NAT device. The site should be configured as a Parent Site. Ensure the Trigger Monitors are set to ALWAYS. Also, be sure to check off the three boxes at the bottom for Metric Exchange, Network Metric Exchange, and Persistence Session Entry Exchange.
Citrix recommends that you set the Trigger monitor setting to MEPDOWN, please refer to: Configure a GSLB Service Group.
-
Click Create, repeat steps 3 & 4 to configure the GSLB site for the other resource location in Azure (this can be configured on the same Citrix ADC)
-
Navigate to Traffic Management > GSLB > Service Groups
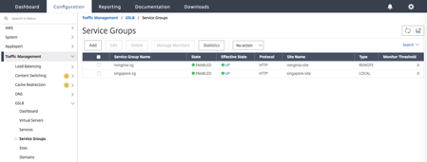
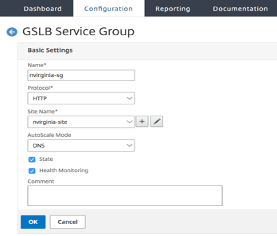
Click Add to add a service group. Name the Service Group, use the HTTP protocol, and then under Site Name choose the respective site that was created in the previous steps. Be sure to configure autoscale Mode as DNS and check off the boxes for State and Health Monitoring. Click OK to create the Service Group.
-
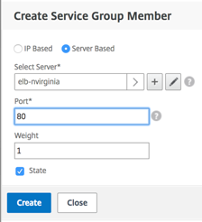
Click Service Group Members and select Server Based. Select the respective Elastic Load Balancing Server that was configured in the start of the run guide. Configure the traffic to go over port 80. Click Create.
-
The Service group Member Binding should populate with 2 instances that it is receiving from the Elastic Load Balancer.

-
Repeat steps 5 & 6 to configure the Service Group for the second resource location in Azure. (This can be done from the same Citrix ADC GUI).
-
The final step is to set up a GSLB Virtual Server. Navigate to Traffic Management > GSLB > Virtual Servers.
-
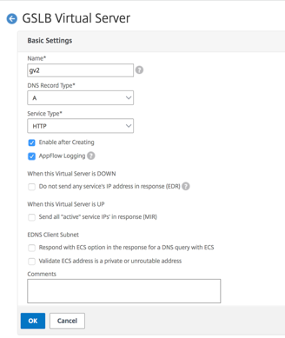
Click Add to create the virtual server. Name the server, DNS Record Type is set as A, Service Type is set as HTTP, and check the boxes for Enable after Creating and AppFlow® Logging. Click OK to create the GSLB Virtual Server.
-
Once the GSLB Virtual Server is created, click No GSLB Virtual Server ServiceGroup Binding.

-
Under ServiceGroup Binding use Select Service Group Name to select and add the Service Groups that were created in the previous steps.

-
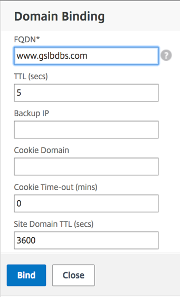
Next configure the GSLB Virtual Server Domain Binding by clicking No GSLB Virtual Server Domain Binding. Configure the FQDN and Bind, the rest of the settings can be left as the defaults.
-
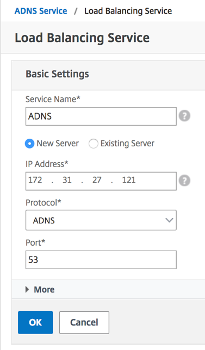
Configure the ADNS Service by clicking No Service. Add a Service Name, click New Server, and enter the IP Address of the ADNS server. Also, if the user ADNS is already configured users can select Existing Server and then choose the user ADNS from the drop-down menu. Make sure the Protocol is ADNS and the traffic is configured to flow over Port 53.
-
Configure the Method as LEASTCONNECTION and the Backup Method as ROUNDROBIN.
-
Click Done and verify that the user GSLB Virtual Server is shown as Up.

Citrix ADC Global Load Balancing for Hybrid and Multi-Cloud Deployments
The Citrix ADC hybrid and multi-cloud global load balancing (GLB) solution enables users to distribute application traffic across multiple data centers in hybrid clouds, multiple clouds, and on-premises deployments. The Citrix ADC hybrid and multi-cloud GLB solution helps users to manage their load balancing setup in hybrid or multi-cloud without altering the existing setup. Also, if users have an on-premises setup, they can test some of their services in the cloud by using the Citrix ADC hybrid and multi-cloud GLB solution before completely migrating to the cloud. For example, users can route only a small percentage of their traffic to the cloud, and handle most of the traffic on-premises. The Citrix ADC hybrid and multi-cloud GLB solution also enables users to manage and monitor Citrix ADC instances across geographic locations from a single, unified console.
A hybrid and multi-cloud architecture can also improve overall enterprise performance by avoiding “vendor lock-in” and using different infrastructure to meet the needs of user partners and customers. With a multiple cloud architecture, users can manage their infrastructure costs better as they now have to pay only for what they use. Users can also scale their applications better as they now use the infrastructure on demand. It also lets you quickly switch from one cloud to another to take advantage of the best offerings of each provider.
Architecture of the Citrix ADC Hybrid and Multi-Cloud GLB Solution
The following diagram illustrates the architecture of the Citrix ADC hybrid and multi-cloud GLB feature.
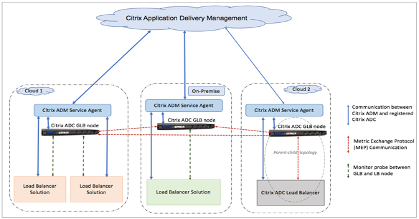
The Citrix ADC GLB nodes handle the DNS name resolution. Any of these GLB nodes can receive DNS requests from any client location. The GLB node that receives the DNS request returns the load balancer virtual server IP address as selected by the configured load balancing method. Metrics (site, network, and persistence metrics) are exchanged between the GLB nodes using the metrics exchange protocol (MEP), which is a proprietary Citrix protocol. For more information on the MEP protocol, see: Configure Metrics Exchange Protocol.
The monitor configured in the GLB node monitors the health status of the load balancing virtual server in the same data center. In a parent-child topology, metrics between the GLB and Citrix ADC nodes are exchanged by using MEP. However, configuring monitor probes between a GLB and Citrix ADC LB node is optional in a parent-child topology.
The Citrix Application Delivery Management (ADM) service agent enables communication between the Citrix ADM and the managed instances in your data center. For more information on Citrix ADM service agents and how to install them, see: Getting Started.
Note: This document makes the following assumptions:
If users have an existing load balancing setup, it is up and running.
A SNIP address or a GLB site IP address is configured on each of the Citrix ADC GLB nodes. This IP address is used as the data center source IP address when exchanging metrics with other data centers.
An ADNS or ADNS-TCP service is configured on each of the Citrix ADC GLB instances to receive the DNS traffic.
The required firewall and security groups are configured in the cloud service providers.
SECURITY GROUPS CONFIGURATION
Users must set up the required firewall/security groups configuration in the cloud service providers. For more information about AWS security features, see: AWS/Documentation/Amazon VPC/User Guide/Security. For more information about Microsoft Azure Network Security Groups, see: Azure/Networking/Virtual Network/Plan Virtual Networks/Security.
In addition, on the GLB node, users must open port 53 for ADNS service/DNS server IP address and port 3009 for GSLB site IP address for MEP traffic exchange. On the load balancing node, users must open the appropriate ports to receive the application traffic. For example, users must open port 80 for receiving HTTP traffic and open port 443 for receiving HTTPS traffic. Open port 443 for NITRO communication between the Citrix ADM service agent and Citrix ADM.
For the dynamic round trip time GLB method, users must open port 53 to allow UDP and TCP probes depending on the configured LDNS probe type. The UDP or the TCP probes are initiated using one of the SNIPs and therefore this setting must be done for security groups bound to the server-side subnet.
Capabilities of the Citrix ADC Hybrid and Multi-Cloud GLB Solution
Some of the capabilities of the Citrix ADC hybrid and multi-cloud GLB solution are described in this section:
Compatibility with other Load Balancing Solutions
The Citrix ADC hybrid and multi-cloud GLB solution supports various load balancing solutions, such as the Citrix ADC load balancer, NGINX, HAProxy, and other third-party load balancers.
Note:
Load balancing solutions other than Citrix ADC are supported only if proximity-based and non-metric based GLB methods are used and if parent-child topology is not configured.
GLB Methods
The Citrix ADC hybrid and multi-cloud GLB solution supports the following GLB methods.
-
Metric-based GLB methods. Metric-based GLB methods collect metrics from the other Citrix ADC nodes through the metrics exchange protocol.
-
Least Connection: The client request is routed to the load balancer that has the fewest active connections.
-
Least Bandwidth: The client request is routed to the load balancer that is currently serving the least amount of traffic.
-
Least Packets: The client request is routed to the load balancer that has received the fewest packets in the last 14 seconds.
-
-
Non-metric based GLB methods
-
Round Robin: The client request is routed to the IP address of the load balancer that is at the top of the list of load balancers. That load balancer then moves to the bottom of the list.
-
Source IP Hash: This method uses the hashed value of the client IP address to select a load balancer.
-
-
Proximity-based GLB methods
-
Static Proximity: The client request is routed to the load balancer that is closest to the client IP address.
-
Round-Trip Time (RTT): This method uses the RTT value (the time delay in the connection between the client’s local DNS server and the data center) to select the IP address of the best performing load balancer.
-
For more information on the load balancing methods, see: Load Balancing Algorithms.
GLB Topologies
The Citrix ADC hybrid and multi-cloud GLB solution supports the active-passive topology and parent-child topology.
-
Active-passive topology - Provides disaster recovery and ensures continuous availability of applications by protecting against points of failure. If the primary data center goes down, the passive data center becomes operational. For more information about GSLB active-passive topology, see: Configure GSLB for Disaster Recovery.
-
Parent-child topology – Can be used if customers are using the metric-based GLB methods to configure GLB and LB nodes and if the LB nodes are deployed on a different Citrix ADC instance. In a parent-child topology, the LB node (child site) must be a Citrix ADC appliance because the exchange of metrics between the parent and child site is through the metrics exchange protocol (MEP).
For more information about parent-child topology, see: Parent-Child Topology Deployment using the MEP Protocol.
IPv6 Support
The Citrix ADC hybrid and multi-cloud GLB solution also supports IPv6.
Monitoring
The Citrix ADC hybrid and multi-cloud GLB solution supports built-in monitors with an option to enable the secure connection. However, if LB and GLB configurations are on the same Citrix ADC instance or if parent-child topology is used, configuring monitors is optional.
Persistence
The Citrix ADC hybrid and multi-cloud GLB solution supports the following:
-
Source IP based persistence sessions, so that multiple requests from the same client are directed to the same service if they arrive within the configured time-out window. If the time-out value expires before the client sends another request, the session is discarded, and the configured load balancing algorithm is used to select a new server for the client’s next request.
-
Spillover persistence so that the backup virtual server continues to process the requests it receives, even after the load on the primary falls below the threshold. For more information, see: Configure Spillover.
-
Site persistence so that the GLB node selects a data center to process a client request and forwards the IP address of the selected data center for all subsequent DNS requests. If the configured persistence applies to a site that is DOWN, the GLB node uses a GLB method to select a new site, and the new site becomes persistent for subsequent requests from the client.
Configuration by using the Citrix ADM StyleBooks
Customers can use the default Multi-cloud GLB StyleBook on Citrix ADM to configure the Citrix ADC instances with hybrid and multi-cloud GLB configuration.
Customers can use the default Multi-cloud GLB StyleBook for LB Node StyleBook to configure the Citrix ADC load balancing nodes which are the child sites in a parent-child topology that handle the application traffic. Use this StyleBook only if users want to configure LB nodes in a parent-child topology. However, each LB node must be configured separately using this StyleBook.
Workflow of the Citrix ADC Hybrid and Multi-Cloud GLB Solution Configuration
Customers can use the shipped Multi-cloud GLB StyleBook on Citrix ADM to configure the Citrix ADC instances with hybrid and multi-cloud GLB configuration.
The following diagram shows the workflow for configuring the Citrix ADC hybrid and multi-cloud GLB solution. The steps in the workflow diagram are explained in more detail after the diagram.
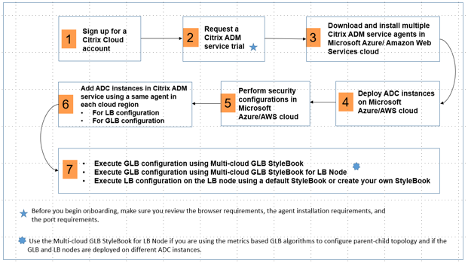
Perform the following tasks as a cloud administrator:
-
Sign up for a Citrix Cloud™ account.
To start using Citrix ADM, create a Citrix Cloud company account or join an existing one that has been created by someone in your company.
-
After users log on to Citrix Cloud, click Manage on the Citrix Application Delivery Management tile to set up the ADM service for the first time.
-
Download and install multiple Citrix ADM service agents.
Users must install and configure the Citrix ADM service agent in their network environment to enable communication between the Citrix ADM and the managed instances in their data center or cloud. Install an agent in each region, so that they can configure LB and GLB configurations on the managed instances. The LB and GLB configurations can share a single agent. For more information on the above three tasks, see: Getting Started.
-
Deploy load balancers on Microsoft Azure/AWS cloud/on-premises data centers.
Depending on the type of load balancers that users are deploying on cloud and on-premises, provision them accordingly. For example, users can provision Citrix ADC VPX instances in a Microsoft Azure Resource Manager (ARM) portal, in an Amazon Web Services (AWS) virtual private cloud and in on-premises data centers. Configure Citrix ADC instances to function as LB or GLB nodes in standalone mode, by creating the virtual machines and configuring other resources. For more information on how to deploy Citrix ADC VPX instances, see the following documents:
-
Perform security configurations.
Configure network security groups and network ACLs in ARM and AWS to control inbound and outbound traffic for user instances and subnets.
-
Add Citrix ADC instances in Citrix ADM.
Citrix ADC instances are network appliances or virtual appliances that users want to discover, manage, and monitor from Citrix ADM. To manage and monitor these instances, users must add the instances to the service and register both LB (if users are using Citrix ADC for LB) and GLB instances. For more information on how to add Citrix ADC instances in the Citrix ADM, see: Getting Started.
-
Implement the GLB and LB configurations using default Citrix ADM StyleBooks.
-
Use Multi-cloud GLB StyleBook to execute the GLB configuration on the selected GLB Citrix ADC instances.
-
Implement the load balancing configuration. (Users can skip this step if they already have LB configurations on the managed instances.)
Users can configure load balancers on Citrix ADC instances in one of two ways:
-
Manually configure the instances for load balancing the applications. For more information on how to manually configure the instances, see: Set up Basic Load Balancing.
-
Use StyleBooks. Users can use one of the Citrix ADM StyleBooks (HTTP/SSL Load Balancing StyleBook or HTTP/SSL Load Balancing (with Monitors) StyleBook) to create the load balancer configuration on the selected Citrix ADC instance. Users can also create their own StyleBooks. For more information on StyleBooks, see: StyleBooks.
-
-
Use Multi-cloud GLB StyleBook for LB Node to configure GLB parent-child topology in any of the following cases:
-
If users are using the metric-based GLB algorithms (Least Packets, Least Connections, Least Bandwidth) to configure GLB and LB nodes and if the LB nodes are deployed on a different Citrix ADC instance
-
If site persistence is required
-
Using StyleBooks to Configure GLB on Citrix ADC LB Nodes
Customers can use the Multi-cloud GLB StyleBook for LB Node if they are using the metric-based GLB algorithms (Least Packets, Least Connections, Least Bandwidth) to configure GLB and LB nodes and if the LB nodes are deployed on a different Citrix ADC instance.
Users can also use this StyleBook to configure more child sites for an existing parent site. This StyleBook configures one child site at a time. So, create as many configurations (config packs) from this StyleBook as there are child sites. The StyleBook applies the GLB configuration on the child sites. Users can configure a maximum of 1024 child sites.
Note:
Use Multi-cloud GLB StyleBook found here: Using StyleBooks to Configure GLB to configure the parent sites.
This StyleBook makes the following assumptions:
-
A SNIP address or a GLB site IP address is configured.
-
The required firewall and security groups are configured in the cloud service providers.
Configuring a Child Site in a Parent-Child Topology by using Multi-cloud GLB StyleBook for LB Node
-
Navigate to Applications > Configuration, and click Create New.
-
The Choose StyleBook page displays all the StyleBooks available for customer use in Citrix Application Delivery Management (ADM). Scroll down and select Multi-cloud GLB StyleBook for LB Node.
The StyleBook appears as a user interface page on which users can enter the values for all the parameters defined in this StyleBook.
Note:
The terms data center and sites are used interchangeably in this document.
-
Set the following parameters:
-
Application Name. Enter the name of the GLB application deployed on the GLB sites for which you want to create child sites.
-
Protocol. Select the application protocol of the deployed application from the drop-down list box.
-
LB Health Check (Optional)
-
Health Check Type. From the drop-down list box, select the type of probe used for checking the health of the load balancer VIP address that represents the application on a site.
-
Secure Mode. (Optional) Select Yes to enable this parameter if SSL based health checks are required.
-
HTTP Request. (Optional) If users selected HTTP as the health-check type, enter the full HTTP request used to probe the VIP address.
-
List of HTTP Status Response Codes. (Optional) If users selected HTTP as the health check type, enter the list of HTTP status codes expected in responses to HTTP requests when the VIP is healthy.
-
-
-
Configuring parent site.
Provide the details of the parent site (GLB node) under which you want to create the child site (LB node).
-
Site Name. Enter the name of the parent site.
-
Site IP Address. Enter the IP address that the parent site uses as its source IP address when exchanging metrics with other sites. This IP address is assumed to be already configured on the GLB node in each site.
-
Site Public IP Address. (Optional) Enter the Public IP address of the parent site that is used to exchange metrics, if that site’s IP address is NAT’ed.
-
-
Configuring child site.
Provide the details of the child site.
-
Site name. Enter the name of the site.
-
Site IP Address. Enter the IP address of the child site. Here, use the private IP address or SNIP of the Citrix ADC node that is being configured as a child site.
-
Site Public IP Address. (Optional) Enter the Public IP address of the child site that is used to exchange metrics, if that site’s IP address is NAT’ed.
-
-
Configuring active GLB services (optional)
Configure active GLB services only if the LB virtual server IP address is not a public IP address. This section allows users to configure the list of local GLB services on the sites where the application is deployed.
-
Service IP. Enter the IP address of the load balancing virtual server on this site.
-
Service Public IP Address. If the virtual IP address is private and has a public IP address NAT’ed to it, specify the public IP address.
-
Service Port. Enter the port of the GLB service on this site.
-
Site Name. Enter the name of the site on which the GLB service is located.
-
-
Click Target Instances and select the Citrix ADC instances configured as GLB instances on each site on which to deploy the GLB configuration.
-
Click Create to create the LB configuration on the selected Citrix ADC instance (LB node). Users can also click Dry Run to check the objects that would be created in the target instances. The StyleBook configuration that users have created appears in the list of configurations on the Configurations page. Users can examine, update, or remove this configuration by using the Citrix ADM GUI.
For more information on how to deploy a Citrix ADC VPX instance on Microsoft Azure, see Deploy a Citrix ADC VPX Instance on Microsoft Azure.
For more information on how a Citrix ADC VPX instance works on Azure, visit How a Citrix ADC VPX Instance Works on Azure.
For more information on how to configure GSLB on Citrix ADC VPX instances, see Configure GSLB on Citrix ADC VPX Instances.
For more information on how to configure GSLB on an active-standby high-availability setup on Azure, visit Configure GSLB on an Active-Standby High-Availability Setup.
Prerequisites
Users need some prerequisite knowledge before deploying a Citrix VPX instance on Azure:
-
Familiarity with Azure terminology and network details. For information, see the Azure terminology in the previous section.
- Knowledge of a Citrix ADC appliance. For detailed information about the Citrix ADC appliance, see: Citrix ADC 13.0.
- For knowledge of Citrix ADC networking, see the Networking topic: Networking.
Azure GSLB Prerequisites
The prerequisites for the Citrix ADC GSLB Service Groups include a functioning Amazon Web Services / Microsoft Azure environment with the knowledge and ability to configure Security Groups, Linux Web Servers, Citrix ADCs within AWS, Elastic IPs, and Elastic Load Balancers.
GSLB DBS Service integration requires Citrix ADC version 12.0.57 for AWS ELB and Microsoft Azure ALB load balancer instances.
Citrix ADC GSLB Service Group Feature Enhancements
GSLB Service Group entity: Citrix ADC version 12.0.57
GSLB Service Group is introduced which supports autoscale using DBS dynamic discovery.
DBS Feature Components (domain-based service) must be bound to the GSLB service group
Example:
     > add server sydney_server LB-Sydney-xxxxxxxxxx.ap-southeast-2.elb.amazonaws.com
     > add gslb serviceGroup sydney_sg HTTP -autoscale DNS -siteName sydney
     > bind gslb serviceGroup sydney_sg sydney_server 80
<!--NeedCopy-->
Limitations
Running the Citrix ADC VPX load balancing solution on ARM imposes the following limitations:
-
The Azure architecture does not accommodate support for the following Citrix ADC features:
-
Clustering
-
IPv6
-
Gratuitous ARP (GARP)
-
L2 Mode (bridging). Transparent virtual server are supported with L2 (MAC rewrite) for servers in the same subnet as the SNIP.
-
Tagged VLAN
-
Dynamic Routing
-
Virtual MAC
-
USIP
-
Jumbo Frames
-
-
If you think you might need to shut down and temporarily deallocate the Citrix ADC VPX virtual machine at any time, assign a static Internal IP address while creating the virtual machine. If you do not assign a static internal IP address, Azure might assign the virtual machine a different IP address each time it restarts, and the virtual machine might become inaccessible.
-
In an Azure deployment, only the following Citrix ADC VPX models are supported: VPX 10, VPX 200, VPX 1000, and VPX 3000. For more information, see the Citrix ADC VPX Data Sheet.
-
If a Citrix ADC VPX instance with a model number higher than VPX 3000 is used, the network throughput might not be the same as specified by the instance’s license. However, other features, such as SSL throughput and SSL transactions per second, might improve.
-
The “deployment ID” that Azure generates during virtual machine provisioning is not visible to the user in ARM. Users cannot use the deployment ID to deploy Citrix ADC VPX appliance on ARM.
-
The Citrix ADC VPX instance supports 20 Mb/s throughput and standard edition features when it is initialized.
-
For a XenApp and XenDesktop® deployment, a VPN virtual server on a VPX instance can be configured in the following modes:
-
Basic mode, where the ICAOnly VPN virtual server parameter is set to ON. The Basic mode works fully on an unlicensed Citrix ADC VPX instance.
-
SmartAccess mode, where the ICAOnly VPN virtual server parameter is set to OFF. The SmartAccess mode works for only 5 Citrix ADC AAA session users on an unlicensed Citrix ADC VPX instance.
-
Note:
To configure the Smart Control feature, users must apply a Premium license to the Citrix ADC VPX instance.
Azure-VPX Supported Models and Licensing
In an Azure deployment, only the following Citrix ADC VPX models are supported: VPX 10, VPX 200, VPX 1000, and VPX 3000. For more information, see the Citrix ADC VPX Data Sheet.
A Citrix ADC VPX instance on Azure requires a license. The following licensing options are available for Citrix ADC VPX instances running on Azure.
- Subscription-based licensing: Citrix ADC VPX appliances are available as paid instances on Azure Marketplace. Subscription based licensing is a pay-as-you-go option. Users are charged hourly. The following VPX models and license types are available on Azure Marketplace:
| VPX Model | License Type |
|---|---|
| VPX10 | Standard, Advanced, Premium |
| VPX200 | Standard, Advanced, Premium |
| VPX1000 | Standard, Advanced, Premium |
| VPX3000 | Standard, Advanced, Premium |
-
Bring your own license (BYOL): If users bring their own license (BYOL), they should see the VPX Licensing Guide at: CTX122426/NetScaler VPX and CloudBridge VPX Licensing Guide. Users have to:
-
Use the licensing portal within MyCitrix to generate a valid license.
-
Upload the license to the instance.
-
-
Citrix ADC VPX Check-In/Check-Out licensing: For more information, see: Citrix ADC VPX Check-in and Check-out Licensing.
Starting with NetScaler release 12.0 56.20, VPX Express for on-premises and cloud deployments does not require a license file. For more information on Citrix ADC VPX Express see the “Citrix ADC VPX Express license” section in Citrix ADC licensing overview, which can be found here: Licensing Overview.
Note:
Regardless of the subscription-based hourly license bought from Azure Marketplace, in rare cases, the Citrix ADC VPX instance deployed on Azure might come up with a default NetScaler® license. This happens due to issues with Azure Instance Metadata Service (IMDS).
Perform a warm restart before making any configuration change on the Citrix ADC VPX instance, to enable the correct Citrix ADC VPX license.
Port Usage Guidelines
Users can configure more inbound and outbound rules n NSG while creating the NetScaler VPX™ instance or after the virtual machine is provisioned. Each inbound and outbound rule is associated with a public port and a private port.
Before configuring NSG rules, note the following guidelines regarding the port numbers users can use:
-
The NetScaler VPX instance reserves the following ports. Users cannot define these as private ports when using the Public IP address for requests from the internet. Ports 21, 22, 80, 443, 8080, 67, 161, 179, 500, 520, 3003, 3008, 3009, 3010, 3011, 4001, 5061, 9000, 7000. However, if users want internet-facing services such as the VIP to use a standard port (for example, port 443) users have to create port mapping by using the NSG. The standard port is then mapped to a different port that is configured on the Citrix ADC VPX for this VIP service. For example, a VIP service might be running on port 8443 on the VPX instance but be mapped to public port 443. So, when the user accesses port 443 through the Public IP, the request is directed to private port 8443.
-
The Public IP address does not support protocols in which port mapping is opened dynamically, such as passive FTP or ALG.
-
High availability does not work for traffic that uses a public IP address (PIP) associated with a VPX instance, instead of a PIP configured on the Azure load balancer. For more information, see: Configure a High-Availability Setup with a Single IP Address and a Single NIC.
-
In a NetScaler Gateway deployment, users need not configure a SNIP address, because the NSIP can be used as a SNIP when no SNIP is configured. Users must configure the VIP address by using the NSIP address and some nonstandard port number. For call-back configuration on the back-end server, the VIP port number has to be specified along with the VIP URL (for example, url: port).
Note:
In Azure Resource Manager, a Citrix ADC VPX instance is associated with two IP addresses - a public IP address (PIP) and an internal IP address. While the external traffic connects to the PIP, the internal IP address or the NSIP is non-routable. To configure a VIP in VPX, use the internal IP address (NSIP) and any of the free ports available. Do not use the PIP to configure a VIP.
For example, if NSIP of a Citrix ADC VPX instance is 10.1.0.3 and an available free port is 10022, then users can configure a VIP by providing the 10.1.0.3:10022 (NSIP address + port) combination.
In this article
- Contributors
- Overview
- Citrix VPX
- Microsoft Azure
- Azure Terminology
- Use Cases
- Deployment Types
- Multi-NIC Multi-IP (Three-NIC) Deployment for GSLB
- Azure Resource Manager (ARM) Template Deployment
- Deployment Steps
- Multi-NIC Multi-IP Architecture (Three-NIC)
- ARM (Azure Resource Manager) Templates
- Citrix ADC GSLB and Domain Based Services Back-end Autoscale™ with Cloud Load Balancer
- Citrix ADC Global Load Balancing for Hybrid and Multi-Cloud Deployments
- Architecture of the Citrix ADC Hybrid and Multi-Cloud GLB Solution
- Capabilities of the Citrix ADC Hybrid and Multi-Cloud GLB Solution
- Configuration by using the Citrix ADM StyleBooks
- Workflow of the Citrix ADC Hybrid and Multi-Cloud GLB Solution Configuration
- Prerequisites
- Azure GSLB Prerequisites
- Limitations
- Azure-VPX Supported Models and Licensing
- Port Usage Guidelines