Manage catalogs
Note:
This article describes the tasks you can use to manage catalogs that were created in the Quick Deploy interface. For information about catalog management using the Web Studio management interface, see Manage machine catalogs.
Add machines to a catalog
While machines are being added to a catalog, you cannot make any other changes to that catalog.
- From the Quick Deploy > Microsoft Azure dashboard, click anywhere in the catalog’s entry.
-
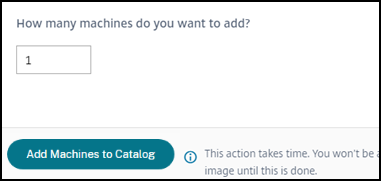
On the Machines tab, click Add Machines to Catalog.
-
Enter the number of machines you want to add to the catalog.
- (Valid only if the catalog is domain-joined.) Type the user name and password for the service account.
- Click Add Machines to Catalog.
You cannot reduce the machine count for a catalog. However, you can use power management schedule settings to control how many machines are powered on, or delete individual machines from the Machines tab. See Manage machines in a catalog for information on deleting machines from the Machines tab.
Change the number of sessions per machine
Changing the number of sessions per multi-session machine can affect users’ experience. Increasing this value can reduce the compute resources allocated to concurrent sessions. Recommendation: Observe your usage data to determine the appropriate balance between user experience and cost.
- From the Quick Deploy > Microsoft Azure dashboard, select a catalog containing multi-session machines.
- On the Details tab, click Edit next to Sessions per Machine.
- Enter a new number of sessions per machine.
- Click Update Number of Sessions.
- Confirm your request.
This change does not affect current sessions. When you change the maximum number of sessions to a value that is lower than a machine’s currently active sessions, the new value is implemented through the normal attrition of active sessions.
If a failure occurs before the update process begins, the catalog’s Details display retains the correct number of sessions. If a failure occurs during the update process, the display indicates the number of sessions you wanted.
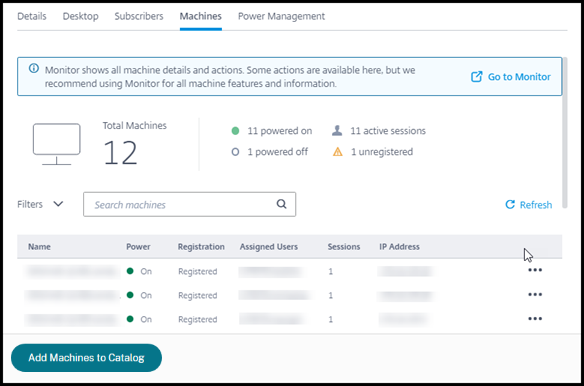
Manage machines in a catalog
Note:
Many of the actions that are available from the Quick Deploy > Microsoft Azure dashboard are also available from the Monitor dashboard in Citrix DaaS Standard for Azure (formerly Citrix Virtual Apps and Desktops Standard for Azure service).
To select actions from the Quick Deploy > Microsoft Azure dashboard:
- From the Quick Deploy > Microsoft Azure dashboard, click anywhere in a catalog’s entry.
-
On the Machines tab, find the machine you want to manage. In the ellipsis menu for that machine, select the desired action:
- Restart: Restart the selected machine.
- Start: Start the selected machine. This action is available only if the machine is powered off.
- Shutdown: Shut down the selected machine. This action is available only if the machine is powered on.
-
Turn maintenance mode on/off: Turn maintenance mode on (if it is off) or off (if it is on) for the selected machine.
By default, maintenance mode is turned off for a machine. Turning on maintenance mode for a machine prevents new connections from being made to that machine. Users can connect to existing sessions on that machine, but they cannot start new sessions on that machine. You might place a machine in maintenance mode before applying patches, or for troubleshooting.
-
Delete: Delete the selected machine. This action is available only when the machine’s session count is zero. Confirm the deletion.
When a machine is deleted, all data on the machine is removed.
- Force restart: Force a restart of the selected machine. Select this action only if a Restart action for the machine failed.
Add apps to a catalog
- From the Quick Deploy > Microsoft Azure dashboard, click anywhere in the catalog’s entry.
-
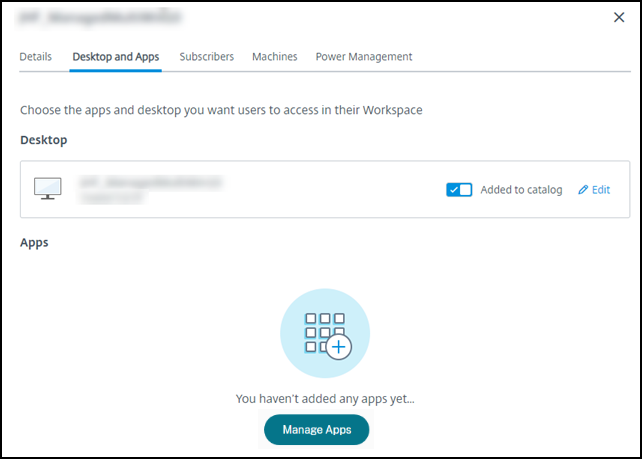
On the Desktop and Apps tab, click Manage Apps.
- Select how you are adding apps: from the Start menu of machines in the catalog, or from a different path on the machines.
-
To add apps from the Start menu:
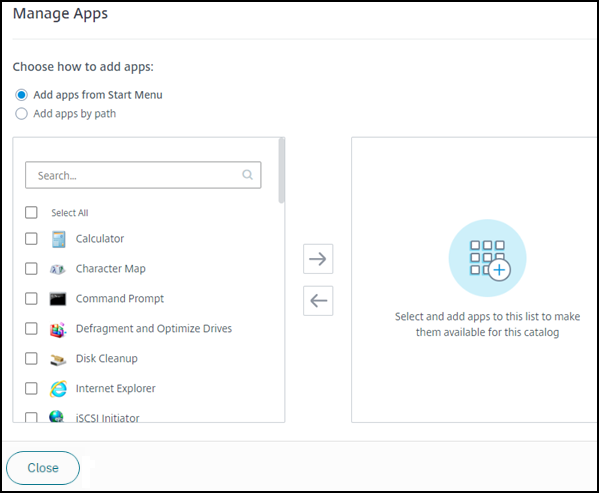
- Select available apps in the left column. (Use Search to tailor the apps list.) Click the right arrow between the columns. The selected apps move to the right column.
- Similarly, to remove apps, select them in the right column. Click the left arrow between columns.
- If the Start menu has more than one version of the same app, with the same name, you can add only one. To add another version of that app, edit that version to change its name. Then you can add that version of the app.
-
To add apps by path:
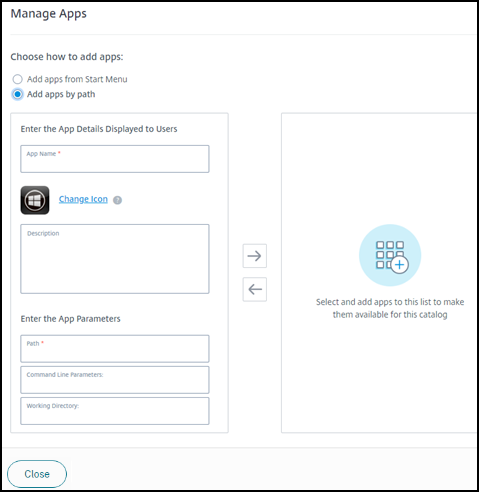
- Enter the name for the app. This is the name users see in Citrix Workspace.
- The icon shown is the icon users see in Citrix Workspace. To select another icon, click Change icon and navigate to the icon you want to display.
- (Optional) Enter a description of the application.
- Enter the path to the app. This field is required. Optionally, add command line parameters and the working directory. For details about command line parameters, see Pass parameters to published applications.
- When you’re finished, click Close.
What to do next (if you’re completing the catalog creation and delivery flow): Send the Citrix Workspace URL to your users, if you haven’t already.
On Windows Server 2019 VDAs, some application icons might not appear correctly during configuration and in the users’ workspace. As a workaround, after the app is published, edit the app and use the Change icon feature to assign a different icon that displays correctly.
Edit an app in a catalog
- From the Quick Deploy > Microsoft Azure dashboard, click anywhere in the catalog’s entry.
- On the Desktop and Apps tab, click anywhere on the row containing the app you want to edit.
-
Click the pencil icon.
-
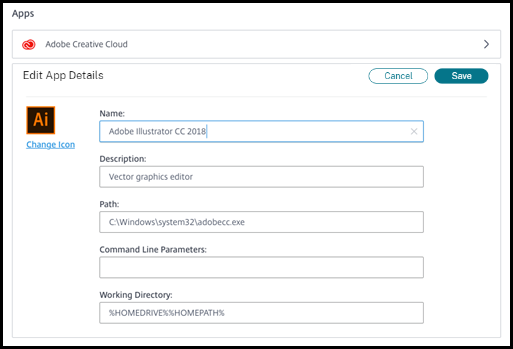
Type changes in any of the following fields:
- Name: The name users see in Citrix Workspace.
- Description
- Path: The path to the executable.
- Command line parameters: For details, see Pass parameters to published applications.
- Working directory
- To change the icon users see in their Citrix Workspace, click Change icon and navigate to the icon you want to display.
- When you’re done, click Save.
Pass parameters to published applications
When you associate a published application with file types, the percent and star symbols (enclosed in double quotation marks) are appended to the end of the command line. These symbols act as a placeholder for parameters passed to user devices.
-
If a published application does not launch when expected, verify that its command line contains the correct symbols. By default, parameters supplied by user devices are validated when the symbols are appended.
For published applications that use customized parameters supplied by the user device, the symbols are appended to the command line to bypass command-line validation. If you do not see these symbols in a command line for the application, add them manually.
-
If the path to the executable file includes directory names with spaces (such as “C:\Program Files”), enclose the command line for the application in double quotation marks to indicate that the space belongs in the command line. Add double quotation marks around the path, and another set of double quotation marks around the percent and star symbols. Add a space between the closing quotation mark for the path and the opening quotation mark for the percent and star symbols.
For example, the command line for the published application Windows Media Player is:
“C:\Program Files\Windows Media Player\mplayer1.exe” “%*”
Remove apps from a catalog
Removing an app from a catalog does not remove it from the machines. It just prevents it from appearing in Citrix Workspace.
- From the Quick Deploy > Microsoft Azure dashboard, click anywhere in the catalog’s entry.
- On the Desktop and Apps tab, click the trash icon next to the apps you want to remove.
Delete a catalog
When you delete a catalog, all the machines in the catalog are permanently destroyed. Deleting a catalog cannot be reversed.
- From the Quick Deploy > Microsoft Azure dashboard, click anywhere in the catalog’s entry.
- On the Details tab, click Delete Catalog on the lower portion of the window.
- Confirm the deletion by selecting the acknowledgment check boxes and then clicking the confirmation button.
To help identify residual Active Directory machine accounts that you must delete, you can download a list of machine and Cloud Connector names.
Manage power management schedules
A power management schedule affects all machines in a catalog. A schedule provides:
- Optimal user experience: Machines are available for users when they’re needed.
- Security: Desktop sessions that remain idle for a specified interval are disconnected, requiring users to launch a new session in their workspace.
- Cost management and power savings: Machines with desktops that remain idle are powered-off. Machines are powered on to meet scheduled and actual demand.
You can configure a power schedule when you create a custom catalog or do it later. If no schedule is selected or configured, a machine powers off when a session ends.
You cannot select or configure a power schedule when creating a catalog with quick create. By default, quick create catalogs use the Cost Saver preset schedule. You can select or configure a different schedule later for that catalog.
Schedule management includes:
Information in a schedule
The following diagram shows the schedule settings for a catalog containing multi-session machines. Settings for a catalog containing single-session (random or static) machines differ slightly.
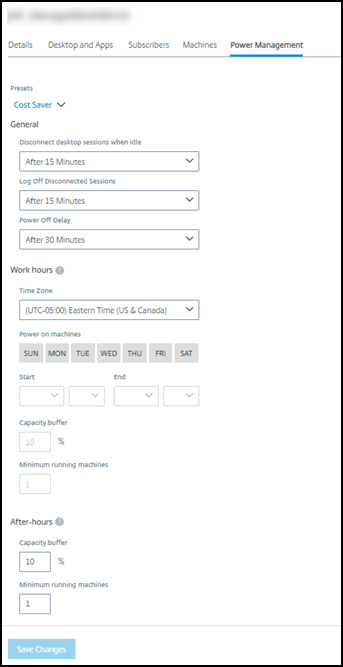
A power management schedule contains the following information.
Preset schedules
Citrix DaaS™ for Azure offers several preset schedules. You can also configure and save custom schedules. Although you can delete custom presets, you cannot delete Citrix-provided presets.
Time zone
Used with the power-on machines setting to establish work hours and after hours, based on the selected time zone.
This setting is valid for all machine types.
Power on machines: Work hours and after hours
The days of the week and start-stop hours of the day that form your work hours. This generally indicates the intervals when you want machines powered on. Any time outside of those intervals is considered after-hours. Several schedule settings allow you to enter separate values for work hours and after-hours. Other settings apply all the time.
This setting is valid for all machine types.
Hibernate machines: Work hours and after hours
You can hibernate machines. While a machine is hibernating, you aren’t charged for its usage and you save on energy consumption. Open apps and files are saved when the machine starts hibernating and are quickly available the next time a user connects to the machine.
This setting is available when all the following criteria are met:
- The machine supports hibernation.
- The machine type is static or random.
- The OS is Windows, not Linux.
- MCSIO is not enabled.
- The subscription is a customer-managed Azure subscription.
Shut down machines when no reconnection
Specify how long a machine stays suspended before it’s shut down. Enter a value greater than the value specified in the When disconnected field.
This setting is valid onlyfor random machines.
Disconnect desktop sessions when idle
How long a desktop can remain idle (not used) before the session is disconnected. After a session is disconnected, the user must go to Workspace and start a desktop again. This is a security setting.
This setting is valid for all machine types. One setting applies all the time.
Power off idle desktops
How long a machine can remain disconnected before it is powered off. After a machine is powered off, the user must go to Workspace and start a desktop again. This is a power-saving setting.
For example, let’s say you want desktops to disconnect after they have been idle for 10 minutes. Then, power off the machines if they remain disconnected for another 15 minutes.
If Tom stops using his desktop and walks away for a one-hour meeting, the desktop will be disconnected after 10 minutes. After another 15 minutes, the machine will be powered off (25 minutes total).
From a user standpoint, the two idle settings (disconnect and power-off) have the same effect. If Tom stays away from his desktop for 12 minutes or an hour, he must start a desktop again from Workspace. The difference in the two timers affects the state of the virtual machine providing the desktop.
This setting is valid for single-session (static or random) machines. You can enter values for work hours and after-hours.
Log off disconnected sessions
How long a machine can remain disconnected before the session is closed.
This setting is valid for multi-session machines. One setting applies all the time.
Power-off delay
The minimum amount of time a machine must be powered-on before it is eligible for power-off (along with other criteria). This setting keeps machines from “flip-flopping” on and off during volatile session demands.
This setting is valid for multi-session machines, and applies all the time.
Minimum running machines
How many machines must remain powered-on, regardless of how long they are idle or disconnected.
This setting is valid for random and multi-session machines. You can enter values for work hours and after-hours.
Capacity buffer
A capacity buffer helps accommodate sudden spikes in demand, by keeping a buffer of machines powered-on. The buffer is specified, as a percentage of current session demand. For example, if there are 100 active sessions and the capacity buffer is 10%, Citrix DaaS for Azure provides capacity for 110 sessions. A spike in demand might occur during work hours or adding new machines to the catalog.
A lower value decreases the cost. A higher value helps ensure an optimized user experience. When launching sessions, users do not have to wait for extra machines to power on.
When there are more than enough machines to support the number of powered-on machines needed in the catalog (including the capacity buffer), extra machines are powered off. Power-off might occur because of off-peak time, session logoffs, or fewer machines in the catalog. The decision to power off a machine must meet the following criteria:
- The machine is powered on and not in maintenance mode.
- The machine is registered as available or waiting to register after power-on.
- The machine has no active sessions. Any remaining sessions have ended. (The machine was idle for the idle timeout period.)
-
The machine has been powered on for at least “X” minutes, where “X” is the power-off delay specified for the catalog.
In a static catalog, after all machines in the catalog are assigned, the capacity buffer does not play a role in powering machines on or off.
This setting is valid for all machine types. You can enter values for work hours and after-hours.
Create a power management schedule
- From the Quick Deploy > Microsoft Azure dashboard, click anywhere in the catalog’s entry.
- On the Power Management tab, determine whether any of the preset schedules (in the menu at the top) meet your needs. Select a preset to see the values it uses. If you want to use a preset, leave it selected.
- If you change the values in any fields (such as days, times, or intervals), the preset selection changes to Custom automatically. An asterisk indicates that custom settings have not been saved.
- Set the values you want for the custom schedule.
- Click Custom at the top and save the current settings as a new preset. Enter a name for the new preset and click the check mark.
- When you’re done, click Save Changes.
Later, you can edit or delete a custom preset by using the pencil or trash icons in the Presets menu. You cannot edit or delete common presets.
VDA snapshot and restore
The Citrix DaaS for Azure snapshot and restore features provide a way to recover from unplanned data loss or other failures in VDAs that deliver desktops and apps. The snapshot operation takes and stores a snapshot of the machine. Later, a restore operation uses a snapshot you select.
- You can configure daily and weekly snapshot schedules for all the machines in a catalog. These snapshots are called automatic snapshots. A snapshot is taken of each machine in the catalog. There are no default snapshot schedules.
- You can back up a single V in a catalog on demand. This is called a manual snapshot. You can create a manual snapshot of a machine even if the catalog it belongs to has scheduled snapshots. (However, you can’t schedule single-machine snapshots.)
Important:
The Citrix DaaS for Azure snapshot and restore features are supported only for machines in static catalogs and assigned to users.
Snapshot schedules
Remember: Snapshot schedules apply to all machines in a catalog.
By default, there are no snapshot schedules.
To manage snapshot schedules:
- From the Manage dashboard, click anywhere in the catalog’s entry.
- On the Details tab, click Schedule Snapshots.
- On the Schedule Snapshots page, configure schedules for weekly or daily automatic snapshots, or both:
- To add or change weekly snapshots, move the slider for Weekly automatic snapshots until a check mark appears. Select the day of the week and the start time.
- To add or change daily snapshots, move the slider for Daily automatic snapshots until a check mark appears. Select the start time.
- To remove weekly snapshots, move the slider for Weekly automatic snapshots until an X appears.
- To remove daily snapshots, move the slider for Daily automatic snapshots until an X appears.
- When you’re done, click Save at the bottom of the page.
Manual snapshots
A manual snapshot is for a single machine in a catalog. (You cannot create a schedule to take a snapshot of single machines.)
- From the Manage dashboard, click anywhere in the catalog’s entry.
- On the Machines tab, find the machine you want to take a snapshot of. Select Snapshots in the ellipsis menu for that machine.
- On the Snapshots for VDA-name page, click Create Manual Snapshot.
- Provide a name for the snapshot. Recommended: Choose a name you can easily identify later.
- Confirm your request.
View and manage snapshots
- From the Manage dashboard, click anywhere in the catalog’s entry.
- On the Machines tab, find the machine you want to take a snapshot of. Select Snapshots in the ellipsis menu for that machine.
- On the Backups for VDA-name page:
- If there are no snapshots for the machine, a message guides you to either create a manual snapshot for this machine, or create scheduled snapshots for all of the machines in the catalog containing this machine.
- You can select one of the snapshots and restore the machine. See Restore.
- You can delete snapshots. Select the check boxes for one or more snapshots and then click Delete in the table header. Confirm your request.
Tip: When you delete a catalog, all snapshots are destroyed.
Restore
You can restore a machine from any available snapshot for that machine.
During a restore, the machine is powered off. None of the actions in a machine’s ellipsis menu are available while a snapshot is being restored.
- From the Manage dashboard, click anywhere in the catalog’s entry.
- On the Machines tab, find the machine you want to take a snapshot of. Select Snapshots in the ellipsis menu for that machine.
- On the Snapshots for VDA-name page, select the check box of the snapshot you want to use.
- Click Restore in the table header.
- Confirm the request.
The Status column on the Machines tab indicates the progress and outcome of the restore operation.
If a machine fails to restore a snapshot, try again.