Install Web Studio
Note:
Citrix Studio (MMC Studio) was removed starting with version 2511 and is no longer supported. This article assumes that Web Studio is the only management console in use.
Introduction
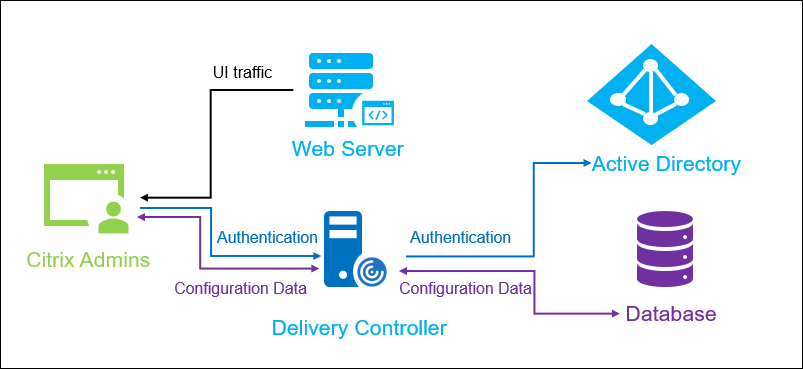
Web Studio is a web-based management console offering full feature parity with Citrix Studio. With the same look and feel as the Citrix DaaS Studio interface, Web Studio modernizes your management experience by providing a native web experience.
You can deploy Web Studio to any Windows server with Internet Information Service (IIS) installed. There are two deployment options:
-
Installed on a dedicated server:
For larger environments where performance and scalability are critical, we recommend installing Web Studio on a dedicated server. This server can optionally also host the Director.
-
Integrated with a Delivery Controller™:
For quick deployments and simpler environments, install Web Studio directly on a Delivery Controller. This approach is ideal for smaller deployments where minimizing administrative overhead is a priority.
The following diagram shows the Web Studio architecture:
A general workflow to get Web Studio up and running is as follows:
To set up a load-balanced Web Studio deployment, see this article.
New features available in Web Studio
See the What’s new article.
System requirements
The following tables list the supported operating systems, browsers, display settings, and hardware requirements for installing and using Studio.
Supported operating systems
| Operating system | Editions | Server Core support |
|---|---|---|
| Windows Server 2025 | Standard, Datacenter | Yes |
| Windows Server 2022 | Standard, Datacenter | Yes |
| Windows Server 2019 | Standard, Datacenter | Yes |
| Windows Server 2016 | Standard, Datacenter | Yes |
Supported browsers
| Browser | Minimum supported version |
|---|---|
| Microsoft Edge | 92 |
| Firefox ESR (Extended Support Release) | 90 |
| Google Chrome | 92 |
| Safari | 14 |
Display requirements
| Requirement | Value |
|---|---|
| Recommended screen resolution | 1440 × 1024 |
Hardware requirements
| Resource | Minimum requirement |
|---|---|
| Memory | 1 GB RAM |
| Disk space | 100 MB |
Install Web Studio
The following information is a supplement to the guidance in Install core components. To install Web Studio:
-
Install Web Studio using the full product ISO installer for Citrix Virtual Apps™ and Desktops. The ISO installer checks for prerequisites, installs any missing components, sets up the Web Studio website (on the Delivery Controller if included in Delivery Controller installation), and performs basic configuration.
-
If Web Studio was not included during installation, use the installer to add Web Studio.
-
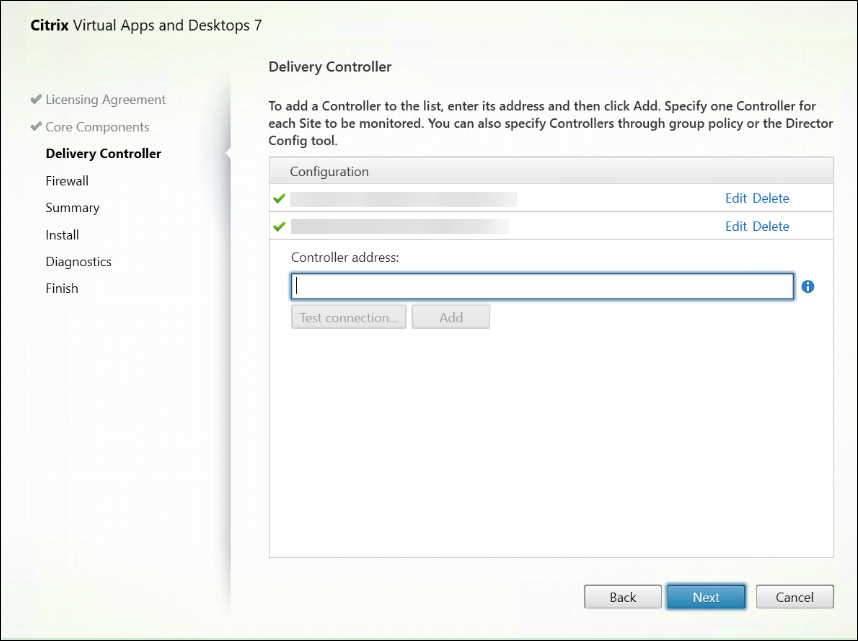
When installing Web Studio, you are prompted to type the FQDN of a Delivery Controller.
Note:
- We recommend running Web Studio and Delivery Controllers on the same version to ensure full functionality.
- You can add more than one Delivery Controller. Web Studio attempts to connect to them in random order. If the Delivery Controller to which Web Studio is attempting to connect is unreachable, Web Studio automatically falls back to other Delivery Controllers.
- If Director was selected in Core Components and installed, the Delivery Controllers you add here are used for both Web Studio and Director.
- If the delivery controller is configured for TLS (recommended) then the entered FQDN must match the common name or a subject alternative name of the certificate installed on the delivery controller.
-
Web Studio can be installed on any IIS website with Site ID = 1, regardless of the site name. This feature enables you to host Web Studio under a custom IIS site instead of the Default Web Site.
-
If IIS is not installed before running the ISO installer, the installer automatically configures IIS and deploys Web Studio under the Default Web Site (Site ID = 1). After installation, the site name can be renamed as needed.
-
If IIS is already installed, you can create a IIS site in advance with your preferred name and physical path, as long as its Site ID is 1. Web Studio is then installed directly under that site, with no further configuration required.
-
-
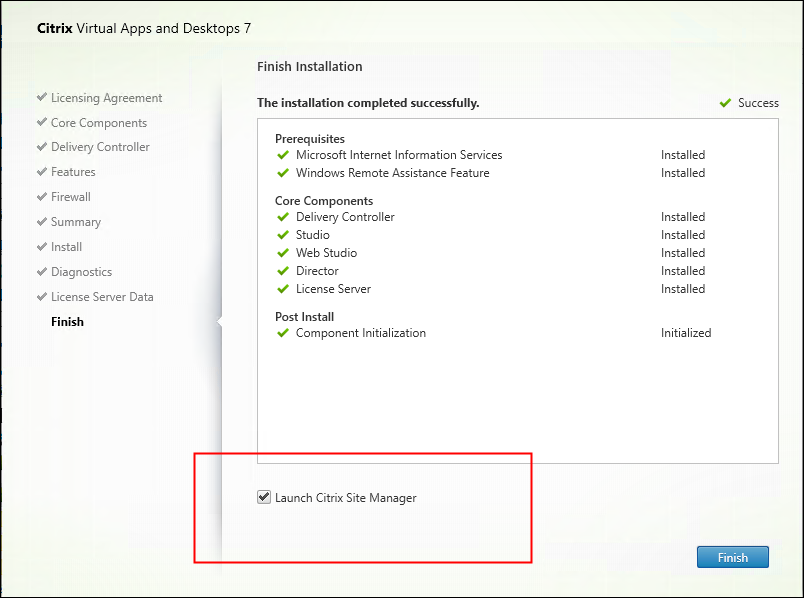
On the Finish page, review the installed components and then click Finish.
Note:
You can also use the command line to install Web Studio. Example:
.\XenDesktopServerSetup.exe /components webstudio /controllers "ddc1.studio.local" /configure_firewall /quiet. For more information, see Install using the command line.
Configure a certificate for TLS
By default, if IIS isn’t already configured for HTTPS, the installer creates a self-signed certificate using the server’s FQDN as the certificate’s common name, and binds it to port 443. This behavior allows users to access Web Studio from the local machine, but users connecting from other machines see security warnings because the certificate isn’t trusted. We recommend replacing this certificate with a certificate signed by an enterprise or public certificate authority (CA). For more information, see Enable TLS on web studio and Director. If a TLS certificate is already configured in IIS, the installer makes no changes.
Note:
To learn more about securing your Web Studio deployment, see Secure Web Studio deployment.
Set up a site
To set up your Citrix Virtual Apps and Desktops deployment (also known as a site), use the tool, Citrix Site Manager. The tool is installed automatically with a Delivery Controller.
To set up a site, follow these steps:
-
On a Delivery Controller, open the desktop Start menu, and then select Citrix > Citrix Site Manager.
-
In the Citrix Site Manager, select Create a site. The Site Setup wizard appears.
-
Create a site and configure its settings as follows:
- On the Introduction page, type a name for the site.
- The Databases page contains selections for setting up the site, monitoring, and configuration logging databases. For more information, see Step 3. Databases.
- On the Licensing page, specify the License Server address and then indicate which license to use (install). For more information, see Step 4. Licensing.
-
On the Summary page, check all settings and click Submit.
The IP address of this Controller is automatically added to the site.
Note:
The user who creates a site becomes a full administrator for it. For more information, see Delegated administration.
If you install a new Controller after creating a site, you must add the Controller to the site. Detailed steps are as follows:
- Run Citrix Site Manager on this new Controller.
- Select Join an existing site.
- Type the address of a Controller that is already added to the site.
- Click Submit.
Add Delivery Controllers to Web Studio for management
Use the Studio configuration tool to add the Delivery Controllers to Web Studio for management. This tool is available in the Web Studio installation folder.
By default, the tool is installed in the following default folder.
C:\Program Files\Citrix\Web Studio\Tool\StudioConfig.exe
Suppose you want to configure the following two Delivery Controllers for the site that you want to manage with Web Studio: ddc1.studio.local and ddc2.studio.local. Run the following PowerShell command:
.\StudioConfig.exe --server "ddc1.studio.local,ddc2.studio.local"
Note:
- The tool requires computer administrator permissions.
- The Delivery Controller configuration changes might not take effect immediately due to cache settings on the IIS server. For immediate effect, go to the Web Studio server, open Internet Information Services (IIS) Manager, navigate to Server_name > Sites > the IIS site name where Web Studio is installed (site ID = 1), and select Restart in the Manage Website pane.
- When you redeploy the Delivery Controllers with new FQDNs, update their FQDNs in Web Studio using
StudioConfig.exeand in theC:\Program Files\Citrix\Web Studio\Site\assets\json\manifest.jsonfile. If you don’t update themanifest.jsonfile, the old FQDNs still appear in the Web Studio sign-in window. As a result, you must enter the new FQDNs as an alternative when signing in.- To view all supported parameters, run
StudioConfig.exe --help.
(Optional) Configure Web Studio as a proxy for Delivery Controllers
By default, when you manage your deployment using the Web Studio console, you connect to both the Web Studio server and the Delivery Controllers through the web browser. We provide you with an option to configure the Web Studio server as a proxy for Delivery Controllers. As a result, you connect only to the Web Studio server when managing your deployment.
This section guides you to configure a Web Studio server as a proxy for Delivery Controllers. We assume that Web Studio and Delivery Controllers are installed on different servers.
Before you start, verify that you have all necessary core components installed in your deployment. For more information, see Install core components.
To enable proxy mode for Web Studio, follow these steps:
- On the Web Studio server, run Windows PowerShell as an administrator.
-
Run the following command where you replace
fqdn_of_webstudio_machinewith the FQDN of your Web Studio server.& "c:\Program Files\Citrix\Web Studio\Tool\StudioConfig.exe" --enableproxy --proxyserver "fqdn_of_webstudio_machine"Note:
If you have a load-balanced Web Studio deployment, replace
fqdn_of_webstudio_machinewith the FQDN of the load balancer server (also known as the virtual server). For more information, see Set up a load-balanced Web Studio deployment.
To disable proxy mode for Web Studio, run this PowerShell command:
& "c:\Program Files\Citrix\Web Studio\Tool\StudioConfig.exe" --disableproxy
<!--NeedCopy-->
(Optional) Enable or disable Pendo
Starting with version 2411, Web Studio integrates Pendo, which is enabled by default. Pendo collects your usage data following the Citrix Privacy Policy. It also adds an icon in the bottom-right corner of Web Studio, providing you with contextual feature information and feedback options. If you prefer not to share your usage data, you can disable Pendo using the Studio configuration tool.
This tool is available in the Web Studio installation folder. By default, the tool is installed in the following folder: C:\Program Files\Citrix\Web Studio\Tool\StudioConfig.exe.
To disable Pendo, follow these steps:
- Sign in to Web Studio. If an icon appears in the bottom-right corner, Pendo is enabled.
- On the Web Studio server, run Windows PowerShell as an administrator. Run this PowerShell command:
& "c:\Program Files\Citrix\Web Studio\Tool\StudioConfig.exe" --disablependo
<!--NeedCopy-->
To enable Pendo, run this command:
& "c:\Program Files\Citrix\Web Studio\Tool\StudioConfig.exe" --enablependo
<!--NeedCopy-->
Secure server configuration for Web Studio
Apply the following security configurations to the server hosting Web Studio for better security. These settings are applied at the server level, not in Web Studio itself.
Disable medium-strength SSL ciphers (SWEET32)
The Web Studio server might use the medium-strength cipher TLS_RSA_WITH_3DES_EDE_CBC_SHA, which is vulnerable to the SWEET32 attack.
To disable the cipher, run the following PowerShell command on the Web Studio server:
Disable-TlsCipherSuite -Name TLS_RSA_WITH_3DES_EDE_CBC_SHA
Disable deprecated TLS 1.0 and 1.1 protocols
TLS 1.0 and TLS 1.1 are deprecated and should not be enabled on the Web Studio server. To disable them:
- Open Registry Editor (
regedit.exe). - Go to
HKEY_LOCAL_MACHINE\SYSTEM\CurrentControlSet\Control\SecurityProviders\SCHANNEL\Protocols. - Create the following subkeys if they don’t exist:
TLS 1.0\ClientTLS 1.0\ServerTLS 1.1\ClientTLS 1.1\Server
- In each
ClientandServerkey, create the followingDWORD (32-bit)values:-
Enabled=0 -
DisabledByDefault=1(optional but recommended)
-
- Restart the server to apply changes.
Sign in to Web Studio
-
Access Web Studio at
https://<address of the server hosting Web Studio>/Citrix/Studioif the default port number 443 is used. If a different port is configured, usehttps://<address of the server hosting Web Studio>:<port number>/Citrix/Studio.The Sign-in page appears if you’ve added Delivery Controllers to Web Studio and they are reachable.
Note:
The Unable to sign in page appears in the following cases:
- No Delivery Controllers have been specified for the site. You are prompted to add one to connect.
- The specified Delivery Controllers are unreachable. Click Test to check connectivity. Or, enter an alternate Delivery Controller and click Connect.
-
Enter User name, Password, and Domain.
-
Click Sign in.
Next steps
-
Use Web Studio to deliver virtual apps and desktops to your users by:
In this article
- Introduction
- New features available in Web Studio
- System requirements
- Install Web Studio
- Set up a site
- Add Delivery Controllers to Web Studio for management
- (Optional) Configure Web Studio as a proxy for Delivery Controllers
- (Optional) Enable or disable Pendo
- Secure server configuration for Web Studio
- Sign in to Web Studio
- Next steps