-
-
Install core components
-
Cloud Connector Standalone Citrix Secure Ticketing Authority (STA) service
-
-
-
-
-
This content has been machine translated dynamically.
Dieser Inhalt ist eine maschinelle Übersetzung, die dynamisch erstellt wurde. (Haftungsausschluss)
Cet article a été traduit automatiquement de manière dynamique. (Clause de non responsabilité)
Este artículo lo ha traducido una máquina de forma dinámica. (Aviso legal)
此内容已经过机器动态翻译。 放弃
このコンテンツは動的に機械翻訳されています。免責事項
이 콘텐츠는 동적으로 기계 번역되었습니다. 책임 부인
Este texto foi traduzido automaticamente. (Aviso legal)
Questo contenuto è stato tradotto dinamicamente con traduzione automatica.(Esclusione di responsabilità))
This article has been machine translated.
Dieser Artikel wurde maschinell übersetzt. (Haftungsausschluss)
Ce article a été traduit automatiquement. (Clause de non responsabilité)
Este artículo ha sido traducido automáticamente. (Aviso legal)
この記事は機械翻訳されています.免責事項
이 기사는 기계 번역되었습니다.책임 부인
Este artigo foi traduzido automaticamente.(Aviso legal)
这篇文章已经过机器翻译.放弃
Questo articolo è stato tradotto automaticamente.(Esclusione di responsabilità))
Translation failed!
Install core components
Important:
- Citrix collects basic licensing data as necessary for its legitimate interests, including license compliance. For more information, see Citrix Licensing Data.
- Ensure the License Server is running a minimum of version 11.17.2 build 53100. Failure to meet this prerequisite will block the Citrix Virtual Apps and Desktops site upgrades and site creation.
The core components are the Citrix Delivery Controller™, Citrix Studio, Web Studio, Citrix Director, and Citrix License Server.
Note:
Citrix Studio is a Windows-based management console that lets you configure and manage your on-premises Citrix Virtual Apps and Desktops deployment. Web Studio is the next generation of Citrix Studio — a web-based management console offering full feature parity with Citrix Studio. For more information about Web Studio, see Install Web Studio.
(In versions before 2003, core components included Citrix StoreFront. You can still install StoreFront by clicking the Citrix StoreFront tile or running the command available on the installation media.)
Before you start an installation, review this article and Prepare to install.
This article describes the installation wizard sequence when installing core components. Command-line equivalents are provided. For more information, see Install using the command line.
Step 1. Download the product software and launch the wizard
Use your Citrix account credentials to access the Citrix Virtual Apps and Desktops™ download page. Download the product ISO file.
Unzip the file. Optionally, burn a DVD of the ISO file.
Log on to the machine where you are installing the core components, using a local administrator account.
Insert the DVD in the drive or mount the ISO file. If the installer does not launch automatically, double-click the AutoSelect application or the mounted drive.
Step 2. Choose which product to install
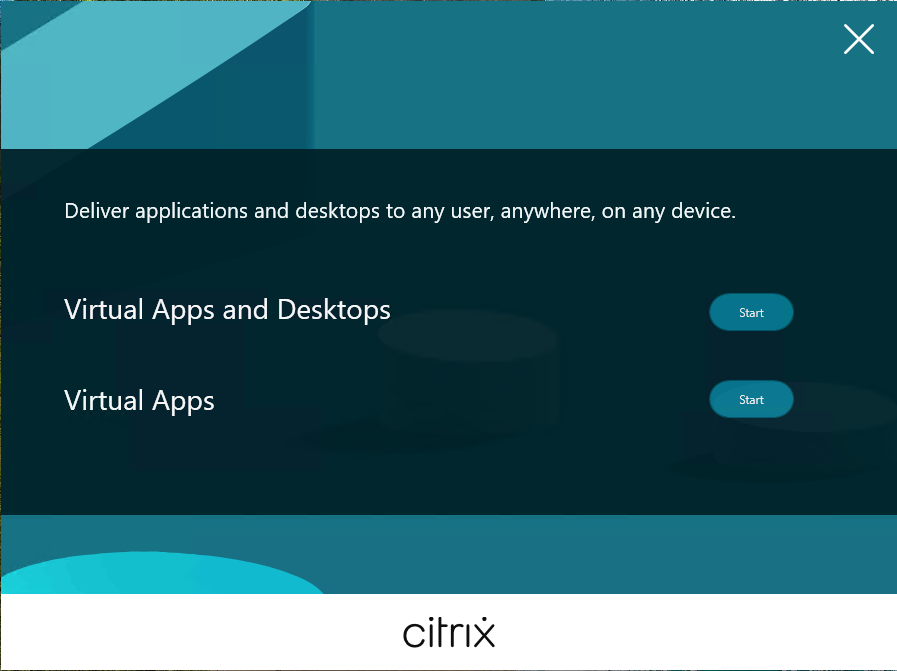
Click Start next to the product to install: Virtual Apps or Virtual Apps and Desktops.
(If the machine already has Citrix Virtual Apps™ and Desktops components installed on it, this page does not appear.)
Command-line option: /xenapp to install Citrix Virtual Apps. Citrix Virtual Apps and Desktops is installed if option is omitted.
Step 3. Choose what to install
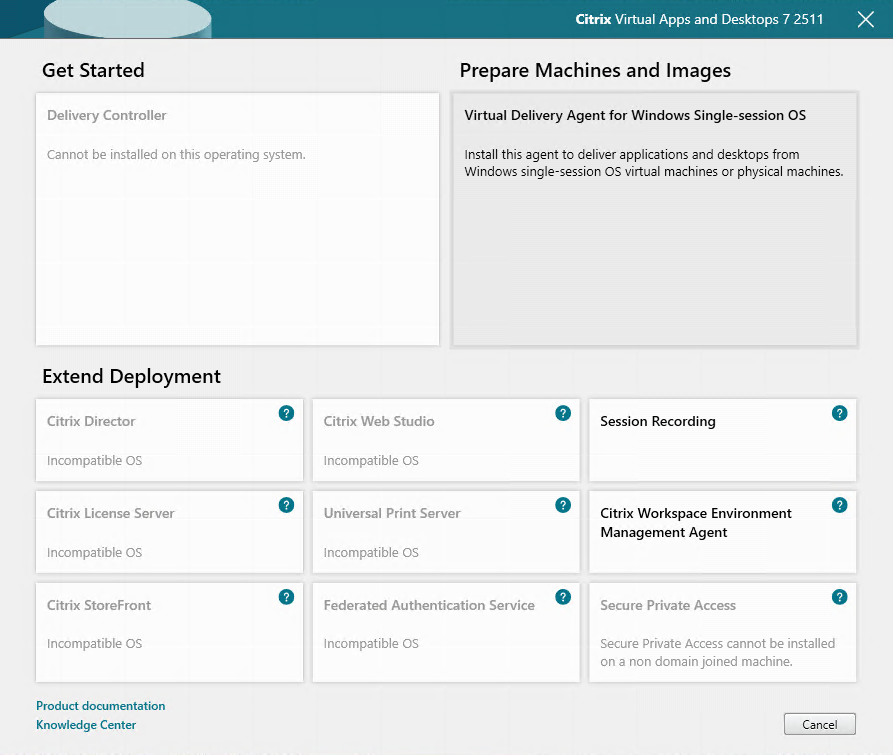
If you’re just getting started, select Delivery Controller. (On a later page, you select the specific components to install on this machine.)
If you’ve already installed a Controller (on this machine or another) and want to install another component, select the component from the Extend Deployment section.
Command-line option: /components
Step 4. Read and accept the license agreement
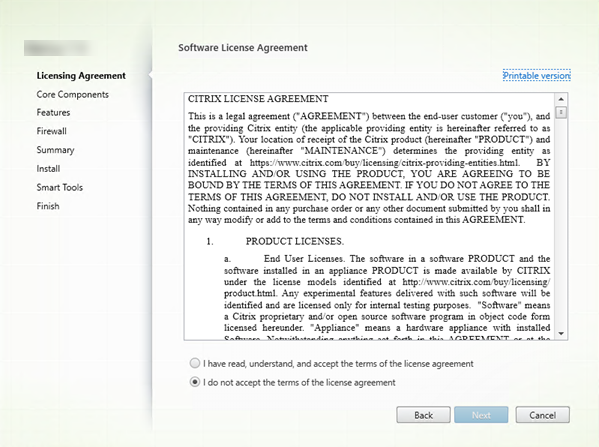
On the Licensing Agreement page, after you read the license agreement, indicate that you have read and accepted it. Then click Next.
Step 5. Select the components to install and the installation location
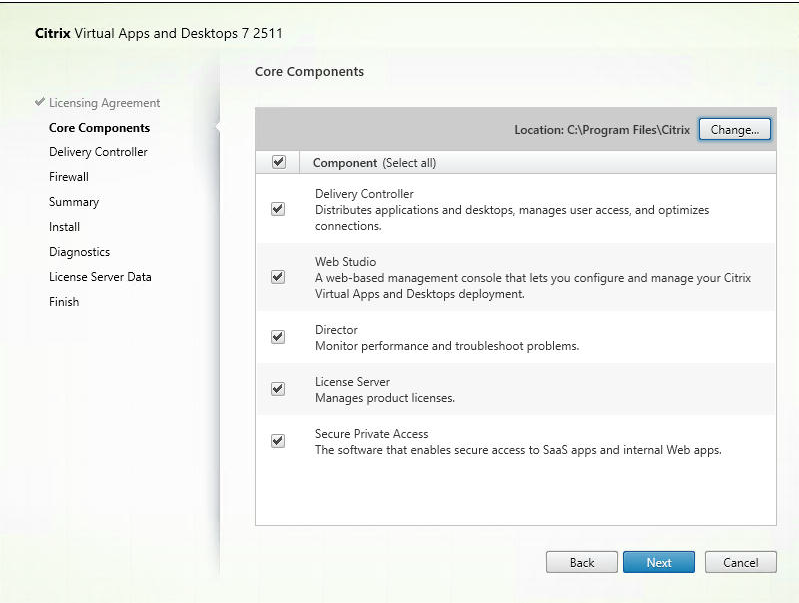
On the Core components page:
-
Location: By default, components are installed in
C:\Program Files\Citrix. The default is fine for most deployments. If you specify a different location, it must have execute permissions for the network service. -
Components: By default, the check boxes for all core components are selected. Installing all of the core components on one server is fine for proof of concept, test, or small production deployments. For larger production environments, Citrix recommends installing Director, StoreFront, Secure Private Access and the License Server on separate servers.
Note:
If you’re installing components on more than one server, install the Citrix License Server and licenses first, before installing other components on other servers. For guidance, see the Automatic installation section of the Licensing Guide for Citrix Virtual Apps and Desktops.
An icon alerts you when you choose not to install a required core component on this machine. That alert reminds you to install that component, although not necessarily on this machine.
Click Next.
Command-line options: /installdir, /components, /exclude
Hardware check
When you install or upgrade a Delivery Controller, the hardware is checked. The installer alerts you if the machine has less than the recommended amount of RAM (5 GB), which can affect site stability. For more information, see Hardware requirements.
Graphical interface: A dialog box appears.
- Recommended: Click Cancel to stop the installation. Add more RAM to the machine and then start the installation again.
- Alternatively, click Next to continue with the installation. The site might have stability issues.
Command-line interface: The install/upgrade ends. The install logs contain a message that describes what was found and the available options.
- Recommended: Add more RAM to the machine and then run the command again.
- Alternatively, run the command again with the
/ignore_hw_check_failureoption to override the warning. Your site might have stability issues.
When upgrading, you’re also notified if the OS or SQL Server version is no longer supported. See Upgrade a deployment.
Step 6. Enable or disable features
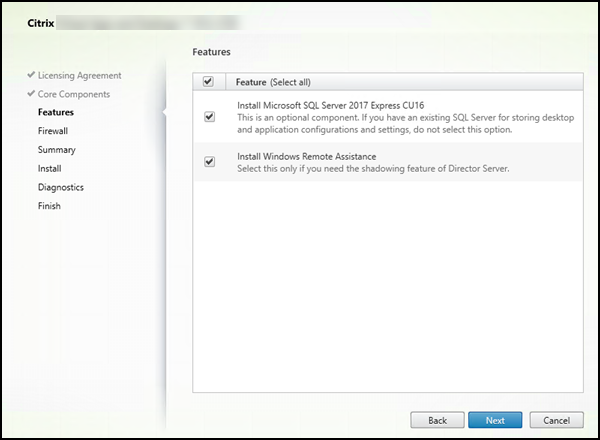
On the Features page:
- Choose whether to install Microsoft SQL Server Express for use as the site database. By default, this selection is enabled. If you’re not familiar with the Citrix Virtual Apps and Desktops databases, review Databases.
- When you install Director, Windows Remote Assistance is installed automatically. You choose whether to enable shadowing in Windows Remote Assistance for use with Director user shadowing. Enabling shadowing opens TCP port 3389. By default, this feature is enabled. The default setting is fine for most deployments. This feature appears only when you are installing Director.
Click Next.
Command-line options: /nosql (to prevent installation), /no_remote_assistance (to prevent enabling)
Step 7. Open Windows firewall ports
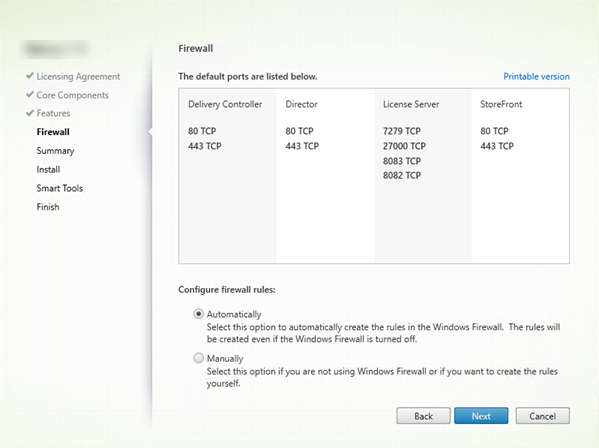
By default, the ports on the Firewall page are opened automatically if the Windows Firewall Service is running, even if the firewall is not enabled. The default setting is fine for most deployments. For port information, see Network ports.
Click Next.
(The graphic shows the port lists when you install all the core components on this machine. That type of installation is usually for test deployments only.)
Command-line option: /configure_firewall
Step 8. Review prerequisites and confirm installation
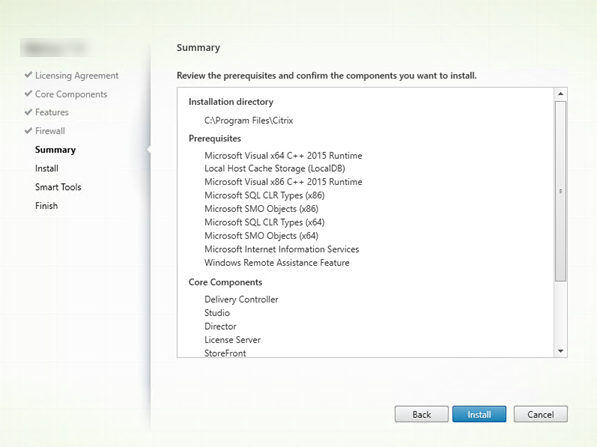
The Summary page lists what will be installed. Use the Back button to return to earlier wizard pages and change selections, if needed.
When you’re ready, click Install.
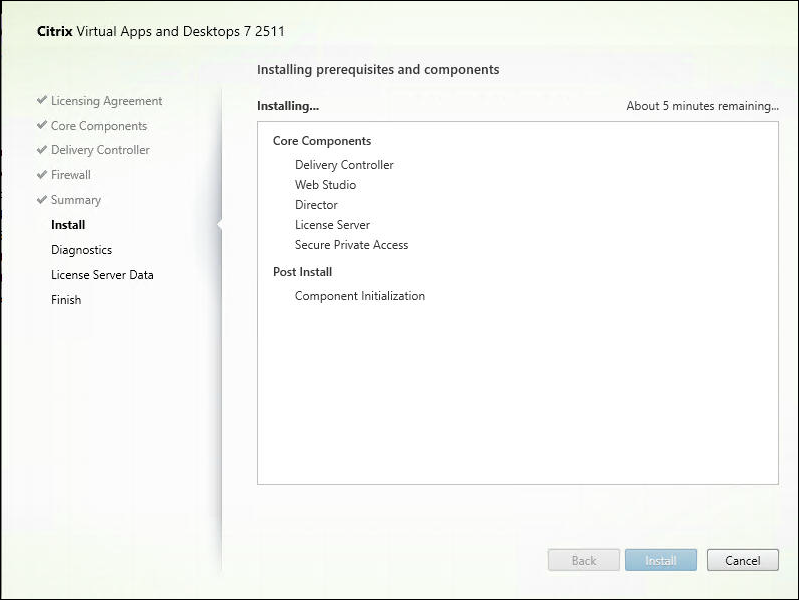
The display shows the progress of the installation:
Step 9. Sharing diagnostics information with Cloud Software Group
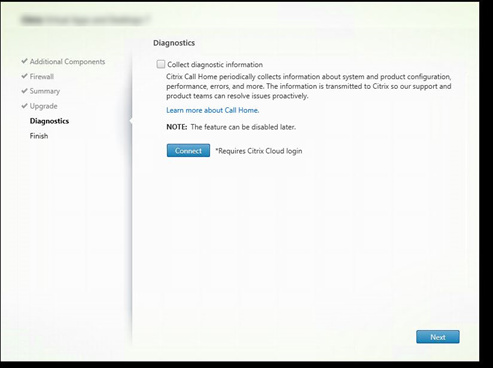
On the Diagnostics page, choose whether to participate in Citrix Call Home.
This page appears when installing a Delivery Controller using the graphical interface. When you install StoreFront (but not a Controller), the wizard displays this page. When you install other core components (but not a Controller or StoreFront), the wizard does not display this page.
During an upgrade, this page does not appear if Call Home is already enabled or if the installer encounters an error related to the Citrix Telemetry Service.
If you choose to participate (the default), click Connect. When prompted, enter your Citrix account credentials. You can change your enrollment choice later, after installation.
After your credentials are validated (or if you choose not to participate), click Next.
If you click Connect on the Diagnostics page without first selecting Collect diagnostic information, after you close the Connect to Citrix Insight Services dialog the Next button is disabled. You cannot move to the next page. To reenable the Next button, select and immediately deselect Collect diagnostic information.
For more information, see Call Home.
Step 10. Sharing License Server data with Cloud Software Group
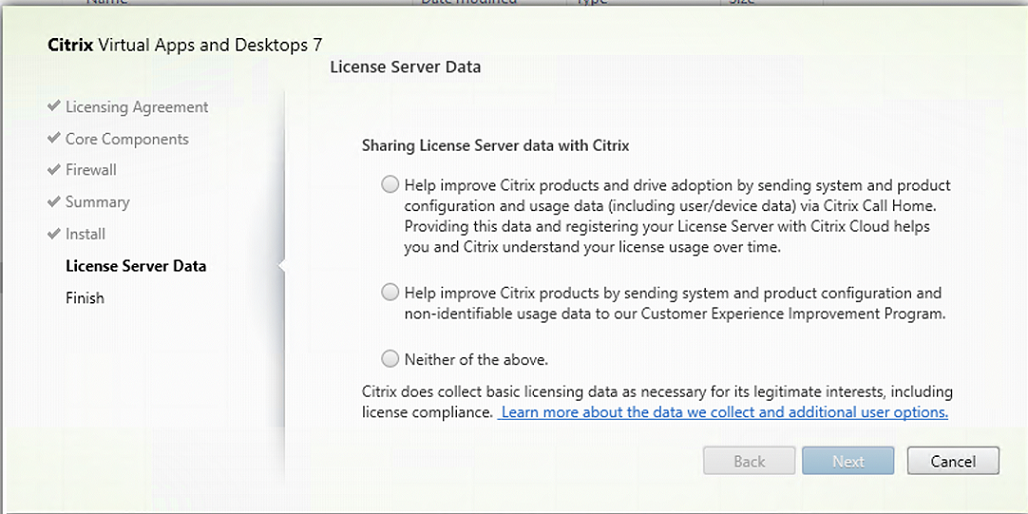
On the License Server Data page, we request that you share either Call Home data or Customer Experience Improvement Program (CEIP) data to assist us. In addition, Cloud Software Group also requires the collection of basic licensing data, including license compliance, as necessary for its legitimate interests.
The License Server Data page appears when you have installed License Server:
- As a standalone.
- As a core component, during installation of a Delivery Controller.
During an upgrade, this page does not appear if the configuration is already set in the /CITRIX.opt: file.
License Server monitors several types of user data, such as licensing data, Call Home data and CEIP data. To enable Call Home data and CEIP data collection, you must choose to participate (opt in).
For more information about how to enable Call Home and CEIP data collection when installing by using the command line, see Command line options for installing core components.
For more information about Cloud Software Group licensing data collection, see Citrix Licensing data collection programs.
Step 11. Finish this installation
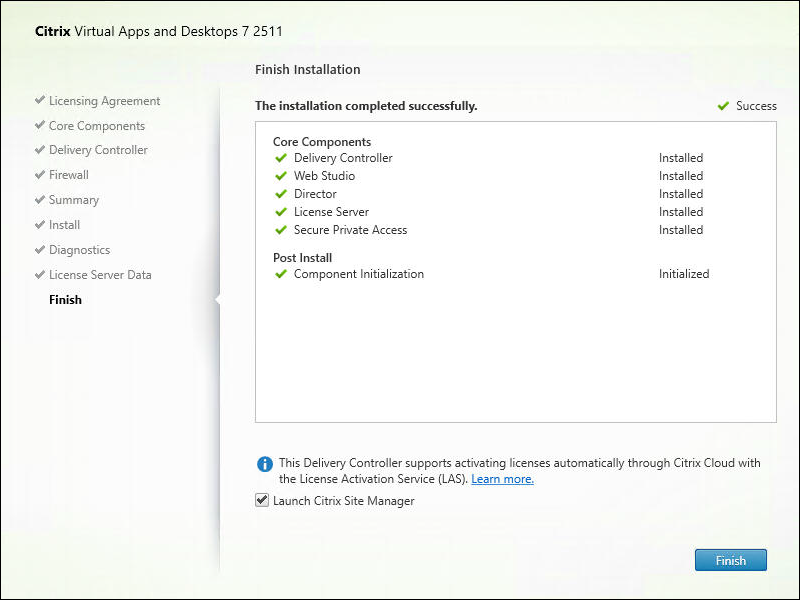
The Finish page contains green check marks for all prerequisites and components that installed and initialized successfully.
Click Finish.
Note:
When you upgrade to version 2511, the installer automatically uninstalls Citrix Studio (MMC-based). Your configuration data is stored in the database and isn’t affected by the auto-uninstall.
Step 12. Install remaining core components on other machines
If you installed all the core components on one machine, continue with Next steps. Otherwise, run the installer on other machines to install other components. You can also install more Controllers on other servers.
Next steps
After you install all the required components, use Web Studio to create a site.
After creating the site, install VDAs.
At any time, you can use the full-product installer to extend your deployment with the following components:
-
Universal Print Server server component: Launch the installer on your print server.
- Select Universal Print Server in the Extend Deployment section.
- Accept the license agreement.
- On the Firewall page, by default, TCP ports 7229 and 8080 are opened in the firewall if the Windows Firewall Service is running, even if the firewall is not enabled. You can disable that default action if you want to open the ports manually.
To install this component from the command line, see Command-line options for installing a Universal Print Server.
- Federated Authentication Service.
- Session Recording.
- Workspace Environment Management.
- Installing uberAgent
- Installing the deviceTRUST Agent
- WEM-Quick-start guide
Share
Share
In this article
- Step 1. Download the product software and launch the wizard
- Step 2. Choose which product to install
- Step 3. Choose what to install
- Step 4. Read and accept the license agreement
- Step 5. Select the components to install and the installation location
- Step 6. Enable or disable features
- Step 7. Open Windows firewall ports
- Step 8. Review prerequisites and confirm installation
- Step 9. Sharing diagnostics information with Cloud Software Group
- Step 10. Sharing License Server data with Cloud Software Group
- Step 11. Finish this installation
- Step 12. Install remaining core components on other machines
- Next steps
This Preview product documentation is Citrix Confidential.
You agree to hold this documentation confidential pursuant to the terms of your Citrix Beta/Tech Preview Agreement.
The development, release and timing of any features or functionality described in the Preview documentation remains at our sole discretion and are subject to change without notice or consultation.
The documentation is for informational purposes only and is not a commitment, promise or legal obligation to deliver any material, code or functionality and should not be relied upon in making Citrix product purchase decisions.
If you do not agree, select I DO NOT AGREE to exit.