Peripherals
Enhanced on-screen keyboard experience
Citrix Workspace app for Android 25.11.0 improves the automatic keyboard display behavior when you connect to Windows Virtual Desktop Agent (VDA) 2511 desktops.
These enhancements improve usability when you interact with input fields and taskbar elements near the bottom of the desktop session while using the on-screen touch keyboard.
When you enable the Automatic keyboard display feature and access a Windows desktop from Citrix Workspace app for Android:
-
The app keeps the text input cursor visible when you type in input fields near the bottom of the session.
-
When you tap the Windows Search box or Start menu in the taskbar, the session view automatically adjusts to keep UI elements visible above the touch keyboard.
-
You can view your input in the search box and interact with other taskbar elements without manually adjusting the session view.
These improvements provide a smoother and more predictable typing experience on touch-based Android devices.
How to configure
Prerequisites:
- Citrix Workspace app for Android: Version 25.11.0 or later
- Windows Virtual Desktop Agent (VDA): Version 2511 or later
Enable automatic keyboard display
The VDA disables this feature by default. To enable it, complete the following steps:
-
Enable the Automatic keyboard display policy on the VDA.
-
Create the following registry key and value:
- Registry path: HKEY_LOCAL_MACHINE\Software\Citrix\IcaMrvc
- Value name: DisableInputPane
- Value type: DWORD
- Value data: 0
-
Restart the VDA session for the changes to take effect.
Scancode input mode for external keyboard
Starting with the 24.1.0 release, you can select Scancode as the keyboard input mode while using an external physical keyboard. This feature is helpful when you use Android devices with an external Windows PC’s standard keyboard. Similar to using the Samsung DeX feature.
With Scancode, you can use the keyboard layout of the VDA instead of the Android’s soft keyboard. In this way, you can completely follow the input style of Windows instead of Android. It’s beneficial when typing in East-Asian languages, as it significantly improves the overall user experience. The end user might find themselves using the keyboard layout of the server instead of the client. For more understanding, see the Use Case section in this article.
How to use the feature
To use the scancode feature:
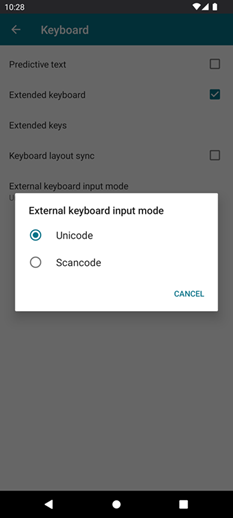
- Open Citrix Workspace app for Android and navigate to Settings > General > Keyboard.
-
Tap External keyboard input mode.

-
Select one of the following options:
-
Scancode - Sends the key position from the client-side keyboard to VDA and VDA generates the corresponding character. Applies server-side keyboard layout.
-
Unicode - Sends the key from the client-side keyboard to VDA and VDA generates the same character in VDA. Applies client-side keyboard layout.
By default, Unicode is selected as the external keyboard input mode.
-
-
Tap Scancode.
When you are in a session, you can switch the remote keyboard using the IME feature and input in the server keyboard layout.
Use case
For example, consider a scenario where you’re using a US international keyboard layout connected to your Android device.
When you choose Scancode and type the key next to the CapsLock on your external keyboard, the scancode 1E is sent to the VDA. The VDA then uses 1E to display the character a.
If you choose Unicode and type the key next to CapsLock on your external keyboard, the character a is sent to the VDA. So, even if the VDA uses another keyboard layout that has a different character in the same position, the character a appears on the screen.
Note:
Unicode is the preferred mode for typing when you use a touch keyboard on your mobile devices. This is because the keys on a touch keyboard generally don’t generate a scancode.
Support for external webcam
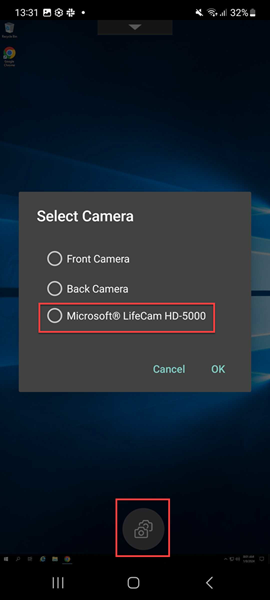
Citrix Workspace app for Android now supports externally connected webcams within your sessions. Connect a USB webcam and use it for video conferencing by tapping the camera icon, then select the external webcam name. It enhances the session experience by using the resources available to end users.
Note:
The external webcam’s name appears only after an external camera is detected.

The next time you use a video conferencing app, the system remembers your preference and uses the camera preference accordingly. For example, if you had completed the last video call with an external webcam preference, next time the external webcam is selected by default.
You can change your camera preference by tapping the camera icon on your screen. You can also change the camera preference during your calls.
Note:
- When you remove the external camera, the floating multiple-camera icon
changes to a flip button
. The Select Camera dialog closes if it’s open and the external camera view on the VDA becomes unresponsive.
- This feature is applicable on both on-premises and cloud deployments.
Client drive mapping
Citrix Workspace app informs the server of the available client drives. By default, client drives are mapped to server drive letters so they appear to be directly connected to the session. These mappings are available only for the current user during the current session.
Note:
This feature is supported only on versions of Android running SDK version 24 and later.
Client drive mapping (CDM) allows plug-and-play storage devices in a session. So, you can use mass storage devices (For example, pen drives) to copy and paste documents between the pen drive and the user device.
In addition, if the CDM setting is set to full access or read access, you can utilize the device’s internal storage as a mapped drive to the session.
Feature limitations:
- Android APIs are observed to be slow, which delays certain operations.
- CDM for external storage isn’t supported on Pixel devices.
- File type association isn’t supported on external storage devices.
Known issue in the feature:
- The Workspace app screen might shift between foreground and background when you plug in an external storage device.
Client Drive Mapping enhancement
Earlier a selected choice of device storage was applied on all configured stores.
Starting with the release 20.8.0, Citrix Workspace app allows you to select dedicated device storage for every configured store.
You get a prompt to select the type of device storage along with the store details at session launch. You can do one of the following:
- Select one of the device storage options and tap OK - The choice is applied only to the current session. A prompt appears to select the type of device storage at every launch.
- Select one of the device storage options, select Do not ask again, and tap OK - The choice is applied for all session launches for that store. No further prompts appear.
- Select Cancel - You’re prompted to select a type of device storage at every launch and within a session as well. The session does not have access to the device storage.
Note:
This feature applies only on direct ICA launches and Citrix Gateway configured stores. Stores with end-to-end SSL setup are supported.
Citrix Casting™
Citrix Casting combines digital and physical environments to deliver apps and data within a secure smart space. The complete system connects devices (or things), like mobile apps and sensors, to create an intelligent and responsive environment.
The Citrix Ready workspace hub is built on the Raspberry Pi 3 platform. The device running Citrix Workspace app connects to the Citrix Ready workspace hub and casts the apps or desktops on a larger display.
Using Citrix Casting, you can:
- Roam your session without launching a VDA session on the mobile devices.
- View the list of available workspace hubs by tapping View hub list from the Workspace hub dialog.
Configure Citrix Casting
Citrix Casting is enabled when all the following system requirements are met:
- Citrix Workspace app 1809 for Android or later installed
- Bluetooth enabled
- Location enabled
- Mobile device and workspace hub using the same Wi-Fi network
To turn on the Citrix Casting feature, tap Settings and Citrix Casting on your device.
For more information about the Citrix Ready workspace hub in Citrix Workspace app, see Configure the Citrix Ready workspace hub.
For information about the Citrix Ready workspace hub, see the Citrix Ready workspace hub documentation.
USB smart card
Citrix Workspace app supports USB smart card readers with StoreFront. You can use USB smart cards for the following purposes when enabled:
- Smart card logon - Authenticates users to Citrix Workspace app.
- Smart card application support - Enables smart card-aware published applications to access local smart card devices.
Citrix Workspace app supports this feature on all Android devices listed by Biometric Associates.
Citrix Workspace app supports the following types of USB smart cards:
- Personal Identity Verification (PIV) cards
- Common Access Cards (CAC) cards
USB smart cards are supported on the Android operating system from version 7.x through 11.x.
You can also enable USB smart card authentication from Settings > Manage Accounts.
Configuring a USB smart card
Prerequisite:
- Download and install the Android PC/SC-Lite service from the Google Play Store.
- Connect the USB smart card reader to the mobile device. For information about connecting smart card readers, refer to the smart card reader specifications provided by the manufacturer.
- Add a smart card enabled StoreFront account.
- On the Citrix Workspace app logon page, tap Add Account. Tap the Use Smartcard option.
- To edit an existing account to use the USB smart card authentication, tap Accounts > Edit and tap the Use Smartcard option.
Support for webcam redirection
You can now redirect the front camera of your device into the session. Both 32-bit and 64-bit applications are supported. By default, the auto-redirection of the webcam is disabled.
Support for front and rear camera redirection
Citrix Workspace app for Android now allows you to switch the camera position from front to rear and conversely, within the HDX session. Both 32-bit and 64-bit applications are supported.
A floating button appears when you invoke the camera. A single tap on the floating button to switch between the front and rear camera positions. You can also move the floating button freely around the screen and place it anywhere.
Known issues in the feature
- The floating button is partially or fully obstructed when the Casting feature or the Document Scan feature is enabled.
Support for external microphone
Previously, Citrix Workspace app for Android supported audio redirection through the device’s microphone only.
Starting with the 23.10.5 version, Citrix Workspace app for Android supports external microphones. Microphones can be USB or Bluetooth-based peripheral devices.
After you connect a USB or a Bluetooth microphone, the audio redirects from the external microphone to the session. When you remove the external microphone from the device, the audio automatically redirects to the device’s microphone.
This feature is helpful when you connect an external microphone, for example, to a:
- phone
- tablet
- smart TV
- external monitor in a conference room.
Support for adaptive audio
Citrix Workspace app for Android supports HDX adaptive audio. This feature is designed to provide users with exceptional audio quality and low latency.
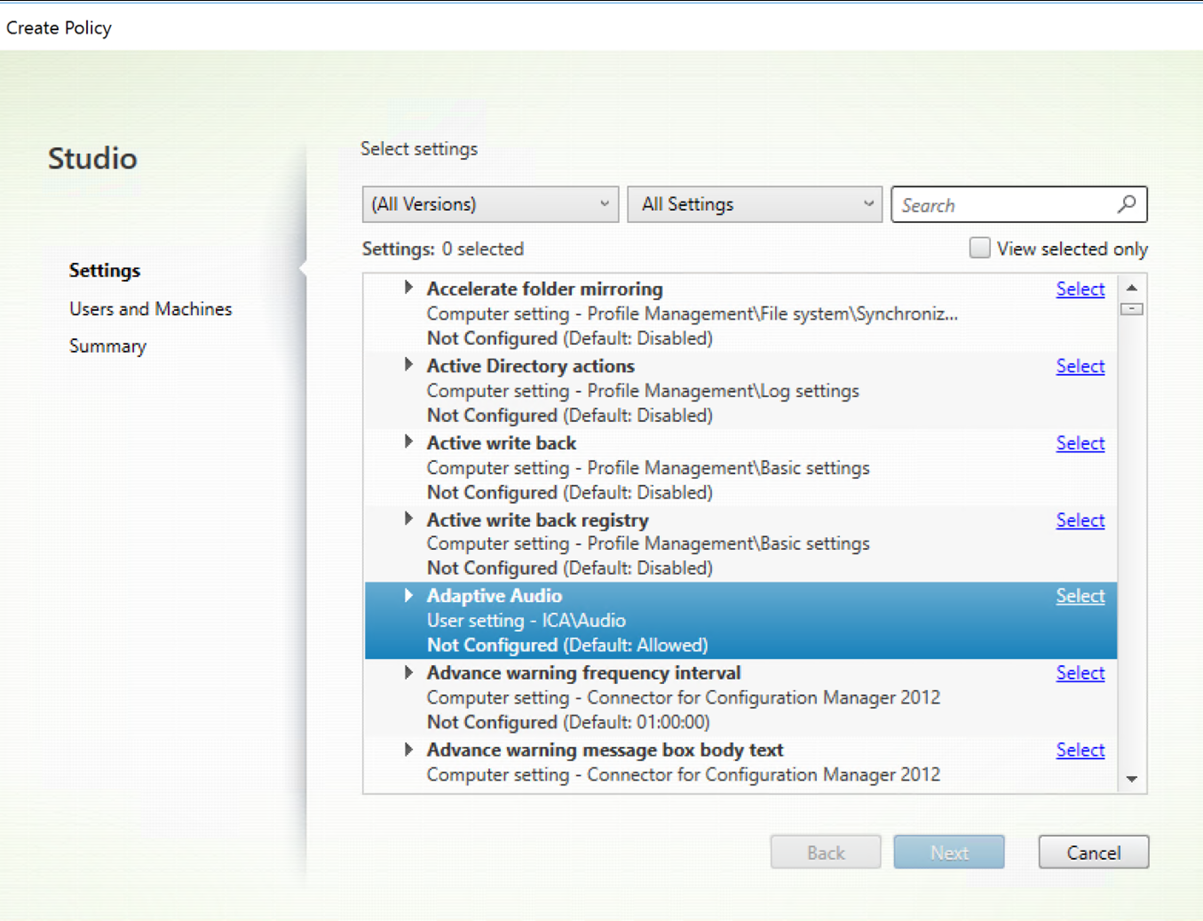
You can configure this feature by enabling the Adaptive Audio policy.

Feature limitation
In a session, when you play audio on one device and then switch to another device, you might experience difficulty hearing the audio properly. As a workaround, you can pause the audio and wait for about 5-10 seconds, after which the voice is audible. [HDX-67047]
For more information, see the Audio policy setting article in the Citrix Virtual Apps and Desktops documentation.
Optimizing in-session audio with echo cancellation for Android
Starting with version 2507, Citrix Workspace app for Android introduces enhanced audio and video quality for Citrix Virtual Apps and Desktops sessions through intelligent echo cancellation technology. This feature automatically reduces feedback and background echo during audio and video calls, providing a clearer communication experience on supported devices with the required hardware.
Note:
This feature might not work as expected on certain devices due to hardware limitations, software inconsistencies, or conflicts with existing audio processing features.
Optimal performance
Our testing shows that this feature works well on Google Pixel devices, which provide consistent audio processing capabilities and optimal hardware support for echo cancellation.
Loss tolerant mode for audio
Mobile users experience audio issues such as choppy sound, echoes, and disruptions during virtual sessions when connecting through networks with high latency and packet loss. These issues impact communication and productivity. Citrix Workspace app for Android version 25.11.0 supports audio over EDT lossy for Android to provide consistent, high-quality audio comparable to desktop platforms.
This feature uses EDT (Enlightened Data Transport), a Citrix UDP-based protocol that performs effectively on challenging network conditions. Audio over EDT Lossy optimizes real-time audio streaming and delivers improved audio quality with minimal stuttering or dropouts.
The feature enhances real-time streaming and improves audio quality over EDT for users connecting through networks with latency and packet loss.
For more information about loss tolerant mode and EDT, see Additional information in the Citrix Virtual Apps and Desktops documentation.
Loss tolerant mode for audio is enabled by default. To disable or re-enable this feature, complete the following steps:
-
Enable HDX adaptive transport (EDT).
-
Enable loss tolerant mode for audio.
Synchronized audio volume control with audio device auto sync
Citrix Workspace app for Android 25.11.0 supports audio volume control and synchronizes playback volume and mute status in real time between the client device and the server system.
When you start a session, the app sends the client’s playback volume to the server and sets the recording volume to 50. You can adjust playback volume from either the client or the server. Platform limitations restrict recording volume control to the server only.
In this article
- Enhanced on-screen keyboard experience
- Scancode input mode for external keyboard
- Support for external webcam
- Client drive mapping
- Citrix Casting™
- USB smart card
- Support for webcam redirection
- Support for front and rear camera redirection
- Support for external microphone
- Support for adaptive audio
- Optimizing in-session audio with echo cancellation for Android