Authenticate
Secure the connections between Citrix Workspace app and the published resources to maximize the security. You can configure the following types of authentication:
- Domain pass-through
- Smart card
- Kerberos pass-through
Domain pass-through authentication
Single sign-on lets you authenticate and use the virtual apps and desktops without having to reauthenticate again.
Logging in to Citrix Workspace app allows your credentials and enumerated resources to be passed through to StoreFront.
In earlier releases, when using Google Chrome, Microsoft Edge or Mozilla FireFox, you can launch single sign-on sessions even if the feature was not enabled.
Starting with Version 1905, all web browsers require you to configure single sign-on using the Group Policy Object administrative template. For more information about configuring single sign-on using Group Policy Object administrative template, see Configure single sign-on with Citrix Gateway.
You can configure single sign-on on both fresh installation or upgrade setup, using any of the following options:
- Command-line interface
- Graphical user interface(GUI)
Configure single sign-on during fresh installation
Configuring single sign-on during fresh installation:
- Configuration on StoreFront or the Web Interface.
- Configure XML trust services on the Delivery Controller.
- Modify Internet Explorer settings.
- Install Citrix Workspace app with single sign-on.
Configure single sign-on on StoreFront or Web Interface
Depending on the type of Citrix Virtual Apps and Desktops deployment, single sign-on can be configured on StoreFront or the Web Interface using the Management Console.
Use the table below for different use case and its respective configuration:
| Use case | Configuration details | Additional information |
|---|---|---|
| Configured SSON on StoreFront or Web Interface | Launch Citrix Studio, go to Store > Manage Authentication methods > enable Domain pass-through. | When Single Sign-on is not configured, Citrix Workspace app automatically switches the authentication method from Domain pass-through to Username and Password, if available. |
| When Workspace for Web is required | Launch Store > Workspace for Websites > Manage Authentication methods > enable Domain pass-through. | When Single Sign-on is not configured, Citrix Workspace app automatically switches the authentication method from Domain pass-through to Username and Password, if available. |
| When StoreFront is not configured | If Web Interface is configured on the VDA, launch XenApp Services Sites > Authentication Methods > enable Pass-through. | When Single Sign-on is not configured, Citrix Workspace app automatically switches the authentication method from Pass-through to Explicit, if available. |
Configure single sign-on with Citrix Gateway
You enable single sign-on with Citrix Gateway using the Group Policy Object administrative template.
- Open the Citrix Workspace app GPO administrative template by running gpedit.msc.
- Under the Computer Configuration node, go to Administrative Template > Citrix Components > Citrix Workspace > User Authentication.
- Select Single Sign-on for Citrix Gateway policy.
- Select Enabled.
- Click Apply and OK.
- Restart Citrix Workspace app for the changes to take effect.
Configure XML trust services on the Delivery Controller
On Citrix Virtual Apps and Desktops™ and Citrix DaaS (formerly Citrix Virtual Apps and Desktops service) , run the following PowerShell command as an administrator on the Delivery Controller:
asnp Citrix*
Set-BrokerSite -TrustRequestsSentToTheXmlServicePort $True
Modify the Internet Explorer settings
- Add the StoreFront server to the list of trusted sites using Internet Explorer. To do this:
- Launch Internet Options from the Control panel.
- Click Security > Local Internet and click Sites. The Local intranet window appears.
- Select Advanced.
- Add the URL of the StoreFront or Web Interface FQDN with the appropriate HTTP or HTTPS protocols.
- Click Apply and OK.
- Modify the User Authentication settings in Internet Explorer. To do this:
- Launch Internet Options from the Control panel.
- Click Security tab > Trusted Sites.
- Click Custom level. The Security Settings – Trusted Sites Zone window appears.
- In the User Authentication pane, select Automatic logon with current user name and password.
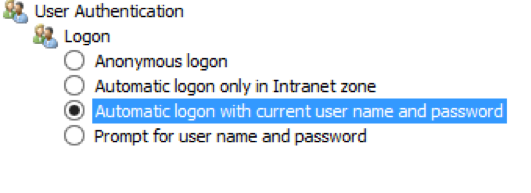
- Click Apply and OK.
Configure single sign-on using the command-line interface
Install Citrix Workspace app for Windows with the /includeSSON switch and restart Citrix Workspace app for the changes to take effect.
Note:
If Citrix Workspace app for Windows is installed without the single sign-on component, upgrading to the latest version of Citrix Workspace app with the
/includeSSONswitch is not supported.
Configure single sign-on using the graphical user interface
- Locate the Citrix Workspace app installation file (
CitrixWorkspaceApp.exe). - Double-click
CitrixWorkspaceApp.exeto launch the installer. - In the Enable Single Sign-on installation wizard, select the Enable Single Sign-on option.
- Click Next and follow the prompts to complete the installation.
You can now log on using Citrix Workspace app without providing user credentials.
Configure single sign-on on Citrix Workspace for Web
You can configure single sign-on on Workspace for Web using the Group Policy Object administrative template.
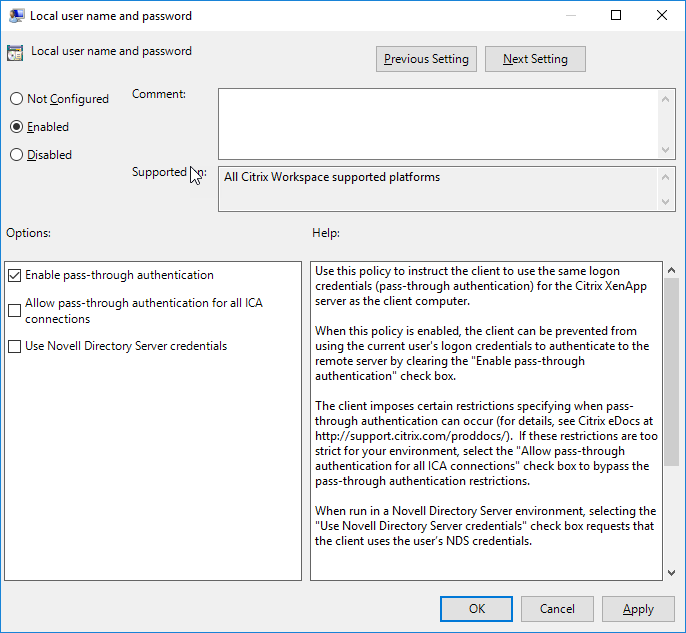
- Open the Workspace for Web GPO administrative template by running gpedit.msc.
- Under the Computer Configuration node, go to Administrative Template > Citrix Component > Citrix Workspace > User Authentication.
- Select the Local user name password policy and set it to Enabled.
- Click Enable pass-through authentication. This option allows Workspace for Web to use your login credentials for authentication on the remote server.
- Click Allow pass-through authentication for all ICA® connections. This option bypasses any authentication restriction and allows credentials to pass-through on all the connections.
- Click Apply and OK.
- Restart the Workspace for Web for the changes to take effect.
Verify that single sign-on is enabled by launching the Task Manager and check if the ssonsvr.exe process is running.
Configure single sign-on using Active Directory
You can configure single sign-on authentication using the Active Directory. You do not need to use deployment tools, such as Microsoft System Center Configuration Manager in this case.
-
Download and place the Citrix Workspace app installation file (CitrixWorkspaceApp.exe) on a suitable network share. It must be accessible by the target machines you install Citrix Workspace app on.
-
Get the
CheckAndDeployWorkspacePerMachineStartupScript.battemplate from the Citrix Workspace app for Windows Download page. -
Edit the location and the version of
CitrixWorkspaceApp.exe. -
In the Active Directory Group Policy Management console, type
CheckAndDeployWorkspacePerMachineStartupScript.batas a startup script. For more information on deploying the startup scripts, see the Active Directory section. -
In the Computer Configuration node, go to Administrative Templates > Add/Remove Templates to add the
icaclient.admfile. -
After adding the
icaclient.admtemplate, go to Computer Configuration > Administrative Templates > Citrix Components > Citrix Workspace > User authentication. -
Select the Local user name password policy and set it to Enabled.
-
Select Enable pass-through authentication and click Apply.
-
Restart the machine for the changes to take effect.
Configure single sign-on on StoreFront and Web Interface
StoreFront configuration
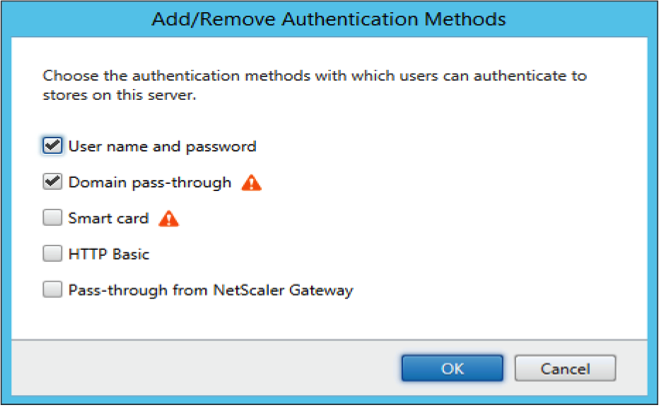
Open Citrix Studio on the StoreFront server and select Authentication > Add /Remove Authentication Methods. Select Domain pass-through.
Configuration Checker
Configuration Checker lets you run a test to ensure that single sign-on is configured properly. The test runs on different checkpoints of the single sign-on configuration and displays the configuration results.
- Right-click Citrix Workspace app icon in the notification area and click Advanced Preferences. The Advanced Preferences dialog appears.
-
Click Configuration Checker. The Citrix Configuration Checker window appears.

- Select SSONChecker from the Select pane.
- Click Run. A progress bar appears, displaying the status of the test.
The Configuration Checker window has the following columns:
-
Status: Displays the result of a test on a specific check point.
- A green check mark indicates that the specific checkpoint is configured properly.
- A blue I indicates information about the checkpoint.
- A Red X indicates that the specific checkpoint is not configured properly.
- Provider: Displays the name of the module on which the test is run. In this case, single sign-on.
- Suite: Indicates the category of the test. For example, Installation.
- Test: Indicates the name of the specific test that is run.
- Details: Provides additional information about the test.
The user gets more information about each checkpoint and the corresponding results.
The following tests are performed:
- Installed with single sign-on.
- Logon credential capture.
- Network Provider registration: The test result against Network Provider registration displays a green check mark only when “Citrix Single Sign-on” is set to be first in the list of Network Providers. If Citrix Single Sign-on appears anywhere else in the list, the test result against Network Provider registration appears with a blue I and additional information.
- Single sign-on process is running.
- Group Policy: By default, this policy is configured on the client.
- Internet Settings for Security Zones: Ensure that you add the Store/XenApp Service URL to the list of Security Zones in the Internet Options. If the Security Zones are configured via Group policy, any change in the policy requires the Advanced Preferences window to be reopened for the changes to take effect and to display the correct status of the test.
- Authentication method for Web Interface/StoreFront.
Note:
- Test results are not applicable on Workspace for Web configurations.
- In a multi-store setup, the authentication method test runs on all the configured stores.
- You can save the test results as reports. The default report format is .txt.
Hide the Configuration Checker option from the Advanced Preferences window
- Open the Citrix Workspace app Group Policy Object administrative template by running gpedit.msc.
- Go to Citrix Components > Citrix Workspace > Self Service > DisableConfigChecker.
- Click Enabled to hide the Configuration Checker option from the Advanced Preferences window.
- Click Apply and OK.
- Run the
gpupdate /forcecommand.
Limitation:
Configuration Checker does not include the checkpoint for the configuration of Trust requests sent to the XML service on the VDA.
Beacon test
Beacon checker is part of Configuration Checke utility. It allows you to perform a beacon test to confirm if the beacon (ping.citrix.com) is reachable. This test helps to eliminate one of the many possible causes for slow resource enumeration, that is beacon not being available. To run the test, right-click the Citrix Workspace app in the notification area and select Advanced Preferences > Configuration Checker. Select Beacon checker from the list of Tests and click Run.
The test results can be any of the following:
- Reachable – Citrix Workspace app is successfully able to contact the beacon.
- Not reachable - Citrix Workspace app is unable to contact the beacon.
- Partially reachable - Citrix Workspace app is able to contact the beacon intermittently.
Domain pass-through authentication with Kerberos
This topic applies only to connections between Citrix Workspace app for Windows and StoreFront, Citrix Virtual Apps and Desktops and Citrix DaaS.
Citrix Workspace app supports Kerberos for domain pass-through authentication for deployments that use smart cards. Kerberos is one of the authentication methods included in Integrated Windows Authentication (IWA).
Kerberos authenticates without passwords for Citrix Workspace app. Thereby, preventing Trojan horse-style attacks on the user device that try to gain access to passwords. Users can log on using any authentication method and access published resources. For example, a biometric authenticator such as a fingerprint reader.
When you log on using a smart card to Citrix Workspace app, StoreFront, Citrix Virtual Apps and Desktops and Citrix DaaS configured for smart card authentication- the Citrix Workspace app:
- Captures the smart card PIN during single sign-on.
-
Uses IWA (Kerberos) to authenticate the user to StoreFront. StoreFront then provides your Citrix Workspace app with information about available the Citrix Virtual Apps and Desktops and Citrix DaaS.
Note
Enable Kerberos to avoid an extran PIN prompt. If Kerberos authentication is not used, Citrix Workspace app authenticates to StoreFront using the smart card credentials.
- The HDX engine passes the smart card PIN to the VDA to log the user on to Citrix Workspace app session. Citrix Virtual Apps and Desktops and Citrix DaaS then delivers the requested resources.
To use Kerberos authentication with Citrix Workspace app, ensure that your Kerberos configuration conforms to the following.
- Kerberos works only between Citrix Workspace app and servers that belong to the same or to trusted Windows Server domains. Servers must also be trusted for delegation, an option you configure through the Active Directory Users and Computers management tool.
- Kerberos must be enabled both on the domain and Citrix Virtual Apps and Desktops and Citrix DaaS. For enhanced security and to ensure that Kerberos is used, disable any non-Kerberos IWA options on the domain.
- Kerberos log on is not available for Remote Desktop Services connections that are configured to use either Basic authentication, always use specified logon information, or always prompt for a password.
Warning
Using Registry editor incorrectly might cause serious problems that can require you to reinstall the operating system. Citrix cannot guarantee that problems resulting from incorrect use of Registry editor can be solved. Use Registry Editor at your own risk. Ensure you back up the registry before you edit it.
Domain pass-through authentication with Kerberos for use with smart cards
See the smart card information present in the Secure your deployment section in the Citrix Virtual Apps and Desktops documentation before continuing.
When you install Citrix Workspace app for Windows, include the following command-line option:
-
/includeSSONThis option installs the single sign-on component on the domain-joined computer, enabling your workspace to authenticate to StoreFront using IWA (Kerberos). The single sign-on component stores the smart card PIN, which is used by the HDX engine when it remotes the smart card hardware and credentials to Citrix Virtual Apps and Desktops and Citrix DaaS. Citrix Virtual Apps and Desktops and Citrix DaaS automatically selects a certificate from the smart card and obtains the PIN from the HDX engine.
A related option,
ENABLE\_SSON, is enabled by default.
If a security policy prevents you from enabling single sign-on on a device, configure Citrix Workspace app using Group Policy Object administrative template.
- Open the Citrix Workspace app Group Policy Object administrative template by running gpedit.msc.
- Choose Administrative Templates > Citrix Components > Citrix Workspace > User authentication > Local user name and password
- Select Enable pass-through authentication.
-
Restart Citrix Workspace app for the changes to take effect.
To configure StoreFront:
When you configure the authentication service on the StoreFront server, select the Domain pass-through option. That setting enables Integrated Windows Authentication. You do not need to select the Smart card option unless you also have non domain-joined clients connecting to StoreFront using smart cards.
For more information about using smart cards with StoreFront, see Configure the authentication service in the StoreFront documentation.
Smart card
Citrix Workspace app for Windows supports the following smart card authentication:
-
Pass-through authentication (Single Sign-on) - Pass-through authentication captures smart card credentials when users log on to Citrix Workspace app. Citrix Workspace app uses the captured credentials as follows:
- Users of domain-joined devices who log on to Citrix Workspace app with smart card credentials can start virtual desktops and applications without needing to reauthenticate.
- Citrix Workspace app running on non-domain joined devices with smart card credentials must type their credentials again to start an desktop or app.
Pass-through authentication requires configuration both on StoreFront and Citrix Workspace app.
-
Bimodal authentication - Bimodal authentication offers users a choice between using a smart card and typing the user name and password. This feature is effective when you cannot use the smart card. For example, the logon certificate has expired. Dedicated stores must be set up per site to allow Bimodal authentication, using the DisableCtrlAltDel method set to False to allow smart cards. Bimodal authentication requires StoreFront configuration.
Using the Bimodal authentication, StoreFront administrator can allow the user both user name and password and smart card authentication to the same store by selecting them in the StoreFront console. See StoreFront documentation.
-
Multiple certificates - Multiple certificates can be available for a single smart card and if multiple smart cards are in use.
-
Client certificate authentication - Client certificate authentication requires Citrix Gateway and StoreFront configuration.
- For access to StoreFront through Citrix Gateway, you might have to reauthenticate after removing a smart card.
- When the Citrix Gateway SSL configuration is set to mandatory client certificate authentication, operation is more secure. However mandatory client certificate authentication is not compatible with bimodal authentication.
-
Double hop sessions -If a double-hop is required, a connection is established between Citrix Workspace app and the user’s virtual desktop. Deployments supporting double hops are described in the Citrix Virtual Apps and Desktops documentation.
-
Smart card-enabled applications - Smart card-enabled applications, such as Microsoft Outlook and Microsoft Office, allow users to digitally sign or encrypt documents available in virtual apps and desktops sessions.
Limitations:
- Certificates must be stored on a smart card and not on the user device.
- Citrix Workspace app does not save the choice of the user certificate, but stores the PIN when configured. The PIN is cached only in non-paged memory and not stored on the disk.
- Citrix Workspace app does not reconnect to a session when a smart card is inserted.
- When configured for smart card authentication, Citrix Workspace app does not support virtual private network (VPN) single-sign on or session pre-launch. To use VPN with smart card authentication, install the Citrix Gateway Plug-in and log on through a webpage, using their smart cards and PINs to authenticate at each step. Pass-through authentication to StoreFront with the Citrix Gateway Plug-in is not available for smart card users.
- Citrix Workspace app Updater communications with citrix.com and the Merchandising Server are not compatible with smart card authentication on Citrix Gateway.
Warning
Some configuration requires registry edits. Using Registry editor incorrectly might cause problems that can require you to reinstall the operating system. Citrix cannot guarantee that problems resulting from incorrect use of Registry Editor can be solved. Ensure you back up the registry before you edit it.
To enable single sign-on for smart card authentication:
To configure Citrix Workspace app for Windows, include the following command-line option during installation:
-
ENABLE\_SSON=YesSingle sign-on is another term for pass-through authentication. Enabling this setting prevents Citrix Workspace app from displaying a second prompt for a PIN.
-
Set SSONCheckEnabled to false if the single sign-on component is not installed. The key prevents the Citrix Workspace app authentication manager from checking for the single sign-on component, thus allowing Citrix Workspace app to authenticate to StoreFront.
HKEY\_CURRENT\_USER\Software\Citrix\AuthManager\protocols\integratedwindows\HKEY\_LOCAL\_MACHINE\Software\Citrix\AuthManager\protocols\integratedwindows\
To enable smart card authentication to StoreFront instead of Kerberos, install Citrix Workspace app for Windows with the following command line options:
-
/includeSSONinstalls single sign-on (pass-through) authentication. Enables credential caching and the use of pass-through domain-based authentication. -
If the user is logging on to the endpoint with a different method to smart card for Citrix Workspace app for Windows authentication (for example, user name and password), the command line is:
/includeSSON LOGON_CREDENTIAL_CAPTURE_ENABLE=No
This prevents the credentials being captured at logon time and allows Citrix Workspace app to store the PIN when logging on to Citrix Workspace app.
- Open the Citrix Workspace app Group Policy Object administrative template by running gpedit.msc.
- Go to Administrative Templates > Citrix Components > Citrix Workspace > User Authentication > Local user name and password.
- Select Enable pass-through authentication. Depending on the configuration and security settings, select Allow pass-through authentication for all ICA option for pass-through authentication to work.
To configure StoreFront:
- When you configure the authentication service, select the Smart card check box.
For more information about using smart cards with StoreFront, see Configure the authentication service in the StoreFront documentation.
To enable user devices for smart card use:
- Import the certificate authority root certificate into the device’s keystore.
- Install your vendor’s cryptographic middleware.
- Install and configure Citrix Workspace app.
To change how certificates are selected:
By default, if multiple certificates are valid, Citrix Workspace app prompts the user to choose a certificate from the list. Alternatively, you can configure Citrix Workspace app to use the default certificate (per the smart card provider) or the certificate with the latest expiry date. If there are no valid logon certificates, the user is notified, and given the option to use an alternate logon method if available.
A valid certificate must have all of these characteristics:
- The current time of the clock on the local computer is within the certificate validity period.
- The Subject public key must use the RSA algorithm and have a key length of 1024 bits, 2048 bits, or 4096 bits.
- Key Usage must contain Digital Signature.
- Subject Alternative Name must contain the User Principal Name (UPN).
- Enhanced Key Usage must contain Smart Card log on and Client Authentication, or All Key Usages.
- One of the Certificate Authorities on the certificate’s issuer chain must match one of the permitted Distinguished Names (DN) sent by the server in the TLS handshake.
Change how certificates are selected by using either of the following methods:
-
On the Citrix Workspace app command line, specify the option
AM\_CERTIFICATESELECTIONMODE={ Prompt | SmartCardDefault | LatestExpiry }.Prompt is the default. For SmartCardDefault or LatestExpiry, if multiple certificates meet the criteria, Citrix Workspace app prompts the user to choose a certificate.
-
Add the following key value to the registry key HKEY_CURRENT_USER or HKEY_LOCAL_MACHINE\Software[Wow6432Node]Citrix\AuthManager: CertificateSelectionMode={ Prompt SmartCardDefault LatestExpiry }.
Values defined in HKEY_CURRENT_USER take precedence over values in HKEY_LOCAL_MACHINE to best assist the user in selecting a certificate.
To use CSP PIN prompts:
By default, the PIN prompts presented to users are provided by Citrix Workspace app for Windows rather than the smart card Cryptographic Service Provider (CSP). Citrix Workspace app prompts users to enter a PIN when required and then passes the PIN to the smart card CSP. If your site or smart card has more stringent security requirements, such as to disallow caching the PIN per-process or per-session, you can configure Citrix Workspace app to instead use the CSP components to manage the PIN entry, including the prompt for a PIN.
Change how PIN entry is handled by using either of the following methods:
- On the Citrix Workspace app command line, specify the option
AM\_SMARTCARDPINENTRY=CSP. - Add the following key value to the registry key HKEY_LOCAL_MACHINE\Software\[Wow6432Node\]Citrix\AuthManager: SmartCardPINEntry=CSP.
Smart card support and removal changes
Consider the following when connecting to a XenApp 6.5 PNAgent site:
- Smart card login is supported for PNAgent site logins.
- The smart card removal policy has changed on the PNAgent Site:
A Citrix Virtual Apps session is logged off when the smart card is removed – if the PNAgent site is configured with smart card as the authentication method, the corresponding policy has to be configured on Citrix Workspace app for Windows to enforce the Citrix Virtual Apps session for logoff. Enable roaming for smart card authentication on the XenApp PNAgent site and enable the smart card removal policy, which logs off Citrix Virtual Apps from the Citrix Workspace app session. The user is still logged into the Citrix Workspace app session.
Limitation:
When you log on to the PNAgent site using smart card authentication, the user name is displayed as Logged On.