Get started
This article is a reference document to help you set up your environment after you install Citrix Workspace app.
Prerequisites:
Verify that all the requirements are met as listed in the System requirements section.
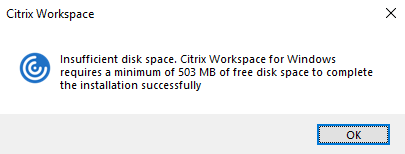
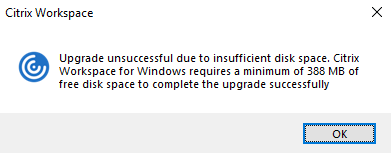
Validating free disk space
See the following table for details on disk space required before installation:
| Installation type | Minimum disk space required |
|---|---|
| Fresh installation | 572 MB |
| Upgrade | 350 MB |
Citrix Workspace app does a check to verify available disk space to complete the installation. The verification is done both during a fresh installation and an upgrade.
During a fresh installation, the installation stops and the following dialog appears when there’s insufficient disk space:
When you’re upgrading Citrix Workspace app, the installation ends and the following dialog box appears when there’s insufficient disk space.
Note:
- The installer checks the disk space only after extracting the installation package.
- When the system is low on disk space during silent installation, the dialog does not appear but the error message is recorded in the
CTXInstall\_TrolleyExpress-\*.log.
Configure the following before using the Citrix Workspace app:
- StoreFront
- Citrix Gateway Store
- Adding store URL to Citrix Workspace app
- Client drive mapping
- Domain Name Service name resolution
Group Policy Object administrative template
We recommend that you use the Group Policy Object administrative template to configure rules for:
- Network routing
- Proxy servers
- Trusted server configuration
- User routing
- Remote user devices
- User experience.
You can use the receiver.admx / receiver.adml template files with domain policies and local computer policies. For domain policies, import the template file using the Group Policy Management console. Importing is useful when applying Citrix Workspace app settings to several different user devices throughout the enterprise. To modify on a single user device, import the template file using the local Group Policy Editor on the device.
Citrix recommends using the Windows Group Policy Object (GPO) administrative template to configure Citrix Workspace app.
The installation directory includes CitrixBase.admx and CitrixBase.adml, and, administrative template files (receiver.adml or receiver.admx`receiver.adml`).
Note:
The .admx and .adml files are for use with Windows Vista, Windows Server 2008, and other later versions of Windows.
For example: \<installation directory\>\Online Plugin\Configuration.
If Citrix Workspace app is installed without the VDA, the admx/adml files are typically found in the C:\Program Files\Citrix\ICA Client\Configuration directory.
See the following table for information about Citrix Workspace app template files and their respective locations.
Note:
Citrix recommends that you use the GPO template files provided with latest version of Citrix Workspace app.
| File type | File location |
| receiver.adm |
|
| receiver.admx |
|
| receiver.adml |
|
| CitrixBase.admx |
|
| CitrixBase.adml |
|
Note:
- If the CitrixBase.admx\adml isn’t added to the local GPO, the Enable ICA File Signing policy might be lost.
- When upgrading Citrix Workspace app, add the latest template files to local GPO. Earlier settings are retained after import. For more information, see the following procedure:
To add the receiver.admx/adml template files to the local GPO:
You can use .adm template files to configure both the Local and the domain-based GPO. Refer to the Microsoft MSDN article about managing ADMX files here.
After installing Citrix Workspace app, copy the following template files:
| File type | Copy from | Copy to |
|---|---|---|
| receiver.admx | Installation Directory\ICA Client\Configuration\receiver.admx |
%systemroot%\policyDefinitions |
| CitrixBase.admx | Installation Directory\ICA Client\Configuration\CitrixBase.admx |
%systemroot%\policyDefinitions |
| receiver.adml | Installation Directory\ICA Client\Configuration\[MUIculture]receiver.adml |
%systemroot%\policyDefinitions\[MUIculture] |
| CitrixBase.adml | Installation Directory\ICA Client\Configuration\[MUIculture]\CitrixBase.adml |
%systemroot%\policyDefinitions\[MUIculture] |
Note:
Add the CitrixBase.admx/CitrixBase.adml to the
\PolicyDefinitionsfolder to view the template files in Administrative Templates > Citrix Components > Citrix Workspace.
StoreFront
Configure Citrix Gateway to enable users to connect from outside the internal network. For example, users who connect from the Internet or from remote locations.
Note:
You might see the old StoreFront user interface if you select The Show all Stores option.
To configure StoreFront:
Install and configure StoreFront as described in the StoreFront documentation. Citrix Workspace app requires an HTTPS connection. On an HTTP configured StoreFront, set the registry key as described in Using command-line parameters.
Note:
Citrix provides a template you can use to create a download site for Citrix Workspace app for Windows.
Citrix Gateway Store
To add or specify a Citrix Gateway using the Group Policy Object administrative template:
- Open the Citrix Workspace app Group Policy Object administrative template by running gpedit.msc.
- Under the Computer Configuration node, go to Administrative Templates > Classic Administrative Templates (ADM) > Citrix Components > Citrix Workspace > StoreFront.
- Select Citrix Gateway URL/StoreFront Accounts List.
-
Edit the settings.
- Store name – Indicates the displayed store name
- Store URL – Indicates the URL of the store
- #Store name – Indicates the name of the store behind Citrix Gateway
- Store enabled state –Indicates the state of the store, On or Off
- Store Description – Provides description of the store
- Add or specify the Citrix Gateway URL. Enter the name of the URL, delimited by a semi-colon:
Example: CitrixWorkspaceApp.exe STORE0= HRStore;https://ag.mycompany.com#Storename;On;Store
Where #Store name is the name of the store behind Citrix Gateway.
Starting with Version 1808, changes made to the Citrix Gateway URL/StoreFront Account List policy are applied in a session after app restart. A reset isn’t required.
Note:
Citrix Workspace app Version 1808 and later doesn’t require resetting on a fresh installation. If there’s an upgrade to 1808 or later, you must reset the Citrix Workspace app for the changes to take effect.
Limitations:
- Citrix Gateway URL must be listed as first followed by StoreFront URLs.
- No support for Multiple Citrix Gateway URLs.
- Citrix Gateway URL configured using this method does not support the PNA Services site behind Citrix Gateway.
Manage workspace control reconnect
Workspace control lets applications follow users as they move between devices. For example, workspace control enables clinicians in hospitals to move from workstation to workstation without having to restart their applications on each device. For Citrix Workspace app, you manage workspace control on client devices by modifying the registry. Workspace control can also be done for domain-joined client devices using Group Policy.
Caution
Editing the registry incorrectly can cause serious problems that might require you to reinstall your operating system. Citrix can’t guarantee that problems resulting from the incorrect use of the Registry Editor can be solved. Use the Registry Editor at your own risk. Be sure to back up the registry before you edit it.
Create WSCReconnectModeUser and modify the existing registry key WSCReconnectMode in the Master Desktop Image or in the Citrix Virtual Apps server. The published desktop can change the behavior of the Citrix Workspace app.
WSCReconnectMode key settings for Citrix Workspace app:
- 0 = do not reconnect to any existing sessions
- 1 = reconnect on application launch
- 2 = reconnect on application refresh
- 3 = reconnect on application launch or refresh
- 4 = reconnect when Citrix Workspace interface opens
- 8 = reconnect on Windows sign-on
- 11 = combination of both 3 and 8
Disable workspace control
To disable workspace control, create the following key:
HKEY_LOCAL_MACHINE\SOFTWARE\Wow6432Node\Citrix\Dazzle (64-bit)
HKEY_LOCAL_MACHINE\SOFTWARE\Citrix\\Dazzle (32-bit)
Name: WSCReconnectModeUser
Type: REG_SZ
Value data: 0
Modify the following key from the default value of 3 to zero
HKEY_LOCAL_MACHINE\SOFTWARE\Wow6432Node\Citrix\Dazzle (64-bit)
HKEY_LOCAL_MACHINE\SOFTWARE\Citrix\Dazzle (32-bit)
Name: WSCReconnectMode
Type: REG_SZ
Value data: 0
Note:
You can also set the WSCReconnectAll key to false if you don’t want to create a key.
Changing the status indicator timeout
You can change the amount of time the status indicator displays when a user is launching a session. To alter the time-out period, create a REG_DWORD value SI INACTIVE MS in HKEY_LOCAL_MACHINE\SOFTWARE\Citrix\ICA CLIENT\Engine\. The REG_DWORD value can be set to 4 if you want the status indicator to disappear sooner.
Customizing location for application shortcut using command line
The start menu integration and desktop shortcut only feature lets you bring published application shortcuts into the Windows Start menu and onto the desktop. Users do not have to subscribe to applications from the Citrix Workspace user interface. Start menu integration and desktop shortcut management provide a seamless desktop experience for groups of users. Also for users who need access to a core set of applications in a consistent way.
The flag is called SelfServiceMode and is set to True by default. When the administrator sets the SelfServiceMode flag to False, you can’t access the self-service user interface. Instead, you can access subscribed apps from the Start menu and desktop shortcuts that is referred as shortcut-only mode.
Users and administrators can use several registry settings to customize the way shortcuts are set up.
Working with shortcuts
- Users can’t remove apps. All apps are mandatory when working with the SelfServiceMode flag set to false (shortcut-only mode). If you remove a shortcut icon from the desktop, the icon comes back when the user selects Refresh from the Citrix Workspace app icon in the notification area.
- Users can configure only one store. The Account and Preferences options aren’t available to prevent the user from configuring more stores. The administrator can give a user special privileges to add more than one account using the Group Policy Object template. Administrators can also provide special privileges by manually adding a registry key (HideEditStoresDialog) on the client machine. When the administrator gives a user this privilege, the user has a Preferences option in the notification area, where they can add and remove accounts.
- Users can’t remove apps using the Windows Control Panel.
- You can add desktop shortcuts via a customizable registry setting. Desktop shortcuts aren’t added by default. After editing the registry settings, restart the Citrix Workspace app.
- Shortcuts are created in the Start menu with a category path as the default, UseCategoryAsStartMenuPath.
Note:
Windows 8/8.1 and Windows 10 do not allow the creation of nested folders within the Start menu. Applications are displayed individually or under the root folder. But, not within the Category sub folders that are defined with Citrix Virtual Apps.
- You can add a flag [/DESKTOPDIR=”Dir_name”] during installation to bring all shortcuts into a single folder. CategoryPath is supported for desktop shortcuts.
- Auto Reinstall Modified Apps feature can be enabled using the registry key
AutoReInstallModifiedApps. WhenAutoReInstallModifiedAppsis enabled, any changes to the published apps and desktops attributes on the server are displayed on the client machine. WhenAutoReInstallModifiedAppsis disabled, apps and desktop attributes aren’t updated and shortcuts aren’t restored on refresh if deleted on the client. By default, theAutoReInstallModifiedAppsis enabled.
Customizing location for application shortcut using the Registry editor
Note:
- By default, registry keys use the String format.
- Change registry keys before you configure a store. If at any time you or a user wants to customize the registry keys, you or the user must:
- reset Citrix Workspace app
- configure the registry keys, and then
- reconfigure the store.
Registry keys for 32-bit machines
Registry key: WSCSupported
Value: True
Key path:
-  HKEY_CURRENT_USER\Software\Citrix\Dazzle
-  HKEY_CURRENT_USER\Software\Citrix\Receiver\SR\Store" + primaryStoreID +\Properties
-  HKEY_LOCAL_MACHINE\Software\Policies\Citrix\Dazzle
-  HKEY_LOCAL_MACHINE\Software\Citrix\Dazzle
Registry key: WSCReconnectAll
Value: True
Key path:
- `HKEY_CURRENT_USER\Software\Citrix\Dazzle`
- `HKEY_CURRENT_USER\Software\Citrix\Receiver\SR\Store" + primaryStoreID + \Properties`
- `HKEY_LOCAL_MACHINE\Software\Policies\Citrix\Dazzle`
- `HKEY_LOCAL_MACHINe\Software\Citrix\Dazzle`
Registry key: WSCReconnectMode
Value: 3
Key path:
-  HKEY_CURRENT_USER\Software\Citrix\Dazzle
-  HKEY_CURRENT_USER\Software\Citrix\Receiver\SR\Store" + primaryStoreID +\Properties
-  HKEY_LOCAL_MACHINE\Software\Policies\Citrix\Dazzle
-  HKEY_LOCAL_MACHINE\Software\Citrix\Dazzle
Registry key: WSCReconnectModeUser
Value: Registry isn’t created during installation.
Key path:
- HKEY_CURRENT_USER\Software\Citrix\Dazzle
- HKEY_CURRENT_USER\Software\Citrix\Receiver\SR\Store" + primaryStoreID+\Properties
- HKEY_LOCAL_MACHINE\Software\Policies\Citrix\Dazzle
- HKEY_LOCAL_MACHINE\Software\Citrix\Dazzle
Registry keys for 64-bit machines:
Registry key: WSCSupported
Value: True
Key path:
- HKEY_CURRENT_USER\Software\Citrix\Dazzle
- HKEY_CURRENT_USER\Software\Citrix\Receiver\SR\Store" + primaryStoreID +\Properties
- HKEY_LOCAL_MACHINE\Software\Wow6432Node\Policies\Citrix\Dazzle
- HKEY_LOCAL_MACHINE\Software\Wow6432Node\Citrix\Dazzle
Registry key: WSCReconnectAll
Value: True
Key path:
-  HKEY_CURRENT_USER\Software\Citrix\Dazzle
-  HKEY_CURRENT_USER\Software\Citrix\Receiver\SR\Store" + primaryStoreID + \Properties
-  HKEY_LOCAL_MACHINE\Software\Wow6432Node\Policies\Citrix\Dazzle
-  HKEY_LOCAL_MACHINE\Software\Wow6432Node\Citrix\Dazzle
Registry key: WSCReconnectMode
Value: 3
Key path:
-  HKEY_CURRENT_USER\Software\Citrix\Dazzle
-  HKEY_CURRENT_USER\Software\Citrix\Receiver\SR\Store" + primaryStoreID +\Properties
-  HKEY_LOCAL_MACHINE\Software\Wow6432Node\Policies\Citrix\Dazzle
-  HKEY_LOCAL_MACHINE\Software\Wow6432Node\Citrix\Dazzle
Registry key: WSCReconnectModeUser
Value: Registry isn’t created during installation.
Key path:
- HKEY_CURRENT_USER\Software\Citrix\Dazzle
- HKEY_CURRENT_USER\Software\Citrix\Receiver\SR\Store" + primaryStoreID+\Properties
- HKEY_LOCAL_MACHINE\Software\Wow6432Node\Policies\Citrix\Dazzle
- HKEY_LOCAL_MACHINE\Software\Wow6432Node\Citrix\Dazzle
User accounts
You can provide users with the account information that they need to access virtual desktops and application using the following:
- Configuring email-based account discovery
- Provisioning file
- Providing users with account information to enter manually
Important
Citrix recommends that you restart Citrix Workspace app after the installation to ensure that:
- Restart ensures that users can add accounts and
- Citrix Workspace app can discover USB devices that were in a suspended state during installation.
A dialog appears to indicate a successful installation, followed by the Add Account dialog. For a first time user, the Add Account dialog requires you to enter an email or server address to set up an account.
Provide users with account information to enter manually
Upon successful installation of Citrix Workspace app, the following screen appears. Users are required to enter an email or server address to access the apps and desktops. When a user enters the details for a new account, Citrix Workspace app tries to verify the connection. If successful, Citrix Workspace app prompts the user to log on to the account.
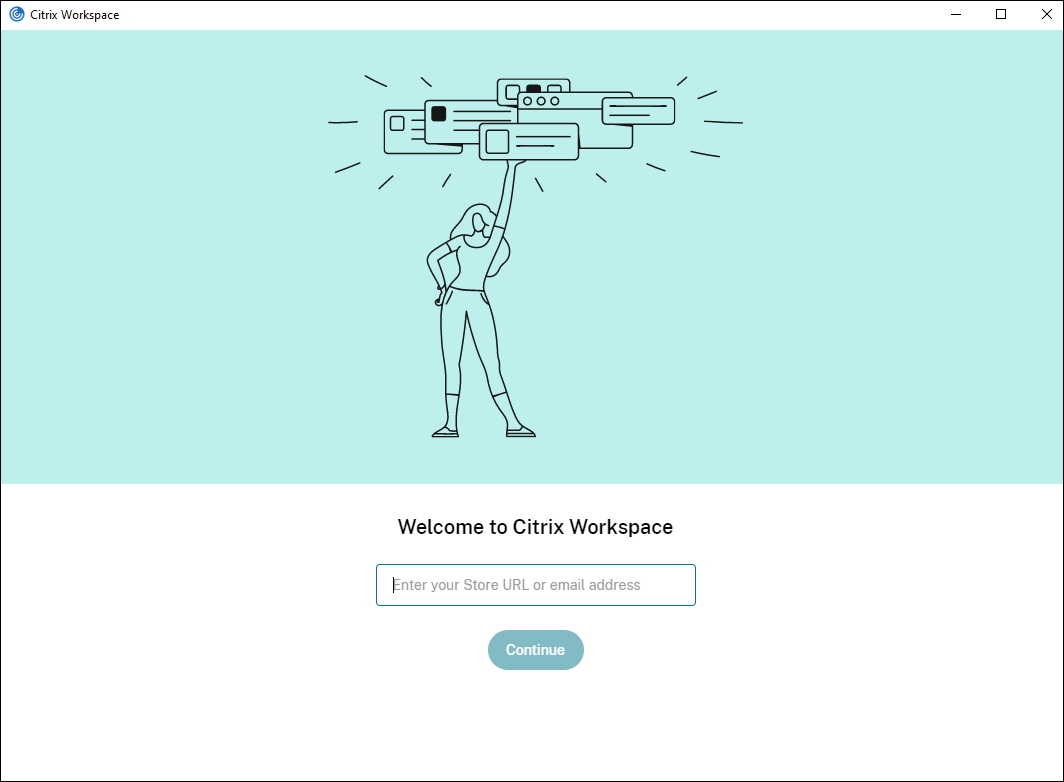
To enable users to set up accounts manually, be sure to distribute the information they need to connect to their virtual desktops and applications.
- To connect to a Workspace store, provide the Workspace URL.
- To connect to a StoreFront store, provide the URL for that server. For example:
https://servername.company.com. -
To connect through Citrix Gateway, first determine whether a user must see all configured stores or just the store with remote access enabled for a particular Citrix Gateway.
-
To present all configured stores: Provide users with the Citrix Gateway fully qualified domain name.
-
To limit access to a particular store: Provide users with the Citrix Gateway fully qualified domain name and the store name in the form:
CitrixGatewayFQDN?MyStoreName:
For example, if a store named “SalesApps” has remote access enabled for server1.com and a store named HRApps has remote access enabled for server2.com, a user must enter:
- server1.com?SalesApps to access SalesApps or
- server2.com?HRApps to access HRApps.
CitrixGatewayFQDN?MyStoreName feature requires a new user to create an account by entering a URL and isn’t available for email-based discovery.
-
Once the Citrix Workspace app is configured with the Store URL, the account can be managed from the Accounts option in the profile menu.
Configure email-based account discovery
When you configure Citrix Workspace app for email-based account discovery, users enter their email address rather than a server URL during initial Citrix Workspace app installation and configuration. Citrix Workspace app determines the Citrix Gateway or StoreFront Server associated with the email address based on Domain Name System (DNS) Service (SRV) records. The app then prompts the user to log on to access virtual desktops and applications.
For more information, see Configuring email based account discovery.
Provide users with provisioning files
StoreFront provides provisioning files that users can open to connect to stores.
You can use StoreFront to create provisioning files that include connection details for accounts. Make these files available to your users to enable them to configure Citrix Workspace app automatically. After installing Citrix Workspace app, users simply open the file to configure Citrix Workspace app. If you configure workspace for web, users can also get Citrix Workspace app provisioning files from those sites.
For more information, see To export store provisioning files for users in the StoreFront documentation.
Provide users with account information to enter manually
To enable users to set up accounts manually, be sure to distribute the information they need to connect to their virtual desktops and applications.
- To connect to a StoreFront store, provide the URL for that server. For example:
https://servername.company.com. -
To connect through Citrix Gateway, first determine whether a user must see all configured stores or just the store with remote access enabled for a particular Citrix Gateway.
-
To present all configured stores: Provide users with the Citrix Gateway fully qualified domain name.
-
To limit access to a particular store: Provide users with the Citrix Gateway fully qualified domain name and the store name in the form:
-
CitrixGatewayFQDN?MyStoreName:
For example, if a store named “SalesApps” has remote access enabled for server1.com and a store named HRApps has remote access enabled for server2.com, a user must enter:
- server1.com?SalesApps to access SalesApps or
- server2.com?HRApps to access HRApps.
CitrixGatewayFQDN?MyStoreName feature requires a new user to create an account by entering a URL and isn’t available for email-based discovery.
When a user enters the details for a new account, Citrix Workspace app tries to verify the connection. If successful, Citrix Workspace app prompts the user to log on to the account.
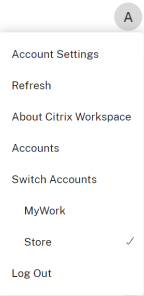
To manage accounts, open the Citrix Workspace app home page, and click ![]() , and then click Accounts.
, and then click Accounts.
Sharing multiple stores accounts automatically
Warning
Using the Registry Editor incorrectly can cause serious problems that require you to reinstall the operating system. Citrix can’t guarantee that problems resulting from incorrect use of the Registry Editor can be solved. Use the Registry Editor at your own risk. Back up the registry before you edit it.
If you’ve more than one store account, you can configure Citrix Workspace app for Windows to automatically connect to all accounts when establishing a session. To automatically view all accounts when opening Citrix Workspace app:
For 32-bit systems:
Key path: HKEY_LOCAL_MACHINE\Software\Citrix\Dazzle
KeyName: CurrentAccount
Value: AllAccount
Type: REG_SZ
For 64-bit systems:
Key path: HKEY_LOCAL_MACHINE\\Software\\Wow6432Node\\Citrix\\Dazzle
KeyName: CurrentAccount
Value: AllAccount
Type: REG_SZ
Client drive-mapping
Citrix Workspace app for Windows supports device mapping on user devices so they’re available from within a session. Users can:
- Transparently access local drives, printers, and COM ports
- Cut and paste between the session and the local Windows clipboard
- Hear audio (system sounds and .wav files) played from the session
Citrix Workspace app informs the server of the available client drives, COM ports, and LPT ports during sign-in. By default, client drives are mapped to server drive letters and server print queues are created for client printers, which make them appear to be directly connected to the session. These mappings are available only for the current user during the current session. They’re deleted when the user logs off and recreated the next time the user logs on.
You can use the redirection policy settings to map user devices not automatically mapped at logon. For more information, see the Citrix Virtual Apps and Desktops™ documentation.
Disable user device mappings
You can configure user device-mapping including options for drives, printers, and ports, using the Windows Server Manager tool. For more information about the available options, see your Remote Desktop Services documentation.
Redirect client folders
Client folder redirection changes the way client-side files are accessible on the host-side session. Enabling only client drive mapping on the server, client-side full volumes automatically maps to the sessions as Universal Naming Convention (UNC) links. When you enable client folder redirection on the server and the user configures it on the user device, part of the user specified local volume gets redirected.
Only the user-specified folders appear as UNC links inside the sessions, instead of the complete file system on the user device. If you disable UNC links through the registry, client folders appear as mapped drives inside the session. For more information, including how to configure client folder redirection for user devices, see the Citrix Virtual Apps and Desktops documentation.
Map client drives to host-side drive letters
Client drive mapping redirects drive letters on the host-side to drives that exist on the user device. For example, drive H in a Citrix user session can be mapped to drive C of the user device running Citrix Workspace app for Windows.
Client drive mapping is built into the standard Citrix device redirection facilities transparently. To File Manager, Windows Explorer, and your applications, these mappings appear like any other network mappings.
The server hosting virtual desktops and applications can be configured during installation to map client drives automatically to a given set of drive letters. The default installation maps drive letters assigned to client drives starting with V and works backward, assigning a drive letter to each fixed drive and CD-ROM drive. (Floppy drives are assigned their existing drive letters.) This method yields the following drive mappings in a session:
| Client drive letter | Accessible by the server as |
|---|---|
| A | A |
| B | B |
| C | V |
| D | U |
The server can be configured so that the server drive letters don’t conflict with the client drive letters. So, the server drive letters are changed to higher drive letters. In the following example, changing server drives C to M and D to N allows client devices to access their C and D drives directly. This method yields the following drive mappings in a session:
| Client drive letter | Accessible by the server as |
|---|---|
| A | A |
| B | B |
| C | C |
| D | D |
The drive letter used to replace the server drive C is defined during Setup. All other fixed drive and CD-ROM drive letters are replaced with sequential drive letters (for example; C > M, D > N, E > O). These drive letters must not conflict with any existing network drive mappings. If you map the network drive to the same drive letter as a server drive letter, the network drive mapping isn’t valid.
Connecting a user device to a server, reestablishes client mappings unless automatic client device mapping is disabled. Client drive mapping is enabled by default. To change the settings, use the Remote Desktop Services (Terminal Services) Configuration tool. You can also use policies to give you more control over how client device mapping is applied. For more information about policies, see the Citrix Virtual Apps and Desktops documentation.
HDX™ Plug and Play USB device redirection
HDX Plug and Play USB device redirection enables dynamic redirection of media devices to the server. The media device includes cameras, scanners, media players, and point of sale (POS) devices. You or the user can restrict the redirection of all or some of the devices. Edit policies on the server or apply group policies on the user device to configure the redirection settings. For more information, see USB and client drive considerations in the Citrix Virtual Apps and Desktops documentation.
Important
If you prohibit Plug and Play USB device redirection in a server policy, the user can’t override that policy setting.
A user can set permissions in Citrix Workspace app to allow or reject device redirection always or notify each time a device is connected. The setting affects only devices plugged in after the user changes the setting.
To map a client COM port to a server COM port:
Client COM port mapping allows devices attached to the COM ports of the user device to be used during sessions. These mappings can be used like any other network mappings.
You can map client COM ports at the command prompt. You can also control client COM port mapping from the Remote Desktop (Terminal Services) Configuration tool or using policies. For information about policies, see the Citrix Virtual Apps and Desktops documentation.
Important
COM port mapping isn’t TAPI-compatible.
-
For Citrix Virtual Apps and Desktops deployments, enable the Client COM port redirection policy setting.
-
Log on to Citrix Workspace app.
-
At a command prompt, type:
net use comx: \\\\client\\comz:where:
- x is the number of the COM port on the server (ports 1 through 9 are available for mapping) and
- z is the number of the client COM port you want to map
-
To confirm the operation, type:
net useThe prompt displays mapped drives, LPT ports, and mapped COM ports.
To use this COM port in a virtual desktop or application, install your user device to the mapped name. For example, if you map COM1 on the client to COM5 on the server, install your COM port device on COM5 during the session. Use this mapped COM port as you would a COM port on the user device.
Domain Name Service name resolution
You can configure Citrix Workspace app for Windows that uses the Citrix XML Service to request a Domain Name Service (DNS) name for a server instead of an IP address.
Important:
Unless your DNS environment is configured specifically to use this feature, Citrix recommends that you do not enable DNS name resolution on the server.
By default, DNS name resolution is disabled on the server and enabled on the Citrix Workspace app. When DNS name resolution is disabled on the server, any Citrix Workspace app request for a DNS name returns an IP address. There’s no need to disable DNS name resolution on Citrix Workspace app.
To disable DNS name resolution for specific user devices:
If your server deployment uses DNS name resolution and you experience issues with specific user devices, you can disable DNS name resolution for those devices.
Caution
Using the Registry Editor incorrectly might cause serious problems that require you to reinstall the operating system. We do not guarantee that problems resulting from incorrect use of the Registry Editor can be solved. Use the Registry Editor at your own risk. Back up of the registry before you edit it.
- Add a string registry key xmlAddressResolutionType to
HKEY\_LOCAL\_MACHINE\Software\Wow6432Node\Citrix\ICA Client\Engine\Lockdown Profiles\All Regions\Lockdown\Application Browsing. - Set the value to IPv4-Port.
- Repeat for each user of the user devices.
Custom web stores
This feature provides access to your organization’s custom web store from the Citrix Workspace app for Windows. To use this feature, the admin must add the domain or custom web store to the Global App Configuration Service allowed URLs.
For more information about configuring web store URLs for end-users, see Global App Configuration Service.
You can now provide the custom web store URL in the Add Account screen in Citrix Workspace app. The custom web store opens in the native Citrix Workspace app window.
To remove the custom web store, go to Accounts > Add or Remove accounts, select the custom web store URL, and click Remove.