Licensing guide for Citrix Gateway
Install a new license
To install a license, you can either use the automatic method or the manual method. Automatic license allocation requires access to citrix.com public domains through the appliance.
To install licenses, use the license access code that Citrix sends you through email.
The following section contains methods to install a license:
Before you start
- Ensure you have your license access code in the
LA-xxxxxxxxxx-xxxxxformat. This code is listed in the Citrix email when you purchase a license. - Ensure you use a proxy server, if you do not want to configure internet connectivity on the Citrix ADC appliance. Select the Connect through Proxy Server checkbox and specify the IP address and port of your proxy server.
Automatic installation
-
In a web browser, type the IP address of the Citrix ADC appliance. For example,
http://192.168.100.1. -
In the User Name and Password, type the administrator credentials.
-
On the Configuration tab, navigate to System > Licenses.
-
In the details pane, click Manage Licenses, click Add New License, and then select:
-
Use license access code: Citrix emails the license access code for the license that you purchased. Enter the license access code
LA-xxxxxxxxxx-xxxxxin the text box.
-
Use license access code: Citrix emails the license access code for the license that you purchased. Enter the license access code
-
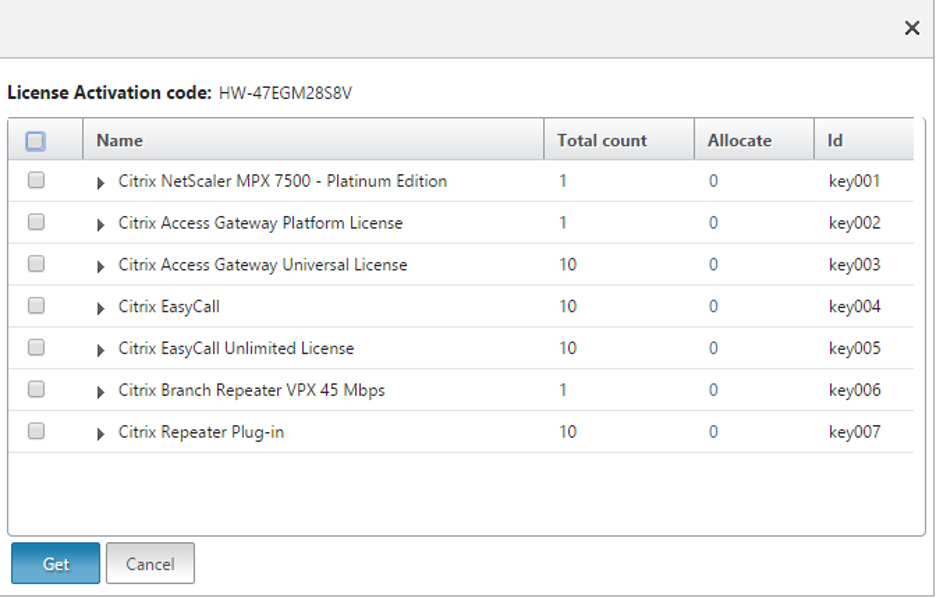
Click Get Licenses. The following dialog box appears.
-
Select the license file that you want to use to allocate your licenses.
-
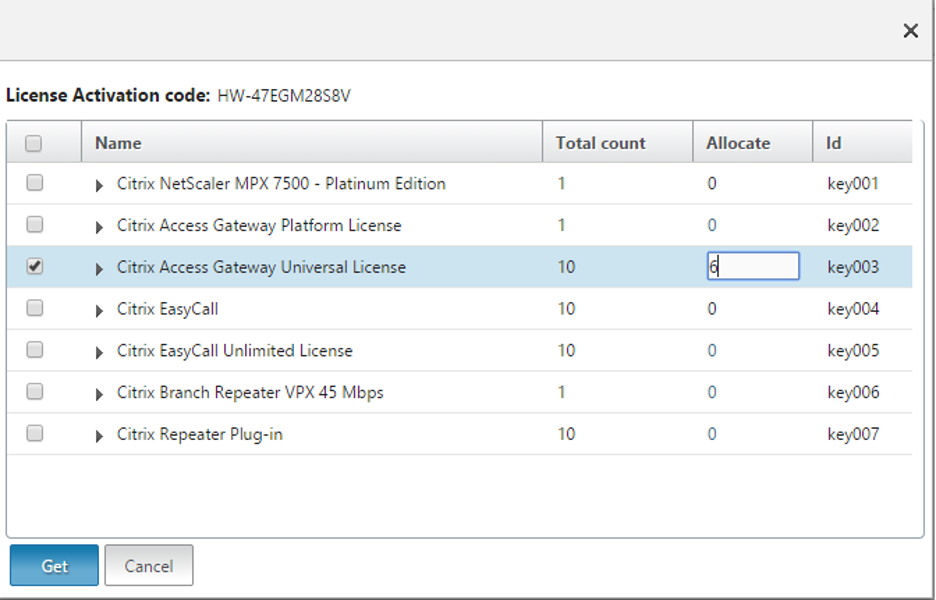
In the Allocate column, enter the number of licenses to be allocated, and click Get.
-
Enter the number of licenses, as seen in the following screenshot.
-
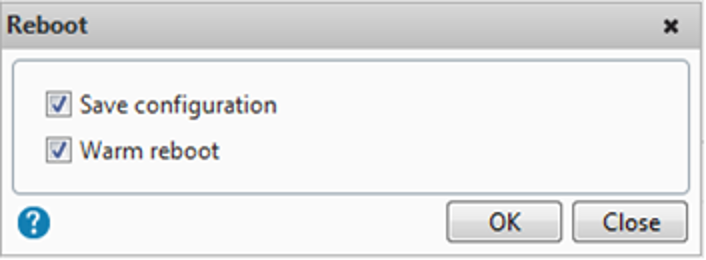
Click restart for the license to take effect.
-
In the Reboot dialog box, click OK to proceed with the changes, or click Close to cancel the changes.
-
After you install the license on the appliance, you must set the maximum number of users that are allowed to connect to the appliance. You set the maximum user count in the global authentication policy.
-
In the configuration utility, on the Configuration tab, in the navigation pane, expand Citrix Gateway and then click Global Settings.
-
In the details pane, under Settings, click Change authentication AAA settings.
-
In Maximum Number of Users, type the total number of users and then click OK.
The number in this field corresponds to the number of licenses contained within the license file. This number should be less than or equal to the total number of licenses installed on the appliance. For example, you install one license that contains 100 user licenses and a second license that contains 400 user licenses. The total number of licenses equals 500. The maximum number of users who can log on is equal to or less than 500. If 500 users are logged on, any user who attempts to log on is denied access until a user logs off or you terminate a session.
Manual installation
If your License Server or appliance does not have an internet access, you can manage licenses from www.citrix.com.
-
From a web browser, go to www.citrix.com.
-
Click Sign In > My Account and type your user ID and password.
-
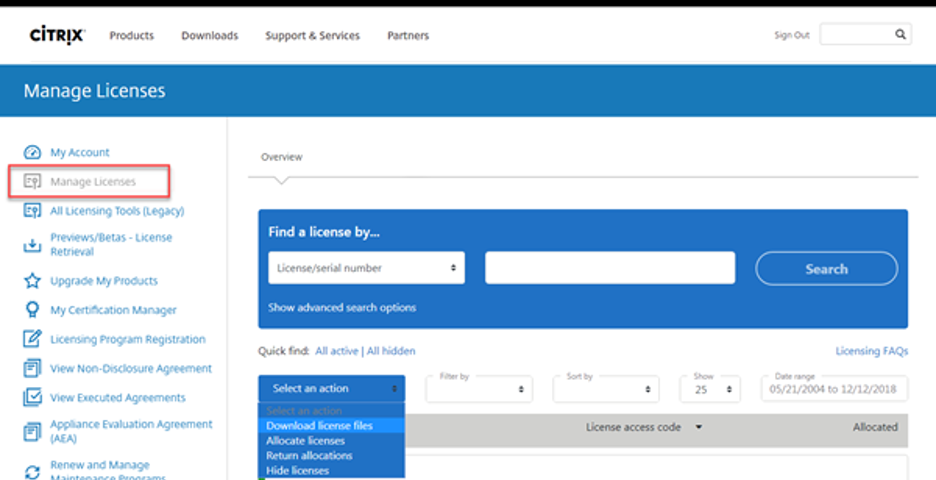
Select Manage Licenses.
-
Select the licenses you want to allocate. The landing page displays only new licenses within 30 days and expiring term licenses. You can use the Find a license by… search to find all licenses using one of the search criteria. Then use the Filter by menu to narrow the display down to specific types of licenses. You can select Quick find: All active to see all licenses.
-
From the Select an action menu, choose Allocate licenses.
-
Enter the host name (case sensitive) and how many licenses to allocate and click Create license file.
-
Select Yes, create license file.
-
Select Download license file, and save the file to a location accessible from your License Server or appliance.
-
In a web browser, type the IP address of the Citrix ADC appliance. For example,
http://192.168.100.1. -
In User Name and Password, type the administrator credentials.
-
On the Configuration tab, navigate to System Licenses.
-
In the details pane, click Manage Licenses.
-
Click Add New License, then select Upload license files from a local computer.
-
Click Browse. Navigate to the location of the license files, select the license file, and then click Open.
-
Click restart to apply the license.
-
In the Reboot dialog box, click OK to proceed with the changes, or click Close to cancel the changes.
Renew a license
You can download the renewed license file from Manage Licenses and then install the file on the appliance.
-
From a web browser, go to www.citrix.com.
-
Click Sign In > My Account and type your user ID and password.
-
Select Manage Licenses.
-
Select the renewed licenses you want to download. The landing page displays only new licenses within 30 days and expiring term licenses. You can use the Find a license by… search to find all licenses using one of the search criteria. Then use the Filter by menu to narrow the display down to specific types of licenses. You can select Quick find: All active to see all licenses.
-
From the Select an action menu, choose Download all licenses, and save the file to a temporary location. Remember the file name and location where you downloaded the file.
-
In a web browser, type the IP address of the Citrix ADC appliance. For example,
http://192.168.100.1. -
In User Name and Password, type the administrator credentials.
-
On the Configuration tab, navigate to System Licenses.
-
In the details pane, click Manage Licenses.
-
Click Add New License, then select Upload license files from a local computer.
-
Click Browse. Navigate to the location of the license files, select the license file, and then click Open.
-
Click restart to apply the license.
-
In the Reboot dialog box, click OK to proceed with the changes, or click Close to cancel the changes.