Personal vDisks
Citrix Virtual Apps and Desktops™ with Personal vDisk technology is a high-performance enterprise desktop virtualization solution. This software makes the VDI accessible to workers who require personalized desktops, by using pooled-static virtual machines.
Citrix Provisioning™ target devices that use personal vDisks are created using the Citrix Virtual Apps and Desktops Setup Wizard. Within a provisioning farm, the wizard creates target devices and adds target devices to an existing site’s collection. The wizard then assigns an existing virtual disk, which is in standard image mode, to that device.
The wizard also creates virtual machines to associate with each Citrix Provisioning target device. A catalog exists in Citrix Studio that allows you to preserve the assignment of users to desktops. The same users are assigned the same desktop for later sessions. In addition, a dedicated storage disk is created (before logon) for each user so they can store all personalization’s to that desktop (Personal vDisk). Personalizations include any changes to the virtual disk image or desktop that are not made as a result of an image update. These personalizations include application settings, adds, deletes, modifications, or documents. Target devices using personal vDisks can also be reassigned a different virtual disk if that virtual disk is from the same base virtual disk lineage.
Inventory is run when a virtual disk is configured or updated. The method selected to configure or update a virtual disk image for use as a Personal vDisk image determines when virtual disk inventory runs in your deployment. The following content identifies the different methods from which you can choose. It provides the high-level tasks associated with each method, and indicates at which point inventory runs for each method.
After configuring and adding a new Personal vDisk image, do not use your golden VM as the machine template. This process creates an unnecessary large disk as your write cache disk (the size of your original HDD).
Configure and deploy a new Personal vDisk image
Configuration methods include:
- Configure in the following order: Citrix Provisioning, then capture the image, then Citrix Virtual Apps™ and Desktops
- Configure in the following order: Citrix Provisioning, then Citrix Virtual Apps and Desktops, then capture the image
- Configure in the following order: Citrix Virtual Apps and Desktops, then Citrix Provisioning, then capture the image
- Configure using Machine Creation Services™ (MCS)
Citrix Provisioning, then capture image, then XenDesktop®
- Install and configure the OS on a VM.
- Install the Citrix Provisioning target device software on the VM.
- Run the Citrix Provisioning Imaging Wizard to configure the virtual disk.
- Reboot.
- The Citrix Provisioning Image Wizard’s second stage runs to capture the Personal vDisk image.
- In the Citrix Provisioning console, set the target device to boot from the virtual disk.
- Configure the VM to boot from the network, then reboot.
- Install Citrix Virtual Apps and Desktops software on the VM, then configure with advanced options for Personal vDisk.
- Manually run inventory, then shut the VM down.
- In the console, place the virtual disk in Standard Image Mode. Image is ready for deployment.
Citrix Provisioning, then Citrix Virtual Apps and Desktops, then capture image
- Install and configure the OS in a VM.
- Install the Citrix Provisioning target device software on the VM.
- Install Citrix Virtual Apps and Desktops software and configure with advanced options for personal vDisks enabled.
- Reboot.
- Log on to the VM.
- Run the Citrix Provisioning Imaging Wizard on the VM to configure the virtual disk. (Inventory automatically runs after the VM successfully shuts down and reboots.)
- The Imaging Wizard’s second stage runs to capture the Personal vDisk image.
- Shut the VM down.
- In the console, place the Personal vDisk image in Standard Image Mode. The Personal vDisk is ready for deployment.
-
Before using a VM template to provision multiple VMs to a Citrix Virtual Apps and Desktops site, verify the new virtual disk can successfully boot from the VM. This VM was created to serve as the machine template (not the golden VM). It is used to verify that the write cache disk is recognized successfully:
a. Place the virtual disk image in Private Image mode.
b. Boot the new virtual disk image from the VM.
c. Format the new write cache partition manually.
d. Shut down the VM. During the shut-down process, when prompted run Personal vDisk inventory.
e. Turn this VM into a template.
Citrix Virtual Apps and Desktops, then Citrix Provisioning, then capture image
- Install and configure the OS in a VM.
- Install Citrix Virtual Apps and Desktops software on the VM, then configure with advanced options for Personal vDisk enabled.
- Reboot.
- Log on to, then shutdown the VM. Inventory automatically runs at shutdown.
- Log on to, then install the Provisioning Service’s target device software.
- Run the Citrix Provisioning Imaging Wizard on the VM to configure the virtual disk.
- Reboot. (Inventory automatically runs after the VM successfully shuts down and reboots.)
- The Imaging Wizard’s second stage runs to capture the Personal vDisk image.
- Shut the VM down.
- Place the virtual disk in Standard Image Mode. The Personal vDisk is ready for deployment.
-
Before using a VM template to provisioning multiple VMs to a Citrix Virtual Apps and Desktops site, verify the new virtual disk can successfully boot from the VM. This VM was created to serve as the machine template (not the golden VM). It is used to verify that the write cache disk is recognized successfully:
a. Place the virtual disk image in Private Image mode.
b. Boot the new virtual disk image from the VM.
c. Format the new write cache partition manually.
d. Shut down the VM. During the shut-down process, when prompted run Personal vDisk inventory
e. Turn this VM into a template.
To configure MCS
- Install and configure the OS in an MCS VM.
- Install Citrix Virtual Apps and Desktops software and configure with advanced options for personal vDisks.
- Reboot the VM.
- Log on to the VM, and then shut the VM down. Inventory automatically runs at shutdown.
- The Personal vDisk image is ready for deployment.
Update an existing Personal vDisk image
Updating existing Personal vDisk methods include using:
- Citrix Provisioning
- MCS
Updates for both Citrix Provisioning and MCS must be done on VMs that do not have a Personal vDisk.
Citrix Provisioning
- Create a version of the virtual disk image.
- Boot the VM from the virtual disk image in Maintenance Mode.
- Install updates on the new virtual disk version.
- Shut the VM down. Inventory runs automatically when the VM shuts down.
- Promote the new version to either Test or Production. Other VMs will have access to the updated virtual disk version the next time they reboot.
MCS
- Boot the golden VM.
- Install updates on the VM.
- Shut the VM down. Inventory automatically runs when the VM is shut down.
For information on creating a Citrix Provisioning target device that uses a Personal vDisk, see Deploy virtual desktops to VMs using the Citrix Virtual Apps and Desktops Setup Wizard. To view the properties of a target device configured to use a Personal vDisk, see Configure target devices that use personal vDisks.
Creating a machine catalog with on-premises provisioning servers
Using the Cloud DDC, you can create a machine catalog and choose to deploy machines using Citrix Provisioning and point it at a provisioning collection. The machines within this collection must all have AD accounts associated with them. The PowerShell snap-in used by the cloud DDC gets the device records from the provisioning database, then looks up the domain SIDs in those device records. If the device record does not contain a domain SID, then the snap-in tries to talk to AD directly. This process fails because that domain does not exist in the cloud.
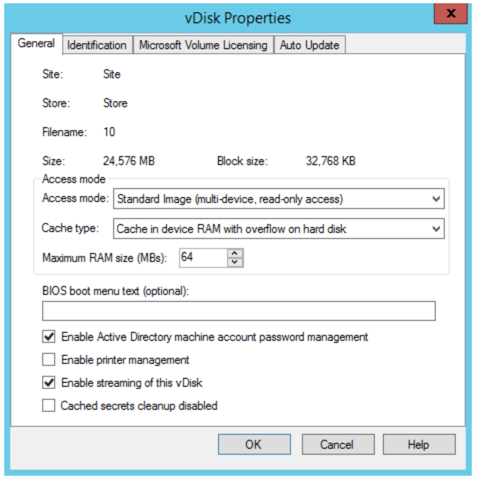
Using the console to view virtual disk properties
In the console, the vDisk Properties dialog allows you to modify virtual disk configuration settings. To view an existing virtual disk’s properties, choose one of the following methods:
- Highlight a virtual disk in the console, then select Properties from the Action menu.
- Right-click on the virtual disk in the console, then select Properties.
-
Double-click on the virtual disk in the console’s details pane.
Note:
The Cache on hard disk feature option currently appears in the product but does not function.
General tab
The following list describes each menu option on the General tab:
- Site: The name of the site where this virtual disk is a member of its virtual disk Pool. This property cannot be modified in this dialog.
- Store: The name of the store where the virtual disk resides. This property cannot be modified in this dialog.
- Filename: The file name that was given to this virtual disk when it was created. This property cannot be modified in this dialog.
- Size: The file size of this virtual disk.
- Access mode: Access mode options.
-
Select the vDisk access mode:
- Standard Image (multi-device, read only access with write cache options)
- Private Image for use with a single target device, which has read and write access.
- Local Hard Disk Drive (read/write)
-
Select the cache type: For Standard Image only, select the write cache type:
- Cache on the device hard drive (NTFS file format)
- Cache on device hard drive persisted (experimental stage only)
- Cache in device RAM
- Cache on device RAM with overflow on hard disk
- Cache on server
- Cache on server persisted
- Select the cache size (MBs): If you select Standard Image and Cache in target device RAM, select the cache size in MB. Default is 4096. For 32-bit systems, the registry determines the max size of the RAM write cache setting WcMaxRamCacheMB in the BNIStack Parameters. This entry is a DWORD parameter. The default value used is 3584 MB.
-
BIOS menu text: This field is optional and allows you to enter a menu text that displayed on the target device when that device starts. The user can then select which virtual disk to boot from.
Important:
If vDisks with the same name from different Stores are assigned to the same target device, they display as duplicate names in the menu. A virtual disk has the same name unless different menu text or descriptions are provided.
- Enable Active Directory machine account password management: Enables the Active Directory password management features. If your target devices belong to a domain and share a virtual disk, see the Active Directory section on the Options tab of the Server Properties dialog.
- Enable printer management: Enables the printer management option if you are not using a different printer system that installs valid printers on each target device. To view printer details for an individual target device, see the Target Device Properties virtual disk tab, then click the Printers button.
- Enable streaming of this vDisk: Enables this virtual disk to be streamed to target devices.
Identification tab
The following list describes each menu option on the Identification tab:
- Description: Provides a description for this virtual disk.
- Date: For informational use only. Initially set to a string representing the creation date of the image file.
- Author: For informational use only. Set as appropriate for your installation.
- Title: For informational use only. Set as appropriate for your installation.
- Company: For informational use only. Set as appropriate for your installation.
- Internal name: For informational use only. Set as appropriate for your installation.
- Original file: For informational use only. Set as appropriate for your installation.
- Hardware target: For informational use only. Set as appropriate for your installation.
Microsoft volume licensing tab for virtual disk file
The following menu option appears on the Microsoft volume licensing tab:
Note:
The virtual disk license mode must be set before target devices can be activated.
-
Microsoft volume licensing: If using Microsoft Key Management Server (KMS) or MAK volume licenses for target devices using this virtual disk image, select that licensing option that follows. Otherwise, select None:
- None
- Key Management Service (KMS)
- Multiple Activation Key (MAK)
Note:
In order for MAK licensing to work, the Volume Activation Management Tool (VAMT) must be installed on all login servers within the farm. This tool is available from Microsoft.
Auto update tab
The following list describes each menu option on the Auto update tab:
Note:
This virtual disk update method can only be used on a base disk that has no VHDX versions associated with it.
- Enable automatic updates for this vDisk: Enables the Automatic Disk Update process on this virtual disk file.
- Class: Enter a class to associate to the virtual disk file. This field is used with Automatic Disk Update and the Managed Disk Feature to match new virtual disk file to the appropriate target devices. Up to 40 characters can be entered.
- Type: Enter a type to associate with the virtual disk file. This field is used in Automatic Disk Update, to match the new virtual disk file to the old file. Up to 40 characters can be entered.
-
Major #, Minor #, Build #: If the new virtual disk version is greater than the old image version, the virtual disk image is replaced for matching Class and Type images. Precedence is: Major, then Minor, then Build.
Note:
During the update process, if several vDisks exist with the same version number because the version number was not incremented, Citrix Provisioning uses the first updated virtual disk presented in the list.
- Serial #: Initially set to a random Globally Unique Identifier (GUID).The user can set the serial number as needed. The serial number is used to ensure that a delta file is applied to the correct virtual disk image file.
Configuring the virtual disk access mode
Use the console to select from the following virtual disk access modes:
- Standard Image: Select this mode when sharing a virtual disk with multiple target devices, with write-cache options enabled.
- Private Image: Select this mode if a virtual disk is only used by a single target device, with read/write access is enabled.
Standard image mode
Standard image mode allows multiple target devices to stream from a single virtual disk image at the same time. This mode reduces the amount of virtual disk management and reduces storage requirements.
When a virtual disk is configured to use standard image mode, it is set to read-only mode. Each target device then builds a write cache to store any writes the operating system needs to make. There are several write-cache options available. Because the virtual disk is read-only, each time a target device starts, it always starts from a clean virtual disk. If a machine becomes infected with a virus or spyware, the target device only needs to reboot the image.
When updates are made to a virtual disk in standard image mode, changes against the base virtual disk image are captured in a differencing disk file, .avhdx, resulting in a new version of the base image. Each new version remains directly associated with the base image. Versioning stages the updates captured in the differencing disk before those changes become available to production devices. If issues are encountered with a version, that version can be reverted. For details on versioning, see Updating virtual disks.
Although each target device uses the same virtual disk, Citrix Provisioning personalizes the streamed image for each target device. This process provides the information needed to ensure the device is uniquely identifiable on the network. You can also specify extra personality settings for each device: you can store application-specific values in the database and retrieve the target device’s unique value as the device loads. For more details, see Managing Target Device.
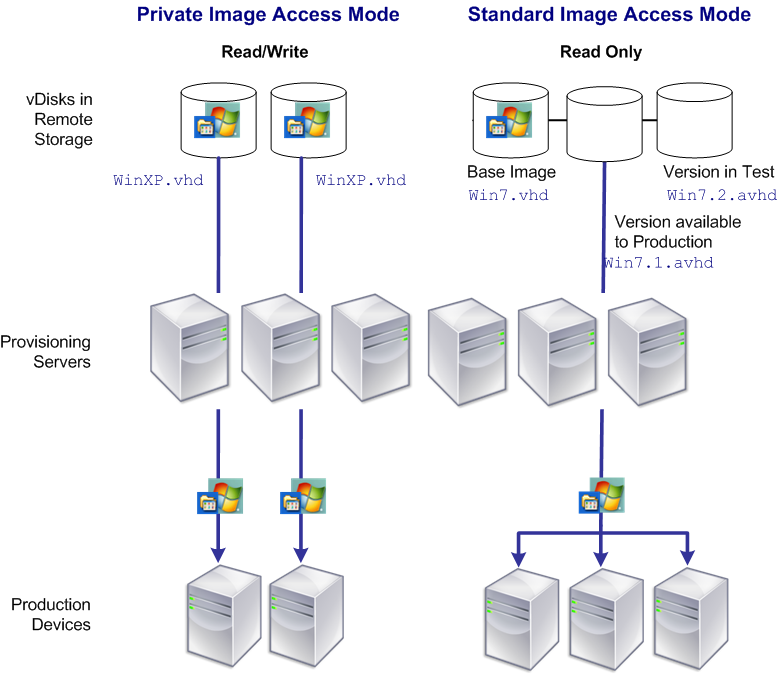
Private image mode
A virtual disk that is in Private Image mode closely models how a computer uses a regular hard drive. That is, only one target device can use a Private Image virtual disk at a time.
The following illustrates how Private Image vDisks (read/write) that are each assigned to a single production device. A Standard Image virtual disk (read-only) is assigned to and shared by a collection of production devices. For Standard Image vDisks, write cache options include cache on server disk, on a device’s hard disk drive, or in the device’s RAM.
To configure the virtual disk mode and any applicable write cache destination
Note:
Only write cache destinations that are supported for Standard access mode appear enabled.
- In the console, right-click on the virtual disk for which you want to configure the virtual disk access mode, then select vDisk Properties. The vDisk Properties dialog appears.
- Click the General tab, then select the image mode (Standard or Private) that applies to this virtual disk from the Access Mode menu.
- If Standard image was selected, from the cache destination menu, select the appropriate write cache destination.
- Click OK to exit the vDisk Properties dialog.