Target devices
A device, such as desktop computer or server, that boots and gets software from a virtual disk on the network is considered a target device. A device that is used to create the virtual disk image is a considered a master target device.
The lifecycle of a target device includes:
- Preparing
- A Master target device used for creating a virtual disk image
- A target device that boots from a virtual disk image
- Adding target devices to a collection in the farm
- From the Console
- Using Auto-Add
- Importing
- Assigning the target device type
- Maintaining target devices in the farm
After a target device is created, the device must be configured to boot from the network. The device must be configured to allow it to boot from the network. Also, a virtual disk must be assigned to the device, and a bootstrap file must be configured to provide the information necessary for that device to boot from the assigned virtual disk.
There are several types of target devices within a farm. For example, while a device is being used to create a virtual disk image, it is considered a Master target device. All other devices are configured as a particular device type. The device Type determines a devices current purpose, and determines if that device can access a particular virtual disk version that is in production, test, or maintenance.
The device Type is selected on the General tab of the Target Device Properties dialog, which includes the following options:
- Production: Select this option to allow this target device to stream an assigned virtual disk that is currently in production, the default.
- Maintenance: Select this option to use this target device as a maintenance device. Only a maintenance device can access and alter a virtual disk version that is in maintenance mode. Only the first maintenance device to boot the version while in maintenance mode is allowed to access that version.
- Test: Select this option to use this target device to access and test differencing disk versions that are currently in test mode.
A target device becomes a member of a device collection when it is added to the farm. The use of device collections simplifies the management of all target devices within that collection. A target device can only be a member in one device collection. However, a target device can exist in any number of views. If a target device is removed from the device collection, it is automatically removed from any associated views.
When target devices are added to a collection, that devices properties are stored in the Citrix Provisioning database. Target device properties include information such as the device name and description, boot method, and virtual disk assignments (see Target device properties for details).
Target devices are managed and monitored using the Console and Virtual Disk Status Tray utilities.
In the Citrix Provisioning™ console, actions can be performed on:
- An individual target device
- All target devices within a collection
- All target devices within a view
Target device properties
Note:
A reboot is required if a target device is active when modifications are made to any of the following device properties: Boot from, MAC, Port, vDisks for this device.
The following tables define the properties associated with a target device.
General tab
| Field | Description |
|---|---|
| Name | The name of the target device or the name of the person who uses the target device. The name can be up to 15 bytes in length. However, the target device name cannot be the same as the machine name being imaged. Note: If the target device is a domain member, use the same name as in the Windows domain. Use the same name unless that name is the same as the machine name being imaged. When the target device boots from the virtual disk, the name entered here becomes the target device machine name. |
| Description | Provides a description to associate with this target device. |
| Type | Select the access type for this target device from the menu, which includes the following options: Maintenance - Select this option to use this target device as a maintenance device which applies updates to a new maintenance version of a virtual disk. A maintenance device has exclusive read-write access to a maintenance version. Test - Select this option to use this target device to access versions that are in test mode. Test devices have shared read-only access to the test versions of a virtual disk to facilitate QA testing of a virtual disk version in standard image mode. Perform this task before releasing that version to production machines. Production - Select this option to allow the target device to stream an assigned virtual disk that is currently in production. Production devices have shared, read-only access to production versions of a virtual disk. Production devices do not have access to maintenance or test versions. This prevents untested updates from accidentally being deployed on production machines. Note: The default Type for a new device is maintenance. The default type for an existing device is maintenance. |
| Boot from | The boot method used by this target device. Options include booting from a virtual disk, hard disk, or floppy disk. |
| MAC | Enter the media access control (MAC) address of the NIC that is installed in the target device. |
| Port | Displays the UDP port value. In most instances, you do not have to change this value. However, if target device software conflicts with any other IP/UDP software, that is, they are sharing port, you must change this value. |
| Class | Class used for matching new vDisks to target devices when using automatic disk image update to match new vDisks images to the appropriate target devices. |
| Disable this device | Enable this option to prevent target devices from booting. Regardless if enabled or disabled, new target devices that are added using Auto-add, have records created in the database. |
vDisks tab
| Field | Description |
|---|---|
| vDisks for this device | Displays the list of virtual disk assigned to this target device, including the following options: Click Add to open the Assign vDisks dialog. To filter the displayed vDisks, select a specific store name and Provisioning Server or select All Stores and All Servers. This process lists all vDisks available to this target device. Highlight the vDisks to assign, then click OK. Click Remove to remove vDisks from this device. |
Personality tab
| Field | Description |
|---|---|
| Options | Provides secondary boot options: Include the local hard drive as a boot device; Include one or more custom bootstraps as boot options. If enabling a custom bootstrap, click Add, to enter the bootstrap file name and the menu text to appear (optional), then click OK. If more than one virtual disk is listed in the table or if either (or both) secondary boot options are enabled, you are prompted with a disk menu when it is booted. Enter a menu option name to display to the target device. The target device can select which boot options to use. Click Edit to edit an existing custom bootstrap’s file name or menu text. Click Remove to remove a custom bootstrap file. |
| Name and string | There are no fixed limit to the number of names you can add. However, the maximum name length is 250 characters and the maximum value length is 1000 characters. Use any name for the field Name, but do not repeat a field name in the same target device. Field names are not case sensitive. In other words, the system interprets FIELDNAME and fieldname as the same name. Blank spaces entered before or after the field name are automatically removed. A personality name cannot start with a $. This symbol is used for reserved values such as $DiskName and $WriteCacheType. |
Status tab
| Field | Description |
|---|---|
| Target device status | The following target device status information appears: Status - current status of this device (active or inactive); IP Address - provides the IP Address or ‘unknown’; Server - the provisioning server that is communicating with this device; Retries - the number of retries to permit when connecting to this device; vDisk - provides the name of the vDisk or displays as ‘unknown’; vDisk version - version of this vDisk currently being accessed; vDisk full name - the full file name for the version currently being accessed; vDisk access - identifies if the version is in production, maintenance, or test; License information - depending on the device vendor, displays product licensing information including; n/a, Desktop License, Datacenter License, or Citrix Virtual Apps and Desktops License. |
Logging tab
| Field | Description |
|---|---|
| Logging level | Select the logging level or select Off to disable logging: Off – Logging is disabled for this provisioning server. Fatal – logs information about an operation that the system might not recover from; Error log information about an operation that produces an error condition; Warning – logs information about an operation that completes successfully, but there are issues with the operation; Info – Default logging level. Logs information about workflow, which generally explains how operations occur. Debug – logs details related to a specific operation and is the highest level of logging. If logging is set to DEBUG, all other levels of logging information are displayed in the log file. Trace – logs all valid operations. |
Setting the target device as the template for this collection
A target device can be set as the template for new target devices that are added to a collection. A new target device inherits the properties from the template target device, which allows you to quickly add new devices to a collection.
Tip
Target devices using virtual disks are created and added to a collection when running the Citrix Virtual Apps and Desktops™ Setup Wizard. If a target device template exists, it is ignored when the target device using a virtual disk is added to the collection.
To set a target device as the template device for a collection, in the console, right-click on the target device, then select the Set device as template option.
Consider the following when using templates:
- Disable the target device that serves as the template. Disabling it adds all target devices using this template to the database, but does not permit the target device to boot.
- Target devices receive a message requesting that they first contact the administrator before being allowed to boot.
- T appears in light blue on the device serving as the template. New target devices automatically have a name generated and all other properties are taken from the default template target device. No user interaction is required.
Creating a VM with nested virtualization
Sometimes, you want to create a nested virtualization paradigm for a VM. If your environment uses Device Guard and you want to create a template from the VM running it, consider that Citrix Provisioning is unaware that it was set up for that particular VM. To resolve this issue, manually enable Device Guard on the Hyper-V host using a PowerShell command. Perform this operation after the VM has been created using the Citrix Virtual Apps™ and Desktops Setup Wizard.
To configure a VM to use Device Guard:
- Create the VM using the Citrix Virtual Apps and Desktops Setup Wizard.
-
After creating the VM, execute the following command for each VM on the physical Hyper-V host to enable nested virtualization:
Set-VMProcessor -VMName <Target VM's Name> -ExposeVirtualizationExtensions $true
Tip:
See the Microsoft site for more information about nested virtualization.
Copying and pasting target device properties
To copy the properties of one target device, and paste those properties to other target device members:
Note: Target devices that use virtual disks can only inherit the properties of another target device that uses one.
- In the Citrix Provisioning console’s Details pane, right-click on the target device that you want to copy properties from, then select Copy device properties. The Copy Device Properties dialog appears.
- Select the check box next to the properties that you want to copy, then click Copy. The properties are copied to the clipboard and the dialog closes.
- Right-click on one or more target devices that inherit the copied properties, then select the Paste menu option. The Paste Device Properties dialog appears.
- Click Close to close the dialog.
Booting target devices
- Right-click on a collection to boot all target devices in the collection. Or, highlight only those target devices that you want to boot within the collection tree, then select the Boot devices menu option. The Target Device Control dialog displays with the Boot devices menu option selected in the Settings menu.
- Click the Boot devices button to boot target devices. The Status column displays the Boot Signal status until the target device successfully receives the signal, then status changes to Success.
Checking a target device’s status from the console
The target device status indicates whether it is active or inactive on the network.
To check the status of a target device:
- Double-click on the target device in the console window, then select the Properties menu option. The Device Properties tab appears.
- Select the Status tab and review the following status information:
- Status, active, or inactive
- IP address
- Current provisioning server
- Current virtual disk name
- Provisioning server cache file size in bytes If the target device is active in the console window, the target device icon appears as a green computer screen. If the target device is inactive, the icon appears as a black computer screen.
Sending messages to target devices
To send a message to target devices members:
-
Right-click on the collection to send a message to all members within the collection. Or, highlight only those target devices within the collection that receive the message, then select the Send message menu option. The Target Device Control dialog displays with the Message to devices menu option selected in the Settings menu. Target devices are displayed in the Device table.
- Type a message to display on target devices in the Message text box.
- Click the Send message button. The Status column displays the Message Signal status until target devices successfully receives the message, the status changes to Success.
Shutting down target devices
To shut down target devices:
- Right-click on the collection to shut down all target devices within the collection. Or, highlight only those target devices to shut down within a collection, then select the Shutdown devices menu option. The Target Device Control dialog displays with the Shutdown devices menu option selected in the Settings menu. Target devices display in the Device table.
- Type the number of seconds to wait before shutting down target devices in the Delay text box.
- Type a message to display on target devices in the Message text box.
- Click the Shutdown devices button to shut down target devices. The Status column displays the shutdown signal status until the target device shuts down. As each target device successfully shuts down, the status changes to Success.
Restarting target devices
To restart target devices:
- Right-click on a collection in the console tree or highlight only those target devices you want to restart within the collection. Select the Restart devices menu option. The Target Device Control dialog displays with the Restart devices menu option selected in the Settings menu. Target devices display in the Device table.
- Type the number of seconds to wait before restarting target devices in the Delay text box.
- Type a message to display on target devices in the Message text box.
- Click the Restart devices button to restart target devices. The Status column displays the Restart Signal status until the target device successfully receives the signal, then status changes to Success.
Moving target devices between collections
A target device can be moved from one collection to another collection within a site by dragging it into the console’s Details pane. Drag the device from one collection, then drop the device into another collection. Alternatively, target devices can be moved using the Move menu option.
To move a target device using the Move menu option:
- In the console, expand the collection, right-click on the target device in the Details pane, then select the Move menu option.
- From the menu, select the collection to move this target device into. If necessary, apply the collection’s device template to the target device being moved by enabling the option Apply target collection’s template device properties.
- Click Move.
Tip:
There is a risk that moving target devices from site to site can cause them to be deleted in the future. This risk increases if the target device was created using the Streamed VM Setup Wizard. You can use the interface to move target devices from one site to another site, however, Citrix® recommends that you avoid moving them from site to site using this method.
Managing target device personality
Normally, all target device’s sharing virtual disk must have identical configurations. The Target Device Personality feature allows you to define data for specific target devices and make it available to the target device at boot time. This data is used by your custom applications and scripts for various purposes.
The number of fields and amount of data that you can define for each target device is limited to 64 Kb or 65,536 bytes per target device. Each individual field contains up to 2,047 bytes.
Target device personality tasks
- Define personality data for a single target device using the console
- Define personality data for multiple target devices using the console
- Using target device personality data
Define personality data from a single target device using the console
To define personality data for a single target device:
- In the Console, right-click on the target device that you want to define personality data for, then select the Properties menu option.
- Select the Personality tab.
- Click the Add button. The Add/Edit Personality String dialog appears. Note: There is no fixed limit to the number of field names and associated strings you can add. However, the total amount of personality data assigned to a single string, names, and data, combined, is approximately 2,047 bytes. Also, the total amount of data contained in names, strings and delimiters is limited to approximately 64 Kb or 65,536 bytes per target device. This limit is checked when you attempt to add a string. If you exceed the limit, a warning message displays and you are prevented from creating an invalid configuration. Target device personality data is treated like all other properties. This data is inherited when new target devices are added automatically to the database. This inheritance occurs using the Add New Target Device Silently option, or with the Add New Target Device with BIOS Prompts option.
- Enter a name and string value. Note: You can use any name for the field. Name, but you cannot repeat a field name in the same target device. Field names are not case sensitive. In other words, the system interprets FIELDNAME and fieldname as the same name. Blank spaces entered before or after the field name are automatically removed. A personality name cannot start with a $. This symbol is used for reserved values such as $DiskName and $WriteCacheType.
- Click OK.
To add more fields and values, repeat Steps 5 and 6 as needed. When finished adding data, click OK to exit the Target Device Properties dialog.
Define personality data for multiple target devices using the console
Define target device personality for multiple devices:
- In the console, right-click on the target device that has the personality settings that you want to share with other device, then select Copy. The Copy device properties dialog appears.
- Highlight the target devices in the Details pane that you want to copy personality settings. Right-click and select the Paste device properties menu.
- Click the Personality strings option, or, alternately choose to copy other properties. Click Paste.
Using target device personality data
Once the file system becomes available to the target device, the personality data is written to a standard Windows .ini text file called Personality.ini. The file is stored in the root directory of the virtual disk file system, your custom scripts or applications access this file.
The file is formatted as follows:
    `[StringData]
    FieldName1=Field data for first field
    FieldName2=Field data for second field`
This file is accessible to any custom script or application and is queried by the standard Windows .INI API. Also, a command line application, called GetPersonality.exe, permits easier batch file access to the personality settings.
A target device’s virtual disk name and mode can be retrieved using GetPersonality.exe. The following reserve values are included in the [StringData] section of the Personality.ini file:
    $DiskName=<xx>
    $WriteCacheType=<0 (Private image)
    All other values are standard image; 1 (Server Disk), 2 (Server Disk Encrypted), 3 (RAM), 4 (Hard Disk), 5 (Hard Disk Encrypted), 6 (RAM Disk), or 7 (Difference Disk). Min=0, Max=7, Default=0>
The xx field is the name of the disk. A virtual disk name cannot start with a $. This symbol is used for reserved values such as $DiskName and $WriteCacheType. The following message displays if a name that starts with $ is entered:
A name cannot start with a $. This is used for reserve values like $DiskName and $WriteCacheType. The $DiskName and $WriteCacheType values can be retrieved on the target device using GetPersonality.exe.
GetPersonality.exe
The command line utility GetPersonality.exe allows users to access the Target Device Personality settings from a Windows batch file. The program queries the INI file for the user and places the personality strings in the locations chosen by the user. GetPersonality.exe supports the following command line options:
    `GetPersonality FieldName /r=RegistryKeyPath <- Place field in registry
    GetPersonality FieldName /f=FileName <- Place field in file
    GetPersonality FieldName /o <- Output field to STDOUT
    GetPersonality /? or /help <- Display help`
Setting environment variables
Setting environment variables with personality data is a two-step process:
- Use the GetPersonality command with the /f option to insert the variable into a temporary file.
-
Use the set command to set the variable. For example, to set the environment variable Path statement for the target device a personality name, define the Pathname with the string value:
`%SystemRoot%;%SystemRoot%\System32\Wbem;C:\Program Files\Microsoft Office\OFFICE11\;C:\Program Files\Microsoft SQL Server\80\Tolls\Binn`The
/foption creates a temporary file, allowing for a name to be assigned, in this casetemp.txt. The following lines are included in the batch file:`GetPersonality Pathname /f=temp.txt set /p Path= <temp.txt`Note:
If the file name specified with the
/foption exists, Get Personality does not append the line to the file. Instead, the existing line is overwritten in the file.
Changing the device status to down
Occasionally, a target device displays as active when it is down. This situation occurs when the status record is not refreshed properly in the database. To change the target device’s status in the database to down, Complete the following steps:
- In the console, right-click on the target device marked as down, then select the Mark Device Down option. A confirmation dialog appears.
- Click OK to mark the device as down.
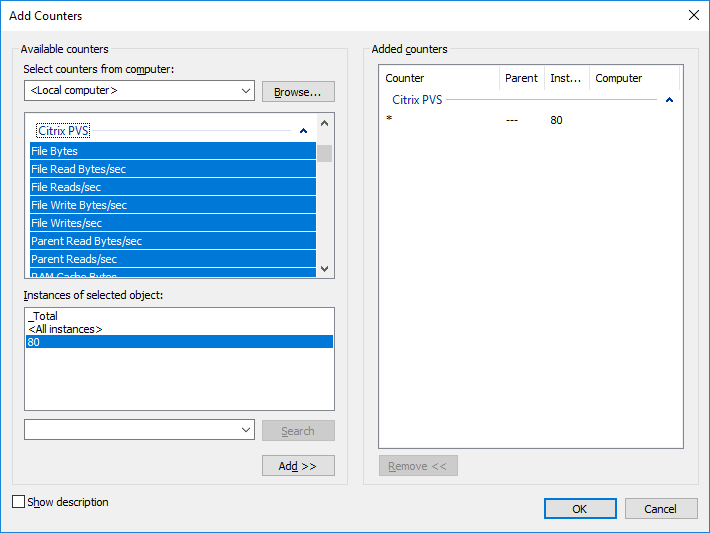
Support for windows performance counters
Citrix Provisioning target devices provide Windows performance counters for each storage tier:
- RAM cache
- VHDX file
- network streaming
Using these performance counters, you can monitor target device streaming IOPS, bandwidth usage, current RAM usage, and VHDX file size.
Boot Device Management support for UEFI using the Citrix Virtual Apps and Desktops Setup wizard
UEFI BDM integrates with the Citrix Virtual Apps and Desktops Setup wizard, which allows you to set the BDM boot option to target UEFI firmware. With this support, Citrix Provisioning supports booting from:
- ISO
- USB
- Boot partitions
Consider the following:
- BDM support for UEFI can only be used by a provisioned VM with a BDM partition.
- This functionality uses the Citrix Provisioning server IP address in the bootstrap of the server to which the user is connected.
- BDM partition booting is a single stage BDM.
With this BDM support, the following new templates are included:
- BIOS (Generation 1 VMs) uses
BDMTeamplate.vhd. - UEFI (Generation 2 VMs) uses
BDMTemplate.vhdx. These VMs are typically used for HDX integration with UEFI.
This functionality does not require PXE, TFTP, or TSB.
Tip:
During UEFI boot, Provisioning server information is displayed in verbose mode without any additional configuration data.
Setting a target device for UEFI firmware
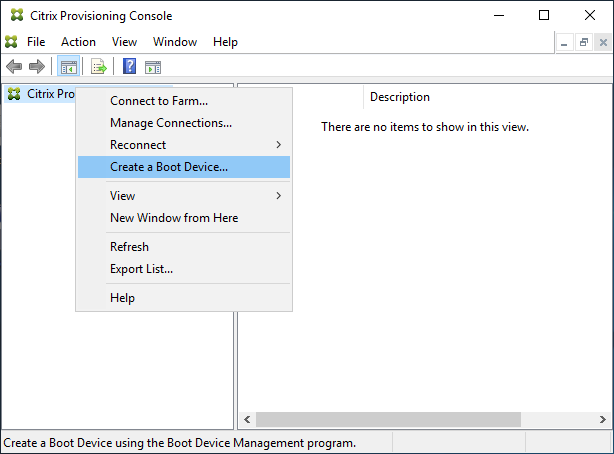
To use the BDM boot partition:
- Select the Citrix Provisioning Console node and right-click to display a context menu.
- In the context menu, select Create a Boot Device.
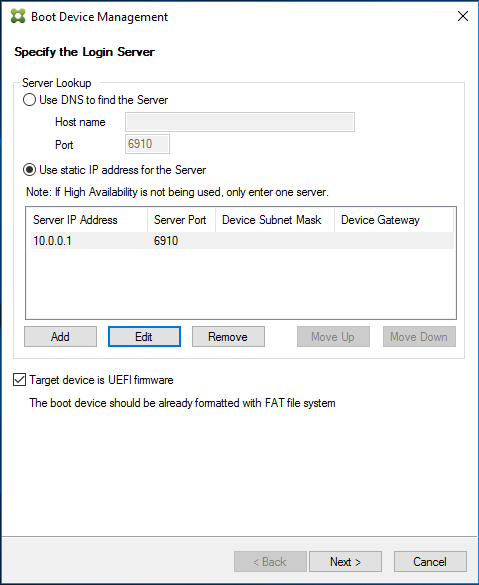
In the Boot Device Management screen:
- Select Target device is UEFI firmware.
- Click Next.
You can access these options without connecting to a Citrix Provisioning server. BDM.exe provides a shortcut in the Start menu. See Server lookup using DHCP to retrieve the device IP address for more information.
Tip:
You can update the BDM partition, with server information and options, using the available bootstrap.
Server look up using DHCP to retrieve the device IP address
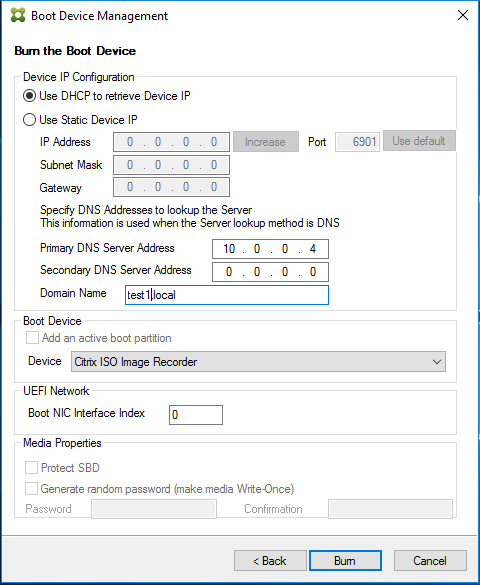
When specifying a login server, you have the option to use either DNS to locate a server, or you can specify a static IP address to identify a server. If the server lookup method is set to Use DNS to find a Server, you can set extra UEFI options, including:
- UEFI network. Use this option to set the boot NIC interface index value. By default, this value is set to 0. This value represents the first NIC.
- Boot Device. Select the Add an active boot partition check box, and use the drop-down menu to select from the following device options:
- Citrix ISO Image Recorder. This is the default choice for UEFI networks.
- USB. Use this device option if a USB drive is connected to the Provisioning server.
- HDD. When the boot device is a directly connected hard disk drive.
After specifying BDM configuration options, click Burn to create a BDM device.
Important:
Citrix recommends that you do not use HDD as a boot option when connected to the Provisioning server.
Updating a BDM partition
A BDM partition can only be upgraded if it is created using the Citrix Virtual Apps and Desktops Setup wizard in one of three ways:
- Using a collection.
- Specifying a group of highlighted devices.
- Using a single device.
Note:
Provisioned devices must be turned off when updating a BDM boot partition.
The BDM boot partition upgrade does not require PXE, TFTP, or TSB. It’s considered a single stage bootloader. At boot time it automatically finds all relevant Provisioning server information and does not need external services provided by PXE, TFTP, or TSB.
When using a BDM partition, consider the following:
- This functionality is similar to actions such as waking on a LAN or to shut down on a provisioned client. Stop or close long running processes at any time. If you close, or otherwise halt a process, it continues to run in the background.
- A BDM boot partition is considered a single state partition, as a result, BDM boot times are fast, or faster, than conventional PXE-based boot times.
To update BDM partitions:
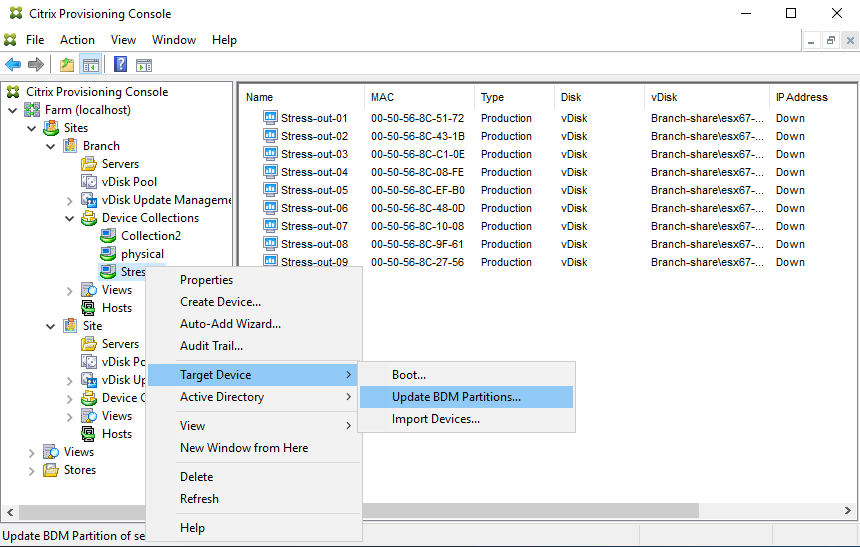
- In the Citrix Provisioning Console, expand Device Collections.
- Select the appropriate BDM update. Right-click to expose a context menu.
- In the context menu, select Target Device, then select Update BDM Partitions.
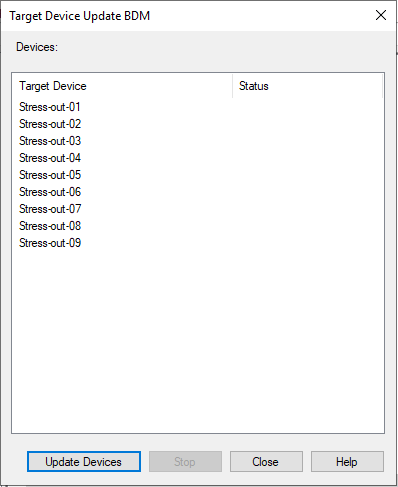
In the Target Device Update BDM screen:
- Click Update Devices. Once selected, Citrix Provisioning begins updating all target devices with the BDM update.
- Click Stop to immediately halt the update process.
- Click Close to dismiss the Target Device Update BDM screen. The process continues to run in the background.
In this article
- Target device properties
- General tab
- vDisks tab
- Personality tab
- Status tab
- Logging tab
- Setting the target device as the template for this collection
- Creating a VM with nested virtualization
- Copying and pasting target device properties
- Booting target devices
- Checking a target device’s status from the console
- Sending messages to target devices
- Shutting down target devices
- Restarting target devices
- Moving target devices between collections
- Managing target device personality
- Define personality data from a single target device using the console
- Define personality data for multiple target devices using the console
- Using target device personality data
- Changing the device status to down
- Support for windows performance counters
- Boot Device Management support for UEFI using the Citrix Virtual Apps and Desktops Setup wizard