What’s new
This release of Citrix Provisioning includes the enhancements described in the following sections. It also includes several fixes for issues seen in past releases, and new known issues that we’ve identified.
Important:
Use the most recent version of the Citrix License Server to receive the latest provisioning features. If you are upgrading Citrix Provisioning to the newest version, the latest License Server version is required. When you do not upgrade to the latest version of the License Server, the product license enters the 30-day License caching mode. For more information, see Licensing.
Support for VMware Cloud on AWS
Citrix Provisioning adds support for VMware Cloud on AWS environments using Citrix Virtual Apps and Desktops™ Service.
Support for Microsoft SQL 2017
Citrix Provisioning™ adds support for Microsoft SQL Server 2017.
Removed support for 32-bit Provisioning Console
Citrix Provisioning supports Citrix Hypervisor 8.1 functionality, guest UEFI boot, and secure boot. This functionality enables VMs running Windows 10 (64-bit), Windows Server 2016 (64-bit), or Windows Server 2019 (64-bit) to boot in UEFI mode. UEFI boot provides a richer interface for the guest operating systems to interact with the hardware, which can significantly reduce Windows VM boot times. See the Citrix Hypervisor documentation for more information.
Provisioning server performance updates
This release of Citrix Provisioning introduces updates to provisioning server performance statistics. These statistics allow other Citrix applications to determine the state of provisioned servers by introducing a performance counter provider that generates dynamic information about the provisioning server.
Note:
Citrix Provisioning version 1909 introduced functionality related to this enhancement for provisioned target devices. See What’s new for more information.
How it works
This version adds a performance counter provider that captures dynamic information about the provisioning server by using an external application running on a server or a remote machine. This application queries the performance data of the server using Windows Performance Counter. The provider does not duplicate information obtained from the system using standard Windows objects, such as CPU, memory, disk, or network configuration information.
Consider:
- New Windows events containing database and stream services restart events are written to the Windows event log.
- The state of provisioned servers is obtained from the Citrix Provisioning object oriented PowerShell API.
- The Citrix Provisioning server installer registers the newly installed performance counter provider.
Updated performance counters
Installing this version adds and registers an updated performance counter on each provisioned server as part of the standard installation and upgrade process. The following image illustrates the counter as part of the StreamProcess:
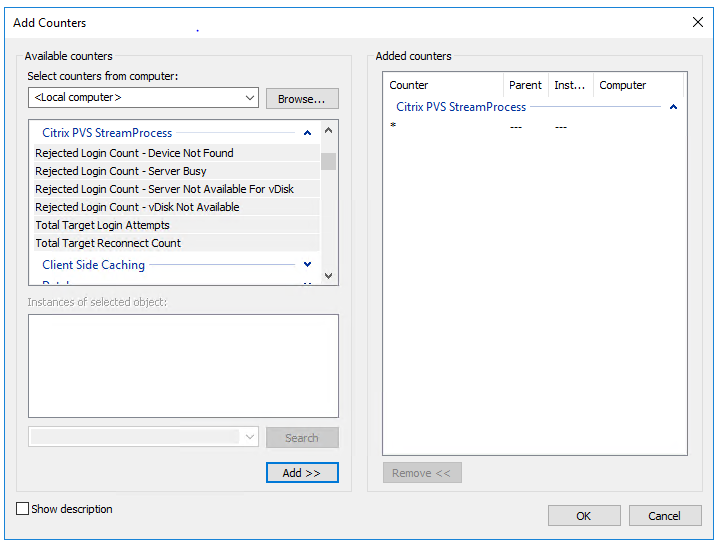
The updated StreamProcess includes the following extra performance counters:
CounterSet: Citrix Provisioning StreamProcess
The provider creates the PVS_Target and PVS_VDisk WMI objects in the root/Citrix/PVS namespace. Each provisioned target device has a single instance of the PVS_Target object. The PVS_Target object provides information about the installed Citrix Provisioning version, and statistics for the latest boot operation.
| Counter name | Type | Description |
|---|---|---|
| Total Target Login Attempts | perf_counter_rawcount | The total number of target device login attempts. |
| Total Target Reconnect Count | perf_counter_rawcount | The total amount of target device reconnects. |
| Rejected Login Count - Device Not Found | perf_counter_rawcount | The number of target device logins that were rejected because the device was not found in the database. |
| Rejected Login Count - virtual disk Not Available | perf_counter_rawcount | The number of target device logins that were rejected because the virtual disk was not available for the device. |
| Rejected Login Count - Server Busy | perf_counter_rawcount | The number of target device logins that were paused because the maximum number of devices a server allows to boot was reached. |
| Rejected Login Count - Server Not Available For virtual disk | perf_counter_large_rawcount | The number of target device logins that were rejected because no servers were available for the virtual disk. |
The StreamProcess writes the following new events to the Windows Event log:
- DB online to offline with offline database support enabled
- DB online to offline with offline database support disabled
- Offline database support enabled event
- Offline database support disabled event
The StreamService writes the following new events to the Windows Event log:
- Stream process restart event
- Management daemon restart event
- Notifier restart event
- Inventory restart event
Provision VDAs on an opaque Network
To provision a VDA on an opaque network, use the Citrix Virtual Apps™ and Desktops Setup Wizard.
Create the hosting unit and associate the opaque network to it using Citrix Studio. See Connections and resources for more information.
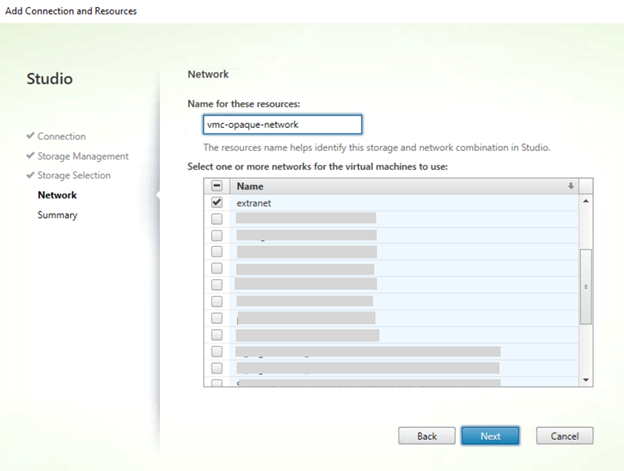
Use Citrix Studio to select an opaque network
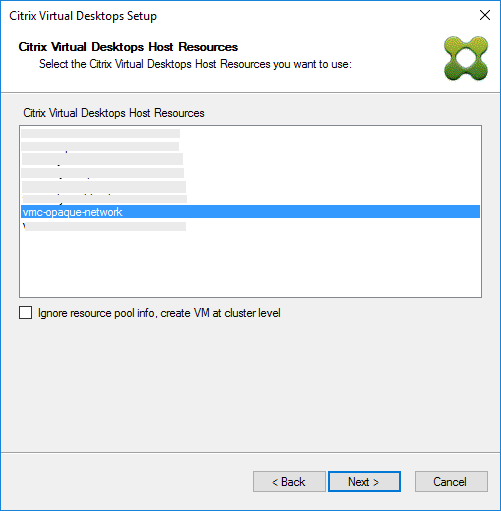
In Citrix Studio, access the Add Connection and Resources page. In the Network section, select the resource representing the opaque network, then click Next:
Tip:
After creating a hosting unit with the opaque network, use it in the Citrix Virtual Apps and Desktops Wizard in the provisioning console.
Provision VDAs to a specific resource pool
Citrix Provisioning 1912 supports provisioning VDAs at a specific resource pool in an on-premises ESX hypervisor. You can provision this VDA using the Citrix Virtual Apps and Desktops Setup Wizard in the Citrix Provisioning console.
Note:
Create a hosting unit with the resource pool using Citrix Studio before using the Setup Wizard in the provisioning console.
- The provisioned target device installer registers the WMI and performance counter providers. No additional installation options require configuration on the provisioned target device.
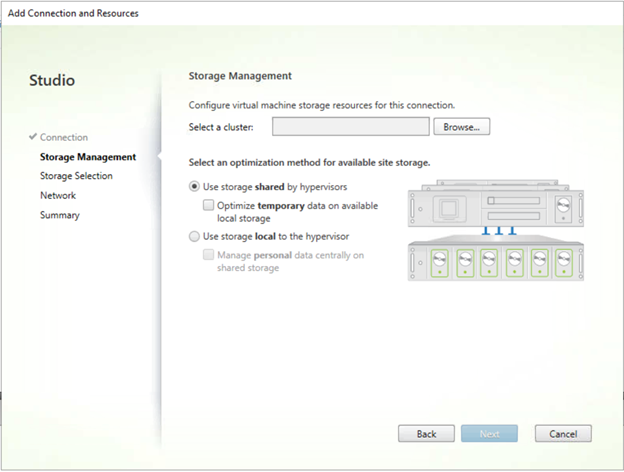
- The current
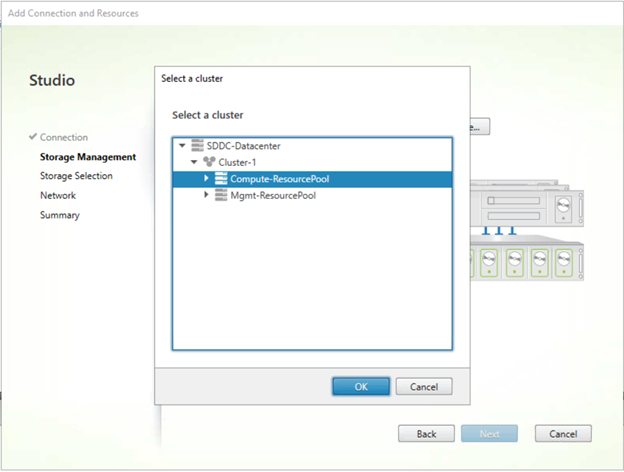
CVhdMpperformance counter provider only supports VHDX for target devices using Cache in device RAM with overflow on hard drive. Configure the resource pool. In Citrix Studio, launch the Add Connection and Resources Wizard. From the Add Connection and Resources page, select Storage Management. In the Select a cluster field, click Browse:
Select the appropriate cluster, and click Next. Select the Compute-ResourcePool or any of the child resource pool options under Compute-ResourcePool.
Use the Citrix Virtual Apps and Desktops Setup Wizard in the provisioning console to select the hosting unit with the resource pool. Click Next:
Tip:
To provision at the root cluster level, select the Ignore resource pool info, create VM at cluster level check box.
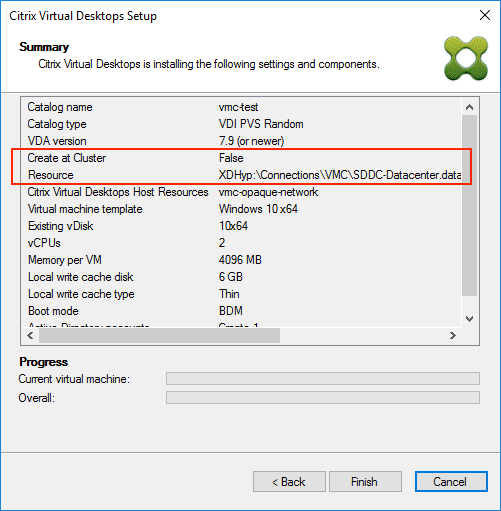
The cluster and the resource pool info appear in the Summary page of the Citrix Virtual Apps and Setup Wizard:
Using PowerShell to provision VDAs at the resource pool level
Citrix Provisioning 1912 includes a new switch parameter, UseResourcePool, added to StartPvsProvisionXdMachines in the Citrix.ProvisioningServices PowerShell cmdlet.
To provision machines at the resource pool level, use the Start-ProvisionXdMachines with the -UseResourcePool switch parameter.
For example:
Start-PvsProvisionXdMachines -DdcAddress <ddcAddress> -BootType <bootType> -CatalogName <catalogName> -CatalogDescription <catalogDescription> -SessionSupport <sessionSupport> -AllocationType <allocationType> -PersistUserChanges <persistUserChanges> -Scope <scope> -VdaLevel <vdaLevel> -XenDesktopHostResource <hostname> -HostResourcePassword <hostPassword> -TemplateName <templateName> -NetworkPath <networkPath> -StoreId <storeId> -SiteId <siteId> -DiskLocatorId <diskLocatorId> -Domain <domain> -OrganizationalUnit <organizationalUnit> -NamingScheme <namingScheme> -VmCount <vmCount> -DeviceMemory <deviceMemory> -DeviceCpu <deviceCPU> -DeviceWriteCacheSize <deviceWriteCacheSize> -NameSuffixType <nameSuffixType> -VmPvdSize <vmPvdSize> -VmPvdDrive <vmPvdDrive> -UseResourcePool
<!--NeedCopy-->
Note:
If the parameter
-UseResourcePoolis not included, the VDA is provisioned at the root cluster level.
How do I?
Use the How Do I? page in the Citrix Knowledge Center for additional information related to configuration, networking, antivirus, or hypervisor related procedures. These pages are purpose-built to help resolve problems arising from the use of Citrix Provisioning.