-
-
-
-
Azure Active Directoryを使用した認証
-
This content has been machine translated dynamically.
Dieser Inhalt ist eine maschinelle Übersetzung, die dynamisch erstellt wurde. (Haftungsausschluss)
Cet article a été traduit automatiquement de manière dynamique. (Clause de non responsabilité)
Este artículo lo ha traducido una máquina de forma dinámica. (Aviso legal)
此内容已经过机器动态翻译。 放弃
このコンテンツは動的に機械翻訳されています。免責事項
이 콘텐츠는 동적으로 기계 번역되었습니다. 책임 부인
Este texto foi traduzido automaticamente. (Aviso legal)
Questo contenuto è stato tradotto dinamicamente con traduzione automatica.(Esclusione di responsabilità))
This article has been machine translated.
Dieser Artikel wurde maschinell übersetzt. (Haftungsausschluss)
Ce article a été traduit automatiquement. (Clause de non responsabilité)
Este artículo ha sido traducido automáticamente. (Aviso legal)
この記事は機械翻訳されています.免責事項
이 기사는 기계 번역되었습니다.책임 부인
Este artigo foi traduzido automaticamente.(Aviso legal)
这篇文章已经过机器翻译.放弃
Questo articolo è stato tradotto automaticamente.(Esclusione di responsabilità))
Translation failed!
Azure Active Directoryを使用した認証
注:
この機能は、AzureでホストされるVDAでのみ使用できます。
ニーズに基づいて、Azureに2種類のLinux VDAを展開できます:
- Azure AD DS参加済みVM。 VMが、Azure Active Directory(AAD)ドメインサービス(DS)の管理対象ドメインに参加しています。 ユーザーはドメイン資格情報を使用してVMにログオンします。
- ドメイン非参加VM。 VMが、AAD IDサービスと統合されており、ユーザー認証を提供します。 ユーザーはAAD資格情報を使用してVMにログオンします。
AAD DSおよびAADについて詳しくは、こちらのMicrosoft社の記事を参照してください。
この記事では、ドメイン非参加VDAでAAD IDサービスを有効化および構成する方法について説明します。
サポートされているディストリビューション
- Ubuntu 22.04、20.04
- RHEL 8.9、8.8、8.6、7.9
- SUSE 15.5
詳しくは、Microsoft社の記事を参照してください。
既知の問題と回避策
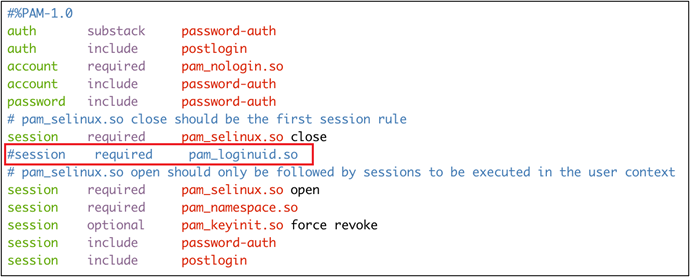
RHEL 7.9では、AADユーザー認証後に、PAM(Pluggable Authentication Module:プラグイン可能な認証モジュール)のpam_loginuid.soがloginuidの設定に失敗します。 この問題により、AADユーザーはVDAセッションにアクセスできなくなります。
この問題を回避するには、/etc/pam.d/remoteで、Session required pam_loginuid.so行をコメントアウトします。 例として以下のスクリーンショットを参照してください。

手順1:Azure Portalでテンプレート仮想マシンを作成する
テンプレート仮想マシンを作成し、Azure CLIをVMにインストールします。
-
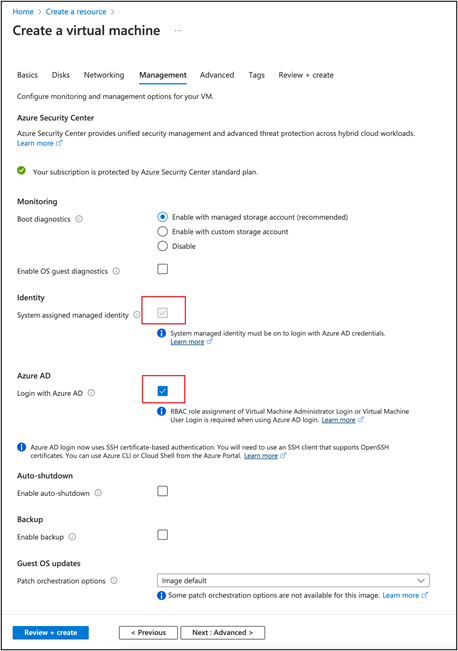
Azure Portalでテンプレート仮想マシンを作成します。 [Review + create] をクリックする前に、[Management] タブで [Login with Azure AD] を選択してください。

-
テンプレート仮想マシンでAzure CLIをVMにインストールします。 詳しくは、Microsoft社の記事を参照してください。
手順2:テンプレート仮想マシンでマスターイメージを準備
マスターイメージを準備するには、「Machine Creation Services(MCS)を使用したLinux VDAの作成」の「手順3:マスターイメージの準備」の手順に従ってください。
手順3:テンプレート仮想マシンをドメイン非参加モードに設定する
マスターイメージを作成したら、次の手順に従ってVMをドメイン非参加モードに設定します:
-
コマンドプロンプトから次のスクリプトを実行します。
Modify /var/xdl/mcs/mcs_util.sh <!--NeedCopy--> -
関数read_non_domain_joined_info()を見つけて、NonDomainJoinedの値を2に変更します。 例として、次のコードブロックを参照してください。function read_non_domain_joined_info() { log "Debug: Enter read_non_domain_joined_info" # check if websocket enabled TrustIdentity=`cat ${id_disk_mnt_point}${ad_info_file_path} | grep '\[TrustIdentity\]' | sed 's/\s//g'` if [ "$TrustIdentity" == "[TrustIdentity]" ]; then NonDomainJoined=2 fi ... } <!--NeedCopy--> -
変更を保存します。
-
テンプレート仮想マシンをシャットダウンします。
手順4:テンプレート仮想マシンからLinux VMを作成する
ドメイン非参加テンプレート仮想マシンの準備ができたら、次の手順に従ってVMを作成します:
-
Citrix Cloudにサインインします。
-
Citrix DaaSをダブルクリックして、[完全な構成]管理コンソールにアクセスします。
-
[マシンカタログ] で、Machine Creation Servicesを使用してテンプレート仮想マシンからLinux VMを作成することを選択します。 詳しくは、Citrix DaaSの記事「ドメイン非参加」を参照してください。
手順5:Linux VMにAADユーザーアカウントを割り当てる
ドメイン非参加VMを作成したら、それらにAADユーザーアカウントを割り当てます。
AADユーザーアカウントをVMに割り当てるには、次の手順に従います:
- 管理者アカウントを使用してVMにアクセスします。
-
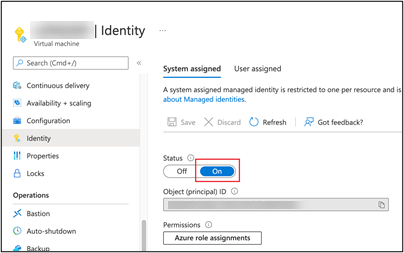
[Identify]>[System assigned]タブで、[System Identity]を有効にします。

-
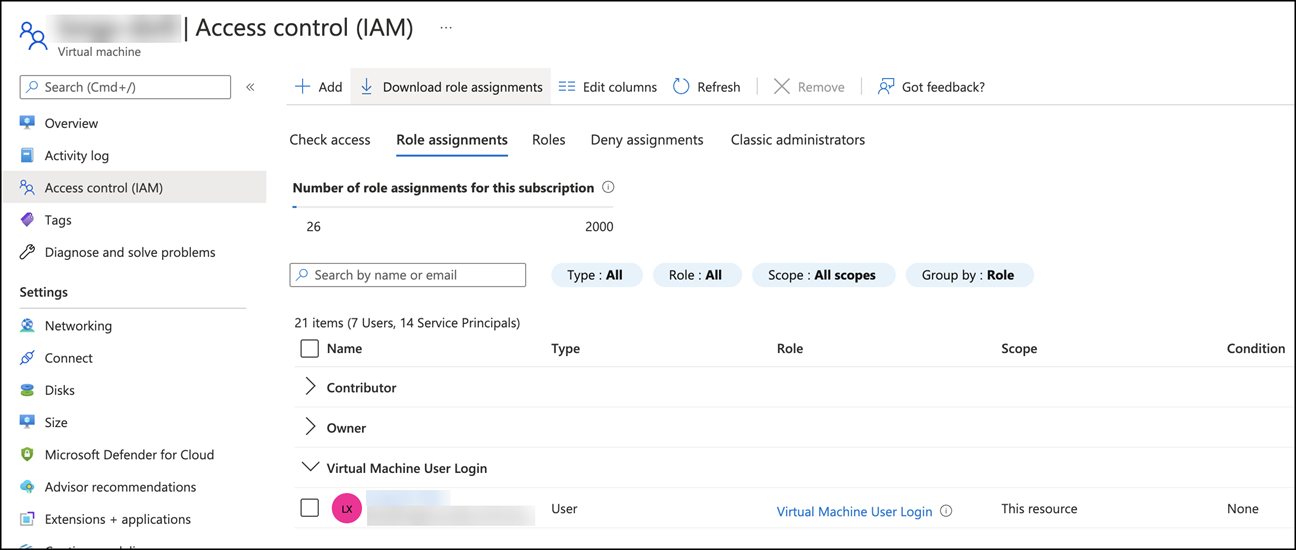
[Access control (IAM)]>[Role assignments]タブで、[Virtual Machine User Login]の欄を見つけ、必要に応じてAADユーザーアカウントを追加します。

ドメイン非参加VDAへのログオン
組織内のエンドユーザーは、ドメイン非参加VDAに2つの方法でログオンできます。 詳細な手順は次のとおりです:
- Workspaceアプリを起動し、AADユーザー名とパスワードを入力してワークスペースにログオンします。 [Workspace]ページが開きます。
-
ドメイン非参加デスクトップをダブルクリックします。 [AAD LOGIN]ページが表示されます。
このページは、VDAで設定されているログインモード(デバイスコードまたはAADアカウント/パスワード)によって異なります。 デフォルトでは、Linux VDAは、次のようにデバイスコードログインモードを使用してAADユーザーを認証します。 管理者は、必要に応じて、ログインモードをAADアカウント/パスワードに変更できます。 手順について詳しくは、以降のセクションを参照してください。

- 画面の指示に基づいて、次のいずれかの方法でデスクトップセッションにログオンします:
- QRコードをスキャンして、コードを入力します。
- AADユーザー名とパスワードを入力します。
AADアカウント/パスワードログインモードへの変更
デフォルトでは、Linux VDAはデバイスコードを使用してAADユーザーを認証します。 詳しくは、Microsoft社の記事を参照してください。 ログインモードを [AADアカウント/パスワード] に変更するには、次の手順を実行します:
VDAで次のコマンドを実行し、AADAcctPwdAuthEnableキーを見つけて、その値を0x00000001に変更します。
  /opt/Citrix/VDA/bin/ctxreg create -k "HKLM\System\CurrentControlSet\Services\CitrixBrokerAgent\WebSocket" -t "REG_DWORD" -v "AADAcctPwdAuthEnable" -d "0x00000001" --force

<!--NeedCopy-->
注
この方法は、Microsoftアカウント、または2要素認証が有効になっているアカウントでは使えません。
共有
共有
This Preview product documentation is Citrix Confidential.
You agree to hold this documentation confidential pursuant to the terms of your Citrix Beta/Tech Preview Agreement.
The development, release and timing of any features or functionality described in the Preview documentation remains at our sole discretion and are subject to change without notice or consultation.
The documentation is for informational purposes only and is not a commitment, promise or legal obligation to deliver any material, code or functionality and should not be relied upon in making Citrix product purchase decisions.
If you do not agree, select I DO NOT AGREE to exit.