Citrix Workspaceアプリの分析
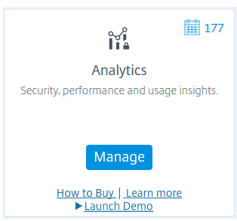
Citrix Analyticsをお持ちの場合、Citrix WorkspaceアプリがユーザーイベントをCitrix Analyticsに送信して処理できるようにStoreFrontを構成できます。Citrix Analyticsは、ユーザー、アプリケーション、エンドポイント、ネットワーク、およびデータに関するメトリックを集計し、ユーザーの行動に関する包括的なインサイトを提供します。この機能の詳細については、Citrix AnalyticsのドキュメントのStoreFrontを使用したVirtual Apps and Desktopsサイトのオンボーディングを参照してください。
この動作を構成するには:
- Citrix Analyticsから構成ファイルをダウンロードします。
- PowerShellを使用して、Citrix AnalyticsデータをオンプレミスのStoreFront展開にインポートします。
StoreFrontが構成されると、Citrix Analyticsサービスが要求したときに、Citrix WorkspaceアプリはStoreFrontストアからデータを送信できます。
重要:
StoreFront展開は、Citrix APIサービスに接続できる必要があります。Analyticsのネットワーク要件を参照してください。
Citrix Analyticsからの構成ファイルのダウンロード
重要:
初期構成には、機密情報を含む構成ファイルが必要です。ダウンロード後はファイルを安全に保管してください。このファイルを組織外の誰とも共有しないでください。構成後、このファイルを削除できます。別のマシンで構成を再度適用する必要がある場合は、Citrix Analyticsサービス管理コンソールからファイルを再度ダウンロードできます。
- 管理者アカウントを使用してモニター(
https://citrix.cloud.com/)にログオンします。 - モニター顧客を選択します。
-
[管理] をクリックして、Citrix Analyticsサービス管理コンソールを開きます。
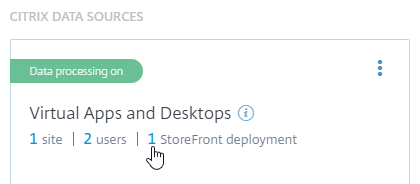
- Citrix Analyticsサービス管理コンソールで、[設定] > [データソース] を選択します。
- Virtual App and Desktopsカードで、(⋮) メニューアイコンを選択し、[StoreFront展開の接続] を選択します。
- [StoreFront展開の接続] ページで、[ファイルのダウンロード] を選択して、StoreFrontConfigurationFile.json ファイルをダウンロードします。
構成ファイルの例
{
  "customerId": "<yourcloudcustomer>",
  "enablementService": " https://api.analytics.cloud.com /casvc/<yourcloudcustomer>/ctxana/v1/cas/<yourcloudcustomer>/XenDesktop/<deviceid>/dsconfigdata",
  "cwsServiceKey": "PFJTPn…….. T4=",
  "enablementServiceStatus": " https://api.analytics.cloud.com /casvc/<yourcloudcustomer>/ctxana/v1/cas/storefront/config",
  "instanceId": "d98f21d0-56e0-11e9-ba52-5136d90862fe",
  "name": "CASSingleTenant"
}
<!--NeedCopy-->
ここで
customerId は、現在のモニター顧客の一意のIDです。
cwsServiceKey は、現在のモニター顧客アカウントを識別する一意のキーです。
instanceID は、Citrix WorkspaceアプリからCitrix Analyticsへの要求に署名(保護)するために使用される生成されたIDです。複数のStoreFrontサーバーまたはサーバーグループをモニターに登録する場合、それぞれに一意のinstanceIDがあります。
StoreFront™展開へのCitrix Analyticsデータのインポート
- StoreFrontConfigurationFile.json ファイルを、オンプレミスのStoreFrontサーバー(またはStoreFrontサーバーグループ内の1つのサーバー)上の適切なフォルダーにコピーします。以下のコマンドは、ファイルがデスクトップに保存されていることを前提としています。
- PowerShell ISEを開き、[管理者として実行] を選択します。
-
次のコマンドを実行します。
Import-STFCasConfiguration -Path "$Env:UserProfile\Desktop\StoreFrontConfigurationFile.json" Get-STFCasConfiguration <!--NeedCopy--> -
このコマンドは、インポートされたデータのコピーを返し、PowerShellコンソールに表示します。

注:
Windows Server 2012 R2にインストールされているオンプレミスのStoreFrontサーバーでは、CASに登録できるように、C++ランタイムソフトウェアコンポーネントを手動でインストールする必要がある場合があります。Citrix Virtual Apps and Desktopsのインストール中にStoreFrontがインストールされた場合、CVADメタインストーラーがすでにC++ランタイムコンポーネントをインストールしているため、この手順は不要です。C++ランタイムなしでCitrixStoreFront-x64.exeメタインストーラーのみを使用してStoreFrontがインストールされた場合、CAS構成ファイルをインポートした後にモニターへの登録が失敗する可能性があります。
StoreFrontサーバーグループへのCitrix Analyticsデータの伝播
StoreFrontサーバーグループでこれらの操作を実行している場合は、インポートされたCitrix Analyticsデータをサーバーグループのすべてのメンバーに伝播する必要があります。この手順は、単一のStoreFrontサーバー展開では不要です。
データを伝播するには、次のいずれかの方法を使用します。
- StoreFront管理コンソールを使用します。
- PowerShellコマンドレット Publish-STFServerGroupConfiguration を使用します。
StoreFrontサーバーグループIDの確認
展開がCitrix Analyticsサービスに正常に登録されたかどうかを確認するには、PowerShellを使用して展開のServerGroupIDを検出できます。
- StoreFrontサーバー、またはサーバーグループ内の1つのStoreFrontサーバーにログオンします。
- PowerShell ISEを開き、[管理者として実行] を選択します。
-
次のコマンドを実行します。
$WebConfigPath = "C:\Program Files\Citrix\Receiver StoreFront\Framework\FrameworkData\Framework.xml"
$XMLObject = (Get-Content $WebConfigPath) -as [Xml]
$XMLObject.framework.properties.property
<!--NeedCopy-->
たとえば、これらのコマンドは次のような出力を生成します。
name value
---- -----
ClusterId 8b8ff5c8-44ba-46e4-87f0-2df8cff31432
HostBaseUrl https://storefront.example.com/
SelectedIISWebSiteId 1
AdminConsoleOperationMode Full
<!--NeedCopy-->
StoreFrontからのCitrix Analyticsへのデータ送信の停止
- PowerShell ISEを開き、[管理者として実行] を選択します。
-
次のコマンドを実行します。
Remove-STFCasConfigurationGet-STFCasConfiguration以前にインポートされたCitrix Analyticsデータが正常に削除された場合、Get-STFCasConfiguration は何も返しません。
-
StoreFrontサーバーグループでこれらの操作を実行している場合は、変更を伝播し、インポートされたCitrix Analyticsデータをサーバーグループのすべてのメンバーから削除します。サーバーグループ内の1つのサーバーで、次のコマンドを実行します。
Publish-STFServerGroupConfiguration -
他のサーバーグループメンバーで、次のコマンドを実行して、Citrix Analytics構成がグループ内のすべてのサーバーから正常に削除されたことを確認します。
Get-STFCasConfiguration - 管理者アカウントを使用してモニター(
https://citrix.cloud.com/)にログオンします。 - モニター顧客を選択します。
- [管理] をクリックして、Citrix Analyticsサービス管理コンソールを開きます。
- Citrix Analyticsサービス管理コンソールで、[設定] > [データソース] を選択します。
-
Virtual App and Desktopsカードで、StoreFront展開の数を選択します。
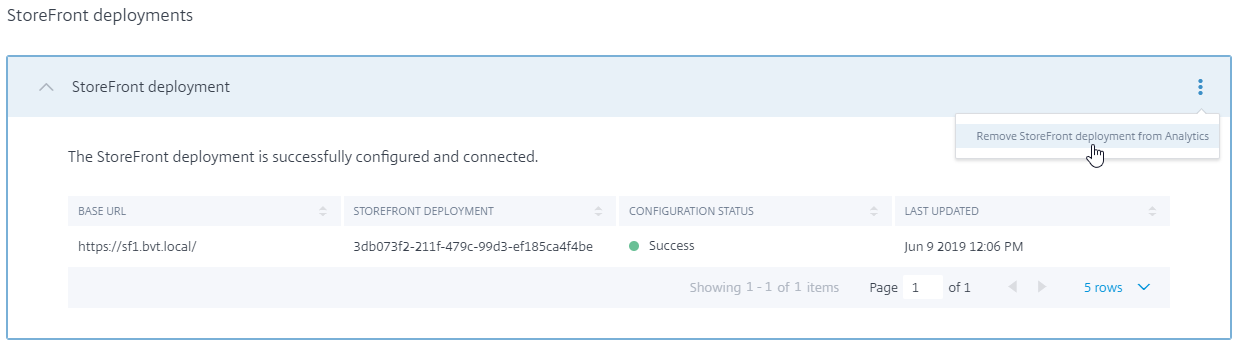
- ホストベースURLとServerGroupIDを参照して、削除するStoreFront展開を特定します。
-
(⋮) メニューで、[AnalyticsからStoreFront展開を削除] を選択します。
注:
サーバー側から構成を削除してもCitrix Analyticsから削除しない場合、StoreFront展開エントリはCitrix Analyticsに残りますが、StoreFrontからデータを受信しません。Citrix Analyticsからのみ構成を削除した場合、StoreFront展開エントリは次回のApp Poolリサイクル時(IISリセット時または24時間ごとの自動リサイクル時)に再度追加されます。
Webプロキシを使用したモニターへの接続とCitrix Analyticsへの登録のためのStoreFrontの構成
StoreFrontがWebプロキシの背後にあるホストWebサーバーに配置されている場合、Citrix Analyticsへの登録は失敗します。StoreFront管理者がCitrix展開でHTTPプロキシを使用している場合、インターネット宛てのStoreFrontトラフィックは、クラウド内のCitrix Analyticsに到達する前にWebプロキシを通過する必要があります。StoreFrontはホスティングOSのプロキシ設定を自動的に使用しません。ストアがWebプロキシを介してアウトバウンドトラフィックを送信するように指示するには、追加の構成が必要です。ストアのweb.configファイルに新しいセクションを追加することで、<system.net>プロキシ構成を構成できます。これは、Citrix Analyticsにデータを送信するために使用されるStoreFrontサーバー上のすべてのストアに対して実行します。
方法1:1つ以上のストアに対するPowerShellを介したストアプロキシ構成の設定(推奨)
PowershellスクリプトConfig-StoreProxy.ps1を実行すると、1つ以上のストアに対してこのプロセスが自動化され、<system.net>を構成するための有効なXMLが自動的に挿入されます。このスクリプトは、ストアのweb.configファイルを現在のユーザーのデスクトップにバックアップし、必要に応じて変更されていないweb.configファイルを復元できるようにします。
注:
スクリプトを複数回実行すると、
<system.net>XMLの複数のコピーが追加される可能性があります。各ストアには、<system.net>のエントリが1つだけである必要があります。複数のコピーを追加すると、ストアプロキシ構成が正しく機能しなくなります。
-
PowerShell ISEを開き、[管理者として実行] を選択します。
-
$Stores = @("Store","Store2")を設定して、Webプロキシで構成するストアを含めます。 -
次のいずれかを指定します。
- IPアドレス、または
- WebプロキシのFQDN
-
次のPowerShellを実行します。
$Stores = @("Store","Store2") $ProxyIP = "10.0.0.1" $ProxyFQDN = "proxyserver.example.com" $ProxyPort = 8888 # Set this for every Store using Stores array function Set-StoreProxyServer() # Tested with both IP and FQDN { [CmdletBinding()] param([Parameter(Mandatory=$true,ParameterSetName="ProxyIP")][Parameter(Mandatory=$true,ParameterSetName="ProxyFQDN")][array]$Stores, [Parameter(Mandatory=$true,ParameterSetName="ProxyIP")][string]$ProxyIP, [Parameter(Mandatory=$true,ParameterSetName="ProxyFQDN")][string]$ProxyFQDN, [Parameter(Mandatory=$true,ParameterSetName="ProxyIP")][Parameter(Mandatory=$true,ParameterSetName="ProxyFQDN")][int]$ProxyPort) foreach($Store in $Stores) { Write-Host "Backing up the Store web.config file for store $Store before making changes..." -ForegroundColor "Yellow" Write-Host "`n" if(!(Test-Path "$env:UserProfile\desktop\$Store\")) { Write-Host "Creating $env:UserProfile\desktop\$Store\ directory for backup..." -ForegroundColor "Yellow" New-Item -Path "$env:UserProfile\desktop\$Store\" -ItemType "Directory" | Out-Null Write-Host "`n" } Write-Host "Copying c:\inetpub\wwwroot\Citrix\$Store\web.config to $env:UserProfile\desktop\$Store\..." -ForegroundColor "Yellow" Copy-Item -Path "c:\inetpub\wwwroot\Citrix\$Store\web.config" -Destination "$env:UserProfile\desktop\$Store\" -Force | Out-Null if(Test-Path "$env:UserProfile\desktop\$Store\web.config") { Write-Host "$env:UserProfile\desktop\$Store\web.config file backed up" -ForegroundColor "Green" } else { Write-Host "$env:UserProfile\desktop\$Store\web.config file NOT found!" -ForegroundColor "Red" } Write-Host "`n" Write-Host "Setting the proxy server to $ProxyAddress for Store $Store..." -ForegroundColor "Yellow" Write-Host "`n" $StoreConfigPath = "c:\inetpub\wwwroot\Citrix\$Store\web.config" $XMLObject = (Get-Content $StoreConfigPath) -as [Xml] if([string]::IsNullOrEmpty($ProxyFQDN)) { $ProxyServer = ("HTTP://$ProxyIP"+":"+$ProxyPort) } else { $ProxyServer = ("HTTP://$ProxyFQDN"+":"+$ProxyPort) } $XMLObject = (Get-Content $StoreConfigPath) -as [Xml] # Create 3 elements $SystemNet = $XMLObject.CreateNode("element","system.net","") $DefaultProxy = $XMLObject.CreateNode("element","defaultProxy","") $Proxy = $XMLObject.CreateNode("element","proxy","") $Proxy.SetAttribute("proxyaddress","$ProxyServer") $Proxy.SetAttribute("bypassonlocal","true") # Move back up the XML tree appending new child items in reverse order $DefaultProxy.AppendChild($Proxy) $SystemNet.AppendChild($DefaultProxy) $XMLObject.configuration.AppendChild($SystemNet) # Save the modified XML document to disk $XMLObject.Save($StoreConfigPath) Write-Host "Getting the proxy configuration for c:\inetpub\wwwroot\Citrix\$Store..." -ForegroundColor "Yellow" $XMLObject = (Get-Content $StoreConfigPath) -as [Xml] $ConfiguredProxyServer = $XMLObject.configuration.'system.net'.defaultProxy.proxy.proxyaddress | Out-Null Write-Host ("Configured proxy server for Store $Store"+": "+ $ConfiguredProxyServer) -ForegroundColor "Green" Write-Host "`n" } Write-Host "Restarting IIS..." -ForegroundColor "Yellow" IISReset /RESTART } Set-StoreProxyServer -Stores $Stores -ProxyFQDN $ProxyFQDN -ProxyPort $ProxyPort # OR Set-StoreProxyServer -Stores $Stores -ProxyIP $ProxyIP -ProxyPort $ProxyPort <!--NeedCopy--> -
C:\inetpub\wwwroot\Citrix\<Store>\web.configファイルに<system.net>セクションがファイルの末尾に含まれていることを確認します。</dependentAssembly> </assemblyBinding> </runtime> <system.net> <defaultProxy> <proxy proxyaddress="HTTP://proxyserver.example.com:8888" bypassonlocal="true" /> </defaultProxy> </system.net> </configuration> <!--NeedCopy--> -
StoreFront展開へのCitrix Analyticsデータのインポートで説明されているように、Citrix Analyticsデータをインポートします。
方法2:ストアのweb.configファイルへの<system.net>セクションの手動追加
これは、Citrix Analyticsにデータを送信するために使用されるStoreFrontサーバー上のすべてのストアに対して実行する必要があります。
-
ストアのweb.configファイルをバックアップし、
C:\inetpub\wwwroot\Citrix\<Store>\web.config以外の別の場所にコピーします。 -
FQDNとポートの組み合わせ、またはIPとポートの組み合わせのいずれかを使用して、プロキシ設定で次のXMLを変更します。
たとえば、FQDNとポートの組み合わせを使用する場合は、次の
<system.net>要素を使用します。<system.net> <defaultProxy> <proxy proxyaddress="HTTP://proxyserver.example.com:8888" bypassonlocal="true" /> </defaultProxy> </system.net> <!--NeedCopy-->たとえば、IPとポートの組み合わせを使用する場合は、次の
<system.net>要素を使用します。<system.net> <defaultProxy> <proxy proxyaddress="HTTP://10.0.0.1:8888" bypassonlocal="true" /> </defaultProxy> </system.net> <!--NeedCopy--> -
ストアのweb.configファイルの末尾に、ここに示されている適切な
<system.net>要素を挿入します。<runtime> <gcServer enabled="true" /> <assemblyBinding xmlns="urn:schemas-microsoft-com:asm.v1"> <dependentAssembly> <assemblyIdentity name="System.Web.MVC" publicKeyToken="31BF3856AD364E35" culture="neutral" /> <bindingRedirect oldVersion="0.0.0.0-5.0.0.0" newVersion="5.0.0.0" /> </dependentAssembly> <dependentAssembly> <assemblyIdentity name="Newtonsoft.Json" publicKeyToken="30ad4fe6b2a6aeed" culture="neutral" /> <bindingRedirect oldVersion="0.0.0.0-9.0.0.0" newVersion="9.0.0.0" /> </dependentAssembly> </assemblyBinding> </runtime> Insert the <system.net> element here </configuration> <!--NeedCopy--> -
StoreFront展開へのCitrix Analyticsデータのインポートで説明されているように、Citrix Analyticsデータをインポートします。