Connect an on-premises Citrix Gateway as an identity provider to Citrix Cloud™ Government
Citrix Cloud Government supports using an on-premises Citrix Gateway as an identity provider to authenticate subscribers signing in to their workspaces.
By using Citrix Gateway authentication, you can:
- Continue authenticating users through your existing Citrix Gateway so they can access the resources in your on-premises Citrix Virtual Apps and Desktops™ deployment through Citrix Workspace.
- Use the Citrix Gateway Authentication, Authorization, and Auditing (AAA) functions with Citrix Workspace.
- Use features such as pass-through authentication, smart cards, secure tokens, conditional access policies, and federation. Many other features providing your users access to the resources they need through Citrix Workspace.
Supported versions
Citrix Gateway authentication is supported for use with the following on-premises product versions:
- Citrix Gateway 12.1 54.13 Advanced edition or later
- Citrix Gateway 13.0 41.20 Advanced edition or later
Prerequisites
Cloud Connectors
You need at least two (2) servers on which to install the Citrix Cloud Connector™ software. These servers must meet the following requirements:
- Meets the system requirements described in Cloud Connector Technical Details.
- Does not have any other Citrix components installed, isn’t an Active Directory domain controller, and isn’t a machine critical to your resource location infrastructure.
- Joined to the domain where your Site resides. If users access your Site’s applications in numerous domains, you must install at least two Cloud Connectors in each domain.
- Connected to a network that can contact your Site.
- Connected to the Internet. For more information, see Citrix Cloud Connector requirements.
- Citrix recommends two servers for Cloud Connector high availability. After installation, the Cloud Connectors allow Citrix Cloud Government to locate and communicate with your Site.
For more information about installing the Cloud Connector, see Install Cloud Connectors from the command line and Citrix Cloud Connector proxy and firewall configuration.
Active Directory
Before enabling Citrix Gateway authentication, perform the following tasks:
- Verify that your workspace subscribers have user accounts in the Active Directory (AD). Subscribers with only AD accounts can sign in to their workspaces successfully.
- Ensure that the user properties in your subscribers’ AD accounts are populated. Citrix Cloud Government requires these properties to establish the user context when subscribers sign in. If these properties aren’t populated, subscribers can’t sign in to their workspace. These properties include:
- Email address
- Display name
- Common name
- SAM account name
- User Principal Name
- OID
- SID
- Connect your Active Directory (AD) to your Citrix Cloud Government account. In this task, you install the Cloud Connector software on the servers you prepared, as described in the Cloud Connectors section. The Cloud Connectors enable Citrix Cloud Government to communicate with your on-premises environment. For instructions, see Connect Active Directory to Citrix Cloud Government.
- If you are performing federation with Citrix Gateway authentication, synchronize your AD users to the federation provider. Citrix Cloud Government requires the AD user attributes for your workspace subscribers so they can sign in successfully.
Requirements
Citrix Gateway advanced policies
Citrix Gateway authentication requires the use of advanced policies on the on-premises Gateway because of deprecation of classic policies. Advanced policies support multifactor authentication for Citrix Cloud Government, including options such as Identity Provider Chaining. If you currently use classic policies, you must create new advanced policies to use Citrix Gateway authentication in Citrix Cloud Government. You can reuse the Action portion of the classic policy when you create the advanced policy.
Certificates for signature
When configuring the Gateway for authenticating subscribers to Citrix Workspace, the Gateway acts as an OpenID Connect provider. Messages between Citrix Cloud Government and Gateway confirm to the OIDC protocol, which involves digitally signing tokens. You must configure a certificate for signing these tokens. This certificate must be issued from a public Certificate Authority (CA). Use of a certificate issued by a private CA is supported only to provide Citrix Cloud Government with the private root CA certificate. So, the certificate chain of trust can’t be established. If you configure multiple certificates for signature, these keys are rotated for each message.
Keys must be bound to vpn global. Without these keys, subscribers can’t access their workspace successfully after signing in.
Clock synchronization
Because digitally signed messages in OIDC carry a timestamp, the Gateway must be synchronized to NTP time. If the clock isn’t synchronized, Citrix Cloud Government assumes that tokens are stale when checking their validity.
Task overview
To set up Citrix Gateway authentication, you perform the following tasks:
- In Identity and Access Management, start configuring the connection to your Gateway. In this step, you generate the client ID, secret, and redirect URL for the Gateway.
- On the Gateway, create an OAuth IdP advanced policy using the information generated from Citrix Cloud Government. The OAuth IdP advanced policy enables Citrix Cloud Government to connect with your on-premises Gateway. For instructions, see the following articles:
- Citrix Gateway 12.1: Use an on-premises Citrix Gateway as the identity provider for Citrix Cloud
- Citrix Gateway 13.0: Use an on-premises Citrix Gateway as the identity provider for Citrix Cloud
- In Workspace Configuration, enable Citrix Gateway authentication for subscribers.
To enable Citrix Gateway authentication for workspace subscribers
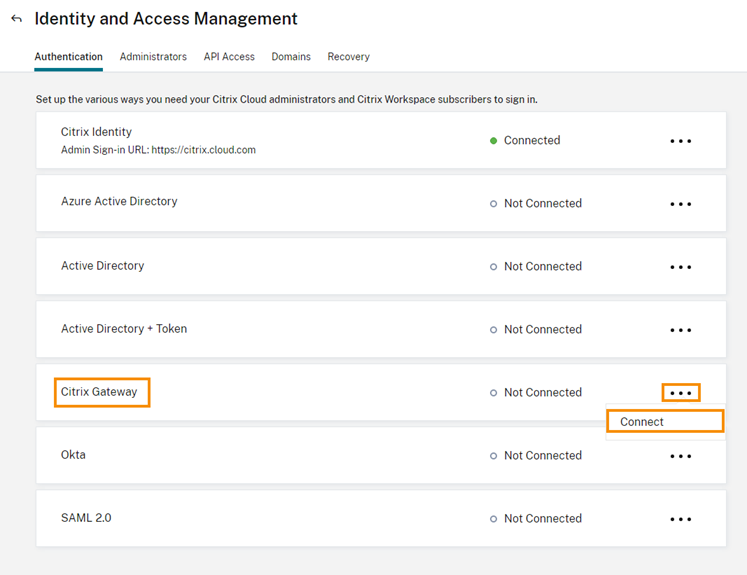
- From the Citrix Cloud Government menu, select Identity and Access Management.
- From the Authentication tab in Citrix Gateway, click the ellipsis menu and select Connect.
- Enter the FQDN of your on-premises Gateway and click Detect.
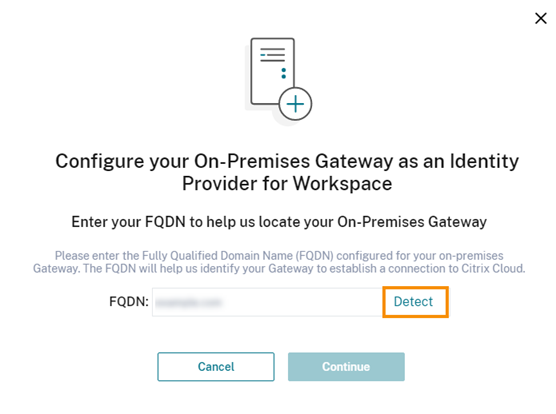 After Citrix Cloud Government detects it successfully, click Continue.
 - Create a connection with your on-premises Gateway:
- Copy the Client ID, Secret, and Redirect URL that Citrix Cloud Government displays.
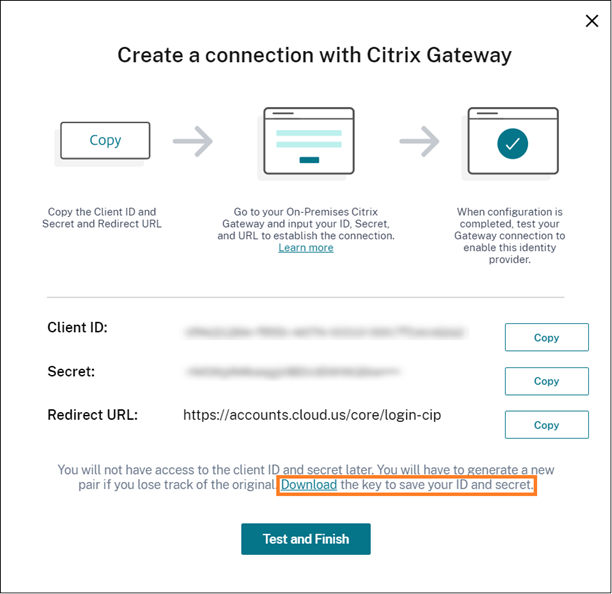 Also, download a copy of this information and save it securely offline for your reference. This information isn’t available in Citrix Cloud Government after it’s generated.
 - On the Gateway, create an OAuth IdP advanced policy using the client ID, Secret, and Redirect URL from Citrix Cloud Government. For instructions, see the following articles:
- For Citrix Gateway 12.1: Use an on-premises Citrix Gateway as the identity provider for Citrix Cloud
- For Citrix Gateway 13.0: Use an on-premises Citrix Gateway as the identity provider for Citrix Cloud
- Click Test and Finish. Citrix Cloud Government verifies that your Gateway is reachable and configured correctly.
- Copy the Client ID, Secret, and Redirect URL that Citrix Cloud Government displays.
- Enable Citrix Gateway authentication for workspaces:
- From the Citrix Cloud Government menu, select Workspace Configuration.
- From the Authentication tab select Citrix Gateway.
- Select I understand the impact on subscriber experience and then click Save.
Troubleshooting
As a first step, review the Prerequisites and Requirements sections in this article. Verify you have all the required components in your on-premises environment and that you have made all required configurations. If any of these items are missing or misconfigured, workspace authentication with Citrix Gateway does not work.
If you experience an issue establishing a connection between Citrix Cloud Government and your on-premises Gateway, verify the following items:
- The FQDN Gateway is reachable from the Internet.
- You have entered the Gateway FQDN correctly in Citrix Cloud Government.
- You have entered the Gateway URL correctly in the
-issuerparameter of the OAuth IdP policy. Example:-issuer https://GatewayFQDN.com. Theissuerparameter is case sensitive. - The client ID, secret, and redirect URL values from Citrix Cloud Government are entered correctly in the Client ID, Client Secret, Redirect URL, and Audience fields of the OAuth IdP policy. Verify that the correct client ID has been entered in the Audience field of the policy.
- The OAuth IdP authentication policy is configured correctly. For instructions, see the following articles:
- Citrix Gateway 12.1: Use an on-premises Citrix Gateway as the identity provider for Citrix Cloud
- Citrix Gateway 13.0: Use an on-premises Citrix Gateway as the identity provider for Citrix Cloud
- Verify that the policy is bound correctly to the AAA authentication server as described in Binding Authentication Policies.
Global catalog servers
In addition to retrieving user account details, Gateway retrieves users’ domain name, AD NETBIOS name, and the root AD domain name. To retrieve the AD NETBIOS name, Gateway searches the AD where the user accounts are. NETBIOS names aren’t replicated on global catalog servers.
If you use global catalog servers in your AD environment, LDAP actions configured on these servers don’t go with Citrix Cloud Government. Instead, you must configure the individual ADs in the LDAP action. If you have multiple domains or forests, you can configure multiple LDAP policies.
AD search for single sign-on with Kerberos or IdP chaining
If you use Kerberos or an external identity provider that uses SAML or OIDC protocols for subscriber sign-in, verify that AD lookup is configured. Gateway requires AD lookups to retrieve subscribers’ AD user properties and AD configuration properties.
Ensure that you have LDAP policies configured, even if authentication is done with the third-party servers. To configure these policies, you add a second authentication factor to your existing login schema profile by following the tasks:
- Create an LDAP authentication server that does only attribute and group extraction from Active Directory.
- Create an LDAP advanced authentication policy.
- Create an Authentication Policy Label.
- Define the Authentication Policy Label as the next factor, after the primary identity provider.
To add LDAP as a second authentication factor
- Create the LDAP authentication server:
- Select System > Authentication > Basic Policies > LDAP > Servers > Add.
- On the Create Authentication LDAP Server page, enter the following information:
- In Choose Server Type, select LDAP.
- In Name, enter a friendly name for the server.
- Select Server IP and then enter the LDAP server’s IP address.
- In Security Type, select your required LDAP security type.
- In Server Type, select AD.
- In Authentication, do not select the checkbox. This checkbox must be cleared because this authentication server is only for extracting user attributes and groups from Active Directory, not authentication.
- Under Other Settings, enter the following information:
- In Server Logon Name Attribute, enter UserPrincipalName.
- In Group Attribute, select memberOf.
- In Sub Attribute Name, select cn.
- Create the LDAP advanced authentication policy:
- Select Security > AAA - Application Traffic > Policies > Authentication > Advanced Policies > Policy > Add.
- On the Create Authentication Policy page, enter the following information:
- In Name, enter a friendly name for the policy.
- In Action Type, select LDAP.
- In Action, select the LDAP authentication server you created earlier.
- In Expression, enter TRUE.
- Click Create to save the configuration.
- Create the Authentication Policy Label:
- Select Security > AAA – Application Traffic > Policies > Authentication > Advanced Policies > Policy Label > Add.
- In Name, enter a friendly name for the authentication policy label.
- In Login Schema, select LSCHEMA_INT.
- Under Policy Binding, in Select Policy, select the LDAP advanced authentication policy you created earlier.
- In GoTo Expression, select END.
- Click Bind to finish the configuration.
- Define the LDAP Authentication Policy Label as the next factor, after the primary identity provider:
- Select System > Security > AAA - Application Traffic > Virtual Servers.
- Select the virtual server that has the binding for your primary identity provider and select Edit.
- Under Advanced Authentication Policies, select the existing Authentication Policy bindings.
- Select the binding for your primary identity provider and then select Edit Binding.
- On the Policy Binding page, in Select Next Factor, select the LDAP Authentication Policy Label you created earlier.
- Click Bind to save the configuration.
Default password for multifactor authentication
If you use multifactor authentication for workspace subscribers, Gateway uses the last factor’s password as the default password for single sign-on. This password is sent to Citrix Cloud Government when subscribers sign in to their workspace. If LDAP authentication is followed by another factor in your environment, you must configure the LDAP password as the default password that is sent to Citrix Cloud Government. Enable SSOCredentials on the login schema corresponding to the LDAP factor.