Administrators - Configure Citrix ITSM settings
This article provides guidance on how to complete the following administrator tasks:
- Manually sync Citrix DaaS™ data
- Import Citrix data to ServiceNow
- Manage IT services for Citrix Virtual Apps and Desktops™
- Manage ITSM connector advanced settings
Required roles
Citrix ITSM administrator role (x_cion_citrix_it_s.ctx_itsm_admin)
Manually sync Citrix DaaS data
The Citrix ITSM connector syncs delivery data from the connected Citrix Cloud™ accounts to the Studio Dashboard menu. The synchronization occurs every four hours. Citrix ITSM administrators can sync the data immediately by using the following steps:
-
Sign in to your ServiceNow Service Management Portal.
-
Go to Citrix IT Service Management Connector > Home.
-
On the Data Synchronization tile, click Refresh Data.
Import Citrix data to ServiceNow
By default, the Citrix ITSM connector imports five types of deployment data from Citrix DaaS to your ServiceNow instance. See View Citrix DaaS deployment information for details. Starting with the Citrix ITSM connector 22.6, you can import more deployment data by configuring Data import policies.
For example, by configuring the policies, you can import VDA and license information from Citrix DaaS to your ServiceNow instance:
Note:
The Citrix ITSM connector provides two ServiceNow tables to store VDA and license information respectively. Developers can invoke those tables when creating custom ITSM workflows or updating your asset information in the Configuration Management Database. For more information, see ServiceNow tables in the Citrix ITSM developer documentation.
Import VDA information
With Data Import Policies, you can import VDA information from your Citrix Cloud accounts to your ServiceNow instance on a daily basis.
To create a data import policy, follow these steps:
-
Sign in to your ServiceNow Service Management Portal.
-
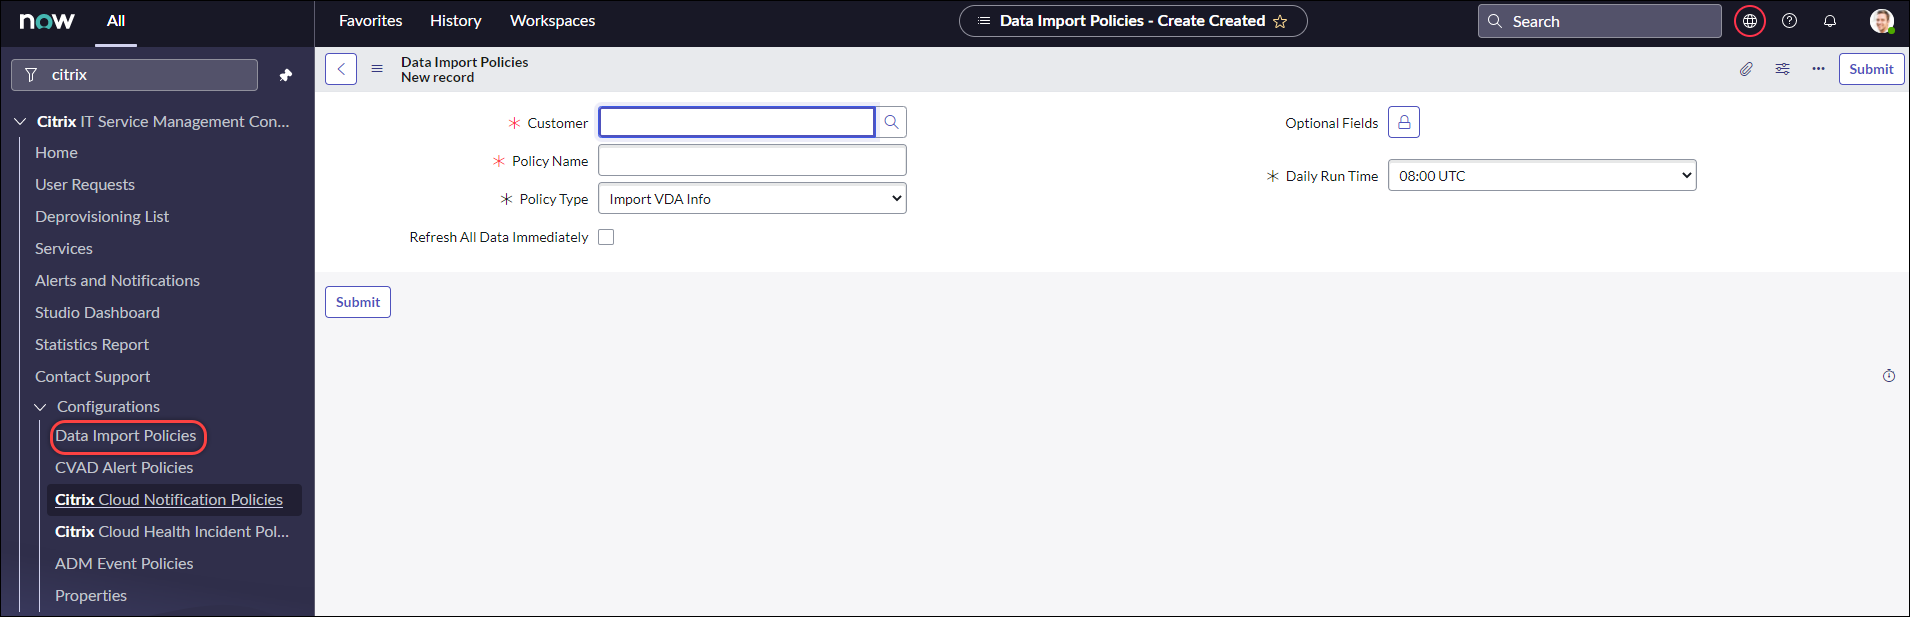
Go to Citrix IT Service Management Connector > Configurations > Data Import Policies. The Data Import Policies page appears.
-
Click New in the upper-right corner. The following page appears.
-
In the Customer field, select a Citrix Cloud account you want to manage.
-
In the Policy Name field, enter a descriptive name for the policy.
-
From the Policy Type list, select Import VDA Info.
-
In the Optional Fields field, select any additional fields you want to import as follows:
- Click the lock icon.
- From the list that appears, select the fields to import.
- Click the Unlock icon to save the changes.
Note:
- By default, the policy automatically imports several VDA fields, such as machine name, desktop group name.
- For the policy to take effect if the Citrix ITSM connector plug-in installed is version 22.6, you must add at least one optional field. To remove this limitation, upgrade the plug-in to version 22.9 or later.
- Importing more fields consumes more resources on your ServiceNow instance, such as storage capacity, processing power, and network bandwidth.
-
From the Daily Run Time drop-down list, select the time of day you want the import task to run.
-
To import VDA to ServiceNow immediately after you create the policy, select Refresh All Data Immediately.
-
Click Submit.
A new tab, Published VDI List, appears on the Studio Dashboard page, where IT help desks can view the VDA machine information. The imported VDA data are also stored in the
x_cion_citrix_it_s_citrix_vdisdatabase table. For more information, see the Citrix ITSM developer documentation.
After you create a data import policy, the first import loads all the VDA records from the Citrix Cloud account into your ServiceNow instance. Subsequent imports load only the VDA records that have been added since the previous import. If needed, you can refresh existing VDA data in ServiceNow with the latest data from Citrix Cloud.
To refresh VDA data in ServiceNow with the latest data from Citrix Cloud, follow these steps:
-
Go to Citrix IT Service Management Connector > Configurations > Data Import Policies. The Data Import Policies page appears.
-
Open a policy as needed.
-
Select Refresh All Data Immediately.
-
Click Update.
Import license information
To import daily usage data for Citrix app and desktop licenses, follow these steps:
-
Go to Citrix IT Service Management Connector > Configurations > Data Import Policies. The Data Import Policies page appears.
-
Click New in the upper-right corner. The New Record page appears.
-
In the Customer field, select a Citrix Cloud account you want to manage.
-
In the Policy Name field, enter a descriptive name for the policy.
-
From the Policy Type list, select Import License Info.
-
From the License Type list, select the license type you want to import.
For more information, see License types in the Citrix Licensing documentation.
-
Click Submit.
The imported license usage data is stored in the
x_cion_citrix_it_s_cvad_active_usedatabase table. For more information about this table, see the Citrix ITSM developer documentation. For more information about license usage data, see Monitor licenses and active usage for cloud services in the Citrix Cloud documentation.
Manage IT services for Citrix Virtual Apps and Desktops
Use Studio Dashboard to manage IT services for Citrix Virtual Apps and Desktops, including:
- Set application and desktop availability for user requests
- Enable automatic approval for applications
- Enable automatic approval for desktops
- Enable deprovisioning of idle desktops
- Enable VM resizing
Set application and desktop availability for user requests
By default, all published applications and desktops are unavailable for user requests. You can enable their availability as needed. Detailed steps are as follows:
-
Sign in to your ServiceNow Service Management Portal.
-
Go to Citrix IT Service Management Connector > Studio Dashboard.
-
Click the Published Applications or the Published Desktops tab as needed.
-
Locate an application or desktop, and then click the Published Name field. The application or desktop information page appears.
-
To make the applications or desktops available for user requests, select Availablility for requests.
-
To hide the application or desktop from the request list, clear Available for requests.
-
Click Update.
Enable automatic approval for applications
By default, application requests require manual approval. To save the approval process for an application, you can enable automatic approval for it. Detailed steps are as follows:
-
Go to Citrix IT Service Management Connector > Studio Dashboard.
-
Click the Published Applications tab.
-
Locate an application and click the Published Name field. The application information page appears.
-
Select Enable Automatic Approval.
-
Set the rule for adding users to a resource group:
- AD Group for Automatic Approval. Click the lock icon and then the Add/Move Multiple icon. Active Directory groups that have permission to use this application appear. Follow the onscreen instructions to add groups as needed.
- Delivery Group for Automatic Approval. Click the lock icon and then the Add/Move Multiple icon. Delivery groups that have permission to use this application appear. Follow the onscreen instructions to add groups as needed.
- Application Group for Automatic Approval. Click the lock icon and then the Add/Move Multiple icon. Application groups that have permission to use this application appear. Follow the onscreen instructions to add groups as needed.
-
Click Update.
Enable automatic approval for desktops
By default, desktop requests require manual approval. To speed up the approval process for a desktop, you can enable automatic approval for it. Detailed steps are as follows:
-
Go to Citrix IT Service Management Connector > Studio Dashboard.
-
Click the Published Desktops tab.
-
Locate a desktop and click the Published Name field. The desktop information page appears.
-
Select Enable Automatic Approval.
-
To add users to the displayed delivery group, click Update.
-
To add users to an AD group that has permission to use the desktop, follow these steps:
- Select Add AD Group Instead.
- From the AD Group for Automatic Approval list, select an AD group as needed. The list displays AD groups that have permission to use the desktop.
- Click Update.
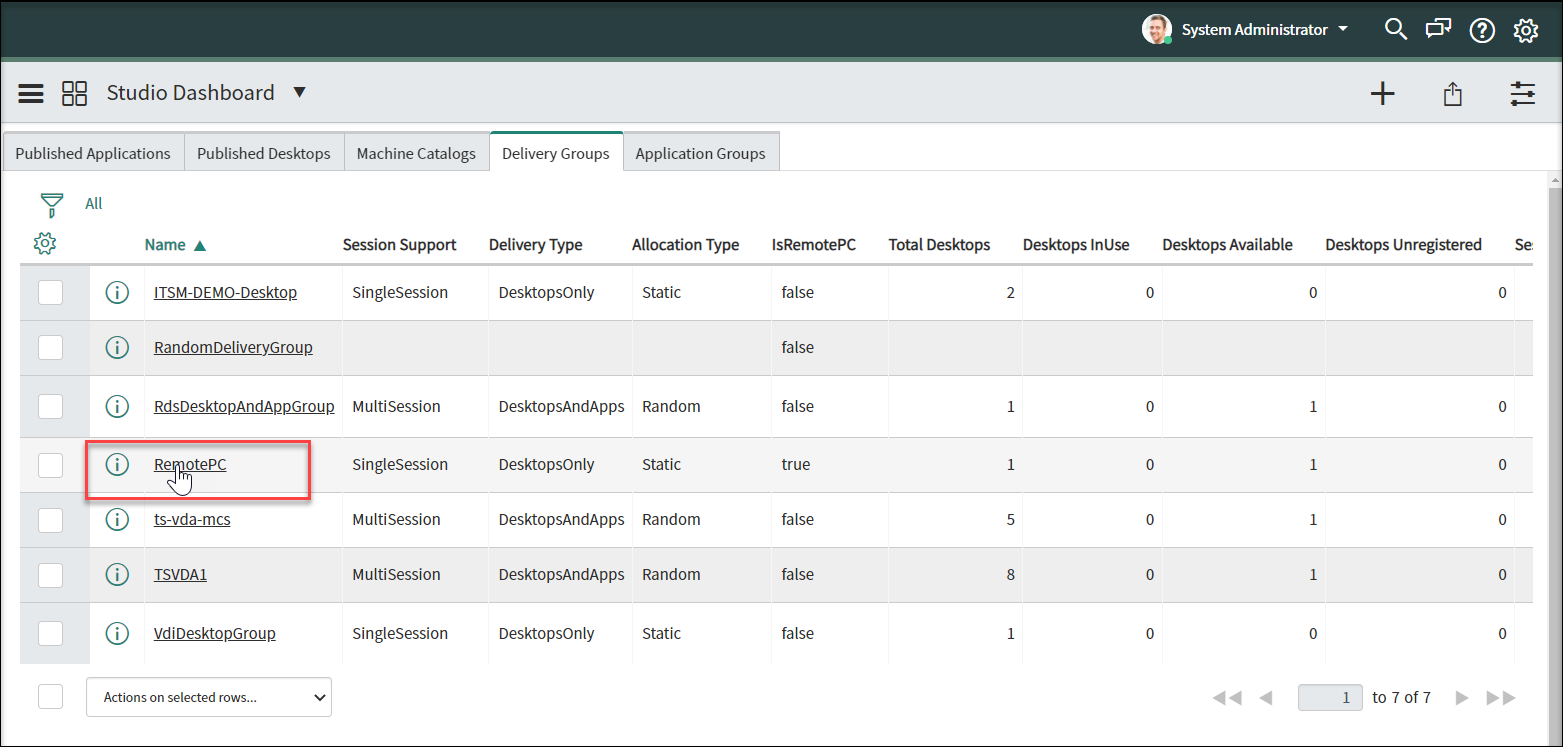
Enable deprovisioning of idle desktops
Deprovisioning idle desktops lets resource managers take back idle resources, thus increasing resource utilization. You can enable deprovisioning of idle desktops based on delivery groups. If needed, you can also enable automatic deprovisioning.
Note:
Deprovisioning idle desktops is supported only for static VDI desktops.
Detailed steps are as follows:
-
Go to Citrix IT Service Management Connector > Studio Dashboard.
-
Click the Delivery Groups tab.
-
Locate a delivery group whose Allocation Type field shows Static, and then click the Name field. The information page of the delivery group appears.
-
Select Enable Deprovisioning.
-
In the Days of Idling Before Alerts field that appears, change the default value if needed.
When a desktop in the delivery group has been idle for more than the specified days, the desktop appears in the Deprovisioning List menu. Its State field shows Flagged for Deprovisioning, notifying the desktop will soon be ready for deprovisioning. To avoid generating such notifications, set Days of Idling before Alerts to 0.
-
In the Days of Idling Before Deprovisioning field that appears, change the default value if needed.
When a desktop in the delivery group has been idle for more than the specified days, the desktop appears in the Deprovisioning List menu. Its State field shows Ready for Deprovisioning.
-
To enable automatic deprovisioning, select Automatic Deprovisioning, and then select a deprovisioning type:
- Remove the desktop
- Keep the desktop but remove the user assignment
-
Click Update.
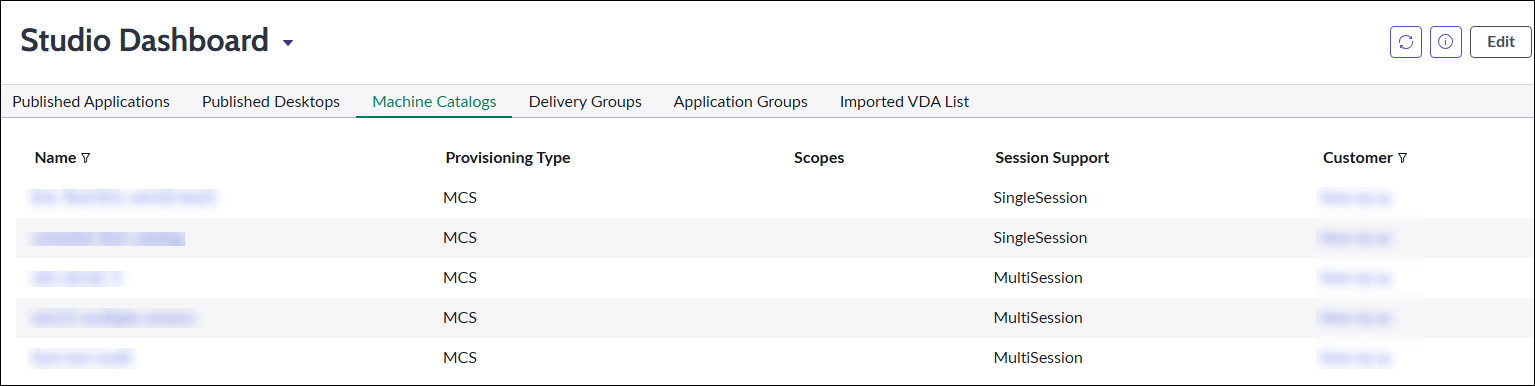
Enable VM resizing
As an ITSM administrator, you can enable VM resizing for an MCS-provisioned machine catalog. After you enable this capability, machines in this catalog can be resized to the VM sizes you specify. This capability allows help desks and end users to request desktops scaling to match workload needs.
To enable VM resizing, follow these steps:
-
Go to Citrix IT Service Management Connector > Studio Dashboard.
-
Click the Machine Catalogs tab.
-
Locate a machine catalog where the Provisioning Type field shows MCS, and click its Name. The machine catalog details page appears.
-
Select Enable VM Resize.
-
In the Resize Type field that appears, specify the VM sizes available for resizing:
- Click the lock icon to unlock the field.
- Click the magnifier icon next to Select targe record to view available options.
- Select a VM size option from the list.
-
If needed, repeat steps b–c to add more VM size options.
Note:
The selected sizes determine the VM resizing options available for help desks and end uses to request. Choose sizes based on workload requirements.
-
Click Update.
After you complete these steps, resizing is enabled for the selected machine catalog.
Manage ITSM connector advanced settings
Use Configurations > Properties to manage advanced settings for the ITSM connector, including:
- Enable remote PowerShell
- Enable auto-deletion for Citrix alerts and notifications
- Enable support for multiple-AD-domain Citrix Cloud accounts
- Enable AD operations through ITSM
Enable remote PowerShell
To support the Run PowerShell scripts on a machine Custom Activity, enable the remote PowerShell feature in the Citrix ITSM connector as follows:
-
Sign in to your ServiceNow Service Management Portal.
-
In the left pane, select Citrix IT Service Management Connector > Configurations > Properties. The Citrix Customers page appears, listing Citrix Cloud accounts that you added to the plug-in.
-
Locate a customer, and then click Display Name. The customer information page appears.
-
Select Enable Remote PowerShell.
-
Click Update.
For more information about this Custom Activity, see Custom Activities and tables.
Note:
Your setting takes effect in 24 hours. For it to take effect immediately, restart Cloud Connectors.
Enable auto-deletion for Citrix alerts and notifications
The Citrix ITSM connector keeps syncing the following data from Citrix Cloud to your ServiceNow instance. To save storage space, you can enable automatic deletion for the data and specify a retention period for it.
- Alerts from Citrix DaaS and Citrix Virtual Apps and Desktops
- Notifications from Citrix Cloud
- Events from Citrix Application Delivery Management (ADM)
- License usage data from Citrix DaaS
To enable auto-deletion for Citrix data, follow these steps:
-
Sign in to your ServiceNow Service Management Portal.
-
In the left pane, select Citrix IT Service Management Connector > Configurations > Properties. The Citrix Customers page appears, listing Citrix Cloud accounts that you added to the plug-in.
-
Locate a customer, and then click Display Name. The customer information page appears.
-
Select Enable Data Auto-Deletion.
-
In the Days of Retention field that appears, enter a retention period, in days.
-
Click Update.
Enable support for multiple-AD-domain Citrix Cloud accounts
In multiple-AD-domain Citrix Cloud accounts, users are identified by user names and domain names. To enable the ITSM connector plug-in to retrieve user session data from those accounts, select the SAM Account Name or User Principal Name (UPN) as the user-unique identity.
Follow these steps to enable the support:
-
Sign in to your ServiceNow Service Management Portal.
-
In the left pane, select Citrix IT Service Management Connector > Configurations > Properties. The Citrix Customers page appears, listing Citrix Cloud accounts that you added to the plug-in.
-
Locate a customer that has more than one AD domain, and then click Display Name. The customer information page appears.
-
From the User Unique Identity list, select the field that stores the sAMAccountName or UPN. The options come from the field names in the Organization > Users table.
-
Click Update to save the change.
-
For the other multiple-AD-domain customers in the list, repeat steps 3–5 for each.
Enable AD operations through ITSM
When approving user requests for applications and desktops, resource managers can assign applications and desktops to users by adding them to Active Directory (AD) groups with permission to use the applications or desktops. To enable this functionality, you must enable AD operations using one of the following methods:
- Use ServiceNow for AD operations: Activate the Active Directory Automation solution in ServiceNow. For more information, see this ServiceNow article.
- Use ITSM for AD operations: Enable the Enable AD Operation via ITSM property. This configuration uses the Citrix Identity service to connect to your AD server.
To enable the Enable AD Operation via ITSM property, follow these steps:
-
Sign in to your ServiceNow Service Management Portal.
-
In the left pane, select Citrix IT Service Management Connector > Configurations > Properties. The Citrix Customers page appears, listing Citrix Cloud accounts that you added to the plug-in.
-
Locate an account, and then click the Display Name field. The customer information page appears.
-
Select AD Operation via ITSM.
-
In the AD Account and AD Password fields that appear, enter the credentials with permission to add users to AD groups.
-
Click Update.