Additional Features
User Activity Logging
The User Activity Logging feature lets customers track and audit user browsing activity during Citrix Remote Browser Isolation (RBI) sessions. The feature captures visited host names, access timestamps, user identifiers, and allowlist enforcement status. All collected data is stored in the customer’s Azure Storage Account, which provides full data ownership and control.
Important:
This feature must be enabled at both the customer level and the application level. Browsing activity data is uploaded hourly and is not real-time.
Key Benefits
- Compliance and auditing: Meet enterprise audit requirements and regulatory compliance standards.
- Security analysis: Identify abnormal browsing patterns and potential security threats.
- Policy optimization: Analyze user behavior to refine allowlist configurations.
- Data sovereignty: Keep data under your control in your Azure environment.
Prerequisites
Before configuring User Activity Logging, ensure that you have the following:
- A valid Azure subscription.
- An Azure Storage Account for browsing activity data.
- A catalog created under the Remote Browser Isolation service.
Configuration steps
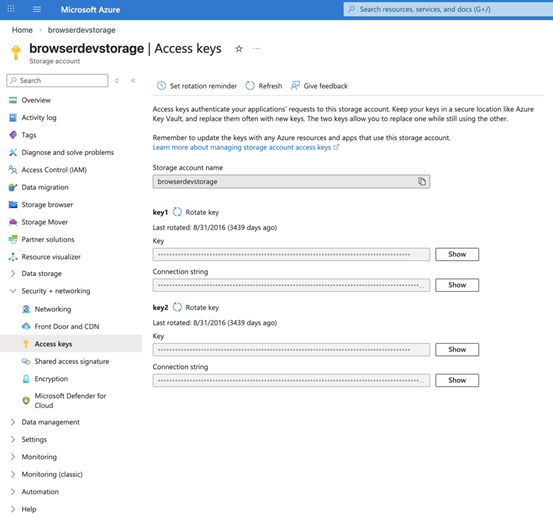
Step 1: Retrieve Azure Storage connection string
This guide assumes that an Azure Storage Account exists. To create one, see Azure Storage documentation.
- Sign in to Azure portal and open the Storage Account.
- In the left menu, go to Security + networking and select Access keys.
- Copy the Connection string from either key1 or key2.
- Store the connection string securely for use in the step 3 (Verify the feature is working).
Note:
Citrix RBI automatically creates a container named
user-activitywhen you save the configuration. Manual container creation is not required.
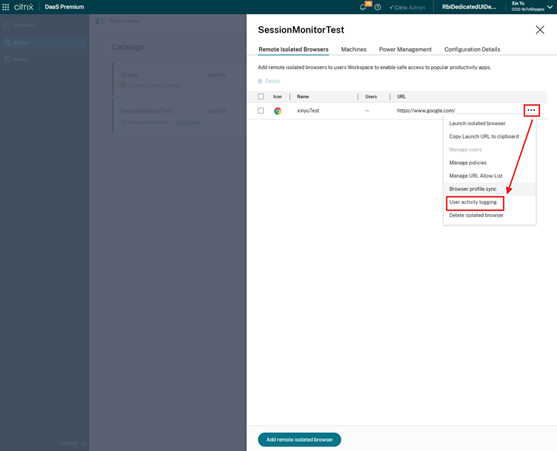
Step 2: Configure User Activity Logging for applications
Azure Storage connections can be configured per application.
Create or update configuration
- In the Admin Console, navigate to the Manage page.
- Select the catalog and application for which User Activity Logging must be enabled.
- Find the User activity logging setting.
- Enable User activity logging.
- Paste the Azure Storage connection string from Step 1.
- Click Save.
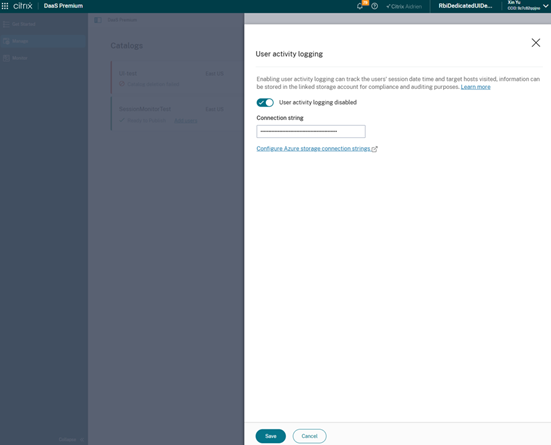
When the configuration is saved, the system:
- Validates the connection string.
- Checks connectivity to Azure Storage.
- Creates a container named
user-activityif it does not exist. - Confirms connection permissions.
Delete configuration
To stop tracking browsing activity for a specific application:
- Navigate to the settings page for that application.
- Find the User activity logging setting.
- Disable User activity logging.
- Click Save.
After deleting the configuration, newly launched user sessions no longer record browsing activity. Historical data already uploaded to Azure Storage is not deleted.
Step 3: Verify the feature is working
After configuration is complete, verify the feature:
- Launch a new browser session using the application configured with User Activity Logging.
- Visit several websites, for example
www.google.comandwww.microsoft.com. - Wait for upload. Browsing activity is saved locally first and uploaded hourly.
- For initial verification, wait at least 1-2 hours.
- In Azure portal, open the Storage Account and then the
user-activitycontainer. - Verify that new JSON files appear.
- Download a JSON file and confirm it contains hostnames of visited websites.
Viewing and analyzing browsing activity
Data Storage Structure
Browsing activity data is organized in Azure Blob Storage by date and file name:
Container: user-activity
|- YYYY-MM-DD/
|  |- {VDAHostname}_{GUID}_{AppName}_{YYYY-MM-DD-HH}.json
|  |- {VDAHostname}_{GUID}_{AppName}_{YYYY-MM-DD-HH}.json
|  `- {VDAHostname}_{GUID}_{AppName}_{YYYY-MM-DD-HH}.json
`- YYYY-MM-DD/
    `- ...
<!--NeedCopy-->
File naming convention
- Folder structure:
{YYYY-MM-DD}/(organized by date). - File name pattern:
{VDAHostname}_{GUID}_{AppName}_{YYYY-MM-DD-HH}.json -
{VDAHostname}: Hostname of the VDA machine. -
{GUID}: Unique identifier for each upload batch. -
{AppName}: Name of the Secure Browser application. -
{YYYY-MM-DD-HH}: Upload timestamp in 24-hour format.
New files are generated every hour for each active VDA.
Data format description
Each JSON file contains multiple records in NDJSON format (newline-delimited JSON). Each line represents one access event.
{"accessHostEvent":{"hostName":"www.google.com","acceptHost":true},"accessTime":"2026-01-29T14:23:45.123Z","sessionId":"abc123-def456-ghi789","userName":"user@example.com","appName":"MySecureBrowser"}
{"accessHostEvent":{"hostName":"www.microsoft.com","acceptHost":true},"accessTime":"2026-01-29T14:25:10.456Z","sessionId":"abc123-def456-ghi789","userName":"user@example.com","appName":"MySecureBrowser"}
{"accessHostEvent":{"hostName":"malicious.site","acceptHost":false},"accessTime":"2026-01-29T14:30:22.789Z","sessionId":"abc123-def456-ghi789","userName":"user@example.com","appName":"MySecureBrowser"}
<!--NeedCopy-->
Field descriptions
| Field | Description | Example |
|---|---|---|
accessHostEvent.hostName |
Hostname of the website accessed by the user. | www.google.com |
accessHostEvent.acceptHost |
Whether access is allowed by the allowlist (true means allowed and false means blocked). |
true |
accessTime |
Access timestamp (UTC). | 2026-01-29T14:23:45.123Z |
sessionId |
Unique session identifier. | abc123-def456-ghi789 |
userName |
User identifier. | user@example.com |
appName |
Application name. | MySecureBrowser |
Privacy protection: The system records only hostnames such as www.example.com. It does not record full URL paths, query parameters, or user-entered content.
Methods for viewing data
Use the following methods to view browsing activity records:
Azure Storage Explorer
- Download and install Azure Storage Explorer.
- Connect to the Storage Account.
- Browse the
user-activitycontainer. - Download
JSONfiles and review their content.
Azure portal
- Sign in to Azure portal.
- Navigate to the Storage Account.
- Select Containers >
user-activity. - Download files to view their contents.
Tip: For deeper analysis, import the data into Excel, Power BI, or another analytics tool.
Key features and considerations
Feature highlights
- Automatic recording: Captures website access events without manual intervention.
-
Blocked attempts included: Captures blocked access attempts (
acceptHost: false) for allowlist analysis. - Hourly uploads: Uploads data in hourly batches to reduce network overhead.
- Data sovereignty: Stores all data in the customer’s Azure environment.
- Multi-application support: Supports separate or shared Storage Account configuration across applications.
Limitations
- Not real-time: Data can take up to one hour to appear in Azure Storage.
- Dedicated Edition only: Available only for Dedicated Edition applications.
-
Fixed container name: The container name is
user-activityand cannot be customized. - VDA restart impact: Data not uploaded yet can be lost if a VDA restarts before upload.
Troubleshooting
Issue 1: No Data in Azure Storage
Possible causes:
- The feature toggle is not enabled.
- The connection string is incorrect or expired.
- Insufficient wait time (at least one hour is required).
- The application is not Dedicated Edition.
Resolutions:
- Check feature toggle status.
- Reconfigure the connection string and save.
- Start a new session, visit websites, and wait 1-2 hours.
- Confirm the application is Dedicated Edition.
- Verify that the
user-activitycontainer was created.
Issue 2: Validation fails when configuring connection string
Possible causes:
- Connection string format is incorrect.
- Storage Account network restrictions block access.
- Insufficient permissions to create containers.
Resolutions:
- Copy the complete connection string again from Azure portal.
- Check Storage Account firewall settings. For testing, temporarily allow broader network access.
- Verify that the connection string grants container creation permissions.
- Ensure that the Storage Account is not locked or otherwise restricted.
Issue 3: User sessions are interrupted or slow after data upload
No, data uploads run in the background and do not interrupt normal browser usage. Upload uses asynchronous I/O with minimal resource consumption.
Issue 4: Does configuration take effect immediately for active user sessions?
No, users must close the current session and start a new one for updated settings to apply. Active sessions continue using the configuration present at launch time.
Issue 5: Can multiple applications use the same Storage Account?
Yes, multiple applications can share the same Storage Account and user-activity container. File naming and the appName field help distinguish data between applications.
Integration with Chrome Enterprise Premium (CEP)
This topic introduces the integration between Citrix Remote Browser Isolation (RBI) and Google Chrome Enterprise Premium (CEP) for Linux VDAs. It explains what the feature enables, how it works, and what administrators must know before enabling it.
Introduction
Google Chrome Enterprise Premium (CEP) provides advanced security, browser management, and policy enforcement for enterprise environments. With this feature, the Citrix RBI browser can enroll into Chrome Enterprise policies by using a Google enrollment token. Administrators can then centrally manage organizational and departmental secure browser policies from Google Admin console.
This integration provides a scalable, cloud-managed approach to enforce security and compliance on untrusted endpoint devices without requiring an EDR agent.
What this feature enables
With CEP integration:
Administrators can:
- Apply Chrome Enterprise policies to all Citrix RBI browser users in the same catalog.
- Centrally manage those policies through Google Admin console.
Users can:
- Use an RBI browser that becomes a managed browser after enrollment.
- Receive consistent enterprise policies, for example copy and paste controls and URL blocklists.
- Receive automatic policy updates from Google Cloud.
How to use it
Preparation
Before enabling CEP integration:
- Confirm that Google Workspace supports Chrome Enterprise Premium.
- Make sure at least one Citrix RBI catalog exists. If not, create one.
- Identify which RBI catalogs must be governed by Chrome policies.
- Generate one enrollment token per organizational unit (OU) in Google Admin console, if needed.
Configuration on Citrix Cloud portal
CEP requires an enrollment token for each catalog. Citrix automatically distributes the token to user sessions launched from that catalog.
Enrollment flow
- Obtain an enrollment token from Google Admin console.
- Sign in to Citrix Cloud and navigate to Remote Browser Isolation.
- Select Manage in the left menu.
- Select the target catalog, then open Configuration Details.
- Enable Enable Google Token Enrollment and enter the enrollment token.
- Select Apply token.
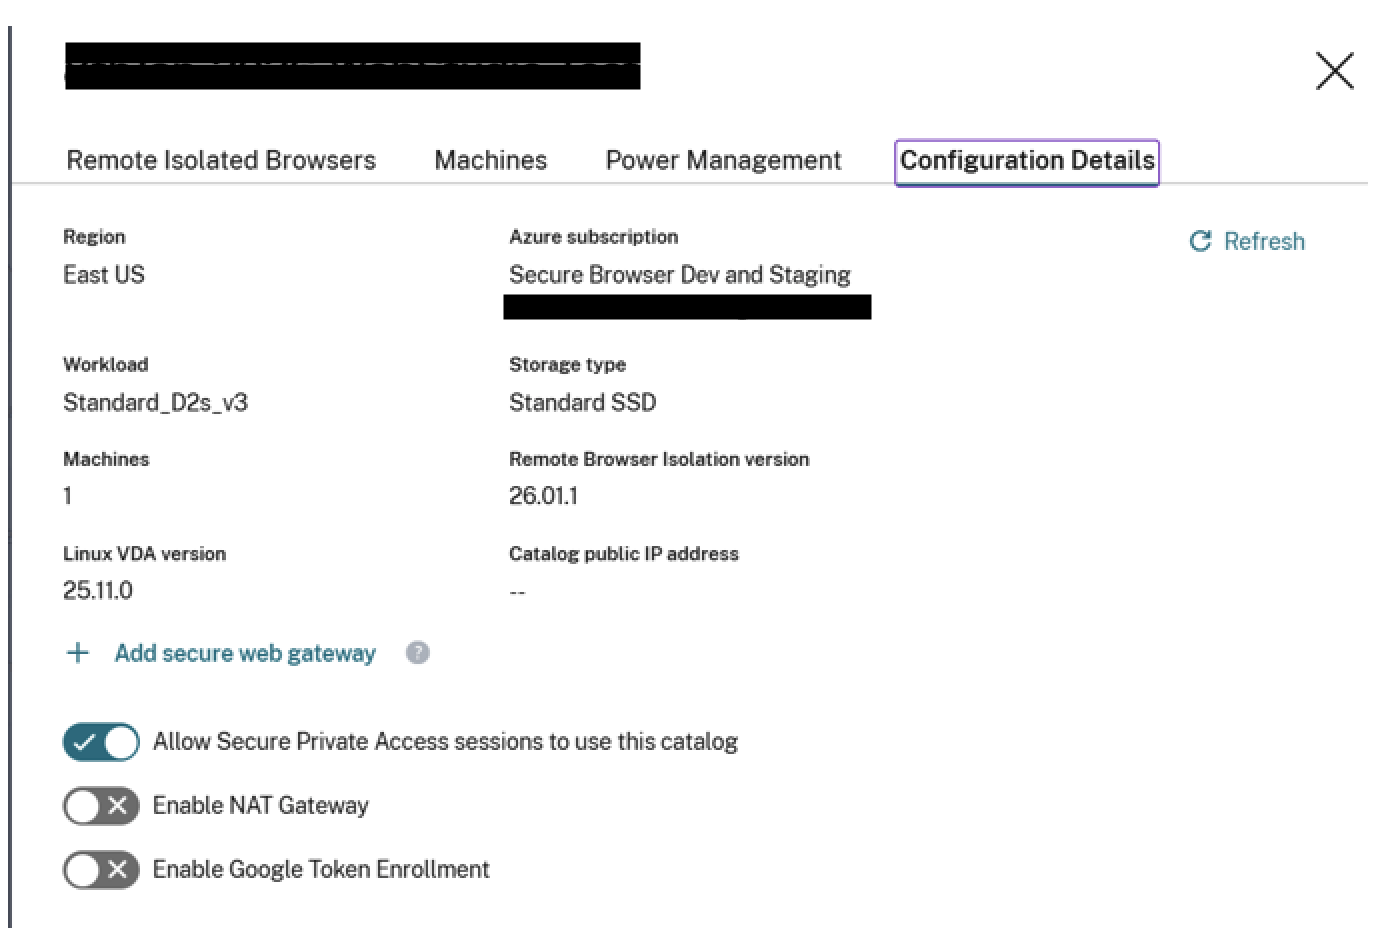
When a user launches a secure browser application under that catalog, token enrollment happens automatically and browsing continues in the CEP-enrolled browser.
Administrator tasks
- Disable or re-enable Enable Google Token Enrollment, or update the enrollment token.
- Monitor Chrome policy enforcement using
chrome://policy. - Review the Google Admin device list periodically and remove stale records.
Limitations and known behaviors
User profile sync is not supported
Chrome user profile cloud sync does not function inside a CEP token-enrolled RBI browser.
Reboot is required for each configuration change
Because RBI uses ephemeral file systems, a reboot is required if administrators enable or disable CEP integration, or update the CEP token.
Allow list policy behavior
If the allow list configured for an RBI browser application under the catalog is modified from the default *:*, include *.google.com:* to complete CEP enrollment. After CEP is launched, the RBI allow list policy is not honored.
Google admin may show duplicate devices
After an image upgrade, a machine can receive a new ID. This can create an additional device record in Google Admin console.
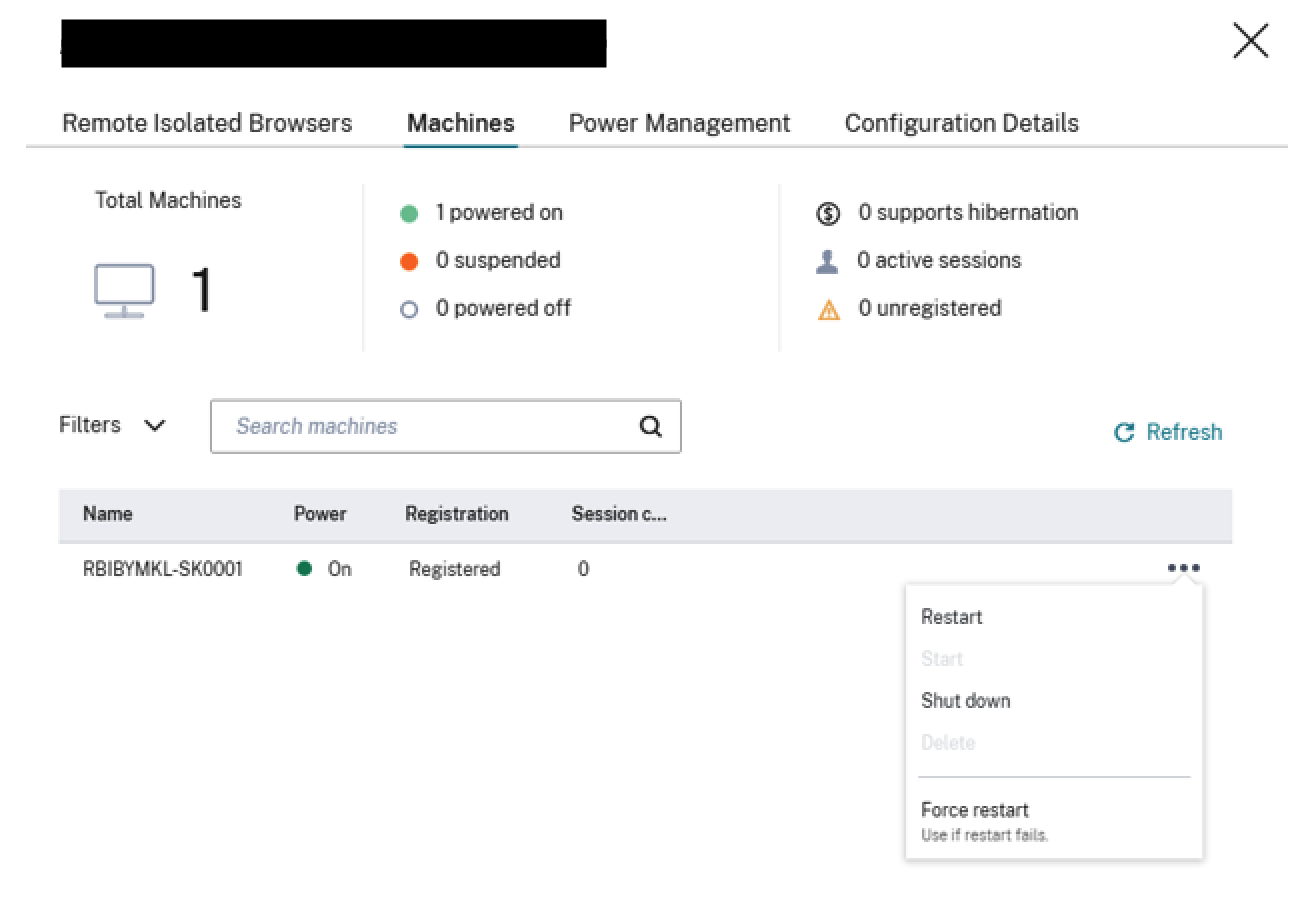
Reboot machines under a catalog
For each machine listed in the catalog:
- Select the menu on the right.
- Select Restart.
Configuring Azure Firewall for Customer-Managed RBI Catalog Virtual Network
Azure Firewall enables you to filter outgoing web requests from your catalog machines in your Remote Browser Isolation service. By deploying Azure Firewall in your existing Azure Virtual Network, you can control and monitor outbound traffic. This helps you enhance network security and manage outbound connections for your workloads.
Prerequisites:
- A catalog created under the Remote Browser Isolation service in your Azure subscription.
- Sufficient permissions to create and manage Azure resources.
Locate the Azure Virtual Network
- In the Citrix Cloud DaaS console, identify the machine catalog you want to secure.
- Select a machine from the catalog and copy the first part of its name (for example, RBI3BLR6-O80001).
- In the Azure portal, search for the VM using this name.
- In the VM’s overview, select the linked virtual network.
Create an Azure Firewall
- In the virtual network’s menu, select Subnets under Settings.
- Add a new subnet with the purpose set to Azure Firewall (use default settings).
- Return to the virtual network overview and select Azure Firewall under Capabilities.
- Click Add a new firewall.
- Complete the following fields:
- Subscription and Resource group: Select as appropriate.
- Name: Enter a name for your firewall.
- Region: Match the region of your virtual network.
- Firewall tier: Select Standard.
- Virtual Network: Choose the network identified in Step 1.
- Firewall Policy: Select Use a Firewall Policy to manage this firewall.
- Policy Name: Click Add new and enter a name (for example, Test-policy).
- Firewall Management NIC: Disable this setting.
- Review your settings and create the firewall.
Configure Routing
- After deployment, open the Azure Firewall resource and note its private IP address.
- In the Azure portal, navigate to your virtual network and select Subnets.
- Identify the subnet where your catalog VMs reside (typically named default).
- Create a new route table or select an existing one associated with this subnet.
- Add a new route:
-
Destination:
0.0.0.0/0 -
Next hop type:
Virtual appliance - Next hop address: Enter the Azure Firewall’s private IP address.
-
Destination:
- Save the route.
Configure Firewall Rules
- In the Azure portal, go to Firewall Manager > Azure Firewall Policies.
- Select the policy that you created (for example, Test-policy).
- Go to Rules.
- Add a new Application rule collection (recommended for web filtering).
- Define rules to allow or deny specific FQDNs or URL categories. For example, to deny access to
www.example.com:-
Name:
DenyExampleWebsite - Source IP address: The subnet range of your catalog VMs.
-
Destination FQDNs:
www.example.com -
Protocols:
http:80,https -
Action:
Deny
-
Name:
- Save the rule collection.
- Add additional Allow or Deny rules as needed, adjusting priorities accordingly. (Optional)
Test the Configuration
- Launch a browser session from a machine in the configured catalog.
- Try accessing both allowed and blocked websites to confirm that access controls are working correctly.
- Verify that the firewall is correctly filtering network traffic according to the defined rules.
Troubleshooting
If you encounter issues, refer to the Azure Firewall Documentation.
Limitations
All browsers within the same catalog use the same firewall, policies, and rules.
Enable Network Address Translation (NAT) (Secure Web) Gateway
On the Configuration Details page, you have the option to add a Secure Web Gateway for specific catalogs.
Software Upgrades and Patch Management
Citrix creates and manages the machine images and catalogs, including software management. When new versions of catalogs are available, Citrix pushes these upgrades to customer catalogs, ensuring that their machines receive the latest fixes and patches next time they get restarted. RBI uses the DaaS Catalog service to facilitate these upgrades in the customer’s subscription.
Integration with Citrix Workspace
Remote Browser Isolation can be integrated with Citrix Workspace. To ensure that it’s integrated:
- Sign in to Citrix Cloud.
- In the upper left menu, select Workspace Configuration.
- Select the Service Integrations tab.
- Confirm that the Remote Browser Isolation service entry indicates Enabled. If it does not, click the ellipsis menu and select Enable.
If you haven’t already done so, configure the Workspace URL, external connectivity, and workspace authentication for your Workspace, as described in Configure authentication to workspaces.
Remote Browser Isolation supports authentication with Active Directory and Microsoft Entra ID. Authentication with Active Directory is configured by default. For information about configuring authentication using Microsoft Entra ID, see Connect Microsoft Entra ID to Citrix Cloud.
If you configure authentication using Microsoft Entra ID, the on-premises domain containing your Active Directory domain controllers must contain one (preferably two) Cloud Connectors.
Integrate with your on-premises StoreFront™
Citrix Virtual Apps and Desktops™ customers with an on-premises StoreFront can easily integrate with the Remote Browser Isolation service to provide the following benefits:
- Aggregate your published remote isolated browsers with your existing Citrix Virtual Apps™ and Desktops apps for a unified store experience.
- Use native Citrix Receivers for enhanced end user experience.
- Strengthen security for Remote Browser Isolation launches by using your existing multifactor authentication solution integrated with your StoreFront.
For details, see CTX230272 and the StoreFront configuration documentation.
In this article
- User Activity Logging
- Integration with Chrome Enterprise Premium (CEP)
- Configuring Azure Firewall for Customer-Managed RBI Catalog Virtual Network
- Enable Network Address Translation (NAT) (Secure Web) Gateway
- Software Upgrades and Patch Management
- Integration with Citrix Workspace
- Integrate with your on-premises StoreFront™