Configure
Feature flag management
Feature flags are used to enable or disable features dynamically. If an issue occurs with Citrix Workspace™ app in production, the affected feature can be disabled dynamically, even after the feature is shipped.
How to configure
No configurations are needed to enable traffic for feature management, except when a firewall or proxy is blocking outbound traffic. In such cases, you need to enable traffic using specific URLs or IP addresses, depending on your policy requirements.
Note:
- Once we’ve applied feature flags, you’ll see the feature flag updates after the next launch of your Citrix Workspace app. When you’re in the Incognito mode also, you’ll see the updates after the next launch.
To date, for cloud customers, there’s no access to StoreFront to customize Citrix Workspace app for HTML5.
Enable traffic for feature flag management
For Citrix Workspace app version 2409 and later:
To ensure optimal functionality and access to preview features, you need to enable traffic to the URL features.netscalergateway.net.
Known issues and workaround
If you can’t upgrade to Citrix Workspace app for HTML5 2409 or later and experience inconsistencies with the following feature in versions older than 2409, set the recommended configuration values as follows:
- When you start an app session, a white bar might appear inside the session. As a workaround, disable the Enhanced app switcher support feature. For more information about the configuration, see Enhanced app switcher support. [CVADHELP-18625]
-
When you use Citrix Workspace app for HTML5 versions 2308 or 2309 with the F5 Load Balancer, sessions intermittently fail to start or become unresponsive. The issue occurs after the feature flag management is deprecated for versions before 2409. As a workaround:
- Navigate to
C:\Program Files\Citrix\Receiver StoreFront\HTML5Clientin the StoreFront server and locateconfiguration.jsfile. -
Navigate to the end of the file and paste the following:
//Script to disable CGP WASM Object.defineProperty(globalThis["HTML5_CONFIG"]["transport"], 'wasmCgpEnabled', { get() { return false; }, set(value) { }, configurable: true, enumerable: true, }); <!--NeedCopy--> - Click Save. [RFHTMCRM-14936]
- Navigate to
-
In a multi-monitor setup, typing characters on the second screen of ChromeOS devices causes the keyboard to send double strokes. For example, pressing ‘t’ results in ‘tt.’ [CVADHELP-27464]
As a workaround:
Upgrade Citrix Workspace app for HTML5 to version 2409 or later, and ensure that traffic is allowed to the URL
features.netscalergateway.net. If upgrading isn’t possible, disable the IME multi-monitor feature in the configuration settings:'features' : { 'ime': { 'multiMonitor' : false } } <!--NeedCopy-->
Global App Configuration service
Administrators can customize user settings for sessions that are launched in Citrix Workspace app by using the Global App Configuration service. Administrators can customize user settings for on-premises and Workspace (Cloud) deployments.
Previously, administrators could only use the configuration.js for this purpose, and it was applicable only for StoreFront users.
Limitation in the feature
- Global App Config service settings might not work as expected if you’ve installed the AdBlock extension on the browser. [CVADHELP-23003]
- Custom domain URLs feature doesn’t adhere to the Global App Configuration service (GACS) settings.
How to configure
The Global App Configuration service for Citrix Workspace allows a Citrix administrator to deliver Workspace service URLs and Workspace App settings through a centrally managed service.
For more information, see the Global App Configuration service documentation.
Notes:
- This feature is available for workspace and HTTPS‑based stores only.
- For the Global App Configuration service to work, verify that your users can access the URL
.
Clipboard
Before introducing this feature, Citrix Workspace app did not support copying and pasting HTML-formatted text from a local application to another application using the Paste Special feature. As a result, the targeted app (in this case, Microsoft Excel) wouldn’t keep its HTML formatting characteristics.
Citrix Workspace app for HTML5 supports HTML format in addition to plain text between the client and a session. This support is useful for Office apps and browsers. Enhanced clipboard support is available on Chrome and Safari browsers only. You can copy HTML content and keep formatting. When copying a link in Chrome, a <img> tag is added in HTML format, which effectively allows you to copy images and text. This HTML formatting feature is richer than plain text but doesn’t work in all applications.
For more information, see Client clipboard redirection in the Citrix Virtual Apps and Desktops documentation.
Enhanced clipboard experience
You can copy and paste text between the session and the end user’s device. You can do it when you launch multiple Virtual Desktops hosted applications or desktops on Windows, Mac, or Chrome operating systems using the browser based Citrix Workspace app for HTML5.
With this feature, you can use the Ctrl C and Ctrl V hotkeys (for Windows or Chrome operating systems) and CMD C and CMD V hotkeys (for Mac operating system) to copy and paste.
This feature is enabled by default.
On Firefox and Edge browsers, to copy the text from a remote session to a local device, press Ctrl C and then click Confirm.
Disable the copy confirmation dialog by selecting the Disable Copy Confirmation checkbox in Preferences on the toolbar. Clear the checkbox to enable the option again.
To disable the enhanced clipboard experience
To disable this feature, edit the configuration.js file located inside the HTML5Client folder (C:\Program Files\Citrix\Receiver StoreFront\HTML5Client) and set the value of directClipboard to false.
Known limitations in the feature
- You can copy and paste only HTML, plain text, images, but not files.
- This feature doesn’t support large data.
- The Ctrl key might remain stuck in the down position. This issue occurs when you press the right Ctrl key for a long time and then press C to copy the text. As a workaround, click the right Ctrl key multiple times.
- Occasionally, copying text requires an extra click through the Copy confirmation dialog when you use Google Chrome, Safari, Edge, and Firefox browsers.
- Use the Ctrl c or CMD C and Ctrl V or CMD V keys to copy and paste. Occasionally, using the Edit menu or right-click option to copy the text might require an extra click using the Confirm dialog.
- The right-click functionality works only when you copy and paste from your virtual desktop and app sessions to your local device. It doesn’t work when you copy and paste from the local device to your virtual desktop and app sessions.
Support for copying image clips
Using the standard keyboard shortcuts, you can now copy and paste image clips between your local device and your virtual desktop and app sessions. You can use the standard keyboard shortcuts for copying and pasting while using apps such as:
- Microsoft Word
- Microsoft Paint
- Adobe Photoshop
Previously, this functionality was available only for text for the Google Chrome browser and the Microsoft Edge (Chromium) browser with HTTPS stores. This functionality is now available for text and images. It’s applicable on the Google Chrome browser and the Microsoft Edge (Chromium) browser with HTTPS stores.
| Supported clipboard actions | |
|---|---|
| Google Chrome browser and Microsoft Edge (Chromium) browser with HTTPS stores | Image clip copy and paste support. Text copy and paste support |
| Mozilla Firefox, HTTP stores | Text copy and paste support |
Notes:
- In general, for security reasons, we recommend you use only HTTPS-based stores.
- Due to network bandwidth constraints, sessions might become unresponsive when you try to copy and paste an image clip larger than 2 MB.
- In Microsoft Windows OS and ChromeOS devices, use Ctrl + C and Ctrl + V for copy and paste. In Apple Mac devices, use Command + C and Command + V for copy and paste.
- The right-click functionality works only when you copy and paste from your virtual desktop and app sessions to your local device. It doesn’t work when you copy and paste from the local device to your virtual desktop and app sessions.
- We’ve tested this feature with BMP, PNG, JPEG, and GIF formats.
Clipboard supports HTML format
You can use HTML format for clipboard operations between the virtual desktop and the endpoint device. When you copy the HTML data, the source content format is copied, and when you paste the data, the destination content carries the formatting. In addition, HTML format provides a better look and feel.
For more information on how to set the policies, see Client clipboard write allowed formats in the Citrix Virtual Apps and Desktops documentation.
Switch apps
This feature enables an end user to switch between many published apps in the same session. When you open or close an app, the app count updates accordingly. If some apps are opened in another session, the app count includes all the opened ones.
Note:
This feature is enabled by default.
How to use
You can effortlessly switch between applications in a browser tab by using the switch app functionality. This feature has two modes:
- Taskbar mode
- Grid-view mode
Taskbar mode
This mode optimizes sessions running on larger screens like laptops and desktops. For apps launched from the same VDA, the taskbar allows easy navigation between the apps.
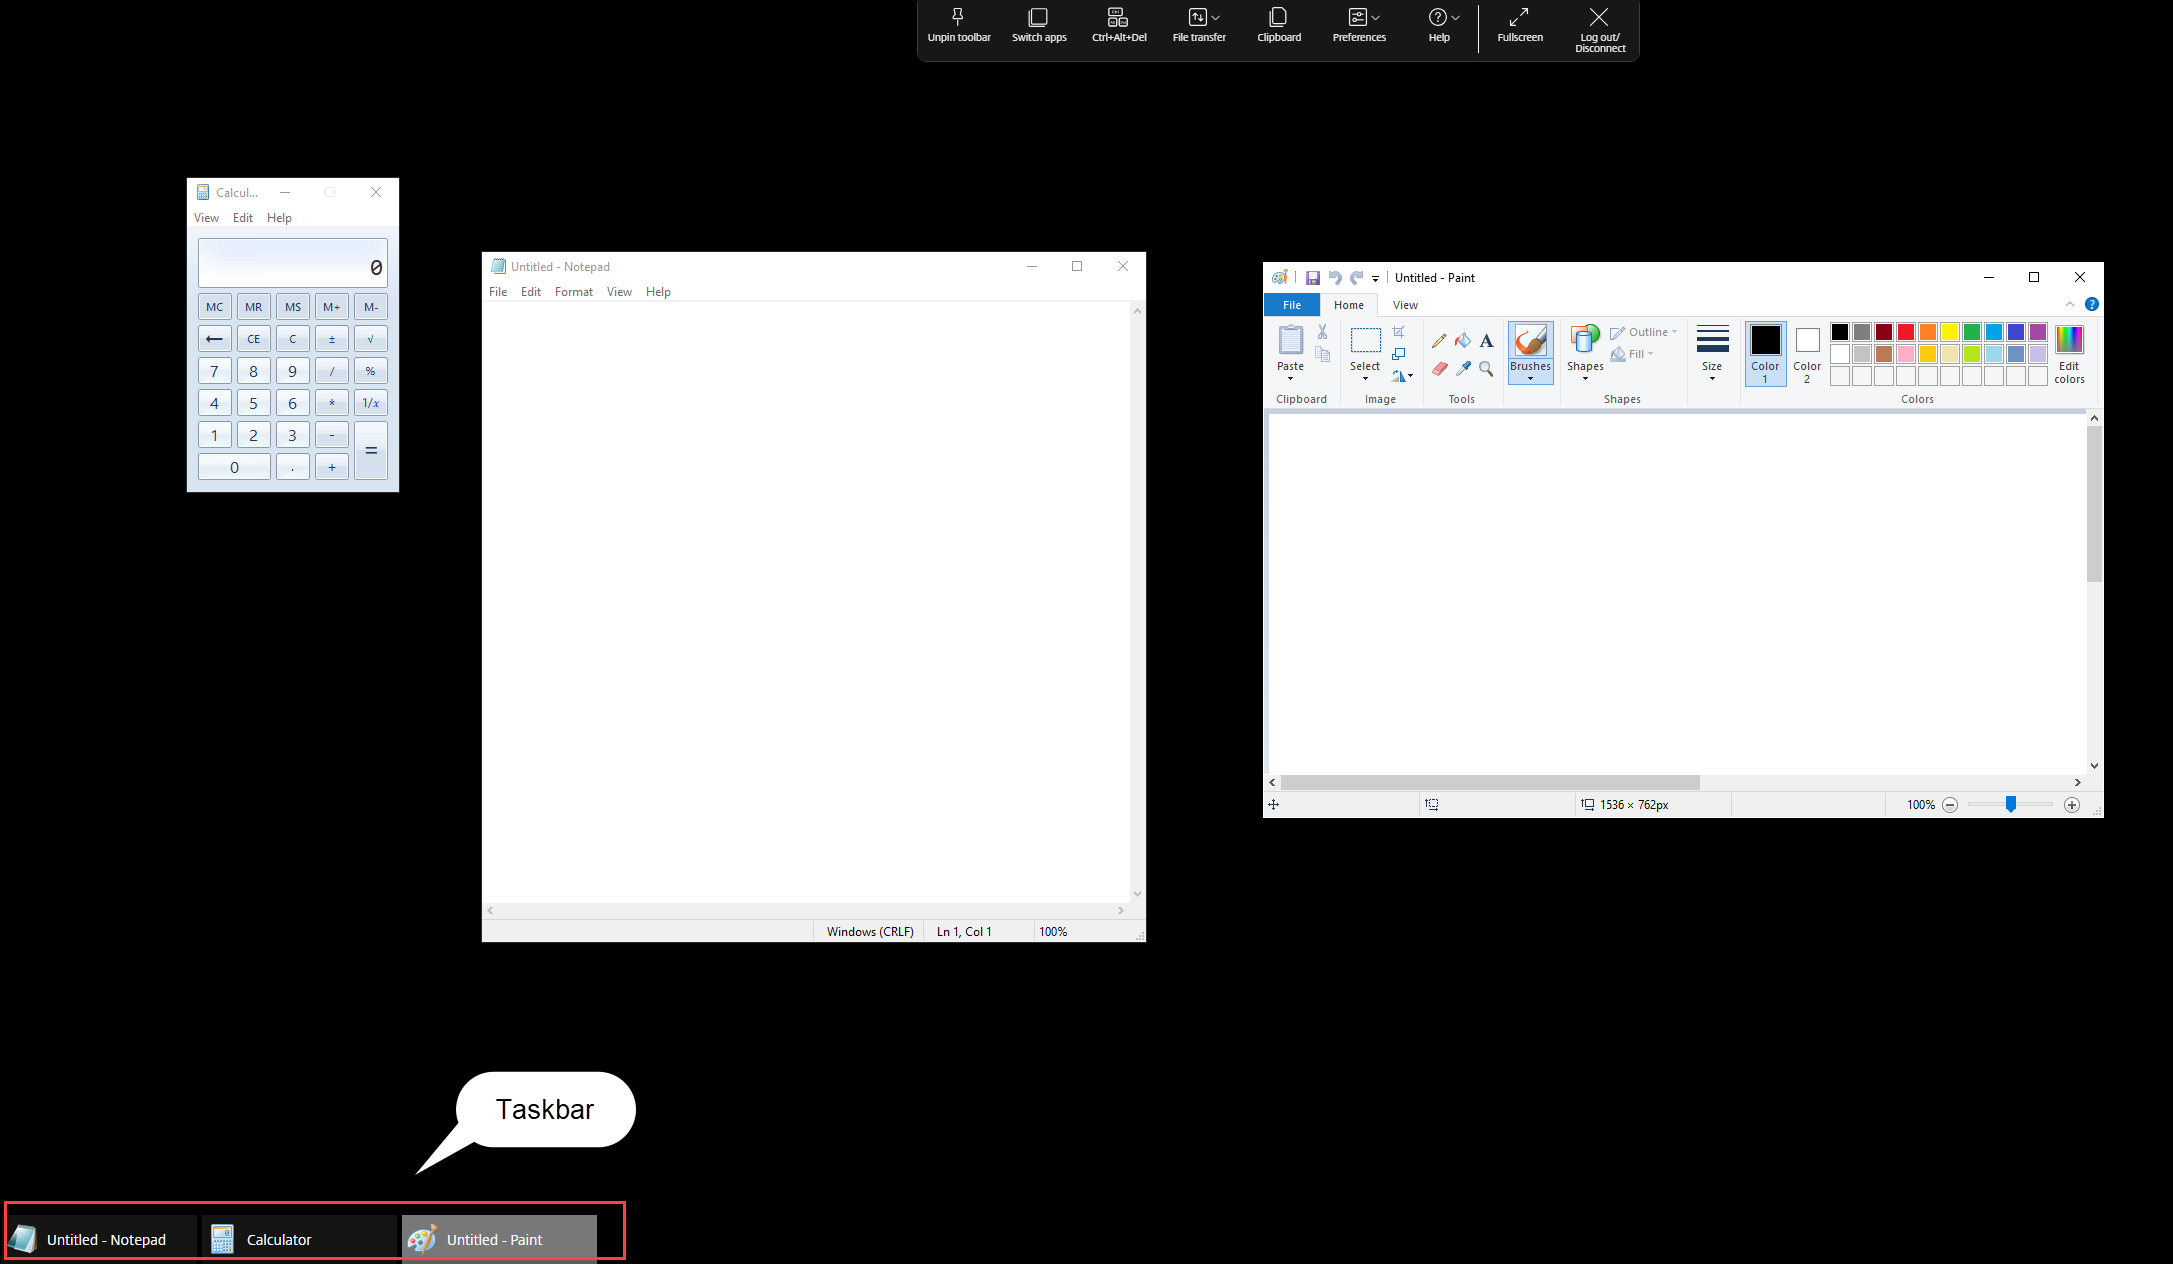
The taskbar shows all the apps currently active in the session, allowing users to switch between them easily. In the right-click menu of the app switcher, users have two preference options that are remembered for the next launch.
- Auto-hide: The app switcher automatically hides the taskbar when not in use and reappears when the user hovers the mouse pointer at the bottom of the screen.
- Show icons only: Only the icons of the apps are displayed, with their titles hidden.
![]()
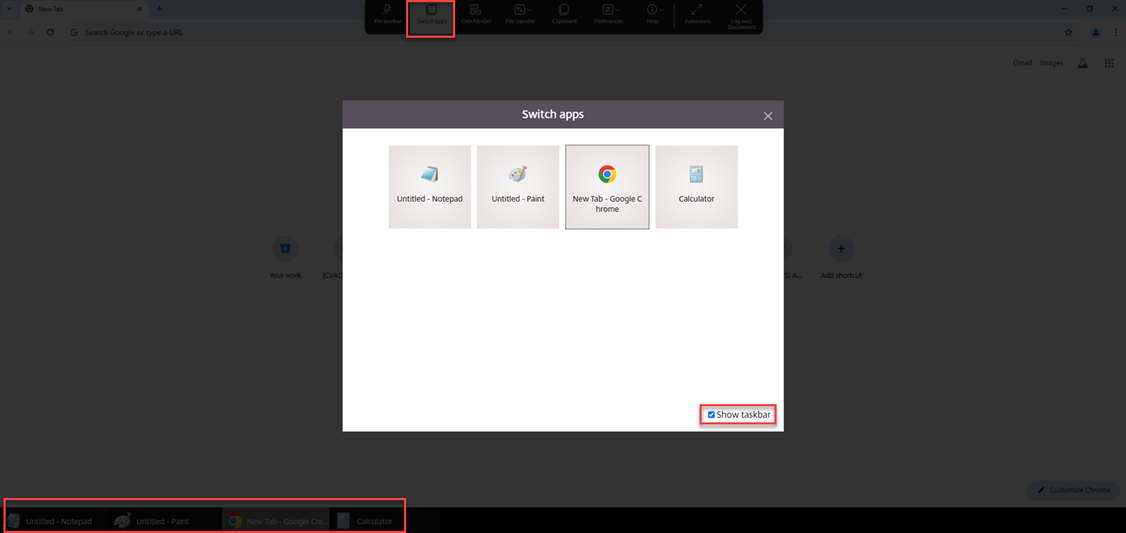
Grid-view mode
This mode optimizes the sessions running on mobile or touch devices. To bring the grid into view, touch or tap the Switch apps icon in the toolbar.

The grid view displays apps that are launched from the same VDA, providing users on mobile devices with a clearer and larger view compared to the regular taskbar. Also, there is an option to enable or disable the app switcher taskbar, allowing users to adjust the viewport size as needed.
Enhanced app switcher support
When you launch a published application session in full-screen or kiosk mode, the session doesn’t overlap with the desktop taskbar. The app switcher no longer hides the session. This enhancement is supported only in single-monitor mode.
Note:
This feature is enabled by default.
How to configure
You can disable the feature in the following ways:
- Configuration.js
- Global App Configuration service
Configuration.js
In Citrix Workspace app for HTML5, the configuration.js file is located under the C:\Program Files\Citrix\Receiver StoreFront\HTML5Client folder. Edit this file to configure the feature.
Notes:
- Citrix recommends that you back up the
configuration.jsfile before modifying it.- Administrator-level credentials are required to edit the
configuration.jsfile.
To disable the feature:
- Navigate to the
configuration.jsfile in theHTML5Clientfolder. -
Add the
enhancedAppswitcherattribute and set the attribute tofalse. For example:'ui': { 'appSwitcher': { 'enhancedAppSwitcher': false } } <!--NeedCopy-->
Note:
The
configuration.jsfile is in theC:\Program Files\Citrix\Receiver StoreFront\HTML5Clientfolder on the StoreFront machine.
Global App Configuration service
On the cloud setup, administrators can disable the enhanced switch apps feature by setting the Enhanced App Switcher Support attribute to False.
Improved virtual apps and desktops launch experience
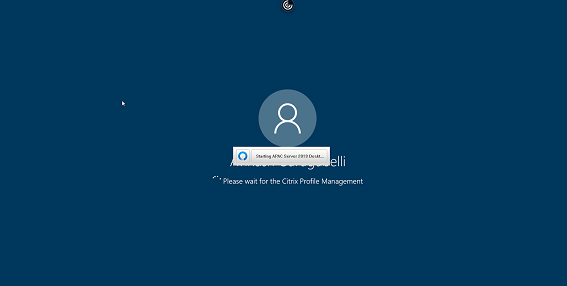
Starting with the 2306 release, the improved app and desktop launch experience provide timely and relevant information about the launch status.
Note:
Administrators must upgrade HDX SDK files to use Citrix Workspace app for HTML5 2306 version. The older HDX SDK files are incompatible with the 2306 version and later. To download the latest HDX SDK files, click here. For more information, see the Citrix Workspace app for HTML5 HDX SDK developer docs.
Configure session launch notification display
Starting with 2307, administrators can enable or disable the display of launch progress notifications using the following configuration. If this configuration is enabled, you see the session launch progress notifications on the lower right of the screen. If this configuration is disabled, you can’t see the session launch progress notifications.
Note:
- By default, this configuration is enabled.
The following screenshot appears when notifications are enabled.
The following screenshot appears when notifications are disabled.
How to configure
You can configure this feature in the following way:
In Citrix Workspace app for HTML5, the configuration.js file is in the C:\Program Files\Citrix\Receiver StoreFront\HTML5Client folder. Edit this file to configure the feature.
Notes:
- Citrix recommends that you back up the configuration.js file before modifying it.
- Administrator-level credentials are required to edit the configuration.js file.
To disable the feature, do the following:
- Navigate to the configuration.js file in the HTML5Client folder.
-
Add the CTXTUI attribute and set the attribute to false.
The following is an example of JSON data:
{ "vc_channel": { "CTXTUI": false } } <!--NeedCopy--> - Save the changes.
Configuration for blocking Global App Configuration service (GACS) requests
With the 2509 version, administrators can block Global App Configuration service (GACS) requests using configuration.js for on-prem stores. The attribute name is disableGACS. When you set this attribute to true, Citrix Workspace app doesn’t connect to any GACS endpoints.
Note:
The attribute disableGACS is set as false by default.
How to configure
Notes:
- Citrix recommends you back up the configuration.js file before making changes.
- Administrator-level credentials are required to edit the configuration.js file.
- The configuration.js file is located under the
C:\Program Files\Citrix\Receiver StoreFront\HTML5Clientfolder.
To set disableGACS to true using configuration.js:
- Navigate to the configuration.js file.
-
Add the disableGACS setting and set the disableGACS attribute to true.
The following is an example of JSON data:
{ "thirdPartyServices": { "disableGACS": true } } <!--NeedCopy--> - Save the changes.
Configuration for blocking feature flag requests
With the 2509 version, administrators can block feature flag requests using configuration.js for on-prem stores. The attribute name is disableFeatureFlag. When you set this attribute to true, Citrix Workspace app doesn’t connect to any feature flag endpoints.
Note:
The attribute disableFeatureFlag is set as false by default.
How to configure
Notes:
- Citrix recommends you back up the configuration.js file before making changes.
- Administrator-level credentials are required to edit the configuration.js file.
- The configuration.js file is located under the
C:\Program Files\Citrix\Receiver StoreFront\HTML5Clientfolder.
To set disableFeatureFlag to true using configuration.js:
- Navigate to the configuration.js file.
-
Add the disableFeatureFlag setting and set the disableFeatureFlag attribute to true.
The following is an example of JSON data:
{ "thirdPartyServices": { "disableFeatureFlag": true } } <!--NeedCopy--> - Save the changes.
In this article
- Feature flag management
- Global App Configuration service
- Clipboard
- Enhanced clipboard experience
- Switch apps
- Enhanced app switcher support
- Improved virtual apps and desktops launch experience
- Configuration for blocking Global App Configuration service (GACS) requests
- Configuration for blocking feature flag requests