Session experience
High DPI support for multiple monitors
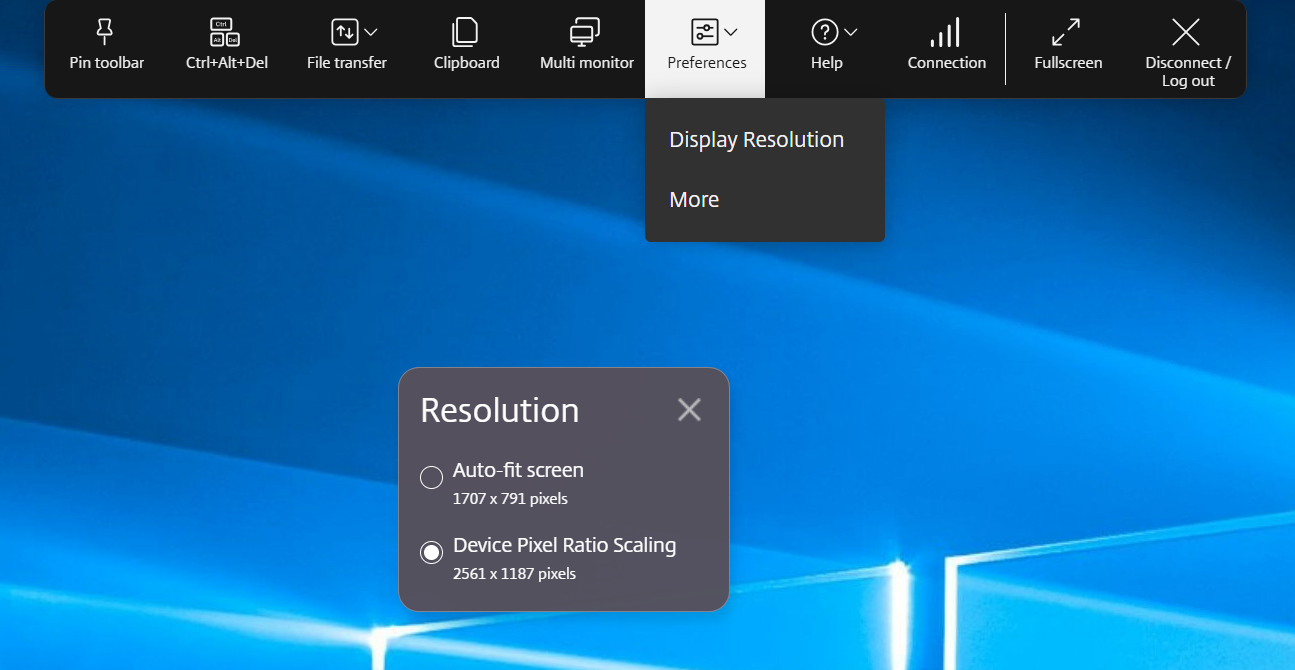
Citrix Workspace app for HTML5 supports DPI scaling for app and desktop sessions on single and multi-monitor sessions. This feature is mostly used with large-size and high‑resolution monitors to display applications, text, images, and other graphical elements in a size that can be viewed comfortably.
Note:
This feature is enabled by default for app and desktop sessions.
Benefits
This feature automatically adjusts virtual desktop and app sessions based on device DPI, ensuring content appears perfectly sized and sharp without blurriness. Apps and desktops are intelligently scaled based on monitor resolution and device pixel ratio for optimal readability and usability.
How to configure
- End users can disable this feature using session toolbar.
- Administrators can disable this feature using Configuration.js.
Session toolbar
In the Citrix Workspace app for HTML5 session, end users can disable this feature using the Toolbar > Preferences > Display Resolution > select Auto-fit screen option to disable the High DPI scaling.
Configuration.js
Administrators can disable using configuration.js.
Notes:
- Citrix recommends you back up the configuration.js file before making changes.
- Administrator-level credentials are required to edit the configuration.js file.
- The configuration.js file is located under the
C:\Program Files\Citrix\Receiver StoreFront\HTML5Clientfolder.
To disable the feature, do the following:
- Navigate to the configuration.js file.
-
Edit the file and set the scaleToDPI attribute to false.
The following is an example of JSON data:
{ "features": { "graphics": { "dpiSetting": { "scaleToDPI": false } } } } <!--NeedCopy--> - Save the changes.
Session reliability
The session reliability feature ensures that sessions remain active on the user’s screen even if there is a disruption in network connectivity. Users continue to see the application they’re using until network connectivity resumes.
When connectivity is lost, the session remains active on the server. To alert the user about the connectivity issue, the display becomes unresponsive and a reconnect overlay screen appears. Until connectivity resumes on the other side of the tunnel, session reliability reconnects users without reauthentication prompts.
Note:
The session reliability timeout policy setting has a default value of 180 seconds or three minutes. Though you can extend the time the session reliability keeps a session open, this feature is convenient to the user.
For more information about the feature, see Session reliability in the Citrix Virtual Apps and Desktops documentation.
Important
With the session reliability feature enabled, the default ports for session communication are 2598 for non-SSL VDA and 443 for SSL VDA.
You can use session reliability with Gateway and SSL VDAs. When using a non-SSL VDA with Citrix Gateway, data encryption happens between the user device and Citrix Gateway. When using SSL VDA with Citrix Gateway, data encryption happens from the user device to VDA.
Using session reliability policies
- The session reliability connections policy setting allows or prevents session reliability.
- The session reliability timeout policy setting has a default value of 180 seconds or three minutes. Though you can extend the time the session reliability keeps a session open, this feature is convenient to the user. Therefore, it does not prompt the user to re-authenticate.
Tips
- Extending session reliability timeouts might cause a user to get distracted and walk away from the device, leaving the session accessible to unauthorized users. By default, incoming session reliability connections use port 2598, unless you change the port number in the session reliability port number policy setting. If you use session reliability, it closes, or disconnects, the user session after the amount of time you specify in the Session reliability timeout policy setting.
- Session reliability is enabled by default on the server. To disable this feature, configure the policy managed by the server.
Configuring session reliability from Citrix Studio
By default, session reliability is enabled.
To disable session reliability:
- Launch Citrix Studio.
- Open the Session Reliability connections policy.
- Set the policy to Prohibited.
Configuring session reliability timeout
By default, the session reliability timeout is set to 180 seconds.
Note:
Session reliability timeout policy can be configured only with XenApp and XenDesktop 7.11 and later.
To modify session reliability timeout:
- Launch Citrix Studio.
- Open the Session reliability timeout policy.
- Edit the timeout value.
- Click OK.
Enhanced session reliability
The following improvements address network disruptions, ensuring a better user experience by reconnecting the session reliably:
- When you switch between Internet Service Providers (ISPs), the session becomes unresponsive. With the fix, you can reconnect to the session during ISP switches.
- When you switch networks and one Wi-Fi connection lacks internet connectivity, the session reliability feature might fail. With the fix, you can now reconnect to the session during a network switch.
Toolbar
By default, the enhanced toolbar feature is enabled.
To hide the toolbar:
- While logged in as an administrator, access the configuration.js file in
C:\ProgramFiles\Citrix\<actual path>\HTML5Client. - Search the configuration.js file to locate ‘menubar key.’
- In the configuration.js file, set “menubar”:false.
You can also hide an individual icon to prevent it from showing up in the toolbar. For example, to hide the ctrl+alt+del button in the toolbar:
- While logged in as an administrator, access the configuration.js file in C:\ProgramFiles\Citrix<actual path>\HTML5Client.
- Search the configuration.js file to locate ‘lock.’
- In the configuration.js file, set lock:false.
URL redirection
URL redirection allows you to control whether users access the URL by using:
- browser published on servers or
- browser that run on user devices
URL (Host to client) redirection is one type of content redirection. It’s supported only on Server OS VDAs (not Desktop OS VDAs).
When the URL redirection is enabled, the URLs are intercepted on the server VDA and sent to the user device. Citrix Workspace app for HTML5 displays a dialog prompting the user to select whether to open the URL within the session or on the local device. The dialog appears for every URL.
When the URL redirection is disabled, users open the URLs with web browsers or multimedia players on the server VDA. When the URL redirection is enabled, users can’t disable it.
URL redirection was previously known as server to client redirection or host to client redirection.
For more information, see General content redirection.
Battery status indicator
The battery status of the device now appears in the notification area within the virtual desktop session. Previously, the battery status indicator wasn’t visible in the session. This setting sometimes led to a loss of productivity when the laptop shuts down after the battery runs out.
The newly available battery status indicator feature is supported on Google Chrome and Microsoft Edge (Chromium) browsers. It’s supported only on VDA versions 7.18 and later.
Note:
With Microsoft Windows 10 VDA, the battery status indicator might take about 1 or 2 minutes to appear.
Improved in-session toolbar
Starting with the 2411 version, an enhanced toolbar UI appears when you start a desktop session. The look and feel of the in-session toolbar UI has changed. The toolbar UI is designed to enhance the end user experience by organizing the options in a user-friendly manner.
Old toolbar UI

New toolbar UI

Note:
This feature is disabled by default. To enable the feature, follow the configuration steps.
Known issues in the feature
- When you move the toolbar notch in the session, the tooltip for the notch doesn’t appear. [RFHTMCRM-14281]
How to configure
You can configure the new toolbar feature for on-premises setups as follows:
Configuration.js**
In Citrix Workspace app for HTML5, the configuration.js file is located under the C:\Program Files\Citrix\Receiver StoreFront\HTML5Client folder. Edit this file to configure the feature.
Notes:
- Citrix recommends that you back up the configuration.js file before modifying it.
- Administrator-level credentials are required to edit the configuration.js file.
To enable the new toolbar feature:
- Navigate to the configuration.js file in the HTML5Client folder.
- Add the
switchToNewToolbarattribute and set the attribute to true. For example:
   {
       'ui': {
           'toolbar': {
               'switchToNewToolbar': true,
           }
       }
   }
<!--NeedCopy-->
Global App Configuration service
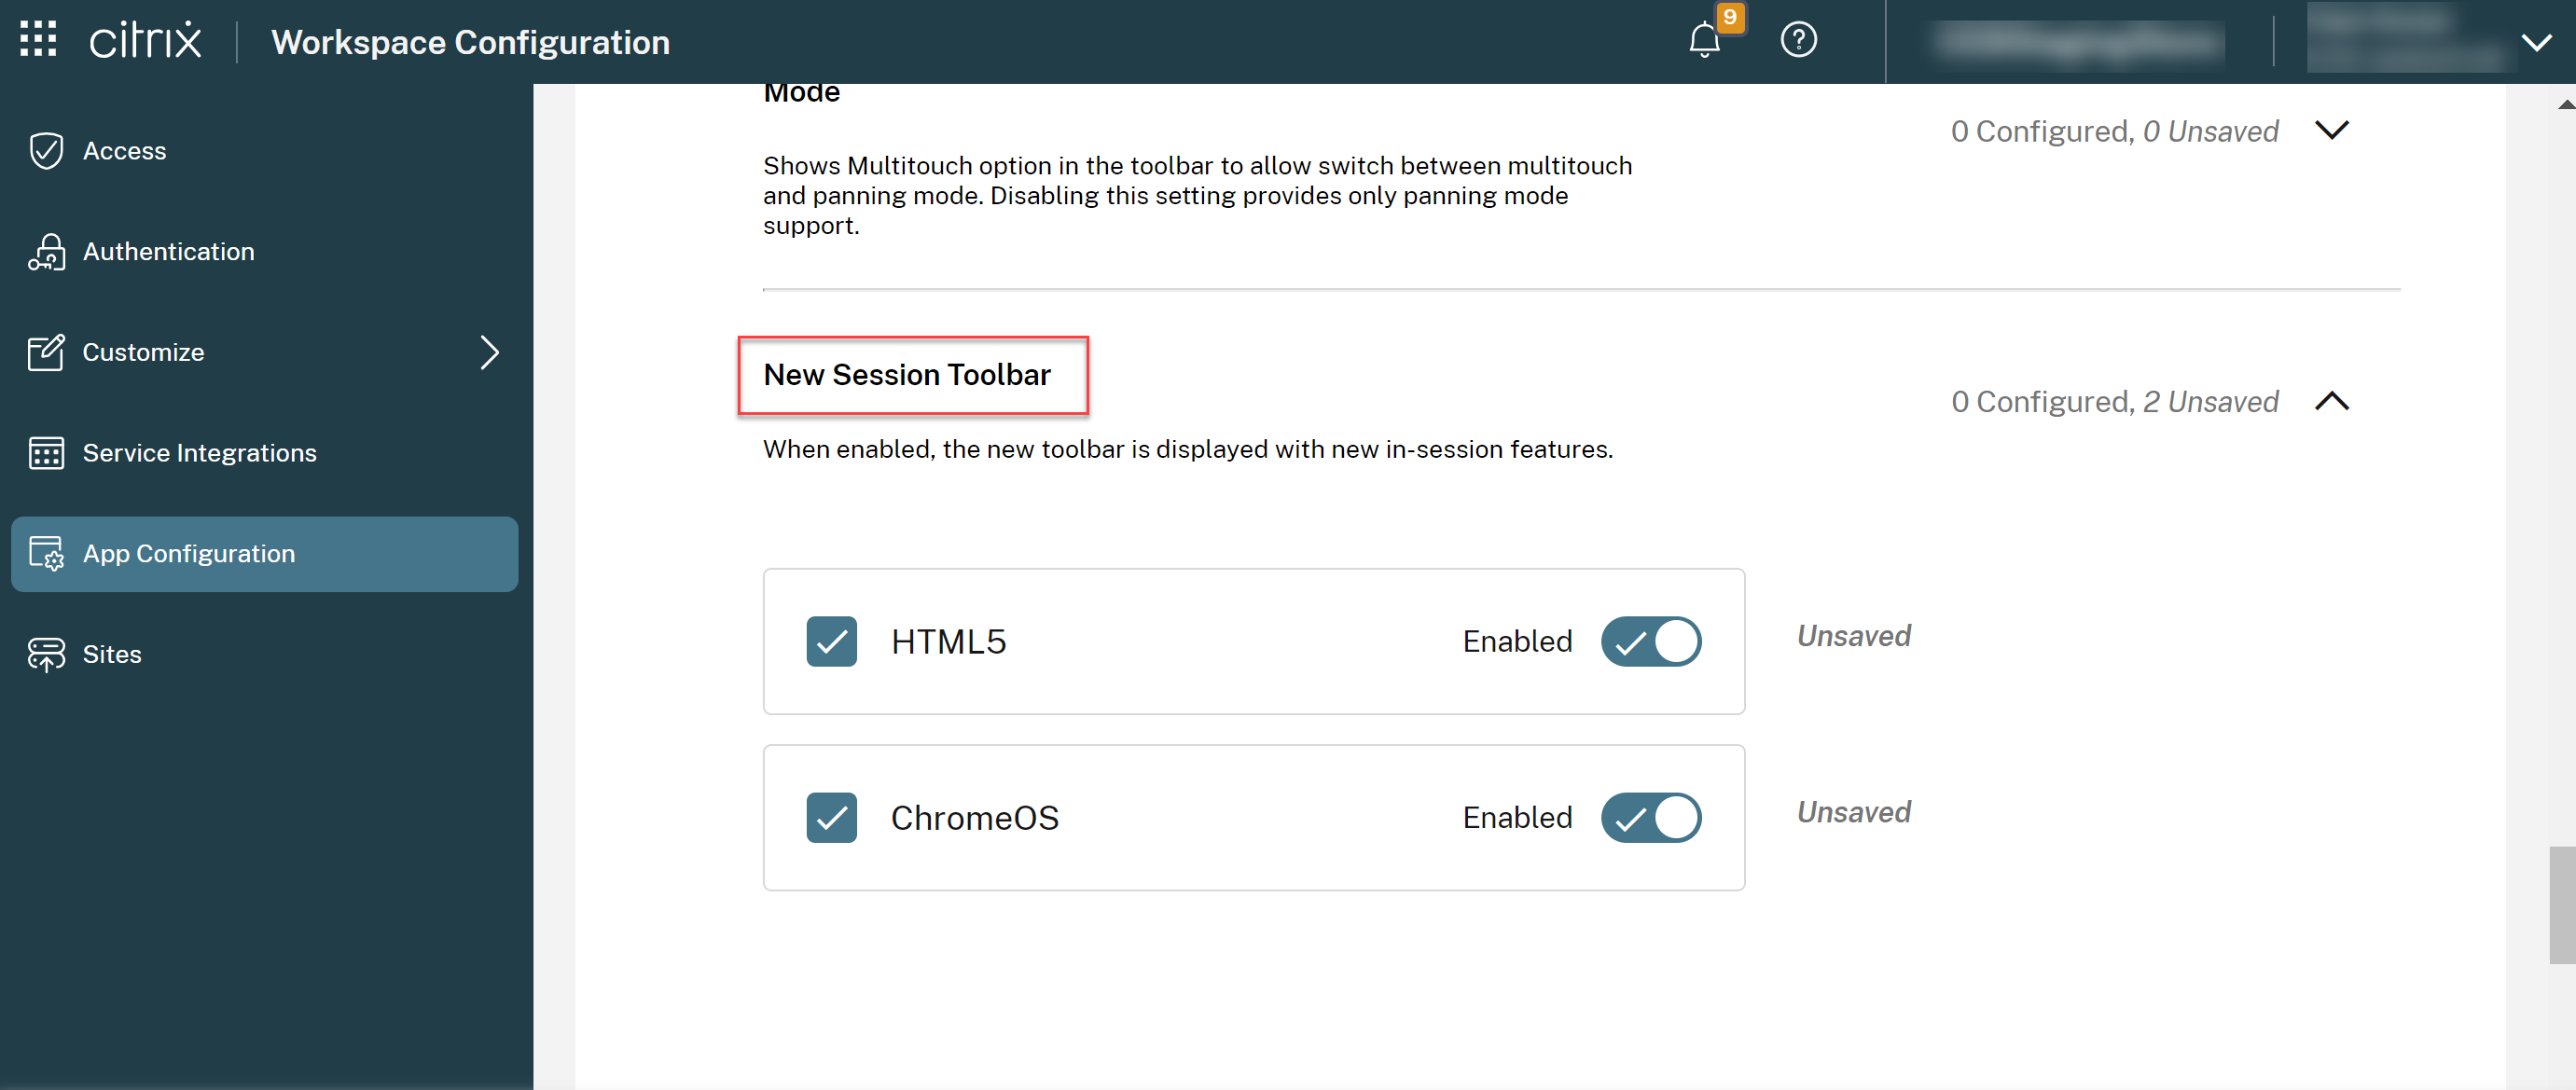
On the cloud setup, administrators can enable or disable the improved toolbar feature by navigating to Workspace Configuration > App Configuration > Session Experience > Toolbar > New Session Toolbar. Select the checkbox and respective toggle button to enable the feature.
Icons and Actions
Note:
The icons are visible to the end users only if their organization’s admin has enabled the specific feature.
| Icon or Action | Description |
|---|---|
| Toolbar notch | When you start an app or a desktop session, the toolbar notch appears at the top of the screen. When you click the notch, the toolbar appears in the unpinned state. Drag and reposition the toolbar notch onto any side of the screen. After you release the mouse, the notch will automatically align itself with the nearest edge. |
| Pin | When you pin it, you can drag and reposition the toolbar onto any side of the screen. After you release the mouse, the toolbar automatically aligns itself with the nearest edge. The advantage of pinning the toolbar is that it doesn’t minimize into a notch after you complete an action that involves toolbar icons. |
| Unpin | When you unpin the toolbar, it minimizes into a notch after you complete an action that involves toolbar icons. You can drag and reposition the toolbar notch onto any side of the screen. |
| Switch apps | Click the icon to view the already opened apps in the same VDA. This icon doesn’t appear in the desktop session. 
|
| Ctrl+Alt+Del | You can perform the Ctrl+Alt+Del function with the click of a button. This option helps users to sign out, switch users, lock the system, or access the Task Manager. |
|
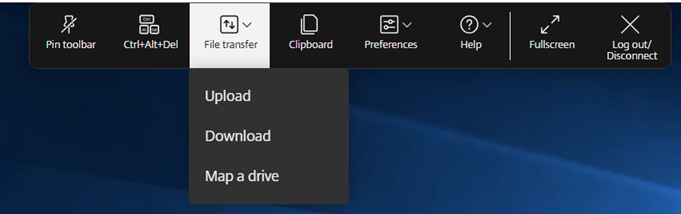
File transfer
|
|
|
|
|
|
| Clipboard | You can use the clipboard option to copy and paste plain text and HTML data from the VDA to the local device and back. For more information, see Clipboard. |
|
Devices
|
Click to open the USB Devices dialog box. Click Add to view the USB devices connected to the local device. The dialog box lists the devices that can be redirected to the session. To redirect the USB devices, select an appropriate device and click Connect. For more information, see USB device redirection. |
| Note: You can view the Devices icon only if your IT administrator provides access to connect USB devices through policy settings. | |
|
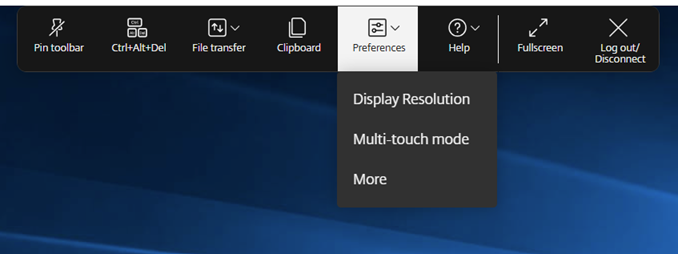
Preferences
|
|
|
|
|
|
|
|
|
Help
|
|
|
|
|
|
| Fullscreen | You can switch your screen from windowed mode to full-screen mode. In Citrix Workspace app for HTML5, the fullscreen icon action doesn’t span the session across monitors. However, if you select the monitors from the custom layout and the session spans to the respective monitors, then when you restore, the Fullscreen icon gets replaced by the Extend option. When you click the Extend icon, the session spans to the previously selected monitors. |
|
Disconnect
|
The disconnect action keeps the virtual desktop running. Log out to save energy. |
Note: When admin configures both Log out and Disconnect options, the following message appears. 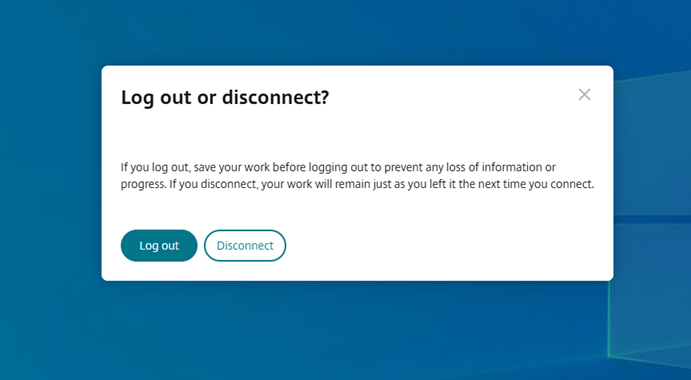
|
|
| Log out to save energy: the logout action shuts down the virtual machine and conserves energy. End users must make sure to save their work before logging out. | |
| Disconnect: closes the virtual desktop session window. However, the virtual session remains active until the next sign-in. End users can resume their work easily. The Sustainability leaf icon appears only when the sustainability feature is enabled. For more information, see Sustainability initiative from Citrix Workspace app. |
Sustainability initiative from Citrix Workspace app
Starting from the 2405 version, we have introduced a sustainability initiative that encourages users to conserve energy that might be used due to running unused virtual desktops.
Starting from the 2411 version, admins can customize the disconnect and log out dialog box contents.
With this feature enabled, when users tap on the X icon to disconnect the session, a prompt is displayed to log out from the desktop session. This feature can be helpful in enterprises that use Windows OS policies to shut down VMs when no users are logged in.
Notes:
- This feature is disabled by default.
- This feature is available on both cloud and on-premises store.
- To use this feature, you must enable the new toolbar feature. To enable, see the configuration section in the Improved in-session toolbar feature.
To enable this feature, do the following:
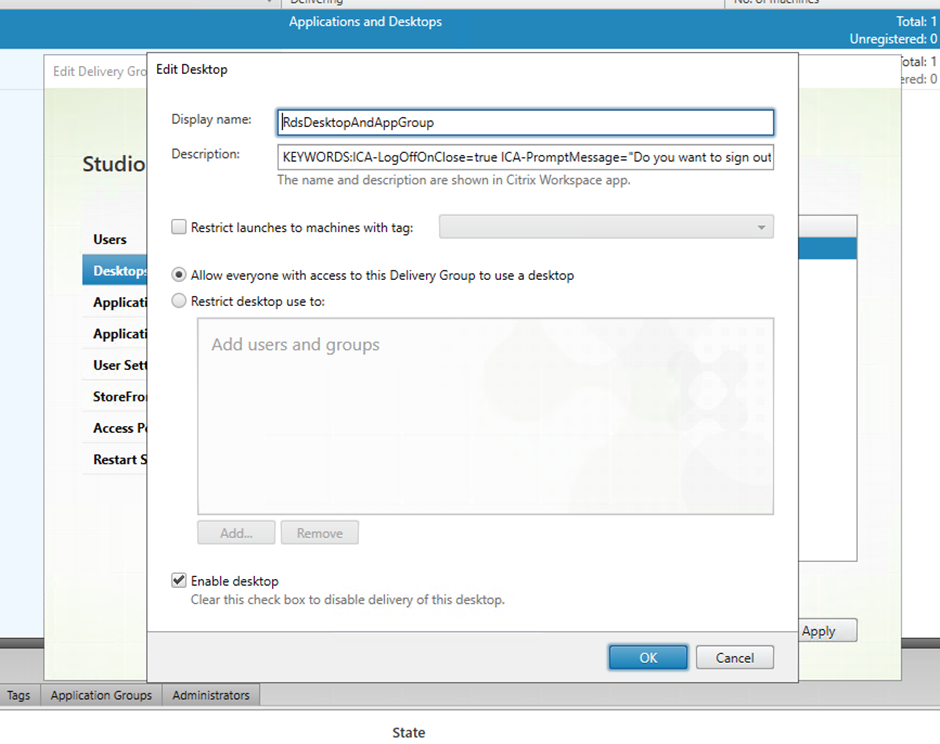
- Navigate to Citrix Studio.
- Click Delivery Groups from the left navigation pane.
- Select the required VDA from the Delivery Group section.
- Click the Edit icon. The Edit Delivery Group page appears.
- Click Desktops from the left navigation pane.
- Select the required VDA where you must add the keywords.
- Click Edit. The Edit Desktop page appears.
- Set the
ICA-LogOffOnClosekeyword totruein the Description field. - Click OK. The following dialog box appears when you close the virtual desktop.
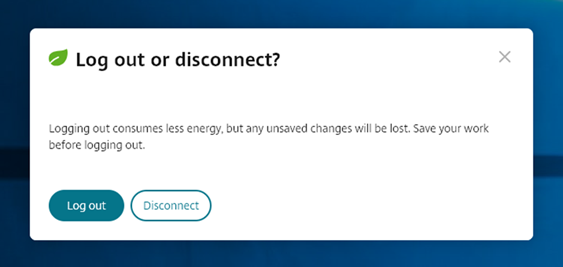
End users can exit from the session in two ways:
Log out to save energy - This sustainability action shuts down the virtual machine to conserve energy. End users must make sure to save their work before signing out.
Disconnect to close the virtual desktop session window. However, the virtual session remains active until the next sign-in. End users can resume their work easily.
Customizing the text in the Save Energy screen
Starting from the 2411 version, admins can customize the disconnect and log out dialog box contents in the Save energy screen.
Notes:
- This feature is disabled by default.
- This feature is available on both cloud and on-premises store.
- To use this feature, you must enable the new toolbar feature. To enable, see the configuration section in the Improved in-session toolbar feature.
Prerequisites
The minimum on-prem StoreFront™ version required is 2407.
Configure
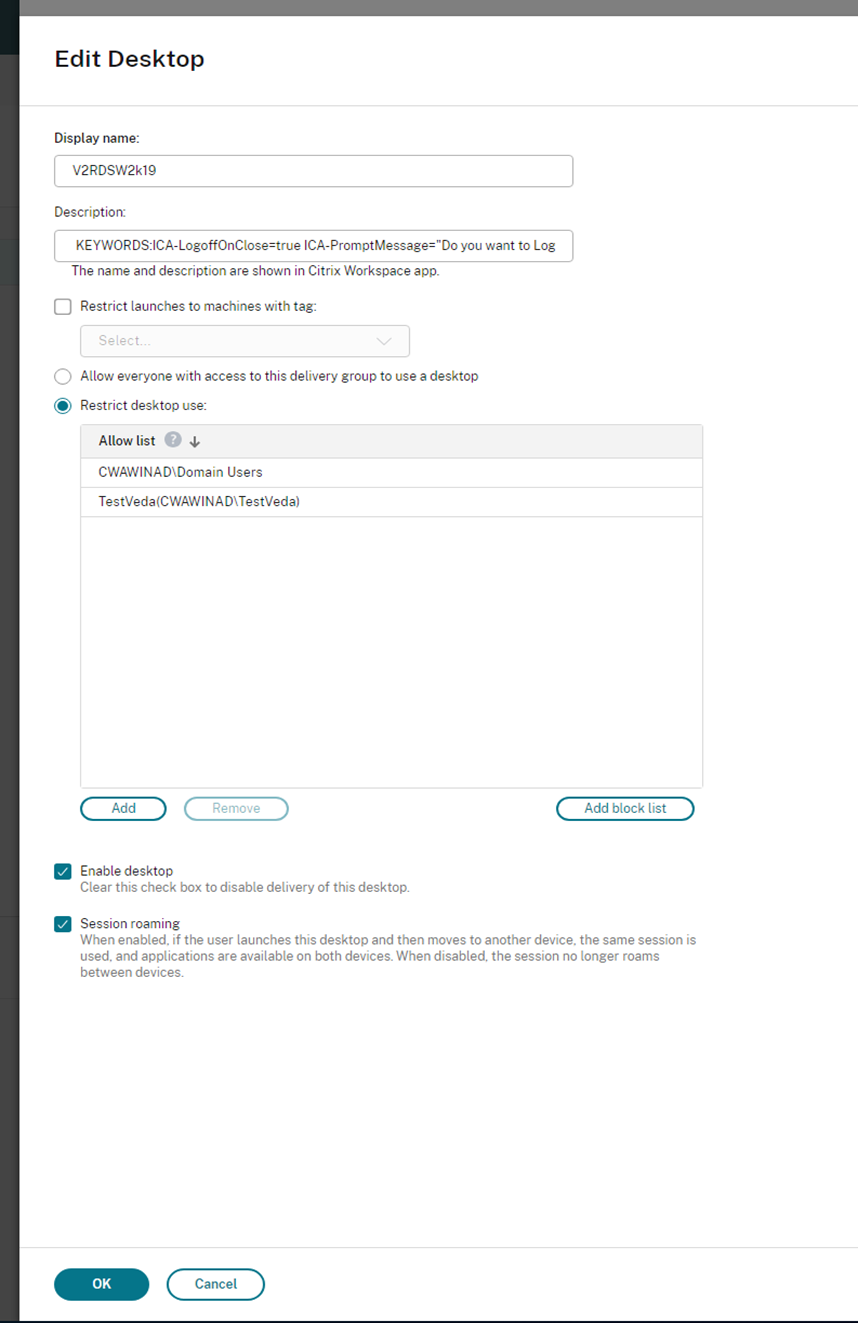
Admins can customize the sustainability dialog box contents using the following keywords in DDC for both on-premises and cloud setup:
Note:
The maximum number of characters allowed in the Description field is 200.
| Keyword | Description |
|---|---|
| ICA-LogOffOnClose | Keyword for enabling or disabling Sustainability. The default value is false. |
| ICA-Icon | Keyword for enabling or disabling Sustainability leaf Icon. Even if this setting is empty, the ICA-LogOffOnClose setting applies. |
| ICA-PromptMessage | Keyword for customizing the prompt message that appears in the dialog box. If you haven’t given a customized message, then the default message applies. |
| ICA-Title | The keyword for customizing the title that appears in the dialog box. If you haven’t given a customized message, then the default message applies. |
Notes:
- The disconnect and log out dialog boxes appear according to the parsed key.
- If you choose not to use the sustainability feature, then the admin can configure the key LogOffOnClose to false. However, the user sees the default dialog box, and can choose to click the Don’t ask me again checkbox. When the user clicks this option, the session disconnects, but the dialog box doesn’t appear in subsequent sessions.
Customization:
To customize the text in the Save Energy screen, do the following:
- Follow steps 1–8 from the preceding section.
- Set the
ICA-PromptMessagekeyword to the required text in the Description field. - Set the
ICA-Titlekeyword to the required text in the Description field. -
Set the
ICA-Iconkeyword to true or false.Example:
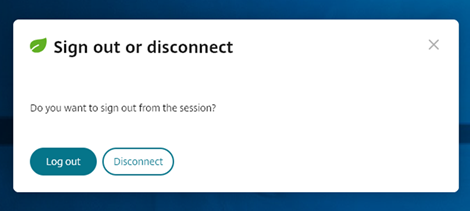
KEYWORDS:ICA-LogOffOnClose=true ICA-PromptMessage="Do you want to sign out from the session?" ICA-Title="Sign out or disconnect" ICA-Icon=true
<!--NeedCopy-->
The following screenshot displays how to edit desktop group dialogs:
For on-premises setups
For cloud setups
The keywords are assigned by default for new desktop machines assigned to the group. For existing desktop machines, you must run the following PowerShell commands for changes to apply:
$dg = Get-BrokerDesktopGroup -Name '<group name>' -Property 'Name','Uid'

$apr = @( Get-BrokerAssignmentPolicyRule -DesktopGroupUid $dg.Uid -Property 'Description' )

Get-BrokerMachine -DesktopGroupUid $dg.Uid -IsAssigned $true | Set-BrokerMachine -Description $apr[0].Description
<!--NeedCopy-->
With this PowerShell script, it’s possible to have multiple assignment policy rules for a single Delivery Group. Using Citrix Studio also, you can configure multiple Assignment policy rules, each with a unique description value, and a possible set of different keywords.
-
Click OK. The following dialog box appears when you close the virtual desktop:
When
ICA-Icon=false, the Leaf icon doesn’t appear.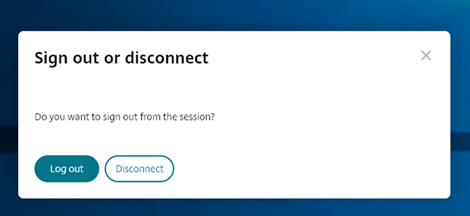
End user experience
When users tap on the X icon to disconnect the session, the following prompt appears:
End users can exit from the session in the following two ways:
- Log out to save energy - This sustainability action shuts down the virtual machine and conserves energy. End users must make sure to save their work before logging out.
- Disconnect - click Disconnect to close the virtual desktop session window. However, the virtual session remains active until the next sign-in. End users can resume their work easily.
Note:
The sustainability leaf icon appears only when your admin has enabled the sustainability feature.
Enhancements to the improved in-session toolbar
Starting with the 2502 version, this feature is enabled by default. To disable the feature, follow the configuration steps mentioned in this article.

Note:
The new toolbar isn’t supported if the Citrix Workspace app for HTML5 session is launched in a mobile browser.
How to configure
You can disable the new toolbar UI by using:
- Configuration.js
- Global App Configuration service
Configuration.js
In Citrix Workspace app for HTML5, the configuration.js file is located under the C:\Program Files\Citrix\Receiver StoreFront\HTML5Client folder. Edit this file to configure the feature.
Notes:
- Citrix recommends that you back up the configuration.js file before modifying it.
- Administrator-level credentials are required to edit the configuration.js file.
To disable the new toolbar feature:
- Navigate to the configuration.js file in the HTML5Client folder.
- Add the
switchToNewToolbarattribute and set the attribute to false. For example:
   {
       'ui': {
           'toolbar': {
               'switchToNewToolbar': false,
           }
       }
   }
<!--NeedCopy-->
Global App Configuration service
On the cloud setup, administrators can disable the new toolbar feature by navigating to Workspace Configuration > App Configuration > Session Experience > Toolbar > New Session Toolbar. Clear the checkbox and respective toggle button to disable the feature.

Toolbar customization
Admins can customize the toolbar, choosing what options must be viewed by the end user. You can customize it using the Global App Configuration service.

To enable a particular feature, administrators can:
- Navigate to Workspace Configuration > App Configuration > Session Experience > Toolbar.
- Select the checkbox HTML5.
- Scroll and click the down arrow.
- Select the platform checkbox and click the toggle button to enable or disable the option in the toolbar
- Save and publish the changes.
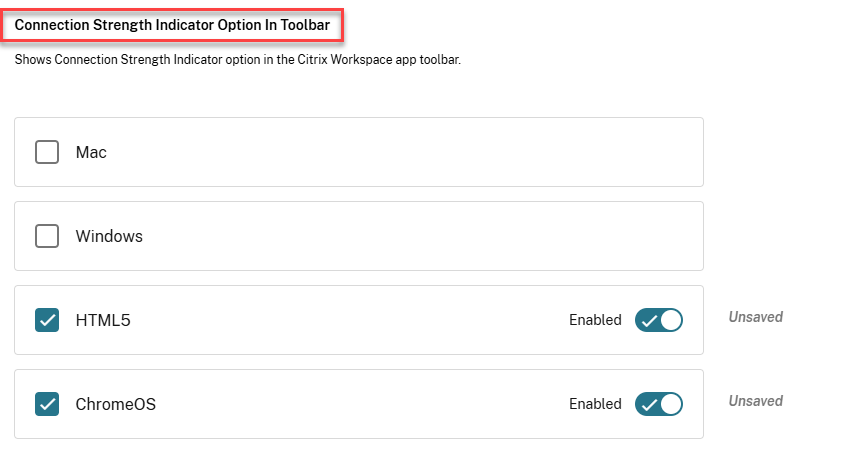
The following table displays the toolbar options that the admin can configure:
| Option | Description |
|---|---|
| About Option In Toolbar | Shows About Option in the Citrix Workspace app toolbar. |
| Client drive mapping option in toolbar | When enabled, the Client drive mapping (CDM) option appears in the session toolbar. |
| Clipboard Option In Toolbar | Shows Clipboard option in the toolbar. Disabling this setting allows user to perform clipboard actions via keyboard shortcuts. |
| Connection Strength Indicator Option In Toolbar | Shows Connection Strength Indicator option in the Citrix Workspace app toolbar. Note: This option applies only to the new toolbar. |
| Ctrl+Alt+Del (Lock) Option In Toolbar | Shows Ctrl+Alt+Del (lock) option in the Citrix Workspace app toolbar. Disabling this setting prevents this key combination from being sent to the VDA. |
| Disconnect Option In Toolbar | Shows Disconnect option in the Citrix Workspace app toolbar. When this setting is disabled, users can disconnect the session by closing the tab. |
| Display Resolution Option In Toolbar | Shows Display Resolution option in the Citrix Workspace app toolbar that allows users to select different session resolutions. Disabling this setting matches the resolution to the browser tab size. |
| File Upload & Download Options In Toolbar | Shows File Upload and Download option in the Citrix Workspace app toolbar. When this setting is disabled, users can still use drag/drop and Send my device within the VDA. |
| Fullscreen Option In Toolbar | Shows Fullscreen option in the Citrix Workspace app toolbar. When this setting is disabled, users can use a browser shortcut to make the session fullscreen. |
| Gesture Guide Option In Toolbar | Shows Gesture guide option in the Citrix Workspace app toolbar. |
| In-session Toolbar | Enables a floating toolbar within the session. |
| Logging Option In Toolbar | Shows View logs option in the Citrix Workspace app toolbar that allows users to view logs generated for a session. |
| Logoff Option In Toolbar | Shows the Logout option in the Citrix Workspace app toolbar. When this setting is disabled, users can Logout via the Start menu or close all the apps within the session. |
| Multi-monitor Option In Toolbar | Shows Multi-monitor option in the Citrix Workspace app toolbar when at least one external monitor is connected. |
| Multitouch Option In Toolbar To Allow Switching Between Multitouch And Panning Mode | Shows Multitouch option in the toolbar to allow switch between multitouch and panning mode. Disabling this setting provides only panning mode support. |
| Pin option in toolbar | When enabled, the Pin/Unpin option appears in the session toolbar. Note: This option applies only to the new toolbar. |
| Preferences Option In Toolbar | Shows Preferences option in the Citrix Workspace app toolbar. |
| Switch Apps Option In Toolbar | Shows Switch apps option in toolbar for virtual app session to allow switching between the apps. Disabling this removes the option to switch apps. |
| USB Devices Option In Toolbar | Shows USB Devices option in the Citrix Workspace app toolbar. Disabling this setting prevents access to any USB devices within the Citrix Workspace app. |
Connection strength indicator
Starting with the version 2502, Citrix Workspace app for HTML5 supports the Connection Strength Indicator (CSI) on the in-session toolbar. This feature displays a network strength icon that alerts you of network issues. You can click the indicator to view real-time connection statistics for the client and VDA, and copy (or download) diagnostic information to share with IT for advanced troubleshooting.
Notes:
- This feature is enabled by default.
- When you open the session, you can see the Connection Details icon on the in-session toolbar, provided the new toolbar feature is enabled.

Benefits
- Immediate feedback: The network strength icon gently nudges users when network issues are detected.
- Enhanced troubleshooting: Real-time stats and diagnostics help users and IT teams quickly identify and resolve connectivity issues.
Prerequisites
This feature is available only when a session is opened using:
- Citrix Virtual Apps and Desktops™ version 2407 or later
- Citrix Virtual Apps and Desktops version 2402 LTSR CU1 or later
Known issue in the feature
With Citrix Virtual Apps and Desktops version 2411, the Connection Strength Indicator (CSI) on the in-session toolbar doesn’t display the protocol information such as RTT and Bandwidth (in EDT protocol) [XASUP-6810].
How to configure
You can disable the feature by using:
- Configuration.js
- Global App Configuration service
Configuration.js
In Citrix Workspace app for HTML5, the configuration.js file is located under the C:\Program Files\Citrix\Receiver StoreFront\HTML5Client folder. Edit this file to configure the feature.
Notes:
- Citrix recommends that you back up the configuration.js file before modifying it.
- Administrator-level credentials are required to edit the configuration.js file.
To disable the new toolbar feature:
- Navigate to the configuration.js file in the HTML5Client folder.
- Add the
connectionStrengthIndicatorattribute and set the attribute to false. For example:
   {
       'ui': {
           'toolbar': {
               'connectionStrengthIndicator': false,
           }
       }
   }
<!--NeedCopy-->
Global App Configuration service
Administrators can disable the feature by navigating to Workspace Configuration > App Configuration > Session Experience > Toolbar > Connection Strength Indicator.
Clear the checkbox and respective toggle button to disable the feature.
Enhanced multi-monitor support with auto-detection and custom display selector
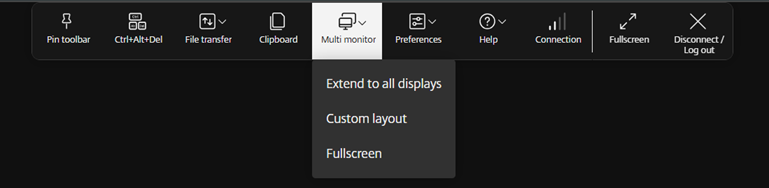
Starting with version 2505, new options have been added under Multi monitor icon in the toolbar, which appears only when more than one screen is connected. The multi-monitor selector allows users to choose which displays to use in full-screen mode for app and desktop sessions.
As long as the layout remains the same at the client OS, it is remembered when you disconnect and reconnect to the same session.
Note:
This feature is enabled by default.
System requirements
This feature is only supported on Google Chrome and Microsoft Edge Chromium browsers on Windows OS.
Prerequisites
-
Ensure that the new toolbar feature is enabled. For more information, see Improved in-session toolbar.
-
Allow permissions:
- Window management permission that is important for websites that must access information about different monitors and manage windows across them
- Browser pop-up permission to manage whether websites can open new windows or tabs without your direct interaction.
Permission workflow
Perform the following steps:
-
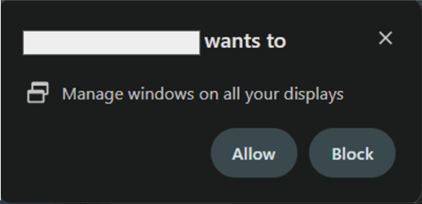
As a first-time user, when you click the multi-monitor selector icon, the following pop-up appears seeking permission to use the multi-monitor setup.

The pop-up appears from the browser to seek permission to use multiple monitors.
-
If you click Block, you can’t use multiple monitors. To enable permissions manually, refer Enable the multi-monitor permissions manually.
If you click Allow, the pop-up appears to let you know about the pop-up blockers.

-
Click OK, and navigate to the browser settings and select Always allow pop-ups.
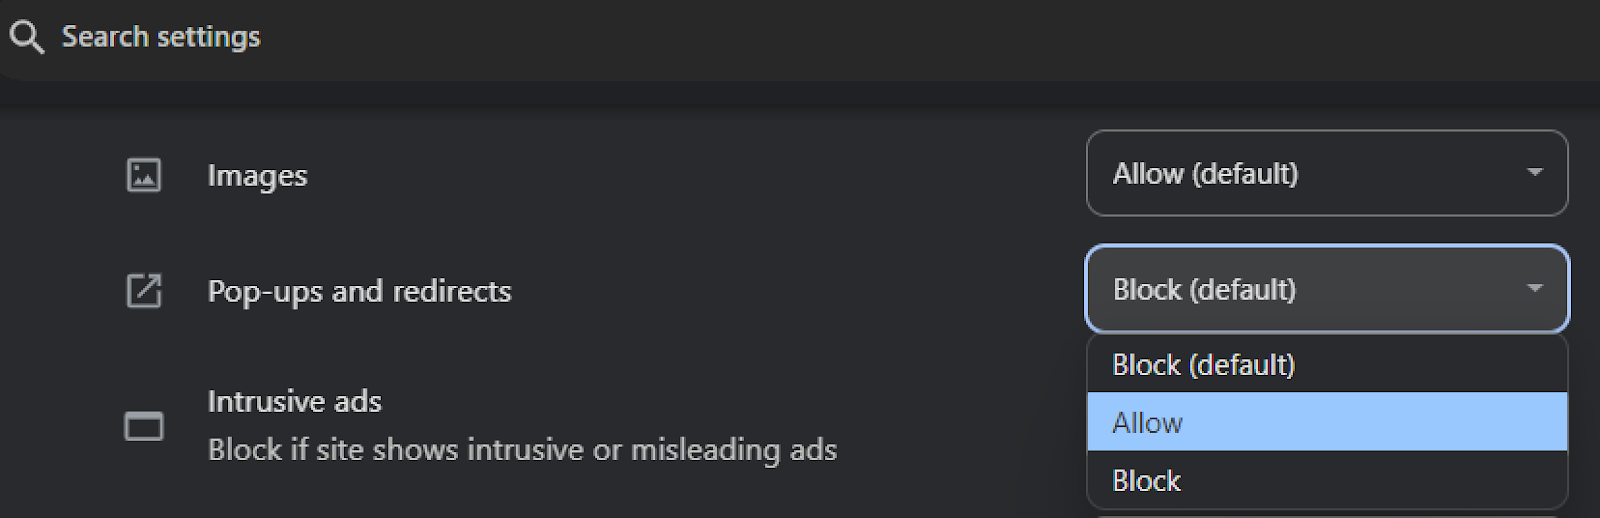
(or)
Click the pop-up icon on the browser address bar.

Select Always allow pop-ups as shown.

Enable the multi-monitor permissions manually
If you click Block in the multi-monitor pop-up permissions, the multi-monitor icon doesn’t appear. Instead, the full-screen icon appears on the toolbar that takes you to the older behavior.
To manually re-enable the multi-monitor permissions on Microsoft Chromium Edge:
- Click ellipses (⋯) in the top-right corner and select Settings.
- Navigate to Cookies and site permissions > All permissions
- Scroll down and click Window management.
-
Select Allow for sites requesting window placement permissions.

To manually re-enable the multi-monitor permissions on Google Chrome:
- Click ellipses (⋮) in the top-right corner.
- Select Settings.
- In the left-hand menu, click Privacy and security.
- Click Site Settings.
- Scroll down to Permissions and click Additional permissions.
- Click Window management.
- Click Add to add a site to Allow window placement under Allowed to manage windows on all your displays.

Multi-monitor icon
The Multi monitor toolbar icon includes three drop-down menu options for desktop and app sessions in full-screen mode:
-
Extend to all displays: The session switches to full-screen mode on primary screen and maximized mode on all connected screens.
-
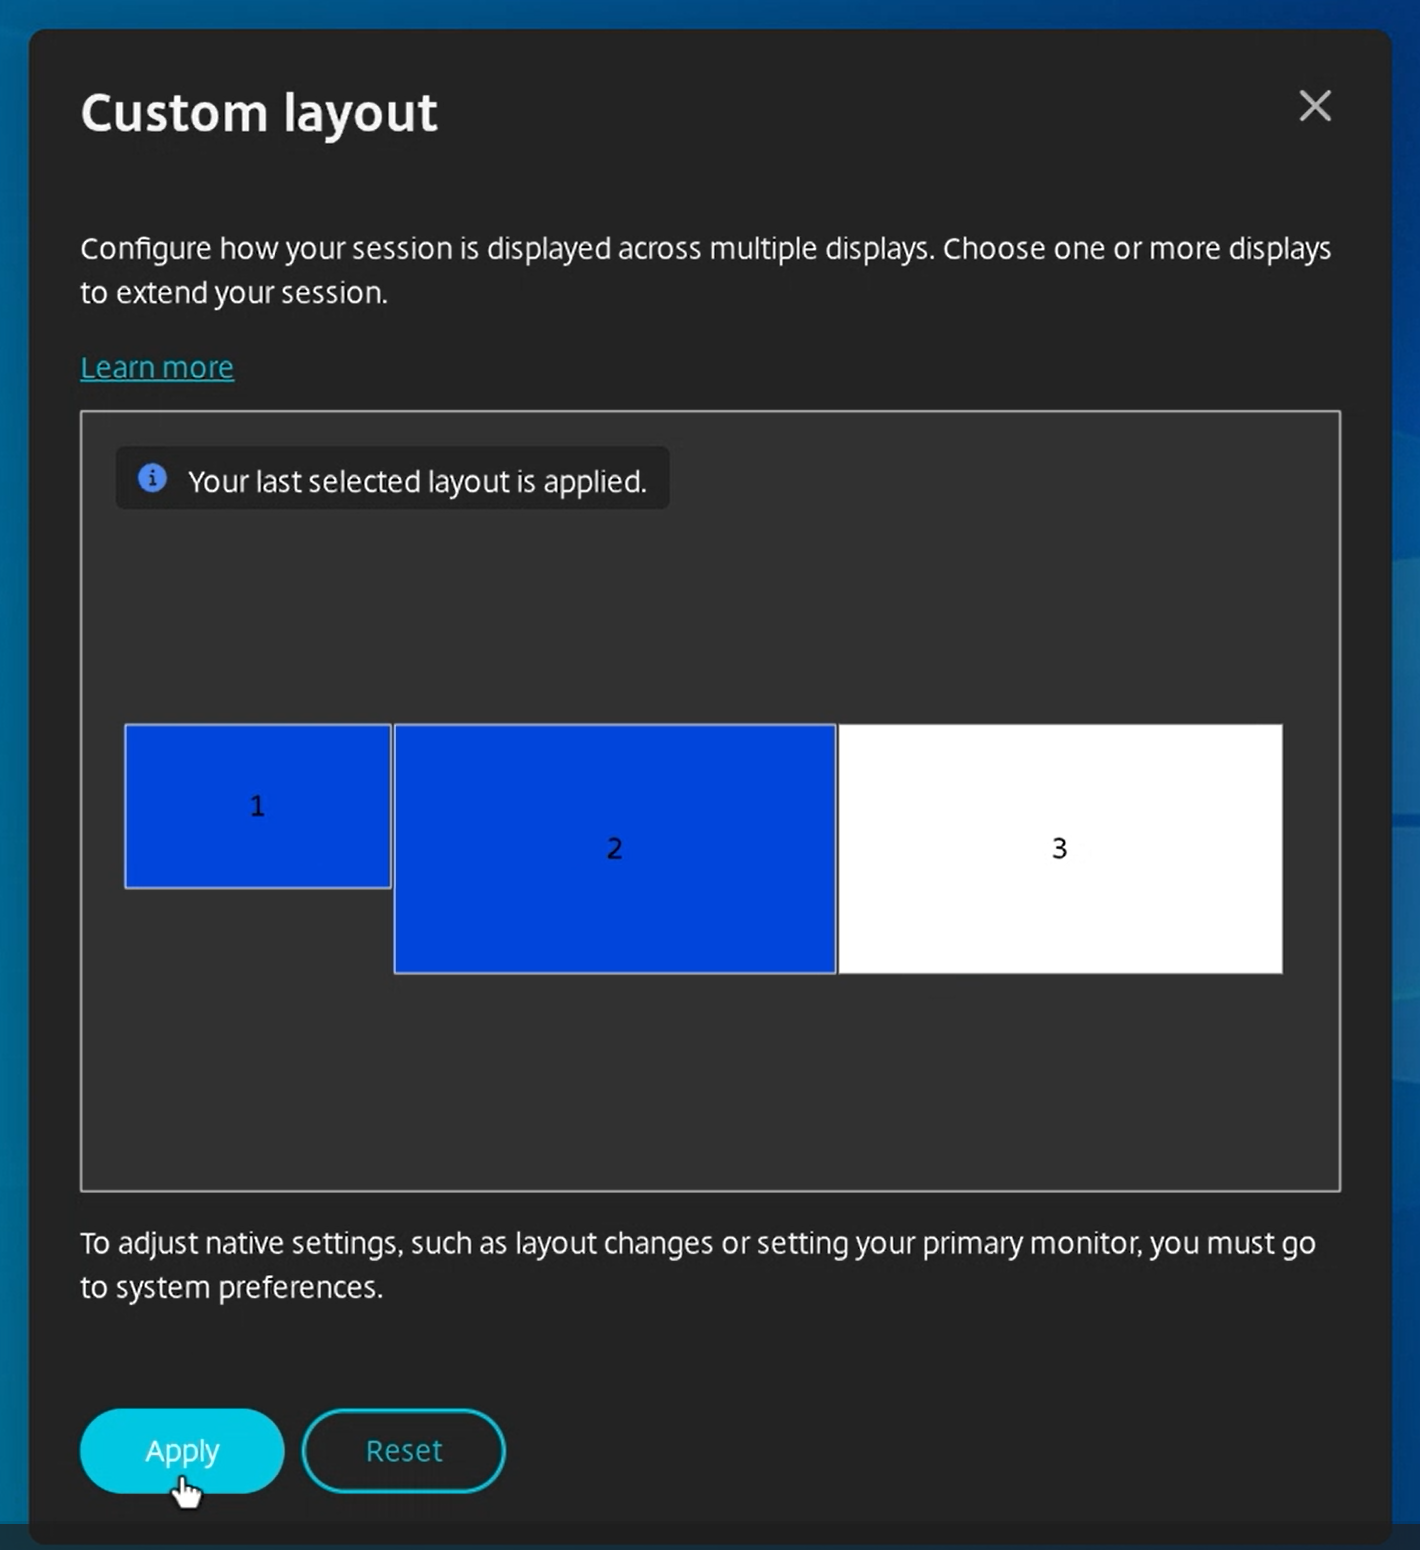
Custom Layout: This option opens a custom monitor selector displaying the monitor layout. With this feature, you can configure how your session appears across the monitors. Users can click the rectangles in the selector to choose which screens to use and then click Apply to span the session on those monitors. The layout box arrangement depends on how the monitors are connected.
- Fullscreen: The session layout changes to full-screen mode using screens that intersect with the session window.
Use case for custom layout
Assume that you have two monitors connected to your device. You can choose to run a video conferencing app on your native device monitor and view your virtual desktop contents in full-screen across your other two monitors during the call.
Fullscreen and Extend options
The Fullscreen or Extend button in the new toolbar is a multi-purpose option button. You can switch your screen from windowed mode to full-screen mode.

The Fullscreen icon action either takes the session to full-screen mode or if you reposition your virtual desktop between more than one adjacent monitor (a subset of available monitors), then the session spans across these monitors.
For more information, see Multi-monitor setups.
Extend option
If you select the monitors from the custom layout and the session spans to the respective monitors, when you restore, the Fullscreen icon gets replaced by the Extend option. When you click the Extend icon, the session spans to the previously selected monitors.

Multi-monitor plug and unplug actions
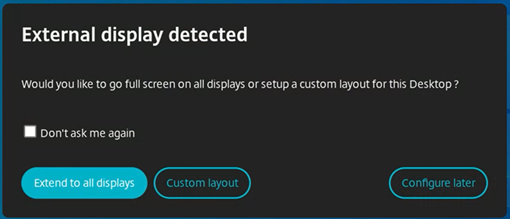
When a new monitor is plugged in (connected), a notification asking the user to make a selection appear.
Users can select Don’t ask me again to mute this notification.
Known limitations
-
On the external monitor, resource windows aren’t in full-screen mode. Instead, it is in windowed mode with a size equal to the external monitor size. We recommend manually switching to full-screen for a better user experience on each of the external monitor windows.
To switch fullscreen, use the F11 key on Windows and your Mac, move the pointer to the green button in the top-left corner of the window, then choose Enter Full Screen from the menu.
- The multi-monitor selection is not saved between sessions. You must manually select your preferred monitors each time you start a new session by clicking the multi-monitor icon on the toolbar.
- Multi-monitor state goes into single monitor Fullscreen state by default on external monitor layout change when the session is in active state.
How to configure
This feature is enabled by default. You can disable the feature in the following way.
Configuration.js
In Citrix Workspace app for HTML5, the configuration.js file is located under the C:\Program Files\Citrix\Receiver StoreFront\HTML5Client folder. Edit this file to configure the feature.
Notes:
- Citrix recommends that you back up the configuration.js file before modifying it.
- Administrator-level credentials are required to edit the configuration.js file.
To enable the new toolbar feature:
- Navigate to the configuration.js file in the HTML5Client folder.
-
Add the enableMultiMonitorCustomLayout attribute and set the attribute to False. For example:
{ 'features': { 'graphics': { 'multiMonitor': true, 'enableMultiMonitorCustomLayout': false } } } <!--NeedCopy--> - Save the changes. Restart the StoreFront services (if necessary)
Enhanced session toolbar notch size
The 2509 version of Citrix Workspace app for HTML5 features a redesigned, smaller notch in the session window that you can drag and drop to any window edge. The notch design provides an optimal size, and the cursor pointer changes when you hover over it. This update addresses user feedback about wasted screen space and replaces the unclear orange indicator with a recognizable warning icon when Connection State Indicator (CSI) detects network issues.
Note:
When you use Citrix Workspace app for HTML5 version 2509 or later, this feature is automatically enabled for desktop sessions and requires no client-side configuration.
Enhanced desktop launch experience
Starting with version 2411, Citrix Workspace app for HTML5 ensures an enhanced desktop launch experience. You experience a seamless, flicker-free transition to your desktop without intermediate screens. The app also eliminates dark screens and flickering during resizing or stretching, providing a stable and modern interface. This feature is enabled by default.
Enhanced virtual desktop screen resizing experience
Starting with the 2411 version, Citrix Workspace app for HTML5 ensures a smooth transition and prevents dark screens and flickers when resizing or stretching your virtual desktop screen. This feature is enabled by default.
Enhanced seamless app launch and resizing experience
Starting with the 2502 version, Citrix Workspace app for HTML5 ensures an enhanced app launch experience. You experience a seamless, flicker-free transition to your apps without intermediate screens. The app also eliminates dark screens and flickering during resizing or stretching, providing a stable and modern interface. This feature is enabled by default.
Support for horizontal scrolling on trackpad
Starting with the 2502 version, horizontal scrolling using the trackpad is supported within the session.
Disable downloading of Citrix Workspace app logs in error dialogs
Starting with the version 2505, admins can hide the Download Log button in all error dialogs for both app and desktop sessions in Citrix Workspace app for HTML5 (cloud and on-prem).
Note:
This feature is disabled by default. In other words, the user has an option to download logs from the error dialog.
How to configure
This feature is disabled by default. You can enable the feature using the Global App Configuration service.
Global App Configuration service
Administrators can enable this feature by navigating to Workspace Configuration > App Configuration > Session Experience > Session settings > Hide Download Log Button In Error. Select the checkbox and respective toggle button to disable downloading of logs.
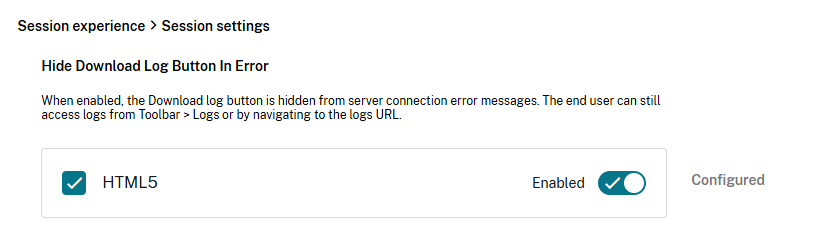
When enabled, users can’t see the Download log button in error dialogs. However, users can still access logs from the toolbar using the Collect logs option unless this option is also disabled.
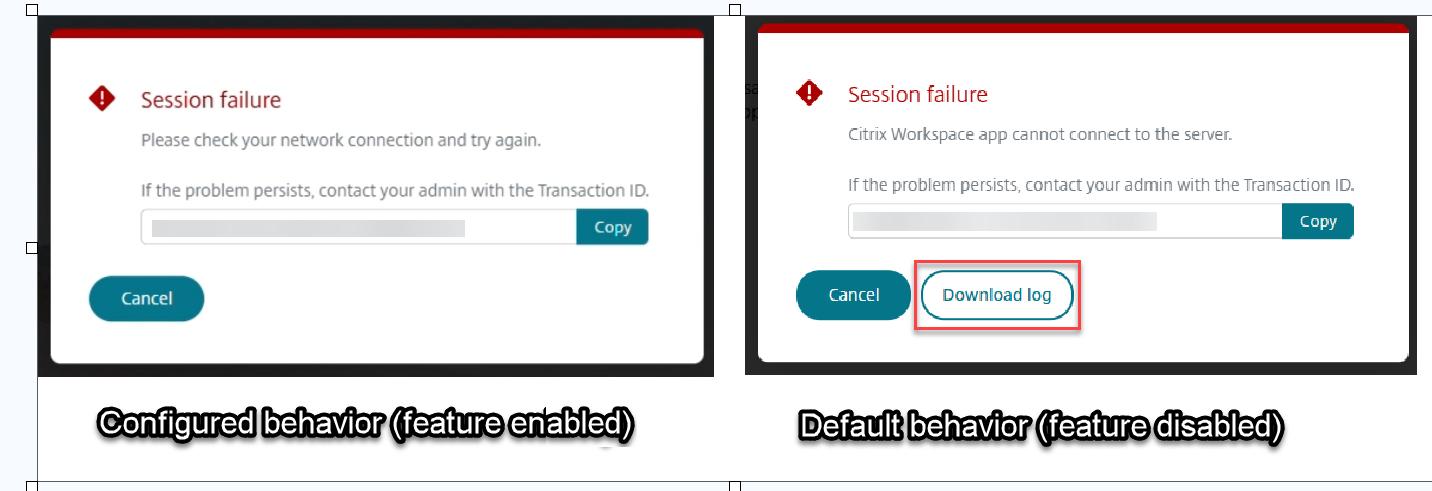
In cases where both Collect logs from toolbar and in Download logs in error dialog is hidden, logs can still be accessed with the logs URL like: https://<storeurl-with-path>SessionWindow.<version>.html#engineType=log
Important:
To fully restrict log access, you must disable the View logs setting and enable the Hide Download Log Button In Error setting in Global App Configuration service.
Use case
Using Citrix Workspace app for HTML5 in kiosk mode where access to native application is restricted, users can inadvertently access Windows Explorer of the client device when trying to download logs from error dialogs.
Troubleshooting
Problem: The Download Log button still appears after you enable the setting.
Cause: There might be a delay in Global App Configuration Service settings propagation, or the localStorage on the client isn’t updated.
Solution: Clear your browser cache and localStorage to ensure that the latest settings are fetched by the client.
In this article
- High DPI support for multiple monitors
- Session reliability
- Toolbar
- URL redirection
- Battery status indicator
- Improved in-session toolbar
- Sustainability initiative from Citrix Workspace app
- Enhanced multi-monitor support with auto-detection and custom display selector
- Enhanced session toolbar notch size
- Enhanced desktop launch experience
- Enhanced virtual desktop screen resizing experience
- Enhanced seamless app launch and resizing experience
- Support for horizontal scrolling on trackpad
- Disable downloading of Citrix Workspace app logs in error dialogs