File handling
File Transfer
By default, users can:
- Upload files from a local download folder or attached peripheral and seamlessly access the data from a Citrix Virtual Apps and Desktops or Citrix DaaS sessions.
- Download files from a Citrix Virtual Apps and Desktops or Citrix DaaS session to a folder or peripheral on their user device.
Administrators can selectively enable or disable file transfer, uploads, or downloads through policies in Citrix Studio.
Citrix Workspace app for HTML5 supports downloading files on a MacBook using the Safari browser.
Requirements
- XenApp and XenDesktop 7.6 or later, with:
- Hotfix ICATS760WX64022.msp on server OS VDAs (Windows 2008 R2 or Windows 2012 R2)
- Hotfix ICAWS760WX86022.msp or ICAWS760WX64022.msp on client OS VDAs (Windows 7 or Windows 8.1)
- To change file transfer policies: Group Policy Management (GPM) hotfix GPMx240WX64002.msi or GPMx240WX86002.msi on machines running Citrix Studio
Known limitations in the feature
- A user can upload or download a maximum of 10 files at a time.
- Maximum file size:
- For uploads: 2147483647 bytes (2 GB)
- For downloads: 262144000 bytes (250 MB)
- If either the Upload file to Desktop or the Download file from Desktop policy is set to Disabled, the toolbar still displays both the Upload and the Download icons. However, the functionality is based on the policy setting. If both policies are set to Disabled, the Upload and Download icons aren’t displayed in the toolbar.
File Transfer policies
By default, file transfer is enabled. Use Citrix Studio to change these policies, located under User Setting > ICA\File Redirection. Consider the following when using file transfer policies:
-
File transfer for Citrix Workspace app for ChromeOS/HTML5: Allows or prevents end users to transfer files between Citrix Virtual Apps and Desktops session and the end user’s device.
Allows or prevents end users to transfer files between Citrix DaaS session and the end user’s device.
-
Upload file for Citrix Workspace app for ChromeOS/HTML5: Allows or prevents users from uploading files. It can be from the user’s device to a Citrix Virtual Apps and Desktops session or Citrix DaaS session.
-
Download file for Citrix Workspace app for ChromeOS/HTML5: Allows or prevents users from downloading files. It can be from a Citrix Virtual Apps and Desktops session or Citrix DaaS session to the user’s device.
Client Drive Mapping
Starting with the 2303 version, the Client Drive Mapping (CDM) feature supports folder mapping on the local machine so they’re accessible from within a session. You can map any folder from the local machine, if the folder doesn’t contain system files.
The end user can do the following operations:
- Copy files and folders from the local machine to the mapped drive in the session.
- View the list of files and folders in the mapped drive.
- Open and read the file contents in the mapped drive.
- View the file properties (modified time and file size only) in the mapped drive.
This feature provides the advantage of accessing both virtual desktop drives and local machine drives together in the file explorer within the HDX™ session. This feature is supported on desktop platforms, Google Chrome, and Microsoft Edge Chromium browsers only.
Note:
- By default, this feature is enabled.
- Cloud-based drives, for example, OneDrive and Google Drive can be mapped provided it’s supported by the cloud provider.
Known limitations in the feature
- You can’t rename files and folders inside the mapped drive.
- Mappings will only have the name of the folder and not the full path.
- If your local folder has hidden files, and you mapped the same folder, the hidden files are visible inside the session in the mapped drive.
- You can’t change the file property to read-only access in the mapped drive.
- When you map a folder from the removable device and if you remove the device during an active session, you can’t use the mapped drive inside the session. You must remove the mapping manually.
Known issues in the feature
- When you use the CDM feature on mobile platforms, the dialog box gets truncated from the top.
How to configure
You can configure the CDM feature in the following way:
- Configuration.js
Note:
As a prerequisite, an administrator must enable the Client drive redirection policy on the Delivery Controller (DDC). For more information, see Client Drive Redirection in the Citrix Virtual Apps and Desktops documentation.
Configuration.js
The configuration.js file is located in the C:\Program Files\Citrix\Receiver StoreFront\HTML5Client folder. Edit this file to configure the CDM feature.
Notes:
- Citrix recommends that you back up the configuration.js file before modifying it.
- Administrator-level credentials are required to edit the configuration.js file.
To disable the feature:
- Locate and edit the configuration.js file in the HTML5Client folder.
-
Add the clientDriveMapping attribute and set the attribute enabled to false. For example,
`features': { 'clientDriveMapping' : { 'enabled' : false, 'availableAccessLevels': [1, 2, 3], // 1 - Read-Write Access, 2 - Read-Only Access, 3 - No-Access //drop-down options 'accessLevel': 1 // 1 - Read-Write Access, 2 - Read-Only Access, 3 - No-Access //admin sets these values } } <!--NeedCopy--> - Save the changes.
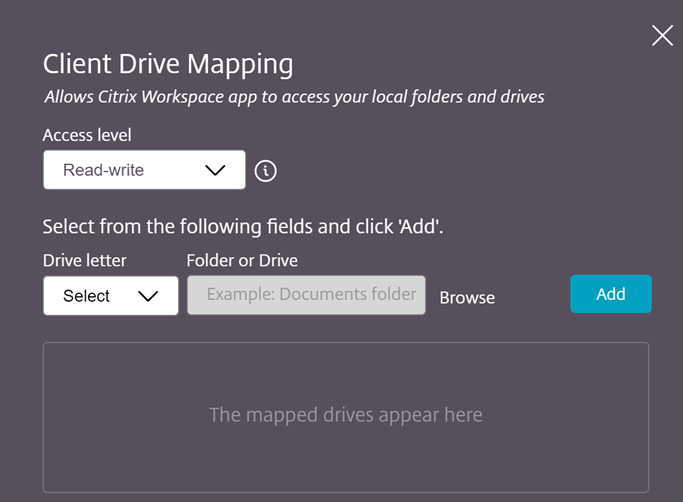
Access level
When you enable the feature, you can set the folder or drive access levels. For example, if an administrator sets availableAccessLevels as [2, 3], the end user can view the Read-Only Access and No-Access options in the drop-down list.
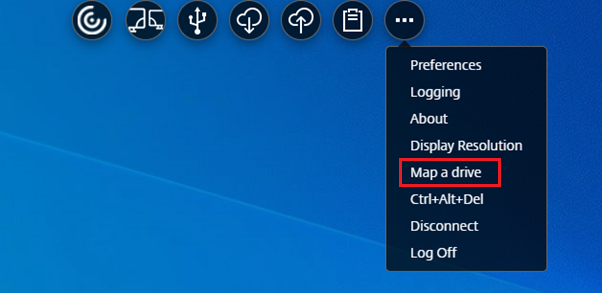
How to use the feature
-
Navigate to the Toolbar > more (…) > Map a drive.
-
Select the Access level for the folder or the drive. The drop-down list option that you see depends upon on the access level set by your organization’s IT administrator for your profile.
-
Select a Drive letter and click Browse to navigate to your folder or drive in your local machine.
- Click Add.
-
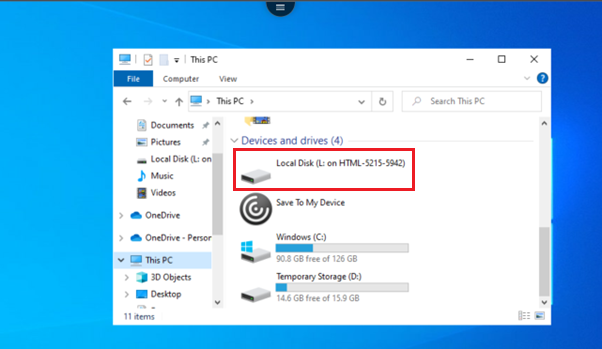
Disconnect and reconnect the session.
The session displays the drive letter that is mapped inside the session.