Session experience
Clipboard support for copying files and folders
Starting with version 2503, this enhancement enables clipboard support for seamless copying of files and folders between HDX™ sessions. Users can copy files and folders as permitted by their Citrix® administrators, enhancing flexibility and productivity.
With this feature, you can do the following:
- Copy files and folders between the HDX sessions seamlessly.
- Ensure files, folders, and content remain intact with no corruption during transfer.
- Admins can define and enforce policies to regulate and secure copy-paste operations, tailoring functionality to organizational needs.
This feature is enabled by default through the clipboard redirection policy, allowing seamless copy and paste of files and folders. For more information, see Client clipboard redirection.
Enhanced desktop launch experience
Starting with version 2503, Citrix Workspace™ app for Mac enhances the desktop launch experience by removing the retry timeout setting and improving status messaging. This enhancement is enabled by default.
This update ensures that:
- Users no longer experience premature failures during the launch process, even if it takes a longer time to complete.
- Retry messages, such as Powering On and Waiting for registration, are now displayed, making it more intuitive for end users to check the status of the Virtual Delivery Agent.

Hybrid launch support for GACS for on-premises store
Starting with version 2503, Citrix Workspace app for Mac supports management using Global App Configuration Service (GACS) for on-premises store in hybrid launch. In a hybrid launch scenario, users access Citrix resources through a web browser. When an application or desktop is selected, Citrix StoreFront™ generates an ICA file with the necessary launch instructions. The locally installed Citrix Workspace app then reads the ICA file, and establishes a secure connection to the remote application or desktop.
Key Behavior:
- When a user launches a session, in-session settings apply from the next launch.
- If a store is added in the app and later accessed via a browser, settings are retrieved from the client app.
- Only the most recently accessed store applies its settings to the native app.
For example:
If a user first launches a session from one store, the app fetches and applies its GACS policies. Later, if the user switches to another store and launches a session, the app updates and applies the new store’s GACS policies. For more information, see GACS supports hybrid launch.
Seamless drag and resize improvements
Starting with version 2411, the seamless drag and resize enhancement feature is automatically enabled when Citrix Workspace app for Mac connects to a Windows VDA version 2311 or later. This enhancement provides a smoother drag and resize experience for virtual apps, ensuring seamless interaction. This feature requires user-provided Accessibility permissions. If Citrix Viewer does not have the necessary permissions, a prompt appears requesting Accessibility permission.

Support for Rapid Scan
Starting with the 2409 version, Citrix Workspace app for Mac supports the Rapid scan feature. You can use this feature to scan multiple documents with an iOS device, and then transfer those scanned documents to a Mac device using the Citrix Workspace app for Mac and iOS.
If you’re signed into Citrix Workspace on both your Mac and iOS device, you can use Rapid Scan to scan documents with your iPhone or iPad. The scanned files are saved on your Mac, and you can also access them remotely from a virtual desktop using Client Drive Mapping. This feature works for both cloud and on-premise stores.
Prerequisites:
- Ensure that both devices are logged into the same Citrix Workspace account.
- Both devices must be connected to the same Wi-Fi network.
- The Citrix Workspace app for Mac must be version 2409 or higher.
How to Use Rapid Scan:
- Open the Citrix Workspace app on your Mac.
-
Long-press (or right-click) the Citrix Workspace icon in the Dock or menu bar.
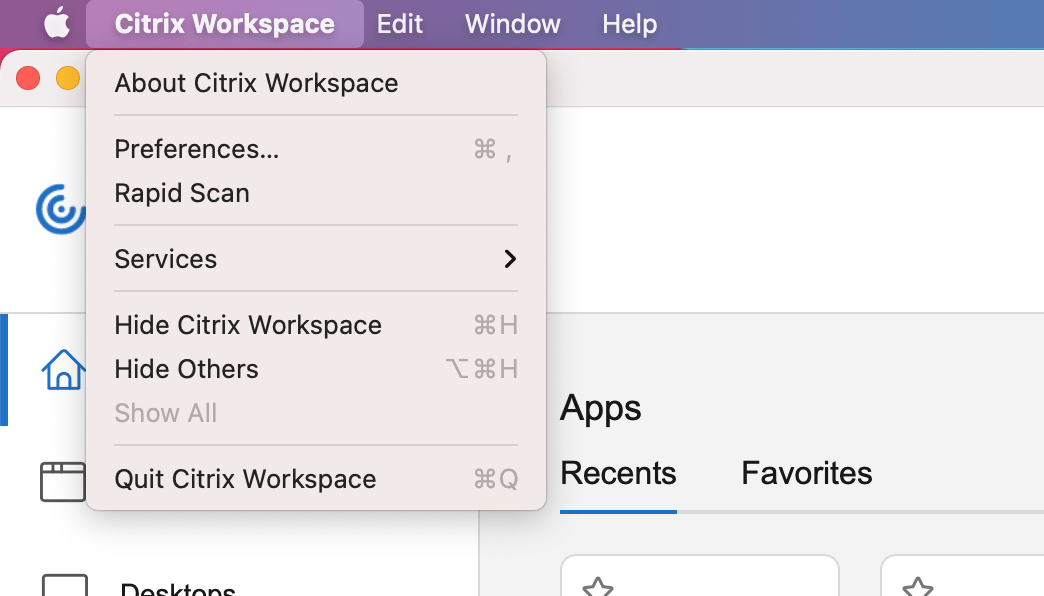
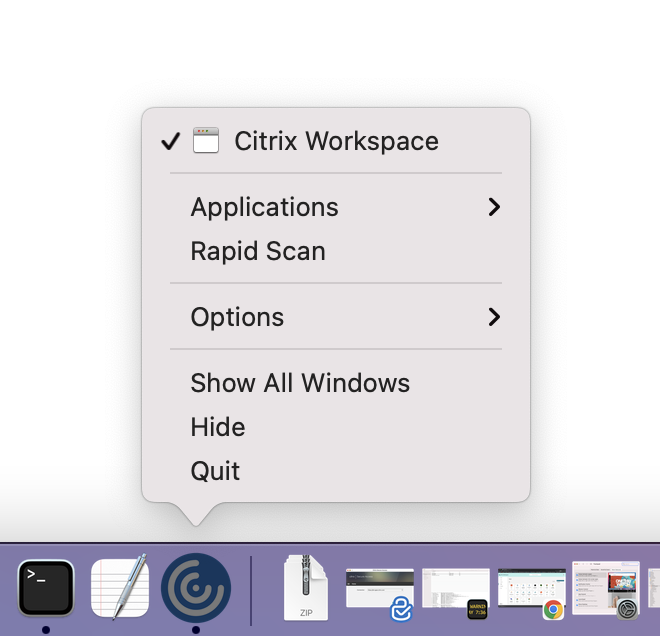
- Select Rapid Scan from the menu. A QR code appears on your Mac screen.
- On your iOS device, go to Settings and tap Rapid Scan.
- Scan the QR code displayed on your Mac using your iOS device.
- When the confirmation window appears on your Mac, click Yes to establish the connection. You can now use your iOS device to scan documents.
- Choose to save the scanned files in PDF or JPEG format.
- By default, the scanned documents are saved to the Downloads folder on your Mac.
- After the download is complete, click Open in Finder on your Mac to locate the scanned documents.
Access scanned documents from a Virtual Desktop:
- Client Drive Mapping (CDM) must be enabled to access your Mac’s storage drives inside the Virtual Desktop. This allows you to transfer files between your Mac and the Virtual Desktop. Please contact your administrator to enable this feature.
- Once CDM is enabled, your local drives is visible in the Virtual Desktop.
- When prompted, allow Read & Write permissions to access your local disk from the Virtual Desktop.
- Navigate to the folder where the scanned documents are stored (the Downloads folder by default) and copy the files to the Virtual Desktop’s storage.
Enhanced Desktop Viewer toolbar
Starting with the 2409 version, the virtual Desktop Viewer toolbar is enhanced to be more intuitive, modern, and user-friendly. With this feature, you can now customize the Citrix Workspace app toolbar by adding and removing options on the toolbar.

The new toolbar provides the following options:
| Show or hide toolbar | Click this button to show or hide the Desktop Viewer toolbar. A notch appears when the toolbar is hidden. |
| Shortcuts | Click this button to access the shortcuts. |
| Devices | Click this button to access the options in the Devices section. |
| Preferences | Click this button to access the options in the Preferences section. |
| Minimize | Click this button to minimize the virtual session. This option is hidden in the full-screen mode. |
| Fullscreen | Click this button to access the virtual session in full screen. |
| Restore | Click this button to restore the virtual session from the full-screen mode. |
| Disconnect | Click this button to sign out or to disconnect from a virtual session. |
You can click and drag the toolbar across all screens in the virtual session. When you drag the toolbar, it can rotate automatically based on its placement on the screen. Once you release the drag, it gets positioned to the nearest edge of the screen.
You can configure this feature using the Global App configuration service (GACS) and Mobile Device Management (MDM).
Using GACS
- Sign in to your Citrix Cloud™ account and navigate to Workspace Configuration > App Configuration.
- From the list of configured URLs, select the one for which you want to map settings, and click Configure.
- Under the Toolbar section, navigate to the required option in the toolbar and click the expand icon.
- Select the Mac checkbox and then click Edit.
- You can now customize the toolbar option to hide or show.
- Click Publish Drafts to save the settings.
Using MDM
To hide the toolbar, administrators must use the following setting:
<key>EnableInSessionToolbar</key>
<false/>
To hide specific buttons in the toolbar, administrators must use the following setting:
<key>HiddenToolbarButtons</key>
<array>
`<string>preferences</string>`

`<string>minimize</string>`

`<string>fullscreen</string>`
</array>
The supported values include ctrlAltDel, connectionStrength, device, shortcuts, preferences, minimize, fullscreen, and close.
Note:
If no configuration is made, the session toolbar is displayed by default with all buttons.
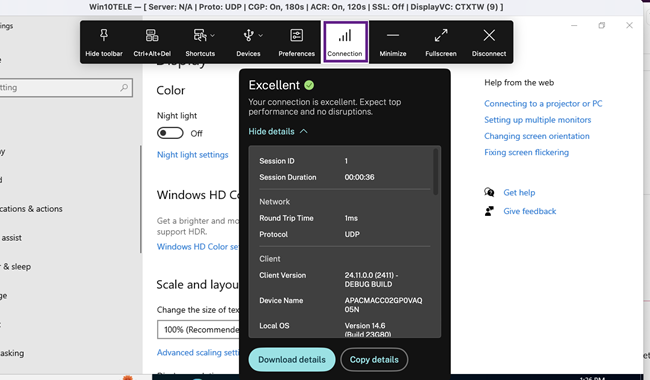
Connection Strength Indicator
Starting with version 2409, Citrix Workspace app for Mac supports the Connection Strength Indicator (CSI) on the Desktop Viewer toolbar. This feature displays a network strength icon that alerts you of network issues. By clicking the icon, you can view real-time connection statistics for the client, gateway, and VDA, and copy diagnostic information to share with IT for advanced troubleshooting.
Prerequisites
- macOS version must be at least Monterey or above.
- Telemetry service must be supported on Windows VDA (enabled by default from VDA 2405 and 2402 CU1).
- Telemetry service must be enabled on Linux VDA from version 2311.
- Telemetry service must be enabled on Mac VDA from Phase I Public TP.
Note:
To use this feature, the new Toolbar feature needs to be enabled. For more information, see Enhanced Desktop Viewer toolbar.
Enhanced virtual desktop screen resizing experience
Starting with the 2409 version, Citrix Workspace app for MAC ensures a smooth transition and prevents black screens and flickers when resizing or stretching your virtual desktop screen. This feature is enabled by default.
Enhanced desktop launch experience
Starting with version 2409, Citrix Workspace App for Mac ensures an enhanced desktop launch experience. You’ll experience a seamless, flicker-free transition to your desktop without intermediate screens. The app also eliminates black screens and flickering during resizing or stretching, providing a stable and modern interface. This feature is enabled by default.
Enhanced clipboard support for HTML text, files, and folders
Starting with version 2409, Citrix Workspace app for Mac supports the seamless copying and pasting of HTML-formatted text, files, and folders between a Mac local app and a virtual app or desktop session running through Citrix Workspace app for Mac.
HTML text
Whether you’re working locally or in a virtual session, this functionality ensures that HTML content is accurately retained during the copy-and-paste process. With this feature, you can copy and paste large HTML text between local and virtual sessions without any restrictions.
To enable the HTML format for clipboard, you need to add an entry for CF_HTML and any other in “Client clipboard write allowed formats” and “Session clipboard write allowed formats” in the ICA® policy settings.
Note:
- Client clipboard write allowed formats does not apply if the Client clipboard redirection policy is set to Prohibited or Restrict client clipboard write policy is disabled.
- Session clipboard write allowed formats does not apply if the Client clipboard redirection policy is set to Prohibited or Restrict session clipboard write policy is disabled.
Files and folders
With this feature, you can do the following:
- Users can copy files and folders between the native Mac client and virtual desktops.
- Users can copy HTML content between the native Mac client and HDX sessions, and between HDX sessions.
- Admins can set policies to control the scope of copy-paste capabilities.
- Ensures no corruption in copied files, folders, and content.
The copy and paste of files and folders is enabled by default in the clipboard redirection policy. For more information, see Client clipboard redirection.
Session reliability and auto client reconnect
Session reliability keeps sessions active and on the user’s screen when network connectivity is interrupted. Users continue to see the application that they’re using until network connectivity resumes.
With session reliability, the session remains active on the server. To indicate that connectivity is lost, the user’s display freezes until connectivity resumes on the other side of the tunnel. Session reliability reconnects users without reauthentication prompts.
Important
- Citrix Workspace app for Mac users can’t override the server setting.
- With Session reliability enabled, the default port used for session communication switches from 1494 to 2598.
You can use session reliability with Transport Layer Security (TLS).
Note:
TLS encrypts only the data sent between the user device and Citrix Gateway.
Using session reliability policies
The session reliability connections policy setting allows or prevents session reliability.
The session reliability timeout policy setting has a default of 180 seconds, or three minutes. Though you can extend the time the session reliability keeps a session open, this feature is convenient to the user. Therefore, it does not prompt the user for reauthentication.
Tip
Extending session reliability timeouts might cause a user to get distracted and walk away from the device, leaving the session accessible to unauthorized users.
By default, incoming session reliability connections use port 2598, unless you change the port number in the session reliability port number policy setting.
You can configure the Auto client reconnect authentication policy setting to prompt users to reauthenticate when reconnecting to interrupted sessions.
If you use both session reliability and auto client reconnect, the two features work in sequence. Session reliability closes, or disconnects, the user session after the amount of time you specify in the Session reliability timeout policy setting. After that, the auto client reconnect policy settings take effect, attempting to reconnect the user to the disconnected session.
Note:
Session reliability is enabled by default at the server. To disable this feature, configure the policy managed by the server.
Configuring session reliability from Citrix Studio
By default, session reliability is enabled.
To disable session reliability:
- Launch Citrix Studio.
- Open the Session Reliability connections policy.
- Set the policy to Prohibited.
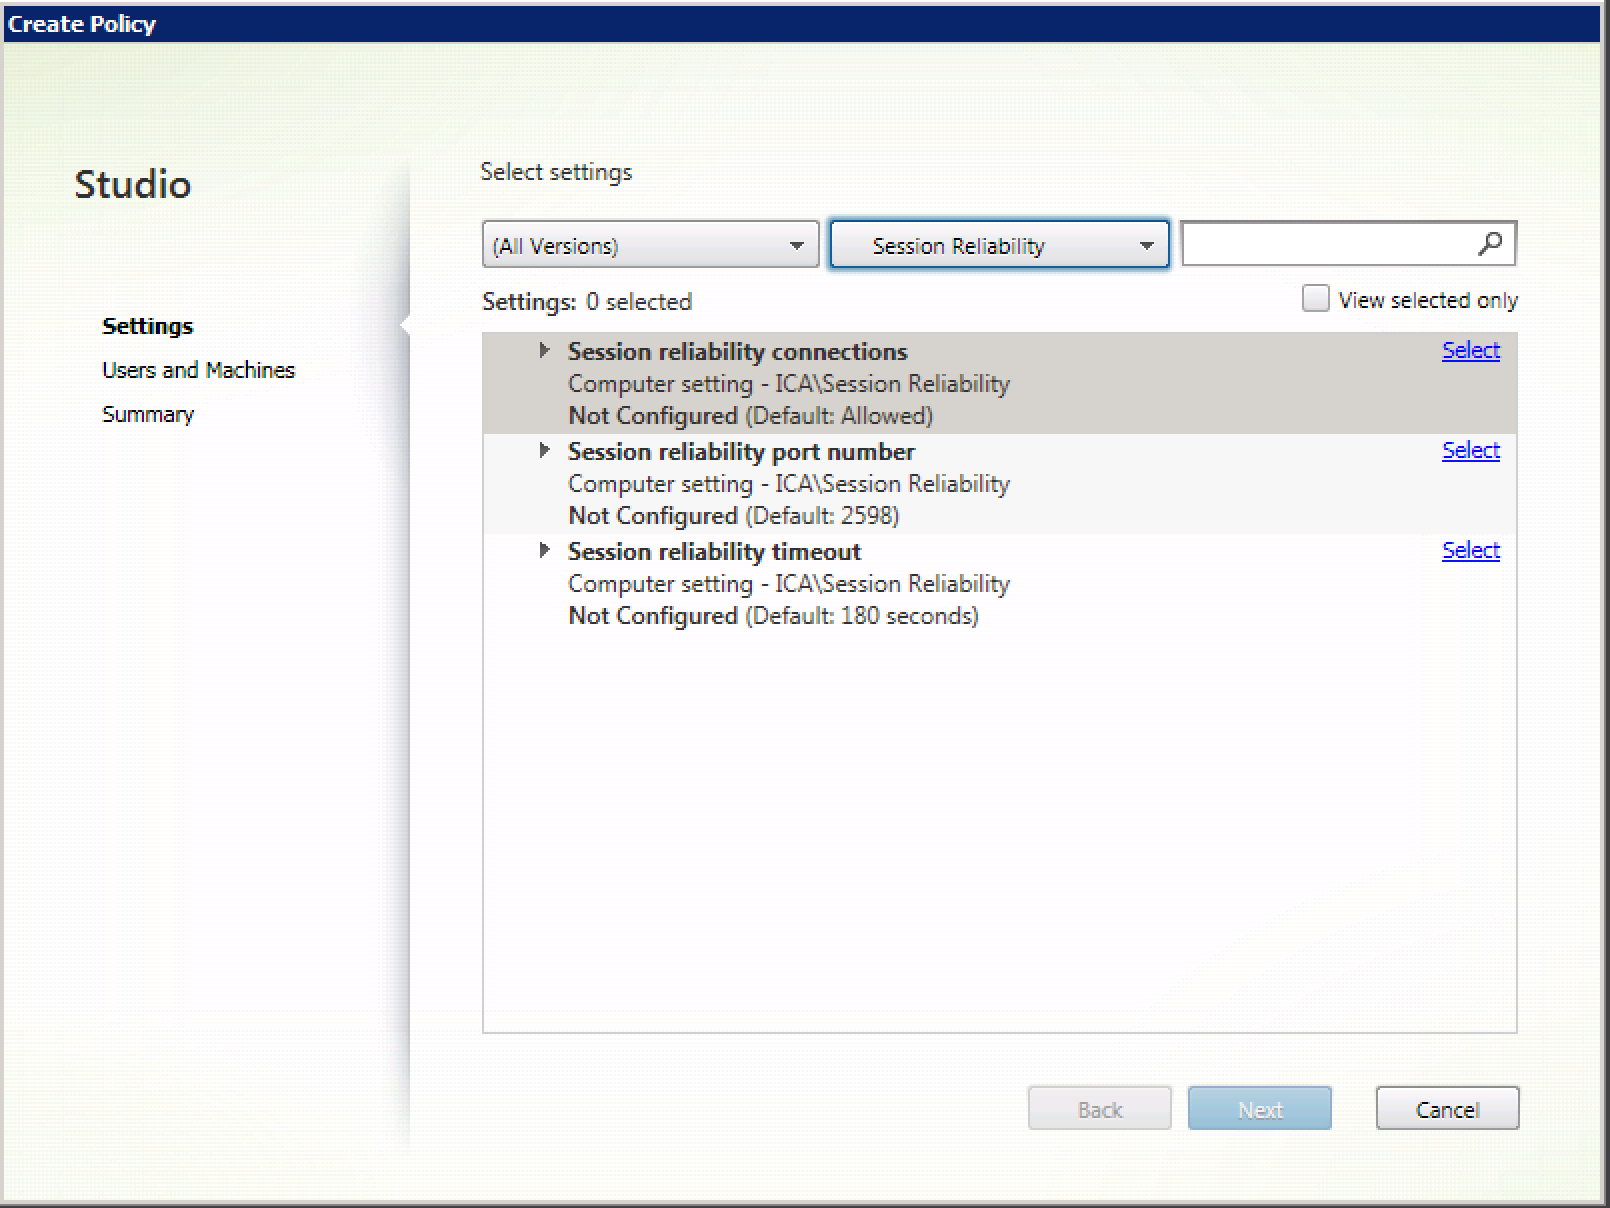
Configuring session reliability timeout
By default, the session reliability timeout is set to 180 seconds.
Note:
Session reliability timeout policy can be configured only with XenApp and XenDesktop 7.11 and later.
To modify session reliability timeout:
- Launch Citrix Studio.
- Open the Session reliability timeout policy.
- Edit the timeout value.
- Click OK.
Configuring auto client reconnection using Citrix Studio
By default, auto client reconnection is enabled.
To disable auto client reconnection:
- Launch Citrix Studio.
- Open the Auto client reconnect policy.
- Set the policy to Prohibited.

Configuring Auto client reconnection timeout
By default, the Auto client reconnection timeout is set to 120 seconds.
Note:
Auto client reconnect timeout policy can be configured only with XenApp and XenDesktop 7.11 and later.
To modify auto client, reconnect timeout:
- Launch Citrix Studio.
- Open the Auto client reconnect policy.
- Edit the timeout value.
- Click OK.
Limitations:
On a Terminal Server VDA, Citrix Workspace app for Mac uses 120 seconds as the timeout value irrespective of the user settings.
Configuring the Reconnect user interface Transparency
The Session User Interface is displayed during a session reliability and auto client reconnect attempts. The Transparency level of the user interface can be modified using Studio policy.
By default, Reconnect UI Transparency is set to 80%.
To modify Reconnect user interface Transparency level:
- Launch Citrix Studio.
- Open the Reconnect UI Transparency level policy.
- Edit the value.
- Click OK.
Auto client reconnect and session reliability interaction
There are mobility challenges associated with switching between various access points, network disruptions, and display timeouts related to latency. These create challenging environments when trying to maintain link integrity for active Citrix Workspace app for Mac sessions. Citrix enhanced session reliability and auto reconnection technologies resolve this issue.
This feature allows users to reconnect to sessions automatically after recovery from network disruptions. These features, enabled by policies in Citrix Studio, can be used to improve the user experience.
Note:
Auto client reconnection and session reliability timeout values can be modified using the default.ica file in StoreFront.
Auto client reconnection
Auto client reconnection can be enabled or disabled using Citrix Studio policies. By default, this feature is enabled. For information about modifying this policy, see the auto client reconnection section earlier in this article.
Use the default.ica file in StoreFront to modify the connection timeout for AutoClienreconnect. By default, this timeout is set to 120 seconds (or two minutes).
| Setting | Example | Default |
|---|---|---|
| TransportReconnectRetryMaxTSeconds | TransportReconnectRetryMaxTSeconds=60 | 120 |
Session reliability
Session reliability can be enabled or disabled using Citrix Studio policies. By default this feature is enabled.
Use the default.ica file in StoreFront to modify the connection timeout for session reliability. By default this timeout is set to 180 seconds (or three minutes).
| Setting | Example | Default |
|---|---|---|
| SessionReliabilityTTL | SessionReliabilityTTL=120 | 180 |
How auto client reconnection and session reliability work
When auto client reconnection and session reliability are enabled for a Citrix Workspace app for Mac, consider the following:
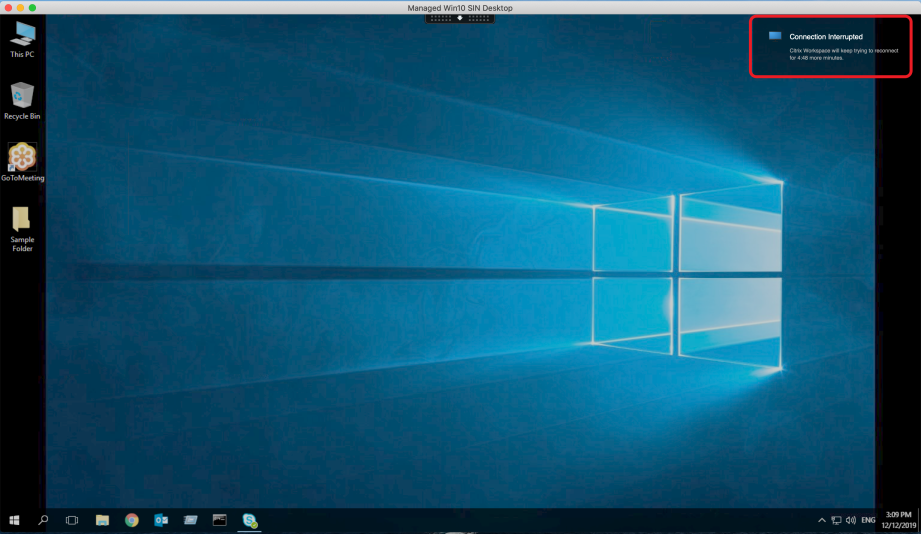
- A session window is grayed out when a reconnection is in progress. A countdown timer displays the amount of time remaining before the session is reconnected. Once a session is timed out, it’s disconnected.
By default, the reconnect countdown notification starts at 5 minutes. This timer value represents the combined default values for each of the timers (auto client reconnection and session reliability), 2 and 3 minutes respectively. The following image illustrates the countdown notification which appears in the upper right portion of the session interface:
Tip
You can alter the grayscale brightness used for an inactive session using a command prompt. For example,
defaults write com.citrix.receiver.nomas NetDisruptBrightness 80. By default, this value is set to 80. The maximum value can’t exceed 100 (indicates a transparent window) and the minimum value can be set to 0 (a fully blacked out screen).
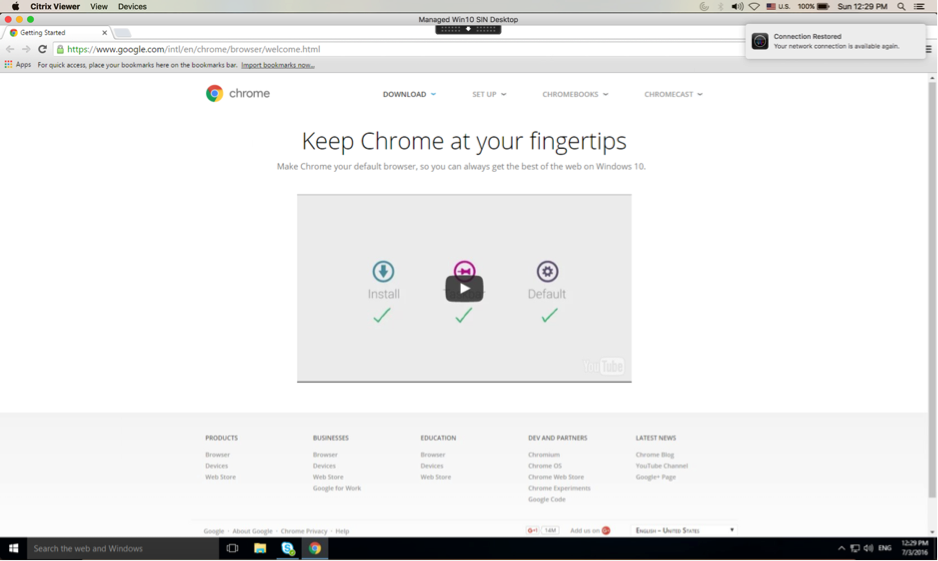
- Users are notified when a session successfully reconnects (or when a session is disconnected). This notification appears in the upper right portion of the session interface:
- A session window which is under auto client reconnect and session reliability control provides an informational message indicating the state of the session connection. Click Cancel Reconnection to move back to an active session.
Service continuity
Service continuity removes or minimizes the dependency on the availability of components that are involved in the connection process. Users can launch their virtual apps and desktops regardless of the health status of the cloud services.
For more information, see the Service continuity section in the Citrix Workspace documentation.
Support for service continuity in the Safari browser
Starting with the 2206.1 version, the Citrix Workspace service continuity feature is supported for the Safari browser. Users must install Citrix Workspace app for Mac and the Citrix Workspace web extension. Service continuity removes (or minimizes) the dependency on the availability of the components involved in the connection process. It allows you to connect to your virtual apps and desktops regardless of the cloud services’ health status. For more information about the service continuity feature, see section Service continuity.
Enhancement to Permanent Client Access License (CAL) for Remote Desktop Sessions
Starting with the 2204 version, if you’re running CAL in your environment to access remote desktops, when the client ID is greater than 15 characters, you can launch the remote desktop session with a permanent license.
To enable this feature, admins must configure the default.ica file by doing the following:
- In the StoreFront server, navigate to C:\inetpub\wwwroot\Citrix<StoreName>\App_Data and open the
default.icafile with any editor. - Add the following lines in the [WFClient] section:
isRDSLicensingEnabled=On
Support for HTML format on the Citrix Workspace app for Mac clipboard
Starting with version 2409, Citrix Workspace app for Mac supports the seamless copying and pasting of HTML-formatted text between a Mac local app and a virtual app or desktop session running through Citrix Workspace app for Mac. Whether you’re working locally or in a virtual session, this functionality ensures that HTML content is accurately retained during the copy-and-paste process. With this feature, you can copy and paste large HTML text between local and virtual sessions without any restrictions.
This feature is disabled by default in the clipboard redirection policy.
To enable the HTML format for clipboard, you need to add an entry for CF_HTML (and any other in “Client clipboard write allowed formats” and “Session clipboard write allowed formats”) in the ICA policy settings. For more information, see Client clipboard redirection.
Note:
- Client clipboard write allowed formats does not apply if the Client clipboard redirection policy is set to Prohibited or Restrict client clipboard write policy is disabled.
- Session clipboard write allowed formats does not apply if the Client clipboard redirection policy is set to Prohibited or Restrict session clipboard write policy is disabled.
Customize the Desktop Viewer toolbar
Previously, you can completely disable the Desktop Viewer toolbar. However, you can’t enable or disable a few options on the toolbar. With this release, you can customize the Citrix Workspace app for Mac toolbar by adding and removing options on the toolbar. For more information, see Hide or show the desktop tool bar in the virtual desktop session.
You can configure the toolbar through the Mobile Device Management (MDM) settings. The following settings can hide the Device, Preferences, Minimize, and Full screen button:
  <key>HiddenToolbarButtons</key>
  <array>
    <string>device</string>
    <string>preferences</string>
    <string>minimize</string>
    <string>fullscreen</string>
  </array>

<!--NeedCopy-->
Note:
You cannot hide the Pin button from the toolbar.
Sustainability initiative from Citrix Workspace app
Starting with the 2409 version, Citrix Workspace app for Mac supports the Sign out option for the virtual desktop session. This feature might help conserve energy if you sign out from virtual machines when not in use.
When the user clicks Disconnect or Log out, or closes a virtual desktop, then the following prompt is displayed, recommending the user to use the Log out option to save energy.
To enable this feature on Terminal Server Virtual Delivery Agent (TSVDA), follow these steps:
- Navigate to Citrix Studio.
- Click Delivery Groups in the left navigation pane.
- Select the required VDA from the Delivery Group section.
- Click the Edit icon to open the Edit Delivery Group page.
- Click Desktops from the left navigation pane.
- Choose the VDA where the keyword must be added and click Edit.
- In the Edit Desktop page, set the
ICA-LogOffOnClosekeyword totruein the Description field. - Click OK to save the changes.
To enable this feature on Windows Desktop Virtual Delivery Agent (WVDA), follow these steps:
- Navigate to Citrix Studio.
- Click Delivery Groups in the left navigation pane.
- Select the required VDA from the Delivery Group section.
- Click the Edit icon to open the Edit Delivery Group page.
- Click User Settings from the left navigation pane.
- Set the
ICA-LogOffOnClosekeyword totruein the Description field. - Click OK to save the changes.
The following dialog box appears when you close the virtual desktop.

Support for voice dictation
Starting with version 2505, Citrix Workspace app for Mac supports dictation. This feature allows users to:
-
Voice Navigation: Interact with the Citrix Viewer toolbar using voice commands for easier access to toolbar functions.
Note:
Voice navigation is limited to the toolbar and does not support navigation within applications inside the session.
-
Voice Dictation: Enter text by speaking, with your words automatically transcribed into any text field within your Citrix session.
-
Text Editing: Edit and format text using voice commands while in session, available on macOS only.
This feature improves accessibility and productivity by allowing users to interact with virtual desktops hands-free.
Tips
To enable this feature, open System Settings on your macOS device and turn on Voice Control. To learn how to use Voice Control, select Open Tutorial in the Voice Control settings.

Monitoring Zoom plug-in metrics on Director
Starting with version 2505 of Citrix Workspace app for Mac, and version 2507 of Citrix Virtual Apps and Desktops for both Delivery Controller (DDC) and Virtual Delivery Agent (VDA), you can monitor optimized Zoom environments for Mac endpoints with enhanced visibility.
To track the Zoom plug-in management status directly in the Director UI, follow these steps:
-
Access the Director UI by navigating to http://[DDC_IP]/Director.
-
Click Filters.
-
Select the desired VDI session.
-
Click Session Performance.
-
Under Real-time Communications, check Zoom.
-
Click View Details.
-
Review the Zoom metrics.
Keyboard accessibility support for the toolbar on the Virtual Desktop
Starting with version 2505, the Virtual Desktop toolbar supports keyboard accessibility for all levels. Users can navigate the entire toolbar using keyboard shortcuts.
You can use the following keyboard shortcuts to access the VDI toolbar using the keyboard:
- Shift + Command + T: To activate the VDI toolbar.
- Tab: To navigate across the VDI Toolbar in the clockwise direction.
- Shift + Tab: To navigate across the VDI toolbar in the anti-clockwise direction.
- Space: To select an option on the VDI Toolbar.
- Escape: To close a modal in focus, the user can’t simply interact with the toolbar. Instead, they must either switch to another application or click the session area outside the modal.
The toolbar now supports Keyboard navigation, allowing users to navigate and highlight UI elements within it.
Enhancement to Connection Strength Indicator on Citrix Viewer toolbar
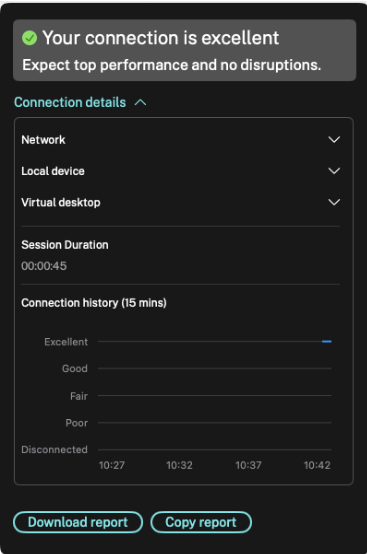
Starting with version 2505, Citrix Workspace app for Mac introduces an enhanced Connection Strength Indicator designed for a more intuitive and user-friendly experience.
The key improvements include:
- Real-time Wi-Fi strength: Instantly view your current Wi-Fi signal quality for better connectivity awareness.
- Expanded device details: Access information such as CPU, memory, and disk usage directly from the indicator.
- Proactive notifications with snooze options: Receive alerts when your connection strength drops, with the ability to temporarily snooze notifications.
- Actionable recommendations: Get clear suggestions to resolve connectivity issues when your connection strength falls below optimal levels.
- 15-minute connection history: Review a visual history of your connection strength over the past 15 minutes to assist with troubleshooting and analysis.
Enhanced Native macOS Gesture support
Starting with CWA 2508 for Mac, Citrix Viewer provides enhanced gesture support specifically designed for Citrix VDA for macOS environments.
Native macOS Gesture shortcuts
Citrix Viewer now provides the following native macOS gesture shortcuts:
- Mission Control - Access Mission Control functionality.
- App Expose - View all windows for the current application.
- LaunchPad - Open LaunchPad to access applications.
- Show Desktop - Display the desktop by minimizing all windows.
Debugging Shortcuts
Two debugging shortcuts are available for Mac VDA environments:
- Restart Citrix Service - Restart the Citrix service for troubleshooting.
- Restart macOS - Restart the macOS system (Mac VDA only).
Configuration
The native macOS gesture shortcuts include the following configuration details:
-
Access Location: You can access all shortcuts from the Citrix Viewer toolbar.
-
Auto-Configuration: The system automatically enables this feature without requiring client side configuration.
Requirements
Make sure that you have the following:
- Citrix Workspace App 2508 or later for Mac
- Mac VDA 2507 or later
- Mac VDA environment
In this article
- Clipboard support for copying files and folders
- Enhanced desktop launch experience
- Hybrid launch support for GACS for on-premises store
- Seamless drag and resize improvements
- Support for Rapid Scan
- Enhanced Desktop Viewer toolbar
- Connection Strength Indicator
- Enhanced virtual desktop screen resizing experience
- Enhanced desktop launch experience
- Enhanced clipboard support for HTML text, files, and folders
- Session reliability and auto client reconnect
- Service continuity
- Support for service continuity in the Safari browser
- Enhancement to Permanent Client Access License (CAL) for Remote Desktop Sessions
- Support for HTML format on the Citrix Workspace app for Mac clipboard
- Customize the Desktop Viewer toolbar
- Sustainability initiative from Citrix Workspace app
- Support for voice dictation
- Monitoring Zoom plug-in metrics on Director
- Keyboard accessibility support for the toolbar on the Virtual Desktop
- Enhancement to Connection Strength Indicator on Citrix Viewer toolbar
- Enhanced Native macOS Gesture support