Configure
App Protection
Disclaimer
App Protection policies work by filtering access to required functions of the underlying operating system (specific API calls required to capture screens or keyboard presses). This means that App Protection policies can provide protection even against custom and purpose-built hacker tools. However, as operating systems evolve, new ways of capturing screens and logging keys can emerge. While we continue to identify and address them, we cannot guarantee full protection in specific configurations and deployments.
App Protection is an add-on feature that provides enhanced security when using Citrix Virtual Apps and Desktops and Citrix DaaS (formerly Citrix Virtual Apps and Desktops service). The feature restricts the ability of clients to be compromised by keylogging and screen capturing malware. App Protection prevents exfiltration of confidential information such as user credentials and sensitive information displayed on the screen. The feature prevents users and attackers from taking screenshots and from using keyloggers to glean and exploit sensitive information.
App Protection requires that you install an add-on license on your License Server. A Citrix Virtual Desktops license must also be present. For information on Licensing, see the Configure section in the App Protection documentation.
Requirements:
- Citrix Virtual Apps and Desktops™ Version 1912 or later.
- StoreFront Version 1912.
- Citrix Workspace app Version 1912 or later.
Prerequisites:
- The App Protection feature must be enabled on the Controller. For more information, see App Protection documentation.
You can include the App Protection component with Citrix Workspace app either:
- During Citrix Workspace app installation using command-line interface or graphical user interface. OR
- During an app launch (on-demand installation).
Note:
- This feature is supported only on Microsoft Windows Desktop operating systems such as Windows 10, Windows 8.1, and Windows 7.
- This feature is not supported over Remote Desktop Protocol (RDP).
On-premises HDX™ session protection:
Two policies provide anti-keylogging and anti-screen-capturing functionality in a session. These policies must be configured through PowerShell. No graphical user interface is available for the purpose.
Note:
Citrix DaaS does not support the App Protection feature.
For information on App Protection configuration on Citrix Virtual Apps and Desktops, see App Protection documentation.
App Protection - Configuration in Citrix Workspace app
Note:
- Include the App Protection component with Citrix Workspace app only if your administrator has instructed you to do so.
- App Protection component might impact the screen-capturing capabilities on your device.
During the Citrix Workspace app installation, you can include App Protection using one of the following methods:
- Graphical user interface
- Command-line interface
Graphical user interface
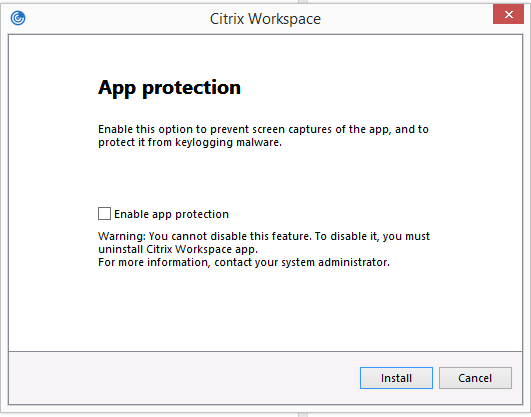
During the Citrix Workspace app installation, use the following dialog to include the App Protection component. Select Enable app protection and then click Install to continue with the installation.
Note:
Not enabling App Protection during installation causes a prompt to appear when you launch a protected app. Follow the prompt to install the App Protection component.
Command-line interface
Use the command line switch /includeappprotection during Citrix Workspace app installation to add the App Protection component.
The following table provides information on screens protected depending on deployment:
| App Protection deployment | Screens protected | Screens not protected |
|---|---|---|
| Included in Citrix Workspace app | Self-Service plug-in and Auth manager / User credentials dialog | Connection Center, Devices, Any Citrix Workspace app error messages, Auto client reconnect, Add account |
| Configured on the Controller | ICA session screen (both apps and desktops) | Connection Center, Devices, Any Citrix Workspace app error messages, Auto client reconnect, Add account |
Expected Behavior:
The expected behavior depends upon the method by which users access the StoreFront store containing protected resources.
Note:
- Citrix recommends that you only use the native Citrix Workspace app to launch a protected session.
-
Behavior on Workspace for Web:
The App Protection component is not supported on Workspace for Web configurations. Applications protected by App Protection policies are not enumerated. For more information about the resources assigned, contact your system administrator.
-
Behavior on Citrix Workspace app versions that do not support App Protection:
On Citrix Workspace app Version 1911 and earlier, applications protected by App Protection policies are not enumerated on StoreFront.
-
Behavior of apps that have the App Protection feature configured on the Controller:
If App Protection is configured on the Controller and you try to launch an application that is protected, the App Protection is installed on-demand. The following dialog appears:
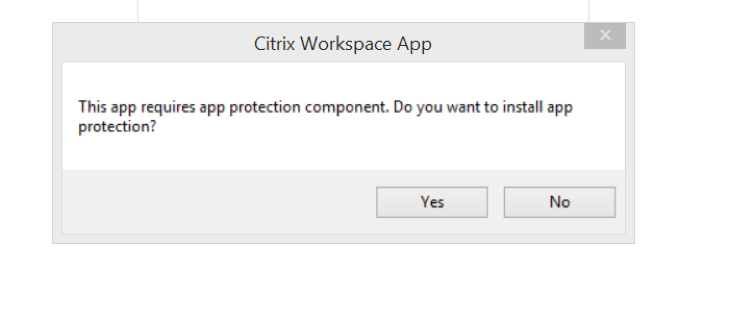
After clicking Yes, App Protection component is installed and the user is able to launch the protected app.
-
Behavior of protected session over Remote Desktop Protocol(RDP)
- Your active protected session disconnects if you launch a Remote Desktop Protocol(RDP) session.
- You cannot launch a protected session in a Remote Desktop Protocol(RDP) session.
App Protection error logs:
The App Protection component logs are registered to the debug output. To collect these logs, do the following:
- Download and install the DebugView app from the Microsoft website.
-
Launch the command prompt and run the following command:
Dbgview.exe /t /k /v /l C:\logs.txtFrom the example above, you can view the logs in log.txt file.
The command indicates the following:
-
/t– DebugView app starts minimized in the notification area. -
/k– Enable kernel capture. -
/v– Enable verbose kernel capture. -
/l– Log the output to a specific file.
Uninstalling the App Protection component:
To uninstall the App Protection component, you must uninstall Citrix Workspace app from your system. Restart the system for the changes to take effect.
Note:
App Protection is supported only on upgrade from Version 1912 onwards.
Known issues or limitations:
- No feature support on Microsoft Server operating systems such as Windows Server 2012 R2 and Windows Server 2016.
- To take a screen capture of the local device, Citrix Workspace app-related windows must be minimized. Otherwise, you can’t perform screen captures of your local device.
- No feature support in double-hop scenarios.
- For this feature to function properly, disable the Client clipboard redirection policy on the VDA.
Endpoint encoder performance estimator on Microsoft Teams
When you launch the HdxTeams.exe process (the WebRTC media engine embedded in Citrix Workspace app that handles Microsoft Teams redirection), it estimates the best encoding resolution that the endpoint’s CPU can sustain without overloading. Possible values are 240p, 360p, 720p and 1080p.
The performance estimation process (also called webrtcapi.EndpointPerformance) runs when HdxTeams.exe initializes. The macroblock code determines the best resolution that can be achieved with the particular endpoint. The highest possible resolution is then included during the codec negotiation between the peers, or between the peer and the conference server.
There are four performance categories for endpoints that have its own maximum available resolution:
| Endpoint performance | Maximum resolution | Registry key value |
|---|---|---|
| fast | 1080p | 3 |
| medium | 720p | 2 |
| slow | 360p | 1 |
| very slow | 240p | 0 |
There are configuration flags to disable the VP9 or H264 codec. H264 is lighter on the CPU but consumes more bandwidth. On the contrary, VP9 consumes more CPU power but less bandwidth.
Registry Path in Citrix Workspace app:
Navigate to the registry path HKEY_CURRENT_USER\SOFTWARE\Citrix\HDXMediaStream and create the following keys:\
| Name | Type | Values | Description |
|---|---|---|---|
| DisableVP9 | DWORD | 1; 0 | 1 - disable VP9 codec; 0 - enable |
| DisableH264 | DWORD | 1;0 | 1 - disable H.264 codec; 0 - enable |
| OverridePerformance | DWORD | 0;1;2;3 | Force desired performance. Value must be in the range between 0 and 3, where 0 indicates very slow and 3 very fast. |
For more information about Microsoft Teams optimization, see Optimization for Microsoft Teams.
Adaptive transport
Adaptive transport is a data transport mechanism for Citrix Virtual Apps and Desktops and Citrix DaaS. It is faster, can scale, improves application interactivity, and is more interactive on challenging long-haul WAN and internet connections. Adaptive transport maintains high server scalability and efficient use of bandwidth. By using adaptive transport, ICA virtual channels automatically respond to changing network conditions. They intelligently switch the underlying protocol between the Citrix protocol called Enlightened Data Transport (EDT) and TCP to deliver the best performance. It improves data throughput for all ICA virtual channels including Thinwire display remoting, file transfer (Client Drive Mapping), printing, and multimedia redirection. The same setting is applicable for both LAN and WAN conditions.
In earlier releases, when HDXoverUDP is set to Preferred, data transport over EDT is used when possible, with fallback to TCP.
When you enable session reliability, EDT, and TCP attempts to connect in parallel, session reliability reconnection, and auto client reconnect. This enhancement reduces connection time when EDT is preferred but the required underlying UDP transport is unavailable and TCP must be used.
By default, after fallback to TCP, adaptive transport continues to seek EDT every five minutes.
Requirements:
- Citrix Virtual Apps and Desktops 7.12 or later.
- StoreFront 3.8.
- IPv4 VDAs only. IPv6, mixed IPv6 and IPv4 configurations are’nt supported.
- Add firewall rules to allow inbound traffic on UDP ports 1494 and 2598 of the VDA.
Note:
TCP ports 1494 and 2598 are required and opened automatically when you install the VDA. However, UDP ports 1494 and 2598 are’nt automatically opened. Set them to Enabled.
Citrix Workspace app allows the adaptive transport by default. Also by default, the client attempts to use adaptive transport only if the VDA is configured to Preferred on the delivery controller and if the setting has been applied on the VDA.
You can enable adaptive transport using the HDX Adaptive Transport policy setting. Set the new policy to Preferred to use adaptive transport when possible, with fallback to TCP.
Use the Group Policy Object (GPO) administrative template to disable adaptive transport on the client.
To configure adaptive transport using the Citrix Workspace app Group Policy Object (GPO) administrative template
The following are optional configuration steps to customize your environment. For example, you might choose to disable the feature for a particular client for security reasons.
Note:
By default, adaptive transport is disabled (Off) and TCP is always used.
- Open the Citrix Workspace app Group Policy Object administrative template by running gpedit.msc.
- Under the Computer Configuration node, go to Administrative Templates > Citrix Workspace > Network routing.
- Set the Transport protocol for Citrix Workspace policy to Enabled.
-
Select Communication Protocol for Citrix Workspace as required.
- Off - Indicates that TCP is used for data transfer.
- Preferred - Indicates that the client tries to connect to the server using UDP at first. If UDP is unavailable,then the connection switches to TCP as a fallback.
- On - Indicates that the Citrix Workspace app for Windows connects to the server using UDP only. There is no fallback to TCP with this option.
- Click Apply and OK.
- From the command line, run
gpupdate /forcecommand.
To use adaptive transport, add the Citrix Workspace app template files to the Policy Definitions folder. For information on adding template files to the local GPO, see the Group Policy Object template section.
To confirm that the policy setting has taken effect:
Navigate to HKEY\_LOCAL\_MACHINE\SOFTWARE\Policies\Citrix\ICA Client\Engine\Lockdown Profiles\All Regions\Lockdown\Network\UDT and verify that the HDXOverUDP key is included.
For more information, see Adaptive transport section in Citrix Virtual Apps and Desktops documentation.
Advanced Preferences sheet
You can customize the availability and the contents of the Advanced Preferences sheet that is present in the right-click menu of the Citrix Workspace app icon in the notification area. Customizing ensures that users can apply only administrator-specified settings on their systems. Specifically, can:
- Hide the Advanced Preferences sheet altogether
- Hide the following, specific settings from the sheet:
- Data collection
- Connection Center
- Configuration checker
- Keyboard and Language bar
- High DPI
- Support information
- Shortcuts and Reconnect
- Citrix Casting™
Hiding Advanced Preferences option from the right-click menu
You can hide the Advanced Preferences sheet by using the Citrix Workspace app Group Policy Object (GPO) administrative template:
- Open the Citrix Workspace app Group Policy Object administrative template by running gpedit.msc.
- Under the Computer Configuration node, go to Administrative Templates > Citrix Workspace > Self Service > Advanced Preferences Options.
- Select the Disable Advance Preferences policy.
- Select Enabled to hide the Advanced Preferences option from the right-click menu of the Citrix Workspace app icon in the notification area.
Note:
By default, the Not Configured option is selected.
Hiding specific settings from the Advanced Preferences sheet using the Group Policy Object(GPO) administrative template
- Open the Citrix Workspace app Group Policy Object administrative template by running gpedit.msc.
- Under the Computer Configuration node, go to Administrative Templates > Citrix Workspace > Self Service > Advanced Preferences Options.
- Select the policy for the setting that you want to hide.
The table below lists the options that you can select and the effect of each:
| Options | Action |
|---|---|
| Not Configured | Displays the setting |
| Enabled | Hides the setting |
| Disabled | Displays the setting |
You can hide the following specific settings from the Advanced Preferences sheet:
- Configuration checker
- Connection Center
- High DPI
- Data collection
- Delete saved passwords
- Keyboard and Language bar
- Shortcuts and Reconnect
- Support information
- Citrix Casting
Hiding the Reset Workspace option from the Advanced Preferences sheet using the Registry editor
You can hide the Reset Workspace option from the Advanced Preferences sheet only using the Registry editor.
- Launch the registry editor
- Navigate to
HKEY_LOCAL_MACHINE\SOFTWARE\Citrix\Dazzle. - Create a String Value key EnableFactoryReset and set it to any of the following options:
- True - Displays the Reset Workspace option in the Advanced Preferences sheet.
- False - Hides the Reset Workspace option in the Advanced Preferences sheet.
Hiding Citrix Workspace Updates option from the Advanced Preferences sheet
Note:
The policy path for the Citrix Workspace Updates option is different from that of the other options present in the Advanced Preferences sheet.
- Open the Citrix Workspace app Group Policy Object administrative template by running gpedit.msc.
- Under the Computer Configuration node, go to Administrative Templates > Citrix Components > Citrix Workspace > Workspace Updates.
- Select the Workspace Updates policy.
- Select Disabled to hide the Workspace Updates settings from the Advanced Preferences sheet.
Application delivery
When delivering applications with Citrix Virtual Apps and Desktops and Citrix DaaS™, consider the following options to enhance the user experience:
- Web Access Mode - Without any configuration, Citrix Workspace app provides browser-based access to applications and desktops. You can use Workspace for Web or Web Interface site to select and use the applications you want. In this mode, no shortcuts are placed on the user’s desktop.
- Self Service Mode - By adding a StoreFront account to Citrix Workspace app or configuring Citrix Workspace app to point to a StoreFront website, you can configure self-service mode, which allows you to subscribe to applications from the Citrix Workspace app user interface. This enhanced user experience is similar to that of a mobile app store. In a self-service mode, you can configure mandatory, auto-provisioned, and featured app keyword settings as required.
Note:
By default, Citrix Workspace app allows you to select the applications to display in the Start menu.
- App shortcut-only mode - You can configure Citrix Workspace app to automatically place application and desktop shortcuts directly in the Start menu or on the desktop. The new shortcut only mode allows you to find the published apps within the familiar Windows navigation schema.
For more information, see the Create Delivery Groups section in the Citrix Virtual Apps and Desktops documentation.
Configure self-service mode
Add a StoreFront account to Citrix Workspace app or configure Citrix Workspace app to point to a StoreFront site to use self-serivce mode. Self-service allows users to subscribe to applications from the Citrix Workspace user interface. This enhanced user experience is similar to that of a mobile app store.
Note:
By default, Citrix Workspace app allows users to select the applications they want to display in their Start menu.
In self-service mode, you can configure mandatory, auto-provisioned, and featured app keyword settings as needed.
Append keywords to the descriptions you provide for delivery group applications:
- To make an individual app mandatory, so that it cannot be removed from Citrix Workspace app, append the string KEYWORDS: Mandatory to the application description. There is no Remove option for users to unsubscribe to mandatory apps.
- To automatically subscribe all users of a store to an application, append the string KEYWORDS: Auto to the description. When users log on to the store, the application is automatically provisioned without users needing to manually subscribe to the application.
- To advertise applications to users or to make commonly used applications easier to find by listing them in the Citrix Workspace Featured list, append the string KEYWORDS: Featured to the application description.
Customize the app shortcut location using the Group Policy Object template
- Open the Citrix Workspace app Group Policy Object administrative template by running gpedit.msc.
- Under the Computer Configuration node, go to Administrative Templates > Citrix Components > Citrix Workspace > Self Service.
- Select Manage SelfServiceMode policy.
- Select Enabled to view the Self-service user interface.
- Select Disabled to subscribe to the apps manually. This option hides the Self-service user interface.
- Select Manage App Shortcut policy.
- Select the options as required.
- Click Apply and OK.
- Restart Citrix Workspace app for the changes to take effect.
Using StoreFront account settings to customize app shortcut locations
You can set up shortcuts in the Start menu and on the desktop from the StoreFront site. The following settings can be added in the web.config file in C:\inetpub\wwwroot\Citrix\Roamingin the <annotatedServices> section:
- To put shortcuts on the desktop, use PutShortcutsOnDesktop. Settings: “true” or “false” (default is false).
- To put shortcuts in the Start menu, use PutShortcutsInStartMenu. Settings: “true” or “false” (default is true).
- To use the category path in the Start menu, use UseCategoryAsStartMenuPath. Settings: “true” or “false” (default is true).
Note:
Windows 8, 8.1 and Windows 10 do not allow the creation of nested folders within the Start menu. Applications are displayed individually or under the root folder but not within Category sub folders defined with Citrix Virtual Apps and Desktops.
- To set a single directory for all shortcuts in the Start menu, use StartMenuDir. Setting: String value, being the name of the folder into which shortcuts are written.
- To reinstall modified apps, use AutoReinstallModifiedApps. Settings: “true” or “false” (default is true).
- To show a single directory for all shortcuts on the desktop, use DesktopDir. Setting: String value, being the name of the folder into which shortcuts are written.
- To not create an entry on the clients ‘add/remove programs’, useDontCreateAddRemoveEntry. Settings: “true” or “false” (default is false).
- To remove shortcuts and Citrix Workspace icon for an application that was previously available from the Store but now is not available, use SilentlyUninstallRemovedResources. Settings: “true” or “false” (default is false).
In the web.config file, add the changes in the XML section for the account. Find this section by locating the opening tab:
<account id=... name="Store"
The section ends with the </account> tag.
Before the end of the account section, in the first properties section:
<properties> <clear> <properties>
Properties can be added into this section after the <clear /> tag, one per line, giving the name and value. For example:
<property name="PutShortcutsOnDesktop" value="True"/>
Note:
Property elements added before the <clear /> tag may invalidate them. Removing the <clear /> tag when adding a property name and value is optional.
An extended example for this section is:
<properties <property name="PutShortcutsOnDesktop" value="True" <property name="DesktopDir" value="Citrix Applications">
Important
In multiple server deployments, use only one server at a time to make changes to the configuration of the server group. Ensure that the Citrix StoreFront management console is not running on any of the other servers in the deployment. Once complete, propagate your configuration changes to the server group, so that the other servers in the deployment are updated. For more information, see StoreFront documentation.
Using per-app settings in Citrix Virtual Apps and Desktops 7.x to customize app shortcut locations
Citrix Workspace app can be configured to automatically place application and desktop shortcuts directly in the Start menu or on the desktop. This functionality was similar to previously released versions of Workspace for Windows, however, release 4.2.100 introduced the ability to control app shortcut placement using Citrix Virtual Apps per app settings. This functionality is useful in environments with a handful of applications that need to be displayed in consistent locations.
If you want to set the location of shortcuts so every user finds them in the same place use Citrix Virtual Apps per App Settings:
| If you want per-app settings to determine where applications are placed independently of whether in self-service mode or Start menu mode. | Configure Citrix Workspace app for Windows with PutShortcutsInStartMenu=false and enable per app settings. Note: This setting applies to the Web interface site only. |
Note:
The PutShortcutsInStartMenu=false setting applies to both XenApp 6.5 and XenDesktop 7.x.
Configure per app settings in XenApp 6.5
To configure a per app publishing shortcut in XenApp 6.5:
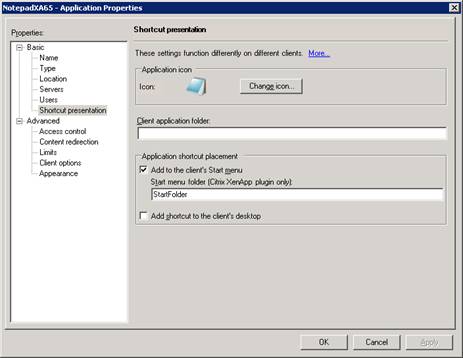
- In the XenApp® Application Properties screen, expand Basic properties.
- Select the Shortcut presentation option.
- In the Application shortcut placement portion of the Shortcut presentation screen, select the Add to the client’s Start menu check box. After selecting the check box, enter the name of the folder where you want to place the shortcut. If you do not specify a folder name, XenApp places the shortcut in the Start menu without placing it in a folder.
- Select the Add shortcut to the client’s desktop to include the shortcut on a client machine’s desktop.
- Click Apply.
-
Click OK.
Using per app settings in XenApp 7.6 to customize app shortcut locations
To configure a per app publishing shortcut in XenApp 7.6:
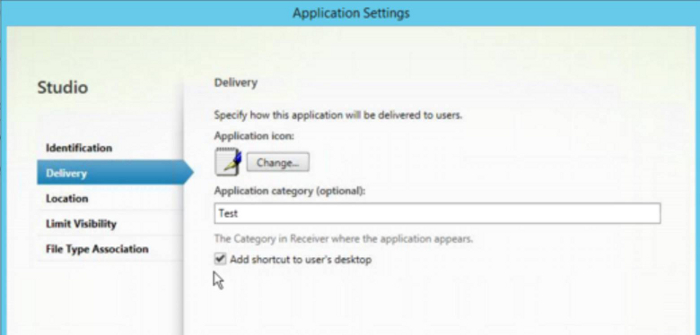
- In Citrix Studio, locate the Application Settings screen.
- In the Application Settings screen, select Delivery. Using this screen, you can specify how applications are delivered to users.
- Select the appropriate icon for the application. Click Change to browse to the location of the desired icon.
- In the Application category field, optionally specify the category in Citrix Workspace app where the application appears. For example, if you are adding shortcuts to Microsoft Office applications, enter Microsoft Office.
- Select the Add shortcut to user’s desktop check box.
-
Click OK.
Reducing enumeration delays or digitally signing application stubs
If users experience delays in app enumeration at each logon, or if there is a need to digitally sign application stubs, Citrix Workspace app provides functionality to copy the .EXE stubs from a network share.
This functionality involves several steps:
- Create the application stubs on the client machine.
- Copy the application stubs to a common location accessible from a network share.
- If necessary, prepare a white list (or, sign the stubs with an Enterprise certificate.
- Add a registry key to enable Workspace for Windows to create the stubs by copying them from the network share.
If RemoveappsOnLogoff and RemoveAppsonExit are enabled, and users are experiencing delays in app enumeration at every logon, use the following workaround to reduce the delays:
- Use regedit to add HKEY_CURRENT_USER\Software\Citrix\Dazzle /v ReuseStubs /t REG_SZ /d “true”.
- Use regedit to add HKEY_LOCAL_MACHINE\Software\Citrix\Dazzle /v ReuseStubs /t REG_SZ /d “true”. HKEY_CURRENT_USER has preference over HKEY_LOCAL_MACHINE.
Caution
Editing the Registry incorrectly can cause serious problems that may require you to reinstall your operating system. Citrix cannot guarantee that problems resulting from the incorrect use of Registry Editor can be solved. Use Registry Editor at your own risk. Be sure to backup the registry before you edit it.
Enable a machine to use pre-created stub executables that are stored on a network share:
- On a client machine, create stub executables for all of the apps. To accomplish this, add all the applications to the machine using Citrix Workspace app. Citrix Workspace app generates the executables.
- Harvest the stub executables from %APPDATA%\Citrix\SelfService. You only need the .exe files.
- Copy the executables to a network share.
- For each client machine that is locked down, set the following registry keys:
- Reg add HKEY_LOCAL_MACHINE\Software\Citrix\Dazzle /v CommonStubDirectory /t REG_SZ /d “\\ShareOne\WorkspaceStubs”
- Reg add HKEY_LOCAL_MACHINE\Software\Citrix\Dazzle /v
- CopyStubsFromCommonStubDirectory /t REG_SZ /d “true”. It’s also possible to configure these settings on HKEY_CURRENT_USER if you prefer. HKEY_CURRENT_USER has preference over HKEY_LOCAL_MACHINE.
- Exit and restart Citrix Workspace app to test the settings.
Example use cases:
This topic provides use cases for app shortcuts.
Allowing users to choose what they want in the Start menu (Self-Service)
If you have dozens (or even hundreds) of apps, it’s best to allow users to select which applications they want to Favorite and add to the Start menu:
| If you want the user to choose the applications they want in their Start menu.. | configure Citrix Workspace app in self-service mode. In this mode, you also configure auto-provisioned and mandatory app keyword settings as needed. |
| If you want the user to choose the applications, they want in their Start menu but also want specific app shortcuts on the desktop.. | configure Citrix Workspace app without any options and then use per app settings for the few apps that you want on the desktop. Use auto provisioned and mandatory apps as needed. |
No app shortcuts in the Start menu
If a user has a family computer, you might not need or want app shortcuts at all. In such scenarios, the simplest approach is browser access; install Citrix Workspace app without any configuration and browse to Workspace for Web and Web interface. You can also configure Citrix Workspace app for self-service access without putting shortcuts anywhere.
| If you want to prevent Citrix Workspace app from putting application shortcuts in the Start menu automatically. | configure Citrix Workspace app with PutShortcutsInStartMenu=False. Citrix Workspace app will not put apps in the Start menu even in self-service mode unless you put them there using per app settings. |
All app shortcuts in the Start menu or on the Desktop
If the user has only a few apps, you can put them all in the Start menu or all on the desktop, or in a folder on the desktop.
| If you want Citrix Workspace app to put all application shortcuts in the start menu automatically.. | configure Citrix Workspace app with SelfServiceMode =False. All available apps appear in the Start menu. |
| If you want all application shortcuts to put on desktop.. | configure Citrix Workspace app with PutShortcutsOnDesktop = true. All available apps appear in the desktop. |
| If you want all shortcuts to be put on the desktop in a folder… | configure Citrix Workspace app with DesktopDir=Name of the desktop folder where you want applications. |
Per app settings in XenApp 6.5 or 7.x
If you want to set the location of shortcuts so every user finds them in the same place use XenApp per App Settings:
| If you want per-app settings to determine where applications are placed independently of whether in self-service mode or Start menu mode.. | configure Citrix Workspace app with PutShortcutsInStartMenu=false and enable per app settings. |
Apps in category folders or in specific folders
If you want applications displayed in specific folders use the following options:
| If you want the application shortcuts Citrix Workspace app places in the start menu to be shown in their associated category (folder).. | configure Citrix Workspace app with UseCategoryAsStartMenuPath=True. |
| If you want the applications that Citrix Workspace app puts in the Start menu to be in a specific folder.. | configure Citrix Workspace app with StartMenuDir=the name of the Start menu folder name. |
Remove apps on logoff or exit
If you don’t want users to see apps if another user is going to share the end point, you can ensure that apps are removed when the user logs off and exits
| If you want Citrix Workspace app to remove all apps on logoff.. | configure Citrix Workspace app with RemoveAppsOnLogoff=True. |
| If you want Citrix Workspace app to remove apps on exit.. | configure Citrix Workspace app with RemoveAppsOnExit=True. |
Configuring Local App Access applications
When configuring Local App Access applications:
-
To specify that a locally installed application must be used instead of an application available in Citrix Workspace app, append the text string KEYWORDS:prefer=”pattern.” This feature is referred to as Local App Access.
Before installing an application on a user’s computer, Citrix Workspace app searches for the specified patterns to determine if the application is installed locally. If it is, Citrix Workspace app subscribes the application and does not create a shortcut. When the user starts the application from the Citrix Workspace app window, Citrix Workspace app starts the locally installed (preferred) application.
If a user uninstalls a preferred application outside of Citrix Workspace app, the application is unsubscribed during the next Citrix Workspace app refresh. If a user uninstalls a preferred application from the Citrix Workspace app dialog, Citrix Workspace app unsubscribes the application but does not uninstall it.
Note:
The keyword prefer is applied when Citrix Workspace app subscribes an application. Adding the keyword after the application is subscribed has no effect.
You can specify the prefer keyword multiple times for an application. Only one match is needed to apply the keyword to an application. The following patterns can be used in any combination:
-
To specify that a locally installed application should be used instead of an application available in Citrix Workspace app, append the text string KEYWORDS:prefer=”pattern”. This feature is referred to as Local App Access.
Before installing an application on a user’s computer, Citrix Workspace app searches for the specified patterns to determine if the application is installed locally. If it is, Citrix Workspace app subscribes the application and does not create a shortcut. When the user starts the application from the Citrix Workspace app dialog, Citrix Workspace app starts the locally installed (preferred) application.
If a user uninstalls a preferred application outside of Citrix Workspace app, the application is unsubscribed during the next Citrix Workspace app refresh. If a user uninstalls a preferred application from the Citrix Workspace app, Citrix Workspace app unsubscribes the application but does not uninstall it.
Starting with 1912, you can configure the automatic refresh behaviour in Citrix Workspace app using the Registry editor.
With earlier releases, when you restart Citrix Workspace app, an automatic refresh occurred even when the cache data is available.
Note:
You cannot configure this option on non-X1 Store accounts.
To configure the automatic refresh using the registry editor:
- Launch the registry editor and navigate to HKEY_LOCAL_MACHINE\SOFTWARE\Wow6432Node\Citrix\Dazzle path.
-
Create the following String Value keys:
Registry key Value InitialRefreshMinMs 10000 (10 Second) InitialRefreshMaxMs 15000 (15 Second) SuppressRefreshMs 1000 (1 second) - Save and close the editor.
Note:
The keyword prefer is applied when Citrix Workspace app subscribes an application. Adding the keyword after the application is subscribed has no effect.
You can specify the prefer keyword multiple times for an application. Only one match is needed to apply the keyword to an application. The following patterns can be used in any combination:
-
prefer=”ApplicationName”
The application name pattern matches any application with the specified application name in the shortcut file name. The application name can be a word or a phrase. Quotation marks are required for phrases. Matching is not allowed on partial words or file paths and is case-insensitive. The application name matching pattern is useful for overrides performed manually by an administrator.
| KEYWORDS:prefer= | Shortcut under Programs | Matches? |
|---|---|---|
| Word | \Microsoft Office\Microsoft Word 2010 | Yes |
| Microsoft Word | \Microsoft Office\Microsoft Word 2010 | Yes |
| Console | McAfee\VirusScan Console | Yes |
| Virus | McAfee\VirusScan Console | No |
| Console | McAfee\VirusScan Console | Yes |
-
prefer=”\\Folder1\Folder2\…\ApplicationName”
The absolute path pattern matches the entire shortcut file path plus the entire application name under the Start menu. The Programs folder is a sub folder of the Start menu directory, so you must include it in the absolute path to target an application in that folder. Quotation marks are required if the path contains spaces. The matching is case-sensitive. The absolute path matching pattern is useful for overrides implemented programmatically in Citrix Virtual Apps and Desktops.
| KEYWORDS:prefer= | Shortcut under Programs | Matches? |
|---|---|---|
| \Programs\Microsoft Office\Microsoft Word 2010 | \Programs\Microsoft Office\Microsoft Word 2010 | Yes |
| \Microsoft Office | \Programs\Microsoft Office\Microsoft Word 2010 | No |
| \Microsoft Word 2010 | \Programs\Microsoft Office\Microsoft Word 2010 | No |
| \Programs\Microsoft Word 2010 | \Programs\Microsoft Word 2010 | Yes |
-
prefer=”\Folder1\Folder2\…\ApplicationName”
The relative path pattern matches the relative shortcut file path under the Start menu. The relative path provided must contain the application name and can optionally include the folders where the shortcut resides. Matching is successful if the shortcut file path ends with the relative path provided. Quotation marks are required if the path contains spaces. The matching is case-sensitive. The relative path matching pattern is useful for overrides implemented programmatically.
| KEYWORDS:prefer= | Shortcut under Programs | Matches? |
|---|---|---|
| \Microsoft Office\Microsoft Word 2010 | \Microsoft Office\Microsoft Word 2010 | Yes |
| \Microsoft Office | \Microsoft Office\Microsoft Word 2010 | No |
| \Microsoft Word 2010 | \Microsoft Office\Microsoft Word 2010 | Yes |
| \Microsoft Word | \Microsoft Word 2010 | No |
For information about other keywords, see “Additional recommendations” in Optimize the user experience section in the StoreFront documentation.
Application launch time
Use the session pre-launch feature to reduce application launch time during normal or high traffic periods, thus providing users with a better experience. The pre-launch feature allows a pre-launch session to be created when a user logs on to Citrix Workspace app, or at a scheduled time if the user is already logged on.
This pre-launch session reduces the launch time of the first application. When a user adds a new account connection to Citrix Workspace app for Windows, session pre-launch does not take effect until the next session. The default application ctxprelaunch.exe is running in the session, but it is not visible to you.
Session pre-launch is supported On StoreFront deployments. For Web Interface deployments, be sure to use the Web Interface Save Password option to avoid logon prompts. Session pre-launch is not supported for Citrix Virtual Apps and Desktops deployments.
For more information, see Session prelaunch and session linger in a delivery group in Citrix Virtual Apps and Desktops documentation.
Session pre-launch is disabled by default. To enable session pre-launch, specify the ENABLEPRELAUNCH=true parameter on the Workspace command line or set the EnablePreLaunch registry key to true. The default setting, null, means that pre-launch is disabled.
Note:
If the client machine has been configured to support Domain Passthrough (SSON) authentication, pre-launch is automatically enabled. If you want to use Domain Pass-through (SSON) without prelaunch, set the EnablePreLaunch registry key value to false.
The registry locations are:
-
HKEY_LOCAL_MACHINE\Software\[Wow6432Node\]Citrix\Dazzle
-
HKEY_CURRENT_USER\Software\Citrix\Dazzle
There are two types of pre-launch:
- Just-in-time pre-launch- Pre-Launch starts immediately after the user’s credentials are authenticated whether it is a high-traffic period. Typically used for normal traffic periods. A user can trigger just-in-time pre-launch by restarting the Citrix Workspace app.
- Scheduled pre-launch- Pre-launch starts at a scheduled time. Scheduled pre-launch starts only when the user device is already running and authenticated. If those two conditions are not met when the scheduled pre-launch time arrives, a session does not launch. To spread network and server load, the session launches within a window of when it is scheduled. For example, if the scheduled pre-launch is scheduled for 1:45 p.m., the session actually launches between 1:15 p.m. and 1:45 p.m. Typically used for high-traffic periods.
Configuring pre-launch on a Citrix Virtual Apps server consists of creating, modifying, or deleting pre-launch applications, and updating user policy settings that control the pre-launch application.
You cannot customize the pre-launch feature using the receiver.admx file. However, you can change the pre-launch configuration by modifying registry values during or after Citrix Workspace app for Windows installation.
- The HKEY_LOCAL_MACHINE values are written during client installation.
- The HKEY_CURRENT_USER values enable you to provide different users on the same machine with different settings. Users can change the HKEY_CURRENT_USER values without administrative permission. You can provide your users with scripts to accomplish this.
HKEY_LOCAL_MACHINE registry values:
For 64-bit Windows operating systems: HKEY_LOCAL_MACHINE\SOFTWARE\Wow6432Node\Citrix\ICA Client\Prelaunch
For 32-bit Windows operating systems: HKEY_LOCAL_MACHINE\SOFTWARE\Citrix\ICA Client\Prelaunch
Name: UserOverride
Values:
0 - Use the HKEY_LOCAL_MACHINE values even if HKEY_CURRENT_USER values are also present.
1 - Use HKEY_CURRENT_USER values if they exist; otherwise, use the HKEY_LOCAL_MACHINE values.
Name: State
Values:
0 - Disable pre-launch.
1 - Enable just-in-time pre-launch. (Pre-Launch starts after the user’s credentials are authenticated.)
2 - Enable scheduled pre-launch. (Pre-launch starts at the time configured for Schedule.)
Name: Schedule
Value:
The time (24-hour format) and days of week for scheduled pre-launch entered in the following format:
HH:MM|M:T:W:TH:F:S:SU - where, HH and MM are hours and minutes;M:T:W:TH:F:S:SU is the day of the week. For example, to enable scheduled pre-launch on Monday, Wednesday, and Friday at 1:45 p.m., set Schedule as Schedule=13:45 |
1:0:1:0:1:0:0. The session launches between 1:15 p.m. and 1:45 p.m. |
HKEY_CURRENT_USER registry values:
HKEY_CURRENT_USER\SOFTWARE\Citrix\ICA Client\Prelaunch
The State and Schedule keys have the same values as for HKEY_LOCAL_MACHINE.
Bidirectional content redirection
The bidirectional content redirection policy allows you to enable or disable client to host and host to client URL redirection. Server policies are set in Studio, and client policies are set from the Citrix Workspace app Group Policy Object administration template.
Though Citrix also offers host to client redirection and Local App Access for client to URL redirection, we recommend that you use bidirectional content redirection for domain-joined Windows clients.
You can enable bidirectional content redirection using one of the following methods:
- Group Policy Object (GPO) administrative template
- Registry editor
Note:
- Bidirectional content redirection does not work on session where Local App Access is enabled.
- Bidirectional content redirection must be enabled both on the server and the client. When it is disabled either on the server or the client, the functionality is disabled.
- When you include URLs, you can specify one URL or a semi-colon delimited list of URLs. You can use an asterisk (*) as a wildcard.
To enable bidirectional content redirection using the GPO administrative template:
Use Group Policy Object administrative template configuration only for a first-time installation of Citrix Workspace app for Windows.
- Open the Citrix Workspace app Group Policy Object administrative template by running gpedit.msc.
- Under the User Configuration node, go to Administrative Templates > Classic Administrative Templates (ADM) > Citrix Components > Citrix Workspace > User experience.
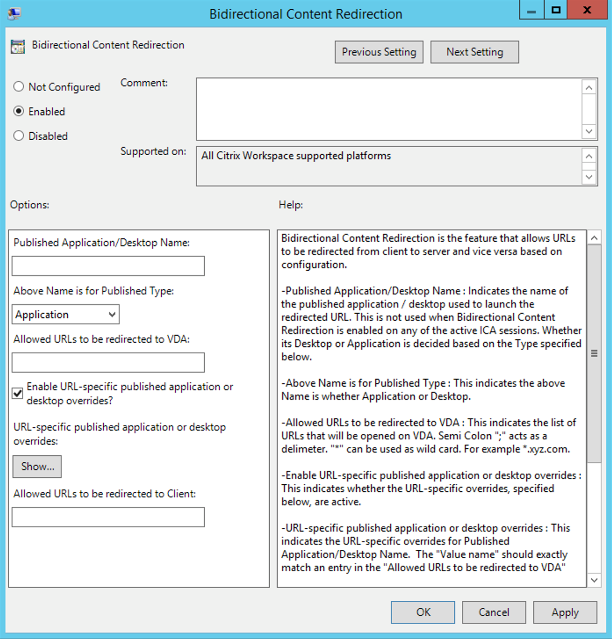
- Select the Bidirectional Content Redirection policy.
-
In the Published Application/Desktop name field, provide the name of the resource used to launch the redirected URL.
Note:
When you include URLs, specify a single URL or a semi-colon delimited list of URLs. You can use an asterisk (*) as a wildcard.
- From the Above Name is for Published Type, select Application or Desktop of the resource as appropriate.
- In the Allowed URLs to be redirected to VDA field, enter the URL that must be redirected. Separate the list with a semicolon.
- Select Enable URL-specific published application for desktop overrides? option to override a URL.
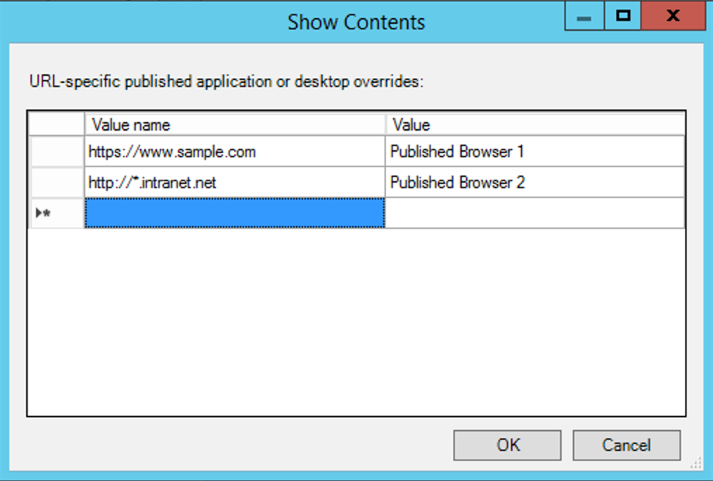
-
Click Show to display a list where the value name must match any of the URLs listed in the Allowed URLs to be redirected to the VDA field. The value must match a published application name.
- In the Allowed URLs to be redirected to Client: field, enter the URL that must be redirected from the server to the client. Separate the list with a semicolon.
Note:
When you include URLs, specify a single URL or a semi-colon delimited list of URLs. You can use an asterisk (*) as a wildcard.
- Click Apply and OK.
- From the command line, run the
gpupdate /forcecommand.
To enable bidirectional content redirection using the registry:
To enable bidirectional content redirection, run the redirector.exe /RegIE command from the Citrix Workspace app installation folder C:\Program Files (x86)\Citrix\ICA Client).
Important:
- Ensure that redirection rule does not result in a looping configuration. A looping configuration results if VDA rules are set so that, for example, a URL,
https://www.my\_company.comis configured to be redirected to the client, and the VDA.- URL redirection supports only explicit URLs (those appearing in the address bar of the browser or found using the in-browser navigation, depending on the browser).
- If two applications with same display name are configured to use multiple StoreFront accounts, the display name in the primary StoreFront account is used for launching the application or a desktop session.
- New browser window opens only when URL is redirected to the client. When URL is redirected to VDA, if the browser is already open, then the redirected URL opens in the new tab.
- Embedded links in files like documents, emails, PDF is supported.
- Ensure that only one of the server file type association and the host content redirection policies is set to Enabled on the same machine. Citrix recommends that you disable either the server file type association feature or the Host Content (URL) Redirection feature to ensure that URL redirection works properly.
Limitation:
No fallback mechanism is present if the redirection fails due to session launch issues.
Bloomberg keyboards
Citrix Workspace app supports the use of Bloomberg keyboard in a virtual apps and desktops session. The required components are installed with the plug-in. You can enable the Bloomberg keyboard feature when installing Citrix Workspace app for Windows or by using the Registry editor.
Multiple sessions with Bloomberg keyboards are not recommended. The keyboard operates in a single-session environment only.
Configure Bloomberg keyboard:
Caution
Editing the registry incorrectly can cause serious problems that might require you to reinstall your Operating system. Citrix cannot guarantee that problems resulting from the incorrect use of Registry editor can be solved. Use Registry editor at your own risk. Be sure to back up the registry before you edit it.
-
Locate the following key in the registry:
HKEY_LOCAL_MACHINE\SOFTWARE\Citrix\ICA Client\GenericUSB
-
Do one of the following:
- To enable this feature, for the entry with type DWORD and Name EnableBloombergHID, set the value to 1.
- To disable this feature, set the value to 0.
For more information on configuring Bloomberg Keyboard, see Knowledge Center article CTX122615.
To prevent the desktop viewer window from dimming:
If you have multiple Desktop Viewer windows, by default the desktops that are not active are dimmed. If users want to view multiple desktops simultaneously, this can make the information on them unreadable. You can disable the default behavior and prevent the Desktop Viewer window from dimming by editing the Registry editor.
Caution
Editing the registry incorrectly can cause serious problems that might require you to reinstall your Operating system. Citrix cannot guarantee that problems resulting from the incorrect use of Registry Editor can be solved. Use Registry Editor at your own risk. Be sure to back up the registry before you edit it
-
On the user device, create a REG_DWORD entry called DisableDimming in one of the following keys, depending on whether you want to prevent dimming for the current user of the device or the device itself. An entry exists if the Desktop Viewer has been used on the device:
HKEY_CURRENT_USER\Software\Citrix\XenDesktop\DesktopViewerHKEY_LOCAL_MACHINE\Software\Citrix\XenDesktop\DesktopViewer
Optionally, instead of controlling dimming, you can define a local policy by creating the same REG_WORD entry in one of the following keys:
HKEY_CURRENT_USER\Software\Policies\Citrix\XenDesktop\DesktopViewerHKEY_LOCAL_MACHINE\Software\Policies\Citrix\XenDesktop\DesktopViewer
Before using these keys, check whether the Citrix Virtual Apps and Desktops and Citrix DaaS administrator has set a policy for this feature.
Set the entry to any non-zero value such as 1 or true.
If no entries are specified or the entry is set to 0, the Desktop Viewer window is dimmed. If multiple entries are specified, the following precedence is used. The first entry that is located in this list, and its value, determine whether the window is dimmed:
- HKEY_CURRENT_USER\Software\Policies\Citrix\…
- HKEY_LOCAL_MACHINE\Software\Policies\Citrix\…
- HKEY_CURRENT_USER\Software\Citrix\…
- HKEY_LOCAL_MACHINE\Software\Citrix\…
Citrix Casting
The Citrix Ready® workspace hub combines digital and physical environments to deliver apps and data within a secure smart space. The complete system connects devices (or things), like mobile apps and sensors, to create an intelligent and responsive environment.
Citrix Ready workspace hub is built on the Raspberry Pi 3 platform. The device running Citrix Workspace app connects to the Citrix Ready workspace hub and casts the apps or desktops on a larger display. Citrix Casting is supported only on Microsoft Windows 10 Version 1607 and later or Windows Server 2016.
Citrix Casting is a feature that has the capability to allow you to instantly and securely access any app from a mobile device and display on a large screen.
Note:
- Citrix Casting for Windows supports Citrix Ready workspace hub Version 2.40.3839 and later. Workspace hub with earlier versions might not get detected or cause a casting error.
- The Citrix Casting feature is not supported on Citrix Workspace app for Windows (Store).
Prerequisites:
- Bluetooth enabled on the device for hub discovery.
- Both Citrix Ready workspace hub and Citrix Workspace app must be on the same network.
- Port 55555 must not be blocked between the device running Citrix Workspace app and the Citrix Ready workspace hub.
- For Citrix Casting, port 1494 must not be blocked.
- Port 55556 is the default port for SSL connections between mobile devices and the Citrix Ready workspace hub. You can configure a different SSL port on Raspberry Pi’s settings page. If the SSL port is blocked, users cannot establish SSL connections to the workspace hub.
- Citrix Casting is supported only on Microsoft Windows 10 Version 1607 and later or Windows Server 2016.
Configure Citrix Casting launch
Note:
You can hide all or part of the Advanced Preferences sheet available from the Citrix Workspace app icon in the notification area. For more information, see Advanced Preferences sheet.
-
Right-click the Citrix Workspace app icon from the notification area and select Advanced Preferences.
The Advanced Preferences dialog appears.
-
Select Citrix Casting.
The Citrix Casting dialog appears.
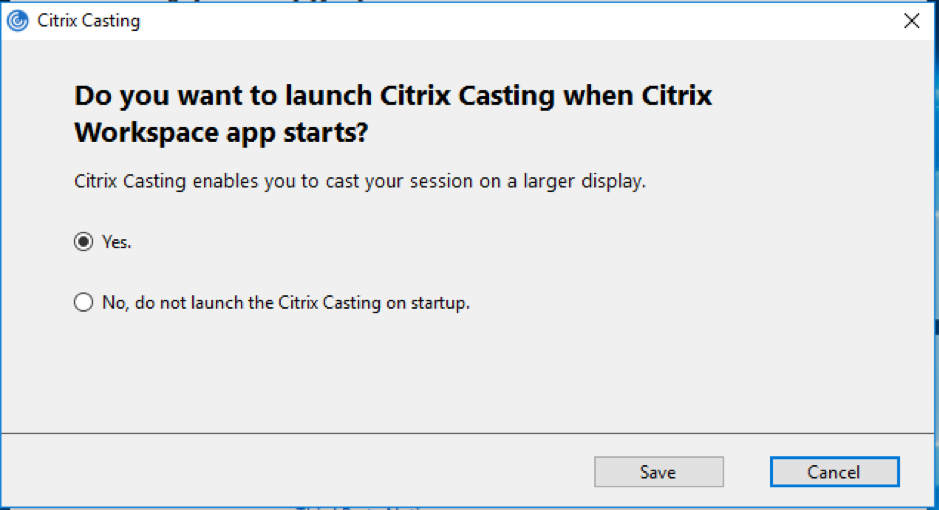
- Select one of the options:
- Yes – Indicates that Citrix Casting is launched when Citrix Workspace app starts.
- No, do not launch the Citrix Casting on startup – Indicates that Citrix Casting does not launch when Citrix Workspace app starts.
Note:
Selecting the option No does not terminate the current screen casting session. The setting is applied only at the next Citrix Workspace app launch.
- Click Save to apply the changes.
How to use Citrix Casting with Citrix Workspace app
-
Log on to Citrix Workspace app and enable Bluetooth on your device.
The list of available hubs is displayed. The list is sorted by the RSSI value of the workspace hub beacon package.
-
Select the workspace hub to cast your screen and choose one of the following:
- Mirror to duplicate the primary screen and cast the display to the connected workspace hub device.
- Extend to use the workspace hub device screen as your secondary screen.
Note:
Exiting Citrix Workspace app does not exit Citrix Casting.
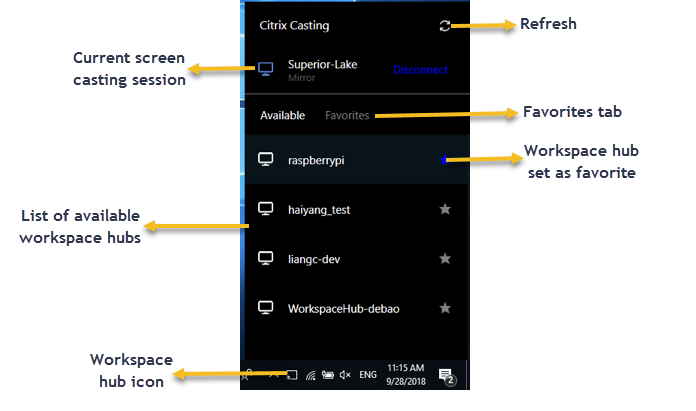
In the Citrix Casting notification dialog, the following options are available:
- The current screen casting session displayed at the top.
- Refresh icon.
- Disconnect to stop the current screen casting session.
- Star icon to add the workspace hub to Favorites.
- Right-click the workspace hub icon in the notification area and select Exit to disconnect the screen casting session and to exit Citrix Ready workspace hub.
Self-check list
If Citrix Workspace app cannot detect and communicate with any available workspace hubs in range, ensure that you do the following as part of self-check:
- Citrix Workspace app and Citrix Ready workspace hub are connected to the same network.
- Bluetooth is enabled and working properly on the device where Citrix Workspace app is launched.
- The device where Citrix Workspace app is launched is within range (less than 10 meters and without any obstructing objects such as walls) of Citrix Ready workspace hub.
- Launch a browser in Citrix Workspace app and type
http://<hub_ip>:55555/device-details.xmlto check whether the workspace hub device details are displayed. - Click Refresh in Citrix Ready workspace hub and try reconnecting to the workspace hub.
Known issues and limitations
- Citrix Casting does not work unless the device is connected to the same network as the Citrix Ready workspace hub.
- In case of network issues, there might be a lag in display on the workspace hub device.
- When you select Extend, the primary screen where Citrix Ready workspace app is launched flashes multiple times.
- In Extend mode, you cannot set the secondary display as the primary display.
- The screen casting session automatically disconnects when there is any change in the display settings on the device. For example, change in screen resolution, change in screen orientation.
- During the screen casting session, if the device running Citrix Workspace app locks, sleeps or hibernates, an error appears at login.
- Multiple screen casting sessions are not supported.
- The maximum screen resolution supported by Citrix Casting is 1920 x 1440.
- Citrix Casting supports Citrix Ready workspace hub Version 2.40.3839 and later. Workspace hub with earlier versions might not get detected or cause a casting error.
- This feature is not supported on Citrix Workspace app for Windows (Store).
- On Windows 10, Build 1607, Citrix Casting in Extend mode might not be properly positioned.
Composite USB device redirection
Configuring composite USB redirection:
- Open the Citrix Workspace app Group Policy Object administrative template by running gpedit.msc.
- Under the Computer Configuration node, go to Administrative Templates > Citrix Components > Citrix Workspace > Remoting client devices > Generic USB Remoting.
- Select the SplitDevices policy.
- Select Enabled.
- Click Apply Click OK to save the policy.
To allow or deny an interface:
- Open the Citrix Workspace app Group Policy Object administrative template by running gpedit.msc.
- Under the User Configuration node, go to Administrative Templates > Citrix Components > Citrix Workspace > Remoting client devices > Generic USB Remoting.
- Select USB Device Rules policy.
- Select Enabled.
- In the USB Device Rules text box, add the USB device that you want to allow or deny.
For example,
ALLOW: vid=047F pid= C039 split=01 intf=00,03- allows 00 and 03 interface and restrict others. - Click Apply and OK.
In a desktop session, split USB devices are displayed in the Desktop Viewer under Devices. Also, you can view split USB devices from Preferences > Devices.
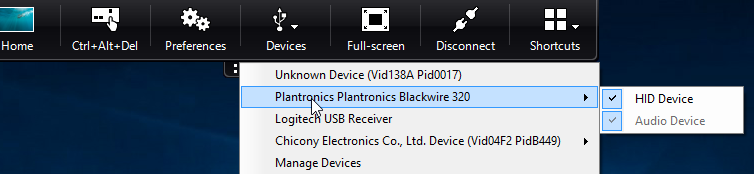
Note:
When you split a composite USB device for generic USB redirection, you must select the device from Desktop Viewer or Connection Center to redirect the device.
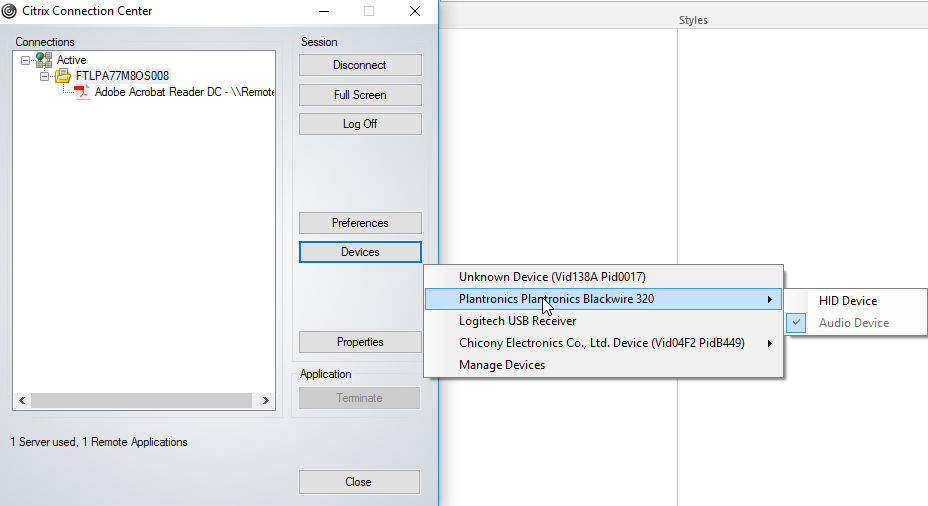
In an application session, split USB devices are displayed in the Connection Center.
The table below provides details on the behavior scenarios when a USB interface is allowed or denied.
To allow an interface:
| Split | Interface | Action |
|---|---|---|
| TRUE | Valid number 0 -n | Allow specified interface |
| TRUE | Invalid number | Allow all interfaces |
| FALSE | Any value | Allow Generic USB of parent device |
| Not specified | Any value | Allow Generic USB of parent device |
For example, SplitDevices- true indicates that all devices split.
To deny an interface:
| Split | Interface | Action |
|---|---|---|
| TRUE | Valid number 0 -n | Deny specified interface |
| TRUE | Invalid number | Deny all interfaces |
| FALSE | Any value | Deny Generic USB of parent device |
| Not specified | Any value | Deny Generic USB of parent device |
For example, SplitDevices- false indicates that devices are not split with specified interface number.
Example: MyPlantronics headset
Interface number:
- Audio Interface Class -0
- HID Interface Class-3
Sample rules used for MyPlantronics headset:
- ALLOW:
vid=047F pid= C039 split=01 intf=00,03 /Allowed 00 and 03 interface, restrict others - DENY:
vid=047F pid= C039 split=01 intf=00,03 / deny 00 and 03
Limitation:
Citrix recommends that you do not split interfaces for a webcam. As a workaround, redirect the device to a single device using Generic USB redirection. For a better performance, use the optimized virtual channel.
DPI scaling
Citrix Workspace app allows the operating system to control the session resolution.
You can apply high DPI in a session but the feature is disabled by default. This means that session scaling follows the operating system resolution.
You can configure DPI scaling using the following options:
- Group Policy Object (GPO) administrative template (per-machine configuration)
- Advanced Preferences (per-user configuration)
Limitations:
- Even with this feature enabled, a slight blur has been observed in the Desktop Viewer.
- In a session, when you change the DPI settings and relaunch it, the size of the session window might not be appropriate. As a workaround, resize the session window.
To configure DPI scaling using GPO administrative template:
- Open the Citrix Workspace app Group Policy Object administrative template by running gpedit.msc.
- Under the Computer Configuration node, go to Administrative Templates> Citrix Components > Citrix Workspace > DPI
-
Select High DPI policy.
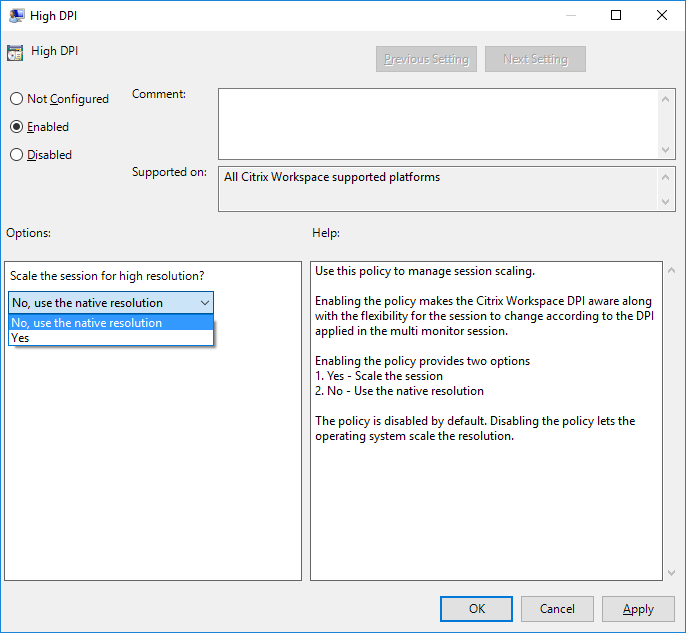
-
Select from one of the following options:
- Yes - Indicates that high DPI is applied in a session.
- No, use the native resolution - Indicates that the resolution is set by the operating system.
- Click Apply and OK.
- From the command line, run the
gpupdate /forcecommand to apply the changes.
Configure DPI scaling using the graphical user interface:
Note:
You can hide all or part of the Advanced Preferences sheet available from the Citrix Workspace app for Windows icon in the notification area. For more information, see Advanced Preferences sheet.
- Right-click Citrix Workspace app icon from the notification area.
-
Select Advanced Preferences and click DPI settings.
The DPI settings dialog appears.
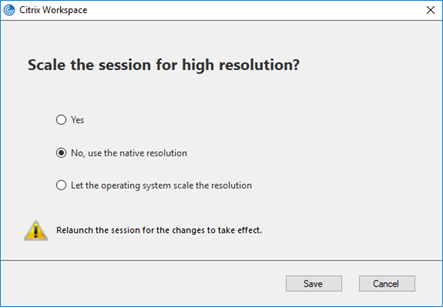
-
Select one of the following options:
- Yes - Indicates that high DPI is applied in a session.
- No, use the native resolution - Indicates that the Citrix Workspace app detects the DPI on the VDA and applies it.
- Let the operating system scale the resolution - By default, this option is selected. It allows the Windows to handle the DPI scaling. This option also means that the High DPI policy is set to disabled.
- Click Save.
- Restart the Citrix Workspace app session for the changes to take effect.
DPI scaling options
There are three possible settings for DPI scaling in the Citrix Workspace app - Scaled, Unscaled, and Operating system scaling. The use cases for the different settings are as follows.
Scaled:
The scaled setting scales the resolution on the VDA similarly to Operating system scaling, however this setting supports mixed DPI scenarios. This corresponds to the UI setting Yes, or the High DPI policy set to Enabled in the GPO policy. This setting works well for mixed DPI scenarios when connecting to modern VDAs. This is the only way to scale seamless sessions. Scaling might cause blurriness in the images, particularly in the case of text. There can be poor performance when connecting to legacy VDAs (6.5, or configured for Legacy Graphics). Local App Access, RTOP, and other plug-ins that use screen positioning APIs do not work with scaling. By design, seamless apps jumps between monitors in this mode to maintain correct scaling. This setting is recommended for users on Windows 10 connecting to modern VDAs. It supports mixed DPI without any additional impact on server resources.
Unscaled:
The unscaled setting sends the full resolution of all monitors in the session. These resolutions are unscaled and can result in small text and icons in apps and desktops. This corresponds to the UI setting “No” and the HighDPI policy is set to Enabled in the GPO. This setting does not cause any blurriness due to scaling, but can result in small text and icons. When connecting to a desktop session, the DPI can be set within the VDA resulting in the desired scaling. This is not possible on RDS desktops, or seamless applications. Enabling this setting causes sessions with higher resolution which can impact server performance and scalability. This setting is recommended for desktop sessions requiring the best image quality, where the additional server resources are acceptable. It can also be used in cases where the small text and icons are not an issue for the user.
Operating system scaling:
Operating system scaling is the default and corresponds to the UI setting “Let the operating system scale the resolution”. The High DPI policy set to Disabled in this scenario. This lets the Windows Operating system handle the DPI scaling for a session. The resolution on the VDA is scaled based on the DPI, resulting in a smaller resolution than the client device. This works well for single monitor sessions, and is efficient when connecting to 6.5 VDAs, or VDAs configured for Legacy Graphics. This method does not support Mixed DPI- all monitors must have the same DPI or the session does not work. Scaling can cause blurriness in the images, particularly in the case of text. There might also be issues with cursor sizes on Windows 10 Operating system. This setting is recommended for users on Windows 7 endpoints, or those connecting to legacy VDAs. It can also be used on Windows 10 if there is no Mixed DPI.
Virtual display layout
This feature lets you define a virtual monitor layout that applies to the remote desktop and to virtually split a single client monitor into up to eight monitors on the remote desktop. You can configure the virtual monitors on the Monitor Layout tab in the Desktop Viewer. There, you can draw horizontal or vertical lines to separate the screen into virtual monitors. The screen is split according to specified percentages of the client monitor resolution.
You can set a DPI for the virtual monitors that is used for DPI scaling or DPI matching. After applying a virtual monitor layout, resize or reconnect the session.
This configuration applies only to full-screen sessions, single-monitor desktop sessions, and does not affect any published applications. This configuration applies to all subsequent connections from this client.
Generic client Input Method Editors (IME)
Configuring generic client IME using the command-line interface:
-
To enable generic client IME, run the
wfica32.exe /localime:oncommand from the Citrix Workspace app installation folderC:\Program Files (x86)\Citrix\ICA Client.
-
To disable generic client IME, run the
wfica32.exe /localime:offcommand from the Citrix Workspace app installation folderC:\Program Files (x86)\Citrix\ICA Client.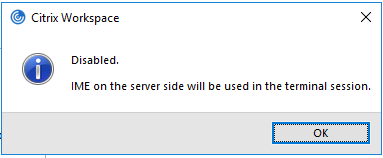
Note:
You can use the command-line switch
wfica32.exe /localime:onto enable both generic client IME and keyboard layout synchronization.
-
To disable generic client IME, run the
wfica32.exe /localgenericime:offcommand from the Citrix Workspace app installation folderC:\Program Files (x86)\Citrix\ICA Client. This command does not affect keyboard layout synchronization settings.
If you have disabled generic client IME using the command-line interface, you can enable the feature again by running the wfica32.exe /localgenericime:on command.

Toggle:
Citrix Workspace app supports toggle functionality for this feature. You can run the wfica32.exe /localgenericime:on command to enable or disable the feature. However, the keyboard layout synchronization settings take precedence over the toggle switch. If keyboard layout synchronization is set to Off, toggling does not enable generic client IME.
Configure generic client IME using the graphical user interface:
Generic client IME requires VDA Version 7.13 or later.
Generic client IME feature can be enabled by enabling keyboard layout synchronization. For more information, see Keyboard layout synchronization.
Citrix Workspace app allows you to configure different options to use generic client IME. You can select from one these options based on your requirements and usage.
- In an active application session, right-click the Citrix Workspace app icon in the notification area and select Connection Center.
-
Select Preferences and Local IME.
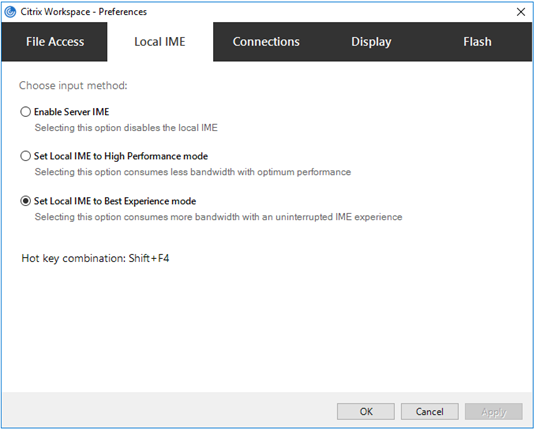
The options below are available to support different IME modes:
- Enable Server IME – Disables local IME and only the languages set on the server can be used.
- Set Local IME to High Performance mode – Uses local IME with limited bandwidth. This option restricts the candidate window functionality.
- Set Local IME to Best Experience mode – Uses local IME with best user experience. This option consumes high bandwidth. By default, this option is selected when generic client IME is enabled.
The change in settings is applied only for the current session.
Enabling hotkey configuration using a registry editor:
When generic client IME is enabled, you can use the Shift+F4 hotkeys to select different IME modes. The different options for IME modes appear in the top-right corner of the session.
By default, the hotkey for generic client IME is disabled.
In the registry editor, navigate to HKEY_LOCAL_MACHINE\SOFTWARE\Wow6432Node\Citrix\ICA Client\Engine\Lockdown Profiles\All Regions\Lockdown\Client Engine\Hot Keys.
Select AllowHotKey and change the default value to 1.

Limitations:
- Generic client IME does not support UWP (Universal Windows Platform) apps such as Search UI, and the Edge browser of the Windows 10 operating system. As a workaround, use the server IME instead.
- Generic client IME is not supported on Internet Explorer Version 11 in Protected Mode. As a workaround, you can disable Protected Mode by using Internet Options. To do this, click Security and uncheck Enable Protected Mode.
H.265 video encoding
Citrix Workspace app supports the use of the H.265 video codec for hardware acceleration of remote graphics and videos. To benefit from this feature, it must be supported and enabled on both the VDA and Citrix Workspace app. If the GPU on the endpoint does not support H.265 decoding using the DXVA interface, the H265 Decoding for graphics policy settings is ignored and the session falls back to using the H.264 video codec.
Prerequisites:
- VDA 7.16 and later.
- Enable the Optimize for 3D graphics workload policy on the VDA.
- Enable the Use hardware encoding for video codec policy on the VDA.
Note:
H.265 encoding is supported only on the NVIDIA GPU.
In Citrix Workspace app for Windows, this feature is set to Disabled by default.
Configuring Citrix Workspace app to use H.265 video encoding using Citrix Group Policy Object (GPO) administrative template:
- Open the Citrix Workspace app Group Policy Object administrative template by running gpedit.msc.
- Under the Computer Configuration node, go to Administrative Templates > Citrix Workspace > User Experience.
- Select the H265 Decoding for graphics policy.
- Select Enabled.
- Click Apply and OK.
Configuring H.265 video encoding using Registry editor:
Enabling H.265 video encoding on a non-domain joined network on a 32-bit operating system:
- Launch the Registry Editor using regedit on the Run command.
- Navigate to
HKEY_LOCAL_MACHINE\SOFTWARE\Policies\Citrix\ICA Client\Graphics Engine. - Create a DWORD key by name EnableH265 and set the value of the key to 1.
Enabling H.265 video encoding on a non-domain joined network on a 64-bit operating system:
- Launch the Registry Editor using regedit on the Run command.
- Navigate to
HKEY_LOCAL_MACHINE\SOFTWARE\Wow6432Node\Policies\Citrix\ICA Client\Graphics Engine. - Create a DWORD key by name EnableH265 and set the value of the key to 1.
Restart the session for the changes to take effect.
Note:
- If the Hardware acceleration for Graphics policy is disabled in the Citrix Workspace app for Windows Group Policy Object administrative template, the H265 Decoding for graphics policy settings is ignored and the feature does not work.
- Run the HDX Monitor 3.x tool to identify if H.265 video encoder is enabled within the sessions. For more information about HDX Monitor 3.x tool, see Knowledge Center article CTX135817.
Keyboard layout and language bar
Keyboard layout
Note:
You can hide all or part of the Advanced Preferences sheet available from the Citrix Workspace app icon in the notification area. For more information, see Advanced Preferences sheet.
Keyboard layout synchronization enables users to switch among preferred keyboard layouts on the client device. This feature is disabled by default.
To enable keyboard layout synchronization:
-
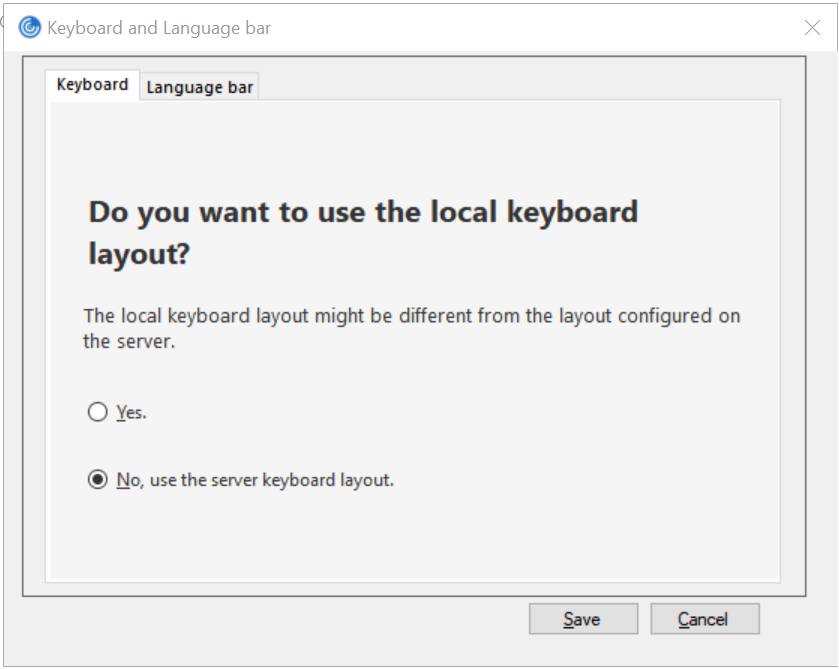
From the Citrix Workspace app icon in the notification area icon, select Advanced Preferences > Keyboard and Language bar.
The Keyboard and Language bar dialog appears.
-
Select from one of the following options:
- Yes - Indicates that the local keyboard layout is used in a session.
- No, use the server keyboard - Indicates that the keyboard layout used on the VDA is applied in a session. This option sets the local keyboard layout feature to disabled.
-
Click Save.
You can also enable and disable keyboard layout synchronization using the command line by running wfica32:exe /localime:on or wfica32:exe /localime:off from the Citrix Workspace app for Windows installation folder C:\Program files (x86)\Citrix\ICA Client.
Using the local keyboard layout option activates the Client IME (Input Method Editor). If users working in Japanese, Chinese, or Korean prefer to use the Server IME, they must disable the local keyboard layout option by selecting No, or running wfica32:exe /localime:off. The session reverts to the keyboard layout provided by the remote server when they connect to the next session.
Sometimes, switching the client keyboard layout does not take effect in an active session. To resolve this issue, log off from Citrix Workspace app and login again.
Hide the keyboard layout switch notification dialog:
The keyboard layout change notification dialog lets you know that the VDA session is switching the keyboard layout. The keyboard layout switch needs approximately two seconds to switch. When you hide the notification dialog, wait for some time before you start typing to avoid incorrect character input.
Warning
Editing the registry incorrectly can cause serious problems that might require you to reinstall your operating system. Citrix cannot guarantee that problems resulting from the incorrect use of Registry Editor can be solved. Use Registry Editor at your own risk. Be sure to back up the registry before you edit it.
Hide the keyboard layout switch notification dialog using the Registry editor:
- Launch the Registry editor and navigate to
HKEY_LOCAL_MACHINE\Software\Citrix\IcaIme. - Create a String Value key by name HideNotificationWindow.
- Set the DWORD value to 1.
- Click OK.
- Restart the session for the changes to take effect.
Limitations:
- Remote applications which run with elevated privilege (for example, right-click an application icon > Run as administrator) cannot be synchronized with the client keyboard layout. As a workaround, manually change the keyboard layout on the server side (VDA) or disable UAC.
- If the user changes the keyboard layout on the client to a layout which is not supported on the server, the keyboard layout synchronization feature is disabled for security reasons - an unrecognized keyboard layout is treated as a potential security threat. To restore the keyboard layout synchronization feature, log off and relog in to the session.
- In an RDP session, you cannot change the keyboard layout using Alt + Shift shortcuts. As a workaround, use the language bar in the RDP session to switch the keyboard layout.
- This feature is disabled in Windows Server 2016 due to a third-party issue which might introduce performance risk. The feature can be enabled with a registry setting on the VDA: in
HKEY_LOCAL_MACHINE\Software\Citrix\ICA\IcaIme, add a new key called DisableKeyboardSync and set the value to 0.
Language bar
The language bar displays the preferred input language in a session. In earlier releases, you could change this setting using only the registry keys on the VDA. Starting with Citrix Receiver for Windows Version 4.11, you can change the settings using the Advanced Preferences dialog. The language bar appears in a session by default.
Note:
This feature is available in sessions running on VDA 7.17 and later.
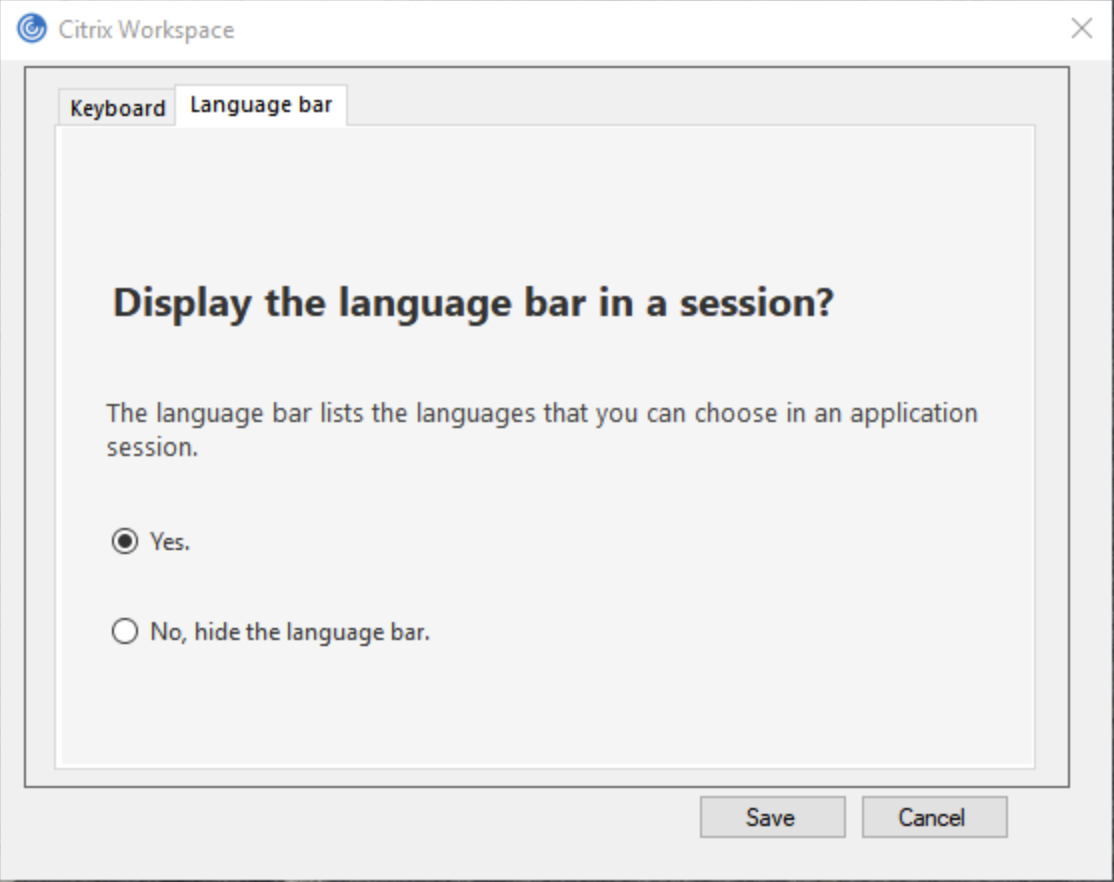
Configure showing or hiding the remote language bar:
- Right-click the Citrix Workspace app icon from the notification area and select Advanced Preferences.
- Select Keyboard and Language bar.
- Select the Language bar tab.
- Select from one of the following options:
- Yes - Indicates that the language bar is displayed in a session.
- No, hide the language bar - Indicates that the language bar is hidden in a session.
-
Click Save.
The setting changes take effect immediately.
Note:
- You can change the settings in an active session.
- The remote language bar does not appear in a session if there is only one input language.
Hide the language bar tab from the Advanced Preferences sheet:
You can hide the language bar tab from the Advanced Preferences sheet by using the registry.
- Launch the registry editor.
- Navigate to
HKEY_LOCAL_MACHINE\SOFTWARE\Citrix\ICA Client\Engine\Configuration\Advanced\Modules\LocalIME. - Create a DWORD value key, ToggleOffLanguageBarFeature, and set it to 1 to hide the Language bar option from the Advanced Preferences sheet.
USB support
USB support enables you to interact with a wide range of USB devices when connected to a Citrix Virtual Apps and Desktops and Citrix DaaS. You can plug USB devices into their computers and the devices are remote to their virtual desktop. USB devices available for remoting include flash drives, smartphones, PDAs, printers, scanners, MP3 players, security devices, and tablets. Desktop Viewer users can control whether USB devices are available on the Citrix Virtual Apps and Desktops and Citrix DaaS using a preference in the toolbar.
Isochronous features in USB devices, such as webcams, microphones, speakers, and headsets are supported in typical low latency/high-speed LAN environments. This allows these devices to interact with packages, such as Microsoft Office Communicator and Skype.
The following types of device are supported directly in a virtual apps and desktops session, and so does not use USB support:
- Keyboards
- Mice
- Smart cards
Specialist USB devices (for example, Bloomberg keyboards and 3-D mice) can be configured to use USB support. For information on configuring Bloomberg keyboards, see Configure Bloomberg keyboards.
For information on configuring policy rules for other specialist USB devices, see Knowledge Center article CTX122615.
By default, certain types of USB devices are not supported for remoting through Citrix Virtual Apps and Desktops and Citrix DaaS. For example, a user may have a network interface card attached to the system board by internal USB. Remoting this device would not be appropriate. The following types of USB device are not supported by default in a virtual apps and desktops session:
- Bluetooth dongles
- Integrated network interface cards
- USB hubs
- USB graphics adapters
USB devices connected to a hub can be remote, but the hub itself cannot be remote.
The following types of USB device are not supported by default for use in a Citrix Virtual Apps session:
- Bluetooth dongles
- Integrated network interface cards
- USB hubs
- USB graphics adapters
- Audio devices
- Mass storage devices
How USB support works:
When a user plugs in a USB device, it is checked against the USB policy, and, if allowed, remoted to the virtual desktop. If the device is denied by the default policy, it is available only to the local desktop.
When a user plugs in a USB device, a notification appears to inform the user about a new device. The user can decide which USB devices are remoted to the virtual desktop by selecting devices from the list each time they connect. Alternatively, the user can configure USB support so that all USB devices plugged in both before and/or during a session is automatically remoted to the virtual desktop that is in focus.
Mass storage devices
For mass storage devices only, in addition to USB support, remote access is available through client drive mapping, which you configure through the Citrix Workspace app for Windows policy Remoting client devices > Client drive mapping. When this policy is applied, the drives on the user device are automatically mapped to drive letters on the virtual desktop when users log on. The drives are displayed as shared folders with mapped drive letters.
The main differences between the two types of remoting policy are:
| Feature | Client drive mapping | USB support |
|---|---|---|
| Enabled by default | Yes | No |
| Read-only access configurable | Yes | No |
| Safe to remove device during a session | No | Yes, if the user clicks Safely Remove Hardware in the notification area |
If both Generic USB and the Client drive mapping policies are enabled and a mass storage device is inserted before a session starts, it is redirected using client drive mapping first, before being considered for redirection through USB support. If it is inserted after a session has started, it will be considered for redirection using USB support before client drive mapping.
USB device classes allowed by default:
Different classes of USB device are allowed by the default USB policy rules.
Although they are on this list, some classes are only available for remoting in virtual apps and desktops sessions after additional configuration. These are noted below.
- Audio (Class 01)- Includes audio input devices (microphones), audio output devices, and MIDI controllers. Modern audio devices generally use isochronous transfers, which are supported by XenDesktop® 4 or later. Audio (Class01) is not applicable to Citrix Virtual Apps because these devices are not available for remoting in Citrix Virtual Apps using USB support.
Note:
Some specialty devices (for example, VOIP phones) require additional configuration.
-
Physical Interface Devices (Class 05)- These devices are similar to Human Interface Devices (HIDs), but generally provide “real-time” input or feedback and include force feedback joysticks, motion platforms, and force feedback endoskeletons.
-
Still Imaging (Class 06)- Includes digital cameras and scanners. Digital cameras often support the still imaging class which uses the Picture Transfer Protocol (PTP) or Media Transfer Protocol (MTP) to transfer images to a computer or other peripheral. Cameras may also appear as mass storage devices and it may be possible to configure a camera to use either class, through setup menus provided by the camera itself.
Note:
If a camera appears as a mass storage device, client drive mapping is used and USB support is not required.
-
Printers (Class 07)- In general most printers are included in this class, although some use vendor-specific protocols (class ff). Multi-function printers may have an internal hub or be composite devices. In both cases the printing element generally uses the Printers class and the scanning or fax element uses another class; for example, Still Imaging.
Printers normally work appropriately without USB support.
Note
This class of device (in particular printers with scanning functions) requires additional configuration.
-
Mass Storage (Class 08)- The most common mass storage devices are USB flash drives; others include USB-attached hard drives, CD/DVD drives, and SD/MMC card readers. There are a wide variety of devices with internal storage that also present a mass storage interface; these include media players, digital cameras, and mobile phones. Mass Storage (Class 08) is not applicable to Citrix Virtual Apps because these devices are not available for remoting in Citrix Virtual Apps using USB support. Known subclasses include:
- 01 Limited flash devices
- 02 Typically CD/DVD devices (ATAPI/MMC-2)
- 03 Typically tape devices (QIC-157)
- 04 Typically floppy disk drives (UFI)
- 05 Typically floppy disk drives (SFF-8070i)
- 06 Most mass storage devices use this variant of SCSI
Mass storage devices can often be accessed through client drive mapping, and so USB support is not required.
-
Content Security (Class 0d)- Content security devices enforce content protection, typically for licensing or digital rights management. This class includes dongles.
-
Video (Class 0e)- The video class covers devices that are used to manipulate video or video-related material, such as webcams, digital camcorders, analog video converters, some television tuners, and some digital cameras that support video streaming.
Important
Most video streaming devices use isochronous transfers, which are supported by XenDesktop 4 or later. Some video devices (for example webcams with motion detection) require additional configuration.
-
Personal Healthcare (Class 0f)- These devices include personal healthcare devices such as blood pressure sensors, heart rate monitors, pedometers, pill monitors, and spirometry.
-
Application and Vendor Specific (Classes fe and ff)- Many devices use vendor-specific protocols or protocols not standardized by the USB consortium, and these usually appear as vendor-specific (class ff).
USB devices classes denied by default
The following different classes of USB device are denied by the default USB policy rules.
-
Communications and CDC Control (Classes 02 and 0a). The default USB policy does not allow these devices, because one of the devices may be providing the connection to the virtual desktop itself.
-
Human Interface Devices (Class 03). Includes a wide variety of both input and output devices. Typical Human Interface Devices (HIDs) are keyboards, mice, pointing devices, graphic tablets, sensors, game controllers, buttons, and control functions.
Subclass 01 is known as the “boot interface” class and is used for keyboards and mice.
The default USB policy does not allow USB keyboards (class 03, subclass 01, protocol 1), or USB mice (class 03, subclass 01, protocol 2). This is because most keyboards and mice are handled appropriately without USB support and it is normally necessary to use these devices locally as well remotely when connecting to a virtual desktop.
-
USB Hubs (Class 09). USB hubs allow extra devices to be connected to the local computer. It is not necessary to access these devices remotely.
-
Smart Card (Class 0b). Smart card readers include contactless and contact smart card readers, and also USB tokens with an embedded smart card-equivalent chip.
Smart card readers are accessed using smart card remoting and do not require USB support.
-
Wireless Controller (Class e0). Some of these devices may be providing critical network access, or connecting critical peripherals, such as Bluetooth keyboards or mice.
The default USB policy does not allow these devices. However, there may be particular devices to which it is appropriate to provide access using USB support.
-
Miscellaneous network devices (Class ef, subclass 04)- Some of these devices may be providing critical network access. The default USB policy does not allow these devices. However, there may be particular devices to which it is appropriate to provide access using USB support.
Update the list of USB devices available for remoting
You can update the range of USB devices available for remoting to desktops by editing the Citrix Workspace for Windows template file. This allows you to make changes to the Citrix Workspace for Windows using Group Policy. The file is located in the following installed folder:
\C:\Program Files\Citrix\ICA Client\Configuration\en.
Alternatively, you can edit the registry on each user device, adding the following registry key:
HKEY_LOCAL_MACHINE\SOFTWARE\Policies\Citrix\ICA Client\GenericUSB Type=String Name="DeviceRules" Value=
Important
Editing the Registry incorrectly can cause serious problems that may require you to reinstall your operating system. Citrix cannot guarantee that problems resulting from the incorrect use of Registry Editor can be solved. Use Registry Editor at your own risk. Be sure to back up the registry before you edit it.
The product default rules are stored in:
HKEY_LOCAL_MACHINE\SOFTWARE\Citrix\ICA Client\GenericUSB Type=MultiSz Name=“DeviceRules” Value=
Do not edit the product default rules.
For more information about USB devices policy settings, see USB devices policy settings in Citrix Virtual Apps and Desktops documentation.
Configuring USB audio
Note:
- When you upgrade or install Citrix Workspace app for Windows for the first time, add the latest template files to the local GPO. For more information on adding template files to the local GPO, see Group Policy Object administrative template. In case of an upgrade, the existing settings are retained while importing the latest files.
- This feature is available only on Citrix Virtual Apps server.
To configure USB audio devices:
- Open the Citrix Workspace app Group Policy Object administrative template by running gpedit.msc.
- Under the Computer Configuration node, go to Administrative Templates > Classic Administrative Templates (ADM) > Citrix Components > Citrix Workspace > User experience, and select Audio through Generic USB Redirection.
- Edit the settings.
- Click Apply and OK.
- Open cmd prompt in administrator mode.
- Run the below command
gpupdate /force.
vPrefer launch
In earlier releases, you could specify that the instance of an app installed on the VDA (referred to as local instance in this document) must be launched in preference to the published application by setting the KEYWORDS:prefer=”application” attribute in Citrix Studio.
Starting with Version 4.11, in a double-hop scenario (where Citrix Workspace app is running on the VDA that is hosting your session), you can now control whether Citrix Workspace app launches the local instance of an application installed on the VDA (if available as a local app) in preference to launching a hosted instance of the application.
vPrefer is available on StoreFront Version 3.14 and Citrix Virtual Desktops 7.17 and later.
When you launch the application, Citrix Workspace app reads the resource data present on the StoreFront server and applies the settings based on the vprefer flag at the time of enumeration. Citrix Workspace app searches for the installation path of the application in the Windows registry on the VDA and, if present, launches the local instance of the application. Otherwise, a hosted instance of the application is launched. If you launch an application that is not installed on the VDA, the hosted application is launched. For more information on how the local launch is handled on StoreFront, see Control of local application launch on published desktops in the Citrix Virtual Apps and Desktops documentation.
If you do not want the local instance of the application to be launched on the VDA, set the LocalLaunchDisabled to True using the PowerShell on the Delivery Controller. For more information, see the Citrix Virtual Apps and Desktops documentation.
This feature helps to launch applications faster, thereby providing a better user experience. You can configure it by using the Group Policy Object (GPO) administrative template. By default, vPrefer is enabled only in a double-hop scenario.
Note:
When you upgrade or install Citrix Workspace app for the first time, add the latest template files to the local GPO. For more information on adding template files to the local GPO, see Group Policy Object administrative template. In case of an upgrade, the existing settings are retained while importing the latest files.
- Open the Citrix Workspace app GPO administrative template by running gpedit.msc.
- Under the Computer Configuration node, go to Administrative Template > Citrix Component > Citrix Workspace > SelfService.
- Select the vPrefer policy.
- Select Enabled and from the Allow apps drop-down, select one of the following options:
- Allow all apps: This option launches the local instance of all apps on the VDA. Citrix Workspace app searches for the installed application (including the native Windows apps such as Notepad, Calculator, WordPad, Command prompt) and launches the application on the VDA instead of the hosted app.
- Allow installed apps: This option launches the local instance of the installed app on the VDA. If the app is not installed on the VDA, it launches the hosted app. By default, Allow installed apps is selected when the vPrefer policy is set to Enabled. This option excludes the native Windows operating system applications such as Notepad, Calculator etc.
- Allow network apps: This option launches the instance of an app that is published on a shared network.
- Click Apply and OK.
- Restart the session for the changes to take effect.
Limitation:
- Workspace for Web does not support this feature.
StoreFront Cloud
Citrix Workspace app for Windows supports configuring Workspaces for subscribers, who might be using one or more services available from Citrix Cloud.
Citrix Workspace app will intelligently display only the specific workspace resources to which users are entitled. All your digital workspace resources available in Citrix Workspace app are powered by the Citrix Cloud Workspace experience service.
A workspace is part of a digital workspace solution that enables IT to securely deliver access to apps from any device. This screenshot is an example of what the workspace experience looks like to your subscribers. This interface is evolving and may look different to what your subscribers are working with today. For example, it might say “StoreFront” at the top of the page instead of “Workspace”.
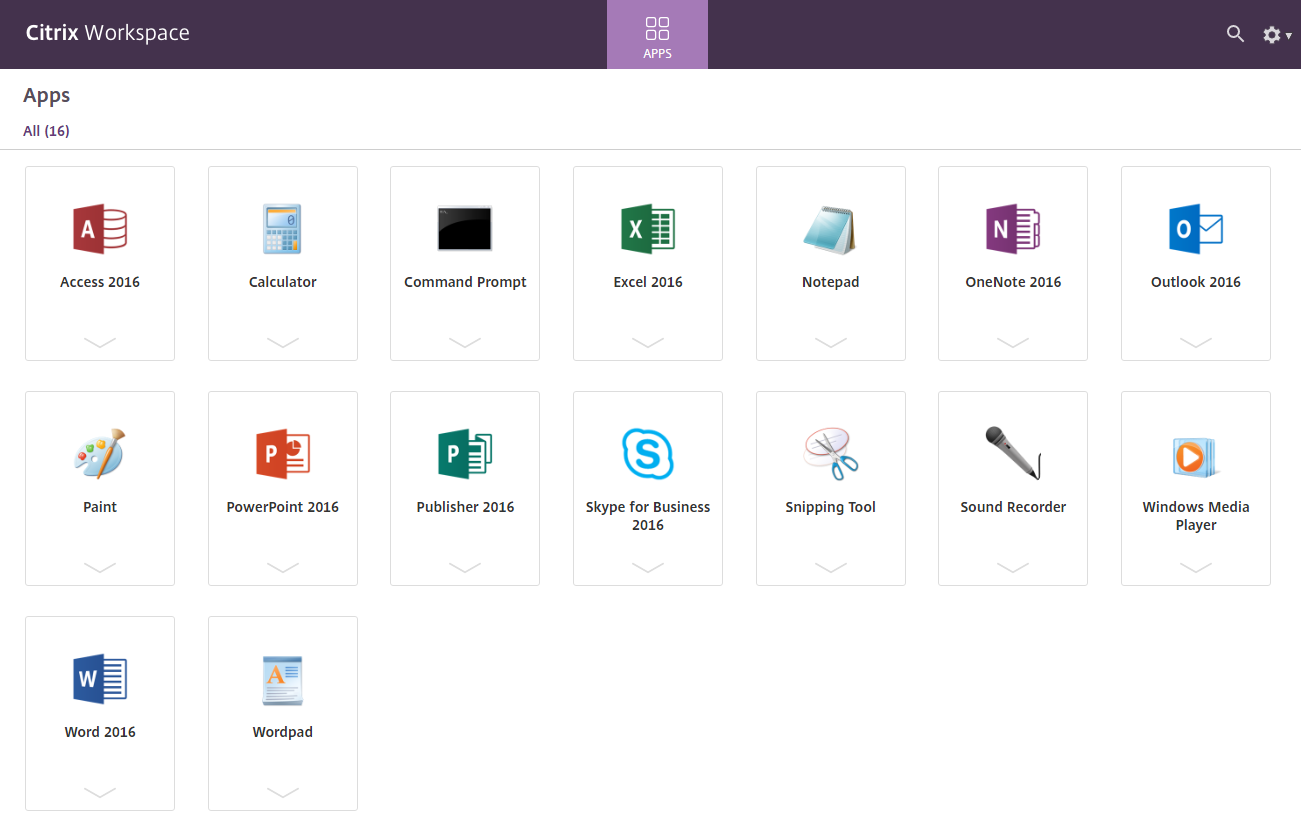
SaaS apps
Secure access to SaaS applications provides a unified user experience that delivers published SaaS applications to the users. SaaS apps are available with single sign-on. Administrators can now protect the organization’s network and end-user devices from malware and data leaks by filtering access to specific websites and website categories.
Citrix Workspace app for Windows support the use of SaaS apps using the Access Control Service. The service enables administrators to provide a cohesive experience, integrating single sign-on, and content inspection.
Delivering SaaS apps from the cloud has the following benefits:
- Simple configuration – Easy to operate, update, and consume.
- Single Sign-on – Hassle-free log on with single sign-on.
- Standard template for different apps – Template-based configuration of popular apps.
Prerequisites:
- The SaaS application must support SAML 2.0 authentication to be able to apply the single sign-on feature.
- The Enable enhanced security option must be enabled on the Access Control Service so that the Citrix Enterprise Browser (formerly Citrix Workspace Browser) is used while rendering a SaaS application. If this is option is not enabled, SaaS apps are launched using the default browser as set on the client.
Note:
Citrix Workspace app aggregates the apps and desktops that are published both from on-premises and cloud environments for a unified user experience.
Citrix Workspace app includes an embedded Citrix Secure Browser to launch the SaaS apps. The Chromium embedded framework on which Citrix Secure Browser is built is on Version 70. This results in a better user experience when accessing secure SaaS apps.
Note:
- In case of Workspace for Web, SaaS apps are launched only in the default browser as set on the client and not in the Citrix Secure Browser.
- The user experience between an ICA® session app and a secure SaaS app might vary.
The Citrix Secure Browser supports operations such as toolbar, clipboard, Print, Download, and Watermark. These operations are applied in Citrix Workspace app as defined in the policy configuration on the Access Control Service.
Operations that you can perform using the Citrix Secure Browser:
Toolbar - When the toolbar option is enabled on an app, you can view the Back, Forward, and Refresh options in the launched app. The toolbar also displays an ellipsis that includes Clipboard operations.
Clipboard - When the clipboard access is enabled on an app, you can use the Cut, Copy, and Paste options that appear in the toolbar in the launched app. When the option is disabled, the Cut, Copy, and Paste options are grayed out.
Print - You can run a print command in the launched app if the print option is enabled. When disabled, the print option does not appear in the launched app.
Navigation - The next and the previous icon appear in the toolbar in the launched app if the navigation option is enabled.
Download - You can download files from the launched app if the download option is enabled. Right-click on the launched app and select Save as. Browse to the desired location and click Download.
Note:
When you download a file, a progress bar is not displayed to indicate the status of the download. The download, however, is successful.
Watermark - When the watermark option is enabled, a watermark containing the user name and the IP address of the client machine appears in the launched app. The watermark is semi-transparent and cannot be edited to display any other information.
Configuring cache using the GPO:
When multiple users use the same device to log in to access the Secure SaaS apps, the cache gets carried forward to the subsequent user, thereby sharing browsing information across users.
To address this issue, Citrix Workspace app introduces a new Group Policy Object (GPO) administrative policy. This policy will disallow the storing of the browser cache on the local device.
- Open the Citrix Workspace app Group Policy Object administrative template by running gpedit.msc.
- Under the Computer Configuration node, go to Administrative Templates > Citrix Workspace > Citrix Secure browser.
- Select the Cache policy. Note: By default, this policy is set to Enabled.
- To disable it, select Disabled and click Apply and OK.
- Restart Citrix Workspace app for the change to take effect.
Limitations:
- When you launch a published app with print option enabled and download disabled, and give a print command on a launched app, you might be able to save the PDF even when the download functionality is restricted. As a workaround, to strictly disable the download functionality, disable the print option.
- Videos embedded in an app might not work.
For more information about StoreFront Cloud, see StoreFront Cloud in Citrix Cloud.
PDF Printing
Prerequisites:
- Citrix Workspace app Version 1808 or later.
- Citrix Virtual Apps and Desktops Version 7 1808 or later.
- At least one PDF viewer must be installed on your computer.
To enable PDF printing:
- On the Delivery Controller™, use the Citrix Studio, to select the Policy node in the left pane. You can either create a policy or edit an existing policy.
- Set the Auto-create PDF Universal Printer policy to Enabled.
Restart the Citrix Workspace app session for the changes to take effect.
Limitation:
- PDF viewing and printing are not supported on the Microsoft Edge browser.
Expanded tablet mode in Windows 10 using Windows Continuum
Windows Continuum is a Windows 10 feature that adapts to the way the client device is used. Citrix Workspace app for Windows Version 4.10 and later supports Windows Continuum, including dynamic change of modes.
For touch-enabled devices, the Windows 10 VDA starts in tablet mode when there is no keyboard or mouse attached. It starts in desktop mode when either a keyboard or a mouse or both are attached. Detaching or attaching the keyboard on any client device or the screen on a 2-in-1 device like a Surface Pro toggles between tablet and desktop modes. For more information, see Tablet mode for touchscreen devices in Citrix Virtual Apps and Desktops documentation.
The Windows 10 VDA detects the presence of a keyboard or a mouse on a touch-enabled client device when you connect or reconnect to a session. It also detects when you attach or detach a keyboard or mouse during the session. This feature is enabled by default on the VDA. To disable the feature, modify the Tablet mode toggle policy using Citrix Studio.
Tablet mode offers a user interface that is better suited to touchscreens:
- Slightly larger buttons.
- The Start screen and all apps you start open in a full screen.
- The taskbar contains a Back button.
- Icons are removed from the taskbar.
Desktop mode offers the traditional user interface where you interact in the same manner as using a PC with a keyboard and mouse.
Note:
Workspace for Web does not support Windows Continuum feature.
Relative mouse
Relative mouse support provides an option to interpret the mouse position in a relative rather than an absolute manner. This capability is required for applications that demand relative mouse input rather than absolute.
Note
This feature can be applied in a published desktop session only.
Configuring the feature using the Registry Editor or the default.ica file allows the setting to be persistent even after the session is terminated.
You can control the availability of the feature on a per-user and a per-machine basis using the registry as follows:
Configuring relative mouse using the Registry Editor
To configure the feature, set the following registry keys as applicable and then restart the session for the changes to take effect:
To make the feature available on a per-session basis:
HKEY_LOCAL_MACHINE\SOFTWARE\Policies\Citrix\ICA Client\Engine\Lockdown Profiles\All Regions\Lockdown\Virtual Channels\RelativeMouse
To make the feature available on a per-user basis:
HKEY_CURRENT_USER\Software\Policies\Citrix\ICA Client\Engine\Lockdown Profiles\All Regions\Lockdown\Virtual Channels\RelativeMouse
- Name: Mouse
- Type: REG_SZ
- Value: True
Note:
- The values set in the Registry editor take precedence over the ICA file settings.
- The values set in HKEY_LOCAL_MACHINE and HKEY_CURRENT_USER must be the same. Different values in these might cause conflicts.
Configuring the relative mouse using the default.ica file
- Open the default.ica file typically at
C:\inetpub\wwwroot\Citrix\<site name>\conf\default.ica, where sitename is the name specified for the site when it was created. In case of StoreFront customers, default.ica file is typically located atC:\inetpub\wwwroot\Citrix\<Storename>\App_Data\default.ica, where storename is the name specified for the store when it was created. - Add a new key by name RelativeMouse in the WFClient section, with its value set to the same configuration as the JSON object.
- Set the value as required:
- true – To enable relative mouse
- false – To disable relative mouse
- Restart the session for the changes to take effect.
Note:
The values set in the Registry editor takes precedence over the ICA file settings.
Enabling relative mouse from the Desktop Viewer
- Log on to Citrix Workspace app.
- Launch a published desktop session.
-
From the Desktop Viewer toolbar, select Preferences.
The Citrix Workspace - Preferences window appears.
- Select Connections.
- Under Relative Mouse settings, enable Use relative mouse.
- Click Apply and OK.
Note:
Configuring relative mouse from the Desktop Viewer applies the feature to per-session only.
Hardware decoding
When using Citrix Workspace app (with HDX engine 14.4), the GPU can be used for H.264 decoding wherever it is available at the client. The API layer used for GPU decoding is DirectX Video Acceleration.
To enable hardware decoding using Citrix Workspace app Group Policy Object administrative template:
- Open the Citrix Workspace app Group Policy Object administrative template by running gpedit.msc.
- Under the Computer Configuration node, go to Administrative Templates > Citrix Workspace >User Experience.
- Select Hardware Acceleration for graphics.
- Select Enabled and click Apply and OK.
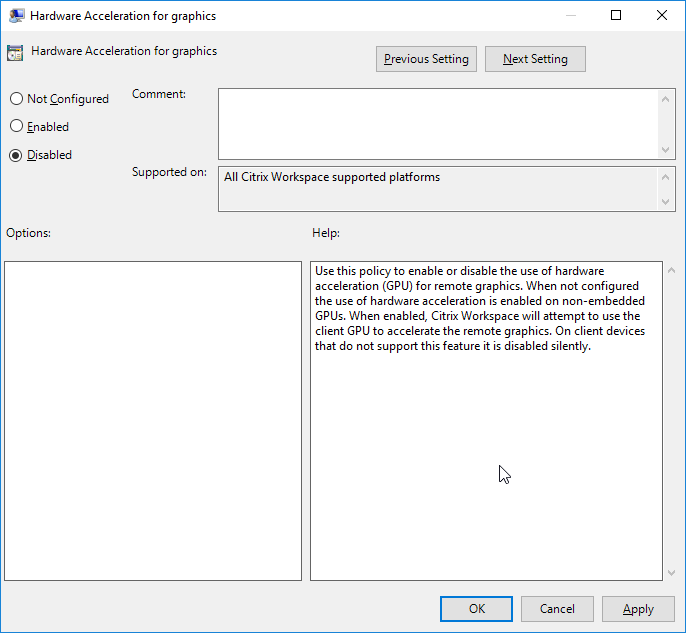
To validate if the policy was applied and hardware acceleration is being used for an active ICA session, look for the following registry entries:
Registry Path: HKEY_CURRENT_USER\SOFTWARE\Citrix\ICA Client\CEIP\Data\GfxRender.
Tip
The value for Graphics_GfxRender_Decoder and Graphics_GfxRender_Renderer should be 2. If the value is 1, that means CPU-based decoding is being used.
When using the hardware decoding feature, consider the following limitations:
- If the client has two GPU’s and if one of the monitors is active on the second GPU, CPU decoding will be used.
- When connecting to a Citrix Virtual Apps server running on Windows Server 2008 R2, Citrix recommends that you do not to use hardware decoding on the user’s Windows device. If enabled, issues like slow performance while highlighting text and flickering issues are seen.
Microphone input
Citrix Workspace app supports multiple client-side microphone inputs. Locally installed microphones can be used for:
- Real-time activities, such as softphone calls and Web conferences.
- Hosted recording applications, such as dictation programs.
- Video and audio recordings.
Citrix Workspace app users can select whether to use microphones attached to their device using Connection Center. Citrix Virtual Apps and Desktops and Citrix DaaS users can also use the Citrix Virtual Apps and Desktops viewer Preferences to disable their microphones and webcams.
Multi-monitor support
You can use up to eight monitors with Citrix Workspace app for Windows.
Each monitor in a multiple monitor configuration has its own resolution designed by its manufacturer. Monitors can have different resolutions and orientations during sessions.
Sessions can span multiple monitors in two ways:
-
Full screen mode, with multiple monitors shown inside the session; applications snap to monitors as they would locally.
Citrix Virtual Apps and Desktops and Citrix DaaS: To display the Desktop Viewer window across any rectangular subset of monitors, resize the window across any part of those monitors and click Maximize.
-
Windowed mode, with one single monitor image for the session; applications do not snap to individual monitors.
Citrix Virtual Apps and Desktops and Citrix DaaS: When any desktop in the same assignment (formerly “desktop group”) is launched subsequently, the window setting is preserved and the desktop is displayed across the same monitors. Multiple virtual desktops can be displayed on one device provided the monitor arrangement is rectangular. If the primary monitor on the device is used by the virtual apps and desktops session, it becomes the primary monitor in the session. Otherwise, the numerically lowest monitor in the session becomes the primary monitor.
To enable multi-monitor support, ensure the following:
- The user device is configured to support multiple monitors.
- The operating system must be able to detect each of the monitors. On Windows platforms, to verify that this detection occurs, go to Settings > System and click Display and confirm that each monitor appears separately.
- After your monitors are detected:
- Citrix Virtual Desktops™: Configure the graphics memory limit using the Citrix Machine Policy setting Display memory limit.
-
Citrix Virtual Apps: Depending on the version of the Citrix Virtual Apps server you have installed:
- Configure the graphics memory limit using the Citrix Computer Policy setting Display memory limit.
- From the Citrix management console for the Citrix Virtual Apps server, select the farm and in the task pane, select Modify Server Properties > Modify all properties > Server Default > HDX Broadcast > Display (or Modify Server Properties > Modify all properties > Server Default > ICA > Display) and set the Maximum memory to use for each session’s graphics.
Ensure that the setting is large enough (in kilobytes) to provide sufficient graphic memory. If this setting is not high enough, the published resource is restricted to the subset of the monitors that fits within the size specified.
Using Citrix Virtual desktops on dual monitor:
- Select the Desktop Viewer and click the down arrow.
- Select Window.
- Drag the Citrix Virtual Desktops screen between the two monitors. Ensure that about half the screen is present in each monitor.
-
From the Citrix Virtual Desktop toolbar, select Full-screen.
The screen is now extended to both the monitors.
For information about calculating the session’s graphic memory requirements for Citrix Virtual Apps and Desktops and Citrix DaaS, see Knowledge Center article CTX115637.
Printer
To override the printer settings on the user device
- From the Print menu available from an application on the user device, choose Properties.
- On the Client Settings tab, click Advanced Optimizations and make changes to the Image Compression and Image and Font Caching options.
On-screen keyboard control
To enable touch-enabled access to virtual applications and desktops from Windows tablets, Citrix Workspace app automatically displays the on-screen keyboard when you activate a text entry field, and when the device is in tent or tablet mode.
On some devices and in some circumstances, Citrix Workspace app cannot accurately detect the mode of the device, and the on-screen keyboard may appear when you do not want it to.
To suppress the on-screen keyboard from appearing when using a convertible device, create a REG_DWORD value DisableKeyboardPopup in HKEY_CURRENT_USER\SOFTWARE\Citrix\ICA Client\Engine\Configuration\Advanced\Modules\MobileReceiver and set the value to 1.
Note:
On a x64 machine, create the value in
HKEY_LOCAL_MACHINE\SOFTWARE\Wow6432Node\Citrix\ICA Client\Engine\Configuration\Advanced\Modules\MobileReceiver.
The keys can be set to 3 different modes as given below:
- Automatic: AlwaysKeyboardPopup = 0; DisableKeyboardPopup = 0
- Always popup (on-screen keyboard): AlwaysKeyboardPopup = 1; DisableKeyboardPopup = 0
- Never popup (on-screen keyboard): AlwaysKeyboardPopup = 0; DisableKeyboardPopup = 1
Keyboard shortcuts
You can configure combinations of keys that Citrix Workspace app interprets as having special functionality. When the keyboard shortcuts policy is enabled, you can specify Citrix Hotkey mappings, behavior of Windows hotkeys, and keyboard layout for sessions.
- Open the Citrix Workspace app Group Policy Object administrative template by running gpedit.msc.
- Under the Computer Configuration node, go to Administrative Templates> Citrix Components > Citrix Workspace > User Experience.
- Select the Keyboard shortcuts policy.
- Select Enabled, and the desired options.
- Restart the Citrix Workspace app session for the changes to take effect.
Support for 32-bit color icons:
Citrix Workspace app supports 32-bit high color icons and automatically selects the color depth for applications visible in the Citrix Connection Center dialog, the Start menu, and task bar to provide for seamless applications.
Caution
Editing the registry incorrectly can cause serious problems that may require you to reinstall your operating system. Citrix cannot guarantee that problems resulting from the incorrect use of Registry Editor can be solved. Use Registry Editor at your own risk. Be sure to back up the registry before you edit it.
To set a preferred depth, you can add a string registry key named TWIDesiredIconColor to HKEY_LOCAL_MACHINE\SOFTWARE\Wow6432Node\Citrix\ICA Client\Engine\Lockdown Profiles\All Regions\Preferences and set it to the desired value. The possible color depths for icons are 4, 8, 16, 24, and 32 bits-per-pixel. The user can select a lower color depth for icons if the network connection is slow.
Desktop Viewer
Different enterprises have different corporate needs. Your requirements for the way users access virtual desktops may vary from user to user and may vary as your corporate needs evolve. The user experience of connecting to virtual desktops and the extent of user involvement in configuring the connections depend on how you set up Citrix Workspace app for Windows.
Use the Desktop Viewer when users need to interact with their virtual desktop. The user’s virtual desktop can be a published virtual desktop, or a shared or dedicated desktop. In this access scenario, the Desktop Viewer toolbar functionality allows the user to open a virtual desktop in a window and pan and scale that desktop inside their local desktop. Users can set preferences and work with more than one desktop using multiple Citrix Virtual Apps and Desktops and Citrix DaaS connections on the same user device.
Note:
Use Citrix Workspace app to change the screen resolution on their virtual desktops. You cannot change the screen resolution using Windows Control Panel.
Keyboard input in Desktop Viewer
In Desktop Viewer sessions, Windows logo key+L is directed to the local computer.
Ctrl+Alt+Delete is directed to the local computer.
Key presses that activate Sticky Keys, Filter Keys, and Toggle Keys (Microsoft accessibility features) are normally directed to the local computer.
As an accessibility feature of the Desktop Viewer, pressing Ctrl+Alt+Break displays the Desktop Viewer toolbar buttons in a pop-up window.
Ctrl+Esc is sent to the remote, virtual desktop.
Note:
By default, if the Desktop Viewer is maximized, Alt+Tab switches focus between windows inside the session. If the Desktop Viewer is displayed in a window, Alt+Tab switches focus between windows outside the session.
Hotkey sequences are key combinations designed by Citrix. For example, the Ctrl+F1 sequence reproduces Ctrl+Alt+Delete, and Shift+F2 switches applications between full-screen and windowed mode. You cannot use hotkey sequences with virtual desktops displayed in the Desktop Viewer (that is, with virtual apps and desktops sessions), but you can use them with published applications (that is, with Citrix Virtual Apps sessions).
Virtual desktops
From within a desktop session, users cannot connect to the same virtual desktop. Attempting to do so will disconnect the existing desktop session. Therefore, Citrix recommends:
- Administrators should not configure the clients on a desktop to point to a site that publishes the same desktop
- Users should not browse to a site that hosts the same desktop if the site is configured to automatically reconnect users to existing sessions
- Users should not browse to a site that hosts the same desktop and try to launch it
Be aware that a user who logs on locally to a computer that is acting as a virtual desktop blocks connection to that desktop.
If your users connect to virtual applications (published with Citrix Virtual Apps) from within a virtual desktop and your organization has a separate Citrix Virtual Apps administrator, Citrix recommends working with them to define device mapping such that desktop devices are mapped consistently within desktop and application sessions. Because local drives are displayed as network drives in desktop sessions, the Citrix Virtual Apps administrator needs to change the drive-mapping policy to include network drives.
Status indicator time-out
You can change the amount of time the status indicator displays when a user is launching a session. To alter the time-out period, create a REG_DWORD value SI INACTIVE MS in HKEY_LOCAL_MACHINE\SOFTWARE\Citrix\ICA CLIENT\Engine\. The REG_DWORD value can be set to 4 if you want the status indicator to disappear sooner.
Customer Experience Improvement Program (CEIP)
| Data collected | Description | What we use it for |
|---|---|---|
| Configuration and usage data | The Citrix Customer Experience Improvement Program (CEIP) gathers configuration and usage data from Citrix Workspace app for Windows and automatically sends the data to Citrix and Google Analytics. | This data helps Citrix improve the quality, reliability, and performance of Citrix Workspace app. |
Additional information
Citrix will handle your data in accordance with the terms of your contract with Citrix, and protect it as specified in the Citrix Services Security Exhibit available on the Citrix Trust Center.
Citrix also uses Google Analytics to collect certain data from Citrix Workspace app as part of CEIP. Please review how Google handles data collected for Google Analytics.
You can turn off sending CEIP data to Citrix and Google Analytics (except for the two data elements collected for Google Analytics indicated by an * in the second table below) by:
- Right-click the Citrix Workspace app icon from the notification area.
- Select Advanced Preferences. The Advanced Preferences dialog appears.
- Select Data Collection.
- Select No, Thanks to disable CEIP or to forego participation.
- Click Save.
Alternatively, you can navigate to the following registry entry and set the value as suggested:
Path: HKEY_LOCAL_MACHINE\ SOFTWARE\Citrix\ICA Client\CEIP
Key: Enable_CEIP
Value: False
Note:
Once you select No Thanks in the data collection dialog or set the
Enable_CEIPkey toFalse, if you would like to disable sending the final two CEIP data elements collected by Google Analytics (that is, Operating System version & Citrix Workspace app version) navigate to the following registry entry and set the value as suggested:
Path: HKEY_LOCAL_MACHINE\ SOFTWARE\Citrix\ICA Client\CEIP
Key: DisableHeartbeat
Value: True
The specific CEIP data elements collected by Citrix are:
| Operating system version | Citrix Workspace app version | External devices connected | Screen resolution |
| Flash version | Desktop Lock configuration | Touch enabled | Authentication configuration |
| Session launch method | Graphics configuration | Desktop Viewer configuration | Printing |
| Connection error | Time to launch | Citrix Workspace app language | VDA information |
| SSON state | Installer state | Time to install | Connection protocol |
| Internet Explorer version |
The specific CEIP data elements collected by Google Analytics are:
| Operating system version* | Citrix Workspace app version* | Authentication configuration | Citrix Workspace app language |
| Session launch method | Connection error | Connection protocol | VDA information |
| Installer configuration | Installer state | Client keyboard layout | Store configuration |
| Auto-update preference | Connection Center usage | App Protection configuration |
In this article
- App Protection
- Endpoint encoder performance estimator on Microsoft Teams
- Adaptive transport
- Advanced Preferences sheet
- Application delivery
- Application launch time
- Bidirectional content redirection
- Bloomberg keyboards
- Citrix Casting
- Composite USB device redirection
- DPI scaling
- Generic client Input Method Editors (IME)
- H.265 video encoding
- Keyboard layout and language bar
- USB support
- USB devices classes denied by default
- vPrefer launch
- StoreFront Cloud
- SaaS apps
- PDF Printing
- Relative mouse
- Hardware decoding
- Microphone input
- Multi-monitor support
- Printer
- Keyboard shortcuts
- Desktop Viewer
- Virtual desktops
- Customer Experience Improvement Program (CEIP)