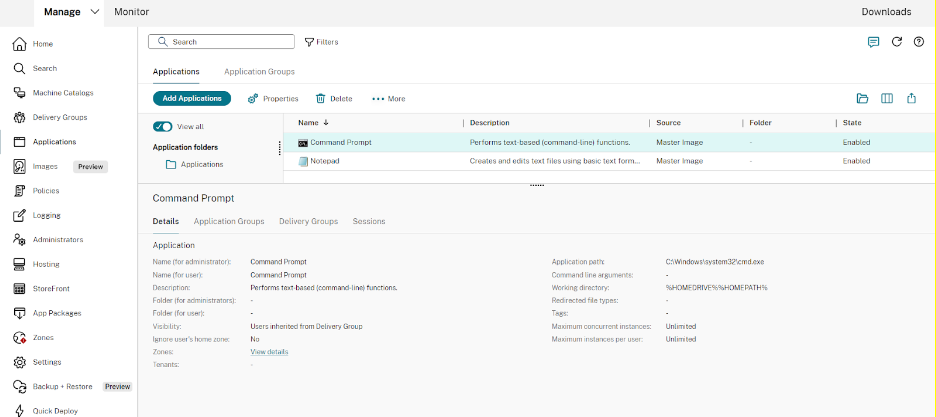
Applications
Note:
Starting with version 2511, Citrix Web Studio (web-based) is the only management console for Citrix Virtual Apps and Desktops™. Citrix Studio (MMC-based) has been removed from the installer. This article applies only to Web Studio. For information about Citrix Studio, see the equivalent article in Citrix Virtual Apps and Desktops 7 2212 or earlier.
Introduction
If your deployment uses only delivery groups (and not application groups), you add applications to the delivery groups. If you also have application groups, generally you add applications to the application groups instead. This guidance provides easier administration. An application must always belong to at least one delivery group or application group.
In the Add Applications wizard, you can select one or more delivery groups, or one or more application groups, but not both. Although you can later change an application’s group association (for example, moving an application from an application group to a delivery group), best practice discourages adding that complexity. Keep your applications in one type of group.
When you associate an application with more than one group, a visibility issue can occur if you do not have sufficient permission to view the application in all of those groups. In such cases, either consult an administrator with greater permissions or have your scope extended to include all the groups with which the application is associated.
If you publish two applications with the same name (perhaps from different groups) to the same users, change the Application name (for user) property in Web Studio. Otherwise, users see duplicate names in Citrix Workspace™ app.
You can change an application’s properties (settings) when you add it, or later. You can also change the application folder where the application is placed, either when you add the application, or later.
For details, see:
Add applications
You can add applications when you create a delivery group or application group. Those procedures are detailed in Create delivery groups and Create application groups. The following procedure describes how to add applications after you create a group.
Good to know:
- You cannot add applications to Remote PC Access delivery groups.
- You cannot use the Add Application wizard to remove applications from delivery groups or application groups. That is a separate operation.
To add one or more applications:
- Select Applications in the left pane and then select Add Applications in the action bar.
- The Add Applications wizard launches with an Introduction page, which you can remove from future launches of this wizard.
- The wizard guides you through the Groups, Applications, and Summary pages. When you are done with each page, click Next until you reach the Summary page.
Alternatives to step 1 if you want to add applications to a single delivery group or application group:
- To add applications to only one delivery group: In step 1, select Delivery Groups in the Web Studio left pane, select a delivery group in the middle pane, and then select Add Applications in the action bar. The wizard does not display the Groups page.
- To add applications to only one application group: In step 1, select Applications in the Web Studio left pane, select an application group in the middle pane, and then select the Add Applications entry under the application group’s name in the action bar. The wizard does not display the Groups page.
Groups page
This page lists all the delivery groups in the site. If you have also created application groups, the page lists the application groups and delivery groups. You can choose from either group, but not from both groups. In other words, you cannot add applications to an application group and a delivery group at the same time. Generally, if you are using application groups, add applications to application groups, rather than delivery groups.
When adding an application, select the check box next to at least one delivery group (or application group, if available). Every application must always be associated with at least one group.
Applications page
Click Add to display the application sources.
-
From Start menu: Applications that are discovered on a machine in the selected delivery groups. When you select this source, a new page launches with a list of discovered applications. Select the check boxes of applications to add, and then click OK.
This source cannot be selected if you (1) selected application groups with no associated delivery groups, (2) selected application groups with associated delivery groups that contain no machines, or (3) selected a delivery group containing no machines.
-
Manually: Applications located on a VDA in the delivery group or elsewhere in your network. Selecting this source opens a new page where you specify an application to add in the following ways:
- Type the path to the executable, working directory, optional command line arguments, and display names for administrators and users.
- Select an application from a VDA in the delivery group. To do so, click Browse, enter credentials for accessing the VDA, wait to be connected to the VDA, and then select an application from the VDA. The properties of the selected application automatically populate fields on the page.
-
Existing: Applications previously added to the site. When you select this source, a new page launches with a list of discovered applications. Select the check boxes of applications to add and then click OK.
This source cannot be selected If the site has no applications.
-
Application packages: Applications in App-V, MSIX, MSIX app attach, or FlexApp application packages. When you select this source, the Add Applications from Packages page launches. Select an application package source, select the applications you want to add from the resulting display, and then select OK. For more information, see Deploy and deliver App packages.
-
Application Group: Application groups. When you select this source, a new page launches with a list of application groups. (Although the display also lists the applications in each group, you can select only the group, not individual applications.) All current and future applications in the selected groups are added. Select the check boxes of application groups to add, and then click OK.
This source cannot be selected if (1) there are no application groups, or (2) if the selected delivery groups do not support application groups (for example, delivery groups with statically assigned machines).
As noted in the table, some sources in the Add list cannot be selected if there is no valid source of that type. Sources that are incompatible (for example, you cannot add application groups to application groups) are not included in the list. Applications that are already added to the groups you chose cannot be selected.
You can change an application’s properties (settings) from this page, or later.
By default, added applications are placed in the application folder named Applications. You can change the application from this page, or later. If you try to add an application and one with the same name exists in the same folder, you are prompted to rename the application you’re adding. You can accept the new name offered, or decline and then rename the application or select a different folder. For example, if app already exists in the Applications folder, and you attempt to add another application named app to that folder, the new name app_1 is offered.
Summary page
If you are adding 10 or fewer applications, their names are listed in Applications to add. If you are adding more than 10 applications, the total number is specified.
Review the summary information and then click Finish.
Change an application’s group association
After adding an application, you can change the delivery groups and application groups with which the application is associated.
You can drag an application to an additional group. This is an alternative to using commands in the action bar.
If an application is associated with more than one delivery group, either using an application group or directly, group priority can be used to specify the order in which multiple groups are evaluated. Groups can be excluded from consideration based on factors like access policy, user lists, or smart access tags, and the specific machine chosen from the group can be affected by factors like zone preference, and launch readiness, and any tag restrictions. By default, all groups are priority 0 (the highest). If the delivery groups have equal priority, then the least loaded delivery group is selected for launching the application. The vertical load balancing is not considered in this case.
An application can be associated with delivery groups containing shared (not private) machines that can deliver applications. You can also select delivery groups containing shared machines that deliver desktops only, if (1) the delivery group contains shared machines and was created with a XenDesktop 7.x version earlier than 7.9, and (2) you have Edit delivery group permission. The delivery group type is automatically converted to desktops and applications when the properties dialog is committed.
- Sign in to Web Studio, select Applications in the left pane, and then select the application.
- Select Properties in the action bar.
- Select the Groups page.
- To add a group, click Add and select Application Groups or Delivery Groups. (If you have not created any application groups, the only entry is Delivery Groups.) Then select one or more available groups. Groups that are incompatible with the application, or that are already associated with the application, cannot be selected.
- To remove a group, select one or more groups and then click Remove. If removing group association would result in the application no longer being associated with any group, you are alerted that the application will be deleted.
- To change the priority of a group, select the group and then click Edit Priority. Select a priority value and then click OK.
- When you are finished, click Apply to apply the changes and leave the window open, or click OK to apply the changes and close the window.
Duplicate, enable or disable, rename, or delete an application
The following actions are available:
- Duplicate: You might want to duplicate an application to create a different version with different parameters or properties. When you duplicate an application, it is automatically renamed with a unique suffix and placed next to the original. You might also want to duplicate an application and then add it to a different group. (After duplicating, the easiest way to move an application is dragging it.)
- Enable or disable: Enabling and disabling an application is a different action than enabling and disabling a delivery group or application group.
- Rename: You can rename only one application at a time. If you try to rename an application and one with the same name exists in the same folder or group, you are prompted to specify a different name.
- Delete: Deleting an application removes it from the delivery groups and application groups with which it was associated, but not from the source that was used to add the application originally. Deleting an application is a different action than removing it from a delivery group or application group.
To duplicate, enable, disable, rename, or delete an application:
- Select Applications in the left pane.
- Select one or more applications in the middle pane and then select the appropriate task in the action bar.
- Confirm the action, when prompted.
Remove applications from a delivery group
An application must be associated (belong) with at least one delivery group or application group. If you attempt to remove an application from a delivery group that would remove that application’s association with any delivery group or application group, you are notified that the application will be deleted if you continue. When that happens, if you want to deliver that application, you must add it again from a valid source.
- Select Delivery Groups in the left pane.
- Select a delivery group. In the lower middle pane, on the Applications tab, select the application you want to remove.
- Select Remove Application from the action bar.
- Confirm the removal.
Remove applications from an application group
An application must belong to at least one delivery group or application group. If you attempt to remove an application from an application group that will result in that application no longer belonging to any group, you are notified that the application will be deleted if you continue. When that happens, if you want to deliver that application, you must add it again from a valid source.
- Select Applications in the left pane.
- Select the application group in the middle pane, and then select one or more applications.
- Select Remove from Application Group in the action bar.
- Confirm the removal.
Change application properties
You can change the properties of only one application at a time.
To change the properties of an application:
- Select Applications in the left pane.
- Select an application and then select Edit Application Properties in the action bar.
- Select the page containing the property you want to change.
- When you are finished, click Apply to apply any changes you made and keep the window open, or click OK to apply changes and close the window.
In the following list, the page is shown in parentheses.
| Property | Page |
|---|---|
| Category/folder where application appears in Citrix Workspace app | Delivery |
| Command line arguments; see Pass parameters to published applications | Location |
| Delivery groups and application groups where the application is available | Groups |
| Description | Identification |
| File name extensions and file type association: which extensions the application opens automatically | File Type Association |
| Icon | Delivery |
| Keywords for StoreFront™ | Identification |
| Limits; see Configure application limits | Delivery |
| Name: Names seen by the user and by the administrator | Identification |
| Path to executable; see Pass parameters to published applications | Location |
| Shortcut on user’s desktop: enable or disable | Delivery |
| Visibility: Limits which users can see the application in Citrix Workspace app. An invisible application can still be started. To make it unavailable and invisible, add it to a different group. | Limit Visibility |
| Working directory | Location |
Application changes might not take effect for current application users until they log off from their sessions.
Configure application limits
Configure application limits to help manage application use. For example, you can use application limits to manage the number of users accessing an application simultaneously. Similarly, application limits can be used to manage the number of simultaneous instances of resource-intensive applications. That limit can help maintain server performance and prevent deterioration in service.
This feature limits the number of application launches that are brokered by the Controller (for example, from Citrix Workspace app and StoreFront), and not the number of running applications that can be launched by other methods. This means that application limits assist administrators when managing concurrent usage, but do not provide enforcement in all scenarios. For example, application limits cannot be applied when the Controller is in outage mode.
By default, there is no limit on how many application instances can run at the same time. There are several application limit settings. You can configure any or all of them.
- The maximum number of concurrent instances of the application by all users in the delivery group.
- One instance of the application per user in the delivery group.
- The maximum number of concurrent instances of the application per machine (PowerShell only).
If a limit is configured, an error message is generated when a user attempts to launch an instance of the application that will exceed the configured limit. If more than one limit is configured, an error is reported when the first limit is reached.
Examples using application limits:
-
Maximum number of simultaneous instances limit: In a delivery group, you configure the maximum number of simultaneous instances of application
Alphato 15. Later, users in that delivery group have 15 instances of that application running at the same time. If any user in that delivery group now attempts to launchAlpha, an error message is generated.Alphais not launched because it would exceed the configured simultaneous application instance limit (15). -
One-instance-per-user application limit: In another delivery group, you enable the one-instance-per-user option for application
Beta. User Tony launches applicationBetasuccessfully. Later in the day, while that application is still running in Tony’s session, he attempts to launch another instance ofBeta. An error message is generated andBetais not launched because it would exceed the one-instance-per-user limit. -
Maximum number of simultaneous instances and one-instance-per-user limits: In another delivery group, you configure a maximum number of simultaneous instances of 10 and enable the one-instance-per-user option for application
Delta. Later, when 10 users in that delivery group each have an instance ofDeltarunning, any other user in that delivery group who tries to launchDeltawill receive an error message.Deltais not launched. If any of the 10 currentDeltausers attempt to launch a second instance of that application, they will receive an error message and the second instance will not be launched. -
Maximum number of simultaneous instances per machine, and using tag restrictions: Application
Charliehas licensing and performance requirements that dictate how many instances can be running at the same time on a specific server. Those requirements also dictate how many instances can be running simultaneously across all servers in the site.The application instances-per-machine limit affects any server in the site (not just machines in a particular delivery group). Let’s say your site has three servers. For application
Charlie, you configure the app instances per machine limit to 2. So, no more than six instances of applicationCharlieare allowed to launch site-wide. (That’s a limit of two instances of Charlie on each of the three servers.)To restrict an application’s usage to only certain machines within a delivery group (in addition to limiting the instances on all machines site-wide):
- Use the tagging functionality for those machines.
- Configure the maximum number of instances per machine limit for that application.
If applications are launched by methods other than Controller brokering (for example, while a Controller is in outage mode) and configured limits are exceeded, users cannot launch more instances until they close enough instances to no longer exceed the limits. The instances that exceeded the limit are not forcibly shut down. They will be allowed to continue until their users close them.
If you disable session roaming, then disable the one-instance-per-user application limit. If you enable the one-instance-per-user application limit, do not configure either of the two values that allow new sessions on new devices. For information about roaming, see Sessions.
To configure the maximum instances per delivery group limit, and the one-instance-per-user limit:
- Select Applications in the left pane and then select an application.
- Select the Edit Application Properties in the action bar.
-
On the Delivery page, choose one of the following options.
- Allow unlimited use of the application. There is no limit to the number of instances running at the same time. This is the default.
-
Set limits for the application. There are two limit types; specify either or both.
- Specify the maximum number of instances that can run concurrently per machine
- Limit to one instance of the application per user
- Click OK to apply the change and close the dialog box, or Apply to apply the change and leave the dialog box open.
To configure the maximum instances per machine limit (PowerShell only):
- In PowerShell (using the Remote PowerShell SDK for Citrix Cloud™ deployments, or the PowerShell SDK for on-premises deployments), enter the appropriate
BrokerApplicationcmdlet with theMaxPerMachineInstancesparameter. -
For guidance, use the
Get-Helpcmdlet. For example:Get-Help Set-BrokerApplication –Parameter MaxPerMachineInstances
Pass parameters to published applications
Use the Location page of an application’s properties to enter the command line and pass parameters to published applications.
When you associate a published application with file types, the symbols "%*" (percent and star symbols enclosed in double quotation marks) are appended to the end of the command line for the application. These symbols act as a placeholder for parameters passed to user devices.
If a published application does not launch when expected, verify that its command line contains the correct symbols. By default, parameters supplied by user devices are validated when the symbols "%*" are appended. For published applications that use customized parameters supplied by the user device, the symbols "%**" are appended to the command line to bypass command-line validation. If you do not see these symbols in a command line for the application, add them manually.
If the path to the executable file includes directory names with spaces (such as "C:\Program Files"), enclose the command line for the application in double quotation marks to indicate that the space belongs in the command line. To do this, add double quotation marks around the path, and another set of double quotation marks around the %* symbols. Be sure to include a space between the closing quotation mark for the path and the opening quotation mark for the %* symbols.
For example, the command line for the published application Windows Media Player is:
"C:\Program Files\Windows Media Player\mplayer1.exe" "%*"
Note:
The maximum number of characters, including arguments, in the command line for launching published applications is 203.
Troubleshooting session sign-out issues with Published Applications
When publishing applications, only the main executable file for the published application is specified. However, some applications might produce additional (child) processes that run in the background and are not closed by the corresponding main executable file when the main published application is closed. Additional processes might also be created, from scripts that are executed, or from specific registry keys, like Run and RunOnceKey. These applications can prevent a graceful sign-out, resulting in lingering or hanging sessions and might result in the session not closing and the user being signed out.
In this case, you need to reset or exit these sessions using Citrix Director.
To help identify and troubleshoot sessions not being signed out properly, Citrix has made three registry entries available. Identifying and troubleshooting of session not being logged off properly due to these issues is a three-step process:
-
Identifying which sessions have published applications are holding up a graceful sign-out
-
Identifying for those published applications if they produce any additional (child) processes
-
Add these processes to a specified registry entry to prevent them from holding up sign-out
Step 2: Identifying for those published applications if they produce any additional (child) processes
Once a published application is identified to hold up a graceful sign-out, the next step is to determine if this application produces additional processes when running.
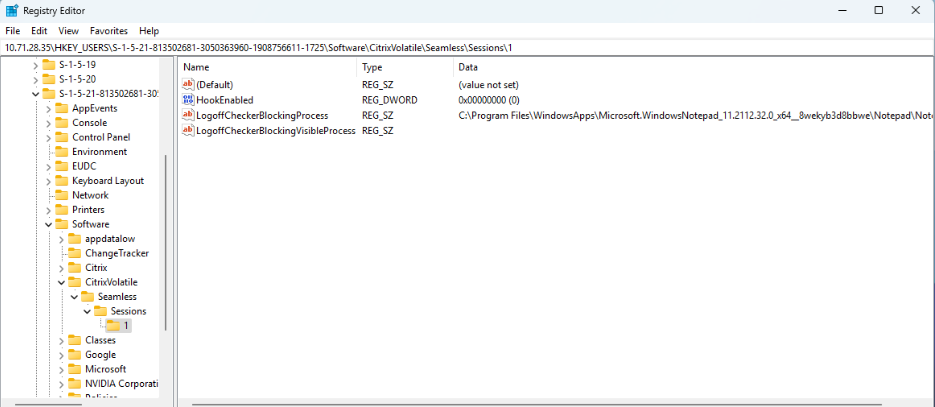
You can read HKCU\Software\CitrixVolatile\Seamless\Sessions\[ID]\LogoffCheckerBlockingProcess to determine if any processes are blocking a graceful sign-out when a published application is closed.
In the following example, the key LogoffCheckerBlockingProcess contains the following entries:
PhoneExperienceHost.exe
SkypeApp.exe
SkypeBackgroundHost.exe
<!--NeedCopy-->
These processes have held up the graceful sign-out.
Note:
Replace the [ID] with the correct session ID for the session you want to check.
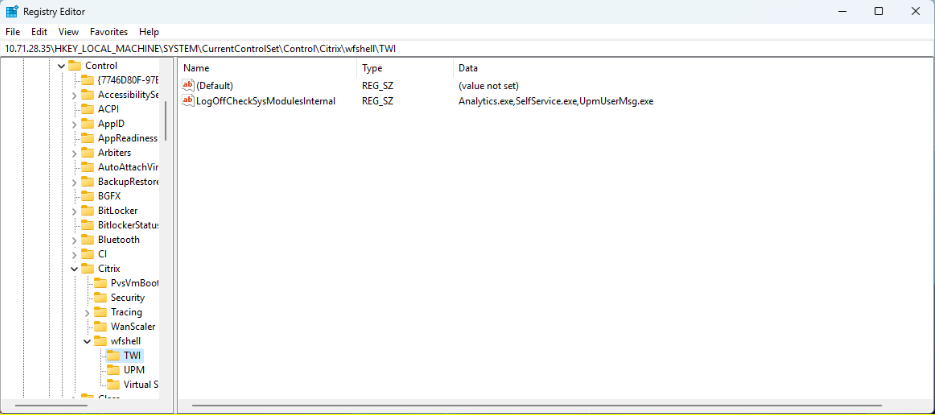
Step 3: Add these processes to a specified registry entry to prevent them from holding up sign-out
You can add these processes to the following registry keys to prevent them from holding up sign-out in future sessions:
Add the process file name to the following registry key:
Caution! Refer to the Disclaimer at the end of this article before using the Registry Editor.
HKEY_LOCAL_MACHINE\SYSTEM\CurrentControlSet\Control\Citrix\wfshell\TWI
Value Name:LogoffCheckSysModules
Type:REG_SZ
String:MyAppName.exe
<!--NeedCopy-->
More information about LogoffCheckSysModules, see Graceful logoff from a published application renders the session in an active state.
Step-by-step troubleshooting guide
-
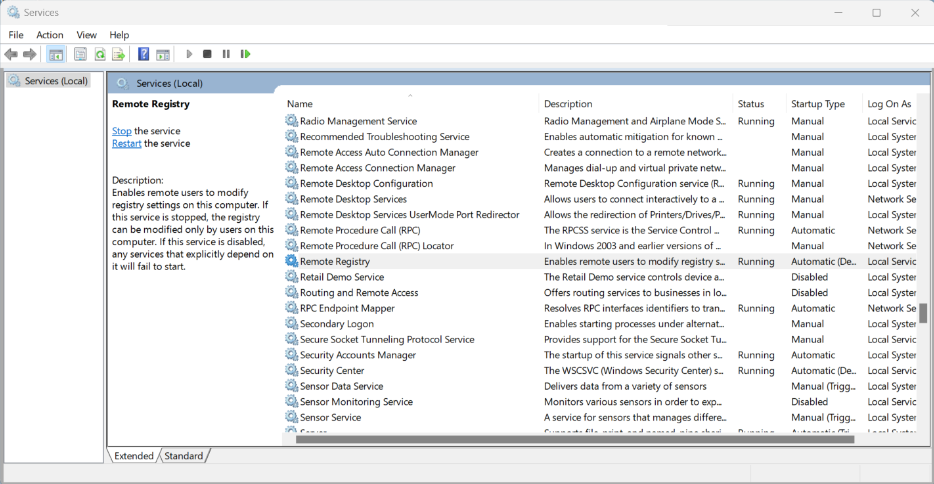
Start the remote registry Service under the VDA under test:
-
In the Control Panel, select Administrative Tools > Services.
-
Right-click Remote Registry Service and select Properties.
-
Under Startup Type, select Automatic from the drop-down menu.
-
-
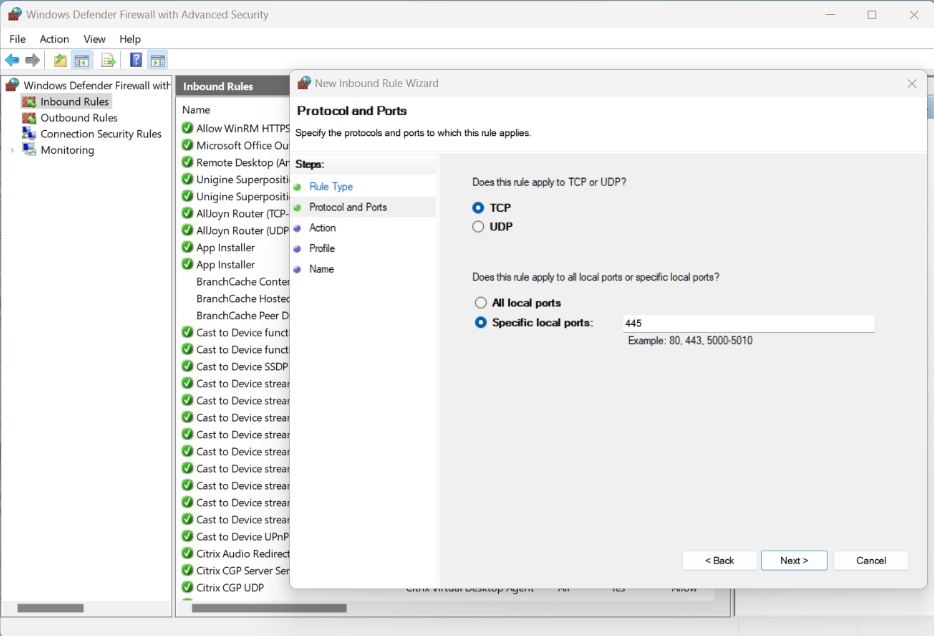
Turn off the Windows Firewall on the VDA under test or create an inbound firewall rule to enable port 455:
-
In the Control Panel, select Windows Defender Firewall > Advanced Settings.
-
Right-click Inbound Rules and select New Rule.
-
In New Inbound Rule Wizard, select Port.
-
On the Protocols and Ports page, select TCP and Specific Local Ports. Enter
445as the local port. -
Select Allow Connection on the Action page.
-
Select the firewall profiles that you want to apply the new inbound rule.
-
Name the firewall rule and select Finish to exit New Inbound Rule wizard.
-
-
From another VM on the same domain (it could be DC, DDC, or another VDA), run
Regeditand connect to a remote registry.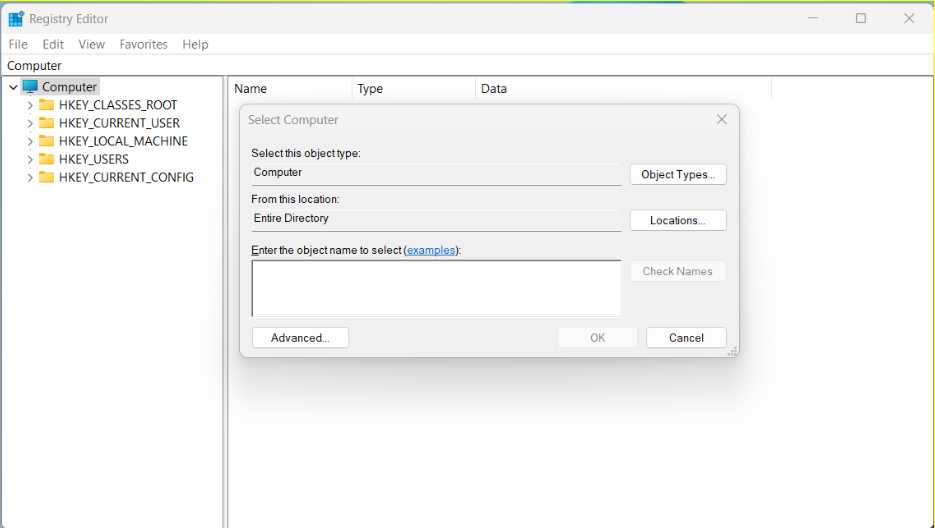
-
Enter the IP address of the VDA under test and click OK. The
regedittree must display branches for the VDA under test.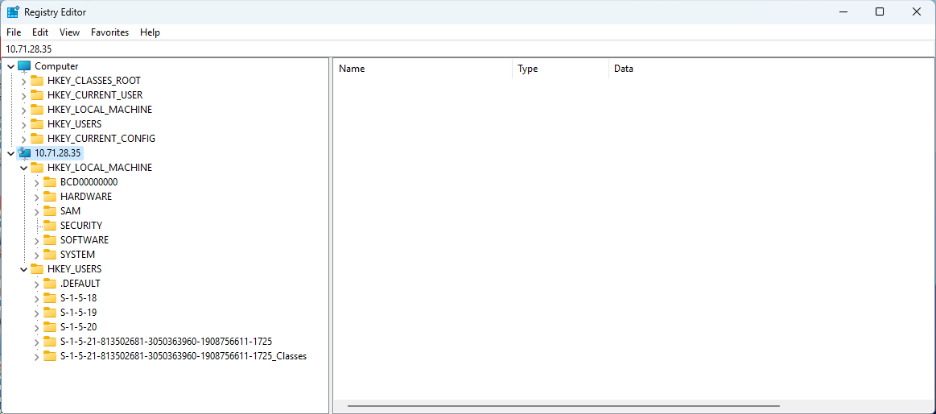
-
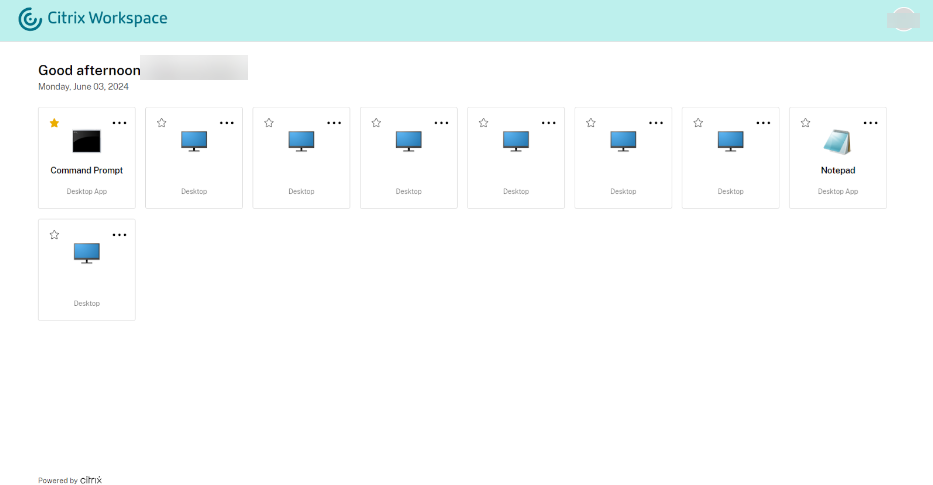
Open the Command Prompt published application.
The Command Prompt app is displayed on Citrix Workspace.
-
Open Connection Center on the client. This is used for monitoring when a session is signed out, after closing an opened seamless app. We can see in the following image that the Command Prompt process
c:\Windows\system32\cmd.exeis active on the remote VDI.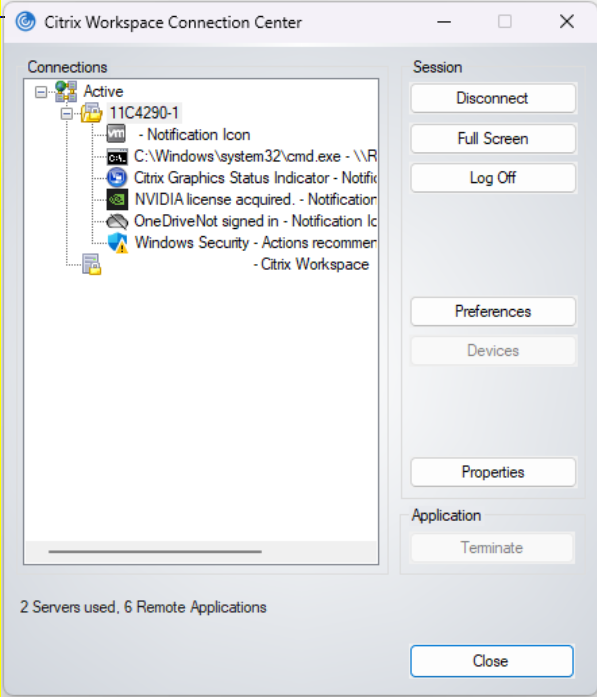
-
From the VDA where regedit is running, go to the following remote IP location:
HKEY_USERS\S-1-X-XX-XXXXXXXX-XXXXXXXXXXX-XXXXXXXXXX-XXXX\SOFTWARE\CitrixVolatile\Seamless\Sessions\X\Note:
This path changes every time you open a new session.
-
There are two keys to read here (do not change them here): LogoffCheckBlockingProcess and LogoffCheckerBlockingVisibleProcess. These keys display any programs that are blocking sign-out. The first one must display
C:\Windows\System32\cmd.exesince that was open and has not been closed yet.Note:
LogoffCheckBlockingProcess and LogoffCheckerBlockingVisibleProcess must not be manually edited. Manually editing these registry values could lead to unstable sessions.

-
Click X in the upper-right hand corner to exit Seamless CMD.
-
Check the connection center to see if the session closes. It may take up to 30 seconds to close. If it closes, there have been no applications or processes that have prevented a graceful sign-out.
-
If the session did not close, refresh the regedit output with F5.
-
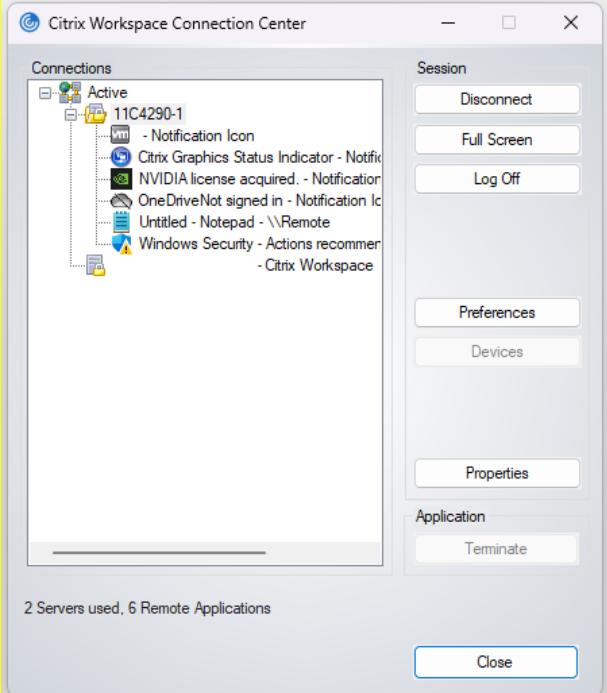
Check the contents of LogoffCheckBlockingProcess and LogoffCheckerBlockingVisibleProcess again. CMD must no longer be present but there should be another listed process. Whatever process is currently blocking session sign-out must be displayed here.
In this case, Notepad.exe is open from the published command prompt before the command prompt was closed and this remote notepad process is holding up a graceful sign-out.
-
Make a note of the path to this executable, and which key it appeared in, and enter it in the following registry key, under the remote tree:
- If it appears in LogoffCheckBlockingProcess:
HKLM\SYSTEM\CurrentControlSet\Control\Citrix\wfshell\TWILogoffCheckSysModulesInternal - If it appears in LogoffCheckerBlockingVisibleProcess:
HKLM\SYSTEM\CurrentControlSet\Control\Citrix\wfshell\TWILogoffCheckVisibleSysModules
Note:
If there is already one or more entries in the key, add a comma to the end and put the new entry after the comma.
- If it appears in LogoffCheckBlockingProcess:
-
Sign out from the session from the connection center on the client, and re-open the Remote Application.
-
Repeat steps 9-16 until the session is signed out automatically within 30 seconds of closing the Remote Application.
Note:
After troubleshooting, revert the temporary Firewall changes to allow remote registry access if needed.
How to modify LogonUI to view Windows disclaimer message in full size when opening published applications
The LogonUI window scaling is improved for scenarios where authentication pass-through does not occur. The LogonUI window is scaled based on the monitor resolution and DPI settings used which ensures that the complete LogonUI window is visible without any clipping.
The window size in pixels can also be set manually in the registry.
-
Open the Registry Editor using
regediton the Run command. -
Go to
HKEY_LOCAL_MACHINE\Software\Citrix\CtxHook\AppInit_DLLS\Seamless Hook\. -
Create two new DWORD keys: LogonUIWidth and LogonUIHeight.
-
Set the value of the keys to the required width and height in pixels for the LogonUI window.
When manually setting the LogonUI windows size, automatic scaling is disabled.
Note:
These registry paths have changed from 2407 and later. The old registry values are ignored and deprecated.
By default, the LogonUI window includes a title bar with a close button which enables the end user to disconnect from the session if needed.
Disable a tilebar
You can disable the tile bar in the LogonUI window with the following registry key:
-
Open the Registry Editor using
regediton the Run command. -
Go to
HKEY_LOCAL_MACHINE\Software\Citrix\CtxHook\AppInit_DLLS\Seamless Hook\. -
Create new DWORD keys: LogonUICaption and set the value of the key to
0.
Manage application folders
By default, new applications you add to delivery groups are placed in a folder named Applications. You can specify a different folder when you create the delivery group, when you add an application, or later.
Good to know:
- You cannot rename or delete the Applications folder, but you can move all the applications it contains to other folders you create.
- A folder name can contain 1–64 characters. Spaces are permitted.
- Folders can be nested up to five levels.
- Folders do not have to contain applications. Empty folders are allowed.
- Folders are listed alphabetically in Web Studio unless you move them or specify a different location when you create them.
- You can have more than one folder with the same name, as long as each has a different parent folder. Similarly, you can have more than one application with the same name, as long as each is in a different folder.
- You must have
View Applicationspermission to see the applications in folders, and you must haveEdit Application Propertiespermission for all applications in the folder to remove, rename, or delete a folder that contains applications. - Most of the following procedures request actions using the action bar in Web Studio. Alternatively, you can use right-click menus or drag the item. For example, if you create or move a folder in a location you did not intend, you can drag/drop it to the correct location.
-
All nodes in Web Studio (such as Machine Catalogs, Delivery Groups, Applications, and Application Groups) share the same folder tree in the back end. To avoid name conflicts when renaming or moving folders, use unique names for first-level folders across different nodes.
If you create a folder using the
New-BrokerAdminFolderSDK cmdlet and want it to appear under the Applications node, you must add theContainsApplicationsmetadata using theSet-BrokerAdminFolderMetadatacmdlet.Example:
 Set-BrokerAdminFolderMetadata -AdminFolderId {adminFolderUid} -Name ContainsApplications -Value true
 <!--NeedCopy-->
To manage application folders, select Applications in the left pane. Use the following list for guidance.
- To view all folders (excluding nested folders): Click Show all above the folder list.
- To create a folder at the highest level (not nested): Select the Applications folder. To place the new folder under an existing folder other than Applications, select that folder. Then, select Create Folder in the actions bar. Enter a name.
- To move a folder: Select the folder and then select Move Folder in the action bar. You can move only one folder at a time unless the folder contains nested folders. (The easiest way to move a folder is to drag it.)
- To rename a folder: Select the folder, and then select Rename Folder in the action bar. Enter a name.
- To delete a folder: Select the folder, and then select Delete Folder in the action bar. When you delete a folder that contains applications and other folders, those objects are also deleted. Deleting an application removes the application assignment from the delivery group. Tt does not remove it from the machine.
- To move applications into a folder: Select one or more applications. Then, select Move Application in the action bar. Select the folder.
You can also place applications you are adding in a folder on the Application page when creating a delivery group or an application group. By default, added applications go in the Applications folder. Click Change to select or create a folder.
Control local launch of applications on published desktops
When users launch a published application from within a published desktop, you can control whether the application is launched in that desktop session or as a published application. Citrix Workspace app searches for the installation path of the application in the Windows registry on the VDA and, if present, launches the local instance of the application. Otherwise, a hosted instance of the application is launched. If you launch an application that is not installed on the VDA, the hosted application is launched. For more information, see vPrefer launch.
In PowerShell (using the Remote PowerShell SDK in Citrix Cloud deployments or the PowerShell SDK in on-premises deployments), you can change this action.
In the New-Broker Application or Set-BrokerApplication cmdlet, use the LocalLaunchDisabled option. For example:
Set-BrokerApplication -LocalLaunchDisabled <Boolean>
By default, this option’s value is false (-LocalLaunchDisabled $false). When launching a published application from within a published desktop, the application is launched in that desktop session.
If you set the option’s value to true (-LocalLaunchDisabled $true), the published application is launched. This creates a separate, additional session from the published desktop (using Citrix Workspace app for Windows) to the published application.
Requirements and limits:
- The application’s
ApplicationTypevalue must beHostedOnDesktop. - This option is available only through the appropriate PowerShell SDK. It is not currently available in the Web Studio graphical interface.
- This option requires minimum: StoreFront 3.14, Citrix Receiver for Windows 4.11, and Delivery Controller 7.17.
In this article
- Introduction
- Add applications
- Change an application’s group association
- Duplicate, enable or disable, rename, or delete an application
- Remove applications from a delivery group
- Remove applications from an application group
- Change application properties
- Configure application limits
- Pass parameters to published applications
- Troubleshooting session sign-out issues with Published Applications
- How to modify LogonUI to view Windows disclaimer message in full size when opening published applications
- Manage application folders
- Control local launch of applications on published desktops