Configuring virtual disks for Active Directory management
Integrating Citrix Provisioning™ and Active Directory allows administrators to:
- Select the Active Directory Organizational Unit (OU) for the Citrix Provisioning target device computer account.
- Take advantage of Active Directory management features, such as delegation of control and group policies.
- Configure the Citrix Provisioning server to automatically manage the computer account passwords of target devices.
Before integrating Active Directory within the farm, verify that the following prerequisites are met:
- The master target Device was added to the domain before building the virtual disk.
- The Disable Machine Account Password Changes option was selected when the running the image optimization wizard.
After all prerequisites have been verified, new target devices can be added and assigned to the virtual disk. A machine account is then created for each target device.
Managing domain passwords
When target devices access their own virtual disk in Private Image mode, there are no special requirements for managing domain passwords. However, when a target device accesses a virtual disk in standard image mode, the provisioning server assigns the target device its name. If the target device is a domain member, the name and password assigned by server must match the information in the corresponding computer account within the domain. Otherwise, the target device is not able to log on successfully. For this reason, the provisioning server must manage the domain passwords for target devices that share a virtual disk.
To enable domain password management you must disable the Active Directory-(or NT 4.0 Domain) controlled automatic renegotiation of machine passwords. This process is done by enabling the Disable machine account password changes security policy at either the domain or target-device level. The provisioning server provides equivalent functionality through its own Automatic Password Renegotiate feature.
Target devices booted from virtual disks no longer require Active Directory password renegotiation. Configuring a policy to disable password changes at the domain level applies to any domain members booting from local hard drives. If policies disabling password changes are not desirable for your environment, disable machine account password changes at the local level. To disable machine account password changes, select the Optimize option when building a virtual disk image. The setting is applied to any target devices that boot from the shared virtual disk image.
Note:
The Citrix Provisioning server does not in any way change or extend the Active Directory schema. The provisioning server’s function is to create or modify computer accounts in Active Directory, and reset passwords.
When domain password management is enabled, it:
- Sets a unique password for a target device.
- Stores that password in the respective domain computer account.
- Gives the information necessary to reset the password at the target device before it logs on to the domain.
Password management process
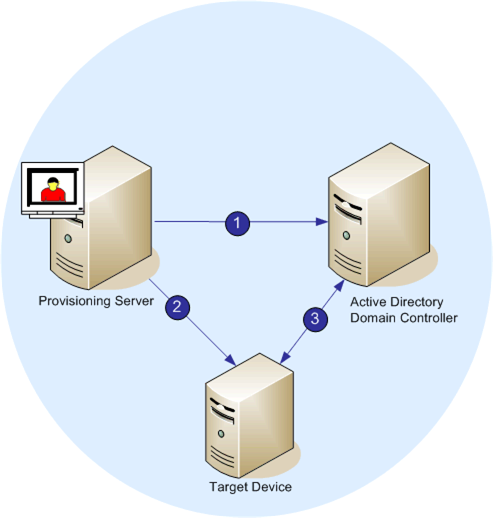
With password management enabled, the domain password validation process includes:
- Creating a machine account in the database for a target device, then assign a password to the account.
- Providing an account name to a target device using the Streaming Service.
- Having the domain controller validate the password provided by the target device.
Enabling domain management
Each target device that logs on to a domain requires a computer account on the domain controller. This computer account has a password maintained by the Windows desktop OS and is transparent to the user. The password for the account is stored both on the domain controller and on the target device. If the passwords stored on the target device and on the domain controller do not match, the user cannot log on to the domain from the target device.
Domain management is activated by completing the following tasks:
- Enabling Machine Account Password Management
- Enabling Automatic Password Management
Enabling machine account password management
To enable machine account password management, complete the following:
- Right-click on a virtual disk in the Citrix Provisioning console, then select the File Properties menu option.
- On the Options tab, select Active Directory machine account password management.
- Click OK, then close the properties dialogs, then restart the Streaming Service.
Enabling automatic password management
If your target devices belong to an Active Directory domain and are sharing a virtual disk, complete the following extra steps.
To enable automatic password support, complete the following:
- Right-click on a provisioning server in the console, then select the Properties menu option.
- Select the Enable automatic password support option on the Options tab.
- Set the number of days between password changes.
- Click OK to close the Server Properties dialog.
- Restart the Streaming Service.
Managing domain computer accounts
The tasks documented here must be performed using the Citrix Provisioning server, rather than in Active Directory, to take full advantage of product features.
Supporting cross-forest scenarios
To support cross-forest scenarios:
- Ensure that DNS is properly set up. See the Microsoft website for information on how to prepare DNS for a forest trust.
- Ensure the forest functional level of both forests is the same version of Windows Server.
- Create the forest trust. To create an account in a domain from another forest, create an Inbound Trust from the external forest to the forest where Citrix Provisioning resides.
Parent-child domain scenario
Common cross-domain configurations involve having the Citrix Provisioning server in a parent domain with users from one or more child domains. These users can administer Citrix Provisioning and manage Active Directory accounts within their own domains.
To implement this configuration:
-
Create a Security Group in the child domain; it can be a Universal, Global, or Local Domain Group. Make a user from the child domain a member of this group.
-
From the provisioning server console, in the parent domain, make the child domain security group a Citrix Provisioning Administrator.
-
If the child domain user does not have Active Directory privileges, use the Delegation Wizard in the Active Directory Users & Computers Management Console. Use this method to assign, create, and delete a user’s computer account rights for the specified OU.
-
Install the Citrix Provisioning Console in the child domain. No configuration is necessary. Log into the provisioning server as the child domain user.
Cross-forest configuration
This configuration is similar to the cross-domain scenario. However, in this configuration the Citrix Provisioning console, user, and administrator group are in a domain that is in a separate forest. The steps are the same as for the parent-child scenario, except that a forest trust must be established first.
Note:
Microsoft recommends that administrators do not delegate rights to the default Computers container. The best practice is to create accounts in the OUs.
Giving provisioning services administrator privileges to users from another domain
Citrix® recommends the following method. For role-based administrators where the PVS is in one domain and the PVS administrator is in another domain, a two-way trust is required.
- Add the user to a universal group in their own domain (not the Citrix Provisioning domain).
- Add that universal group to a local domain group in the Citrix Provisioning domain.
- Make that local domain group the Citrix Provisioning admin group.
Adding target devices to a domain
Note:
The machine name used for the virtual disk image must not be used again within your environment.
- Right-click on one or more target devices in the Console window. You can alternatively right-click on the device collection itself to add all target devices in this collection to a domain. Select Active Directory, then select Create machine account. The Active Directory Management dialog appears.
- From the Domain scroll list, select the domain that the target device belongs to. Or, in the Domain Controller text box, type the name of the domain controller that the target devices are added to. If you leave the text box blank, the first Domain Controller found is used.
- From the Organization unit (OU) scroll list, select, or type the organization unit to which the target device belongs. The syntax is ‘parent/child,’ lists are comma separated. If nested, the parent goes first.
- Click the Add devices button to add the selected target devices to the domain and domain controller. A status message displays to indicate if each target device was added successfully. Click Close to exit the dialog.
Removing target devices from a domain
- Right-click on one or more target devices in the console window. Alternatively, right-click on the device collection itself to add all target devices in this collection to a domain. Select Active Directory Management, then select Delete machine account. The Active Directory Management dialog appears.
- In the Target Device table, highlight those target devices that are removed from the domain, then click the Delete Devices button. Click Close to exit the dialog.
Reset computer accounts
Note:
An Active Directory machine account can only be reset when the target device is inactive.
To reset computer accounts for target devices in an Active Directory domain:
-
Right-click on one or more target devices in the Console window. Alternatively right-click on the device collection itself to add all target devices in this collection to a domain. Then select Active Directory Management, then select Reset machine account. The Active Directory Management dialog appears.
-
In the Target Device table, highlight those target devices to reset, then click the Reset devices button.
Note:
Add this target device to your domain while preparing the first target device.
-
Click Close to exit the dialog.
-
Disable Windows Active Directory automatic password renegotiation. To disable automatic password renegotiation on your domain controller, enable the following group policy: Domain member: Disable machine account password changes.
Note:
To make this security policy change, you must have sufficient permissions to add and change computer accounts in Active Directory. You have the option of disabling machine account password changes at the domain level or local level. If you disable machine account password changes at the domain level, the change applies to all members of the domain. If you change it at the local level (by changing the local security policy on a target device connected to the virtual disk in Private Image mode), the change applies only to the target devices using that virtual disk.
-
Boot each target device.
Active directory-based activation
Update how Microsoft Volume Licensing is configured for an individual virtual disk using Active Directory-based activation. With this functionality you can specify that the virtual disk uses no volume licensing.

Note:
When using the Microsoft Volume Licensing for a virtual disk, consider that Key Management Services (KMS), Multiple Activation Key (MAK) and Active Directory-based activation (ADBA) cannot be used together.
To improve active directory-based activation:
- In the virtual disk Property screen, set the virtual disk Microsoft Licensing property to None.
- On the target device, use
slmgr-dlvfor a Microsoft image, andcscript ospp.vbs/dstatusfor a Microsoft Office image.
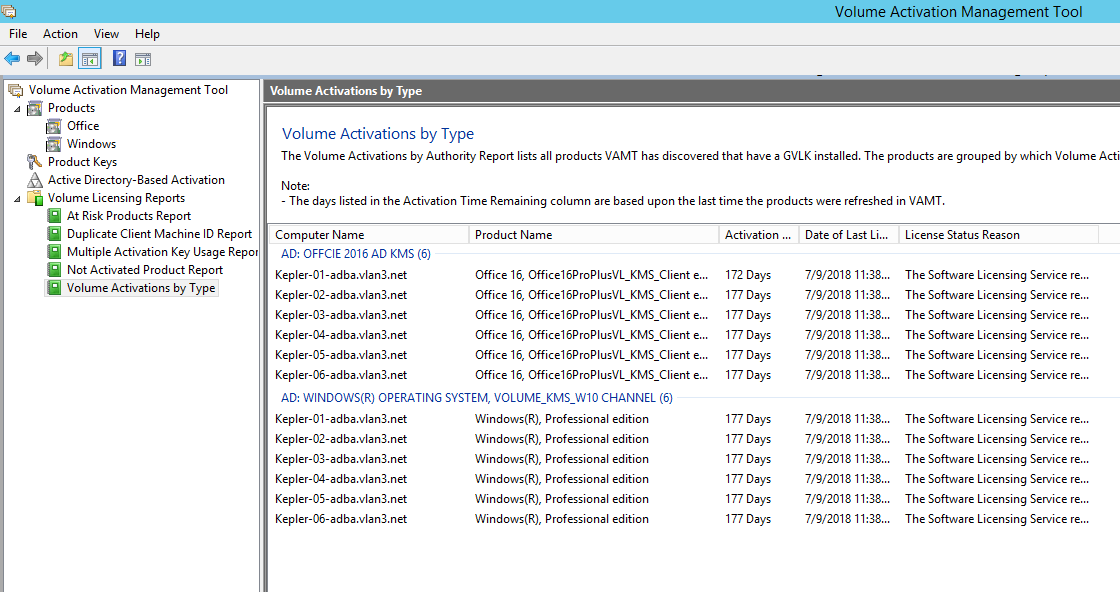
Tip:
A known issue exists where VAMT displays errors about duplicate CMID entries for ADBA activated devices. This issue occurs although ADBA does not utilize CMID. ADBA, despite being similar to KMS, does not use CMID. Microsoft reuses KMS data when compiling CMID information. The following image illustrates a VAMT tool screen for ADBA. The Volume Activation by Type screen displays conflicts for duplicate CMID entries for those devices.