Deploying virtual desktops to VMs using the Citrix Virtual Apps and Desktops™ Setup Wizard
The Citrix Virtual Desktops™ Setup Wizard helps with deploying virtual desktops to virtual machines (VMs).
Important:
- The Citrix Provisioning server must have direct access to the storage device to facilitate communication. The provisioning user must have read\write access to the storage device to ensure successful provisioning with the HDD BDM.
The wizard:
- Creates VMs on a Citrix Virtual Apps™ and Desktops-hosted hypervisor using an existing machine template:
- XenServer (formerly Citrix Hypervisor™)
- ESX through vCenter
- Hyper-V using SCVMM. When provisioning to an SCVMM server, the wizard automatically changes the network configuration of both the first legacy NIC and the second synthetic NIC for Gen 1 VMs. See the SCVMM section for more information.
- Nutanix Acropolis (from snapshots). See Nutanix Acropolis requirements for more information.
- Creates Citrix Provisioning™ target devices within a new or existing provisioning device collection matching the Citrix Virtual Apps and Desktops catalog name.
- Creates Hybrid Azure AD joined catalogs. For information, see Create Hybrid Azure AD joined catalogs.
- Assigns a Standard Image virtual disk to VMs within the device collection.
- Adds the target to the selected Active Directory OU.
- Adds virtual desktops to a Citrix Virtual Apps and Desktops catalog.
Important considerations
Consider the following when using the Citrix Virtual Apps and Desktops Setup Wizard:
- For Citrix Virtual Desktops Setup Wizard provisioned Gen 2 VMs, the BDM partition is FAT formatted with a drive letter. As a result, Windows in a Citrix Provisioning private image are aware of the new partition. For example, an RDS provisioning image using a write cache disk and BDM partition has 2 partitions in private image mode.
- When using the Linux streaming feature, consider that a new step was added to the Citrix Virtual Apps and Desktops Setup Wizard. Add the SOAP SSL certificate to ensure that the Linux target can image the virtual disk through the SOAP server. For details, see Installation.
- Using the Citrix Provisioning Setup Wizard to create VMs on a XenServer host while specifying 1 vCPU, creates a VM with 1 vCPU. However, the topology possesses 2 cores per socket. Creating VMs in this fashion prevents the VM from booting, while displaying the following error message in XenCenter:
The value 'VCPU\_max must be a multiple of this fieldis invalid for fieldplatforms:cores-per-socket. As a result, XenCenter fails to boot the VM because the topology and vCPU configuration are incompatible. - The Citrix Virtual Apps and Desktop Setup Wizard creates targets then boots them to format the cache drive. This process occurs quickly. A VDA occasionally reaches a state where it fails to shut down correctly. This process occurs because the VDA is initializing while the Citrix Provisioning Device Service simultaneously finishes formatting the cache drive then shuts down the target. To resolve this issue, in the virtual disk registry key, HKEY_LOCAL_MACHINE\SOFTWARE\Citrix\CitrixProvisioning, create a DWORD called “RebootDelaySec”. Set an arbitrary value, delay-to-shutdown, in seconds using a decimal value.
-
When using the Citrix Virtual Apps and Desktops Setup Wizard, the default VDA level is the same as that used in Studio.
About Citrix Studio tools
When using Citrix Studio to create provisioned catalogs, consider:
- The Citrix Virtual Apps and Desktops Setup Wizard provisions target VMs and adds them to a broker catalog.
- The Export Devices Wizard adds existing provisioned target VMs to a broker catalog.
With both wizards, authentication occurs to Citrix Virtual Apps and Desktops. Hosting connections are retrieved so that you can select the connection used by the broker to power manage the provisioned target VMs.
Tip:
Only hosting units, not hosting connections, can be used. These hosting units are only created when you specify Studio Tools when the hosting connection is created.
ESX permissions
For ESX, the minimum permissions include the following:
- Datastore Permissions
- Allocate space
- Browse datastore
- Low level file operations
- Network Permissions
- Assign network
- Resource Permissions
- Assign virtual machine to resource pool
- System Permissions - These permissions are automatically added when you create a role in vCenter.
- Anonymous
- Read
- View
- Task Permissions
- Create Task
- Virtual machine configuration Permissions
- Add existing disk
- Add new disk
- Advanced
- Change CPU count
- Change resource
- Memory
- Modify device settings
- Remove disk
- Settings
- Virtual Machine/Interaction
- Power Off
- Power On
- Reset
- Suspend
- Virtual Machine/Inventory
- Create New
- Create from existing
- Remove
- Register
- Virtual Machine/Provisioning
- Clone virtual machine
- Clone template
- Allow disk access
- Allow virtual machine download
- Allow virtual machine files upload
- Deploy template
- Global
- Manager custom attributes
- Set custom attribute
Write cache considerations
The Citrix Virtual Apps and Desktops setup Wizard discards any hard disks that are attached to a template. This process minimizes provisioning time.
The wizard provisions diskless VMs if the virtual disk is in standard image mode and cache is set as cache on the server. If the cache is server-side, Citrix Provisioning does not automatically boot the provisioned VMs.
The wizard provisions VMs with write cache drives (the default size is 6 GB and the default type is dynamic). If the virtual disk is in standard image mode and cache is set as cache on the local hard disk. To format the write cache drive, the wizard automatically boots the VMs in standard image mode with the cache on the server. After formatting completes, VMs are automatically shut down, then Citrix Virtual Apps and Desktops can boot the VMs as necessary.
If the write cache is stored on hypervisor local storage, configuring deployment through the Citrix Virtual Apps and Desktops Setup wizard varies depending on your hypervisor.
On ESX and Hyper-v, you cannot use the Citrix Virtual Apps and Desktops Setup Wizard to provision VMs if you are using hypervisor local storage.
Important:
When specifying names associated with storage devices, do not use a comma (,). Citrix Virtual Apps and Desktops retains names associated with storage devices separated by commas. For example, Storage 1, Storage 2, Storage 3. If a storage name includes a comma, for instance,
Storage1,East, Citrix Provisioning erroneously recognizes this format as two separate storage devices.
Limitation
The registry key UseTemplatecache created on the Provisioning Server running the Citrix Virtual Apps and Desktops Setup Wizard supports only PXE or ISO mode and not HDD BDM boot.
Virtual disk types
VMs provisioned through the Citrix Virtual Apps and Desktops Setup Wizard have new disks created and attached for local provisioning write cache use. The default virtual disk types created are:
- “Fixed” or “dynamic” depending upon the storage repository used in Citrix Hypervisors
- “Dynamic” for SCVMM 2012 SP1
- “Fixed” for SCVMM 2012
- “Thin-provisioned” for ESX
There is a registry key to override the default types of write cache disks created by provisioning deployments on SCVMM and ESX. This registry key does not apply to XenServer. To force “fixed” (or “eager-zeroed thick” for ESX):
[HKEY_CURRENT_USER\Software\Citrix\ProvisioningServices\VdiWizard]
"OVERRIDE_VM_WRITE_CACHE_DISK_TO_FIXED"="true"
Setting this same key to false overrides to the dynamic setting. Remove the key to return to default behavior.
Run the wizard
Run the wizard directly from the Citrix Provisioning console or from a remote console.
Important:
- If you are using ISO BDM boot, ensure that the template has the BDM ISO attached to it. Configure the PXE boot option in the Boot mode in the Virtual Machines page of the Citrix Virtual Apps and Desktops Setup Wizard.
- If you want to stream targets over IPv6, ensure that the master target device acquire IPV6 address before capturing the vDisk.
- If errors occur during processing, you can review the log file
Citrix Virtual Desktop Setup Wizard.logatC:\ProgramData\Citrix\Provisioning Services\Log\. File names from older versions of Citrix Provisioning, which have timestamps in the file name, are renamed to use the new index numbers. Only the latest log files are retained.
-
Right-click on any Site icon in the Console tree panel, then select the Citrix Virtual Desktops Setup Wizard…menu option. The Citrix Virtual Desktops Setup Wizard appears. Note: The Citrix Virtual Apps and Desktop Setup Wizard is shown as the Citrix Virtual Desktops Setup Wizard in the provisioning console.
-
Click Next to begin setup.
-
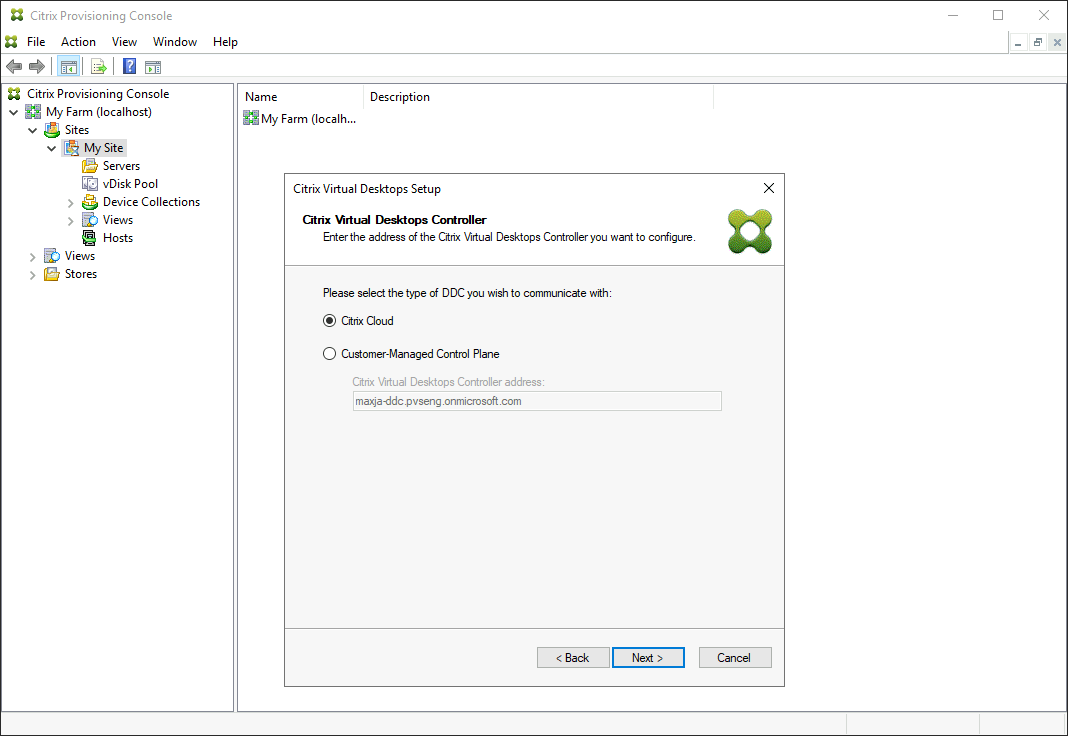
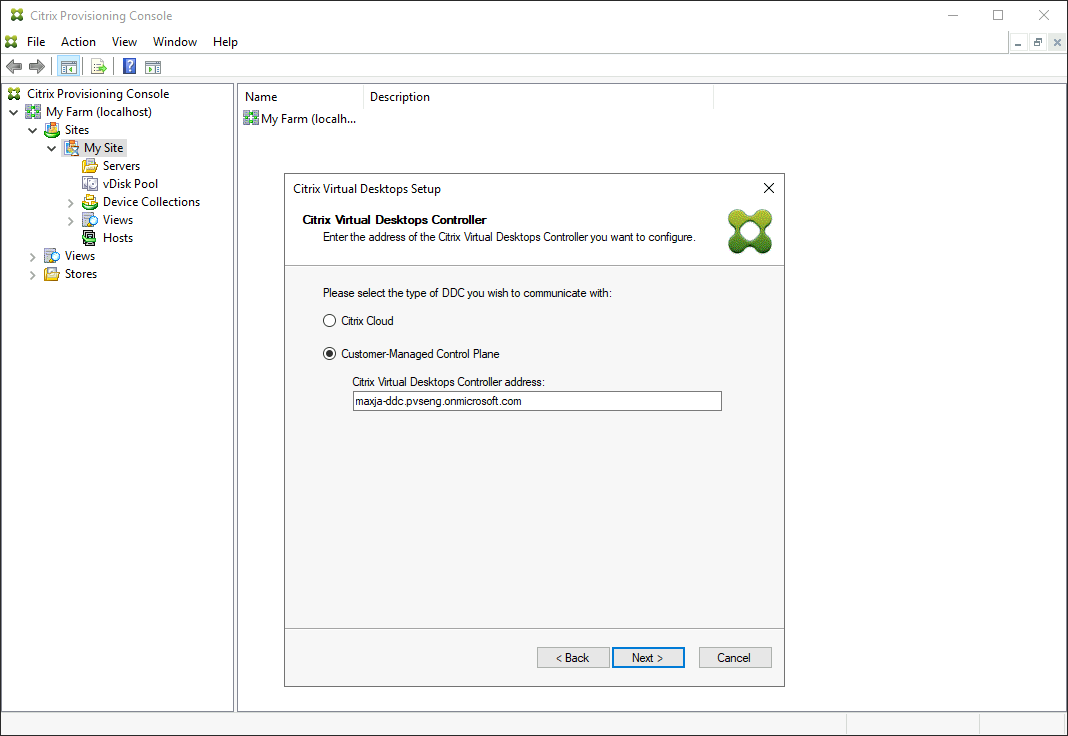
On the Citrix Virtual Desktops Controller page, select the type the Delivery Controller.
-
If you select Citrix Cloud™, enter Citrix Cloud Credentials when prompted, and select the cloud customer if requested.
-
If you select Customer-Managed Control Plane, enter the controller hostname or address. The wizard authenticates to the Delivery Controller using the current logged in user.
-
-
On the Citrix Virtual Desktops Host Resources page, select a Citrix Virtual Apps and Desktops host. If you choose a cluster, machines are evenly distributed across the hosts cluster.
Note:
XenServer 5.5 Update 2 virtualization settings do not display. These settings are added in Citrix Virtual Apps and Desktops as host connections using the Manually create VMs option. As a result, you cannot specify a network or storage location for them, therefore it is not listed in the Citrix Virtual Apps and Desktops Setup Wizard.
-
Supply the host credentials, user name, and password.
-
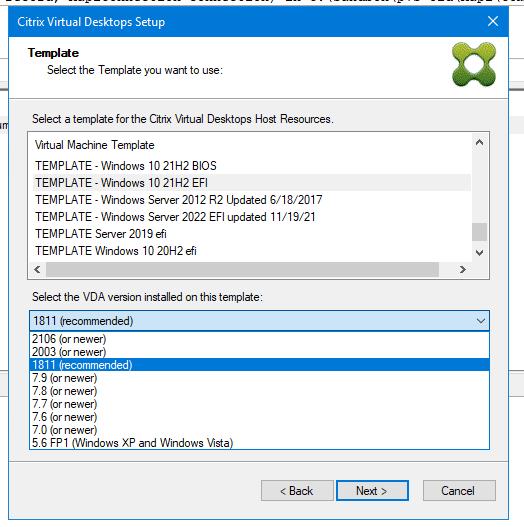
On the Template page, from the list of available templates, select the template to use for the host you chose. If using a previous version of the VDA or if the template is built using Windows Vista, select the check box. Valid templates must have a dynamic MAC address or a static address with a value (00:00:00:00:00:00 is not a valid MAC address).
-
If there is more than one network available for the Virtualizations Settings, the Network page displays so you can select the appropriate network.
-
On the vDisk page, select a single standard image mode virtual disk to assign to the collection of VMs.
-
Create a catalog or use an existing catalog from a previous release (Vista or Windows 7 with VDA 5.6). The options available depend on which catalog option you select:
- If you chose to create a catalog, provide a name and description for that catalog. Appropriate machine types include:
- Windows Client Operating System – best for delivering personalized desktops to users, or delivering applications to users from desktop operating systems.
- Windows Server Operating System – best for delivering hosted shared desktops for large scale deployment of standardized machines or applications, or both.
- The vGPU option is only supported on desktop operating systems.
- If you select an existing catalog using the menu, that catalog’s description, machine type, assignment type, and user data appear.
- If you chose to create a catalog, provide a name and description for that catalog. Appropriate machine types include:
-
On the Virtual machines page, select VM preferences. Preferences vary depending on the machine OS type and if assigned user changes are discarded after the session ends.
- For Windows Client or Windows Server machines that are randomly assigned to users:
- Enter the number of VMs to create (default is 1)
- Enter the number of vCPUs (default is based on the previously selected template)
- Enter the memory size. If the template has dynamic memory configured, two extra configuration settings are required (minimum and maximum memory)
- Enter the local write cache disk size (default is 6 GB)
- Select the checkbox Targets uses IPv6 if you want to create targets that stream using IPv6.
- Select a boot mode. PXE boot (requires a running PXE service) and BDM disk (creates a partition for the Boot Device Manager file). You must select the BDM disk option if you want to create targets that stream using IPv6.
- For Windows Client or Windows Server machines that are randomly assigned to users:
-
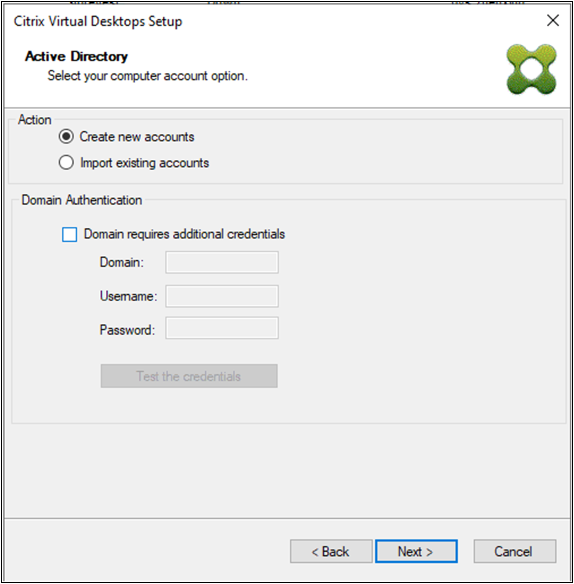
On the Active Directory page, choose the appropriate method for adding Active Directory computer accounts:
- Create new accounts
- Import existing accounts
The page that displays depends on which Active Directory method you select.
Citrix Provisioning supports provisioning of target devices in untrusted domains.
If the domain is not trusted, under Domain Authentication, do the following:
- Select Domain requires additional credentials.
- Enter the domain name, username, and password for the untrusted domain.
- Click Test the credentials. This action validates the domain name and the credentials.
- After you get a green check mark, proceed to the next page.
-
Follow the instructions depending on whether you want to create AD accounts or import existing AD accounts.
-
If you want to create Active Directory computer accounts:
- Select Create new accounts on the Active Directory page.
- Delegate rights to the provisioning console user to allow Active Directory account creation or modification to manage computer account passwords.
- Select the appropriate domain from the Domain menu box, then select from the OUs listed for that domain. The domain and OU default to rights of the current user.
- Select the machine-naming option from the Account naming scheme menu text box. Enter a valid naming scheme consisting of at least one hash symbol (#) that is 15 characters or less. Also, select a number/character fill option that dynamically replaces the hash symbols in the specified naming scheme, incrementing by one for each VM as they are created.
-
If you want to import existing Active Directory computer accounts:
- Select Import existing accounts on the Active Directory page.
-
Click Browse to browse for the appropriate OU to import, or click Import to import an existing
.csvfile in the following format:Name,Type,Description,PVSPC01,Computer,,The Required count displays the number of VMs previously specified and the Added count displays the number of entries in the list.
If you import machine account names that exist in any of the following locations, they are not valid:
- Citrix Virtual Apps and Desktops (as a machine)
- Citrix Provisioning (as a device)
- Hypervisor (as a VM)
- If the AD structure contains many objects or containers, or if you are importing many machine accounts, the import might take a long time.
-
-
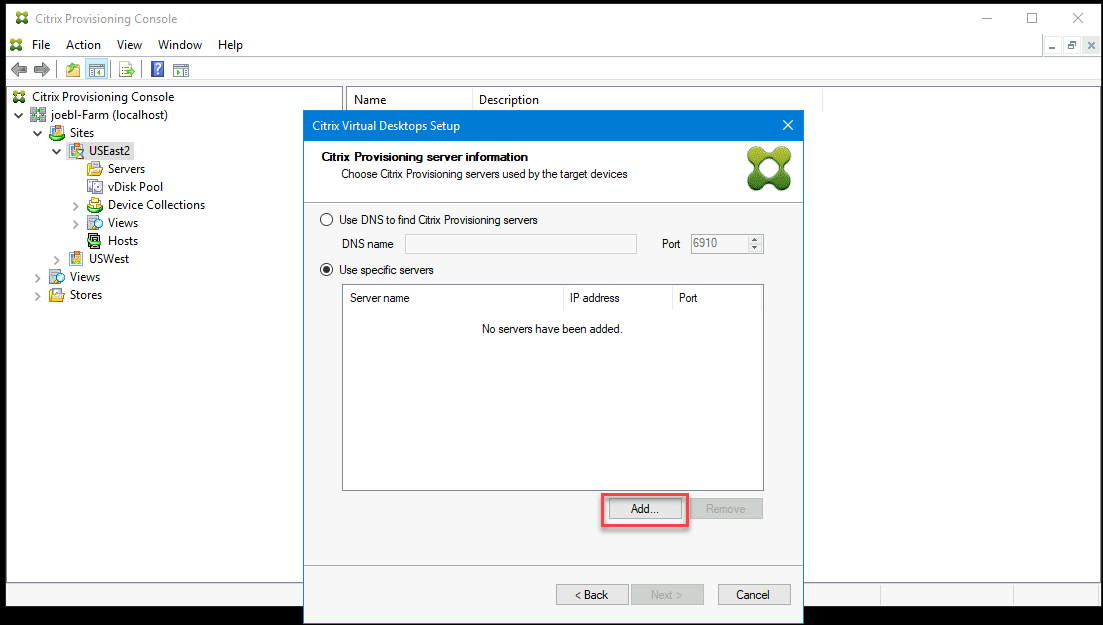
For UEFI targets if you select the BDM boot mode on the Virtual machines page, then you can see the Citrix Provisioning server information page. Using this page, set up the information about the provisioning servers that function as login servers for the target devices. You can select:
-
Use DNS to find Citrix Provisioning Servers: If you have one single Citrix Provisioning Server, then you can use its DNS hostname. If you want a single DNS name to translate to multiple PVS servers, then you have to manually add the records with the common name and the IPv4 or IPv6 address of each server.
Note:
If you want to use a DNS name, then you must specify the fully qualified domain name. DHCP server does not include the zone where you add the DNS name to be used.
-
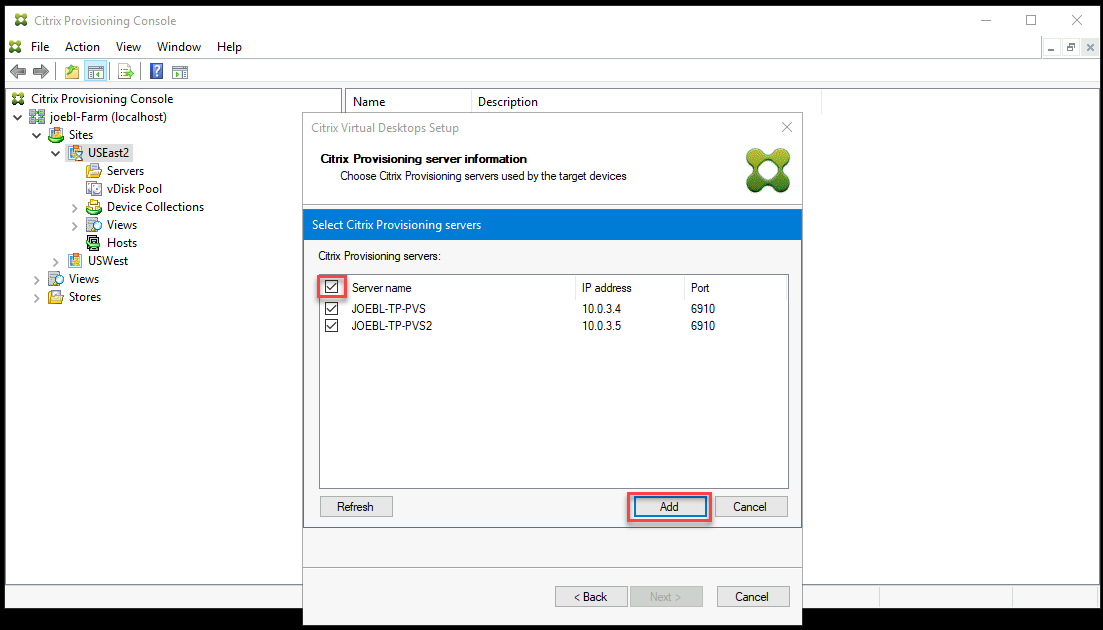
Use specific servers: To specify the desired servers by IP address, click Add to select from the list of configured servers. Select the servers and click Add. The selected servers appear on the Citrix Provisioning server information page.
Note:
The IPv6 addresses are displayed if you select Targets uses IPv6 checkbox earlier on the Virtual Machines page.
-
-
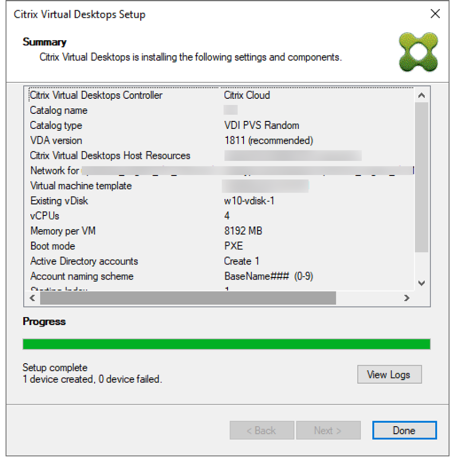
Review all configuration settings. After confirming, the following actions take place one at a time across all hosts until configurations are complete:
- If applicable, create a Citrix Virtual Apps and Desktops catalog
- Create VMs on a host’s hypervisor using the machine template
- Create BDM partitions, if specified
- Create a write cache disk of the specified size
- Create Citrix Provisioning target devices then assign the selected virtual disk to those devices
- Add the target devices to the selected provisioning collection
- Add the VMs to the Citrix Virtual Apps and Desktops catalog
- Boot each VM to format the newly created write cache disk
If you cancel during the configuration, you must manually remove the following:
- Citrix Virtual Apps and Desktops machines from the assigned catalog
- Active Directory computer accounts that were created.
- Newly created Citrix Virtual Apps and Desktops catalogs.
- Citrix Provisioning target devices created in the selected device collection.
- VMs created on any of the selected host hypervisors.
To update and reassign a virtual disk, copy the target device’s currently assigned base virtual disk image. Update the image to include new Citrix Provisioning software and drivers. Reassign the updated virtual disk to the target device. To reassign the virtual disk, use the vDisk Properties Assign vDisk dialog on the console.
-
Select Done on the Summary screen to complete the wizard process. To check VM provisioning and Always on Tracing (AOT) logs messages, click View Logs.
Nutanix Acropolis requirements
The following are required when using Citrix Provisioning with Nutanix Acropolis:
- An installed Nutanix Acropolis hypervisor plug-in for Citrix Provisioning. Download this plug-in from the Nutanix support site. See the Nutanix documentation portal for installation information.
- A Citrix Virtual Apps and Desktops host connection to AHV.
- Nutanix Acropolis platform version 5.1.1 or greater.
Tip:
Unique to AHV provisioning is the requirement to choose a container.
Important considerations when using Nutanix Acropolis hypervisors
When using Nutanix, consider the following:
- Do not delete the NIC of a provisioned VM and then readd them.
- BDM partition is not supported.
- Only the Citrix Virtual Apps and Desktops Setup Wizard is supported, not the Streamed VM Wizard.
- Acropolis hypervisors use snapshots and not templates for VMs.
- Ideally, a snapshot does not have an attached hard disk because the Nutanix Acropolis hypervisor does not remove the hard disk during provisioning.
- When you deploy machines that boot from BDM ISOs, the ISO is mounted in the snapshot. The provisioned VMs are set to use PXE boot. Even though PXE was selected in the Setup Wizard, the deployed VMs honor the template snapshot. These VMs boot to the BDM ISO without extra steps as long as the template snapshot contains the BDM ISO and the default boot order.
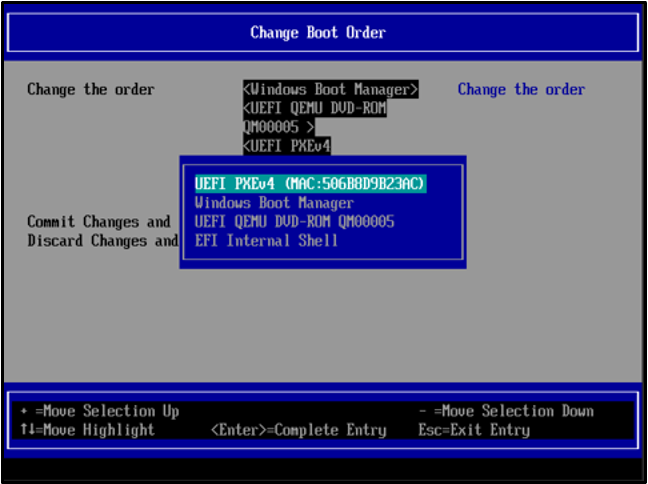
- For PXE booting, change the boot device for a UEFI VM by using only the UEFI firmware menu.
- You can add Nutanix hosts only by using the Citrix Virtual Desktops Setup Wizard from a Citrix Virtual Apps and Desktops Setup Wizard hosting connection.
Note:
For information about Nutanix Acropolis hypervisors, see the Nutanix documentation portal.
Implementing UEFI guest VMs for Nutanix AHV hosts
Citrix Provisioning allows you to implement a UEFI guest VM for Nutanix AHV hosts. The following prerequisites exist:
- The Citrix Virtual Apps and Desktops DDC are installed, along with the Nutanix plug-in.
- The Nutanix plug-in is installed in the provisioning server and provisioning console.
Note:
The VM is set to UEFI before installing the OS.
To implement a UEFI guest VM for Nutanix AHV:
-
Create a master VM.
-
SSH into Nutanix Acropolis and run the following command:
acli vm.update <VM_NAME> uefi_boot=True. -
Mount the Windows and virtual ISOs and install the OS.
-
Install all Windows updates on the OS.
-
Join the OS to Active Directory.
-
Install Citrix Provisioning on the target device.
-
Run the Citrix Provisioning Imaging Wizard to create the target device record, virtual disk, and other elements. Select No to shut down the target device, rather than rebooting it at the conclusion.
-
Set up the boot device for a UEFI VM. You can change the boot device for a UEFI VM by using only the UEFI firmware menu.
For more information, see Setting up Boot Device.
- Start the VM and log into Windows to start the second stage of Imaging Wizard, imaging.
- Create a VM. As in the master VM, repeat steps 2 and 7.
- In the provisioning console, create a VM record for the snapshot VM using the VM’s MAC address. Assign the virtual disk created in step 7 to this device record.
- Boot the VM. Install the VDA, and restart if prompted. Shutdown when the installation finishes.
- Create a snapshot of this VM.
- In the provisioning console, set the virtual disk to standard image mode. If the cache mode is Cache on device hard disk or Cache in device RAM with overflow to hard disk, the wizard prompts you to create a cache disk.
- Use the Citrix Virtual Apps and Desktops setup Wizard to provision UEFI provisioning target devices using the created virtual disk.
SCVMM requirements
You cannot provision vGPU-enabled VMs on Hyper-V.
Limitation:
HyperV Gen1 VMs provisioned using Citrix Virtual Apps and Desktops Setup Wizard always have the operating system set to unknown instead of the operating system of the template.
Provision VDAs on an opaque Network
To provision a VDA on an opaque network, use the Citrix Virtual Apps and Desktops Setup Wizard.
Create the hosting unit and associate the opaque network to it using Citrix Studio. See Connections and resources for more information.
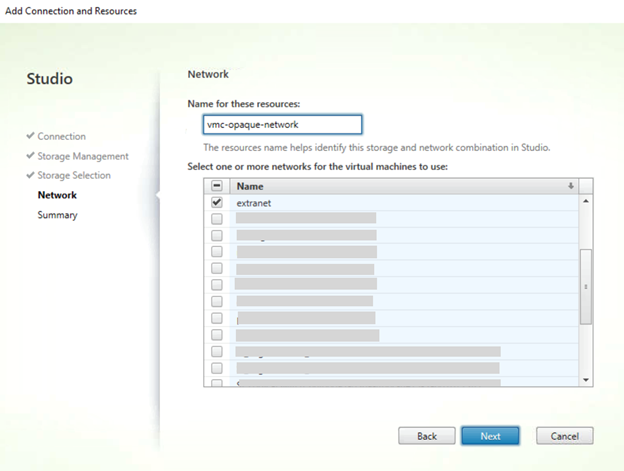
Use Citrix Studio to select an opaque network
In Citrix Studio, access the Add Connection and Resources page. In the Network section, select the resource representing the opaque network, then click Next:
Tip:
After creating a hosting unit with the opaque network, use it in the Citrix Virtual Apps and Desktops Wizard in the provisioning console.
Provision VDAs to a specific resource pool
Citrix Provisioning supports provisioning VDAs at a specific resource pool in an on-premises ESX hypervisor. You can provision this VDA using the Citrix Virtual Apps and Desktops Setup Wizard in the Citrix Provisioning console.
Note:
Create a hosting unit with the resource pool using Citrix Studio before using the Setup Wizard in the provisioning console.
- The provisioned target device installer registers the WMI and performance counter providers. No additional installation options require configuration on the provisioned target device.
- The current
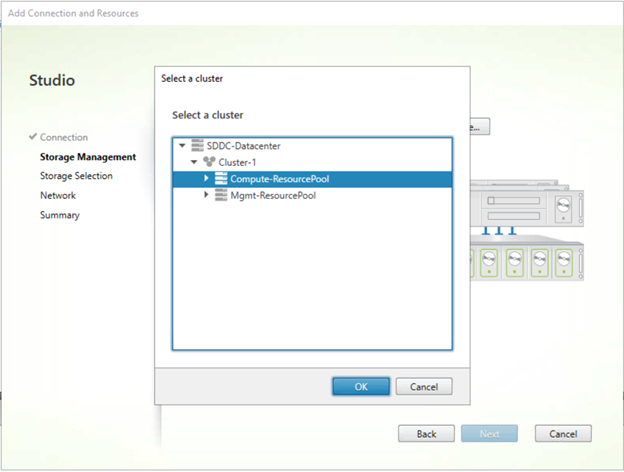
CVhdMpperformance counter provider only supports VHDX for target devices using Cache in device RAM with overflow on hard drive. Configure the resource pool. In Citrix Studio, launch the Add Connection and Resources Wizard. From the Add Connection and Resources page, select Storage Management. In the Select a cluster field, click Browse:

Select the appropriate cluster, and click Next. Select the Compute-ResourcePool or any of the child resource pool options under Compute-ResourcePool.
Use the Citrix Virtual Apps and Desktops Setup Wizard in the provisioning console to select the hosting unit with the resource pool. Click Next:
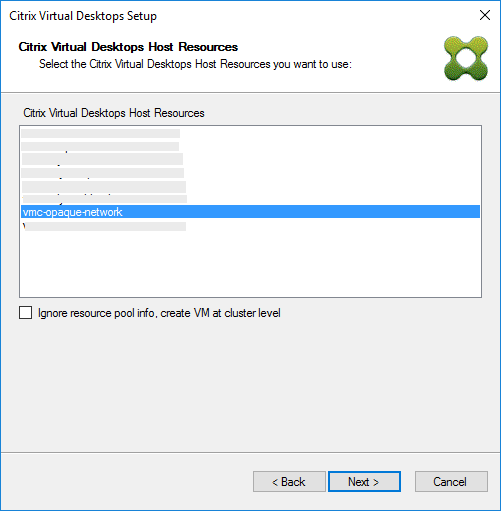
Tip:
To provision at the root cluster level, select the Ignore resource pool info, create VM at cluster level checkbox.
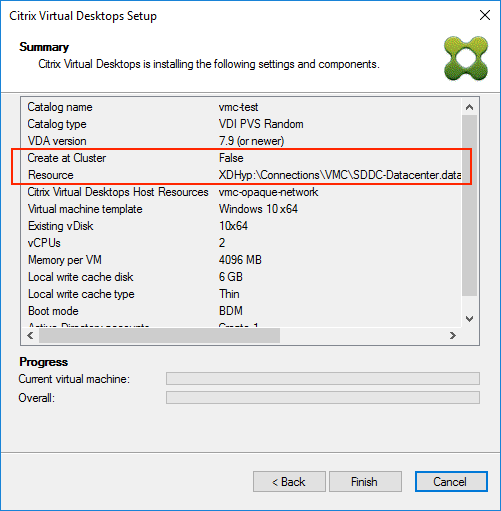
The cluster and the resource pool info appear in the Summary page of the Citrix Virtual Apps and Setup Wizard:
Using PowerShell to provision VDAs at the resource pool level
Citrix Provisioning 1912 includes a new switch parameter, UseResourcePool, added to StartPvsProvisionXdMachines in the Citrix.ProvisioningServices PowerShell cmdlet.
To provision machines at the resource pool level, use the Start-ProvisionXdMachines with the -UseResourcePool switch parameter.
For example:
Start-PvsProvisionXdMachines -DdcAddress <ddcAddress> -BootType <bootType> -CatalogName <catalogName> -CatalogDescription <catalogDescription> -SessionSupport <sessionSupport> -AllocationType <allocationType> -PersistUserChanges <persistUserChanges> -Scope <scope> -VdaLevel <vdaLevel> -XenDesktopHostResource <hostname> -HostResourcePassword <hostPassword> -TemplateName <templateName> -NetworkPath <networkPath> -StoreId <storeId> -SiteId <siteId> -DiskLocatorId <diskLocatorId> -Domain <domain> -OrganizationalUnit <organizationalUnit> -NamingScheme <namingScheme> -VmCount <vmCount> -DeviceMemory <deviceMemory> -DeviceCpu <deviceCPU> -DeviceWriteCacheSize <deviceWriteCacheSize> -NameSuffixType <nameSuffixType> -VmPvdSize <vmPvdSize> -VmPvdDrive <vmPvdDrive> -UseResourcePool
<!--NeedCopy-->
Note:
If the parameter
-UseResourcePoolis not included, the VDA is provisioned at the root cluster level.