Pre-installation tasks
Complete the following tasks before installing and configuring Citrix Provisioning.
Important:
Ensure all Windows updates are current before installing Citrix Provisioning components. Citrix recommends that you reboot after installing all Windows updates.
Select and configure the Microsoft SQL database
Each Citrix Provisioning farm has a single database. You can provide the database on either:
- An existing SQL Server or SQL Server Express instance
- A new server running SQL Server or SQL Server Express
- A new or existing Azure SQL Database instance
All Citrix Provisioning servers in a farm must be able to communicate with the database server.
In a production environment, to avoid poor distribution during load balancing, best practice is to install the SQL Server or SQL Server Express instance and the Citrix Provisioning server component software on separate servers.
There are three ways to create the database:
- Use the Configuration wizard. To use this option, you need
dbcreatorpermission. - If you do not have permission to create databases, use the DbScript.exe utility to create a SQL script that a database administrator can run to create the provisioning database. This utility is installed with the provisioning software.
- If the database administrator creates an empty database by running the DbScript.exe utility, then this database is chosen as the database for the new farm when running the Configuration wizard. The login used when running the Configuration wizard must be the owner of the database. Also, this login must have the View any definition permission. The database administrator sets this permission when the empty database is created.
Run the DbScript.exe utility to create or update the database
If you do not have permission to create databases, use DbScript.exe to generate a SQL script for the database administrator to run to create or update the Citrix Provisioning database. Run the script from the Windows command prompt in C:\Program Files\Citrix\Provisioning Services.
To generate the script to create the database, use this syntax:
- For SQL Server and SQL Server Express:
DbScript.exe -new <databaseName> <farmName> <siteName> <collectionName> <farmAdminGroup> <adGroupsEnabled> <scriptName> <is2012orHigher> - For Azure SQL Database:
DbScript.exe -newForAzSqlDb <databaseName> <farmName> <siteName> <collectionName> <farmAdminGroup> <adGroupsEnabled> <scriptName> <is2012orHigher>
When creating a new database for Azure SQL Database, DbScript produces two script files instead of one.
- The first is run into the master database, and it creates the new database.
- The second script is then run into the new database.
To generate the script to update the database, enter:
DbScript.exe -upgrade <databaseName> <scriptName>
The commands use these arguments:
-
<databaseName>— Name of the database to update. -
<farmName>— Farm name for the database. -
<siteName>— Site name for the database. -
<collectionName>— Collection name for the database -
<farmAdminGroup>— Farm administrator group, specified as a full path.Note:
When you run the Configuration wizard, you must be a member of this group (an Active Directory group) to add the Citrix Provisioning servers to the database.
-
<adGroupsEnabled>— Enable or disable AD groups, specified as Boolean, wheretrueenables AD groups andfalsedisables AD groups. -
<scriptName>— Name of the script to generate, specified as a full path. -
<is2012orHigher>— This is deprecated. Usetrue.
DbScript.exe examples
This example generates a script to create an empty Citrix Provisioning database called db1-2. The script is called newDb.sql and is located in C:.
C:\Program Files\Citrix\Provisioning Services> DbScript.exe -new db1-2 Farm1 Site1 Collection1 "test.local/Users/Domain Users" true c:\newDb.sql true
This example generates a script to upgrade the Citrix Provisioning database test1. The script is called upgrade.sql and, because no path is specified, is located in the directory where the script was run (C:\Program Files\Citrix\Provisioning Services).
C:\Program Files\Citrix\Provisioning Services>DbScript.exe -upgrade test1 upgrade.sql
Database sizing
For information, see database sizing.
When the database is created, its initial size is 20 MB with a growth size of 10 MB. The database log initial size is 10 MB with a growth size of 10%.
The base amount of space required is 112 KB, which does not change. The base image includes the following:
- DatabaseVersion record requires approximately 32 KB
- Farm record requires approximately 8 KB
- DiskCreate record requires approximately 16 KB
- Notifications require approximately 40 KB
- ServerMapped record requires approximately 16 KB
The variable amount of space required, based on objects, is as follows:
- Access and groupings (each)
- A User group that has access to the system requires approximately 50 KB
- A Site record requires approximately 4 KB
- A Collection requires approximately 10 KB
- FarmView (each)
- FarmView requires approximately 4 KB
- FarmView/Device relationship requires approximately 5 KB
- SiteView (each)
- SiteView requires approximately 4 KB
- SiteView/Device relationship requires approximately 5 KB
- Target device (each)
- A target device requires approximately 2 KB
-
DeviceBootstraprequires approximately 10 KB -
Device:Diskrelationship requires approximately 35 KB -
DevicePersonalityrequires approximately 1 KB -
DeviceStatuswhen a Device boot requires approximately 1 KB -
DeviceCustomPropertyrequires approximately 2 KB
- Disk (each)
- Unique disk requires approximately 1 KB
-
DiskVersionrequires approximately 3 KB -
DiskLocatorrequires approximately 10 KB -
DiskLocatorCustomPropertyrequires approximately 2 KB
- Provisioning server (each)
- A server requires approximately 5 KB
-
ServerIPrequires approximately 2 KB -
ServerStatuswhen a Server boot requires approximately 1 KB -
ServerCustomPropertyrequires approximately 2 KB
- Store (each)
- Store requires approximately 8 KB
- Store:Server relationship requires approximately 4 KB
- Disk update (each)
-
VirtualHostingPoolrequires approximately 4 KB -
UpdateTaskrequires approximately 10 KB -
DiskUpdateDevicerequires approximately 2 KB - Each
DiskUpdateDevice:Diskrelationship requires approximately 35 KB -
Disk:UpdateTaskrelationship requires approximately 1 KB
-
The following changes cause the size requirements to increase:
- Each processed task (for example: Virtual disk versionings merge) requires approximately 2 KB.
- If auditing is turned on, each change made by the administrator in the Citrix Provisioning console, MCLI, or PowerShell interface requires approximately 1 KB.
Database mirroring
For Citrix Provisioning to support MS SQL database mirroring, the database needs to be configured with High-safety mode with a witness (synchronous).
For information on how to configure and use database mirroring, see Database mirroring.
Implement database clustering
To implement database clustering:
- Follow Microsoft’s instructions.
- Run the Citrix Provisioning Configuration wizard.
- Specify the Availability Group listener as the database server. No instance is used.
- Enable Multi-Subnet Failover in the Connection Options.
Supported authentication types
The table helps you determine how you want Citrix Provisioning to authenticate with the database, and the credentials you want to use when authenticating.
| Authentication type | Grants access to | Required credentials | Database platform | Other restrictions |
|---|---|---|---|---|
| Active Directory Integrated | Active Directory User. Create the username in Active Directory if you do not want to use an existing one. | Nothing (uses the current login context) | SQL Server | The Citrix Provisioning server must belong to a domain, the Citrix Provisioning Service user context must be a domain user, and a domain user must configure Citrix Provisioning. |
| SQL Server | SQL Login. Create the SQL login on the database server if you do not want to use an existing one. | Login and Password | SQL Server and Azure SQL Database |
Note:
For information on supported authentication types for Citrix Provisioning on Azure, see Supported authentication types in Citrix Provisioning on Azure article.
Configure authentication
Citrix Provisioning can use Active Directory Integrated authentication or SQL Server authentication to access the database.
Configuration wizard user permissions
You must have the system privilege of a local administrator to run the configuration wizard.
The admin database principal is the database principal used by the configuration wizard to create and set up the provisioning database. The authentication credentials that you specify in the configuration wizard identify the database principal.
- If you choose Active Directory Integrated authentication, the configuration wizard accesses the database as the user running the configuration wizard (an Active Directory user).
- If you choose SQL Server authentication, then the configuration wizard accesses the database as a different principal.
See Supported authentication types for more information on selecting an admin database principal.
Note:
The database admin principal is only used while running the configuration wizard. It is not saved and not used by the Stream and SOAP services. You must use a principal with elevated privileges for Stream and SOAP services.
-
When using SQL Server, the admin database principal requires the following permissions:
-
securityadminfor creating and updating server logins (when using SQL Server) -
db_ownerfor any existing database
-
To create a database for a new farm, the admin database principal requires dbcreator as an additional permission. See Select and configure the Microsoft SQL database for information on different ways to create the database.
-
When using Azure SQL Database, the admin database principal requires the following permissions:
-
loginmanagerfor creating and updating server logins -
db_ownerfor any existing database
To create a database for a new farm, the admin database principal requires
dbmanageras an additional permission.loginmanageranddbmanagerare special user roles that are assigned to users in the master database. -
Service account permissions
The service account for the Stream and SOAP services must have the following system privileges:
- Run as service
- Registry read access
- Access to
Program Files\Citrix\Citrix Provisioning - Read and write access to any virtual disk location.
The service database principal is the database principal used by the services to access the provisioning database. The authentication credentials that you specify in the configuration wizard identify the database principal.
- If you choose Active Directory Integrated authentication, the services access the database as the service account (an Active Directory user).
- If you choose SQL Server authentication, then the services can access the database as a different principal.
See Supported authentication types for more information on selecting a service database principal.
The configuration wizard configures the database to ensure that the service database principal has the following permissions:
db_datareaderdb_datawriter- Run permissions on stored procedures
Determine which of the following supported user accounts the Stream and SOAP services run under:
- Specified user account (required when using a Windows Share), which can be a Workgroup or domain user account.
-
Network service account
Minimum privilege local account, which authenticates on the network as a computers domain machine account
Note:
The following features don’t work if you select Network service account:
- KMS Activation Support
- Cached secret clearing
- Daylight Savings time support
Therefore, the support for Network service account is deprecated from Citrix Provisioning version 2503.1.
Support for KMS licensing requires the SOAP Server user account to be a member of the local administrators group.
Tip:
Authentication is not common in workgroup environments, as a result, minimum privilege user accounts must be created on each server and each instance must have identical credentials.
Determine the appropriate security option to use in this farm. Only one option can be selected per farm and the selection you choose impacts role-based administration. For security options:
-
Use Active Directory groups for security (default); select this option if you are on a Windows Domain running Active Directory. This option enables you to use Active Directory for Citrix Provisioning administration roles.
Note:
Windows 2000 Domains are not supported.
-
Use Windows groups for security. Select this option if you are on a single server or in a Workgroup. This option enables you to use the Local User/Groups on that particular server for Citrix Provisioning administration roles.
Console users do not directly access the database.
Minimum permissions required for more provisioning functionality include:
- Citrix Virtual Apps and Desktops™ Setup wizard, Streamed VM Setup wizard, and ImageUpdate service
- vCenter, SCVMM, and XenServer (formerly Citrix Hypervisor™) minimum permissions
- Permissions for the current user on an existing Citrix Virtual Apps™ and Desktops controller
- A Citrix Provisioning console user account configured as a Citrix Virtual Apps and Desktops administrator added to a provisioning
SiteAdmingroup or higher - Active Directory Create Accounts permission to create accounts in the console. To use existing accounts, Active Directory accounts have to exist in a known OU for selection
- AD account synchronization: create, reset, and delete permissions
- Virtual disk: Privileges to perform volume maintenance tasks
Note:
A service account does not require special AD permissions.
Enable a remote connection in SQL Server
Use the information in this section to establish a remote connection to the SQL server.
- Log into the SQL server using SQL Server Management Studio.
-
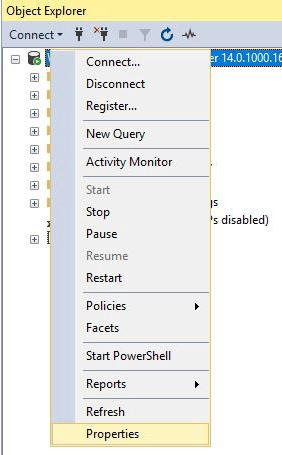
In the object explorer window, right-click the SQL server and choose Properties:
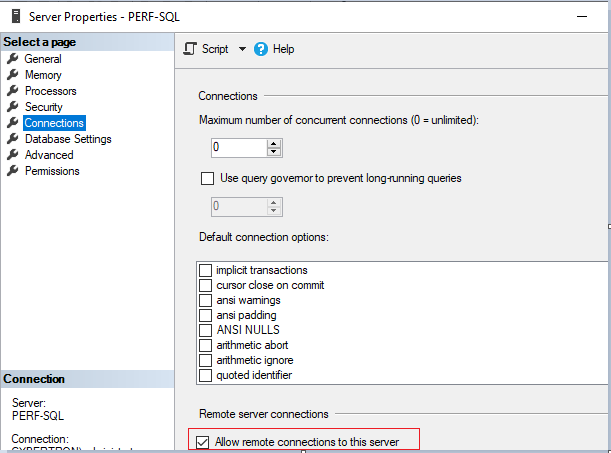
- In the Object Explorer window, select the Connections node. Under Remote server connections, select or clear the Allow remote connections to this server check box:
After updating the remote server connection:
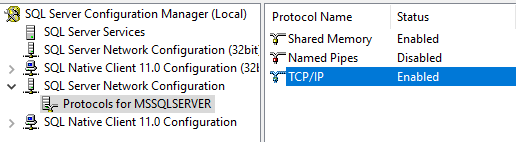
- In the Start menu, click Start > Microsoft SQL Server version > SQL Server version Configuration Manager. The SQL Server Configuration Manager window appears.
- Expand the option SQL Server Network Configuration. Select Protocols for (your server name). Select TCP/IP and right click. In the contextual menu, choose Enable. Click OK to restart the service.
After restarting the service, change the Start mode. In the SQL Server Configuration Manager window:
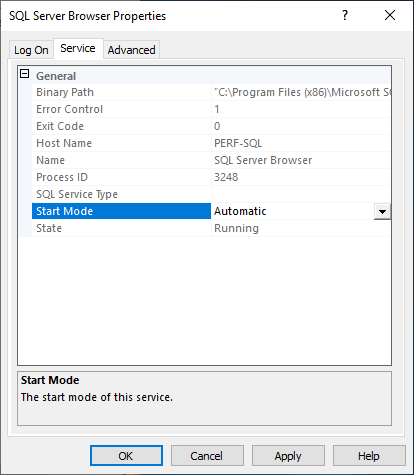
- Select SQL Server Services. In the right pane, right-click the SQL Server Browser option to expose a contextual menu.
- Choose Properties.
- In the Service tab, change the Start Mode to Automatic.
- Click OK.
- Select the SQL Server Browser and right-click to open a contextual menu. Click Start.
- Select the SQL Server service that corresponds to the instance and right-click to open a contextual menu. Click Restart.
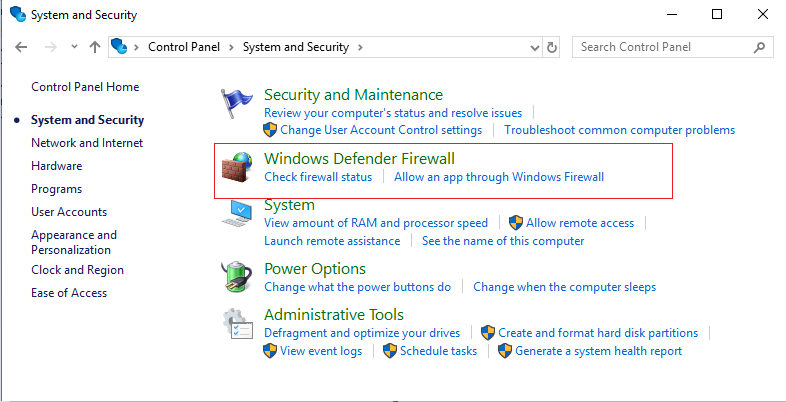
Create an exception for SQL Server in Windows Firewall
Use the information in this section to create an exception for SQL Server in environments using the Windows Firewall:
- Open the Control panel and select System and Security.
-
Select Windows Defender Firewall:
-
Click Allow an app or feature through Windows Defender Firewall. Turn on Windows Firewall:
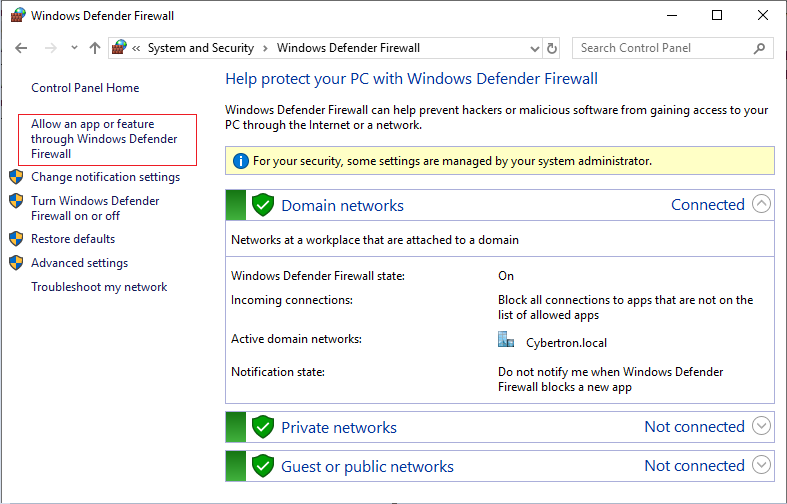
-
In the Allow apps to communicate through Windows Defender Firewall window, click Allow another app…:
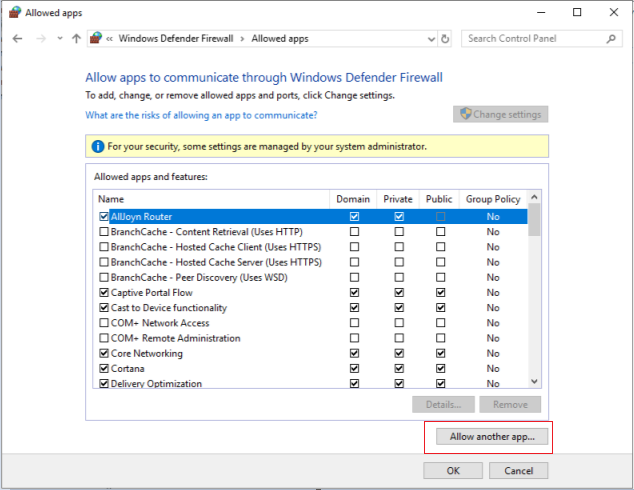
- In the Add an app screen, click Browse.
-
Browse to the SQL Service
sqlserver.exeand click Open. The default path tosqlserver.exeis:- SQL 2019 –
C:\Program Files\Microsoft SQL Server\MSSQL15.<SQL Instance Name>\MSSQL\Binn - SQL 2017 –
C:\Program Files\Microsoft SQL Server\MSSQL14.<SQL Instance Name>\MSSQL\Binn
- SQL 2019 –
- Click Add:

- Repeat steps 4–7 for
C:\Program Files (x86)\Microsoft SQL Server\90\Shared\sqlbrowser.exe. - Click OK.
Enable secure connection from provisioning server to SQL server
SQL server, license server, and provisioning server can be configured to enable secure connection.
Use the information in this section to establish a secure connection to the SQL server.
On the SQL server computer:
- Obtain a server certificate with a private key that can be used as the SQL server’s server certificate. You can obtain the server certificate from a trusted authority or use a self-signed certificate. The server certificate and private key should be in a
.PFXfile. The common name must be the FQDN of the SQL server computer. - Import the certificate and the key in the personal certificates folder of the local computer certificate store on the SQL server computer.
- Give the SQL server access to the certificate and key.
- Do the following to configure the SQL server to force secure connections.
- Run the SQL Server Configuration Manager.
- From the left pane, select SQL Server Network Configuration > Protocols for instance.
- Right-click to select Properties.
- In the Flags tab, set Force Encryption to Yes.
- In the Certificate tab, select the server certificate from the drop-down list. If this certificate is not in the list, then verify that it was imported as described.
- Click OK and restart the SQL server service for the instance.
On the Citrix Provisioning server computer:
- Deploy the necessary certificate authority certificates that are required to trust the server certificate.
- If the authority is not trusted:
- Obtain the authority certificate.
- Import that certificate into the Trusted Root Certificate Authorities folder of the local computer certificate store.
- If the server certificate is self-signed:
- On the SQL server computer, export the certificate only into a certificate file.
- Copy this certificate to the Citrix Provisioning server computer.
- Import this certificate into the Trusted Root Certificate Authorities folder of the local computer certificate store.
- If the authority is not trusted:
- Configure the provisioning server to connect to the SQL server using the same name as in the certificate, which is the FQDN of the SQL server computer. If necessary, run the Configuration Wizard, and join the Farm again. Using this method, you can change the database server name.
Kerberos security
By default, the Citrix Provisioning console, Imaging wizard, PowerShell snap-in, and MCLI use Kerberos authentication when communicating with the SOAP Service in an Active Directory environment. Part of the Kerberos architecture is for a service to register (create a service principal name, SPN) with the domain controller (Kerberos Key Distribution Center). The registration is essential because it allows Active Directory to identify the account that the SOAP service is running in. If the registration is not performed, the Kerberos authentication fails and Citrix Provisioning falls back to using NTLM authentication.
However, NTLM is considered insecure and vulnerable to attack and might be disabled in an environment.
For environments where NTLM is disabled, it is required to configure the SPN to authenticate the SOAP services. SOAP services could run as a domain user or Network Service, each with different SPN requirements. However, the support for running SOAP services as Network Service is being deprecated from Citrix Provisioning version 2503.1. It is therefore necessary that SPNs for the SOAP services be associated with the domain account that runs the SOAP services. For each PVS server, two SPNs are created and these are set on the AD account that is used for the SOAP Services:
-
PVSSoap/<PVS-server-fqdn>, and PVSSoap/<PVS-server-hostname>
The Configuration Wizard can create these SPNs for the SOAP services which means that Kerberos is always used. However, the Configuration Wizard must be run by a user that is a member of the Domain Administrators group. If the Configuration Wizard is run using a user who is not a member of the Domain Administrators group, then ask a domain administrator to create the SPNs as follows:
For each Citrix Provisioning Server, run:
setspn -S PVSSoap/X-fqdn -U Y\Z
setspn -S PVSSoap/X-hostname -U Y\Z
<!--NeedCopy-->
Where, X is the Citrix Provisioning Server and Y\Z is the domain account that the services will run as on that server.