Using the Imaging Wizard to create a virtual disk
Use the Imaging Wizard to automatically create the base virtual disk image from a master target device.
Prerequisites
Windows NT 6.x:
The Citrix Provisioning™ Imaging Wizard provides a block-based cloning solution along with the Volume Shadow Copy Service (VSS).
- Each local disk partition is cloned separately to the virtual disk. If there is a separate System Reserved partition on the local disk, it must be included as a source partition.
- Each destination partition must be equal to or larger than the source partition, regardless of the amount of available free space in the source partition. Consider:
- If a larger destination partition is needed, after imaging completes, use Windows disk management “Extend Volume…”
- If a smaller destination partition is needed, before imaging, the source partition can be resized using Windows disk management “Shrink Volume…”
Tip:
If a Windows reboot request message displays before the imaging process completes, ignore the request until imaging completes successfully.
Imaging Wizard limitations
The Citrix Provisioning Imaging Wizard has the following limitations:
- Choose a different name for the target device. This name is different from the host name representing the master VM you are running.
- If the master VM is a domain member, manually create a computer account for it before rebooting the master VM from the generated vDisk.
- Remember to change the cache type of the generated vDisk from Private to Production before using it to stream target devices.
Imaging
The Imaging Wizard prompts for farm connection information. It includes information necessary to set the appropriate credentials/Active Directory and licensing information. This information is applied to the virtual disk.
- From the master target device’s Windows Start menu, select Citrix>Citrix Provisioning > Imaging Wizard. The Wizard’s Welcome page appears.
- Click Next. The Connect to Farm page appears.
- Enter the hostname of a Citrix Provisioning server within the farm. Include the port used to make that connection. If you want to use a numeric IP address, then you must configure the DNS reverse lookup zones to translate the IP address to a hostname.
- Use the Windows credentials (default), or enter different credentials, then click Next. If using Active Directory, enter the appropriate password information.
- On the Microsoft Volume Licensing page, select the volume license option to use for target devices. Or, alternately select None if volume licensing is not being used.
- Select to create a virtual disk (default), or use an existing virtual disk by entering that virtual disk’s name, then click Next.
- If the Create virtual disk option was selected, the New vDisk dialog displays:
- Enter a name for the virtual disk.
- Select the Store where this virtual disk resides.
- Select the vDisk format from the appropriate menus. If the VHDX format is Dynamic, from the VHDX block size menu, select the block size as either 2 MB or 16 MB.
- Click Next, then define volume sizes on the Configure Image Volumes page.
- Click Next. The Add Target Device page appears.
- Select the target device name. Include the MAC address associated with one of the NICs. This MAC address that selected when the target device software was installed on the master target device. Also include the collection to add this device to. Click Next. If the target device is already a member of the farm, the Existing Target Devices page appears.
- Click Next. A Summary of Farm Changes appears.
- Optionally (unless the virtual disk is used to boot the VMs) select to optimize the virtual disk for use with Citrix Provisioning.
- Verify all changes, then click Finish. A confirmation message displays.
- Click Yes on the confirmation message to start the imaging process.
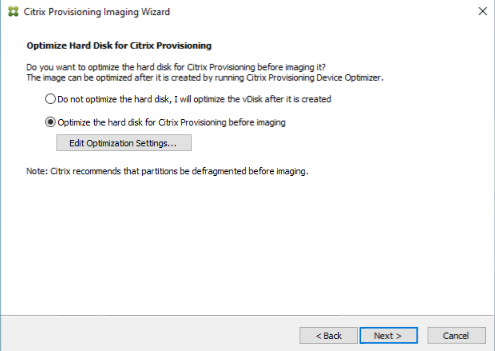
Optimize the hard disk
You can optimize the hard disk before imaging. This process reduces I/O instances to improve write cache functionality.
To access optimization options using the Citrix Provisioning Imaging Wizard:
- Click the master target device’s Windows Start menu.
- Select Citrix > Citrix Provisioning Device Optimizer.
- In the Optimize Hard Disk for Citrix Provisioning screen, select Optimize the hard disk for Citrix Provisioning before imaging.
- Click Edit Optimization Settngs to access more configuration options.