Stores
A store is the logical name for the physical location of the virtual disk folder. This folder can exist on a local server or on a shared storage device. When virtual disk files are created in the Citrix Provisioning™ console, they are assigned to a store. Within a site, one or more Citrix Provisioning servers are given permission to access that store to serve virtual disks to target devices.
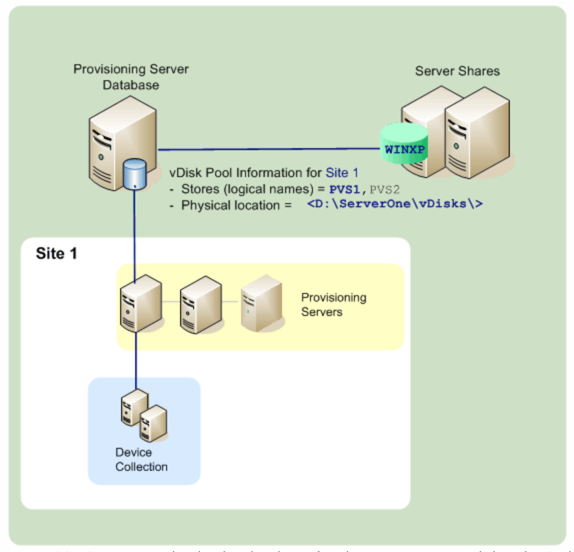
A provisioning server checks the database for the store name and the physical location where the virtual disk resides, then provides it to the target device.
Separating the physical paths to a virtual disk storage location allows for greater flexibility within a farm configuration. Particularly if the farm is configured to be highly available. In a highly available implementation, if the active provisioning server in a site fails, the target device can get its virtual disk from another server that has access to the store and permissions to serve it.
If necessary, copies of virtual disks are maintained on a secondary shared storage location if that connection to the primary shared storage location is lost. In this case, the default path is set in the store properties if all provisioning servers can use the same path to access the store. If a particular server cannot use the path then an override path can be set in the store properties for that particular server. Use an override path when the default path is not valid for that server. This does not occur because of a connection loss, but because the path is not valid. Provisioning servers always use the default path if the override path does not exist in the database.
Store administrative privileges
Stores are defined and managed at the farm level by a farm administrator. Access or visibility to a store depends on the users administrative privileges:
- Farm administrators have full access to all stores within the farm.
- Site administrators have access to only those stores owned by the site.
- Device administrators and device operators have read-only access. Site administrators also have read-only access if that store exists at the farm level, or if that store belongs to another site.
Creating a store
-
In the Citrix Provisioning console tree, right-click on Stores, then select the Create store menu option. The Store Properties dialog appears.
-
On the General tab, type the store name and a description of this store. The store name is the logical name for this storage location.
-
Optionally, select the site that acts as the owner of this store. Otherwise, accept the default <None> so that only farm administrators can manage this store.
-
On the Servers tab, select a site from the list. All provisioning servers in that site appear.
-
Check the box next to each server that is permitted to access this store. If the store is only for a specific site, only those servers within that site are valid selections. Also, if the default path is not valid for a selected server, an override path must be defined for that server on the Server Properties dialogs Store tab. Repeat this step for each site if necessary. If the site administrator performs this procedure, only those sites that they administer appear.
-
On the Paths dialog, type or browse for the default path for this store. The path represents the physical location of the virtual disk folder. Optionally, a new folder can be created by clicking the Browse button, and then clicking Create New Folder. If the user is a site administrator, only those sites that they administer are available in the list.
-
The write cache path for the selected store display under the paths list. Optionally, a new store cache folder can be created by clicking the Browse button, and then clicking Create New Folder. More write cache paths can be added for use by the store by clicking Add. Entering more than one write cache paths allows for virtual disk load to be distributed to physically different drives. When a target device first connects, the Stream Service picks from the list. When using high availability, the order of the write-cache paths for any override paths in store properties for that server must match. The order of the write-cache paths specified must be the same.
If a write cache path is not selected and the OK button is clicked, the user is prompted to create the default write cache path. Click OK on this message to create the default write cache path,
C:\pvsstore\WriteCache. -
After configuring the store and paths used by the store, click Validate to open the Validate Store Paths dialog and validate the path settings.
-
Under the Status column, view the path validation results. Click Close to close this dialog and return to the Store Properties dialog to make any necessary changes or to continue.
-
Click OK to save property settings.
Store properties
Create a store by running the Configuration Wizard or in the Store Properties dialog. The store properties dialog allows you to:
- name and provide a description of the store.
- select the owner of the store, the site which manages the store.
- provide a default path to the store, the physical path to the virtual disk.
- define default write cache paths for this store.
- select the servers that can provide this store.
After a store is created, store information is saved in the Citrix Provisioning database. Each site has one virtual disk pool, which is a collection of virtual disk information required by Citrix Provisioning servers that provide vDisks in that site. The virtual disk information can be added to the virtual disk pool using the vDisk Properties dialog or by scanning a store for new vDisks that have not yet been added to the database.
The Store Properties dialog includes the following tabs:
General:
-
Name:
- View, type the logical name for this store. For example, Provisioning-1.
- View or type a description of this store.
- Description: View or type a description for this store.
- Site that acts as owner of this store: Optional. View or scroll to select the site that acts as owner of this store. This feature allows a farm administrator to give one site’s administrators, special permission to manage the store. These rights are normally reserved for farm administrators.
Paths:
-
Default store path: View, type, or browse for the physical path to the virtual disk folder that this store represents. The default path is used by all provisioning servers that do not have an override store path set.
Note:
If you are setting an override store path in the Server Properties dialog, the path must be set before creating a version of the virtual disk. Because this path information is stored and referenced in the .vhdx header information, changing the path after versioning can cause unexpected results.
- Default write cache paths: View, add, edit, remove, or move the default write cache paths for this store. Entering more than one write cache path allows for virtual disk load to be distributed to physically different drives. When a target device first connects, the Stream Service picks from the list. The order of the write cache paths, for any override paths in the server store properties, must match the order of the write cache paths specified here.
- Validate: Click to validate store path selections from the Validate Store Paths dialog. The validation results display under the Status column.
Servers:
- Site: View or scroll to select the site where provisioning servers that can access this store exist. Multiple sites can access the same store.
- Servers that provide this store: All provisioning servers within the selected site display in this list. Check the box next to all servers that are permitted to access this store. If the store is only for a specific site, only those servers within that site are valid selections. If the default path is not valid for a selected provisioning server, you must define an override path in that server properties dialog, on the Store tab.
- Validate: Click to validate store path selections from the Validate Store Paths dialog. The validation results display under the Status column.