Infrastructure services
There is one Windows infrastructure service: Citrix WEM Infrastructure Service(NT SERVICE\Citrix WEM Infrastructure Service). It manages Workspace Environment Management (WEM) infrastructure services.
Account requirements: Use NetworkServicem or a specified user account that is a member of the Administrator group on the infrastructure server where the service runs.
Install the infrastructure services
Important:
- The WEM infrastructure services cannot be installed on a domain controller. Kerberos authentication issues prevent the infrastructure services from working in this scenario.
- Do not install the infrastructure services on a server where the Delivery Controller™ is installed.
Usage data collection notice:
- By default, the infrastructure services collect anonymous analytics on WEM usage each night and sends it immediately to the Google Analytics server through HTTPS. Analytics collection complies with the Citrix Privacy Policy.
- Data collection is enabled by default when you install or upgrade the infrastructure services. To opt out, in the WEM Infrastructure Service Configuration dialog Advanced Settings tab, select the Do not help improve Workspace Environment Management™ using Google Analytics option.
To Install the infrastructure services, run Citrix Workspace Environment Management Infrastructure Services.exe on your infrastructure server. The PowerShell SDK module is installed by default. By default, the infrastructure service is installed into the following folder: C:\Program Files (x86)\Citrix\Workspace Environment Management Infrastructure Services. For SDK documentation, see Citrix Developer Documentation.
You can choose a silent installation or upgrade of the infrastructure services. For example:
-
.\Citrix Workspace Environment Management Infrastructure Services.exe
/quiet BrokerLocation="C:\test\Infrastructure Services" /log "C:\test\test.log" -
/quiet BrokerLocation="C:\test\Infrastructure Services" /log "C:\test\test.log"-
/quiet. Indicates silent mode. -
/log. Indicates logging file location. -
BrokerLocation. Indicates the installation path for infrastructure services.
-
Create a service principal name
Important:
- When you use load balancing, all instances of the infrastructure services must be installed and configured using the same service account name.
- Windows authentication is a specific method of authentication for SQL instances that use AD. The other option is to use a SQL account instead.
After the installer finishes, create an SPN for the infrastructure service. In WEM, connection and communication between agent, infrastructure service, and domain controller are authenticated by Kerberos. SPNs are used by Kerberos authentication to associate a service instance with a service logon account. The relationship must be configured between the logon account of the infrastructure service instance and the account registered with the SPN. Therefore, to comply with the Kerberos authentication requirements, configure the WEM SPN to associate it with a known AD account by using the command that is suited to your environment:
-
If you do not use Windows authentication or load balancing, use the following command:
setspn -C -S [SPN name] [hostname]
where
hostnameis the name of the infrastructure server. -
If you use Windows authentication or load balancing (requiring Windows authentication), use the following command:
setspn -U -S [SPN name] [accountname]
where
accountnameis the name of the service account that is being used for Windows authentication. -
The default value for
[SPN name]isNorskale/BrokerService. If multiple WEM deployments are in the same forest, you may need to configure several SPNs by adding the following registry values:-
setspn -C -S [SPN name] [hostname]orsetspns -U -S [SPN name] [accountname] -
For Agent Machine: HKEY_LOCAL_MACHINE\SYSTEM\CurrentControlSet\Control\Norskale\Agent Host
-
For infrastructure and console machine: HKEY_LOCAL_MACHINE\SYSTEM\CurrentControlSet\Control\Norskale\Infrastructure Services
- Name: AlternativeSPN
- Type: REG_SZ
- Value: the actual value for the [SPN name]
-
SPNs are case sensitive.
Group Managed Service Account
You can implement a group Managed Service Account (gMSA) solution for WEM. With a gMSA solution, services can be configured for the new gMSA principal and the password management is handled by Windows. For information, see https://docs.microsoft.com/en-us/windows-server/security/group-managed-service-accounts/group-managed-service-accounts-overview. When a gMSA is used as a service principle, the Windows operating system manages the password for the account instead of relying on administrators to manage it. Doing so eliminates the need to change Windows account impersonation settings you configured for the infrastructure service if you change the password for the account later.
To implement a gMSA solution for WEM, follow these steps:
-
If you already have an existing gMSA, do the following:
-
Bind the Citrix WEM SPN with the account using the following command:
setspn -C -S Norskale/BrokerService [gMSA]$
where
gMSAis the name of the gMSA account. -
Add the relevant machines to the account using the following command:
Set-ADServiceAccount -Identity [gMSA] -PrincipalsAllowedToRetrieveManagedPassword [hostname]
where the [hostname] is the name of the infrastructure server.
-
-
If you do not have a gMSA, go to your domain controller, create one, and then bind the Citrix WEM SPN with it. Use the following command:
New-ADServiceAccount [gMSA] -DNSHostName [hostname 1] -PrincipalsAllowedToRetrieveManagedPassword [hostname 2], [hostname 3] -KerberosEncryptionType RC4, AES128, AES256 -ServicePrincipalNames Norskale/BrokerService
where [hostname 1] is the name of the DNS server.
where [hostname 2], [hostname 3] are the names of the infrastructure server.
For more information about creating a gMSA, see https://docs.microsoft.com/en-us/windows-server/security/group-managed-service-accounts/getting-started-with-group-managed-service-accounts.
-
Configure a gMSA manually.
- Enable the account to access the database.
- On your primary SQL Server, navigate to Security > Logins, right-click Logins, and then select New Login.
- In the Login - New window, click Search.
- In the Select User or Group window, configure the settings as follows and click OK to exit the window.
- Object Types. Select only Service Accounts.
- Locations. Select Managed Service Accounts.
- Object name. Type the account name that you created in Step 1.
- On the User Mapping page, select the database to which you want to apply gMSA and then select db-owner as the role membership for the database.
- On the Status page, verify that the Grant and Enabled options are selected.
- Click OK to exit the Login - New window.
- Use the service account that you added to start the Citrix WEM Infrastructure Service.
- On your infrastructure server, open the Windows Services manager, right-click the Citrix WEM Infrastructure Service, and then select Properties.
- On the Log On page, select This account, click Browse, and configure settings as described in the third substep of Step 3.
- Click OK to exit the Citrix WEM Infrastructure Service Properties window.
- In the Windows Services manager, restart the Citrix WEM Infrastructure Service.
Note:
Alternatively, you can configure the account using the WEM GUI. See Create a WEM database and Configure the infrastructure service.
- Enable the account to access the database.
Configure load balancing
Tip:
The Load balancing with Citrix ADC article provides details of how to configure a Citrix ADC appliance to load balance incoming requests from the WEM administration console and the WEM agent.
To configure WEM with a load balancing service:
-
Create a Windows infrastructure service account for the WEM infrastructure service to connect to the WEM database.
-
When you create the WEM database, select the Use Windows authentication for infrastructure service database connection option and specify the infrastructure service account name. For more information, see Create a Workspace Environment Management database.
-
Configure each infrastructure service to connect to the SQL database using Windows authentication instead of SQL authentication: select the Enable Windows account impersonation option and provide the infrastructure service account credentials. For more information, see Configure the Infrastructure Service.
-
Configure the SPNs for the WEM infrastructure services to use the infrastructure service account name. For more information, see Create a service principal name.
Important:
Decide whether to use a service account or machine account before deploying a WEM environment. After a WEM environment is already deployed, you cannot switch back. For example, if you want to load balance incoming requests after you already use the machine account, you must use the machine account instead of the service account.
-
Create a virtual IP address (VIP) that covers the number of infrastructure servers you want to put behind a VIP. All the infrastructure servers covered by a VIP are eligible when agents connect to the VIP.
-
When you configure the Agent Host Configuration GPO, set the infrastructure server setting to the VIP instead of the address for any individual infrastructure server. For more information, see Install and configure the agent.
-
Session persistence is required for the connection between administration consoles and the infrastructure service. (Session persistence between the agent and the infrastructure service is not required.) We recommend that you directly connect each administration console to an infrastructure service server rather than using the VIP.
Create a Workspace Environment Management database
Tip:
You can also create the database using the WEM PowerShell SDK module. For SDK documentation, see Citrix Developer Documentation.
Note:
- If you are using Windows authentication for your SQL Server, run the database creation utility under an identity that has sysadmin permissions.
- Citrix recommends that you configure the primary file (.mdf file) of the WEM database with a default size of 50 MB.
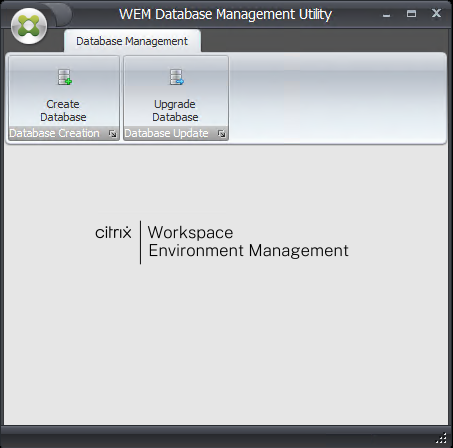
Use the WEM Database Management Utility to create the database. This is installed during the infrastructure services installation process, and it starts immediately afterwards.
-
If the Database Management Utility is not already open, from the Start menu select Citrix>Workspace Environment Management>WEM Database Management Utility.
-
Click Create Database, then click Next.
-
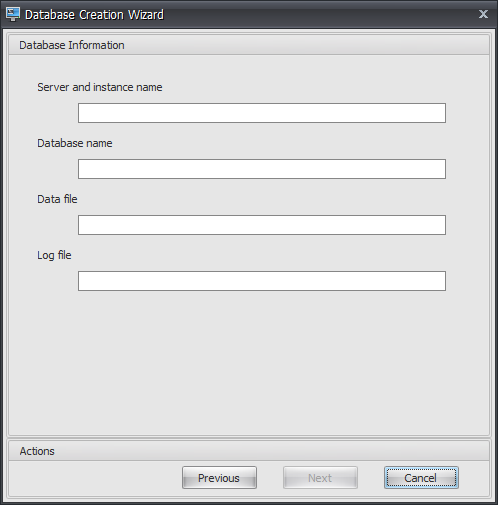
Type the following Database Information, then click Next:
-
Server and instance name. Address of the SQL Server on which the database will be hosted. This address must be reachable exactly as typed from the infrastructure server. Type the server and instance name as the machine name, fully qualified domain name, or IP address. Specify a full instance address as serveraddress,port\instancename. If the port is unspecified the default SQL port number (1433) is used.
-
Database name. Name of the SQL database to create.
Note:
Special characters such as hyphens (-) and dashes (/) are not allowed in the database name.
-
Data file: path to the .mdf file location on the SQL Server.
-
Log file: path to the .ldf file location on the SQL Server.
Note:
The database management utility cannot query your SQL Server for the default location of the data and log files. They default to the default values for a default installation of MS SQL Server. Make sure that the values in these two fields are correct for your MS SQL Server installation or the database creation process will fail.
-
-
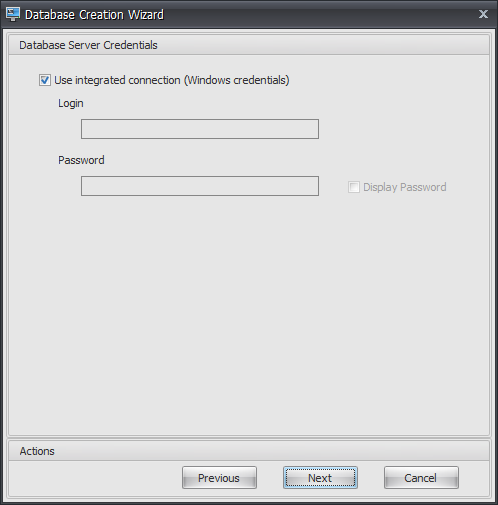
Provide Database Server Credentials which the wizard can use to create the database, then click Next. These credentials are independent from the credentials that the infrastructure service uses to connect to the database after it is created. They are not stored.
The option Use integrated connection is selected by default. It allows the wizard to use the Windows account of the identity it is running under to connect to SQL and create the database. If this Windows account does not have sufficient permissions to create the database, you can either run the database management utility as a Windows account with sufficient privileges, or you can clear this option and provide an SQL account with sufficient privileges instead.
-
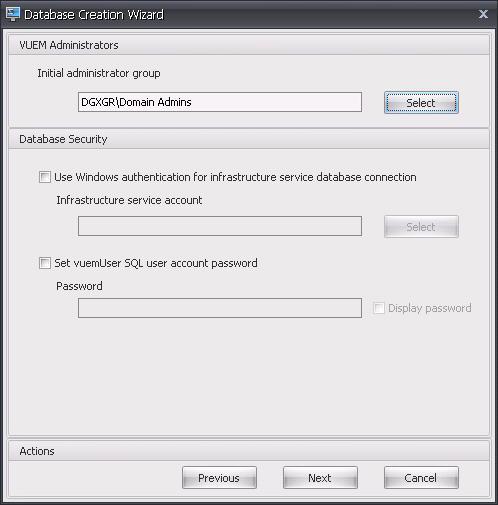
Enter VUEM Administrators and Database Security details, and then click Next. The credentials you provide here are used by the infrastructure service to connect to the database after it is created. They are stored in the database.
- Initial administrator group. This user group is pre-configured as Full Access administrators for the Administration Console. Only users configured as Workspace Environment Management administrators are allowed to use the administration console. Specify a valid user group or you will not be able to use the administration console yourself.
Note:
By default, LDAP is used when browsing the account. To enforce secure communication over LDAPS, add the following registry entry:
- Path:
HKEY_LOCAL_MACHINE\SOFTWARE\Citrix\WEM - Name:
EnableLDAPS - Type:
REG_SZ - Value:
1
- Use Windows authentication for infrastructure service database connection. When this option is cleared (the default) the database expects the infrastructure service to connect to it using the vuemUser SQL user account. The vuemUser SQL user account is created by the installation process. This requires Mixed-Mode Authentication to be enabled for the SQL instance.
When this option is selected, the database expects the infrastructure service to connect to it using a Windows account. In this case the Windows account you select must not already have a login on the SQL instance. In other words, you cannot use the same Windows account to run the infrastructure service as you used to create the database.
To select a gMSA, follow the same steps as selecting an AD user.
- Set vuemUser SQL user account password. By default, the vuemUser SQL account is created with an 8-character password which uses upper and lower case letters, digits, and punctuation. Select this option if you want to enter your own vuemUser SQL account password (for example, if your SQL policy requires a more complex password).
Important:
- You must set the vuemUser SQL user account password if you intend to deploy the Workspace Environment Management database in an SQL Server Always On availability group.
- If you set the password here, remember to specify the same password when you configure the infrastructure service.
-
In the summary pane, review the settings you have selected, and when you are satisfied click Create Database.
-
When you are notified that the database creation has completed successfully, click Finish to exit the wizard.
If an error occurs during the database creation, check the log file “Citrix WEM Database Management Utility Debug Log.log” in the Logs folder under the infrastructure services installation directory.
Configure the infrastructure service
Tip:
You can also configure the infrastructure service using the Workspace Environment Management PowerShell SDK module. For SDK documentation, see Citrix Developer Documentation.
Before the infrastructure service runs, you must configure it using the WEM Infrastructure Service Configuration utility, as described here.
-
From the Start menu select Citrix > Workspace Environment Management > WEM Infrastructure Service Configuration Utility.
-
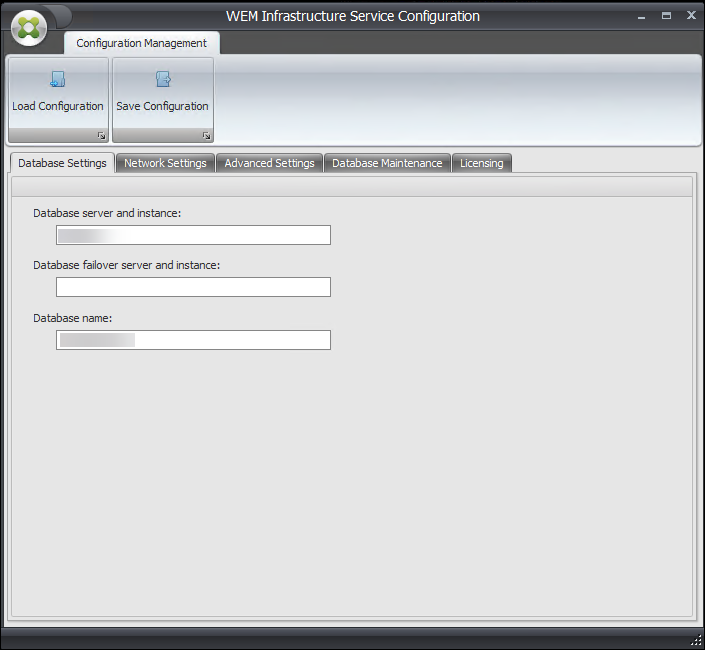
In the Database Settings tab enter the following details:
-
Database server and instance. Address of the SQL Server instance on which the Workspace Environment Management database is hosted. This must be reachable exactly as typed from the infrastructure server. Specify a full instance address as “serveraddress, port\instancename”. If the port is unspecified the default SQL port number (1433) is used.
-
Database failover server and instance. If you are using database mirroring, specify the failover server address here.
-
Database name. Name of the Workspace Environment Management database on the SQL instance.
-
-
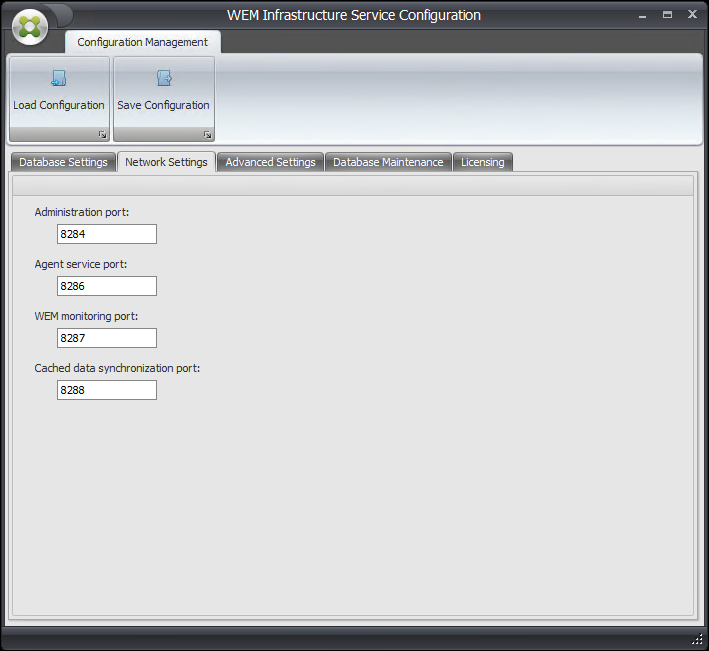
In the Network Settings tab type the ports the infrastructure service uses:
-
Administration port. This port is used by the administration console to connect to the infrastructure service.
-
Agent service port. This port is used by your agent hosts to connect to the infrastructure service.
-
Cache synchronization port. This port is used by the agent service to synchronize its cache with the infrastructure service.
-
WEM monitoring port. [Not currently used.]
-
-
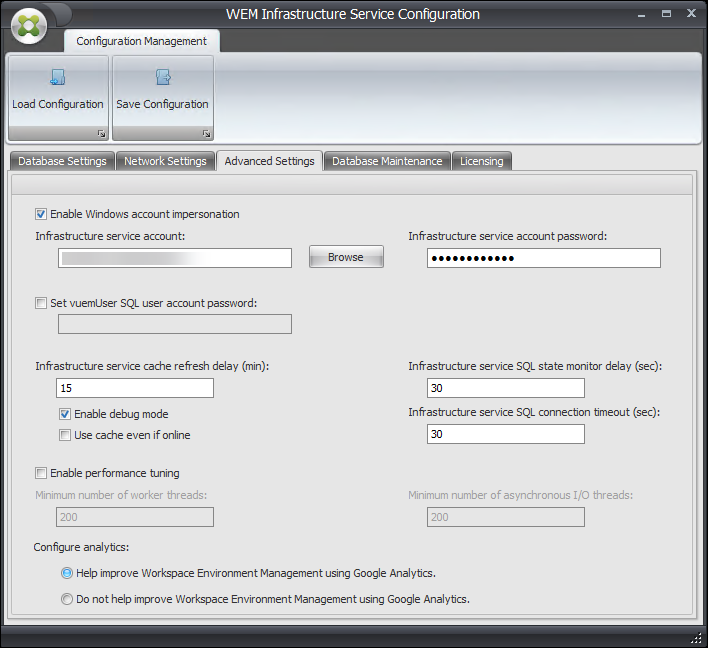
In the Advanced Settings tab, enter impersonation and automatic refresh settings.
-
Enable Windows account impersonation. By default, this option is cleared and the infrastructure service uses mixed-mode authentication to connect to the database (using the SQL account vuemUser created during database creation). If you instead selected a Windows infrastructure service account during database creation, you must select this option and specify the same Windows account for the infrastructure service to impersonate during connection. The account you select must be a local administrator on the infrastructure server.
To select a gMSA, follow the same steps as selecting an AD user.
Note:
By default, LDAP is used when browsing the account. To enforce secure communication over LDAPS, add the following registry entry:
- Path:
HKEY_LOCAL_MACHINE\SOFTWARE\Citrix\WEM - Name:
EnableLDAPS - Type:
REG_SZ - Value:
1
-
Set vuemUser SQL user account password. Allows you to inform the infrastructure service of a custom password configured for the vuemUser SQL user during database creation. Only enable this option if you provided your own password during database creation.
-
Infrastructure service cache refresh delay. Time (in minutes) before the infrastructure service refreshes its cache. The cache is used if the infrastructure service is unable to connect to SQL.
-
Infrastructure service SQL state monitor delay. Time (in seconds) between each infrastructure service attempt to poll the SQL server.
-
Infrastructure service SQL connection timeout. Time (in seconds) which the infrastructure service waits when trying to establish a connection with the SQL server before terminating the attempt and generating an error.
-
Enable debug mode. If enabled, the infrastructure service is set to verbose logging mode.
-
Use cache even if online. If enabled, the infrastructure service always reads site settings from its cache.
-
Enable performance tuning. Lets you optimize the performance in scenarios where the number of connected agents exceeds a certain threshold (by default, 200). As a result, it takes a shorter time for the agent or the administration console to connect to the infrastructure service.
- Minimum number of worker threads. Specifies the minimum number of worker threads that the thread pool creates on demand. Set the number of worker threads in the range of 30-3000. Determine the value based on the number of connected agents. By default, the minimum number of worker threads is 200.
- Minimum number of asynchronous I/O threads. Specifies the minimum number of asynchronous I/O threads that the thread pool creates on demand. Set the number of asynchronous I/O threads in the range of 30-3000. Determine the value based on the number of connected agents. By default, the minimum number of asynchronous I/O threads is 200.
Important:
This feature is especially useful when the agent or the administration console intermittently disconnects from the infrastructure service.
Note:
The values you set in the Enable performance tuning fields are used when new requests are made and before switching to an algorithm for managing thread creation and destruction. For more information, see https://docs.microsoft.com/en-us/dotnet/api/system.threading.threadpool.setminthreads?view=netframework-4.8 and https://support.microsoft.com/en-sg/help/2538826/wcf-service-may-scale-up-slowly-under-load.
-
Help improve Workspace Environment Management using Google Analytics. If selected, the infrastructure service sends anonymous analytics to the Google Analytics server.
-
Do not help improve Workspace Environment Management using Google Analytics. If selected, the infrastructure service does not send anonymous analytics to the Google Analytics server.
Important:
Starting with 2212, Workspace Environment Management determines which option to select based on the region of the machine hosting the infrastructure service. If the machine resides in non-European regions, the first option is selected. If the machine resides in European regions, the second option is selected. The behavior applies only to fresh installations.
-
-
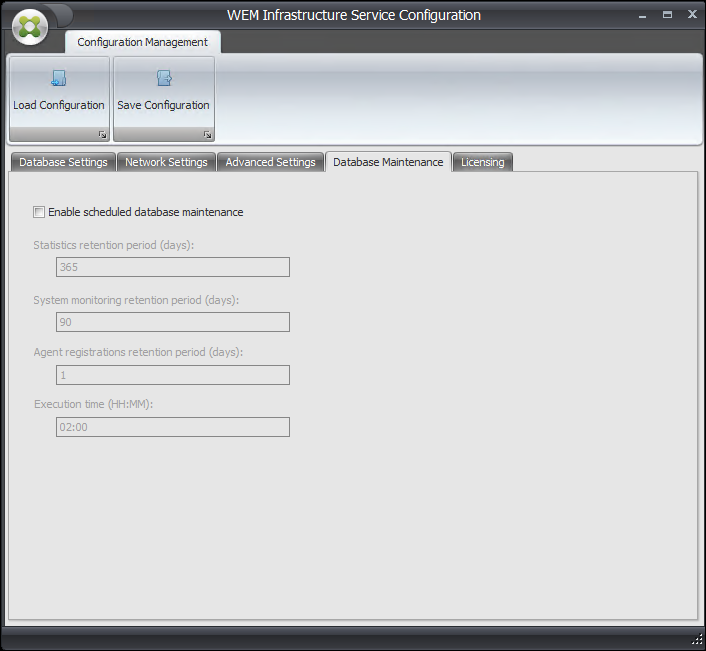
You can use the Database Maintenance tab to configure database maintenance.
-
Enable scheduled database maintenance. If enabled, this setting deletes old statistics records from the database at periodic intervals.
-
Statistics retention period. Determines how long user and agent statistics are retained. The default is 365 days.
-
System monitoring retention period. Determines how long system optimization statistics are retained. The default is 90 days.
-
Agent registrations retention period. Determines how long agent registration logs are retained in the database. The default is 1 day.
-
Execution time. Determines the time at which the database maintenance action is performed. The default is 02:00.
Tip
As a best practice, we recommend that you enable scheduled database maintenance to reduce the database size and achieve the best performance. If there is more than one infrastructure service in a single WEM deployment, enable it only for one infrastructure service.
-
-
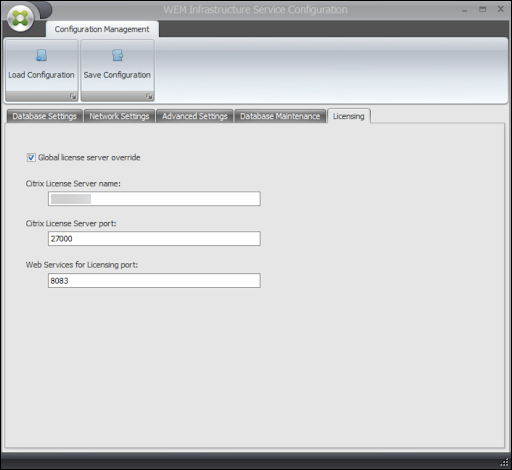
You can optionally use the Licensing tab to specify a Citrix License Server during infrastructure service configuration. If you do not, when an administration console connects to a new Workspace Environment Management database for the first time, you must enter the Citrix License Server credentials in the About tab of the administration console ribbon. The Citrix License Server information is stored in the same location in the database in both cases.
-
Global license server override. Select this option to specify the Citrix License Server details for Workspace Environment Management. Enter the Citrix License Server name, Citrix License Server port, and Web Services for Licensing port (also called the License Activation Service port). These settings override any existing Citrix License Server information stored in the Workspace Environment Management database.
-
-
Click Save Configuration to save your settings.
-
To activate Workspace Environment Management (WEM) using the License Activation Service (LAS), click Accept in the dialog box to approve its security certificate.
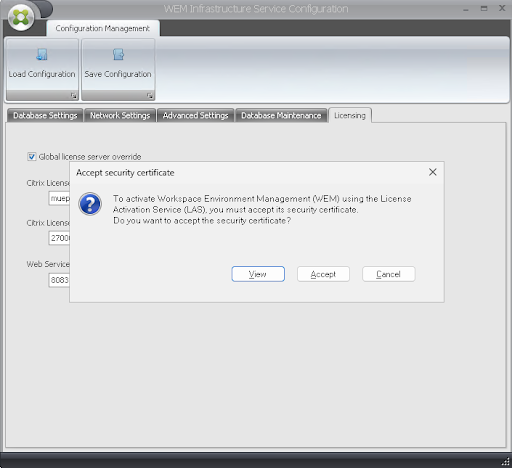
Note:
If the LAS is unavailable, WEM falls back to the legacy Citrix License Server for activation.