Security
These settings let you control user activities within Workspace Environment Management.
Application security
Important:
To control which applications users can run, use the Windows AppLocker interface or Workspace Environment Management. You can switch between these approaches at any time but we recommend that you do not use both approaches at the same time.
These settings let you control the applications users are permitted to run by defining rules. This functionality is similar to Windows AppLocker.
When you use Workspace Environment Management to manage Windows AppLocker rules, the agent processes (converts) Application Security tab rules into Windows AppLocker rules on the agent host. If you stop the agent processing rules, they are preserved in the configuration set and AppLocker continues running by using the last set of instructions processed by the agent.
Application security
This tab lists the application security rules in the current Workspace Environment Management configuration set. You can use Find to filter the list according to a text string.
When you select the top-level item “Application Security” in the Security tab, the following options become available to enable or disable rule processing:
-
Process Application Security Rules. When selected, the Application Security tab controls are enabled and the agent processes rules in the current configuration set, converting them into AppLocker rules on the agent host. When not selected, the Application Security tab controls are disabled and the agent does not process rules into AppLocker rules. (In this case AppLocker rules are not updated.)
Note:
This option is not available if the Workspace Environment Management administration console is installed on Windows 7 SP1 or Windows Server 2008 R2 SP1 (or earlier versions).
-
Process DLL Rules. When selected, the agent processes DLL rules in the current configuration set into AppLocker DLL rules on the agent host. This option is only available when you select Process Application Security Rules.
Important:
If you use DLL rules, you must create a DLL rule with “Allow” permission for each DLL that is used by all the allowed apps.
Caution:
If you use DLL rules, users may experience a reduction in performance. This happens because AppLocker checks each DLL that an app loads before it is allowed to run.
-
The Overwrite and Merge settings let you determine how the agent processes application security rules.
- Overwrite. Lets you overwrite existing rules. When selected, the rules that are processed last overwrite rules that were processed earlier. We recommend that you apply this mode only to single-session machines.
- Merge. Lets you merge rules with existing rules. When conflicts occur, the rules that are processed last overwrite rules that were processed earlier. If you need to modify the rule enforcement setting during merging, use overwrite mode because merge mode will keep the old value if it differs.
Rule collections
Rules belong to AppLocker rule collections. Each collection name indicates how many rules it contains, for example (12). Click a collection name to filter the rule list to one of the following collections:
- Executable Rules. Rules which include files with the .exe and .com extensions that are associated with an application.
- Windows Rules. Rules which include installer file formats (.msi, .msp, .mst) which control the installation of files on client computers and servers.
- Script Rules. Rules which include files of the following formats: .ps1, .bat, .cmd, .vbs, .js.
- Packaged Rules. Rules which include packaged apps, also known as Universal Windows apps. In packaged apps, all files within the app package share the same identity. Therefore, one rule can control the entire app. Workspace Environment Management supports only publisher rules for packaged apps.
- DLL Rules. Rules which include files of the following formats: .dll, .ocx.
When you filter the rule list to a collection, the Rule enforcement option is available to control how AppLocker enforces all rules in that collection on the agent host. The following rule enforcement values are possible:
Off (default). Rules are created and set to “off,” which means they are not applied.
On. Rules are created and set to “enforce,” which means they are active on the agent host.
Audit. Rules are created and set to “audit,” which means they are on the agent host in an inactive state. When a user runs an app that violates an AppLocker rule, the app is allowed to run and the information about the app is added to the AppLocker event log.
To import AppLocker rules
You can import rules exported from AppLocker into Workspace Environment Management. Imported Windows AppLocker settings are added to any existing rules in the Security tab. Any invalid application security rules are automatically deleted and listed in a report dialog.
-
In the ribbon, click Import AppLocker Rules.
-
Browse to the XML file exported from AppLocker containing your AppLocker rules.
-
Click Import.
The rules are added to the Application Security rules list.
To add a rule
-
Select a rule collection name in the sidebar. For example, to add an executable rule select the “Executable Rules” collection.
-
Click Add Rule.
-
In the Display section, type the following details:
- Name. The display name of the rule as it appears in the rule list.
- Description. Additional information about the resource (optional).
-
In the Type section, click an option:
- Path. The rule matches a file path or folder path.
- Publisher. The rule matches a selected publisher.
- Hash. The rule matches a specific hash code.
-
In the Permissions section, click whether this rule will Allow or Deny applications from running.
-
To assign this rule to users or user groups, in the Assignments pane, choose users or groups to assign this rule to. The “Assigned” column shows a “check” icon for assigned users or groups.
Tip:
- You can use the usual Windows selection modifier keys to make multiple selections, or use Select All to select all rows.
- Users must already be in the Workspace Environment Management Users list.
- You can assign rules after the rule is created.
-
Click Next.
-
Specify the criteria that the rule matches, depending on the rule type you choose:
- Path. Specify a file path or folder path that you want the rule to match. When you choose a folder, the rule matches all files inside and below that folder.
- Publisher. Specify a signed reference file that you want to use as a reference for the rule, and then use the Publisher Info slider to tune the level of property matching.
- Hash. Specify a file or folder from which you want to create a hash. The rule matches the hash code of the file.
-
Click Next.
-
Add any exceptions you require (optional). In Add exception, choose an exception type then click Add. (You can Edit and Remove exceptions as required.)
-
To save the rule, click Create.
To assign rules to users
Select one or more rules in the list, then click Edit in the toolbar or context menu. In the editor, select the rows containing the users and user groups you want to assign the rule to, then click OK. You can also unassign the selected rules from everyone using Select All to clear all selections.
Note: If you select multiple rules and click Edit, any rule assignment changes for those rules are applied to all users and user groups you select. In other words, existing rule assignments are merged across those rules.
To add default rules
Click Add Default Rules. A set of AppLocker default rules is added to the list.
To edit rules
Select one or more rules in the list, then click Edit in the toolbar or context menu. The editor appears allowing you to adjust settings which apply to the selection you made.
To delete rules
Select one or more rules in the list, then click Delete in the toolbar or context menu.
To back up application security rules
You can back up all application security rules in your current configuration set. Rules are all exported as a single XML file. You can use Restore to restore the rules to any configuration set. In the ribbon, click Backup then select Security Settings.
To restore application security rules
You can restore application security rules from XML files created by the Workspace Environment Management backup command. The restore process replaces the rules in the current configuration set with those rules in the backup. When you switch to or refresh the Security tab, any invalid application security rules are detected. Invalid rules are automatically deleted and listed in a report dialog, which you can export.
During the restore process, you can choose whether you want to restore rule assignments to users and user groups in your current configuration set. Reassignment only succeeds if the backed-up users/groups are present in your current configuration set/active directory. Any mismatched rules are restored but remain unassigned. After restore, they are listed in a report dialog which you can export in CSV format.
1. In the ribbon, click Restore to start the restore wizard.
2. Select Security settings, then click Next twice.
3. In Restore from folder, browse to the folder containing the backup file.
4. Select AppLocker Rule Settings, then click Next.
5. Confirm whether you want to restore rule assignments or not:
Yes. Restore rules and reassign them to the same users and user groups in your current configuration set.
No. Restore rules and leave them unassigned.
6. To start restoring, click Restore Settings.
Process management
These settings allow you to add specific processes to the allow list or block list.
Process management
Enable Process Management. Toggles whether process on the allow list or block list are in effect. If disabled, none of the settings on the Process BlackList and Process WhiteList tabs are taken into account.
Note:
This option only works if the session agent is running in the user’s session. To do this use the Main Configuration Agent settings to set the Launch Agent options (at Logon/at Reconnect/for Admins) to launch according to the user/session type, and set Agent Type to “UI”. These options are described in Advanced Settings.
Process block list
These settings let you add specific processes to the block list.
Enable Process Blacklist. Enable processing of processes on the block list. You must add processes by using their executable name (for example, cmd.exe).
Exclude Local Administrators. Excludes local administrator accounts.
Exclude Specified Groups. Lets you exclude specific user groups.
Process allow list
These settings let you add specific processes to the allow list. Process block lists and process allow lists are mutually exclusive.
Enable Process Whitelist. Enable processing of processes on the allow list. You must add processes by using their executable name (for example, cmd.exe). Note If enabled, Enable Process Whitelist automatically adds all processes not in the allow list to the block list.
Exclude Local Administrators. Excludes local administrator accounts (they are able to run all processes).
Exclude Specified Groups. Lets you exclude specific user groups (they are able to run all processes).
Privilege elevation
Note:
This feature does not apply to Citrix virtual apps.
The privilege elevation feature lets you elevate the privileges of non-administrative users to an administrator level necessary for some executables. As a result, the users can start those executables as if they are members of the administrators group.
Privilege elevation
When you select the Privilege Elevation pane in Security, the following options appear:
-
Process Privilege Elevation Settings. Controls whether to enable the privilege elevation feature. When selected, enables agents to process privilege elevation settings and other options on the Privilege Elevation tab become available.
-
Do Not Apply to Windows Server OSs. Controls whether to apply privilege elevation settings to Windows Server operating systems. If selected, rules assigned to users do not work on Windows Server machines. By default, this option is selected.
-
Enforce RunAsInvoker. Controls whether to force all executables to run under the current Windows account. If selected, users are not prompted to run executables as administrators.
This tab also displays the complete list of rules that you have configured. Click Executable Rules or Windows Installer Rules to filter the rule list to a specific rule type. You can use Find to filter the list. The Assigned column displays a check mark icon for assigned users or user groups.
Supported rules
You can apply privilege elevation using two types of rules: executable rules and Windows installer rules.
-
Executable Rules. Rules that include files with .exe and .com extensions associated with an application.
-
Windows Installer Rules. Rules that include installer files with.msi and .msp extensions associated with an application. When you add Windows installer rules, keep the following scenario in mind:
- Privilege elevation applies only to Microsoft’s msiexec.exe. Make sure that the tool you use to deploy
.msiand.mspWindows installer files is msiexec.exe. - Suppose that a process matches a specified Windows installer rule and its parent process matches a specified executable rule. The process cannot get elevated privileges unless the Apply to Child Processes setting is enabled in the specified executable rule.
- Privilege elevation applies only to Microsoft’s msiexec.exe. Make sure that the tool you use to deploy
After you click the Executable Rules or the Windows Installer Rules tab, the Actions section displays the following actions available to you:
-
Edit. Lets you edit an existing executable rule.
-
Delete. Lets you delete an existing executable rule.
-
Add Rule. Lets you add an executable rule.
To add a rule
-
Navigate to Executable Rules or Windows Installer Rules and click Add Rule. The Add Rule window appears.
-
In the Display section, type the following:
- Name. Type the display name of the rule. The name appears in the rule list.
- Description. Type additional information about the rule.
-
In the Type section, select an option.
- Path. The rule matches a file path.
- Publisher. The rule matches a selected publisher.
- Hash. The rule matches a specific hash code.
-
In the Settings section, configure the following if needed:
-
Apply to Child Processes. If selected, applies the rule to all child processes that the executable starts. To manage privilege elevation at a more granular level, use the following options:
- Apply only to executables in the same folder. If selected, applies the rule only to executables that share the same folder.
- Apply only to signed executables. If selected, applies the rule only to executables that are signed.
- Apply only to executables of the same publisher. If selected, applies the rule only to executables that share the same publisher information. This setting does not work with Universal Windows Platform (UWP) apps.
Note:
When you add Windows install rules, the Apply to Child Processes setting is enabled by default and you cannot edit it.
-
Start Time. Lets you specify a time for agents to start applying the rule. The time format is HH:MM. The time is based on the agent time zone.
-
End Time. Lets you specify a time for agents to stop applying the rule. The time format is HH:MM. From the specified time onward, agents no longer apply the rule. The time is based on the agent time zone.
-
Add Parameter. Lets you restrict privilege elevation to executables that match the specified parameter. The parameter works as a match criterion. Make sure that the parameter you specify is correct. For an example of how to use this feature, see Executables running with parameters. If this field is empty or contains only blank spaces, the agent applies privilege elevation to relevant executables whether or not they run with parameters.
-
Enable Regular Expressions. Lets you control whether to use regular expressions to further expand the criterion.
-
-
In the Assignments section, select users or user groups to which you want to assign the rule. If you want to assign the rule to all users and user groups, select Select All.
Tip:
- You can use the usual Windows selection modifier keys to make multiple selections.
- Users or user groups must already be in the list displayed on the Administration > Users tab.
- You can choose to assign the rule later (after the rule is created).
-
Click Next.
-
Do either of the following. Different actions are needed depending on the rule type you selected in the preceding page.
Important:
WEM provides you with a tool named AppInfoViewer to obtain the following information and more from executable files: publisher, path, and hash. The tool can be useful if you want to provide relevant information for applications to be configured in the management console. For example, you can use the tool to extract relevant information from applications when using the application security feature. The tool is located in the agent installation folder.
- Path. Type the path to the file or folder to which you want to apply the rule. The WEM agent applies the rule to an executable according to the executable file path.
- Publisher. Fill out the following fields: Publisher, Product name, File name, and File version. You cannot leave any of the fields empty, but you can type an asterisk (*) instead. The WEM agent applies the rule according to publisher information. If applied, users can run executables that share the same publisher information.
- Hash. Click Add to add a hash. In the Add Hash window, type the file name and the hash value. You can use the AppInfoViewer tool to create a hash from a selected file or folder. The WEM agent applies the rule to identical executables as specified. As a result, users can run executables that are identical to the specified one.
-
Click Create to save the rule and to exit the window.
Executables running with parameters
You can restrict privilege elevation to executables that match the specified parameter. The parameter works as a match criterion. To see parameters available to an executable, use tools such as Process Explorer or Process Monitor. Apply the parameters that appear in those tools.
Suppose you want to apply the rule to an executable (for example, cmd.exe) according to the executable file path. You want to apply privilege elevation only to test.bat. You can use Process Explorer to get the parameters.
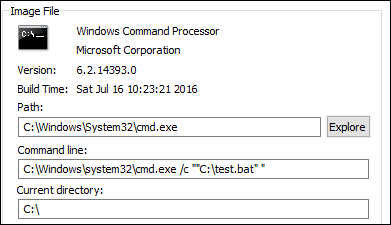
In the Add Parameter field, you can type the following:
/c ""C:\test.bat""
You then type the following in the Path field:
C:\Windows\System32\cmd.exe
In this case, you elevate the privilege of the specified users to an administrator level only for test.bat.
To assign rules to users
Select one or more rules in the list and then click Edit in the Actions section. In the Edit Rule window, select users or user groups to which you want to assign the rule and then click OK.
To delete rules
Select one or more rules in the list and then click Delete in the Actions section.
To back up privilege elevation rules
You can back up all privilege elevation rules in your current configuration set. All rules are exported as a single XML file. You can use Restore to restore the rules to any configuration set.
To complete the backup, use the Backup wizard, available in the ribbon. For more information about using the Backup wizard, see Ribbon.
To restore privilege elevation rules
You can restore privilege elevation rules from XML files exported through the Workspace Environment Management Backup wizard. The restore process replaces the rules in the current configuration set with those rules in the backup. When you switch to or refresh the Security > Privilege Elevation pane, any invalid privilege elevation rules are detected. Invalid rules are automatically deleted and listed in a report that you can export. For more information about using the Restore wizard, see Ribbon.
Self-elevation
With self-elevation, you can automate privilege elevation for certain users without the need to provide the exact executables beforehand. Those users can request self-elevation for any applicable file simply by right-clicking the file and then selecting Run with administrator privileges in the context menu. After that, a prompt appears, requesting that they provide a reason for the elevation. The WEM agent does not validate the reason. The reason for the elevation is saved to the database for auditing purposes. If the criteria are met, the elevation is applied, and the files run successfully with administrator privileges.
The feature also gives you flexibility to choose the best solution for your needs. You can create allow lists for files you permit users to self-elevate or block lists for files you want to prevent users from self-elevating.
Self-elevation applies to files of the following formats: .exe, .msi, .bat, .cmd, .ps1, and .vbs.
Note:
By default, certain applications are used to run some files. For example, cmd.exe is used to run .cmd files and powershell.exe is used to run .ps1 files. In those scenarios, you cannot change the default behavior.
When you select Security > Self-elevation, the following options appear:
-
Enable self-elevation. Controls whether to enable the self-elevation feature. Select the option to:
- Enable agents to process self-elevation settings.
- Make other options on the Self-elevation tab available.
- Make the Run with administrator privileges option available in the context menu when users right-click a file. As a result, users can request self-elevation for files that match the conditions you specify on the Self-elevation tab.
-
Permissions. Lets you create allow lists for files you permit users to self-elevate or block lists for files you want to prevent users from self-elevating.
- Allow. Creates allow lists for files you permit users to self-elevate.
- Deny. Creates block lists for files you want to prevent users from self-elevating.
-
You can perform the following operations:
- Edit. Lets you edit an existing condition.
- Delete. Lets you delete an existing condition.
- Add. Lets you add a condition. You can create a condition based on a path, a selected publisher, or a specific hash code.
-
Settings. Lets you configure additional settings that control how agents apply self-elevation.
- Apply to Child Processes. If selected, applies self-elevation conditions to all child processes that the file starts.
- Start Time. Lets you specify a time for agents to start applying conditions for self-elevation. The time format is HH:MM. The time is based on the agent time zone.
- End Time. Lets you specify a time for agents to stop applying conditions for self-elevation. The time format is HH:MM. From the specified time onward, agents no longer apply the conditions. The time is based on the agent time zone.
-
Assignments. Lets you assign the self-elevation condition to applicable users or user groups. To assign the condition to all users and user groups, click Select All or select Everyone. The Select All check box is useful in scenarios where you want to clear your selection and reselect users and user groups.
Process hierarchy control
The process hierarchy control feature controls whether certain child processes can be started from their parent processes in parent-child scenarios. You create a rule by defining parent processes and then designating an allow list or a block list for their child processes. Review this entire section before using the feature.
Note:
- This feature applies only to Citrix virtual apps.
To understand how the rule works, keep the following in mind:
-
A process is subject to only one rule. If you define multiple rules for the same process, only the rule with the highest priority is enforced.
-
The rule you defined is not restricted only to the original parent-child hierarchy but also applies to each level of that hierarchy. Rules applicable to a parent process prevail over rules applicable to its child processes regardless of the priority of the rules. For example, you define the following two rules:
- Rule 1: Word cannot open CMD.
- Rule 2: Notepad can open CMD.
With the two rules, you cannot open CMD from Notepad by first opening Word and then opening Notepad from Word regardless of the priority of the rules.
This feature relies on certain process-based parent-child relationships to work. To visualize the parent-child relationships in a scenario, use the process tree feature of the Process Explorer tool. For more information about Process Explorer, see https://docs.microsoft.com/en-us/sysinternals/downloads/procmon.
To avoid any potential issues, we recommend that you add an executable file path that points to VUEMAppCmd.exe in Citrix Studio. VUEMAppCmd.exe ensures that the WEM agent finishes processing settings before published applications start. In Citrix Studio, complete the following steps:
-
In Application, select the application, click Properties in the action pane, and then go to the Location page.
-
Type the path of the local application on the end-user operating system.
- Under the Path to the executable file field, type the following: <%ProgramFiles%>\Citrix\Workspace Environment Management Agent\VUEMAppCmd.exe.
-
Type the command-line argument to specify an application to open.
- Under the Command-line argument field, type the full path to the application that you want to launch through VUEMAppCmd.exe. Make sure that you wrap the command line for the application in double quotes if the path contains blank spaces.
- For example, suppose you want to launch iexplore.exe through VUEMAppCmd.exe. You can do so by typing the following:
%ProgramFiles(x86)%\"Internet Explorer"\iexplore.exe.
Considerations
For the feature to work, you need to use the AppInfoViewer tool on each agent machine to enable the feature. (The tool is located in the agent installation folder.) Every time you use the tool to enable or disable the feature, a machine restart is required. With the feature enabled, you must restart the agent machine after upgrading or uninstalling the agent.
To verify that the process hierarchy control feature is enabled, open the Registry Editor on the agent machine. The feature is enabled if the following registry entry exists:
- 32-bit OS
HKEY_LOCAL_MACHINE\SOFTWARE\Citrix\CtxHook\AppInit_Dlls\WEM Hook
- 64-bit OS
HKEY_LOCAL_MACHINE\SOFTWARE\Citrix\CtxHook\AppInit_Dlls\WEM HookHKEY_LOCAL_MACHINE\SOFTWARE\WOW6432Node\Citrix\CtxHook\AppInit_Dlls\WEM Hook
Prerequisites
To use the feature, make sure that the following prerequisites are met:
- A Citrix virtual apps deployment.
- The agent is running on Windows 10 or Windows Server.
- The agent host has been restarted after in-place upgrade or fresh install.
Process hierarchy control
When you select Process Hierarchy Control in Security, the following options appear:
-
Enable Process Hierarchy Control. Controls whether to enable the process hierarchy control feature. When selected, other options on the Process Hierarchy Control tab become available and configured settings there can take effect. You can use this feature only in a Citrix virtual apps deployment.
-
Hide Open With from Context Menu. Controls whether to show or hide the Open With option from the Windows right-click context menu. When enabled, the menu option is hidden from the interface. When disabled, the option is visible and users can use it to start a process. The process hierarchy control feature does not apply to processes started through the Open With option. We recommend that you enable this setting to prevent applications from starting processes through system services that are unrelated to the current application hierarchy.
The Process Hierarchy Control tab also displays the complete list of rules that you have configured. You can use Find to filter the list. The Assigned column displays a check mark icon for assigned users or user groups.
The Actions section displays the following actions:
- Edit. Lets you edit a rule.
- Delete. Lets you delete a rule.
- Add Rule. Lets you add a rule.
To add a rule
-
Navigate to Process Hierarchy Control and click Add Rule. The Add Rule window appears.
-
In the Display section, type the following:
- Name. Type the display name of the rule. The name appears in the rule list.
- Description. Type additional information about the rule.
-
In the Type section, select an option.
- Path. The rule matches a file path.
- Publisher. The rule matches a selected publisher.
- Hash. The rule matches a specific hash code.
-
In the Mode section, select either of the following options:
- Add Child Processes to Block List. If selected, lets you define a block list for applicable child processes after configuring a rule for their parent processes. A block list prohibits only the processes you specified from running and other processes are allowed to run.
- Add Child Processes to Allow List. If selected, lets you define an allow list for applicable child processes after configuring a rule for their parent processes. An allow list allows only the processes you specified to run and other processes are prohibited from running.
Note:
A process is subject to only one rule. If you define multiple rules for the same process, the rules are enforced in order of priority.
-
In the Priority section, set the priority for the rule. When configuring the priority, consider the following: The priority determines the order in which the rules you configured are processed. The greater the value, the higher the priority. Type an integer. If there is a conflict, the rule with the higher priority prevails.
-
In the Assignments section, select users or user groups to which you want to assign the rule. If you want to assign the rule to all users and user groups, select Select All.
Note:
- You can use the usual Windows selection keys to make multiple selections.
- Users or user groups must already be in the list displayed on the Administration > Users tab.
- You can choose to assign the rule later (after the rule is created).
-
Click Next.
-
Do either of the following to configure the rule for parent processes. Different actions are needed depending on the rule type you selected on the previous page.
- Path. Specify a file path or folder path that you want the rule to match. If you specify a folder path, the rule applies to all files and subfolders in that folder. The WEM agent applies the rule to an executable according to the executable file path. We do not recommend that you type only asterisk (*) to indicate a path match. Doing that might cause unintended performance issues.
- Publisher. Specify a signed reference file that you want to use as a reference for the rule. Use the Publisher Info slider to tune the level of property matching. Move the slider up or down to make the rule less or more specific. If you move the slider to the Any publisher position, the rule applies to all signed files. The WEM agent applies the rule to parent processes according to publisher information. If applied, users can run executables that share the same publisher information. If necessary, you can select Use custom values to customize information.
- Hash. Specify a file or folder from which you want to create a hash. The rule matches the hash code of the file. The WEM agent applies the rule to identical executables as specified. As a result, users can run executables that are identical to the specified one.
-
Click Next to configure child process settings.
-
Do either of the following to define an allow list or a block list for applicable child processes.
- Select a rule type from the menu and then click Add. The Child Process window appears.
- In the Child Process window, configure settings as needed. The user interface of the Child Process window is different depending on the rule type you selected. For a child process, the following rule types are available: Path, Publisher, and Hash.
- Click OK to return to the Add Rule window. You can add more child processes or click Create to save the rule and to exit the window.
To assign rules to users
Select one rule in the list and then click Edit in the Actions section. In the Edit Rule window, select users or user groups to which you want to assign the rule and then click OK.
To delete rules
Select one or more rules in the list and then click Delete in the Actions section.
To back up rules
You can back up all process hierarchy control rules in your current configuration set. All rules are exported as a single XML file. You can use Restore to restore the rules to any configuration set.
To complete the backup, use the Backup wizard, available in the ribbon. For more information about using the Backup wizard, see Ribbon.
To restore rules
You can restore process hierarchy control rules from XML files exported through the Workspace Environment Management Backup wizard. The restore process replaces the rules in the current configuration set with those rules in the backup. When you switch to or refresh the Security > Process Hierarchy Control pane, any invalid rules are deleted and listed in a report that you can export. For more information about using the Restore wizard, see Ribbon.