HDX™
Warning
Editing the registry incorrectly can cause serious problems that might require you to reinstall your operating system. Citrix® cannot guarantee that problems resulting from the incorrect use of Registry Editor can be solved. Use Registry Editor at your own risk. Be sure to back up the registry before you edit it.
Citrix HDX includes a broad set of technologies that provide a high-definition user experience.
At the device:
HDX uses the computing capacity of user devices to enhance and optimize the user experience. HDX technology ensures that users receive a smooth, seamless experience with multimedia content in their virtual desktops or applications. Workspace control enables users to pause virtual desktops and applications and resume working from a different device at the point where they left off.
On the network:
HDX incorporates advanced optimization and acceleration capabilities to deliver the best performance over any network, including low-bandwidth and high-latency WAN connections.
HDX features adapt to changes in the environment. The features balance performance and bandwidth. They apply the best technologies for each user scenario, whether the desktop or application is accessed locally on the corporate network or remotely from outside the corporate firewall.
In the data center:
HDX uses the processing power and scalability of servers to deliver advanced graphical performance, regardless of the client device capabilities.
HDX channel monitoring provided by Citrix Director displays the status of connected HDX channels on user devices.
HDX Insight
HDX Insight is the integration of NetScaler® Network Inspector and Performance Manager with Director. It captures data about ICA traffic and provides a dashboard view of real time and historical details. This data includes client-side and server-side ICA session latency, bandwidth use of ICA channels, and the ICA round-trip time value of each session.
Experience HDX capabilities from your virtual desktop
- See how Flash Redirection, one of three HDX multimedia redirection technologies, accelerates delivery of Adobe Flash multimedia content:
- Download Adobe Flash player (https://get.adobe.com/flashplayer/) and install it on both the virtual desktop and the user device.
- On the Desktop Viewer toolbar, select Preferences. In the Desktop Viewer Preferences dialog box, select the Flash tab and select Optimize content.
- To experience how Flash Redirection accelerates the delivery of Flash multimedia content to virtual desktops, view a video on your desktop from a website containing Flash videos, such as YouTube. Flash Redirection is seamless so that users do not know when it is running. You can check to see whether Flash Redirection is being used. Look for a block of color that appears momentarily before the Flash player starts, or by right-clicking on the video and looking for Flash Redirection in the menu.
- See how HDX delivers high definition audio:
- Configure your Citrix client for maximum audio quality; see the Citrix Receiver™ documentation for details.
- Play music files with a digital audio player (such as iTunes) on your desktop.
HDX provides a superior graphics and video experience for most users by default, and configuration isn’t required. Citrix policy settings that provide the best experience for most use cases are enabled by default.
- HDX automatically selects the best delivery method based on the client, platform, application, and network bandwidth, and then self-tunes based on changing conditions.
- HDX optimizes the performance of 2D and 3D graphics and video.
- HDX enables user devices to stream multimedia files directly from the source provider on the internet or intranet, rather than through the host server. If the requirements for this client-side content fetching are not met, media delivery falls back to server-side content fetching and multimedia redirection. Usually, adjustments to the multimedia redirection feature policies aren’t needed.
- HDX delivers rich server-rendered video content to virtual desktops when multimedia redirection is not available: View a video on a website containing high definition videos, such as https://www.microsoft.com/silverlight/iis-smooth-streaming/demo/.
Good to know:
- For support and requirements information for HDX features, see the System requirements article. Except where otherwise noted, HDX features are available for supported Windows Server OS and Windows Desktop OS machines, plus Remote PC Access desktops.
- This content describes how to optimize the user experience further, improve server scalability, or reduce bandwidth requirements. For information about using Citrix policies and policy settings, see the Citrix policies documentation for this release.
- For instructions that include editing the registry, use caution: editing the registry incorrectly can cause serious problems that might require you to reinstall your operating system. Citrix cannot guarantee that problems resulting from the incorrect use of Registry Editor can be solved. Use Registry Editor at your own risk. Be sure to back up the registry before you edit it.
Limitation
When you’re using Windows Media Player and Remote Audio & Video Extensions (RAVE) enabled inside a session, a black screen might display if you right-click on the video content and select Always show Now Playing on top.
Auto client reconnect and session reliability
When accessing hosted applications or desktops, network interruption might occur. To experience a smoother reconnection, we offer auto client reconnect and session reliability. In a default configuration, session reliability starts and then auto client reconnect follows.
Auto client reconnect:
Auto client reconnect relaunches the client engine to reconnect to a disconnected session. Auto client reconnect closes (or disconnects) the user session after the time specified in the setting. If auto client reconnect is in progress, the system sends application and desktops network interruption notification to the user as follows:
- Desktops. The session window is grayed out and a countdown timer shows the time until the reconnections occur.
- Applications. The session window closes and a dialog appears to the user containing a countdown timer showing the time until the reconnections are attempted.
During auto client reconnect, sessions relaunch expecting network connectivity. User cannot interact with sessions while auto client reconnect is in progress.
On reconnection, the disconnected sessions reconnect using saved connection information. The user can interact with the applications and desktops normally.
Default auto client reconnect settings:
- Auto client reconnect timeout: 120 seconds
- Auto client reconnect: Enabled
- Auto client reconnect authentication: Disabled
- Auto client reconnect Logging: Disabled
For more information, see Auto client reconnect policy settings.
Session reliability:
Session reliability reconnects ICA® sessions seamlessly across network interruptions. Session reliability closes (or disconnects) the user session after the time specified in the setting. After the session reliability timeout, the auto client reconnect settings take effect, attempting to reconnect the user to the disconnected session. When session reliability is in progress, application and desktops network interruption notification are sent to the user as follows:
- Desktops. The session window becomes translucent and a countdown timer shows the time until the reconnections occur.
- Applications. The window becomes translucent along with connection interrupted pop ups from the notification area.
While session reliability is active, the user cannot interact with the ICA sessions. However, user actions like keystrokes are buffered for few seconds immediately after the network interruption and retransmitted when the network is available.
On reconnection, the client and the server resume at the same point where they were in their exchange of protocol. The session windows lose translucency and appropriate notification area pop ups are shown for applications.
Default session reliability settings
- Session reliability timeout: 180 seconds
- Reconnection UI transparency level: 80%
- Session reliability connection: Enabled
- Session reliability port number: 2598
For more information, see Session reliability policy settings.
NetScaler with auto client reconnect and session reliability:
If Multistream and Multiport policies are enabled on the server and any or all these conditions are true, auto client reconnect does not work:
- Session reliability is disabled on NetScaler Gateway.
- A failover occurs on the NetScaler appliance.
- NetScaler SD-WAN is used with NetScaler Gateway.
Tablet mode for touch screen devices
By default, any touch enabled device that connects/roams to a Windows 10 VDA starts in tablet mode.
Tablet mode requires a minimum of version XenServer 7.2. XenServer 7.2 integrates with the XenDesktop VDA, changing the hypervisor to enable the virtual firmware settings for 2-in-1 devices. Windows 10 loads the GPIO driver on the target virtual machine based on this updated BIOS. It is used for toggling between tablet and desktop modes within the virtual machine. For more information, see https:/docs.citrix.com/en-us/xenserver/current-release/downloads/release-notes.pdf.
The tablet mode offers a user interface that is better suited to touch screens:
- Slightly larger buttons.
- The Start screen and any apps you start open in a full screen.
- Taskbar contains a back button.
- Icons removed from the task bar.
You have access to the File Explorer.
Web Receivers do not support table mode.
Run the XenServer CLI command to allow laptop/tablet switching:
xe vm-param-set uuid=\<VM\_UUID\> platform:acpi\_laptop\_slate=1
To disable or enable tablet mode, configure this registry setting on XenApp and XenDesktop®:
HKEY_LOCAL_MACHINE\Software\Citrix\Sessions
Name: CitrixEnhancedUserExperience Type: REG_DWORD
Value: 0 (Disable) 1 (Enable)
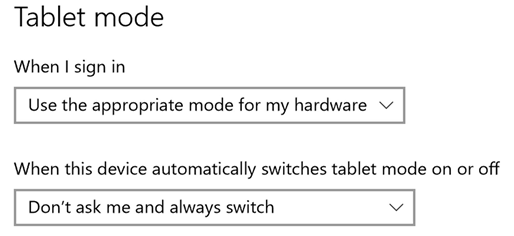
Before starting a session:
We recommend that you navigate to Settings >System >Tablet Mode on the VD before starting a session and set the following options from the drop-down menus:
- Use the appropriate mode for my hardware
- Don’t ask me and always switch
If you don’t set these options before starting the session, set the options after you start the session and restart the VDA.
Improve the image quality sent to user devices
The following visual display policy settings control the quality of images sent from virtual desktops to user devices.
- Visual quality. Controls the visual quality of images displayed on the user device: medium, high, always lossless, build to lossless (default = medium). The actual video quality using the default setting of medium depends on available bandwidth.
- Target frame rate. Specifies the maximum number of frames per second that are sent from the virtual desktop to the user device (default = 30). For devices that have slower CPUs, specifying a lower value can improve the user experience. The maximum supported frame rate per second is 60.
- Display memory limit. Specifies the maximum video buffer size for the session in kilobytes (default = 65536 KB). For connections requiring more color depth and higher resolution, increase the limit. You can calculate the maximum memory required.
Improve video conference performance
Several popular video conferencing applications are optimized for delivery from XenApp and XenDesktop through multimedia redirection (see, for example, HDX RealTime Optimization Pack). For applications that are not optimized, HDX webcam video compression improves bandwidth efficiency and latency tolerance for webcams during video conferencing in a session. This technology streams webcam traffic over a dedicated multimedia virtual channel. This technology uses less bandwidth compared to the isochronous HDX Plug-n-Play USB redirection support, and works well over WAN connections.
Citrix Receiver users can override the default behavior by choosing the Desktop Viewer Mic & Webcam setting Don’t use my microphone or webcam. To prevent users from switching from HDX webcam video compression, disable USB device redirection by using the policy settings under ICA policy settings > USB Devices policy settings.
HDX webcam video compression requires that the following policy settings be enabled (all are enabled by default).
- Client audio redirection
- Client microphone redirection
- Multimedia conferencing
- Windows Media Redirection
If a webcam supports H.264 hardware encoding, HDX video compression uses the hardware encoding by default. Hardware encoding might consume more bandwidth than software encoding. To force software compression, add the following DWORD key value to the registry key: HKCU\Software\Citrix\HdxRealTime: DeepCompress_ForceSWEncode=1.
Network traffic priorities
Priorities are assigned to network traffic across multiple connections for a session using Quality of Service (QoS)-supported routers. Four TCP streams (real time, interactive, background, and bulk) and two User Datagram Protocol (UDP) streams (voice and Framehawk display remoting) are available to carry ICA traffic between the user device and the server. Each virtual channel is associated with a specific priority and transported in the corresponding connection. You can set the channels independently, based on the TCP port number used for the connection.
Multiple channel streaming connections are supported for Virtual Delivery Agents (VDAs) installed on Windows 10, Windows 8, and Windows 7 machines. Work with your network administrator to ensure the Common Gateway Protocol (CGP) ports configured in the Multi-Port Policy setting are assigned correctly on the network routers.
Quality of Service (QoS) is supported only when multiple session reliability ports, or the CGP ports, are configured.
Caution:
Use transport security when using this feature. Citrix recommends using Internet Protocol Security (IPsec) or Transport Layer Security (TLS). TLS connections are supported only when the connections traverse a NetScaler Gateway that supports multi-stream ICA. On an internal corporate network, multi-stream connections with TLS are not supported.
To set Quality of Service for multiple streaming connections, add the following Citrix policy settings to a policy (see Multi-stream connections policy settings for details):
-
Multi-Port policy - This setting specifies ports for ICA traffic across multiple connections, and establishes network priorities.
- Select a priority from the CGP default port priority list. By default, the primary port (2598) has a High priority.
- Type more CGP ports in CGP port1, CGP port2, and CGP port3 as needed, and identify priorities for each. Each port must have a unique priority.
Explicitly configure the firewalls on VDAs to allow the additional TCP traffic.
-
Multi-Stream computer setting - This setting is disabled by default. If you use Citrix NetScaler SD-WAN with Multi-Stream support in your environment, you do not need to configure this setting. Configure this policy setting when using third-party routers or legacy Branch Repeaters to achieve the desired Quality of Service (QoS).
-
Multi-Stream user setting - This setting is disabled by default.
For policies containing these settings to take effect, users must log off and then log on to the network.
Unicode keyboard mapping
Non-Windows Citrix Receivers use the local keyboard layout (Unicode). If a user changes the local keyboard layout and the server keyboard layout (scan code), they might not be in sync and the output is incorrect. For example, User1 changes the local keyboard layout from English to German. User1 then changes the server-side keyboard to German. Even though both keyboard layouts are German, they might not be in sync causing incorrect character output.
Enable or disable Unicode keyboard layout mapping:
By default, the feature is disabled on the VDA side. To enable the feature, toggle on the feature by using registry editor regedit on the VDA. Under HKEY_LOCAL_MACHINE/SOFTWARE/Citrix, create the CtxKlMap key. Set the DWORD value of EnableKlMap = 1
To disable this feature, set the DWORD value EnableKlMap = 0 or delete the CtxKlMap key.
Enable Unicode keyboard layout mapping compatible mode:
By default, Unicode keyboard layout mapping automatically hooks some windows API to reload the new Unicode keyboard layout map when you change the keyboard layout on the server side. A few applications cannot be hooked. To keep compatibility, you can change the feature to compatible mode to support these non-hooked applications.
- Under the HKEY_LOCAL_MACHINE/SOFTWARE/Citrix/CtxKlMap key, set the DWORD value DisableWindowHook =1.
- To use normal Unicode keyboard layout mapping, set DWORD value DisableWindowHook = 0.
Related information
In this article
- HDX Insight
- Experience HDX capabilities from your virtual desktop
- Limitation
- Auto client reconnect and session reliability
- Tablet mode for touch screen devices
- Improve the image quality sent to user devices
- Improve video conference performance
- Network traffic priorities
- Unicode keyboard mapping
- Related information