Event managers - Manage Citrix alerts and notifications
As a Citrix event manager, you can manage and monitor the following Citrix alerts and notifications through the ServiceNow Service Portal:
- Alerts from Citrix DaaS and Citrix Virtual Apps and Desktops™
- Notifications from Citrix Cloud™
- Events from Citrix Application Delivery Management (ADM)
- Alerts and notifications from status.cloud.com
This article provides guidance on how to:
Required roles
You must have one of the following Citrix ITSM roles:
- Event manager (
x_cion_citrix_it_s.ctx_itsm_event_manager) - Operator (
x_cion_citrix_it_s.ctx_itsm_operator) - Administrator (
x_cion_citrix_it_s.ctx_itsm_admin)
Customize alert and notification policies
You can customize policies to control:
-
Which alerts and notifications are synced to your ServiceNow instance. For more information, see:
-
Whether to suppress alert and notification creation by defining maintenance windows. For more information, see Configure Citrix maintenance windows
-
How ServiceNow processes the Citrix ADM events that it receives. For more information, see Customize ADM event policies
-
Which Citrix Cloud health incidents are synced from status.cloud.com to your ServiceNow instance. For more information, see Create Citrix Cloud health incident policies.
Customize alert policies
On the Citrix DaaS™ portal, alerts are generated based on the alert policies administrators create. The Citrix ITSM Adapter service automatically syncs all alert policies from the Citrix DaaS portal to your ServiceNow instance every 12 hours. As the Citrix ITSM event manager, you can choose which alerts are synced based on alert policies.
For more information about alert policies, see the Citrix Virtual Apps and Desktops documentation – Director and the Citrix DaaS documentation – Monitor articles.
To sync alerts corresponding to an alert policy to ServiceNow and display them on the Alerts and Notifications dashboard, configure the integration from either ServiceNow or Citrix Monitor:
- From Citrix Monitor, see Alerts and notifications in the Monitor documentation.
- From ServiceNow, follow these steps:
-
Sign in to your ServiceNow Service Management Portal.
-
In the left pane, select Citrix IT Service Management Connector > Alerts and Notifications Configuration > CVAD Alert Policies. The CVAD Alert Policies page appears, where policies are grouped by Target Kind.
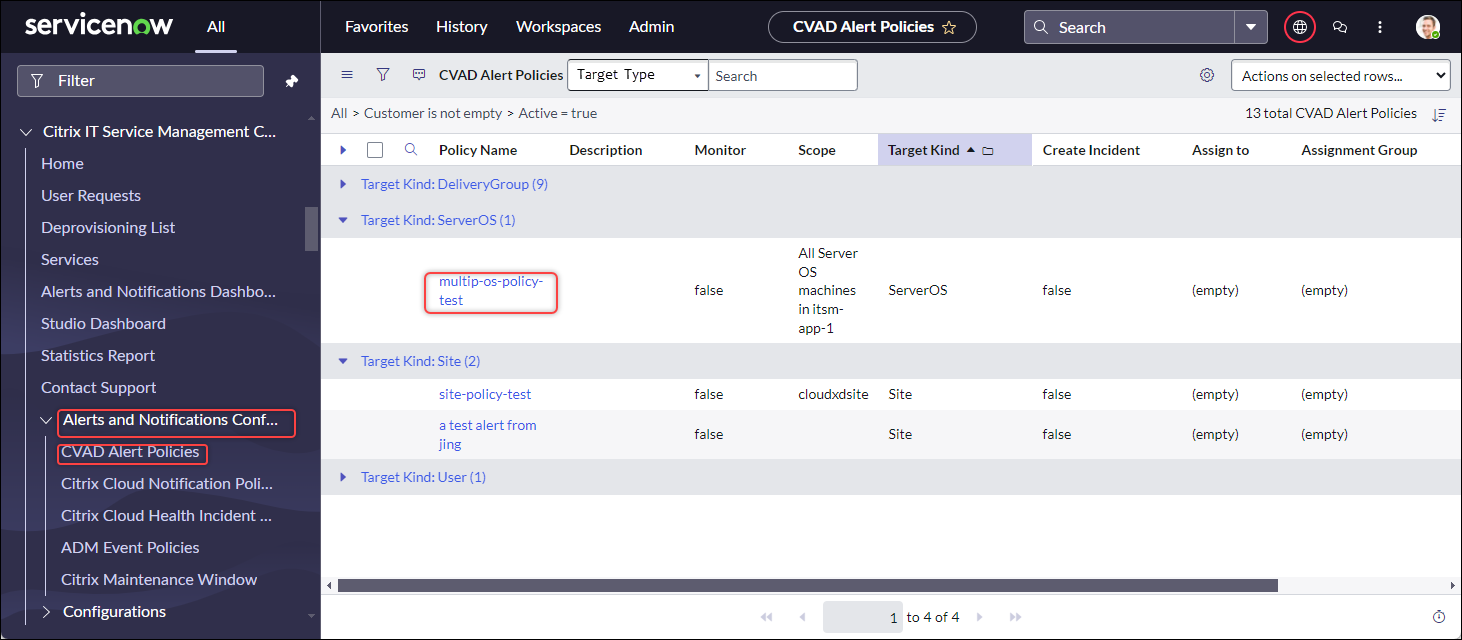
-
To refresh alert policies from Citrix DaaS immediately, click Refresh.
-
Click a policy name link as needed. The target alert policy window appears.
-
Click Enable Monitor at the bottom of the page.
Note:
Enabling monitoring automatically creates a webhook on Citrix Director. If you manually created a Citrix Director webhook, it is overwritten.
-
To create incidents for alerts associated with the policy, follow these steps:
-
Select Create Incident.
-
From the Create Incidents for list, select the alerts for which you want to create incidents. The options include Critical Alerts and All Alerts.
-
Select Category, Impact, and Urgency for the incidents to create.
-
(Optional) In the Assignment group field, type the name of the assignment group you want to assign the incident to. Next, click the search icon to search and select the group.
-
(Optional) In the Assign to field, type the name of the IT member you want to assign the incident to. Next, click the search icon to search and select the member.
-
-
Click Update.
Alerts corresponding to the selected policy are synced to your ServiceNow instance. Citrix ITSM operators can see them on the Citrix IT Service Management Connector > Alerts and Notifications page.
To stop monitoring alerts corresponding to an alert policy, open the policy and then click Disable Monitor.
Customize notification policies
Citrix Cloud notifications provide information about issues or events that need administrators’ attention, such as new Citrix Cloud features or problems with a machine. Citrix Cloud notifications can come from any service within Citrix Cloud. As the Citrix ITSM event manager, you can define policies to control how ServiceNow processes Citrix Cloud notifications based on their attributes. The processing actions include ignore, enable monitoring, and create incidents.
Note:
If no policies apply to a received notification, ServiceNow automatically ignores it.
For more information about Citrix Cloud notifications, see this Citrix Cloud documentation - Notifications article.
To create a policy for Citrix Cloud notifications, follow these steps:
-
Sign in to your ServiceNow Service Management Portal.
-
In the left pane, select Citrix IT Service Management Connector > Alerts and Notifications Configuration > Citrix Cloud Notification Policies.

-
On the Citrix Cloud Notification Policies page that appears, click New. A new policy page appears.
-
Define the general information about the policy as follows:
-
From the Customer list, select a Citrix Cloud account you want to manage.
-
In the Policy Name field, type a descriptive name for the policy.
-
In the Policy Priority field, enter a number to indicate the policy priority. The smaller the number, the higher the priority. When two policies apply to the same notification, the one with the higher priority (smaller number) takes precedence.
-
-
On the Notification Attributes tab, specify attribute values to match notifications. For attributes other than Severity and Priority, enter a keyword or a regular expression.
-
On the ServiceNow Action tab, select the action that you want ServiceNow to perform for the target notifications:
- Ignore. Ignores the target notifications.
- Display in Dashboard. Displays the target notifications on the Alerts and Notifications dashboard.
- Create Incidents. Creates a ServiceNow incident for each notification event.
-
If you select Create Incidents as the action, define the incident as needed:
- Select Category, Impact, and Urgency for the incident.
- To assign the incident to an assignment group, in the Assignment group field, click the search icon and then select the group.
- To assign the incident to a person, in the Assign to field, click the search icon and then select the person.
-
Click Create. The policy appears on the Citrix Cloud Notification Policies page.
Note:
Creating a policy automatically creates a webhook on Citrix Cloud notifications. If you manually created a webhook on Citrix Cloud notifications, it is overwritten.
Configure Citrix maintenance windows
By default, the Citrix ITSM connector plug-in generates an incident for every Citrix alert or notification. To avoid disruption during maintenance, configure Citrix maintenance windows. During those periods, the plug-in halts generating incidents for alerts and notifications.
To create a maintenance window, follow these steps:
-
Sign in to your ServiceNow Service Management Portal.
-
In the left pane, select Citrix IT Service Management Connector > Alerts and Notifications Configuration > Citrix Maintenance Windows.
-
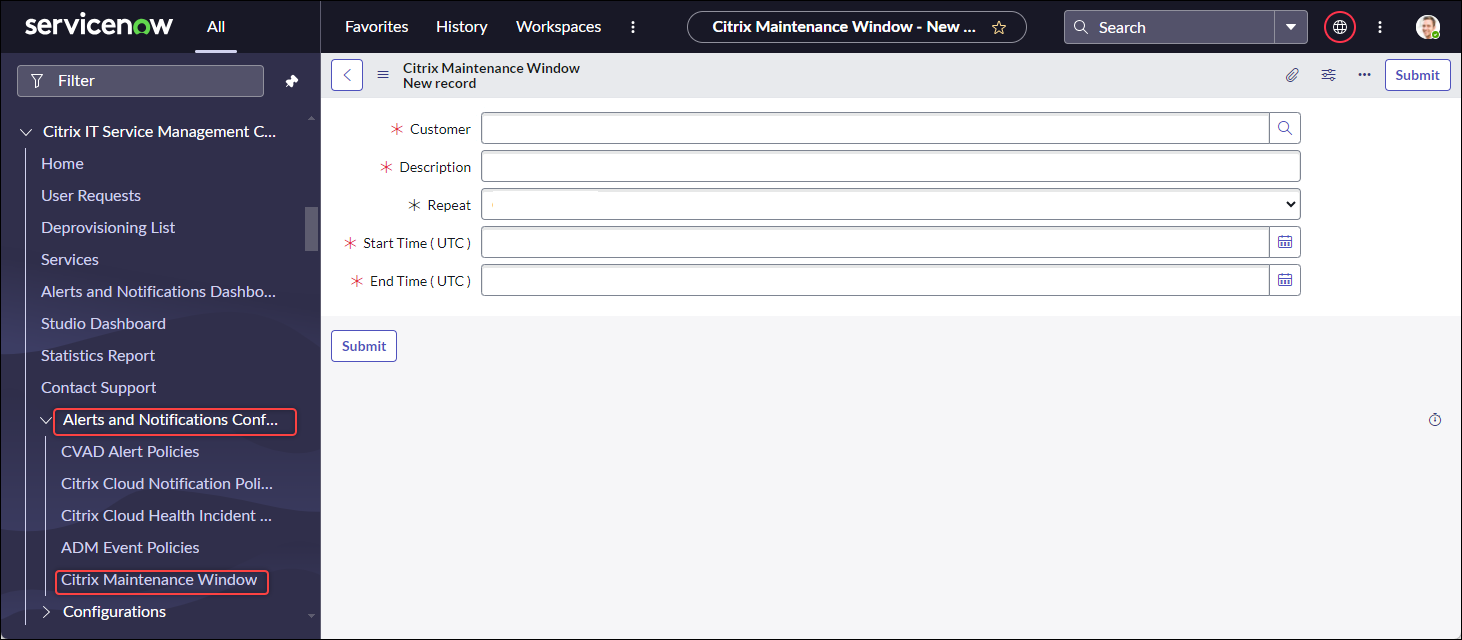
On the Citrix Maintenance Windows page that appears, click New. A configuration page appears.
-
Define the general information about the window as follows:
-
From the Customer list, select a Citrix Cloud account you want to manage.
-
In the Description field, type a descriptive name for this maintenance window.
-
In the Repeat field, select how often the maintenance event is repeated, such as Daily (at the same time each day), Weekly (on the same day each week), Monthly (on the same day of each month), or Never.
-
In the Start Time (UTC)and End Time (UTC) fields, select the start and end times for the maintenance window.
-
-
Click Submit.
Customize ADM event policies
By default, the Citrix ITSM connector plug-in creates a predefined ServiceNow incident for each ADM event it receives. Starting with the ITSM Adapter service 22.6, you can define policies to control how ServiceNow processes ADM events based on event attributes. The processing actions include ignore, enable monitoring, and create incidents.
Note:
- If no policies apply to a received event, ServiceNow automatically creates a predefined incident for it: Incident Category: None, Impact: 2 - Medium, and Urgency: 2 - Medium.
- Citrix Cloud administrators control which types of Citrix ADM events are synced to ServiceNow. For more information, see Integration with the ServiceNow instance in the Citrix Application Delivery Management document.
To create an ADM event policy, follow these steps:
-
Sign in to your ServiceNow Service Management Portal.
-
In the left pane, select Citrix IT Service Management Connector > Alerts and Notifications Configuration > Citrix ADM Event Policies.
-
On the Citrix ADM Event Policies page that appears, click New. A new policy page appears.
-
Define the general information about the policy as follows:
-
From the Customer list, select a Citrix Cloud account you want to manage.
-
In the Policy Name field, type a descriptive name for the policy.
-
In the Policy Priority field, enter a number to indicate the policy priority. The smaller the number, the higher the priority. When two policies apply to the same event, the one with the higher priority (lower number) takes precedence.
-
-
On the Event Attributes tab, specify values for event attributes to match events. For attributes other than Severity, enter a keyword or a regular expression.
For more information about the ADM event attributes, see Create event rules in the Citrix Application Delivery Management document.
-
On the ServiceNow Action tab, select the action that you want ServiceNow to perform for the target events:
- Ignore: Ignores the target events.
- Display in Dashboard: Displays the target events on the Alerts and Notifications page.
- Create Incidents: Creates a ServiceNow incident for each target event.
-
If you select Create Incidents as the action, define the incident as needed:
- Select Category, Impact, and Urgency for the incident.
- To assign the incident to an assignment group, in the Assignment group field, click the search icon and then select the group.
- To assign the incident to a person, in the Assign to field, click the search icon and then select the person.
-
Click Create. The policy appears on the Citrix ADM Event Policies page.
Create Citrix health incident policies
https://status.cloud.com generates health incidents for outages and issues with Citrix Cloud services. By creating policies, you can sync those incidents to your ServiceNow Service Management Portal for monitoring and tracking.
To create a Citrix Cloud health incident policy, follow these steps:
-
Sign in to your ServiceNow Service Management Portal.
-
In the left pane, select Citrix IT Service Management Connector > Alerts and Notifications Configuration > Citrix Cloud Health Incident Policies.
-
On the page that appears, click New. A new policy page appears.
-
Enter the general information for the policy as follows:
-
From the Customer list, select a Citrix Cloud account you want to manage.
-
In the Name field, type a descriptive name for the policy.
-
In the Policy Priority field, enter a number to indicate the policy priority. The smaller the number, the higher the priority. When two policies apply to the same incident, the one with the higher priority (lower number) takes precedence.
-
-
On the Event Attributes tab, specify the Citrix Cloud health incidents that you want to sync by selecting their attributes:
- Service Name: Click the unlock icon, select the services from which the incidents originate, and then click the lock icon.
- Region: Click the unlock icon, select the regions to which the incidents belong, and then click the lock icon.
- Event Type: Click the unlock icon, select the types of the incidents, and then click the lock icon.
-
On the ServiceNow Action tab, select how ServiceNow processes the Citrix Cloud health incidents specified in step 5:
- In the ServiceNow Action field, select a ServiceNow action as needed:
- Display in Dashboard. Displays the incidents on the Alerts and Notifications dashboard.
- Create Incidents. Creates a ServiceNow incident for each target Citrix Cloud health incident.
-
If you select Create Incidents as the action, define the ServiceNow incident as needed:
- Select the Category, Impact, and Urgency values for the incident.
- To assign the incident to an assignment group, in the Assignment group field, click the search icon and then select the group.
- To assign the incident to a person, in the Assign to field, click the search icon and then select the person.
Note:
If any update occurs on a Citrix Cloud health incident, the latest data automatically appears in the Comment field of the corresponding ServiceNow incident. When the Citrix Cloud health incident is resolved, the ServiceNow incident is automatically marked as Closed.
- In the ServiceNow Action field, select a ServiceNow action as needed:
-
Click Create. The policy appears on the Citrix Cloud Health Incident Policies page.
Monitor Citrix alerts and notifications
With the ITSM Adapter service, your ServiceNow instance provides a central place for IT help desks to monitor alerts, notifications, and ADM events from Citrix Cloud.
Note:
Citrix ITSM event managers control which alerts and notifications are shown in the Alerts & Notifications menu. For more information, see Customize alert and notification policies.
Steps:
-
Sign in to your ServiceNow Service Management Portal.
-
In the left pane, select Citrix IT Service Management Connector > Alerts and Notifications Dashboard. The Alerts and Notifications page appears with three tabs. Each tab displays a type of message from Citrix Cloud.
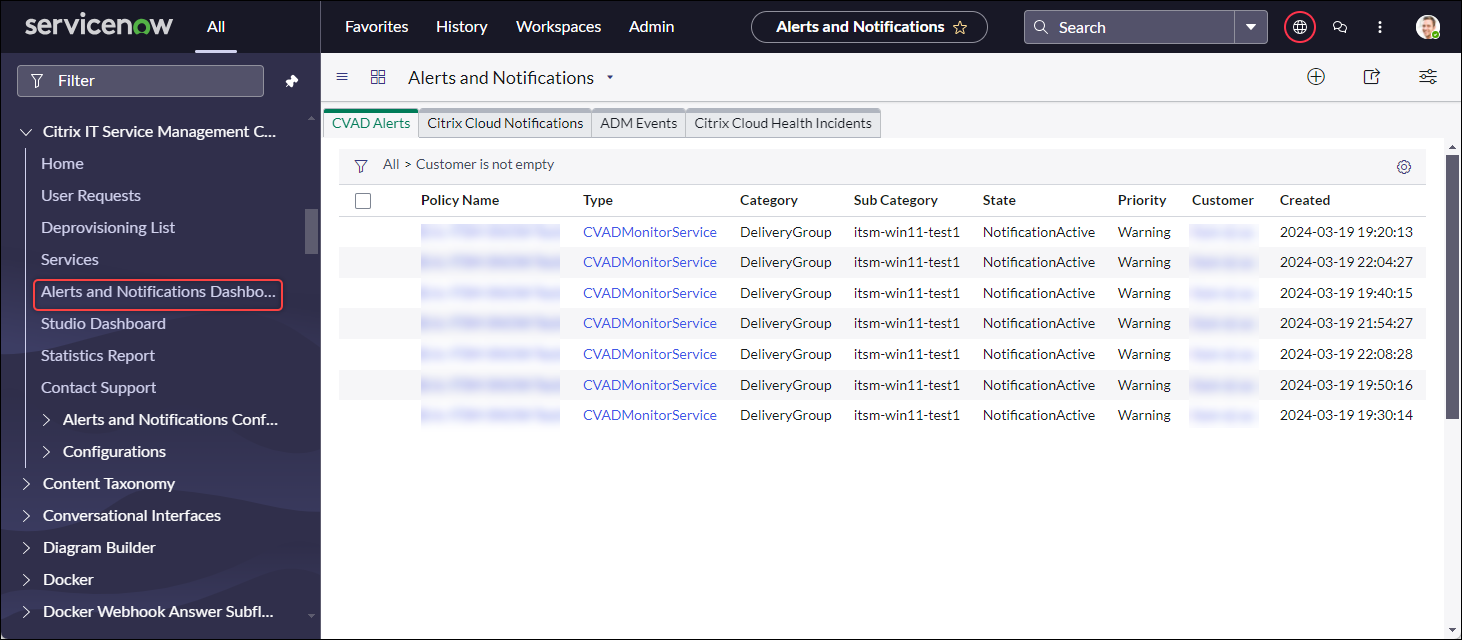
- Click one of the following tabs to view details:
-
CVAD Alerts: Alerts from Citrix DaaS and Citrix Virtual Apps and Desktops.
-
Citrix Cloud Notifications: Notifications from Citrix Cloud.
-
ADM Events: Events from Citrix ADM.
-
Citrix Cloud Service Events: Events from https://status.cloud.com.
-
-
To change settings for the incidents created for Citrix ADM events, follow these steps:
-
Click the ADM Events tab.
-
On the ADM Events page that appears, locate an event, and then click its Incident field.
-
On the Incident page that appears, change settings for the incident as needed. For example, assign the incident to an assignment group or assignee.
-
Click Update.
-