Wrapping iOS mobile apps
This article describes how Citrix Endpoint Management™ administrators wrap third-party enterprise apps and how developers wrap ISV apps. To wrap iOS mobile apps:
- Use MDX Service. For details, see MDX Service.
- Use the MDX Toolkit, which includes a macOS graphical interface tool and a macOS command-line tool. The macOS command-line tool has customization options, can be referenced from scripts that automate the app wrapping process, and lets you preset some MDX policies.
The file type for a wrapped app is .mdx. You upload the .mdx file to the Endpoint Management console where you configure specific app details and policy settings that the Endpoint Management Store enforces. When users sign on, the app appears in the store. Users can then subscribe, download, and install the app on their device.
The following figure provides an overview of the app wrapping steps, from installation of the MDX Toolkit through testing mobile productivity apps. Related topics are listed under the diagram.
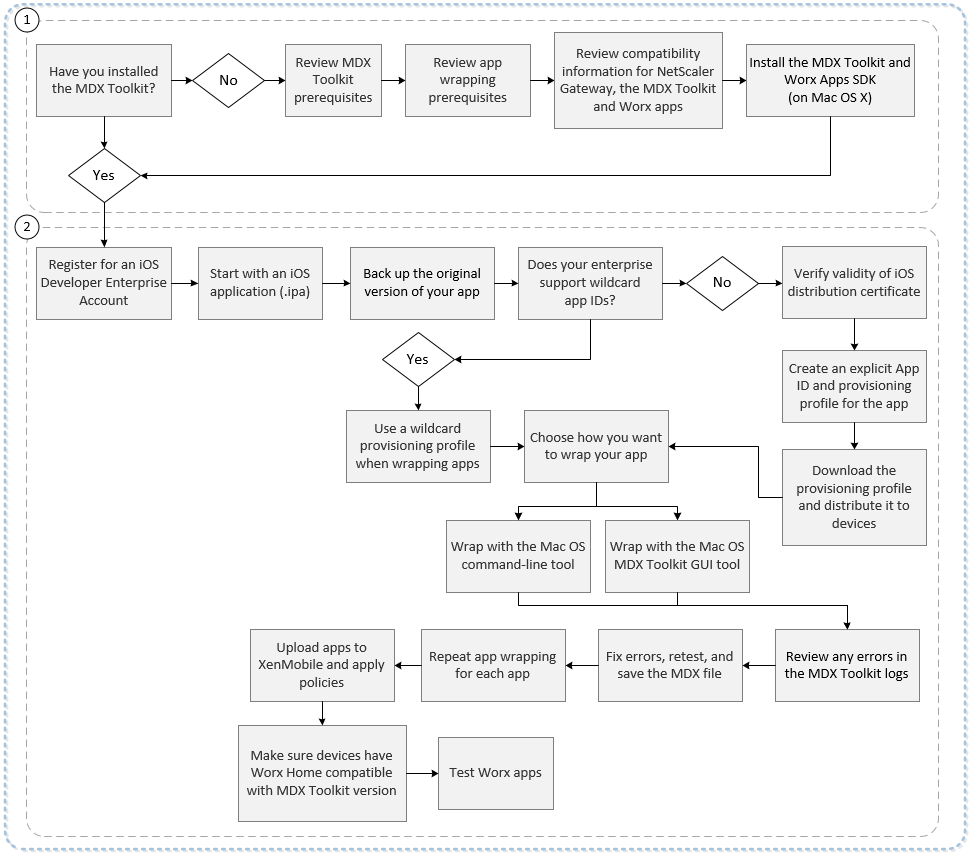
For details about number one, see:
- System requirements
- Other requirements for wrapping iOS mobile apps
- Endpoint Management Compatibility
- Installing the MDX Toolkit
For details about number two, see:
- Creating Provisioning Profiles
- App Upgrades
- Policies and mobile productivity apps
- Enterprise App Wrapping Using the Graphical Interface
- Enterprise iOS App Wrapping Using the Command Line
- Command Options
- Presetting MDX Policies for iOS Apps
- Identifying iOS App Wrapping Errors
- Collecting System Logs on iOS Devices
- To add an MDX app to Citrix Endpoint Management
Important:
Make sure that user devices are updated with a version of Secure Hub that is compatible with the version of MDX Toolkit used to wrap apps. Otherwise, users see an error message about the incompatibility. For details, see Endpoint Management compatibility.
Deploying iOS devices through Apple DEP
Enroll in the Apple Deployment Program to take advantage of the Apple Device Enrollment Program (DEP). You can use Apple DEP to deploy and manage iOS and macOS devices in Citrix Endpoint Management. For more information, including how to enroll in the Apple Deployment Program, see Deploy iOS and macOS devices through Apple DEP.
Creating provisioning profiles
Apps that run on a physical iOS device, other than apps in the Apple App Store, must be signed with a provisioning profile and a corresponding distribution certificate. There are two kinds of developer programs for distribution:
- The iOS Developer Program (Ad Hoc)
- The iOS Developer Enterprise Program. To wrap apps, Citrix recommends using the Enterprise program. You can enroll in the program from the Apple website.
The Enterprise profile allows you to run an app on unlimited devices. The Ad Hoc profile allows you to run an app on up to about 100 devices.
Apple no longer supports the use of wildcard App IDs for new Enterprise accounts. If your Enterprise account does not support wildcard App IDs, you must create multiple explicit App IDs and provisioning profiles, as follows.
-
Verify that you have a valid iOS distribution certificate.
-
From the Apple Enterprise Developer portal, create an explicit App ID for each app you plan to wrap with the MDX Toolkit. An example of an acceptable App ID is: com.CompanyName.ProductName.
-
From the Apple Enterprise Developer portal, go to Provisioning Profiles > Distribution and create an in-house provisioning profile. Repeat this step for each App ID created in the previous step.
-
Download all provisioning profiles.
If your Apple Enterprise account supports wildcard App IDs, you can continue to use a wildcard provisioning profile to wrap apps. However, if you use Apple Push Notification service (APNs) for notifications when Secure Mail is in the background, you must use an explicit provisioning profile and App ID.
Any device on which you want to install the MDX app needs to have the provisioning profile on the device. You can distribute the profile to user devices by using an email attachment. Users can add the profile on their iOS device by clicking the attachment.
For details about provisioning profiles and distribution certificates, see the Apple Developer Account Help.
For more information about deploying the provisioning profile to iOS devices and on handling expired profiles, see the Endpoint Management article on the Provisioning profile device policy.
App upgrades
Important:
Before you upgrade apps, be aware how changes to App IDs or the use of a partial wildcard App ID provisioning profile impact app upgrades.
- Previously wrapped apps upgrade in place unless the App ID has changed. For example, if you change a bundle ID from com.citrix.mail to com.example.mail, there is no upgrade path. The user must reinstall the app. A device considers the app as a new app. The new and prior versions of the app can both reside on the device.
- If you use a partial provisioning profile, such as com.xxxx, to wrap an app with a bundle ID that includes com.citrix, we recommend the following: Remove the installed MDX-wrapped apps and install the apps wrapped with the latest MDX Toolkit. As a result of a bundle ID change from com.citrix.mail to com.example, users must reinstall the app.
- An in-place upgrade succeeds when the following is true: If an app was wrapped with a full wildcard App ID, and the new version of the app has an App ID that matches the installed app.
Policies and mobile productivity apps
Note:
The MDX 10.7.5 release is the final release that supports the wrapping of mobile productivity apps. You cannot use releases of MDX 10.7.10 and later, or the MDX Service, to wrap mobile productivity apps 10.7.5 or later. You must access mobile productivity apps from the public app stores.
Citrix provides a generic set of default policies that apply to all mobile productivity apps and a set of specific policies for some of the mobile productivity apps. Policy file names are based on the bundle ID. By default, the policy file name for a Citrix Endpoint Management app is in the form com.citrix.app_policy_metadata.xml, where app is a name such as “mail”.
If you have an Apple Enterprise account that does not support wildcard App IDs, do the following: Change the company identifier in the bundle ID when you wrap an Endpoint Management app. For example, the bundle ID for Secure Mail is com.citrix.mail. Replace “citrix” in that identifier with your company identifier. If your company identifier is “example”, the bundle ID is com.example.mail. When you wrap that app, the policy file name is com.example.mail_policy_metadata.xml.
To determine which policy file to apply to an app, the MDX Toolkit looks for files in the following order and uses the first file it finds:
- A file name that matches your bundle ID, such as com.example.mail_policy_metadata.xml, as described in the preceding example.
- A file name that matches the original bundle ID, such as com.citrix.mail_policy_metadata.xml.
- A file name that matches the generic default policy file, policy_metadata.xml.
Create your own set of policy defaults for a specific Citrix Endpoint Management app by modifying the files that match your bundle ID or the original bundle ID.
Enterprise app wrapping using the graphical interface
The following steps describe the general process for wrapping an enterprise app that you deploy from Endpoint Management. The general process for ISV app wrapping is described in ISV App Wrapping Using the Graphical Interface.
Important:
Both the private key and the certificate must be installed on the Keychain Access of your Mac before using the graphical interface to wrap iOS apps. If the associated distribution certificate does not have the private key installed into Keychain Access, the graphical interface does not pre-populate the iOS Distribution Certificate list. For details, see “Repairing Your Keychain when the Toolkit Can’t Find a Distribution Certificate,” later in this article.
-
Before you use the toolkit to wrap apps, be sure to back up the original version of those apps so you can return to them if needed.
-
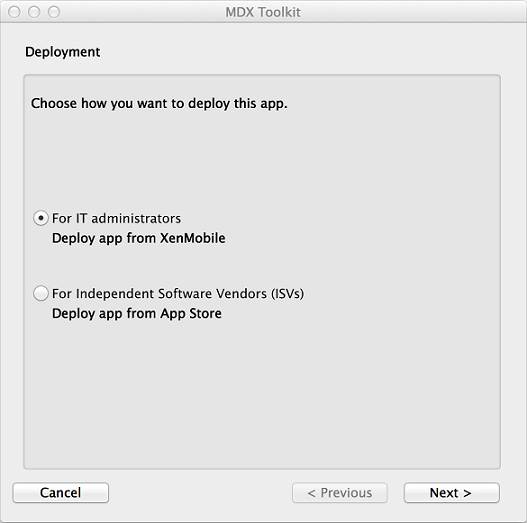
Start the MDX Toolkit from your iOS Applications folder, select For IT administrators, and then click Next.
-
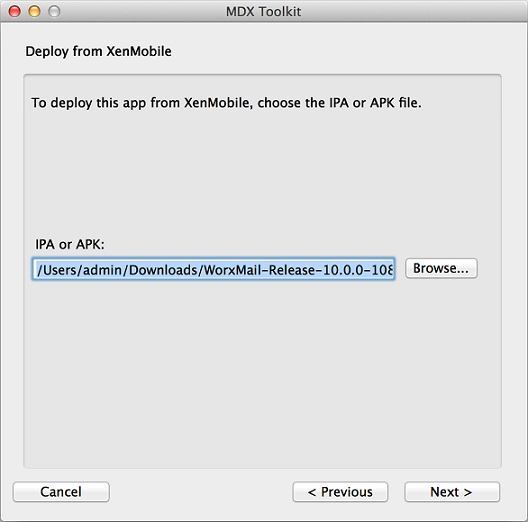
Click Browse, select the file, and then click Next.
-
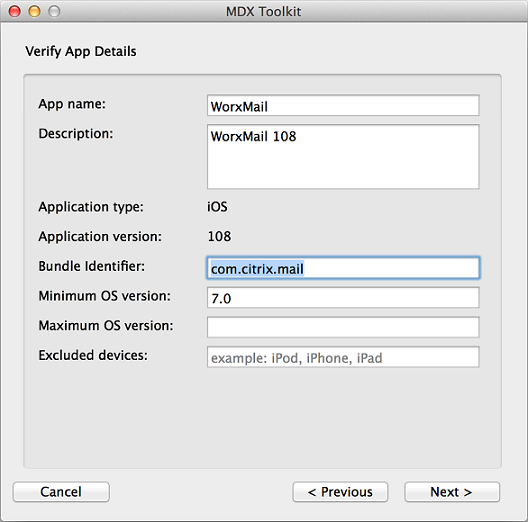
The Verify App Details screen shows information obtained from the app. As needed, change the pre-filled information. Optionally, specify a minimum and maximum OS version and list the device types on which the app is not allowed to run. You can also change the app details after uploading the app to Citrix Endpoint Management.
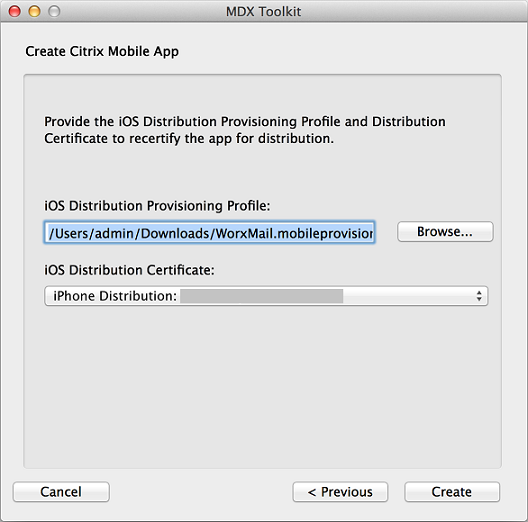
-
In the Create Citrix Mobile App screen, click Browse, select the provisioning profile, and select a distribution certificate. If the iOS Certificate list is empty, repair the keychain on the machine where you are running the MDX Toolkit. For details, see “Repairing Your Keychain when the Toolkit Can’t Find a Distribution Certificate,” later in this article.
-
If you selected a provisioning profile that has an explicit app ID, the tool prompts you to confirm the app ID. For example, the bundle ID for a Citrix Endpoint Management app is com.citrix.ProductName. The provisioning profile that you use must include your company identifier instead of “citrix”.
After you click Yes, click Create.

-
If you selected a provisioning profile that has a wildcard app ID, the tool shows a list of available app IDs. If the app ID you want to use isn’t listed, choose a different provisioning profile. After you choose an app ID, click Create.
-
The toolkit lets you know when the MDX package is created. To wrap another app, click Start Over.
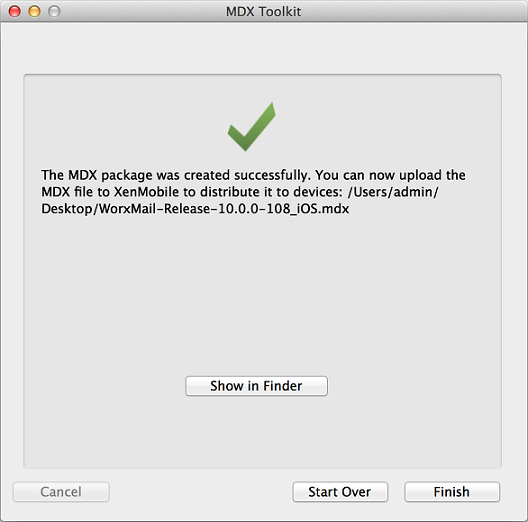
The toolkit appends _iOS to the end of the filename of a wrapped iOS app.
Enterprise iOS app wrapping using the command line
Note:
Be sure to obtain third-party apps directly from the app vendor. iOS apps downloaded from the Apple store are encrypted and cannot be wrapped.
Before you use the toolkit to wrap apps, be sure to back up the original version of those apps so you can return to them if needed.
The following example shows a basic app wrapping command using default settings. Modify the bold information for your specific system. The trailing backslash signifies the command continues to the next line. Remove these symbols before running the command.
To perform these commands, navigate to the /Applications/Citrix/MDXToolkit/ directory in your command line.
A basic iOS wrapping command line is as follows.
./CGAppCLPrepTool \
Wrap \
–Cert CERTIFICATE \
–Profile PROFILE \
-bundleID ID \
–in INPUT_FILE \
–out OUTPUT_FILE
<!--NeedCopy-->
The following is an example of this command-line option.
./CGAppCLPrepTool \
Wrap \
–Cert “iPhone Developer: Joe Admin (12MMA4ASQB)” \
–Profile “team_profile.mobileprovision” \
-bundleID “com.CompanyABC.Sample” \
–in “~/Desktop/SampleApps/Sample.ipa” \
–out “~/Desktop/SampleApps/Sample.mdx”
<!--NeedCopy-->
Examples of options you may add to the preceding command include:
-appName “Wrapped Sample app”
-appDesc “This is my newly wrapped iOS application.”
Both of those options default to the value read from the app, if possible.
For details about the options, see Command Options next. For inline documentation, use the -help option.
Command options
Wrap command
- Help: Displays Help for this command.
- In: Required. Path and file name of the app you are wrapping.
- Out: Optional. Path and file name for the resulting .mdx file. If this option is omitted, the file has the same path and file name as the input file and has an .mdx extension.
- outBundle: Required when generating an .ipa file for uploading to Intune. Path and file name for the resulting .ipa file.
- Cert: Required. Name of the certificate to use to sign the app.
- Profile: Required. Name of the provisioning profile to use to sign the app.
- bundleID: Required for Enterprise accounts that do not support wildcard App IDs. This value is your Apple bundle ID. The MDX Toolkit verifies whether the bundle ID and provisioning profile are compatible.
- Upgrade: This option is intended for legacy apps and will be deprecated. Used for in-place upgrades when you use a partial wildcard provisioning profile. This option ensures that the new binary is signed with the same entitlement as the prior version. If the entitlements do not match, attempts by users to install the upgrade from Secure Hub fail.
- AppName: Optional. App name, obtained from the app if possible.
- AppDesc: Optional. App description, obtained from the app if possible.
- MinPlatform: Optional. Minimum supported platform version. Defaults to blank.
- MaxPlatform: Optional. Maximum supported platform version. Defaults to blank.
- ExcludedDevices: Optional. List of device types on which the app is not allowed to run. Defaults to blank.
- PolicyXML: Optional. Replacement XML policy definition file and path. Defaults to the built-in policy definitions. Example: -policyxml /Applications/Citrix/MDXToolkit/data/policy_metadata.xml. For details, see Presetting MDX Policies for iOS Apps next.
- useNetworkOnlylib: This option wraps the application with the network-only lighter-weight version of the MDX dynamic library. An application wrapped using this option can only be managed by Intune or run unmanaged. It cannot be managed by MDX.
- LogFile: Optional. Name of the log file.
- LogWriteLevel: Optional. Log level, 1 through 4.
- LogDisplayLevel: Optional. Log level for standard output, 0 through 4.
Sign command
- Help: Displays Help for this command.
- In: Required. Path and file name of the app you are wrapping.
- Out: Optional. Path and file name for the resulting .mdx file. If this option is omitted, the file has the same path and file name as the input file and has an .mdx extension.
- Cert: Required. Name of the certificate to use to sign the app.
- Profile: Required. Name of the provisioning profile to use to sign the app.
setinfo command
- Help: Displays Help for this command.
- In: Required. Path and file name of the app to be modified.
- Out: For setinfo, the output path or file name must differ from the original.
- AppDesc: Optional. App description. Remains unchanged if not specified.
- MinPlatform: Optional. Minimum supported SDK level. Remains unchanged if not specified.
- MaxPlatform: Optional. Maximum supported SDK level. Remains unchanged if not specified.
- ExcludedDevices: Optional. List of device types on which the app is not allowed to run. Remains unchanged if not specified.
- StoreURL: Optional. URL of the app in the app store. Remains unchanged if not specified.
- PolicyXML: Optional. Replacement XML policy definition file and path. Defaults to the built-in policy definitions. Example: -policyxml /Applications/Citrix/MDXToolkit/data/policy_metadata.xml. For details, see Presetting MDX Policies for iOS Apps, next.
Presetting MDX policies for iOS apps
For apps that you wrap with the MDX Toolkit command-line tool, you can preset some MDX policies. You can also configure policies in the Citrix Endpoint Management console when you add the apps.
-
Update policy values in the policy XML file.
The MDX Toolkit installer creates this policy file: Applications/Citrix/MDXToolkit/data/policy_metadata.xml
Note:
The policies files for iOS and Android differ. To preset policies for both of those platforms, you must update their respective policy XML files.
-
When you wrap the app with the command line, include
-policyxml /Applications/Citrix/MDXToolkit/data/policy_metadata.xml
Identifying iOS app wrapping errors
If you encounter an error when wrapping an iOS app, you can use the MDX Toolkit logs to identify the error. You must have administrator rights to view the MDX Toolkit logs.
When you run the MDX Toolkit, the tool saves a log file to the following location: Applications > Citrix > MDXToolkit > Logs > Citrix.log. By default, the tool saves warnings and errors in the log.
If an error occurs for an iOS app, a command line with arguments appears at the end of the log. You can copy the command line and run it in Terminal. To do that, in Applications > Utilities, click Terminal, and use the Mac command-line interface to evaluate the command. You may need to refer to the app requirements to evaluate the error.
When you use the command-line tool to run the wrapping process, you can specify the following information in the command line: The log file location, log display level, and log write level. You can also specify verbose logging level and a different log file in the command line.
Selecting the correct provisioning profile
When you wrap a mobile iOS app, you might receive a warning indicating that the app was wrapped successfully, but may contain errors. Errors can occur if the provisioning profile you chose differs from the provisioning profile the app originally used.
The MDX Toolkit can alert you about certain provisioning profile issues. For example, your app may require one or more of the following functions:
- iCloud app that enables the use of iCloud data storage for your iOS app
- Push notification that uses the Apple push notification service to deliver messages to the iOS device
- Special Keychain Access Groups Entitlement to access the keychain item for another app
The logs show the missing key and value pairs for the app. For each key and value pair, you can decide whether you want to fix the error. If you do not fix the error, the app may not function correctly. Also, depending on the key and value pair, you need to check if you can fix your provisioning profile. Occasionally, you might not be able to fix the provisioning profile and can release the app with the defect.
For details about provisioning profiles, see the Apple Developer site.
Repairing your keychain when the Toolkit can’t find a distribution certificate
If the MDX Toolkit does not recognize your iOS Distribution Certificate, there might be an issue between your iCloud Keychain and the keychain on the computer running the MDX Toolkit. To repair your local keychain, follow these steps.
-
On your Mac, in System Preferences, tap iCloud.
-
Clear the Keychain check box.
This step removes your locally synchronized keychain from iCloud.
-
Open Keychain Access, which is in the Utilities folder within the Applications folder.
-
Delete the iOS Developer Certificate used to sign your wrapped apps. This certificate is typically the “iPhone Distribution: Company Name” certificate with an associated private key.
-
From the Keychain Access menu, choose Keychain First Aid.
-
In the Keychain First Aid dialog box, tap Repair and then Start.
-
After the repair completes, tap Verify and then Start.
-
If the repair is successful, import your iOS Distribution Certificate again into the Keychain Access app.
-
Start the MDX Toolkit. The iOS Distribution Provisioning Profile and iOS Distribution Certificate fields should contain your information.
-
As needed, resync you keychain to iCloud: In System Preferences, tap iCloud and then select the Keychain check box.
Resigning apps that contain the MDX App SDK
If your app already contains the MDX App SDK built into it using Xcode, you need to resign the app with your enterprise certificate or provisioning profile. The following is a sample of the Sign Command.
$ /Applications/Citrix/MDXToolkit/CGAppCLPrepTool Sign -help

Command Line Interface for MDX Toolkit, version 10.4.1.290 (Env:Test)

2016-09-29 15:21:45.284 CGAppCLPrepTool[88453:5477658]

---------------------------------------------------------

Sign Command

---------------------------------------------------------

CGAppCLPrepTool Sign -in INPUTFILE -out OUTPUTFILE -Cert CERTIFICATE -Profile PROFILE

-Cert CERTIFICATE        ==> (Required)Name of the certificate to sign the app with

-Profile PROFILE         ==> (Required)Name of the provisioning profile to sign the app with

-in INPUTFILE            ==> (Required)Name of the input app file, ipa/mdx file

-out OUTPUTFILE          ==> (Optional)Name of the output app, ipa(if ipa is input)/mdx file

-upgrade                 ==> (Optional)Preserve in-place upgrade capabilty (not recommended for new apps)

---------------EXAMPLE--------------------

Sign -Cert "iPhone Distribution: Company Name" -Profile "distributionprovisioanl.mobileprovision" -in "/Users/user1/Archives/citrix.ipa"
<!--NeedCopy-->
Collecting System Logs on iOS devices
You can collect System Logs on iOS devices either by using the iPhone Configuration Utility tool or Xcode. You can then email the files to Citrix support for help troubleshoot issues with apps.
To use a Configuration Utility tool to collect System Logs on iOS devices
- Download and install the Apple Configurator (previously the iPhone Configuration Utility) tool from Apple. You can use the tool on both the iPhone and IPad.
- Ensure that your device meets the system requirements and supported languages.
- Run the installer and follow the prompts to complete the wizard.
- Open the Configurator tool.
- Under Devices, click your device.
- Click Console and then click Clear to clear existing logs.
- Reproduce the issue, click Save Console As and then attach and email the logs to support.
To use Xcode to collect logs on iOS devices
-
On the Mac, click Finder, click Go and then click Utilities.
-
In the Utilities folder, double-click Console.
-
In the Console, under Devices, click the iOS device from which you want the console logs.
-
Reproduce the issue.
- In the Console, do one of the following:
- In the main window, select the recent error message.
- On the Console Menu bar, click Edit and then click Select All.
-
Click Edit and then click Copy.
-
Open TextEdit and then paste the logs you copied into a new file.
- Attach the file in your email to support.
In this article
- Deploying iOS devices through Apple DEP
- Creating provisioning profiles
- App upgrades
- Policies and mobile productivity apps
- Enterprise app wrapping using the graphical interface
- Enterprise iOS app wrapping using the command line
- Command options
- Presetting MDX policies for iOS apps
- Identifying iOS app wrapping errors
- Resigning apps that contain the MDX App SDK
- Collecting System Logs on iOS devices
- To use Xcode to collect logs on iOS devices