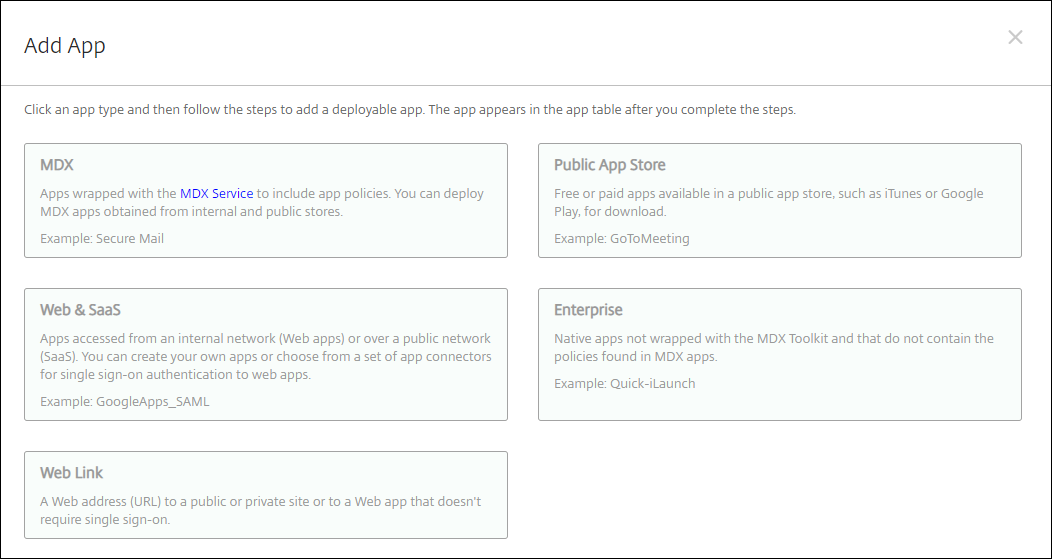
Add apps
Adding apps to Citrix Endpoint Management provides mobile application management (MAM) capabilities. Citrix Endpoint Management assists with application delivery, software licensing, configuration, and application life cycle management.
MDX-enabling apps is an important part of preparing some types of apps for distribution to user devices. For an introduction to MDX, see Citrix Endpoint Management components and MAM SDK overview.
- Citrix recommends use of the MAM SDK to MDX-enable apps. Or, you can continue to MDX-wrap apps until the MDX Toolkit is deprecated. See Deprecation.
- You can’t use the MDX Toolkit to wrap Citrix mobile productivity apps. Get the mobile productivity app MDX files from Citrix downloads.
When you add apps to the Citrix Endpoint Management console, you:
- Configure app settings
- Optionally arrange apps into categories to organize them in Citrix Secure Hub
- Optionally define workflows to require approval before allowing users to access an app
- Deploy apps to users
This article covers the general workflows for adding apps. See the following articles for platform specifics:
Important:
Citrix Endpoint Management supports adding and maintaining up to 300 apps. Going over this limit causes your system to become unstable.
App types and features
The following table summarizes the types of apps that you can deploy with Citrix Endpoint Management.
| App type | Sources | Notes | See |
|---|---|---|---|
| MDX | iOS and Android apps you develop for your users. Citrix mobile productivity apps. | Develop iOS or Android apps with the MAM SDK or wrap them with the MDX Toolkit. For the mobile productivity apps, download the public-store MDX files from Citrix downloads. Then add the apps to Citrix Endpoint Management. | Add an MDX app |
| Public app store | Free or paid apps from public app stores such as Google Play or the Apple App Store. | Upload the apps, MDX-enable the apps, then add the apps to Citrix Endpoint Management. | Add a public app store app |
| Web and SaaS | Your internal network (web apps) or a public network (SaaS). | Citrix Endpoint Management provides mobile single sign-on to native SaaS apps from iOS and Android devices enrolled in MDM. Or, use Security Assertion Markup Language (SAML) application connectors | Add a Web or SaaS app |
| Enterprise | Private apps, including Win32 apps, that aren’t MDX-enabled. Private Android Enterprise apps that are MDX-enabled. Enterprise apps are in Content Delivery Network locations or Citrix Endpoint Management servers. | Add the apps to Citrix Endpoint Management. | Add an enterprise app |
| Web link | Internet web addresses, intranet web addresses, or web apps that don’t require single sign-on. | Configure web links in Citrix Endpoint Management. | Add a Web link |
When planning app distribution, consider these features:
- About silent installations
- About required and optional apps
- About app categories
- Deliver enterprise apps from the Citrix CDN
- Enable Microsoft 365 apps
- Apply workflows
- App store and Citrix Secure Hub branding
- Citrix Virtual Apps and Desktops™ through the app store
About silent installations
Citrix supports the silent installation and upgrade of iOS, Android Enterprise, and Samsung apps. Silent installation means that users aren’t prompted to install apps that you deploy to the device. The apps install automatically in the background.
Prerequisites to implement silent installation:
- For iOS, put the managed iOS device in supervised mode. For more information, see Import iOS & macOS Profile device policy.
- For Android Enterprise, the apps install in the Android work profile on the device. For details, see Android Enterprise.
-
For Samsung devices, enable Samsung Knox on the device.
To do so, you set the Samsung MDM license key device policy to generate Samsung ELM and Knox license access codes. For details, see Samsung MDM license key device policies.
About required and optional apps
When you add apps to a delivery group, you choose whether they’re optional or required. Citrix recommends deploying apps as Required.
-
Required apps install silently on user devices, minimizing interaction. Having this feature enabled also allows apps to update automatically.
-
Optional apps allow users to choose what apps to install, but users must start the installation manually through Citrix Secure Hub.
For apps marked as required, users can promptly receive updates in situations such as:
- You upload a new app and mark it as required.
- You mark an existing app as required.
- A user deletes a required app.
- A Citrix Secure Hub update is available.
Requirements for forced deployment of required apps
- Citrix Secure Hub 10.5.15 for iOS and 10.5.20 for Android (minimum versions)
- MAM SDK or MDX Toolkit 10.6 (minimum version)
- After you upgrade Citrix Endpoint Management and Citrix Secure Hub: Users with enrolled devices must sign off and then sign on to Citrix Secure Hub to get the required app deployment updates.
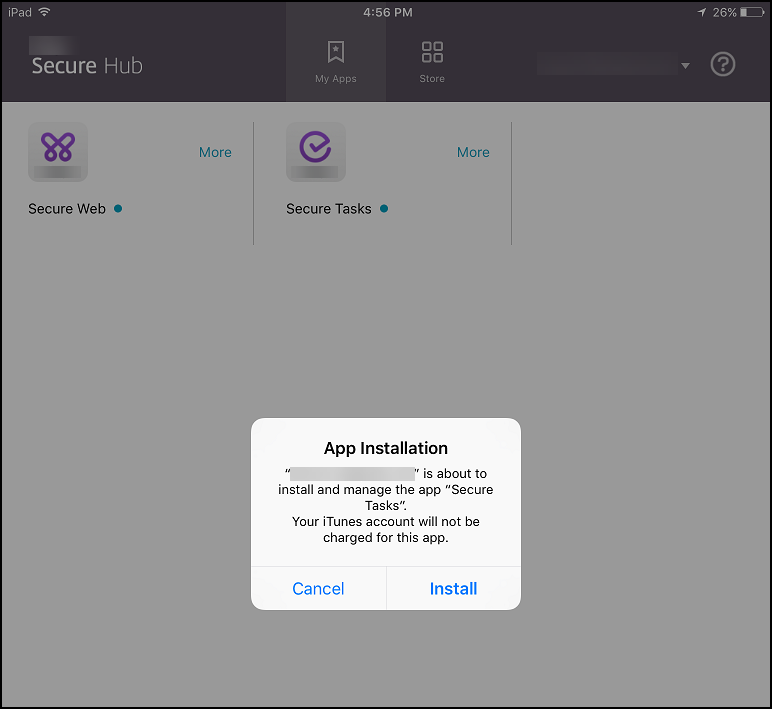
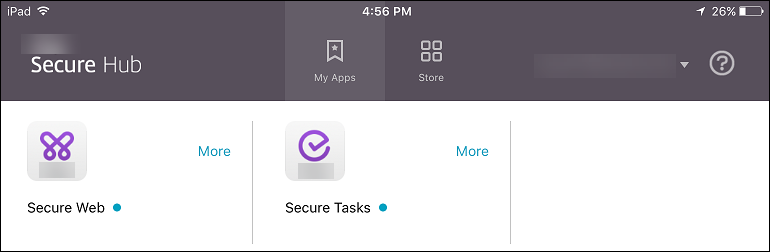
Examples
The following examples show the sequence of adding an app named Secure Tasks to a delivery group and then deploying the delivery group.
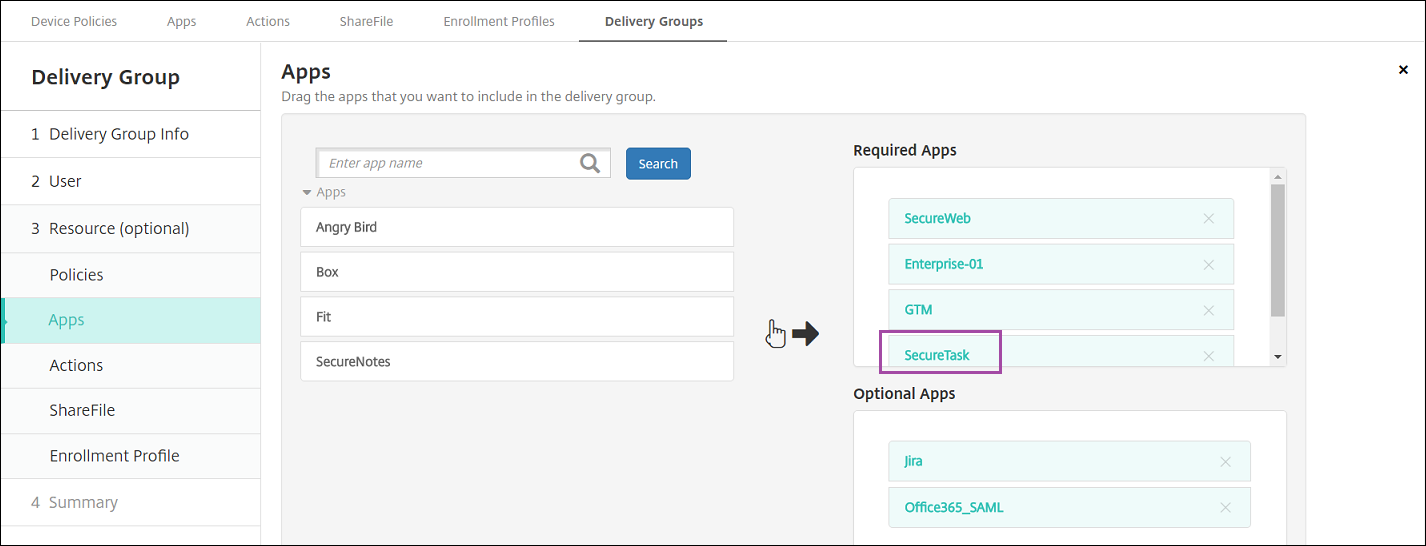
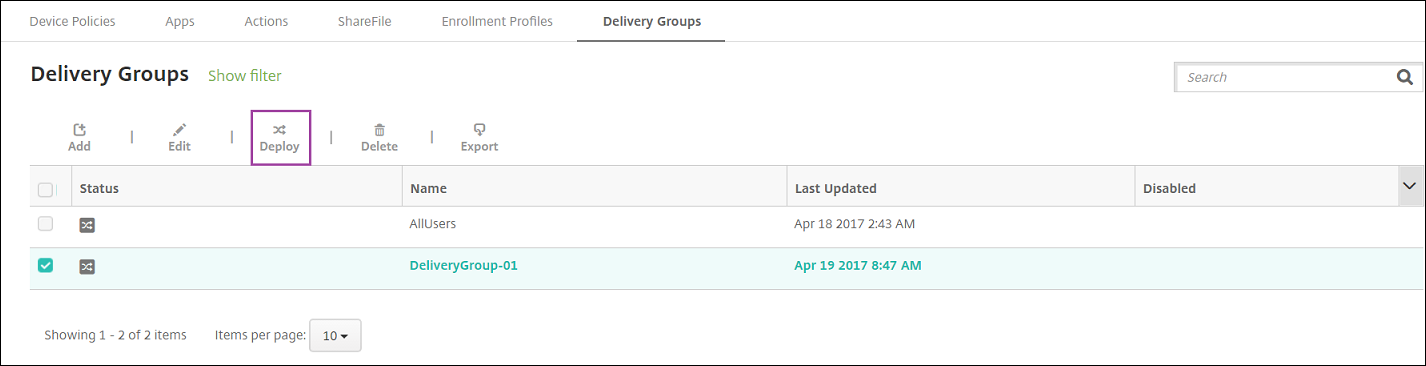
After the sample app, Secure Tasks, deploys to the user device, Citrix Secure Hub prompts the user to install the app.
Important:
MDX-enabled required apps, including enterprise apps and public app store apps, upgrade immediately. This upgrade occurs even if you configure an MDX policy for an app update grace period and the user chooses to upgrade the app later.
iOS required app workflow for enterprise and public store apps
- Deploy the mobile productivity app during initial enrollment. The required app is installed on the device.
- Update the app on the Citrix Endpoint Management console.
- Use the Citrix Endpoint Management console to deploy the required apps.
- The app on the home screen is updated. And, for public store apps, the upgrade starts automatically. Users aren’t prompted to update.
- Users open the app from the home screen. Apps upgrade immediately even if you set an App update grace period and the user taps to upgrade the app later.
Android required app workflow for enterprise apps
- Deploy the mobile productivity app during initial enrollment. The required app is installed on the device.
- Use the Citrix Endpoint Management console to deploy the required apps.
- The app is upgraded. (Nexus devices prompt for install updates, but Samsung devices do a silent install.)
- Users open the app from the home screen. Apps upgrade immediately even if you set an App update grace period and the user taps to upgrade the app later. (Samsung devices do a silent install.)
Android required app workflow for public store apps
- Deploy the mobile productivity app during initial enrollment. The required app is installed on the device.
- Update the app on the Citrix Endpoint Management console.
- Use the Citrix Endpoint Management console to deploy the required apps. Or, open the Citrix Secure Hub Store on the device. The update icon appears in the store.
- App upgrade starts automatically. (Nexus devices prompt users to install the update.)
- Open the app on the home screen. The app is upgraded. Users aren’t prompted for a grace period. (Samsung devices do a silent install.)
Uninstall an app when the app is configured as required
You can allow users to uninstall an app that is configured as required. Go to Configure > Delivery Groups and move the app from Required Apps to Optional Apps.
Recommended: Use a special delivery group to temporarily change an app to optional, so that specific users can uninstall the app. You can then change an existing required app to optional, deploy the app to that delivery group, and then uninstall the app from those devices. After that, if you want future enrollments for that delivery group to require the app, you can set the app back to required.
Organize apps (Android Enterprise)
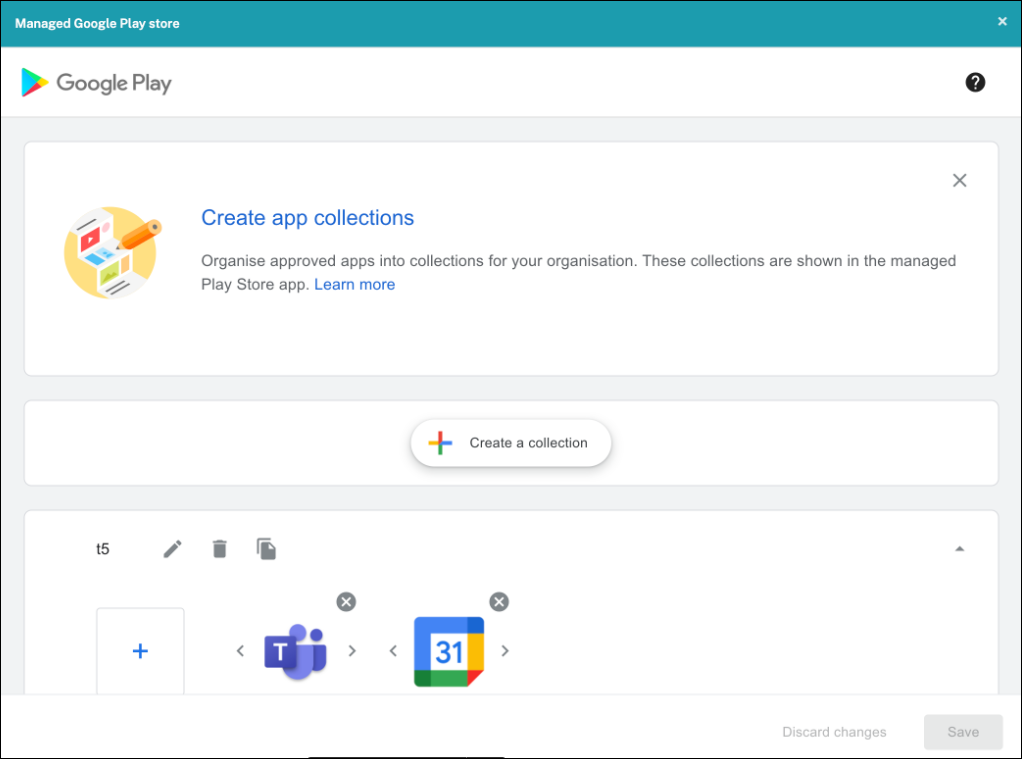
When users log on to Citrix Secure Hub, they receive a list of the apps, web links, and stores that you set up in Citrix Endpoint Management. In Android Enterprise, you can organize these apps into collections to let users access only certain apps, stores, or web links. For example, you create a Finance collection and then add apps to the collection that only pertain to finance. Or, you can configure a Sales collection to which you assign sales apps.
-
In the Citrix Endpoint Management console, click Configure > Apps > Organize Apps. The Managed Google Play store window appears.
-
Click Create a collection and select the apps to be added to that collection.
-
When you’re done adding collections, click Save.
Note:
IT admins need to approve an app before it can be added to a collection on the Managed Google Play window. An IT admin can approve an app by going to https://play.google.com/work. In a future release, you won’t need to approve an app before adding it to a collection.
About app categories (iOS and MDX)
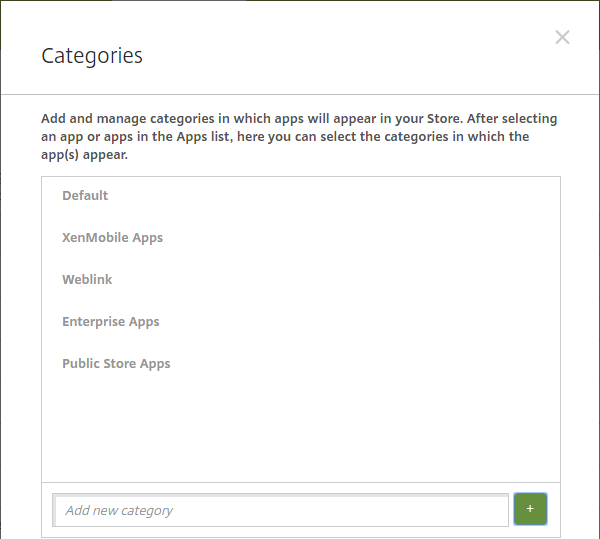
When users log on to Citrix Secure Hub, they receive a list of the apps, web links, and stores that you set up in Citrix Endpoint Management. In iOS or MDX, you can use app categories to let users access only certain apps, stores, or web links. For example, you can create a Finance category and then add apps to the category that only pertain to finance. Or, you can configure a Sales category to which you assign sales apps.
When you add or edit an app, web link, or store, you can add the app to one or more of the configured categories.
-
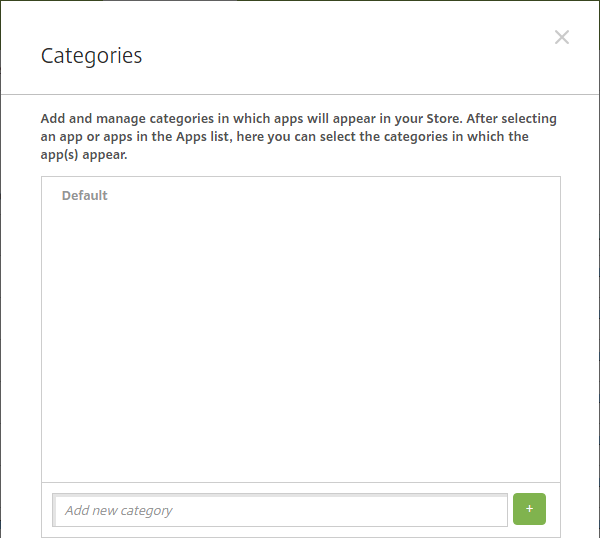
In the Citrix Endpoint Management console, click Configure > Apps > Category. The Categories dialog box appears.
-
For each category you want to add, do the following:
- Type the name of the category that you want to add in the Add a new category field at the bottom of the dialog box. For example, you might type Enterprise Apps to create a category for enterprise apps.
- Click the plus sign (+) to add the category. The newly created category is added and appears in the Categories dialog box.
-
When you’re done adding categories, close the Categories dialog box.
-
On the Apps page, you can place an existing app into a new category.
- Select the app that you want to categorize.
- Click Edit. The App Information page appears.
- In the App category list, apply the new category by selecting the category checkbox. Clear the checkboxes for any existing categories that you don’t want to apply to the app.
- Click the Delivery Groups Assignments tab or click Next on each of the following pages to step through the remaining app set-up pages.
- Click Save on the Delivery Groups Assignments page to apply the new category. The new category is applied to the app and appears in the Apps table.
Add an MDX app
When you receive an MDX file for an iOS or Android app, you can upload the app to Citrix Endpoint Management. After you upload the app, you can configure app details and policy settings. For information about the app policies that are available for each device platform type, see:
-
For Citrix mobile productivity apps, download the public-store MDX files: Go to https://www.citrix.com/downloads. Navigate to Citrix Endpoint Management (XenMobile) > Citrix Endpoint Management Productivity Apps.
-
For other types of MDX apps, get the MDX file.
-
In the Citrix Endpoint Management console, click Configure > Apps > Add. The Add App dialog box appears.
-
Click MDX. The MDX App Information page appears.
-
On the App Information pane, type the following information:
- Name: Type a descriptive name for the app. The name appears under App Name on the Apps table.
- Description: Type an optional description of the app.
- App category: Optionally, in the list, click the category to which you want to add the app. For more information about app categories, see About app categories.
-
Click Next. The App Platforms page appears.
-
Under Platforms, select the platforms you want to add. If you’re only configuring for one platform, clear the others.
-
To select an MDX file to upload, click Upload and navigate to the file location.
-
In the App details page, configure these settings:
- File name: Type the file name associated with the app.
- App Description: Type a description for the app.
- App version: Optionally, type the app version number.
- Package ID: Type the package ID for the app from the managed Google Play Store.
- Minimum OS version: Optionally, type the oldest operating system version that the device can run to use the app.
- Maximum OS version: Optionally, type the most recent operating system that the device must run to use the app.
- Excluded devices: Optionally, type the manufacturer or models of devices that can’t run the app.
- Remove app if MDM profile is removed: Select whether to remove the app from an iOS device when the MDM profile is removed. The default is On.
- Prevent app data backup: Select whether to prevent users from backing up app data on iOS devices. The default is On.
- Product track: Specify which product track that you want to push to iOS devices. If you have a track designed for testing, you can select and assign it to your users. The default is Production.
- Force app to be managed: For an app that installs as unmanaged, select whether to prompt users to allow the app to be managed on unsupervised iOS devices. The default is On.
- App deployed via volume purchase: Select whether to deploy the app by using Apple volume purchase. If On, and you deploy an MDX version of the app and use volume purchase to deploy the app, Citrix Secure Hub shows only the volume purchase instance. Default is Off.
-
Configure the MDX Policies. MDX policies vary by platform and include options for policy areas, including authentication, device security, and app restrictions. In the console, each of the policies has a tooltip that describes the policy.
-
Configure the deployment rules. For information, see Configure deployment rules.
-
Expand Store Configuration.
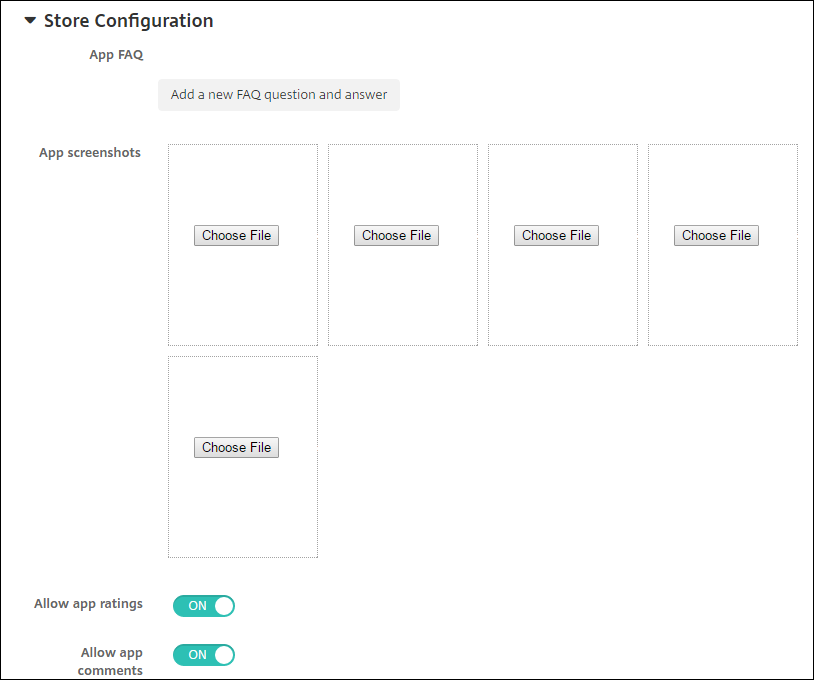
Optionally, you can configure the following:
- App FAQ: Click Add a new FAQ question and answer to create a FAQ for the app.
- Add screenshots for phones/tablets: Add screen captures that appear in the app store.
- Allow app ratings: Allow users to rate the app in the app store.
- Allow app comments: Allow users to leave comments on the app in the app store.
-
Click Next. The Delivery Group Assignment page appears.
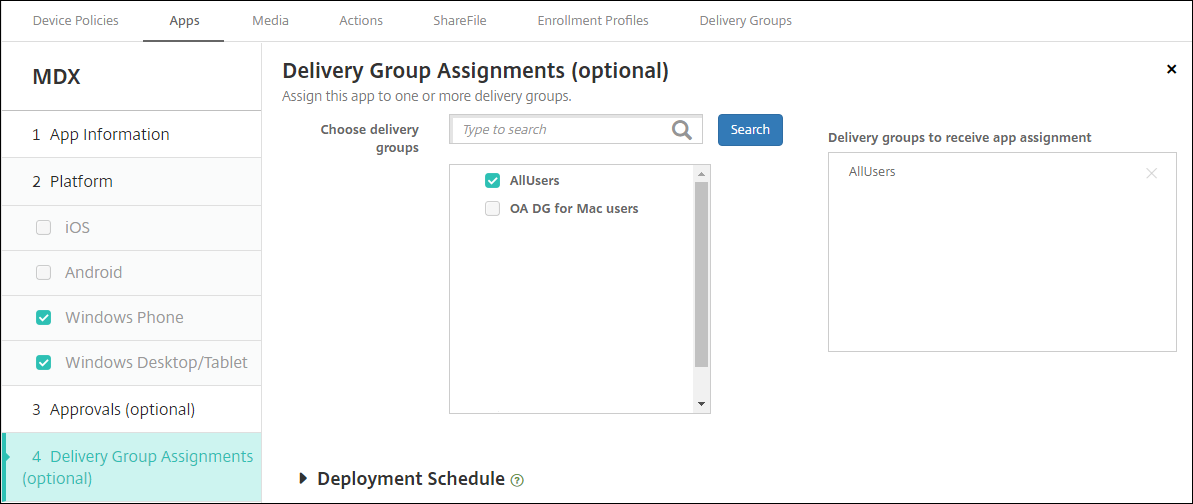
-
Next to Choose delivery groups, type to find a delivery group or select a group or groups in the list. The groups you select appear in the Delivery groups to receive app assignment list.
-
Expand Deployment Schedule and then configure the following settings:
- Deploy: Choose whether to deploy the app to devices. The default is On.
- Deployment schedule: Choose whether to deploy the app Now or Later. If you select Later, configure a date and time to deploy the app. The default is Now.
- Deployment condition: Choose On every connection to deploy the app every time the device connects. Choose Only when previous deployment has failed to deploy the app when the device failed to receive the app previously. The default is On every connection.
The Deploy for always-on connection option applies when you’ve configured the scheduling background deployment key in Settings > Server Properties.
The always-on option:
- Isn’t available for iOS devices
- Isn’t available for Android and Android Enterprise customers who began using Citrix Endpoint Management with version 10.18.19 or later
- Isn’t recommended for Android and Android Enterprise customers who began using Citrix Endpoint Management before version 10.18.19
The deployment schedule that you configure is the same for all platforms. Any changes you make apply to all platforms, except for Deploy for always-on connection.
-
Click Save.
Add a public app store app
You can add free or paid apps to Citrix Endpoint Management that are available in a public app store, such as the Apple App Store.
You can configure settings to retrieve app names and descriptions from the Apple App Store. When you retrieve the app information from the store, Citrix Endpoint Management overwrites the existing name and description. Manually configure Google Play store app information.
Note:
Paid apps for Android through Android Enterprise Managed Google Play is no longer supported by Google. For more information, see Managed Google Play Help documentation.
Configure app information and choose platforms to deliver the app to:
-
In the Citrix Endpoint Management console, click Configure > Apps > Add. The Add App dialog box appears.
-
Click Public App Store. The App Information page appears.
-
On the App Information pane, type the following information:
- Name: Type a descriptive name for the app. This name appears under App Name on the Apps table.
- Description: Type an optional description of the app.
- App category: Optionally, in the list, click the category to which you want to add the app. For more information about app categories, see About app categories.
-
Click Next. The App Platforms page appears.
-
Under Platforms, select the platforms you want to add. If you’re only configuring for one platform, clear the others.
Next you configure the app settings for each platform. See:
- Configure app settings for Google Play apps
- Managed app store apps
- Configure app settings for iOS apps
When you finish configuring the settings for a platform, set the platform deployment rules and app store configuration.
-
Configure the deployment rules. For information, see Configure deployment rules.
-
Expand Store Configuration.
Optionally, you can configure the following:
- App FAQ: Click Add a new FAQ question and answer to create a FAQ for the app.
- Add screenshots for phones/tablets: Add screen captures that appear in the app store.
- Allow app ratings: Allow users to rate the app in the app store.
- Allow app comments: Allow users to leave comments on the app in the app store.
Configure app settings for Google Play apps
Note:
To make all apps in the Google Play store accessible from managed Google Play, use the Access all apps in the managed Google Play store server property. (See Server properties.) Setting this property to true allows all Android Enterprise users to access public Google Play store apps. You can then use the Restrictions device policy to control access to these apps.
Configuring settings for Google Play store apps requires different steps than apps for other platforms. Manually configure Google Play store app information.
-
Make sure that Google Play is selected under Platforms.
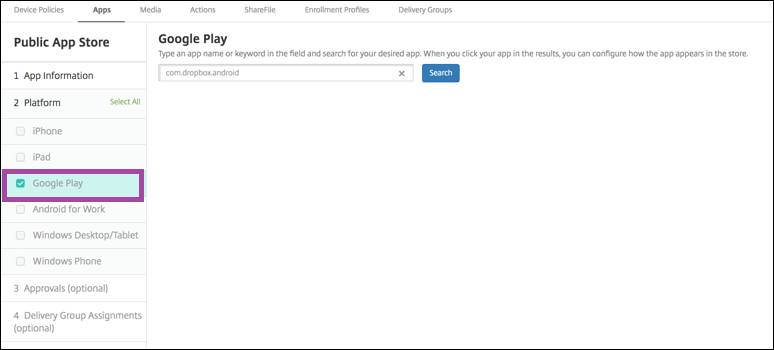
-
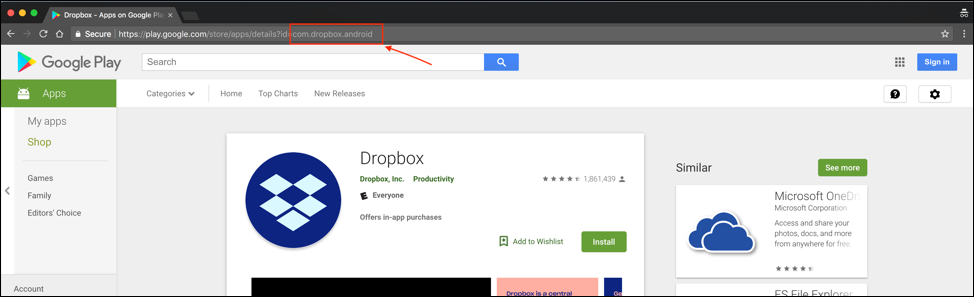
Go to the Google Play store. From the Google Play store, copy the package ID. The ID can be found in the URL of the app.
-
When adding a Public Store app in the Citrix Endpoint Management console, paste the package ID in the search bar. Click Search.
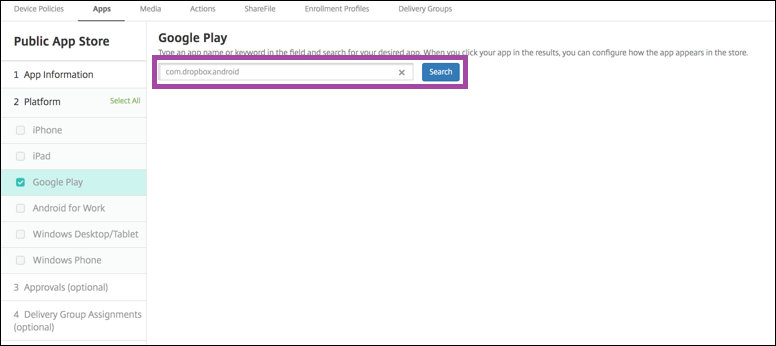
-
If the package ID is valid, a UI appears allowing you to enter app details.

-
You can configure the URL for the image to appear with the app in the store. To use the image from the Google Play store:
-
Go the Google Play store. Right-click the app image and copy the image address.
-
Paste the image address into the Image URL field.
-
Click Upload image. The image appears beside Image.
-
If you don’t configure an image, the generic Android image appears with the app.
Configure app settings for iOS apps
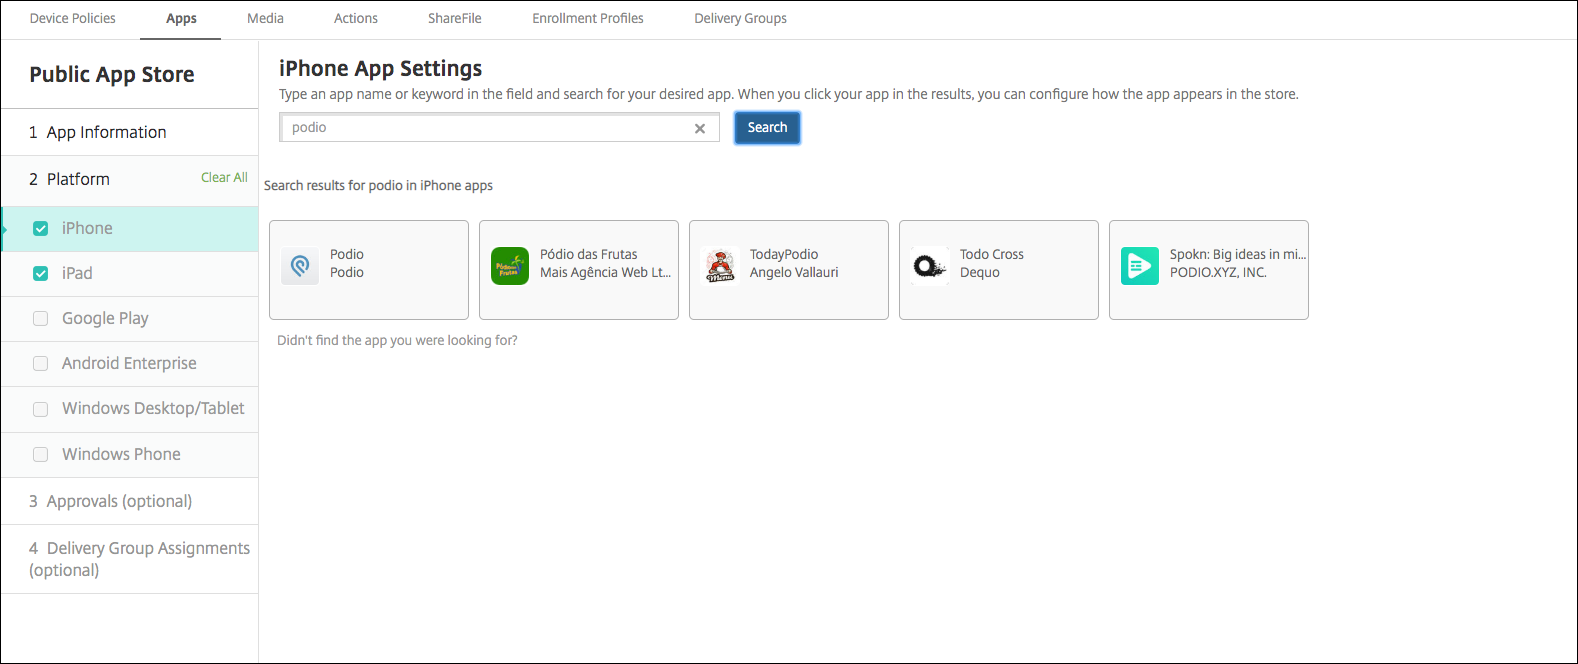
-
Type the app name in the search box and click Search. Apps matching the search criteria appear. Apps matching the search criteria appear.
The following figure shows the result of searching for podio in apps on an iPhone.
-
Click the app that you want to add.
-
The App Details fields pre-populate with information related to the chosen app (including the name, description, version number, and associated image).

-
Configure the settings:
- If necessary, change the name and description for the app.
- App URL: Enter a comma-separated list of URLs to launch your apps from the Citrix Workspace app. This field is only available for iPhone and iPad devices.
- Paid app: This field is preconfigured and cannot be changed.
- Remove app if MDM profile is removed: Select whether to remove the app if the MDM profile is removed. The default is On.
- Prevent app data backup: Select whether to prevent the app from backing up data. The default is On.
- Product track: Specify which product track that you want to push to user devices. If you have a track designed for testing, you can select and assign it to your users. The default is Production.
- Force app to be managed: For an app that installs as unmanaged, select whether to prompt users to allow the app to be managed on unsupervised iOS devices. The default is Off. For iOS devices enrolled through user enrollment, Citrix Endpoint Management doesn’t enforce this setting and doesn’t prompt users to allow app management.
- Force license to association to device: Select whether to associate an app (developed with device association enabled) to a device rather than to a user. If the app you chose does not support assignment to a device, you can’t change this setting.
-
Configure the deployment rules. For information, see Configure deployment rules.
-
Expand Store Configuration.
Optionally, you can configure the following:
- App FAQ: Click Add a new FAQ question and answer to create a FAQ for the app.
- Add screenshots for phones/tablets: Add screen captures that appear in the app store.
- Allow app ratings: Allow users to rate the app in the app store.
- Allow app comments: Allow users to leave comments on the app in the app store.
-
For iPhone or iPad, expand Volume Purchase.
-
To enable Citrix Endpoint Management to apply a volume purchase license for the app: In the Volume purchase license list, click Upload a volume purchase license.
-
In the dialog box that appears, import the license.
The License Assignment table shows the number of licenses in use for the app, out of the total licenses available.
You can disassociate Volume Purchase licenses for an individual user. Doing so ends the license assignments and frees licenses.
-
When you add your volume purchase account, enable App Auto Update. This setting makes sure that apps on user devices automatically update when an update appears in the Apple store. If an app has the Force app to be managed setting enabled, it updates without prompting the user. The update happens whether the app is required or optional.
-
-
After you complete the Volume Purchase settings, click Next. The Approvals page appears.
To use workflows to require approval before allowing users to access the app, see Apply workflows. If you don’t need approval workflow, continue with the next step.
-
Click Next. The Delivery Group Assignment page appears.
-
Next to Choose delivery groups, type to find a delivery group or select a group or groups in the list. The groups you select appear in the Delivery groups to receive app assignment list.
-
Expand Deployment Schedule and then configure the following settings:
- Deploy: Choose whether to deploy the app to devices. The default is On.
- Deployment schedule: Choose whether to deploy the app Now or Later. If you select Later, configure a date and time to deploy the app. The default is Now.
- Deployment condition: Choose On every connection to deploy the app every time the device connects. Choose Only when previous deployment has failed to deploy the app when the device failed to receive the app previously. The default is On every connection.
The Deploy for always-on connection option applies when you’ve configured the scheduling background deployment key in Settings > Server Properties.
The always-on option:
- Isn’t available for iOS devices
- Isn’t available for Android and Android Enterprise customers who began using Citrix Endpoint Management with version 10.18.19 or later
- Isn’t recommended for Android and Android Enterprise customers who began using Citrix Endpoint Management before version 10.18.19
The deployment schedule that you configure is the same for all platforms. Any changes you make apply to all platforms, except for Deploy for always-on connection.
-
Click Save.
Add a Web or SaaS app
Using the Citrix Endpoint Management console, you can give users single sign-on (SSO) authorization to your enterprise, web, and SaaS apps.
You can build your own connector in Citrix Endpoint Management when you add a Web app or SaaS app. For a list of connector types available in Citrix Endpoint Management, see Application connector types.
If an app is available for SSO only: After you save the settings, the app appears on the Apps tab in the Citrix Endpoint Management console.
-
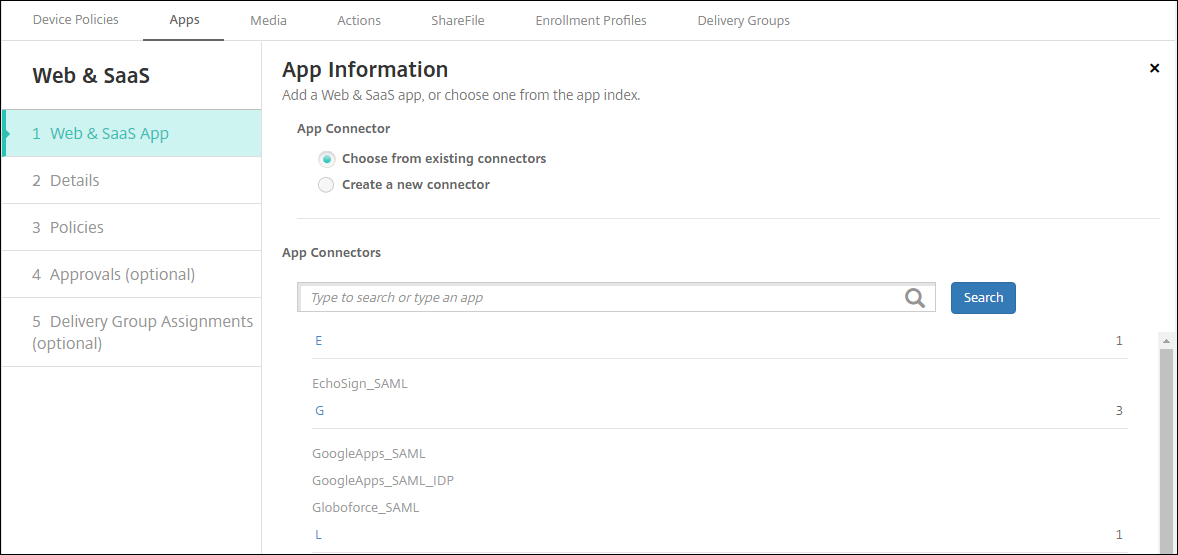
In the Citrix Endpoint Management console, click Configure > Apps > Add. The Add App dialog box appears.
-
Click Web & SaaS. The App Information page appears.
-
Configure an existing or new app connector as follows.
To configure an existing app connector
-
In the App Information page, Choose from existing connectors is already selected, as shown previously. Click the connector that you want to use in the App Connectors list. The app connector information appears.
-
Configure these settings:
- App name: Accept the pre-filled name or type a new name.
- App description: Accept the pre-filled description or type one of your own.
- URL: Accept the pre-filled URL or type the web address for the app. Depending on the connector you choose, this field can have a placeholder that you must replace before you can move to the next page.
- Domain name: If applicable, type the domain name of the app. This field is required.
- App is hosted in internal network: Select whether the app is running on a server in your internal network. If users connect from a remote location to the internal app, they must connect through NetScaler Gateway. Setting this option to On adds the VPN keyword to the app and allows users to connect through NetScaler Gateway. The default is Off.
- App category: Click an optional category in the drop-down list to apply to the app.
- User account provisioning: Select whether to create user accounts for the app. If you use the Globoforce_SAML connector, you must enable this option to provide seamless SSO integration.
- If you enable User account provisioning, configure these settings:
-
Service Account
- User name: Type the name of the app administrator. This field is required.
- Password: Type the app administrator password. This field is required.
-
User Account
- When user entitlement ends: Click the action in the drop-down list to take when users are no longer allowed access to the app. The default is Disable account.
-
User Name Rule
- For each user name rule you want to add, do the following:
- User attributes: Click the user attribute in the drop-down list to add to the rule.
- Length (characters): Click the number in the drop-down list of characters from the user attribute to use in the user name rule. The default is All.
- Rule: Each user attribute you add is automatically appended to the user name rule.
- For each user name rule you want to add, do the following:
-
Service Account
-
Password Requirement
- Length: Type the minimum user password length. The default is 8.
-
Password Expiration
- Validity (days): Type the number of days the password is valid. Valid values are 0–90. The default is 90.
- Automatically reset password after it expires: Select whether to reset the password automatically when it expires. The default is Off. If you don’t enable this field, users can’t open the app after their passwords expire.
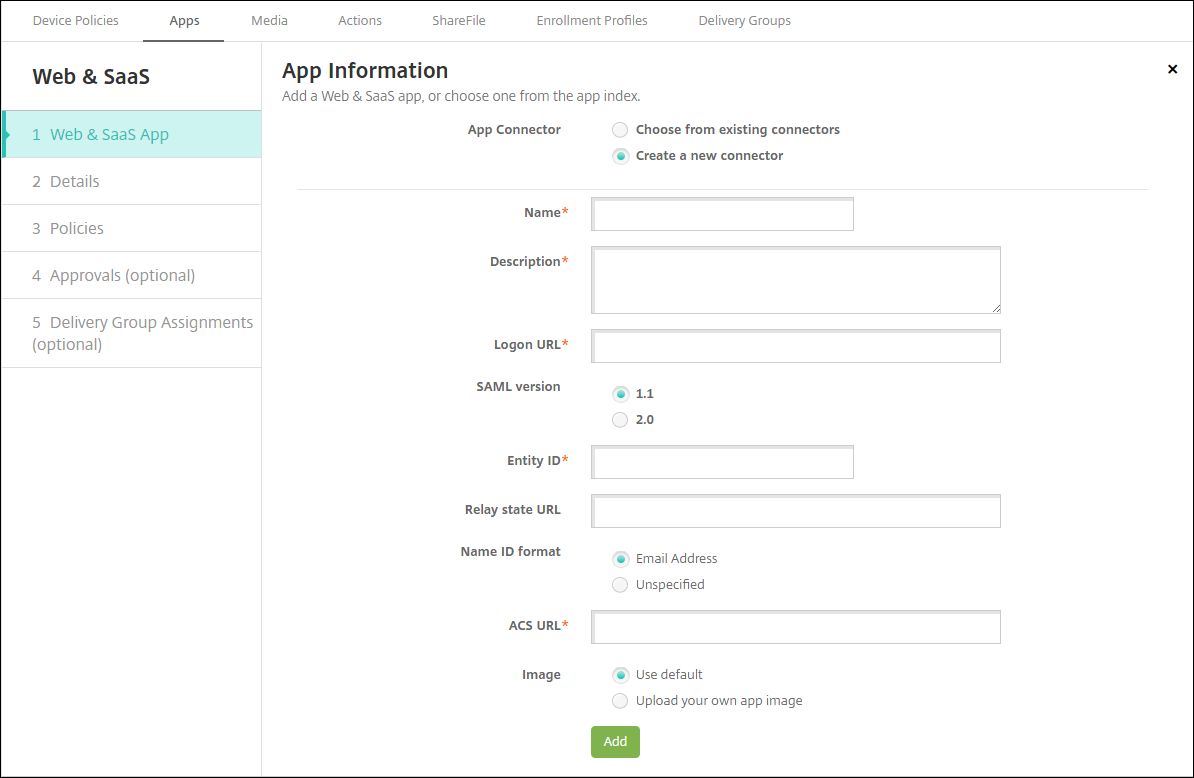
To configure a new app connector
-
In the App Information page, select Create a new connector. The app connector fields appear.
-
Configure these settings:
- Name: Type a name for the connector. This field is required.
- Description: Type a description for the connector. This field is required.
-
Logon URL: Type, or copy and paste, the URL where users log on to the site. For example, if the app you want to add has a logon page, open a web browser and go to the logon page for the app. For example, it might be
https://www.example.com/logon. This field is required. - SAML version: Select either 1.1 or 2.0. The default is 1.1.
- Entity ID: Type the identity for the SAML app.
- Relay state URL: Type the web address for the SAML application. The relay state URL is the response URL from the app.
- Name ID format: Select either Email Address or Unspecified. The default is Email Address.
- ACS URL: Type the Assertion Consumer Service URL of the identity provider or service provider. The ACS URL gives users SSO capability.
-
Image: Select whether to use the default Citrix image or to upload your own app image. The default is Use default.
- To upload your own image, click Browse and navigate to the file location. The file must be a .PNG file. You can’t upload a JPEG or GIF file. When you add a custom graphic, you can’t change it later.
- When you’re finished, click Add. The Details page appears.
-
Click Next. The App Policy page appears.
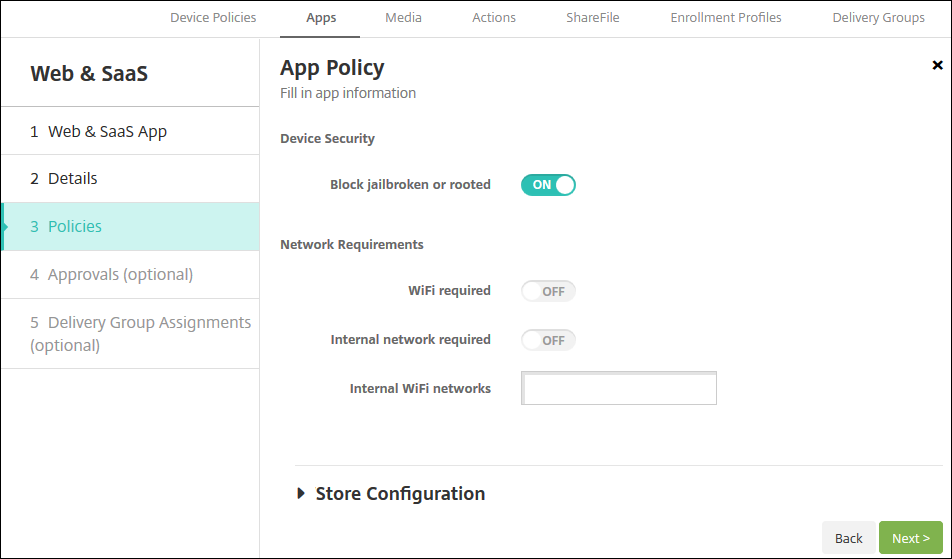
- Configure these settings:
- Device Security
- Block jailbroken or rooted: Select whether to block jailbroken or rooted devices from accessing the app. The default is On.
- Network Requirements
- WiFi required: Select whether a Wi-Fi connection is required to run the app. The default is Off.
- Internal network required: Select whether an internal network is required to run the app. The default is Off.
- Internal WiFi networks: If you enabled Wi-Fi required, type the internal Wi-Fi network to use.
-
Expand Store Configuration.
Optionally, you can configure the following:
- App FAQ: Click Add a new FAQ question and answer to create a FAQ for the app.
- Add screenshots for phones/tablets: Add screen captures that appear in the app store.
- Allow app ratings: Allow users to rate the app in the app store.
- Allow app comments: Allow users to leave comments on the app in the app store.
-
Click Next. The Approvals page appears.
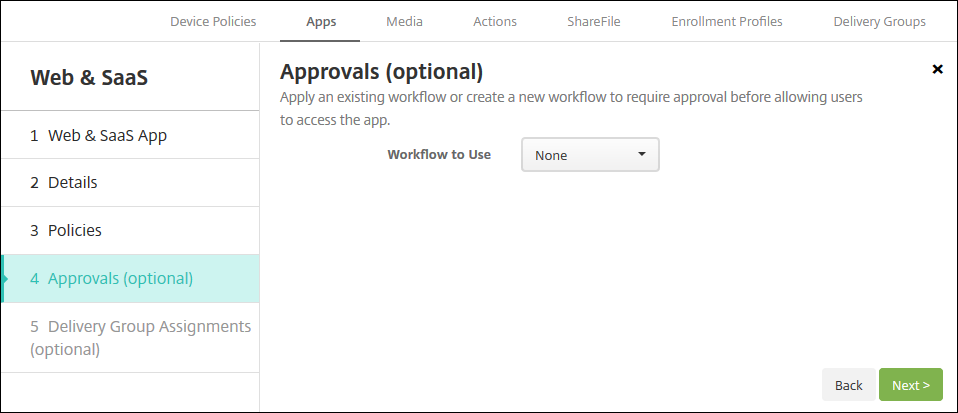
To use workflows to require approval before allowing users to access the app, see Apply workflows. If you don’t need approval workflow, continue with the next step.
-
Click Next. The Delivery Group Assignment page appears.
-
Next to Choose delivery groups, type to find a delivery group or select a group or groups. The groups you select appear in the Delivery groups to receive app assignment list.
-
Expand Deployment Schedule and then configure the following settings:
- Deploy: Choose whether to deploy the app to devices. The default is On.
- Deployment schedule: Choose whether to deploy the app Now or Later. If you select Later, configure a date and time to deploy the app. The default is Now.
- Deployment condition: Choose On every connection to deploy the app every time the device connects. Choose Only when previous deployment has failed to deploy the app when the device failed to receive the app previously. The default is On every connection.
The Deploy for always-on connection option applies when you’ve configured the scheduling background deployment key in Settings > Server Properties.
The always-on option:
- Isn’t available for iOS devices
- Isn’t available for Android and Android Enterprise customers who began using Citrix Endpoint Management with version 10.18.19 or later
- Isn’t recommended for Android and Android Enterprise customers who began using Citrix Endpoint Management before version 10.18.19
The deployment schedule that you configure is the same for all platforms. Any changes you make apply to all platforms, except for Deploy for always-on connection.
- Click Save.
Add an enterprise app
Enterprise apps in Citrix Endpoint Management are private apps that you develop or get from another source. Except for private Android Enterprise apps delivered as MDX-enabled apps, enterprise apps aren’t prepared with the MAM SDK or MDX Toolkit. You can upload an enterprise app on the Apps tab in the Citrix Endpoint Management console. Enterprise apps support the following platforms (and corresponding file types):
- iOS (.ipa file)
-
macOS (.pkg file)
Citrix Endpoint Management does not limit the size of PKG files you upload but limits file upload times. By default, you must complete your upload within 100 s. For more information, see Server properties.
- Android (.apk file)
- Android Enterprise (.apk file)
- See also: Add Win32 apps as Enterprise apps
- See also: MDX-enabled private apps
Adding apps downloaded from the Google Play store as enterprise apps isn’t supported. Add apps from the Google Play store as public app store apps instead. See Add a public app store app.
-
In the Citrix Endpoint Management console, click Configure > Apps > Add. The Add App dialog box appears.
-
Click Enterprise. The App Information page appears.
-
On the App Information pane, type the following information:
- Name: Type a descriptive name for the app. This name is listed under App Name on the Apps table.
- Description: Type an optional description of the app.
- App category: Optionally, in the list, click the category to which you want to add the app. For more information about app categories, see About app categories.
-
Click Next. The App Platforms page appears.
-
Under Platforms, select the platforms you want to add. If you’re only configuring for one platform, clear the others.
-
For each platform you chose, select the file to upload by clicking Upload and navigating to the file location.
-
Click Next. The app information page for the platform appears.
-
Configure the settings for the platform type, such as:
- File name: Optionally, type a new name for the app.
- App description: Optionally, type a new description for the app.
- App version: You can’t change this field.
- Minimum OS version: Optionally, type the oldest operating system version that the device can run to use the app.
- Maximum OS version: Optionally, type the most recent operating system that the device must run to use the app.
- Excluded devices: Optionally, type the manufacturer or models of devices that can’t run the app.
- Package ID: Unique identifier of your app.
- Remove app if MDM profile is removed: Select whether to remove the app from a device when the MDM profile is removed. The default is On. This setting doesn’t apply to macOS.
- Prevent app data backup: Select whether to prevent the app from backing up data. The default is On. This setting doesn’t apply to macOS.
-
Force app to be managed: Select whether to install an app as a managed app on unsupervised devices. The device type determines how Citrix Endpoint Management processes this setting when enabled. If you enable this setting, the app updates without prompting the user. The update happens whether the app is required or optional. The default is Off.
- For iOS devices, if the app was already installed, users receive a prompt to allow the app to be managed. If you deploy an app to devices where the app doesn’t exist, the app installs as a managed app whatever the state of this setting. Available on iOS 9.0 and later. For iOS devices enrolled through user enrollment, Citrix Endpoint Management doesn’t enforce this setting and doesn’t prompt users to allow app management.
- For macOS devices, enable the setting, and then deploy the app to the devices. The app automatically installs as a managed app. Users don’t receive any prompts. If you deploy an app to devices where the app doesn’t exist, the app installs as a managed app whatever the state of this setting. Available on macOS 11.0 and later.
-
Configure the deployment rules. For information, see Configure deployment rules.
-
Expand Store Configuration.
Optionally, you can configure the following:
- App FAQ: Click Add a new FAQ question and answer to create a FAQ for the app.
- Add screenshots for phones/tablets: Add screen captures that appear in the app store.
- Allow app ratings: Allow users to rate the app in the app store.
- Allow app comments: Allow users to leave comments on the app in the app store.
-
Click Next. The Approvals page appears.
To use workflows to require approval before allowing users to access the app, see Apply workflows. If you don’t need an approval workflow, continue to the next step.
-
Click Next. The Delivery Group Assignment page appears.
-
Next to Choose delivery groups, type to find a delivery group or select a group or groups in the list. The groups you select appear in the Delivery groups to receive app assignment list.
-
Expand Deployment Schedule and then configure the following settings:
- Deploy: Choose whether to deploy the app to devices. The default is On.
- Deployment schedule: Choose whether to deploy the app Now or Later. If you select Later, configure a date and time to deploy the app. The default is Now.
- Deployment condition: Choose On every connection to deploy the app every time the device connects. Choose Only when previous deployment has failed to deploy the app when the device failed to receive the app previously. The default is On every connection.
The Deploy for always-on connection option applies when you’ve configured the scheduling background deployment key in Settings > Server Properties.
The always-on option:
- Isn’t available for iOS devices
- Isn’t available for Android and Android Enterprise customers who began using Citrix Endpoint Management with version 10.18.19 or later
- Isn’t recommended for Android and Android Enterprise customers who began using Citrix Endpoint Management before version 10.18.19
The deployment schedule that you configure is the same for all platforms. Any changes you make apply to all platforms, except for Deploy for always-on connection.
-
Click Save.
Add Win32 apps as Enterprise apps
You can upload MSI, APPX, AppxBundle, PS1, or EXE files for Win32 apps to Citrix Endpoint Management for deployment to managed Windows 10 and Windows 11 Desktop and Tablet devices. After you use Citrix Endpoint Management to deploy the files, the Windows device then installs the app as follows:
- If the upgraded app removes the old version during installation, then the device includes only the upgraded app.
- If the upgraded app can’t remove the old version, but the new version can install, then the device includes both versions of the app. Citrix Endpoint Management no longer has the information for the old version.
- If the upgraded app can’t install when an old version exists, the new app doesn’t install. In that case, first deploy the App Uninstall device policy to remove the old version. Then, deploy the new version.
Requirements
- Windows 10 (version 1607 or later) or Windows 11
- Windows 10 Professional or Windows 11 Professional
- Windows 10 Enterprise or Windows 11 Enterprise
- Standalone Win32 MSI apps installed with the /quiet option. For this deployment use case, Microsoft doesn’t support MSIs with more than one app, nested MSIs, or interactive installation.
Look up metadata
When you add a Win32 app to Citrix Endpoint Management, specify the metadata for the app. To look up the metadata, use the Orca application on a Windows computer and make note of the following information:
- Product code
- Product name
- Product version
- Package install type, either per user or per machine
Add a Win32 app to Citrix Endpoint Management
-
Go to Configure > Apps, click Enterprise, and type a name for the app in the App Information page.
-
Clear all Platform checkboxes except for Windows Desktop/Tablet.
-
On the Windows Desktop/Tablet Enterprise App page, click Upload and navigate to the file.
-
Configure these settings:
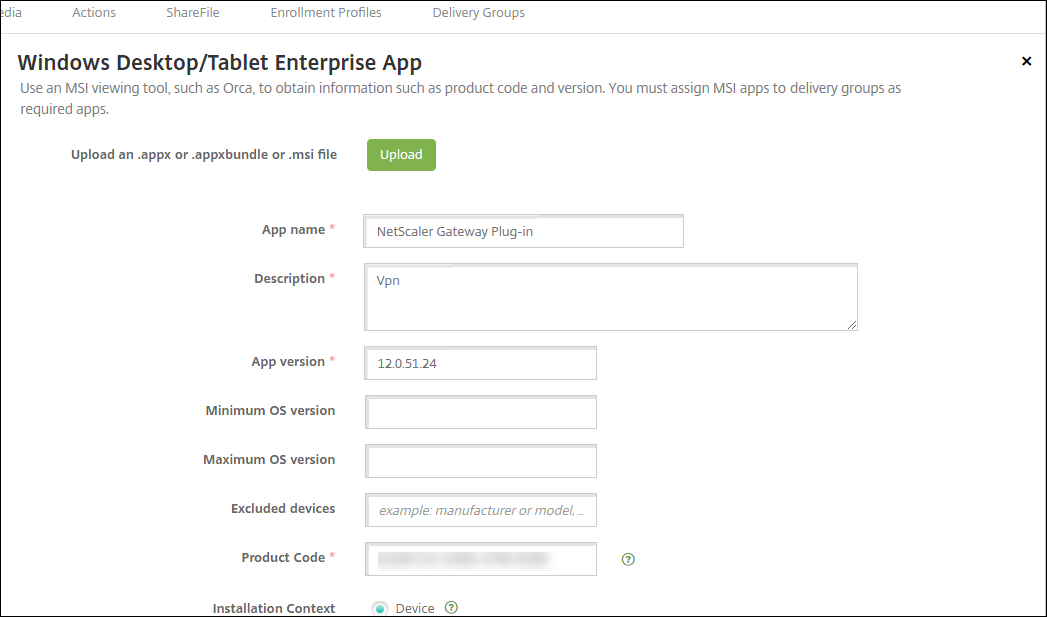
- App name: The name of the app, from the app metadata.
- Description: A description for the app.
- App version: The app version number, from the app metadata.
- Minimum OS version: Optional. The oldest operating system version that the device can run to use the app.
- Maximum OS version: Optional. The most recent operating system that the device must run to use the app.
- Excluded devices: Optional. The manufacturer or models of devices that can’t run the app.
- Product Code: The MSI app product code, in UUID format, from the app metadata.
- Installation Context: Based on the app metadata, select whether the app is to install for the device or user. This setting isn’t available for EXE files.
- Command Line: The command-line options to use when calling MSIEXEC.exe
- Install Command Line: Add command line arguments for installing EXE files silently.
- Uninstall Command Line: Add command line arguments for uninstalling EXE files silently.
- Retry Count: The number of times you can retry a download and installation operation before marking the installation as failed.
- Time Out: The number of minutes that the installation process runs before the installer interprets the installation as failed and no longer monitors the process.
- Retry Interval: The number of minutes between retry operations.
-
Configure the deployment rules. For information, see Configure deployment rules.
-
Expand Store Configuration.
Optionally, you can configure the following:
- App FAQ: Click Add a new FAQ question and answer to create a FAQ for the app.
- Add screenshots for phones/tablets: Add screen captures that appear in the app store.
- Allow app ratings: Allow users to rate the app in the app store.
- Allow app comments: Allow users to leave comments on the app in the app store.
-
Click Next until you get to the Summary page and then click Save.
-
Go to Configure > Delivery Groups and add the Win32 app as a required app.
-
After you deploy the app, let your users know that the app is available.
Upgrade a Win32 app
- Look up the metadata for the app, as described earlier in “Look up metadata.”
- Go to Configure > Apps to upload the new version of the app. Update the App version. If the new version of the app has a different Product Code, update that setting.
- Submit the changes and deploy the app.
Deliver enterprise and MDX apps from the Citrix CDN
You can deliver enterprise and MDX apps from the Citrix Content Delivery Network (CDN). A CDN refers to a geographically distributed group of servers that work together to securely provide fast delivery of application content. A local server delivers the apps to mobile devices.
A CDN improves app download times by distributing content geographically closer to the mobile devices through a nearby CDN distribution point. CDN delivers apps from the closest Point of Presence (POP) location to a user.
The following diagram shows an example of how CDN distributes apps to the Edge Server closest to mobile device users. An Edge Server caches content from the originating server when mobile devices request apps.
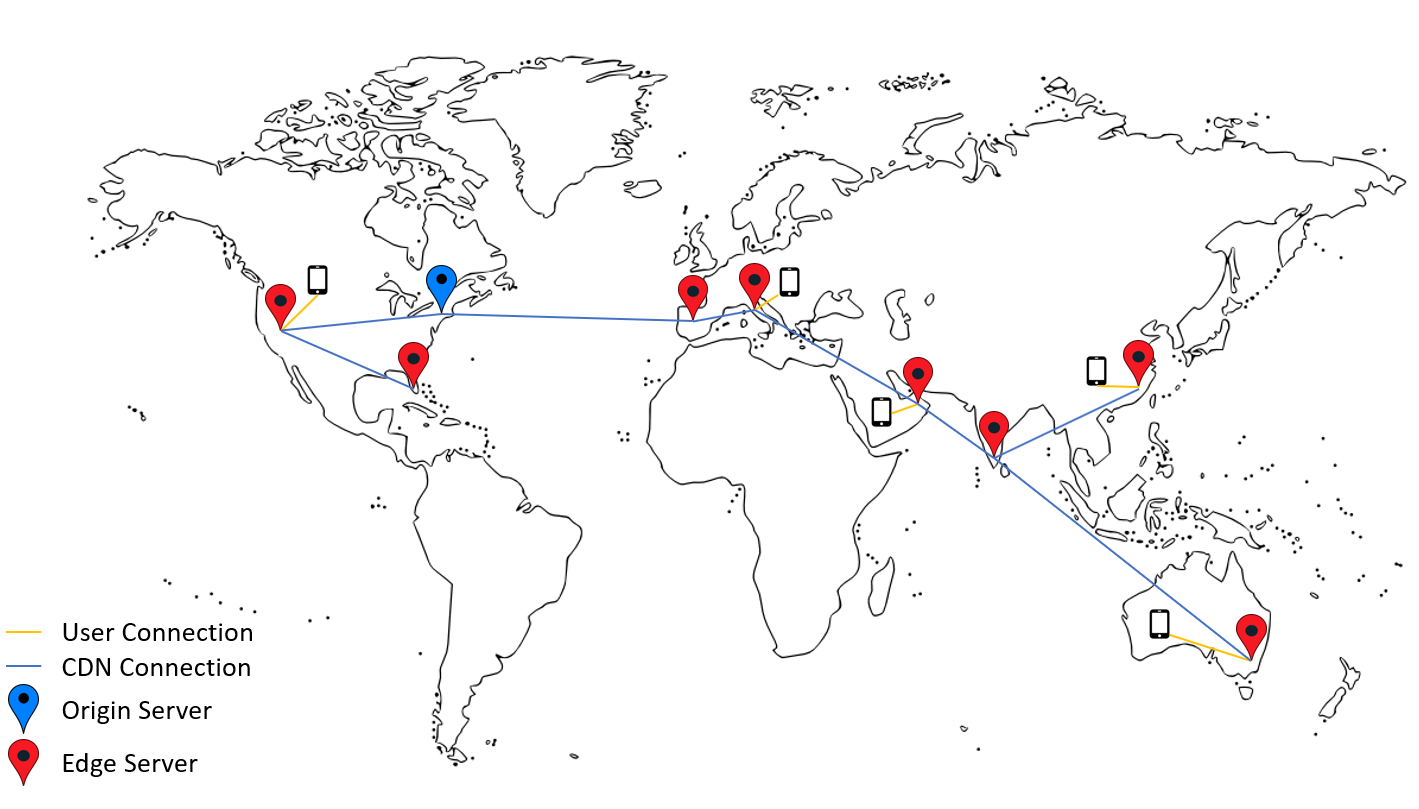
Users can connect to apps by using Citrix Secure Hub. When you add an app, Citrix Endpoint Management creates the app connector for it.
The Citrix CDN support for enterprise apps is available for the following platforms:
- iOS (MDM or MAM enrollment)
- Android (MDM or MAM enrollment)
- Windows desktop or tablet (MDM enrollment)
- macOS (MDM enrollment)
The Citrix CDN support for MDX apps is available for the following platforms:
- iOS (MDM or MAM enrollment)
- Android (MDM or MAM enrollment)
How CDN works
At the core of the CDN service, servers are linked together with the goal of delivering apps faster. That goal is achieved by placing the apps securely on different distribution points worldwide. The mobile devices’ DNS server used during the initial connection to the Citrix Endpoint Management server is what determines the distribution point.
For example: Suppose that the DNS server IP of the mobile device originates in Fort Lauderdale, Florida. The CDN uses a local distribution point closest to that location to deliver the app to the mobile device. That use of the CDN results in improved app download time.
When a mobile device first requests or pushes an enterprise app, Citrix Endpoint Management copies the app to the local distribution point and keeps the app there for 24 hours for other local device downloads.
Deliver enterprise apps from the Citrix CDN
With Citrix Endpoint Management release 19.4.1, enterprise app delivery defaults to CDN delivery for all new multitenancy customers. For existing customers before this release, follow the instructions in this section.
For enterprise apps already on the Citrix Endpoint Management server, Citrix Endpoint Management continues to deliver those apps from the server until those apps get reuploaded after you complete the following steps.
Important:
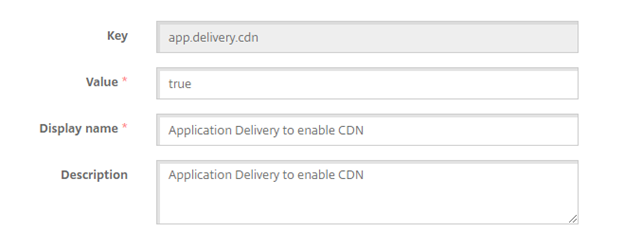
Only Citrix Cloud administrators can enable CDN for an account. The server property
app.delivery.cdnis visible in Citrix Endpoint Management only when you log on as a Citrix Cloud administrator. For information about Citrix Cloud administrators, see Manage Citrix Cloud administrators.
- Enable CDN for your account: In the Citrix Endpoint Management console: Go to Settings > Server Properties.
- Search for
app.delivery.cdnand then click Edit. -
Change the value to true.
- In the Citrix Endpoint Management console, upload your enterprise apps again:
- Go to Configure > Apps and filter the app list by Type (Enterprise) and Platform.
- Select an app, click Edit, click Next, and click Upload.
- Repeat the prior step for each enterprise app.
Deliver MDX apps from the Citrix CDN
With Citrix Endpoint Management release 20.12.0, MDX app delivery defaults to CDN delivery for all new multitenancy customers. For existing customers before this release, follow the instructions in this section.
For MDX apps already on the Citrix Endpoint Management server, Citrix Endpoint Management continues to deliver those apps from the server until those apps get reuploaded after you complete the following steps.
Important:
Only Citrix Cloud administrators can enable CDN for an account. The server property
app.delivery.cdnis visible in Citrix Endpoint Management only when you log on as a Citrix Cloud administrator. For information about Citrix Cloud administrators, see Manage Citrix Cloud administrators.
- Enable CDN for your account: In the Citrix Endpoint Management console: Go to Settings > Server Properties.
- Search for
app.delivery.cdnand then click Edit. -
Change the value to true.
- In the Citrix Endpoint Management console, upload your MDX apps again:
- Go to Configure > Apps and filter the app list by Type (MDX) and Platform.
- Select an app, click Edit, click Next, and click Upload.
- Repeat the prior step for each MDX app.
Add a Web link
A web link is a web address to an internet or intranet site. A web link can also point to a web application that doesn’t require SSO. After you finish configuring a web link, the link appears as an icon in the app store. When users log on with Citrix Secure Hub, the link appears with the list of available apps and desktops.
You can configure web links from the Apps tab in the Citrix Endpoint Management console. When you finish configuring the web link, the link appears as a link icon in the list in the Apps table. When users log on with Citrix Secure Hub, the link appears with the list of available apps and desktops.
Watch this video to learn more:
To add the link, you provide the following information:
- Name for the link
- Description of the link
- Web address (URL)
- Category
- Role
- Image in .png format (optional)
-
In the Citrix Endpoint Management console, click Configure > Apps > Add. The Add App dialog box appears.
-
Click Web Link. The App Information page appears.
-
On the App Information pane, type the following information:
- Name: Type a descriptive name for the app. This name is listed under App Name on the Apps table.
- Description: Type an optional description of the app.
- App category: Optionally, in the list, click the category to which you want to add the app. For more information about app categories, see About app categories.
-
Click Next. The App Platforms page appears.
-
Under Platforms, select Other platforms to add a web app for iOS, Android (legacy DA), and Windows 8, or select Android Enterprise. Clear the checkbox for any platforms that you don’t want to include.
-
If you select Other platforms, continue to the next step to configure the settings.
-
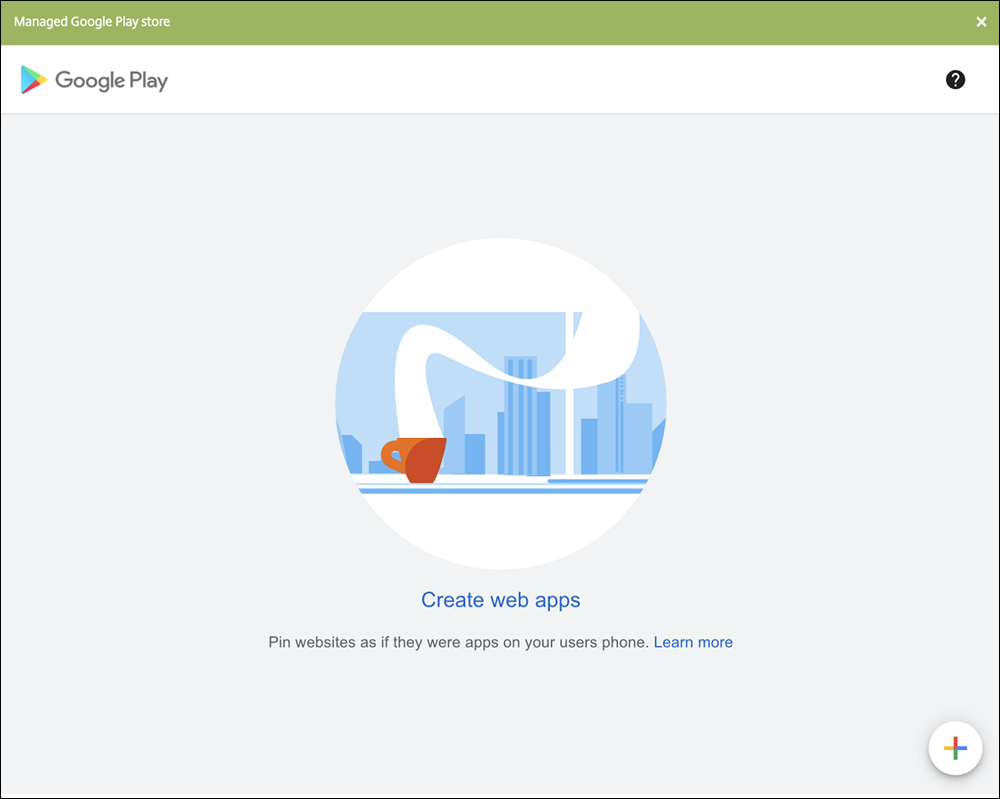
If you select Android Enterprise, click the Upload button to open the managed Google Play store. You do not need to register for a developer account to publish a web app. Click the Plus icon in the lower right corner to continue.
Configure these settings:
- Title: Type the name for the web app.
- URL: Type the web address for the app.
- Display: Choose how to display the web app on the user devices. The available options are Full screen, Standalone, and Minimal UI.
- Icon: Upload your own image for the web app.
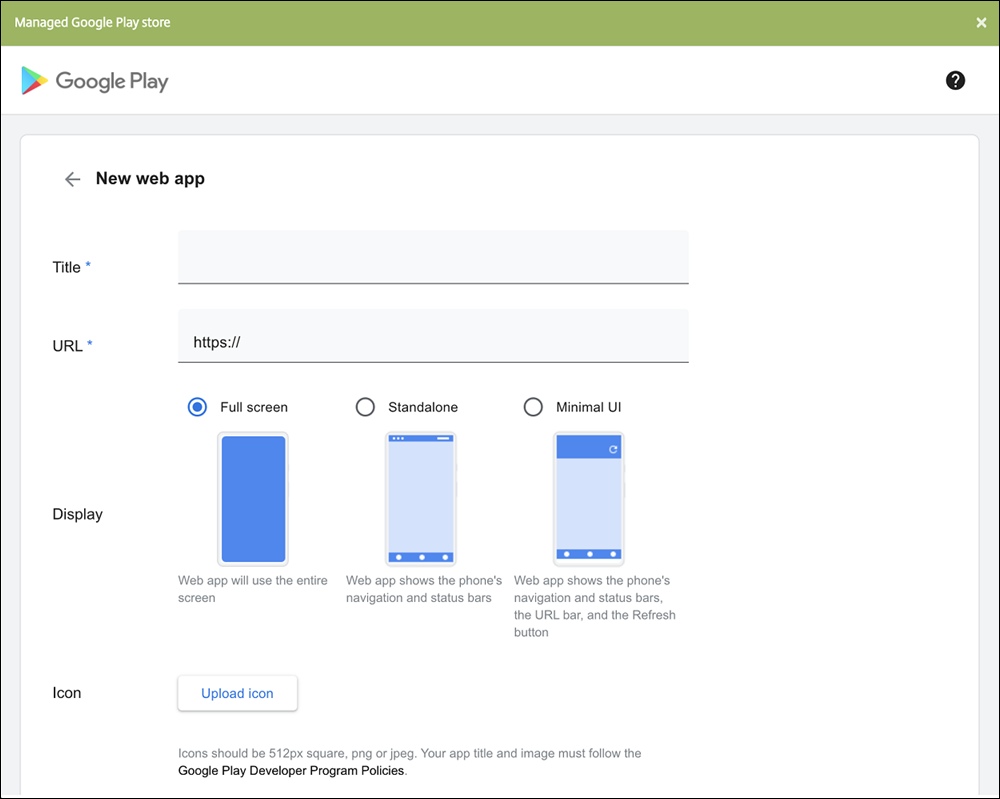
When finished, click Create. It might take up to 10 minutes for your web app to publish.
-
-
For platforms other than Android Enterprise, configure these settings:
- App name: Accept the pre-filled name or type a new name.
- App description: Accept the pre-filled description or type one of your own.
- URL: Accept the pre-filled URL or type the web address for the app. Depending on the connector you choose, this field can have a placeholder that you must replace before you can move to the next page.
- App is hosted in internal network: Select whether the app is running on a server in your internal network. If users connect from a remote location to the internal app, they must connect through NetScaler Gateway. Setting this option to On adds the VPN keyword to the app and allows users to connect through NetScaler Gateway. The default is Off.
- App category: Click an optional category in the drop-down list to apply to the app.
-
Image: Select whether to use the default Citrix image or to upload your own app image. The default is Use default.
- To upload your own image, click Browse and navigate to the file location. The file must be a .PNG file. You can’t upload a JPEG or GIF file. When you add a custom graphic, you can’t change it later.
-
Configure the deployment rules. For information, see Configure deployment rules.
-
Expand Store Configuration.
Optionally, you can configure the following:
- App FAQ: Click Add a new FAQ question and answer to create a FAQ for the app.
- Add screenshots for phones/tablets: Add screen captures that appear in the app store.
- Allow app ratings: Allow users to rate the app in the app store.
- Allow app comments: Allow users to leave comments on the app in the app store.
-
Click Next. The Delivery Group Assignment page appears.
-
Next to Choose delivery groups, type to find a delivery group or select a group or groups in the list. The groups you select appear in the Delivery groups to receive app assignment list.
-
Expand Deployment Schedule and then configure the following settings:
- Deploy: Choose whether to deploy the app to devices. The default is On.
- Deployment schedule: Choose whether to deploy the app Now or Later. If you select Later, configure a date and time to deploy the app. The default is Now.
- Deployment condition: Choose On every connection to deploy the app every time the device connects. Choose Only when previous deployment has failed to deploy the app when the device failed to receive the app previously. The default is On every connection.
The Deploy for always-on connection option applies when you’ve configured the scheduling background deployment key in Settings > Server Properties.
The always-on option:
- Isn’t available for iOS devices
- Isn’t available for Android and Android Enterprise customers who began using Citrix Endpoint Management with version 10.18.19 or later
- Isn’t recommended for Android and Android Enterprise customers who began using Citrix Endpoint Management before version 10.18.19
The deployment schedule that you configure is the same for all platforms. Any changes you make apply to all platforms, except for Deploy for always-on connection.
-
Click Save.
Enable Microsoft 365 apps
You can open the MDX container to allow Citrix Secure Mail, Citrix Secure Web, and Citrix Files to transfer documents and data to Microsoft Office 365 apps. For details, see Allowing Secure Interaction with Office 365 Apps.
Apply workflows
Configure these settings to assign or create a workflow:
-
Workflow to Use: Click an existing workflow in the drop-down list or click Create a new workflow. The default is None.
If you select Create a new workflow, configure these settings.
- Name: Type a unique name for the workflow.
- Description: Optionally, type a description for the workflow.
- Email Approval Templates: In the list, select the email approval template to be assigned. When you click the eye icon to the right of this field, a dialog box appears where you can preview the template.
-
Levels of manager approval: In the list, select the number of levels of manager approval required for this workflow. The default is 1 level. Possible options are:
- Not Needed
- 1 level
- 2 levels
- 3 levels
- Select Active Directory domain: In the list, select the appropriate Active Directory domain to be used for the workflow.
- Find additional required approvers: Type the name of the additional required person in the search field and then click Search. Names originate in the Active Directory.
-
When the name appears in the field, select the checkbox next to the name. The name and email address appear in the Selected additional required approvers list.
To remove a person from the Selected additional required approvers list, do one of the following:
- Click Search to see a list of all the persons in the selected domain.
- Type a full or partial name in the search box, and then click Search to limit the search results.
- Persons in the Selected additional required approvers list have check marks next to their name in the search results list. Scroll through the list and clear the checkbox next to each name you want to remove.
App store and Citrix Secure Hub branding
You can set how apps appear in the store and add your logo to Citrix Secure Hub and the app store. These branding features are available for iOS and Android devices.
Before you begin, make sure you have your custom image ready and accessible.
The custom image must meet these requirements:
- The file must be in .png format
- Use a pure white logo or text with a transparent background at 72 dpi.
- The company logo can’t be more than this height or width: 170 px x 25 px (1x) and 340 px x 50 px (2x).
- Name the files as
Header.pngandHeader@2x.png. - Create a .zip file from the files, not a folder with the files inside it.
-
In the Citrix Endpoint Management console, click the gear icon in the upper-right corner. The Settings page appears.
-
Under Client, click Client Branding. The Client Branding page appears.
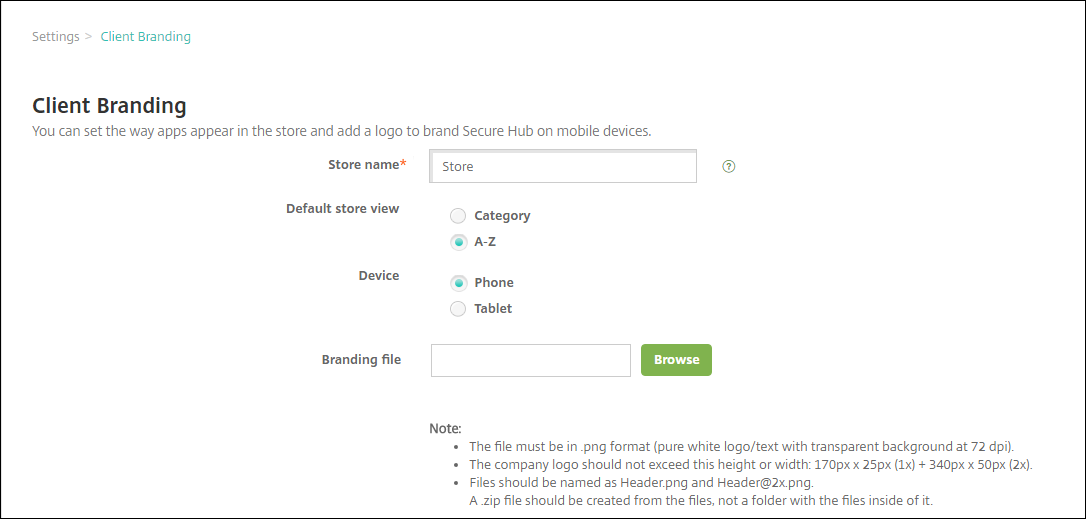
Configure the following settings:
-
Store name: The store name appears in the user’s account information. Changing the name also changes the URL used to access store services. You typically do not need to change the default name.
Important:
The Store name can only have alphanumeric characters.
- Default store view: Select either Category or A-Z. The default is A-Z
- Device option: Select either Phone or Tablet. The default is Phone.
- Branding file: To select a branding image or .zip file of images, click Browse and navigate to the file location.
-
-
Click Save.
To deploy this package to user devices, create a deployment package and then deploy the package.
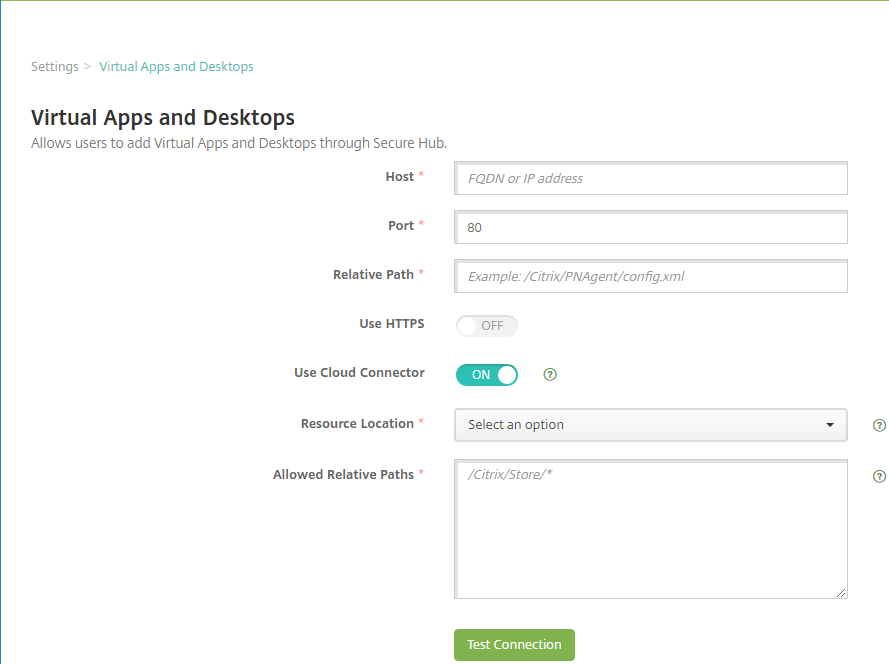
Citrix Virtual Apps and Desktops through the app store
Citrix Endpoint Management can collect apps from Citrix Virtual Apps and Desktops and make the apps available to mobile device users in the app store. Users subscribe to the apps directly inside the app store and launch them from Citrix Workspace. The Citrix Workspace app must be installed on user devices to launch the apps.
To configure this setting, you need the fully qualified domain name (FQDN) or IP address and port number for an on-premises StoreFront.
-
In the Citrix Endpoint Management web console, click the gear icon in the upper-right corner. The Settings page appears.
-
Click Virtual Apps and Desktops. The Virtual Apps and Desktops page appears.
-
Configure these settings:
- Host: Type the fully qualified domain name (FQDN) or IP address for StoreFront.
- Port: Type the port number for StoreFront. The default is 80.
- Relative Path: Type the path. For example, /Citrix/PNAgent/config.xml
- Use HTTPS: Select whether to enable secure authentication between StoreFront and the client device. The default is Off.
-
Use Cloud Connector: Choose On to use Cloud Connector for connections to the StoreFront server. Then, specify a Resource Location and Allowed Relative Paths for the connection.
- Resource Location: Choose from the resource locations defined in Citrix Cloud Connector.
- Allowed Relative Paths: The relative paths allowed for the specified resource location. Specify one path per line. You can use the asterisk (*) wildcard.
Suppose that the resource location is
https://StoreFront.company.comand you want to provide access to the following URLs:https://StoreFront.company.com/Citrix/PNAgent/Config.xmlhttps://StoreFront.company.com/Citrix/PNAgent/enum.aspxhttps://StoreFront.company.com/Citrix/PNAgent/launch.aspx
To allow all requests with the URL
https://StoreFront.company.com/Citrix/PNAgent/*, enter this path:/Citrix/PNAgent/*Citrix Endpoint Management blocks all other paths.
-
Click Test Connection to verify that Citrix Endpoint Management can connect to the specified StoreFront server.
-
Click Save.
In this article
- App types and features
- About silent installations
- About required and optional apps
- Organize apps (Android Enterprise)
- About app categories (iOS and MDX)
- Add an MDX app
- Add a public app store app
- Add a Web or SaaS app
- Add an enterprise app
- Deliver enterprise and MDX apps from the Citrix CDN
- Add a Web link
- Enable Microsoft 365 apps
- Apply workflows
- App store and Citrix Secure Hub branding
- Citrix Virtual Apps and Desktops through the app store