Control access to applications
The app access control feature lets you control access to applications using rules. With this feature, you can streamline the management of applications and images. For example, you can deliver identical machines to different departments while meeting their unique application requirements, thus reducing the number of images.
This article walks you through the process of enabling app access control and configuring the control rules. It also provides an example of using this feature to simplify image management in virtual environments.
Note:
This feature applies to both Active Directory (AD) and non-domain-joined (NDJ) environments.
Overview
With the app access control feature, you can hide applications from users, machines, and processes by configuring hiding rules.
A hiding rule consists of two parts:
-
Objects to hide. Files, folders, and registry entries you want to hide for an application.
For example, to hide an application, you must specify all objects associated with this application, such as files, folders, and registry entries.
-
Assignments. Users, machines, and processes you want to hide the application from.
Assignment types
Assignments in hiding rules come in three categories: processes, users, and machines. The specific assignment types are listed as follows:
| Category | Type |
|---|---|
| Processes | Any processes |
| Users
|
|
| Machines
|
|
Note:
- In the context of the App access control policy, OUs are used as containers only for machines, but not for users. As a result, an OU assignment hides the app only from machines in the OU and not from users in the OU.
- NDJ machines are limited to those machines that Citrix® creates and power manages.
When a hiding rule has multiple assignments configured, be aware of the following considerations:
- If those assignments are of the same category (for example, user A and user group B), the application is hidden from all objects specified in those assignments (user A and all users in user group B).
- If those assignments are of different categories (for example, user A and machine X), the application is hidden when the conditions specified in all those assignments are met (when user A signs in to machine X).
- If those assignments are of the process category, the application is hidden from all processes specified in those assignments.
Note:
If no assignments are configured for a rule, the application specified in the rule is hidden.
Workflow
With the app access control feature, Profile Management can hide applications from users, machines, and processes based on the rules you provide. At a high level, the workflow of implementing app access control is as follows:
-
Create and generate hiding rules. There are two tools that you can use:
- GUI-based tool – WEM Tool Hub > Rule Generator for App Access Control
- PowerShell tool – available with the Profile Management installation package. For more information, see Create, manage, and deploy rules using Rule Generator.
-
Use GPOs to apply hiding rules to machines in your environment. For more information, see Enable app access control using GPOs.
Create, manage, and deploy rules using Rule Generator
This section guides you through using the PowerShell-based Rule Generator to create, manage, and deploy rules.
Before you begin, make sure that the machine where you run the tool meets the following requirements:
- Runs on Windows 10 or 11, or Windows Server 2016, 2019, or 2022.
- (For AD environments only) Is in the same domain as your users and machines.
The general procedure is as follows:
- Run Windows PowerShell as an administrator.
-
Access the \tool folder in the Profile Management installation package, and then run CPM_App_Access_Control_Config.ps1.
Note:
By default, two files are located in the \tool folder: CPM_App_Access_Control_Config.ps1 and CPM_App_Access_Control_Impl.ps1. CPM_App_Access_Control_Config.ps1 relies on CPM_App_Access_Control_Impl.ps1 to work properly. Don’t move CPM_App_Access_Control_Impl.ps1 out of the folder.
- Follow the onscreen instructions to create, manage, and generate hiding rules:
-
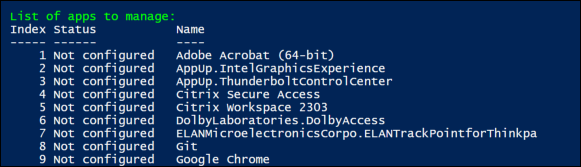
View each application installed on the machine and its state:
- Not configured. No rules are configured for the application.
- Configured. One or more rules are configured for the application and none of them are applied to machines.
- Configured and applied. One or more rules are configured for the application and at least one rule is applied to machines.
-
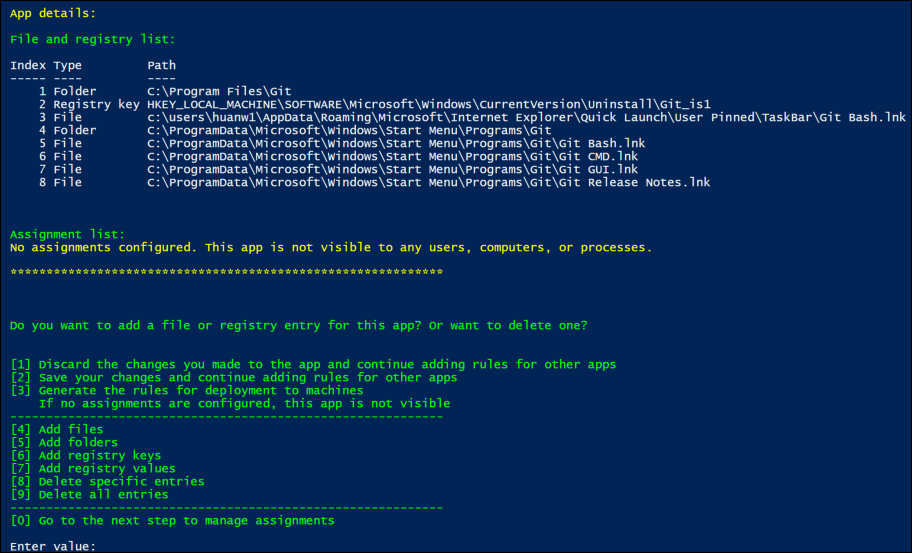
From the application list, select an application you want to hide by entering its index. All files, folders, and registry entries associated with the application appear.
-
To hide an additional file, folder, or registry entry for the selected application, select the corresponding action type, and then add the object by entering its name and path. Repeat this step to add more.
Considerations:
- System environment variables (such as %windir%) in the paths are supported while user environment variables (such as %appdata%) aren’t.
- Wildcards
*and?are supported for files and folders. When there are multiple asterisks (‘*’) in a string, characters between two asterisks are ignored. For example, in the stringc:\users\Finance*Manangement*, the characters*Management*are treated as a single asterisk (*).
Note:
You can also manually define an application by associating it with certain files, folders, and registry entries.
-
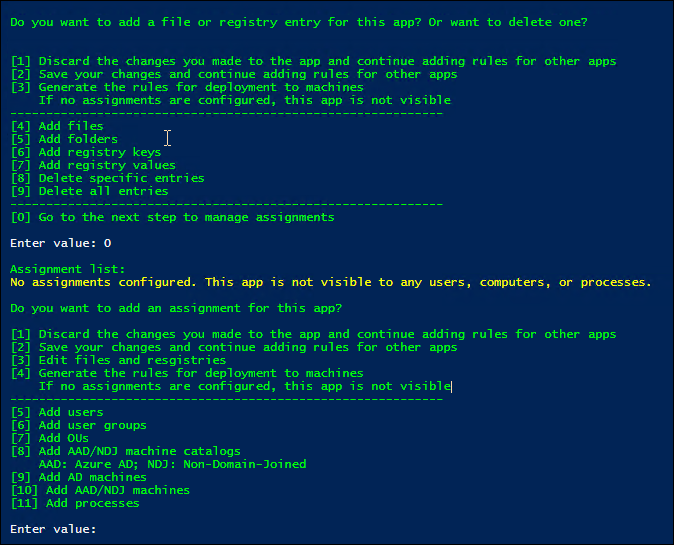
Configure assignments for the rule. In detail, specify the assignment type and then enter the specific objects that you want to hide the application from. For more information, see the following table.
Note:
If you don’t configure any assignments for a rule, the app specified in the rule is invisible.
Assignment type Description AD users, user groups, or OUs Enter their AD domain names, separated by the vertical bars (|). AD machines Enter their DNS host names, separated by the vertical bars (|). NDJ machine catalogs Enter catalog names, separated by the vertical bars (|). Example: Machine_catalog_name1|Machine_catalog_name2NDJ machines
Collect machine names using AAD/NDJ object selector in the WEM web console, and then enter those names, separated by the vertical bars (|). Example: Machine_name1|Machine_name2. To add all non-domain-joined machines, enter NDJ*.
Wildcards*and?are supported for NDJ machine names.
Note: When there are multiple asterisks (*) in a string, the characters between two asterisks are ignored. For example, in the stringResearchDep*Virtual*TeamMachine*, the characters*Virtual*are treated as a single asterisk (*).Azure AD users Collect the users’ SIDs and names using AAD/NDJ object selector in the WEM web console, and then enter them in the form: sid1\name1|sid2\name2. Example:/azuread/989c2938-6527-4133-bab1-f3860dd15098\Tester1|/azuread/82bdde32-d5d9-4d64-b0ff-9876d4488d05\Tester2Azure AD groups Collect the groups’ SIDs and names using AAD/NDJ object selector in the WEM web console, and then enter them in the form: sid1\name1|sid2\name2. Example:/azuread/989c2938-6527-4133-bab1-f3860dd15098\TestGroup1|/azuread/82bdde32-d5d9-4d64-b0ff-9876d4488d05\TestGroup2Note: To exclude specific users or machines, add EX>before their identifiers. To exclude specific processes, add a?before their identifiers. Separate an exclusion from the assigned group using a vertical bar (|).
-
- Repeat step 3 to create hiding rules for other applications.
- Follow the onscreen prompt to generate the raw data for the rules you configured and then save it in a .txt file for future use.
- To test whether the rules work as expected, follow the onscreen prompt to deploy them to this machine or a group of machines.
Enable app access control using GPOs
After you create and generate hiding rules, you can use GPOs to apply them to machines in your environment.
To apply control rules to machines using a GPO, follow these steps:
- Open the Group Policy Management Editor.
- Access Policies > Administrative Templates: Policy definitions (ADMX files) > Citrix Components > Profile Management > App access control.
- Double-click App access control.
- In the policy window that appears, select Enabled.
- Open the .txt file where you saved the generated rules, copy the content, and paste it to the App access control rules field.
- Double-check the rule content to ensure that the rules are separated by
\n, not\r\n. On Windows, pasting content might automatically convert\nto\r\n, which can cause errors. - Click OK.
The configuration precedence for the feature is as follows:
- If this setting isn’t using a GPO, Studio, or WEM, the value from the .ini file is used.
- If this setting isn’t configured anywhere, the feature is disabled.
Example
This section uses an example to guide you through implementing app access control for an image.
Requirements
Requirements in this example are as follows:
- Use a single image to create virtual machines for the Sales, HR, and Engineering departments.
- Control access to the following applications:
- Microsoft Excel: invisible to users in the HR department.
- Visual Studio Code: invisible to users in the Sales or HR department.
Solution
Install Profile Management to control access to installed applications.
Install a template machine
Install a template machine for capturing the image. The procedure is as follows:
- Join a new machine to the same AD domain as your users and machines.
- Install the following software on the machine:
- Windows 10 or 11, or Windows Server 2016, 2019, or 2022, as needed
- Profile Management version 2303 or later
- All required applications
Create and generate hiding rules
-
On the template machine, use the Rule Generator tool to create and generate hiding rules.
- Rule 1: To hide Microsoft Excel from users in the HR department (Application: Microsoft Excel; Assignment: HR user group)
- Rule 2: To hide Visual Studio Code from users in the Sales or HR department (Application: Visual Studio Code; Assignments: Sales user group and HR user group)
-
Generate raw data for the two rules and save it to a .txt file.
For more information about how to use the tool, see Create, generate, and deploy rules using Rule Generator.
Now you can capture the image from the template machine.
Enable app access control using GPOs
After virtual machines are created, use GPOs to centrally enable app access control and apply the generated rules to machines. For more information, see Enable app access control using GPOs.
Migrate rule sets from FSLogix
You can use the Rule Generator tool to migrate rule sets configured in FSLogix to Profile Management’s app access control.
Note:
Some rule types and assignment types used in FSLogix aren’t supported by app access control. Review your environment and consider alternative configurations where necessary.
To migrate FSLogix rule sets:
-
Click Import > FSLogix Apps Rule Set to begin the migration.
-
Click Browse, locate the FSLogix Rule definition file that was saved using the FSLogix Rule Editor, and then click Open.
Note:
Make sure the Rule definition file and its associated Assignment file are stored in the same folder. The tool migrates supported rule sets along with their assignments.
-
When the migration completes, review the details.
Check for any unsupported rules or data, and validate the results. You can edit or add rules after migration.
-
Click Import to finalize the process.
The migrated rules are now available for testing and can be saved along with your existing rules.