Citrix Provisioning™ on Microsoft Azure
This article explains how to move your Citrix Provisioning workloads to the Azure Cloud, using the same provisioning tools and policies as you use with on-premises hypervisors.
This functionality includes support for the Citrix Virtual Apps and Desktops™ Setup Wizard. You can integrate with Citrix Virtual Apps and Desktops and Citrix DaaS (formerly Citrix Virtual Apps and Desktops service) using the same tools that you already know. Installing Citrix Provisioning in your Azure subscription is the same as installing it in an on-premises provisioning farm.
Supported features
The following Citrix Provisioning features are supported when provisioning workloads in Azure:
- UEFI boot of Generation 2 Azure VMs using BDM boot partition.
- Streaming 64-bit Windows 10, Windows 11 (Standard Security Type only), Windows 11 22H2, and Windows Server 2016/2019/2022 target VMs
- The Citrix Virtual Apps™ and Desktops Setup wizard to provision target VMs and add them to Citrix DaaS catalog.
- The import wizard lets you import manually provisioned VMs into the provisioning server.
- The export wizard lets you create and update catalogs in Citrix DaaS™ from manually provisioned targets.
- Create a master VM in Azure to act as the source of the virtual disk (vDisk) to be used by the provisioning server.
- Create a vDisk from an Azure master VM and update it using either provisioning versioning, or reverse imaging.
- Import an existing image to your Azure setup using the Citrix Image Portability Service. See Citrix IPS.
- Power management of targets from Citrix DaaS, provisioning console, Azure Portal, and Azure APIs.
- Azure SQL Database
- Azure SQL Managed Instance
-
Active Directory support using one of the following:
- Integrating with an on-premises forest by installing domain controller VMs in Azure and connecting them to the on-premises forest through an ExpressRoute connection. You can connect your on-premise AD infrastructure to your AAD tenant via the Microsoft AD Connect feature.
- Implementing a standalone Active Directory domain in Azure by installing and configuring domain controller VMs in Azure.
- Azure AD Domain Services can provide an AD environment that Citrix Provisioning can use. You can synchronize your on-premises forest with your Azure AD tenant using AD Connect to provide a fully integrated solution.
-
Create targets in specific availability zones. To do this:
- For each availability zone that the targets will use, create a template VM located in that zone.
- Run the Citrix Virtual Desktops™ Setup Wizard for each zone using the template for that zone.
Limitations
The following features are not supported:
- 32-bit operating systems.
- Windows Server 2012 and earlier are not supported.
- Secure boot and trusted launch are not currently supported.
- PXE and ISO boot of master and target VMs, because Azure does not support them.
- Generation 1 (BIOS) VMs. Only Generation 2 (UEFI) VMs are supported.
- Streamed VM Setup Wizard.
- vDisk Update Management.
- Virtual Host Connection Wizard.
- Auto-Add Wizard.
- Removal of VMs, catalogs, or AD accounts from Citrix Provisioning console is not supported when Citrix Provisioning is integrated with customer-managed Delivery Controller.
- The Citrix Provisioning API, which provides scripted access to the provisioning process, is not supported.
- The Azure machine size used when creating the master VM must be compatible with that used when creating target VMs. Only Generation 2 VMs are supported. This includes the following:
- Presence or absence of a temporary disk must be the same
- Presence or absence of a GPU must be the same
- Template VMs (VMs to be used as a template for creating targets) must exist in the region associated with Citrix DaaS hosting unit. Therefore, for this release you have to create a template VM in each region.
- The Azure disks created for the boot and cache disks of target VMs are of type Standard SSD. Currently, this setting cannot be changed.
-
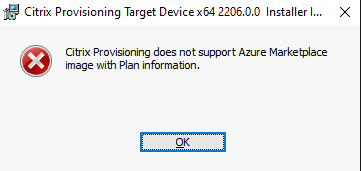
You cannot use pay-as-you-go marketplace image.
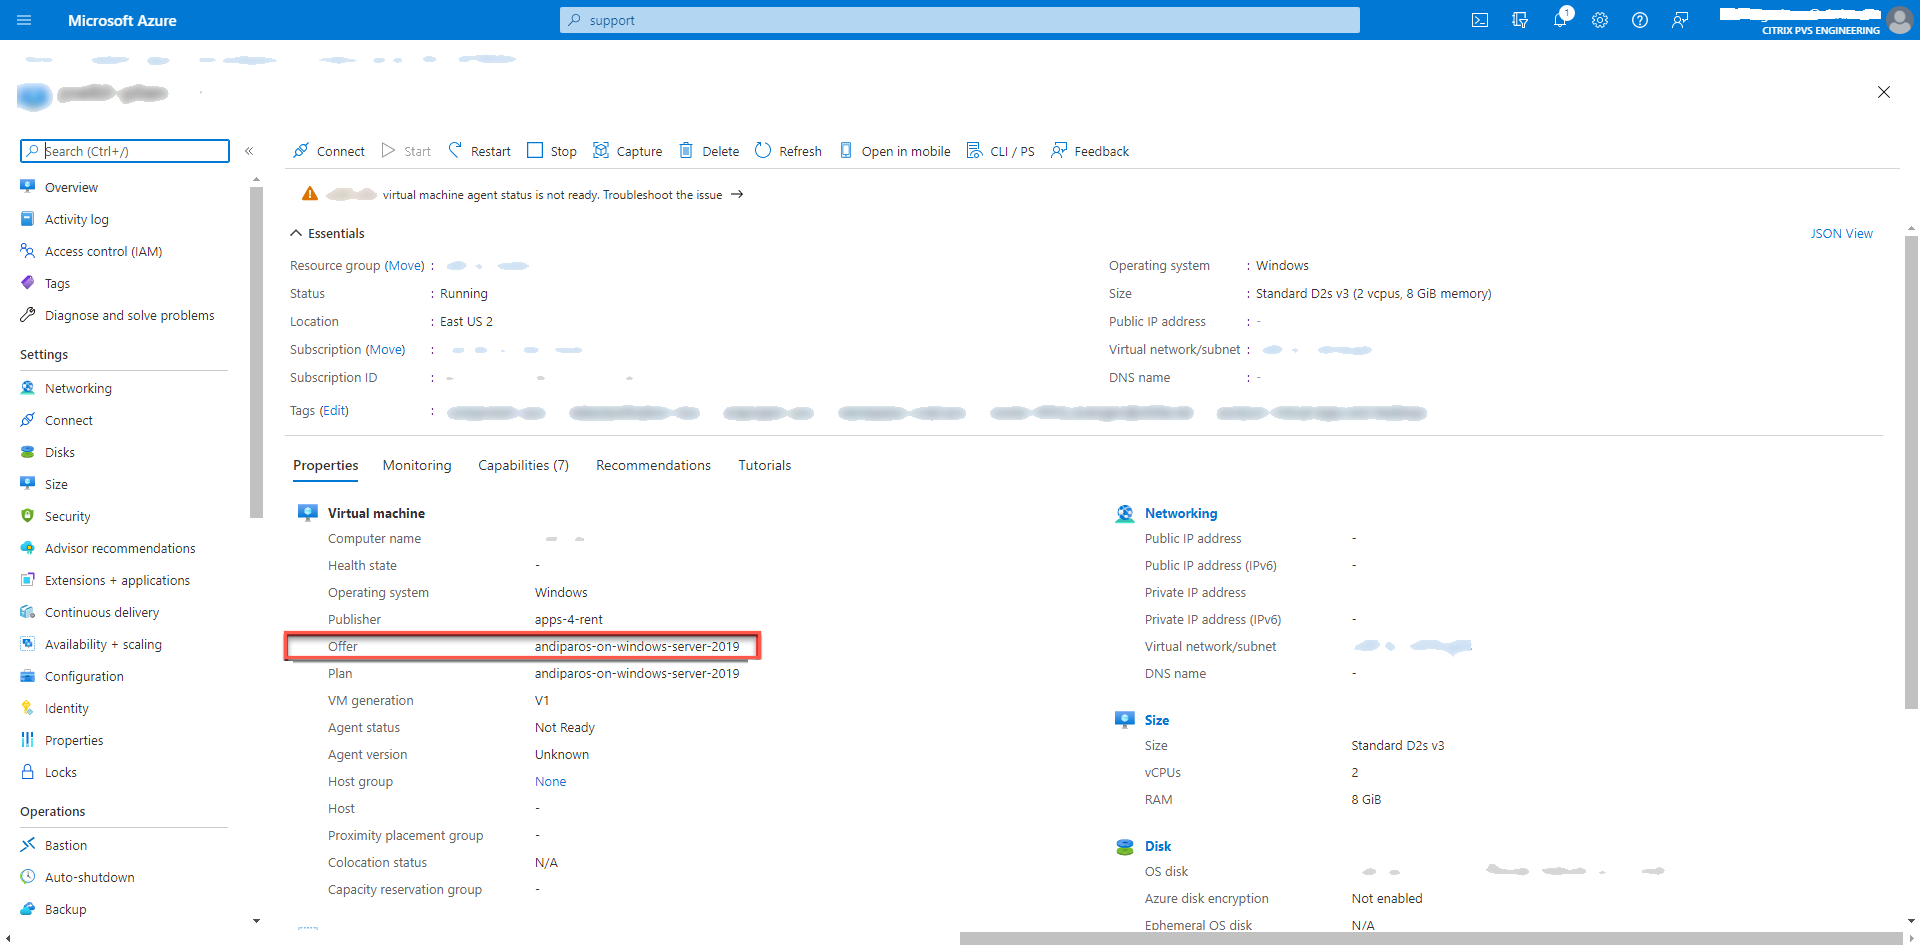
If you try to create vDisks from master VMs that have pay-as-you-go marketplace image, creation will fail with the following error message:
Consider the following Azure limitations:
- No more than 2500 VMs can be created in a single subscription.
- If you plan to use Azure File Services to provide storage for vDisks, you must create a Premium Storage Account.
Requirements
To use Citrix Provisioning on Azure you need the following:
- System requirements for the on-premises version of the product.
- License for this latest version of Citrix Provisioning.
- A license server installed.
- An Azure subscription.
- You can have the database on one of the following:
- Azure SQL Database
- Azure SQL Managed Instance
- SQL Server or SQL Server Express on a VM installed in your subscription.
- Citrix Virtual Apps and Desktops Cloud connector VMs installed in your Azure subscription. A separate resource location (set of Cloud Connectors) is required for each combination of subscription+region to be used. Citrix Provisioning supports working with both customer managed and Citrix Cloud™ Delivery Controllers natively from the same Citrix Provisioning Console.
Licensing
The initial product uses the existing licensing mechanism for provisioning. Refer to the Product Setup to access the license server installed in the test subscription for all internal users. Use one of the following licenses:
- If you have a Citrix DaaS subscription, then use the included Cloud provisioning license.
- If you have a Citrix Virtual Apps and Desktops license with Hybrid Rights, then you can use this license directly.
- If you do not have either of these, then contact your Citrix® representative to get a suitable trial license.
You can install the license server on one of the Citrix Provisioning Server VMs.
Architecture
This high-level architecture diagram shows the components that are either required or recommended to set up Citrix Provisioning on Azure with:
- Citrix Virtual Apps and Desktops
- Citrix DaaS
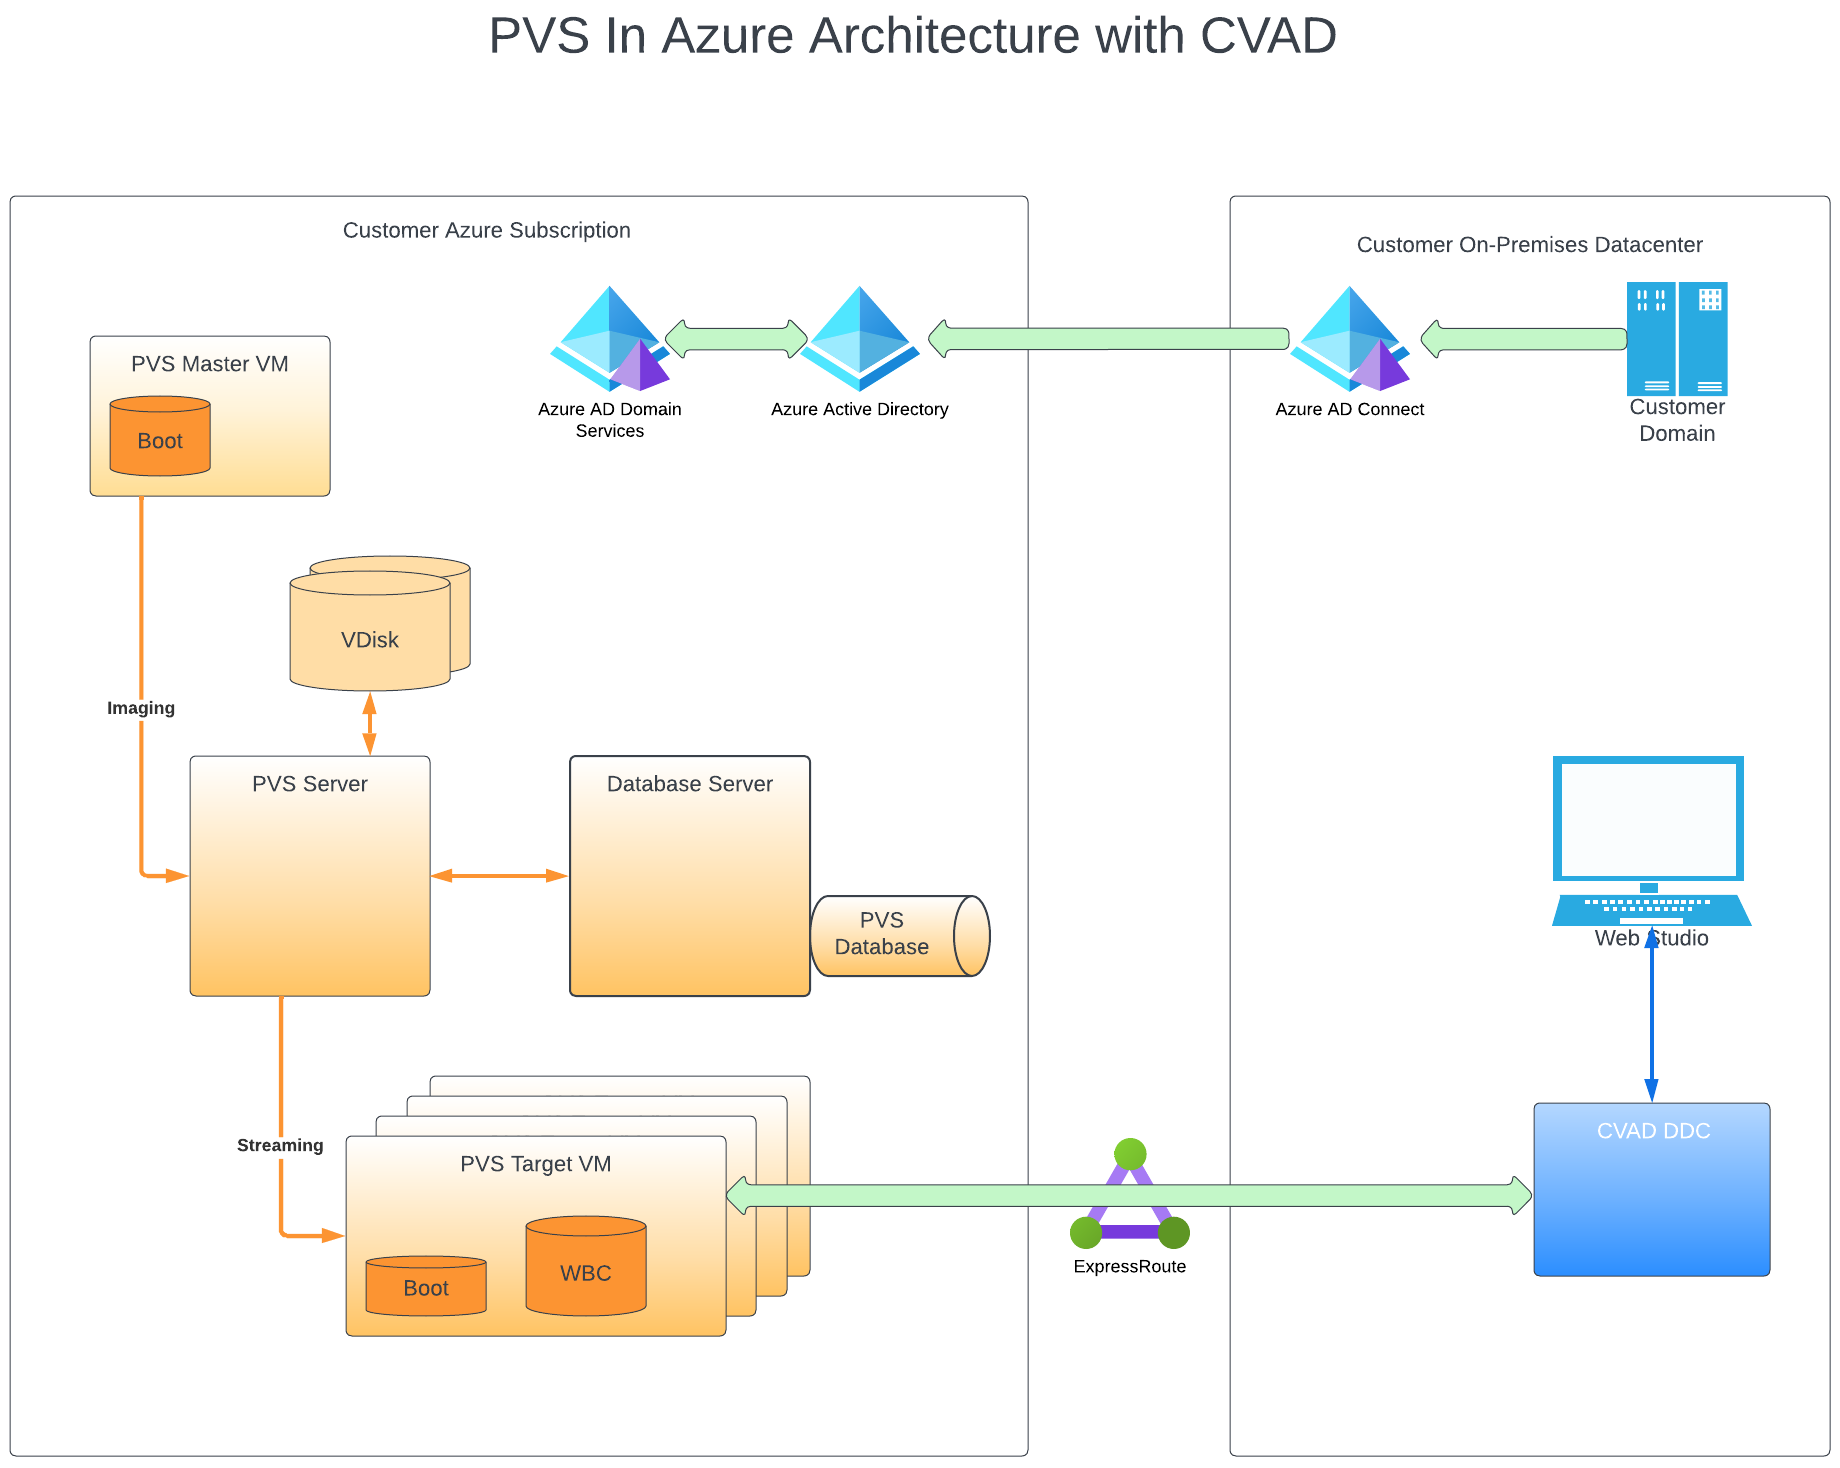
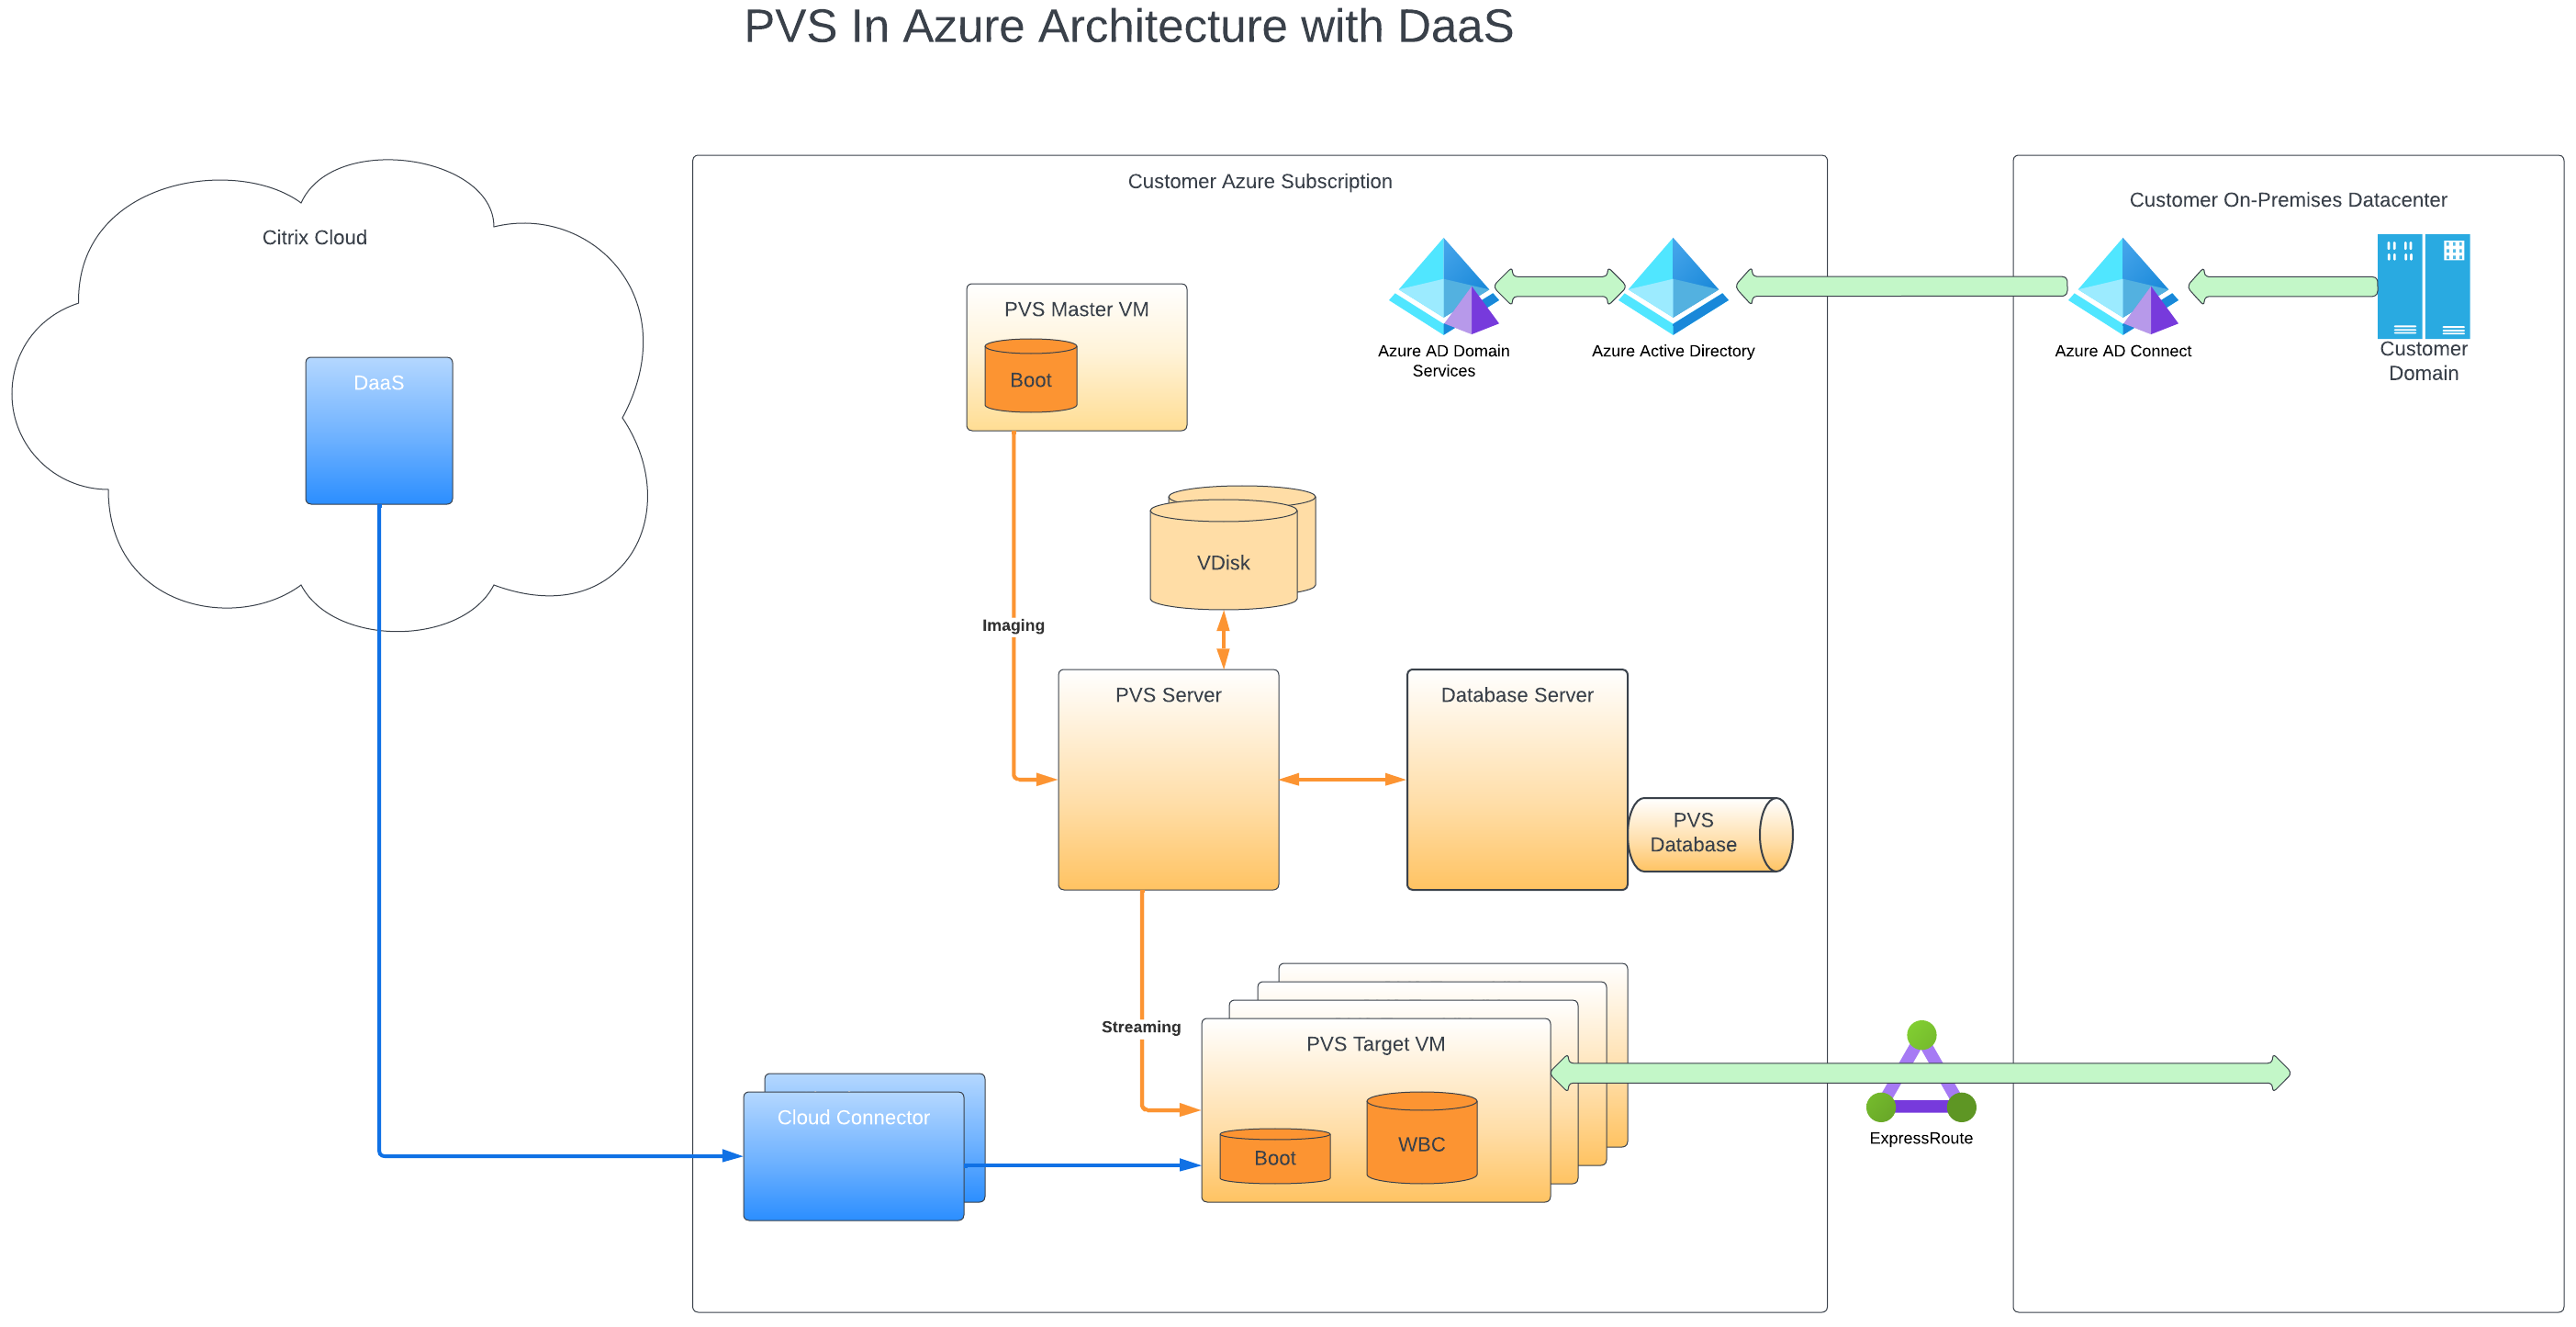
This section describes the main components.
Citrix Cloud
When using Citrix Provisioning on Azure, Citrix DaaS, including the:
- Connection Broker
- Connection Broker Catalogs that reference Citrix Provisioning Target VMs running on Azure.
The Citrix Provisioning Server does not manage power for Azure target VMs although targets can be manually turned on and off from the provisioning console. The Broker initiates power management by talking directly to Azure. As the VM boots, it streams the boot disk from the virtual disk maintained by the Citrix Provisioning Server.
Azure Active Directory Classic version
Citrix Provisioning on Azure supports “Classic” Active Directory only. You can make the classic Active Directory available on Azure in one of the ways as described in Set up Active Directory.
Azure database services
Citrix Provisioning supports the following databases:
- SQL Server
- SQL Server Express
- Azure SQL Database
- Azure SQL Managed Instance
The following table lists the Citrix Provisioning version and the supported hypervisors for using Azure SQL Database and Azure SQL Managed Instance.
| Supported cloud database | Compatible Citrix Provisioning version | Compatible hypervisors |
|---|---|---|
| Azure SQL Database and Azure SQL Managed Instance | 2203 and later | Azure |
| Azure SQL Database | 2203 CU2 and later | All supported Citrix Provisioning on-premises hypervisors and cloud hypervisors other than GCP |
See Supported authentication types for more information on the supported authentication types. Select the authentication type that best suits your needs.
Hybrid Azure AD
Citrix Provisioning on Azure supports Hybrid Azure AD. For information, see Create Hybrid Azure AD joined catalogs.
Citrix Provisioning Server
You install the Citrix Provisioning Server on a server-class Azure VM, similar to on-premises deployments.
The usual processes for providing storage for vDisks apply:
-
You can use local storage on the server VM and manage replication of vDisks between servers yourself.
-
Use Azure Files to provide an SMB server that can be accessed from any server in the region to create a Premium Storage account to host Azure Files. It is only supported for access in the same region as the provisioning server.
Tip:
The storage account must be premium.
- Create a separate VM to act as a file server for sharing vDisks.
Target VMs boot using a small boot disk
The Citrix Provisioning Server and targets do not support either PXE or ISO boot, because they are not available on Azure. Instead, target VMs boot uses a small boot disk, the BDM Boot Disk, which is about 20 MB and contains the Citrix Provisioning UEFI boot application.
Once the BDM app is running, it uses the Citrix Provisioning protocol to stream the virtual disk contents to the VM. The Citrix Virtual Apps and Desktops Setup Wizard can be used to create BDM boot disk. If you want to manually provision target VMs, you can use the BDM.exe tool to create a VHD file. This file is the boot image which can then be uploaded to Azure.
Provisioning of target VMs
The Citrix Virtual Apps and Desktops Setup Wizard can handle all the required steps for provisioning target VMs including:
- Creation and upload of the boot disk including configuration of provisioning servers to contact.
- Creation of Active Directory computer accounts, or import of existing computer accounts.
- Creation of the target VM including the network connection, the boot disk, and Citrix Provisioning WBC disk to hold the cache.
- Configuring the provisioned targets in the provisioning server database.
- Initial boot and shutdown of the target VMs to enable the WBC disk to be formatted.
- Creation of a Citrix Virtual Apps and Desktops catalog and adding the provisioned targets to it.
Citrix Provisioning master VM used to capture a virtual disk
The Citrix Provisioning master VM is used to capture a virtual disk. You create the VM manually on Azure where you install the Citrix Provisioning Target Driver package.
The mechanisms for this and the subsequent capture of a virtual disk from the master VM are essentially the same as for existing on-premises installations. There are some important points to note that are covered in the following sections.
Set up Citrix Provisioning on Azure
This section explains the pre-installation tasks, steps for creating a Citrix Provisioning collection with a set of targets streamed from your virtual disk, and links to the Azure docs to guide you.
To set up Azure provisioning, begin by configuring your provisioning server and other infrastructure on Azure. Using the Azure Resource Manager APIs and the instructions, set up the components along the same lines as your current on-premises setup. You can create PowerShell scripts to automate the process.
Pre-installation tasks
Complete the following tasks before installing and configuring Citrix Provisioning.
Select and configure the database
Each Citrix Provisioning farm has a single database. You can provide the database on either:
- A new or existing SQL Server or SQL Server Express Instance.
- A new or existing Azure SQL Database server.
- A new or existing Azure SQL Managed Instance.
All Citrix Provisioning servers in a farm must be able to communicate with the database server.
In a production environment, to avoid poor distribution during load balancing, best practice is to install the SQL Server or SQL Server Express instance and the Citrix Provisioning server component software on separate servers.
There are three ways to create the database:
- Use the Configuration Wizard. To use this option, you need
dbcreatorpermission. - If you do not have permission to create databases, use the DbScript.exe utility to create a SQL script that a database administrator can run to create the provisioning database. This utility is installed with the provisioning software.
- If the database administrator creates an empty database by running the DbScript.exe utility, then this database is chosen as the database for the new farm when running the configuration wizard. The login used when running the Configuration Wizard must be the owner of the database. Also, this login must have the View any definition permission. The database administrator sets this permission when the empty database is created.
Run the DbScript.exe utility to create or update the database
If you do not have permission to create databases, use DbScript.exe to generate a SQL script for the database administrator to run to create or update the PVS database. Run the script from the Windows command prompt in C:\Program Files\Citrix\Provisioning Services.
To generate a script to create the database, use this syntax:
- For SQL Server, SQL Server Express, or Azure SQL Managed Instance:
DbScript.exe -new <databaseName> <farmName> <siteName> <collectionName> <farmAdminGroup> <adGroupsEnabled> <scriptName> <is2012orHigher> - For Azure SQL Database:
DbScript.exe -newForAzSqlDb <databaseName> <farmName> <siteName> <collectionName> <farmAdminGroup> <adGroupsEnabled> <scriptName> <is2012orHigher>
When creating a new database for Azure SQL Database, DbScript produces two script files instead of one.
- The first is run into the master database, and it creates the new database.
- The second script is then run into the new database.
This is due to limitations of Azure SQL Database.
To generate the script to update the database, enter:
DbScript.exe -upgrade <databaseName> <scriptName>
The commands use these arguments:
-
<databaseName>— Name of the database to create or update. -
<farmName>— Farm name for the new database. -
<siteName>— Site name for the new database. -
<collectionName>— Collection name for the new database -
<farmAdminGroup>— Farm administrator group, specified as a full path.Note:
When you run the configuration wizard, you must be a member of this group (an Active Directory group) to add the PVS servers to the database.
-
<adGroupsEnabled>— Enable or disable AD groups, specified as Boolean, wheretrueenables AD groups andfalsedisables AD groups. -
<scriptName>— Name of the script to generate, specified as a full path. -
<is2012orHigher>— It is deprecated. Always usetrue.
Supported authentication types
Citrix Provisioning on Azure supports more authentication modes to benefit from the features found in Azure SQL Database and Azure SQL Managed Instance. Choose the authentication mode that best suits your needs.
The authentication modes that the Citrix Provisioning on Azure supports are:
- Active Directory Integrated
- SQL Server
- Active Directory Password
- Active Directory Service Principal
- System-Supplied Managed Identity
- User-Supplied Managed Identity
Following are the tables that provide information about the users to which the authentication modes grants access, required credentials, and supported database platforms.
| Authentication mode | Grants access to | Required credentials | Note |
|---|---|---|---|
| Active Directory Integrated | Active Directory User | Nothing (uses the current login context) | Create the user name in the Active Directory if you do not want to use an existing one. |
| SQL Server | SQL Login | Login and Password | Create the SQL login on the database server if you do not want to use an existing one. |
| Active Directory Password | Active Directory User | Domain-Qualified User name and Password | Create the user name in the Active Directory if you do not want to use an existing one. |
| Active Directory Service Principal | Application | Name of Application ID, Application ID, Tenant ID, and Secret | Create the registered application in the Active Directory if you do not want to use an existing one. You can generate a new app secret for an existing registered application if you do not want to use an existing secret. |
| System-Supplied Managed Identity | Virtual Machine | Nothing (uses the current VM) | |
| User-Supplied Managed Identity | Virtual Machine | Managed Identity Name, Client ID, and Object ID |
| Authentication mode | Database platform |
|---|---|
| Active Directory Integrated | SQL Server |
| Azure SQL Database | |
| Azure SQL Managed Instance | |
| SQL Server | SQL Server |
| Azure SQL Database | |
| Azure SQL Managed Instance | |
| Active Directory Password | Azure SQL Database |
| Azure SQL Managed Instance | |
| Active Directory Service Principal | Azure SQL Database |
| Azure SQL Managed Instance | |
| System-Supplied Managed Identity | Azure SQL Database |
| Azure SQL Managed Instance | |
| User-Supplied Managed Identity | Azure SQL Database |
| Azure SQL Managed Instance |
Other restrictions
- Restrictions on Active Directory Integrated authentication:
- With SQL Server: The Citrix Provisioning server must belong to a domain, the provisioning service user context must be a domain user, and Citrix Provisioning must be configured by a domain user.
- With Azure SQL: Use this authentication mode with Azure SQL, but only from an enterprise domain federated to the Azure tenant domain. The Citrix Provisioning server virtual machine must belong to the enterprise domain, provisioning service account user context must be an enterprise user, and Citrix Provisioning must be configured by an enterprise user. Setting up federated domains is a significant task. Use this option if you have done this earlier. Instead, use Active Directory Password authentication.
-
Restrictions on System-Supplied Managed Identity authentication:
- Enable the system assigned managed identity on the Citrix Provisioning server VM.
- Restrictions on User-Supplied Managed Identity authentication:
- Create a user assigned managed identity or select an existing one, and add that user assigned managed identity to the Citrix Provisioning server VM.
Configuration wizard user permissions
You must have the system privilege of a local administrator to run the configuration wizard.
The admin database principal is the database principal used by the configuration wizard to create and set up the provisioning database. The authentication credentials that you specify in the configuration wizard identify the database principal.
- If you choose Active Directory Integrated authentication, the configuration wizard accesses the database as the user running the configuration wizard (an Active Directory user).
- If you choose other authentication modes, then the configuration wizard accesses the database as a different principal.
See Supported authentication types for more information on selecting an admin database principal.
Note:
The database admin principal is only used while running the configuration wizard. It is not saved and not used by the Stream and SOAP services. You must use a principal with elevated privileges for Stream and SOAP services.
-
When using SQL Server or Azure SQL Managed Instance, the admin database principal requires the following permissions:
-
securityadminfor creating and updating server logins (when using SQL Server or Azure SQL Managed Instance) -
db_ownerfor any existing database
To create a database for a new farm, the admin database principal requires
dbcreatoras an additional permission. -
-
When using Azure SQL Database, the admin database principal requires the following permissions:
-
loginmanagerfor creating and updating server logins (when using Azure SQL Database) -
db_ownerfor any existing database
To create a database for a new farm, the admin database principal requires
dbmanageras an additional permission.loginmanageranddbmanagerare special user roles that are assigned to users in the master database. -
Service account permissions
The service account for the Stream and SOAP services must have the following system privileges:
- Run as service
- Registry read access
- Access to
Program Files\Citrix\Citrix Provisioning - Read and write access to any virtual disk location.
The service database principal is the database principal used by the services to access the provisioning database. The authentication credentials you specify in the configuration wizard identify the database principal to be used.
- If you choose Active Directory Integrated authentication, the services access the database as the service account (an Active Directory user).
- If you choose other authentication modes, then the services access the database as a different principal.
See Supported authentication types for more information on selecting a service database principal.
The configuration wizard will configure the database to ensure the service database principal has the following permissions.
db_datareaderdb_datawriter- Run permissions on stored procedures
Enable a feature flag on your Azure subscriptions
Enable the ReserveMacOnCreateNic feature flag using the following PowerShell commands:
Register-AzProviderFeature -FeatureName ReserveMacOnCreateNic -ProviderNamespace Microsoft.Network
Register-AzResourceProvider -ProviderNamespace Microsoft.Network
<!--NeedCopy-->
This PowerShell command only changes the timing when MAC addresses are allocated for virtual NICs and does not change the functionality any other way.
If you want to permanently remove the capability to create target VMs on Azure, you can disable the feature flag as follows:
Unregister-AzProviderFeature -FeatureName ReserveMacOnCreateNic -ProviderNamespace Microsoft.Network
<!--NeedCopy-->
Create one or more Resource groups on Azure
Using the Azure documentation, create the Resource groups that match your required structure.
Set up Active Directory
Use one of the following methods to support Active Directory APIs and functionality on Azure:
-
Enable Azure Active Directory Domain Services feature for the Azure tenant (directory). If you require connectivity with your corporate Active Directory service, install and configure Azure AD Connect on a server in your data center. Azure AD Connect provides synchronization between your on-premises domain controllers and the Azure AD directory. This process can be integrating with your on-premises forest using the Microsoft AD Connect feature.
-
Create Active Directory domain controller VMs in your subscription and connect to an on-premises forest via an ExpressRoute connection.
-
Create a stand-alone Active Directory domain by creating AD Domain Controllers in your subscription.
Citrix Provisioning on Azure also supports Hybrid Azure AD. Set up Hybrid Azure AD and enable Microsoft Entra Connect Sync on the Domain Controller. For information, see Configure Microsoft Entra hybrid join. For information on creating a Hybrid Azure AD catalog, see Create Hybrid Azure AD joined catalogs.
Establish a virtual network for streaming on Azure
If you do not already have a virtual network on Azure, create a virtual network per region and subscription that you are using. There must be virtual network peering to the Active Directory virtual network and to the Azure SQL Managed Instance virtual network (if used). Refer to the Azure instructions, Establish a Virtual Network.
- Set up virtual network peering between the virtual network that is set up to stream targets, and the virtual network running Active Directory. These peerings allow connected VMs to communicate with the Domain Controllers for your Active Directory domain. Citrix recommends using a standard Hub and Spoke configuration for your virtual networks. See Hub-spoke network topology in Azure.
- Set the DNS servers for each virtual network to the AD Domain Controllers’ IP addresses.
(Recommended) Set up Azure Bastion access for secure VM access
For secure external access to VMs running in the subscriptions, we strongly recommend that you create your infrastructure VMs with NO public IP address and configure Azure Bastion, as described in the Azure documentation, Configure Bastion.
Create a connector VM on Azure
Create VMs to act as cloud connectors in each unique combination of region and subscription you are using. Then, install a Citrix Cloud Connector.
Create the Citrix Provisioning Server on Azure
On Azure, create VMs for the provisioning servers. Size servers for the expected load, similar to on-premises provisioning servers. Then install the Citrix Provisioning software on the VMs.
Configure hosting connection for US Government
Citrix Provisioning supports Azure control planes other than Azure Commercial, including Azure for US Government. You can add the management URL https://management.usgovcloudapi.net/ for the Azure US Government while creating the hosting connection using Citrix Studio. For information, see Create a connection using an existing service principal.
Configure service endpoint URLs
Azure has a secret environment where the endpoints of Azure services are a secret. To support the Azure secret region, you can now configure endpoint URLs of required services.
To configure endpoint URLs:
- Ensure that the path
C:\ProgramData\Citrix\Citrix Provisioning\Configexists on all the Citrix Provisioning Servers. -
Set Access Control List (ACLs) on the
Configfolder to protect theconfigJSON file from unauthorized access. The recommended ACLs are as follows:- System: Full Control. This permission applies to folders, subfolders, and files.
- Administrators: Full Control. This permission applies to folders, subfolders, and files.
- Any specific user to run Citrix Provisioning services: Read Only. This permission applies to folders, subfolders, and files. If you do not specify the permission, Citrix Provisioning services run as a User account.
Note:
The support for Network Service account is deprecated from Citrix Provisioning version 2503.1.
-
Create a JSON file
CustomizedAzureEnvironmentConfig.jsonunder theConfigfolder. Enter the endpoint URLs in the JSON file. For example:{ "managementEndpoint": "https://management.scombine.scloud/", "databaseEndpoint": "https://database.scombine.scloud", "loginEndpoint": "https://login.scombine.scloud/", "graphEndpoint": "https://graph.scombine.scloud/", "storageSuffix": ".scombine.scloud" } <!--NeedCopy--> -
Enable the feature flag.
- Add a DWORD value
AzureSecretRegioninComputer\HKEY_LOCAL_MACHINE\SOFTWARE\Citrix\ProvisioningServices\Features. - Set the value to
1.
- Add a DWORD value
Install the Citrix Provisioning software
The Citrix Provisioning Server VMs require the following resources:
- Access to an Azure SQL Database service or Azure SQL Managed Instance service, or a VM running SQL/Server or SQL/Server Express.
-
Access to a license server VM on Azure.
-
The Active Directory requirements are the same as for the existing on-premises version of Citrix Provisioning.
-
A suitable virtual network and subnets to support the traffic. We strongly recommend NO public IP addresses, and access only using the Bastion Service. If you have multiple virtual networks, configure peering to one or more subnets containing the provisioning server, the licensing server, and Active Directory. If you have multiple virtual networks and subnets, Citrix recommends setting up a standard Hub and Spoke. See Hub-spoke network topology in Azure.
-
For streaming, Citrix Provisioning servers require a minimum of one Network Interface Card (NIC) that target devices can use for communication.
-
Access to virtual disk storage. You can use:
-
Local storage on the Provisioning Server VM (typically via an Azure Data Disk).
-
On a file share implemented by a Premium Azure Storage Account, or Azure Netapp Services.
Reminder:
If you use a file share, reference it by UNC in the Citrix Provisioning setup. For example, \server01\path\path.
Citrix Provisioning does not support Standard Storage Accounts. If you use an Azure File Share, follow the instructions to provide access for the StreamServer to the file share in Azure.
-
On a separate VM providing a file share.
-
- Minimum of two 4vCPUs, 8 GB RAM each for the Citrix Provisioning Server VM. The more GBs, the better. Two 4vCPU with 16 GB Citrix Provisioning Servers with accelerated networking enabled are enough to handle 2500 targets streaming one vDisk.
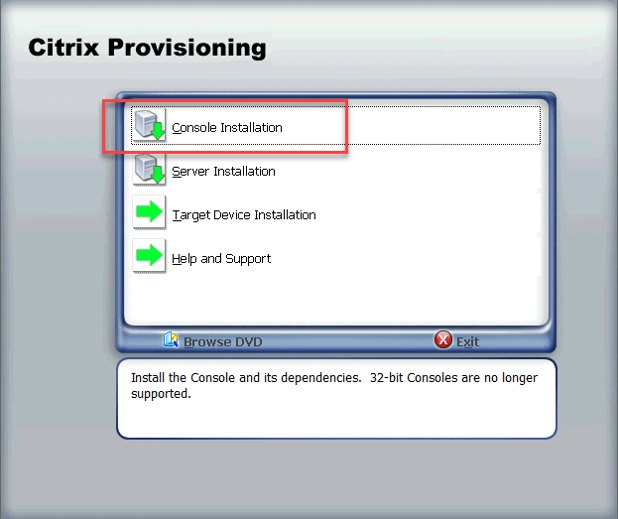
To install the Citrix Provisioning Server and Console:
- Using an administrator account, log into the Citrix Provisioning Server VM (through the Bastion Host, if using Bastion).
- In File Explorer, select the ISO file, right click, and mount it.
- In the mounted drive’s root folder, find the autorun.exe file, and run it. The Citrix Provisioning Installer starts.
-
Start by installing the Console. The installer prompts you to install prerequisites.
- If prompted, reboot, mount the Citrix Provisioning ISO again, and restart the process.
-
Install the Citrix Provisioning Server using the Server Installation link on the autorun program. By default, creating firewall rules for provisioning traffic is enabled.
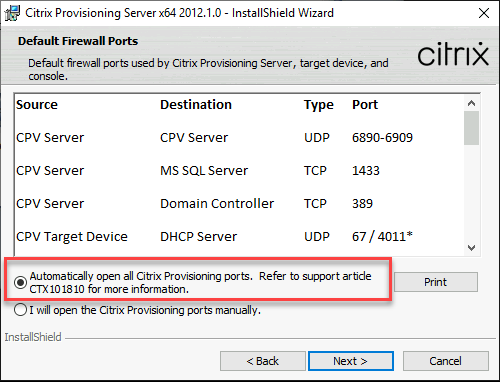
Note:
Ensure any Network Security Group defined for the VNets must allow Citrix Provisioning traffic to flow. See Communication Ports Used by Citrix Technologies for information on ports that must be opened to ensure communication flow.
When the server installation completes, it runs the Citrix Provisioning Configuration Wizard where you set up the provisioning server.
-
Welcome: Read the Welcome dialog and click Next.
-
Farm configuration: Indicate you want to create a new farm.
If you select Farm is already configured, enter database administrator credentials in the pop-up dialog. Select Active Directory Integrated authentication if you want to use the current login.
-
Database Server: Enter the SQL Server host name or address and the name of the instance you created for the provisioning server to use, or add the Azure SQL Database server name (leave instance blank), or the Azure SQL Managed Instance host name (leave instance blank). The Authentication drop-down lists the supported authentication types. Depending on the authentication mode that is selected, you can provide the necessary credentials to connect to the database. The credentials on this page are for the Stream and SOAP services.
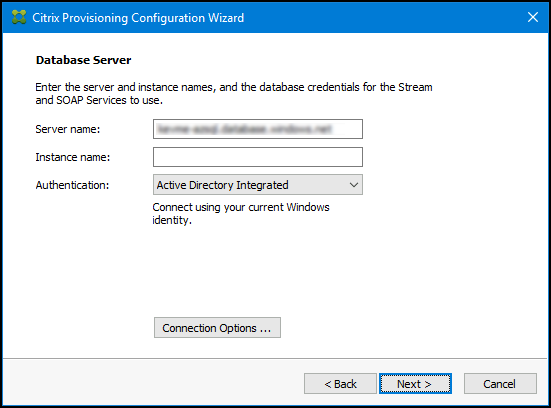
After you click Next, enter database administrator credentials in the pop-up dialog. Select Active Directory Integrated authentication if you want to use the current login.
-
New Farm: Enter the farm, site, and collection names. We recommend selecting Use Active Directory groups for security, and the Farm Administrator group.
-
New Store: Specify the store and location. If you are using a file share, then enter a UNC name.
-
License Server: Enter the license server location.
-
User Account: Specify the user account to run the services under. If you use a network share for the store, use a domain account with access to the share. The account must be an administrator on the PVS server.
-
Network Communication: Choose the network interface to be used for streaming and management. If you only have a single NIC, accept the defaults.
-
Soap SSL Configuration: Accept the default values.
-
Problem Report Configuration: Enter your MyCitrix credentials to enable submission of cases.
-
Finish: Review the configuration settings, and click Finish. A dialog reports a warning about the Windows Firewall.
-
Click OK. A progress dialog opens to display progress as Citrix Provisioning is being configured. If failures occur, you receive a link to review the log.
-
When configuration is successful, click Done.
-
Workflow for running the configuration wizard silently
The basic steps involved in the silent configuration of servers in the farm are:
- Create a
ConfigWizard.ansfile from a configured provisioning server in the farm, or create the file manually. To create the file manually, see Create the ConfigWizard.ans file manually. - Copy the
ConfigWizard.ansfile onto the other servers in the farm, and modify the IP address in theConfigWizard.ansfile to match each server in the farm. - Run
ConfigWizard.exewith the/aparameter.
Create the ConfigWizard.ans file manually
If you want to create the ConfigWizard.ans file from scratch, using a text editor that lets you save as Unicode, create a file named ConfigWizard.ans, and save it as Unicode. Enter the parameters shown in the table. Include all of the parameters relevant to your configuration.
| Screen | UI Option | Manual parameter |
|---|---|---|
| Farm Configuration | Farm is already configured | FarmConfiguration=0 |
| Create farm | FarmConfiguration=1 | |
| Join existing farm | FarmConfiguration=2 | |
| Database Server | DatabaseAdminAuthentication | DatabaseAdminAuthentication=< ActiveDirectoryIntegrated, ActiveDirectoryPassword, or SqlPassword>
|
| DatabaseAdminUsername | DatabaseAdminUsername=<Active Directory username or SQL login> (Used only if DatabaseAdminAuthentication is ActiveDirectoryPassword or SqlPassword) |
|
| DatabaseAdminPassword | DatabaseAdminPassword=<password> (Used only if DatabaseAdminAuthentication is ActiveDirectoryPassword or SqlPassword) |
|
| Database Server (after Create Farm or Join existing farm) | DatabaseAuthentication | DatabaseAuthentication=<ActiveDirectoryIntegrated, ActiveDirectoryPassword, ActiveDirectoryServicePrincipal, ActiveDirectoryMSI/System, ActiveDirectoryMSI/User, or SqlPassword>
|
| DatabaseUsername | DatabaseUsername=<Active Directory username, App Registration name, Managed Identity name, or SQL Login> (Used only if DatabaseAuthentication is ActiveDirectoryPassword, ActiveDirectoryServicePrincipal, ActiveDirectoryMSI/User or SqlPassword) |
|
| DatabasePassword | DatabaseAdminPassword=< password or application secret> (Used only if DatabaseAuthentication is ActiveDirectoryPassword, ActiveDirectoryServicePrincipal, or SqlPassword) |
|
| DatabaseTenantID | DatabaseTenantID= < Tenant ID of application registration > (Only used if DatabaseAuthentication is ActiveDirectoryServicePrincipal) | |
| DatabaseApplicationID | DatabaseApplicationID= < Application ID of application registration > (Only used if DatabaseAuthentication is ActiveDirectoryServicePrincipal) | |
| DatabaseClientID | DatabaseClientD= < Client ID of Managed Identity > (Only used if DatabaseAuthentication is ActiveDirectoryMSI/User) | |
| DatabaseObjectID | DatabaseObjectID= < Object ID of Managed Identity > (Only used if DatabaseAuthentication is ActiveDirectoryMSI/User) | |
| Server name | DatabaseServer=<dBName>,<NonDefaultSQLPort> (If default port, omit port value) |
|
| Instance name | DatabaseInstance=<InstanceName>
|
|
| Database name | DatabaseNew=<DbName>
|
|
| Enable MultiSubnetFailover for SQL Server Always On | MultiSubnetFailover=<0 or 1>
|
|
| Database Mirror Failover Partner Server Name | FailoverDatabaseServer=<dBName>,<NonDefaultSQLPort> (If a database mirror failover partner is not used, this value is omitted, or has an empty value) |
|
| Database Mirror Failover Partner Instance Name | ||
| New Farm (when new farm is created) | Farm name | FarmNew=<FarmName>
|
| Site name | SiteNew=<SiteName>
|
|
| Collection name | CollectionNew=<CollectionName>
|
|
| Farm Administrator group: PVS server is in Active Directory | ADGroup=<Path to AD group> Ex: test.local/Users/Domain Users
|
|
| PVS server is in Workgroup | Group=<Path to local group> Ex: PVS-Server-1/Administrators |
|
| New Store (when new farm is created) | Store name | Store=<StoreName>
|
| Default path | DefaultPath=<Store path>
|
|
| Existing Farm (when joining an existing farm) | Farm name | FarmExisting=<database name>
|
| Site (when joining an existing farm) | Existing site; Site name | ExistingSite=<Site name>
|
| New site; Site name | Site=<Site name>
|
|
| Collection name | Collection=<Collection name>
|
|
| Store (when joining an existing farm) | Existing store; Store name | ExistingStore=<Store name>
|
| New store; Store name | Store=<Store name>
|
|
| Default path | DefaultPath=<Path to store>
|
|
| License Server | License server name | LicenseServer=<Citrix License Server’s IP, host name, FQDN>
|
| License server port | LicenseServerPort=<LicenseServerPort> (27000 is default port) |
|
| On-premises (license type) | licenseSKU=0 | |
| Use Datacenter licenses for desktops if no Desktop licenses are available | LicenseTradeup=<0 or 1> | |
| Cloud (license type) | licenseSKU=1 | |
| User accpunt | Domain user account | Network=0 or do not specify |
| Specified user account; User name/Domain |
<domain\username>
|
|
| Password | UserName2=<Password>
|
|
| Network service (Deprecated from 2503.1) | Network service account | Network=1 |
| Active Directory Computer Account Password | Days between password updates | PasswordManagementInterval=<#ofDays> (Including this parameter enables Automate computer account password updates) |
| Network Communications | Streaming network cards | StreamNetworkAdapterIP=<IPofStreamingNIC1,IPofStreamingNIC2,…> (comma-separated list of IPs) |
| Management network card | ManagementNetworkAdapterIP=<IPofManagementNIC> (only one IP) |
|
| Note: Network cards can be both streaming and management. | ||
| First communications port | IpcPortBase=6890 | |
| Total ports used for server communication | IpcPortCount=20 | |
| Console port | SoapPort=54321 | |
| Soap SSL Configuration | SSL port | SSLPort=54323 |
| SSL certificate | SSLCert=<token>
|
|
| Problem Report Configuration | My Citrix Username | CisUserName=<username>
|
| Password | CisPassword=<password>
|
|
Create the master VM
This section explains how to create the master VM, and preparing the image to connect to the Citrix Provisioning Server at boot time.
Be sure to use:
- A Generation 2 machine.
- Windows 10, Windows 11 (Standard Security Type), or Windows Server 2016/2019/2022 OS.
To create the master VM:
-
Create a Virtual Machine:
-
Log on to the Azure Portal, and go to Home > Virtual Machines.
- Click Add, and complete the Create Virtual Machine wizard. Be sure to set these values:
- Basics: At the bottom of the page, select the I confirm Licensing option.
- Networking: Specify the subnet used for streaming, and choose no public IP.
- Advanced: Ensure VM generation Gen 2 is selected.
-
Complete the Windows Setup.
-
Join the domain used by your Citrix Provisioning deployments.
- Deploy the VDA, using standard practices.
-
- Ensure that the pagefile location is correct.
- If the machine size chosen has a temporary disk, ensure that the system pagefile is located on this disk (drive letter D:). If you created the master VM from an Azure Marketplace image, the system pagefile must already be located on the temporary disk. However, if the VM was created from your own image, this might not be the case.
- If the machine size does not have a temporary disk. The system pagefile must be located on the boot (C:) disk.
-
Install the Citrix Provisioning Target Device software.
- Mount the Citrix Provisioning ISO.
- Reboot when prompted.
-
Run the imaging wizard or P2PVS, as you would for an on-premises installation.
-
Specify the Server name or IP address, and select Use my Windows credentials.
-
Imaging Options: Select Create a vDisk.
-
Add Target Device: Specify the Target device name and the Collection name.
Important:
Use a different name than the current host name. The master VM can boot either from the local disk or from the virtual disk you create, but Computer Account password management is not synchronized between them. If you give the target the same name as the current host, you lose domain trust when switching between the two ways of booting the master VM.
-
New vDisk: Specify the virtual disk name.
-
Microsoft Volume Licensing: Select KMS Licensing.
-
What to Image: Select Image entire boot disk.
-
Optimize Hard Disk for Citrix Provisioning: Select Optimize the hard disk to ensure that unnecessary Windows features are disabled.
-
Summary: Verify that the settings are correct, and click Create when prompted, reboot the VM. As the VM reboots, the Azure Boot Diagnostic page in the Azure portal displays the boot progress.
-
When the Master VM finishes booting, log on again. The imaging wizard resumes where it left off. A dialog asks whether to format the disk. Select Cancel. (The imaging takes some time.)
-
When imaging is complete, exit the imaging wizard.
-
On the provisioning console:
- Update the vDisk to Production status, with Cache Type set to Cache in device RAM with overflow on hard disk.
- Right-click the master VM target definition, and select Active Directory > Create Computer Account.
-
Create target VMs on Azure using the Citrix Virtual Apps and Desktops Setup Wizard
The Citrix Virtual Apps and Desktops Setup Wizard lets you create multiple target VMs in a single invocation. The wizard guides you through the complete process of creating target VMs and integrating them with Citrix Virtual Apps and Desktops and Citrix DaaS.
Initial Setup
Do the following once before running the Citrix Virtual Apps and Desktops Setup wizard:
- If you want to use your own Service Principal for accessing Azure, follow the guidance in Microsoft Azure Resource Manager virtualization environments to create an SPN suitable for use with provisioning.
Note:
Do not use CanNotDelete or ReadOnly locks on resource groups that are used in the Citrix Virtual Apps and Desktops Setup wizard. See Microsoft Lock Resources for details.
Create target VMs
To create target VMs using the wizard:
-
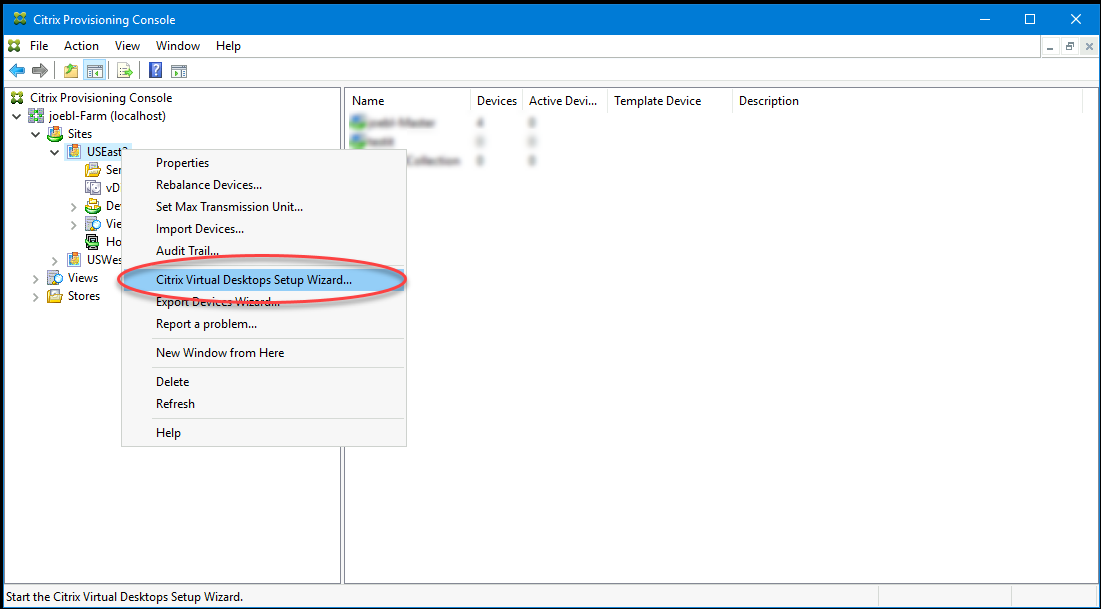
Run the provisioning console, right-click the site where you want to create targets, and select Citrix Virtual Desktops Setup Wizard.
-
Click through the welcome page, select the type of Delivery Controller, and choose Next.
-
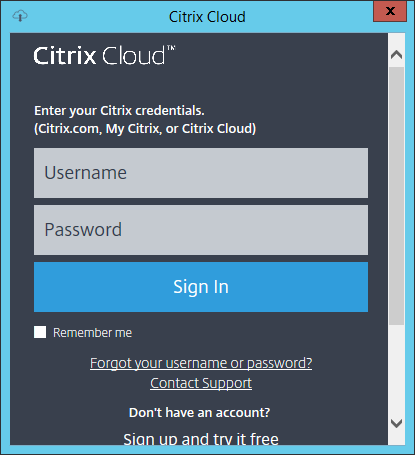
If you select Citrix Cloud:
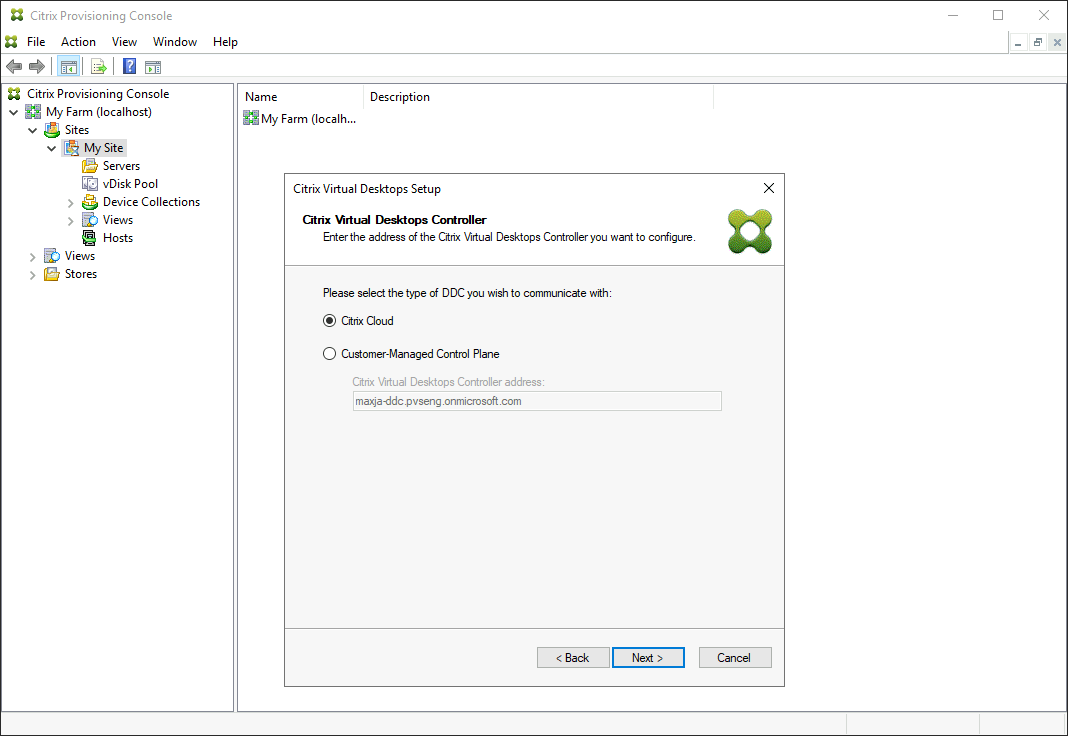
- Enter Citrix Cloud credentials.
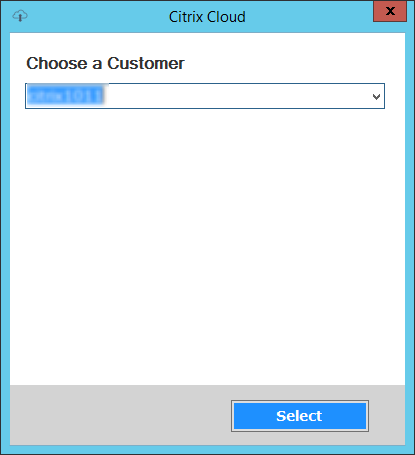
- If you have more than one customer, select appropriate cloud customers.
-
If you select Customer-Managed Control Plane:
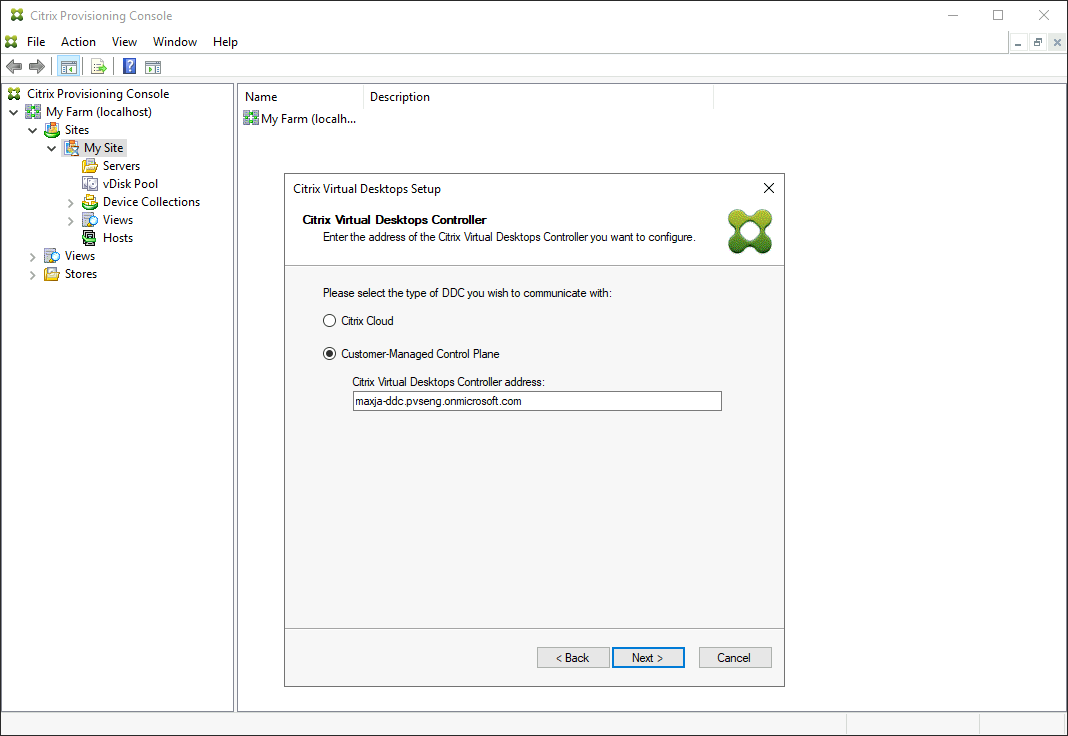
- Enter the controller hostname or address. The wizard authenticates to the Delivery Controller using the current logged in user.
-
-
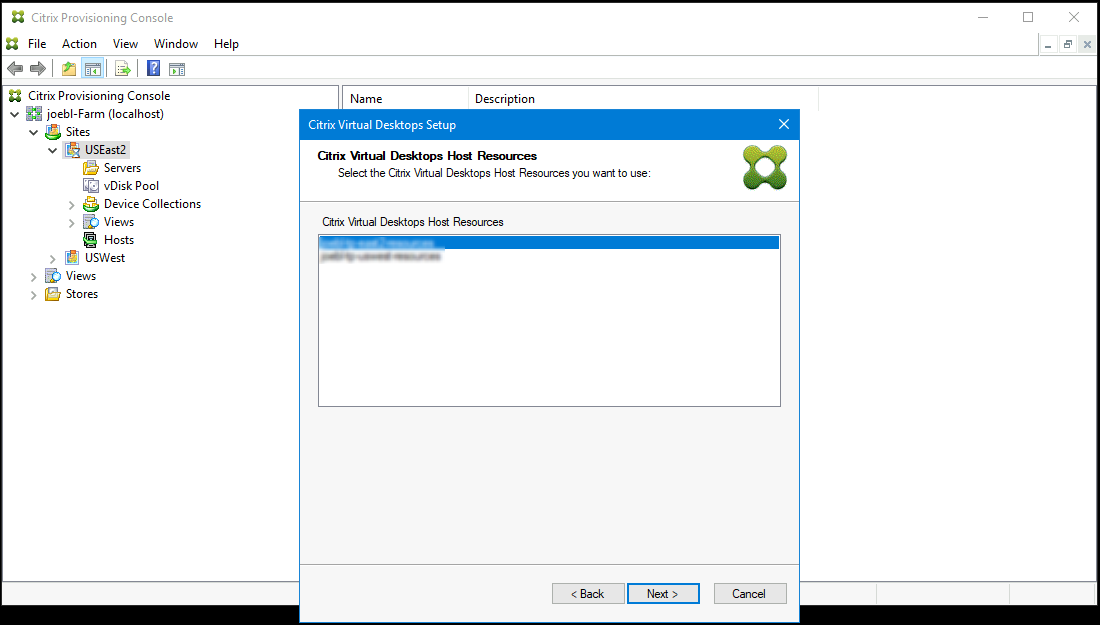
Choose an Azure hosting unit from the displayed list. The wizard displays the list it retrieves them from the Cloud. Select the hosting unit to use based on the resource location you are provisioning to.
-
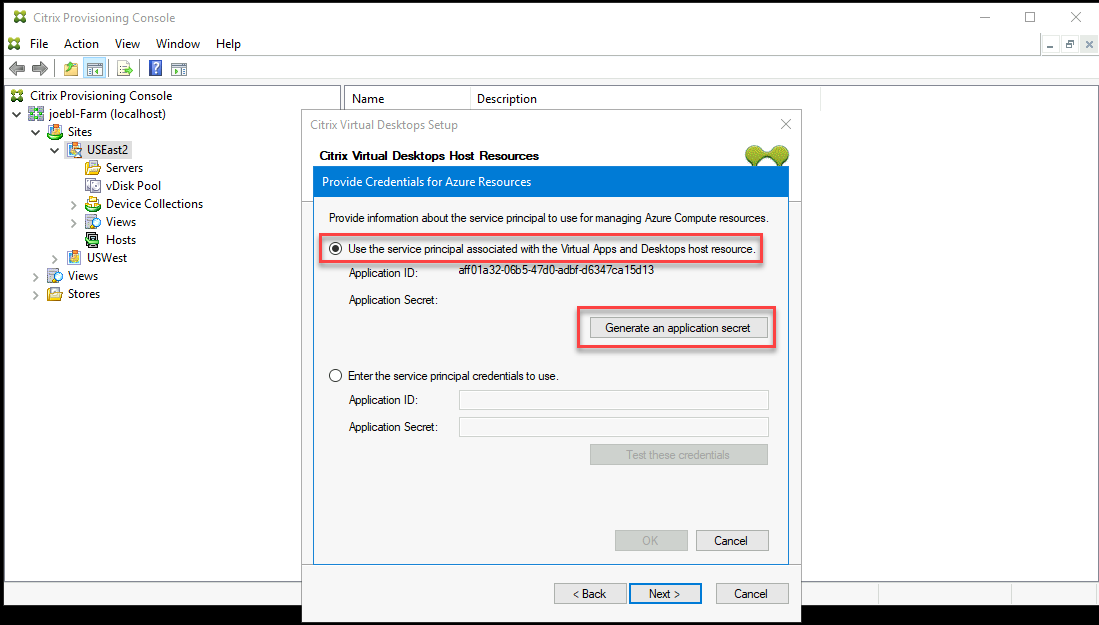
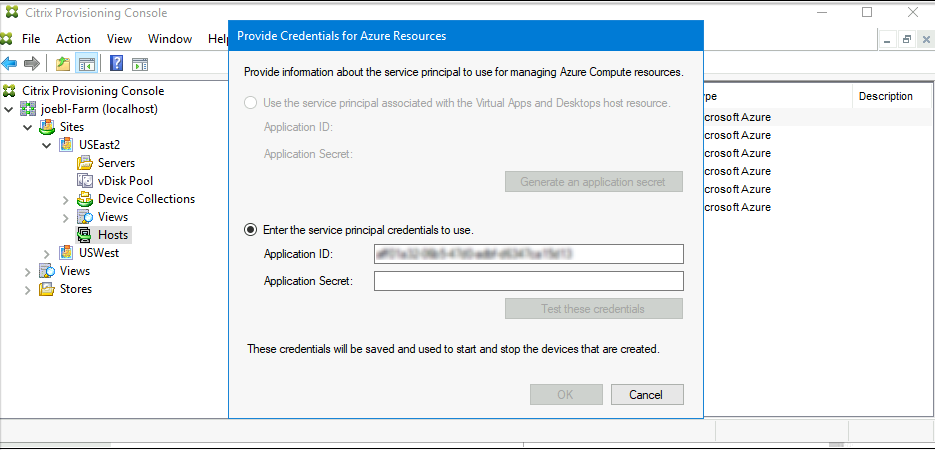
Next, establish a Service Principal Name (SPN) for working with the Azure APIs. An SPN has two components:
-
The Application ID, a GUID uniquely identifying the Service Principal.
-
The application secret.
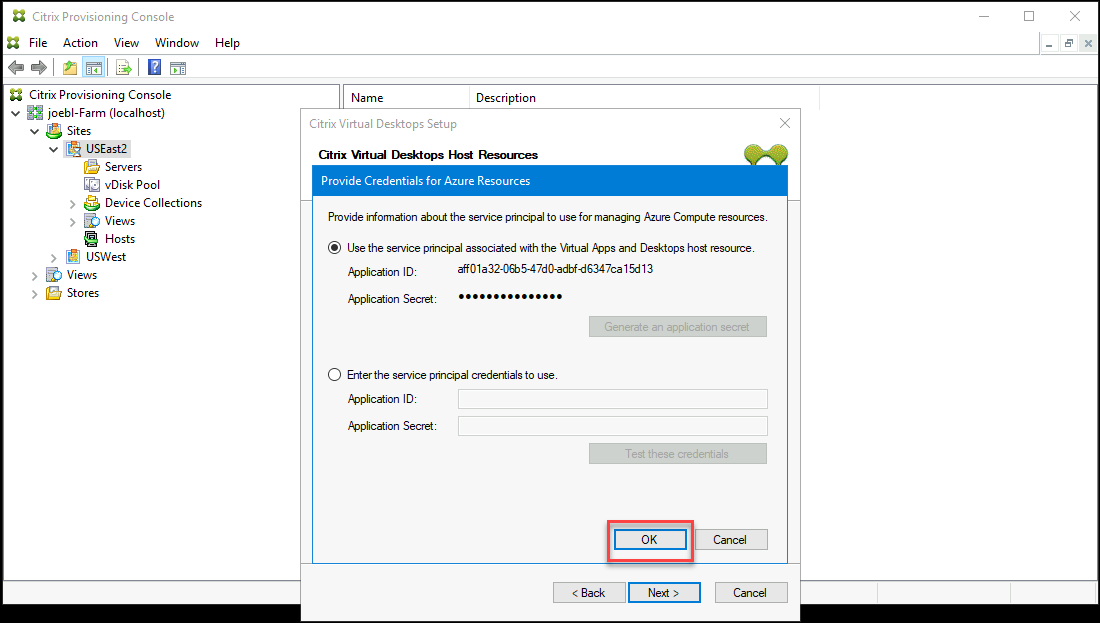
You have two choices for specifying the SPN:
-
The hosting unit has a configured Application ID. The setup wizard can generate a new secret for this application. However, you need the credentials for the user that initially created the application ID stored in the hosting unit. Continue as follows:
-
Select Use the service principal associated with the Virtual Apps and Desktops host resource, and click Generate an application secret.
Tip:
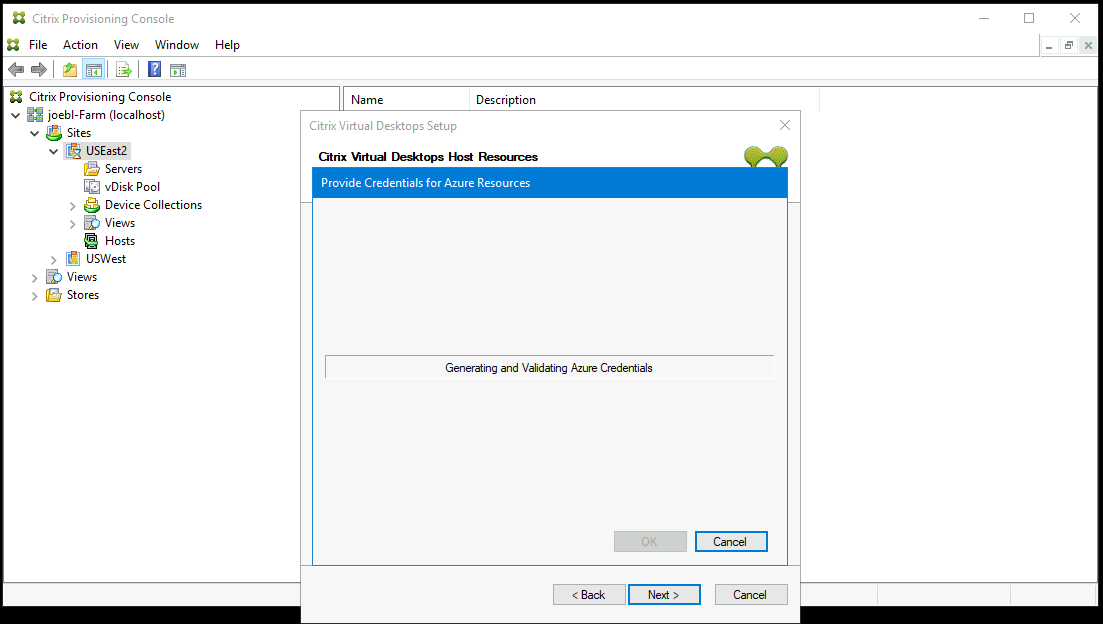
When you run the Citrix Virtual Apps and Desktops Setup Wizard for the first time, the selected hosting unit, in this case an Azure hosting unit, the generated secret is valid for one year. The information about the generated secret is displayed. If the generated secret is valid for one year, it is stored in the Citrix Provisioning database and is used for power management operations. When you run the Citrix Virtual Apps and Desktops Setup Wizard again using the same hosting unit, the generated secret is valid for one day. This secret is deleted when you complete the setup process using the setup wizard. If you cancel the setup process while the Citrix Virtual Apps and Desktops Setup Wizard is running, the generated secret is deleted.
-
Sign into Azure using the same credentials used to create the application. If you use different credentials, you get an error.

This process can take a significant amount of time. You can press the cancel button to abort if you think it is hung:
If you cancel, you are taken back to the screen to generate or enter authentication information
-
Once successful, the secret is shown as a set of asterisks. Click OK to continue.
-
-
If you previously created your own SPN:
-
Select Enter the service principal credentials to use, and enter your application ID and secret. Click Test these credentials.
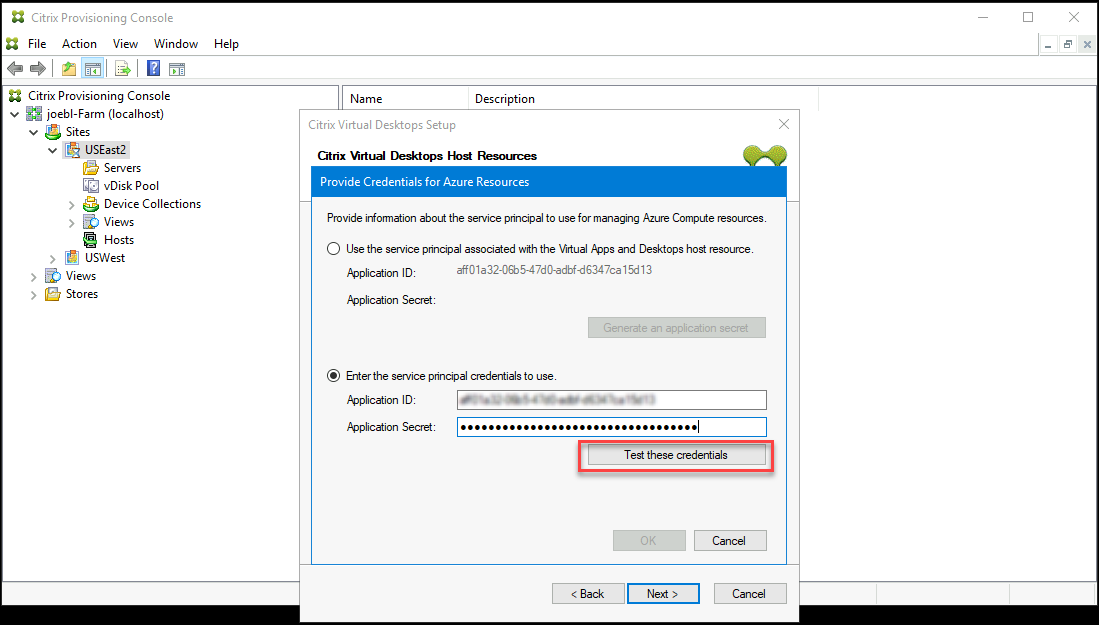
If the SPN is valid, a green check mark is displayed beside the Test button.
-
Click OK to continue. The wizard loads a list of VMs that you can use as the template for creating target VMs.
Reminder:
When you run the Citrix Virtual Apps and Desktops Setup Wizard for the first time using an Azure hosting unit, the credentials are stored in the Citrix Provisioning database for power management operations.
If the process fails, a message similar to this one is displayed:

Click OK to return to the authentication page.
-
-
-
Choose a VM previously setup with the settings for the provisioned targets. Template VMs that use a machine size that supports Gen2 VMs are loaded.
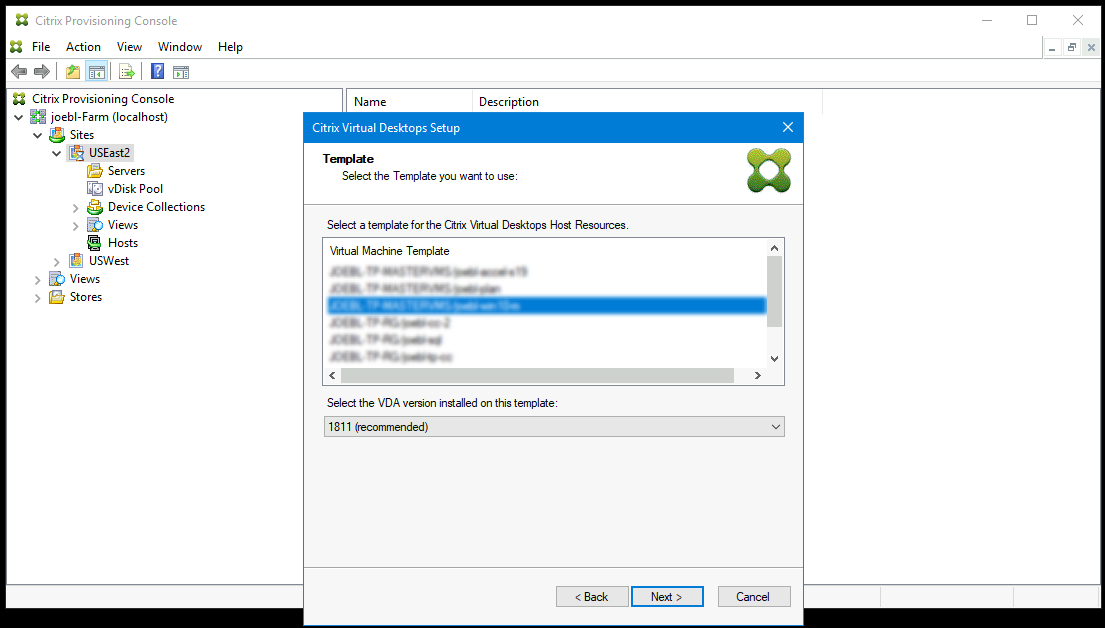
- Select a VM to use as the template. Choose the same VDA version that you use for on-premises Citrix Provisioning and MCS. Click Next.
-
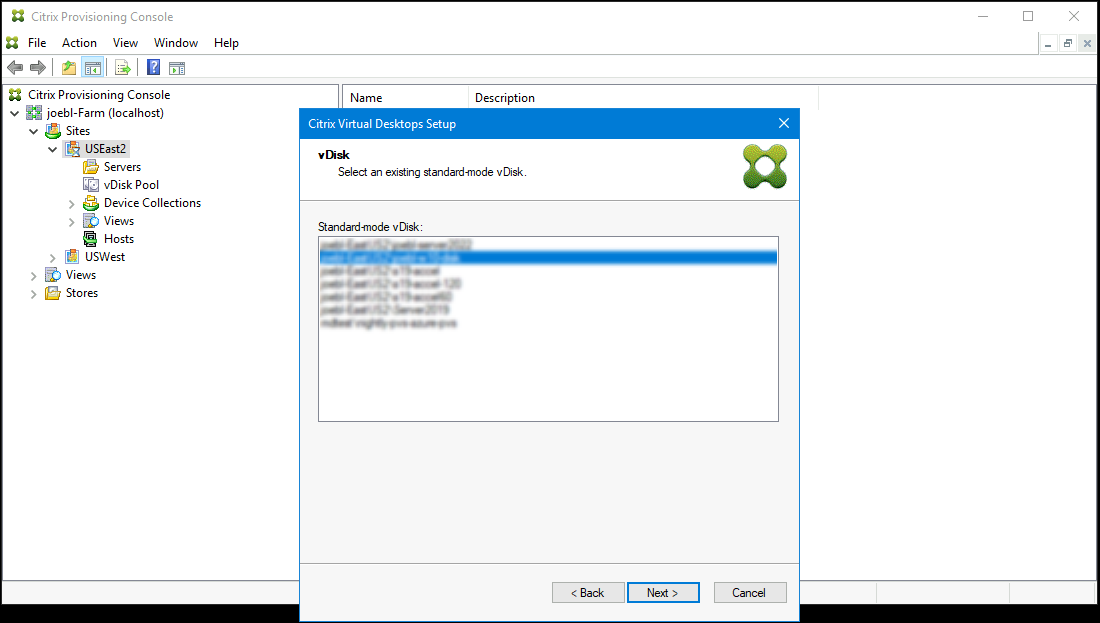
Choose the vDisk to for the provisioned targets.
-
Choose to create a catalog, or add the VMs to an existing catalog.
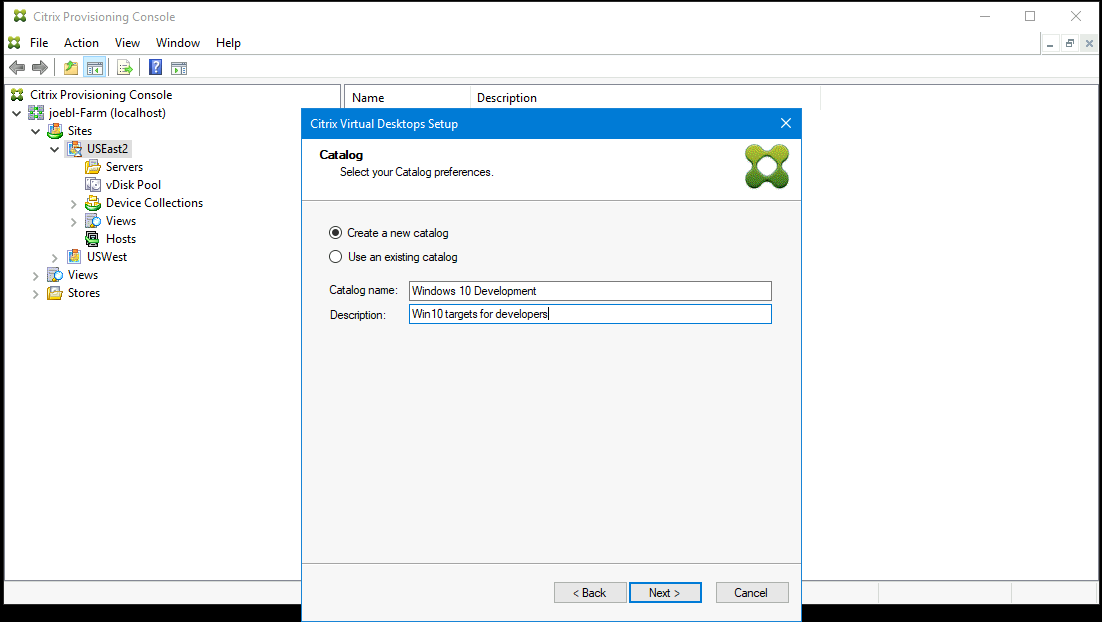
If you add to an existing catalog, a drop-down list of catalogs is supplied for you to choose from.
-
Choose the type of VDA and catalog:
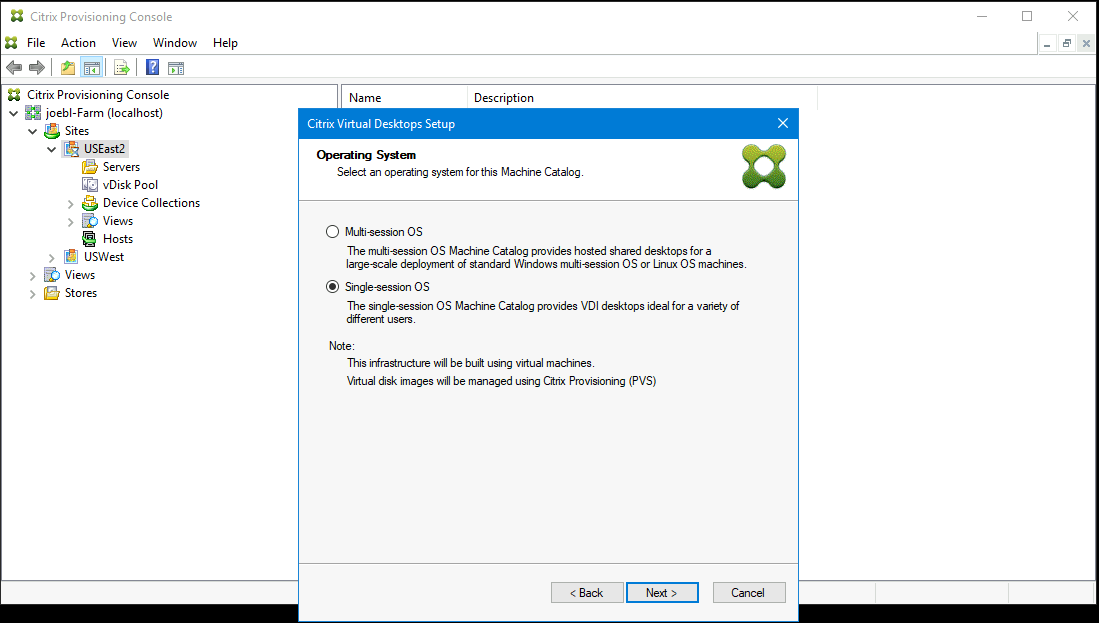
-
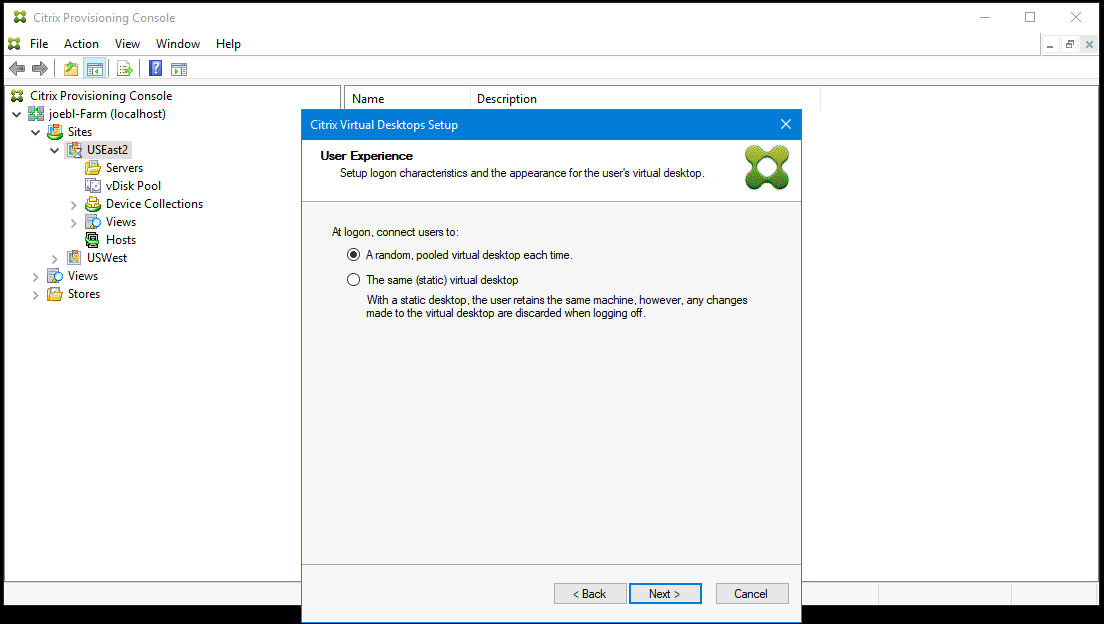
On the Virtual machines page, select VM preferences. Preferences vary depending on the machine OS type and if assigned user changes are discarded after the session ends. For a Windows Client or Windows Server machines that are randomly assigned to users:
- Enter the number of VMs to create (default is 1).
- Enter the number of vCPUs (default is based on the previously selected template).
- Enter the memory size. If the template has dynamic memory configured, two extra configuration settings are required (minimum and maximum memory).
- Enter the local write cache disk size (default is 6 GB).
- Select the checkbox Targets uses IPv6 if you want to create targets that stream using IPv6.
Note:
BDM Mode is the only supported boot mode on Azure.
-
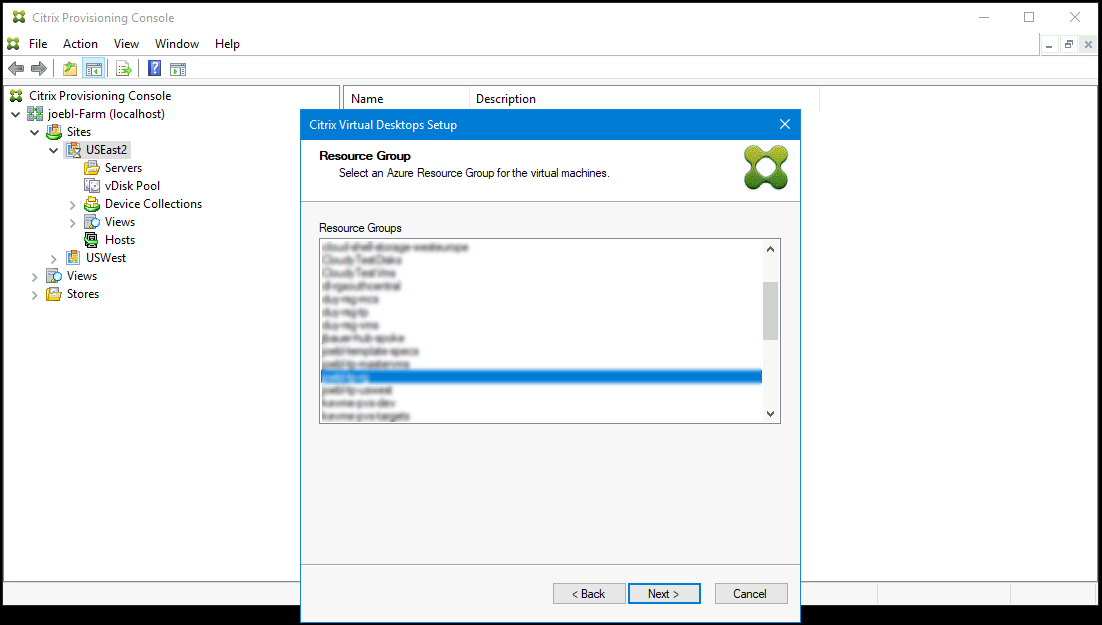
Select the resource group to use when creating target VMs. The resource group must exist, but you determine how the VMs are allocated to resource groups. In the following example, there is a separate resource group for targets, making it easier to manage all targets as a group.
-
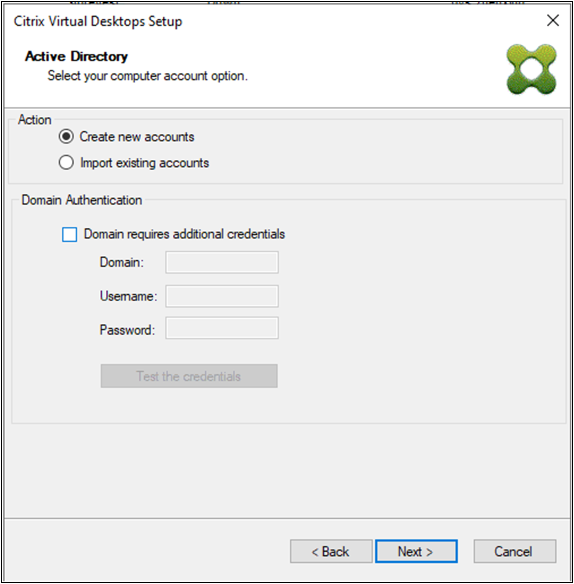
Select Active Directory for the targets.
Citrix Provisioning supports provisioning of target devices in untrusted domains.
If the domain is not trusted, under Domain Authentication, do the following:
- Select Domain requires additional credentials.
- Enter the domain name, username, and password for the untrusted domain.
- Click Test the credentials. This action validates the domain name and the credentials.
- After you get a green check mark, proceed to the next page.
Note:
Searching Azure Active might take a long time, which can cause the Provisioning Console to stop responding. If the wizard stops responding and a dialog appears with the choices End Now or Cancel, click Cancel to continue with the setup operation.
-
Set up the information about the provisioning servers that function as login servers for the targets. You can select:
-
Use DNS to find Citrix Provisioning Servers: If you have one single Citrix Provisioning Server, then you can use its DNS hostname. If you want a single DNS name to translate to multiple PVS servers, then you have to manually add the records with the common name and the IPv4 or IPv6 address of each server.
Note:
If you want to use a DNS name, then you must specify the fully qualified domain name. DHCP server does not include the zone where you add the DNS name to be used.
-
Use specific servers: To specify the desired servers by IP address, click Add to select from the list of configured servers. Select the servers and click Add. The selected servers appear on the Citrix Provisioning server information page.
Note:
The IPv6 addresses are displayed if you select Targets uses IPv6 checkbox earlier on the Virtual Machines page.
-
-
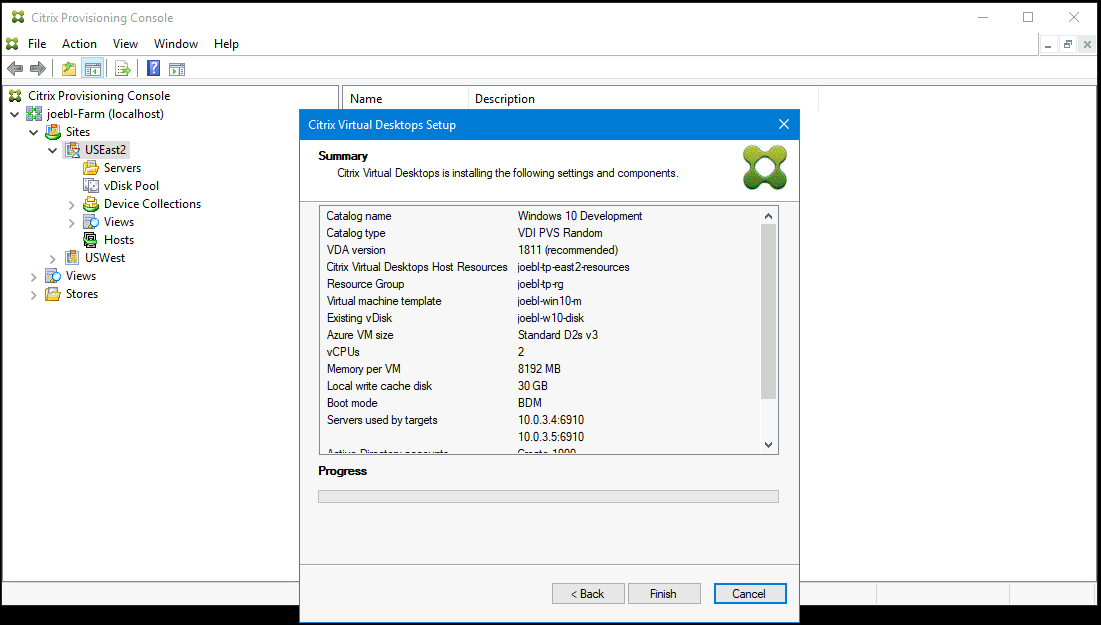
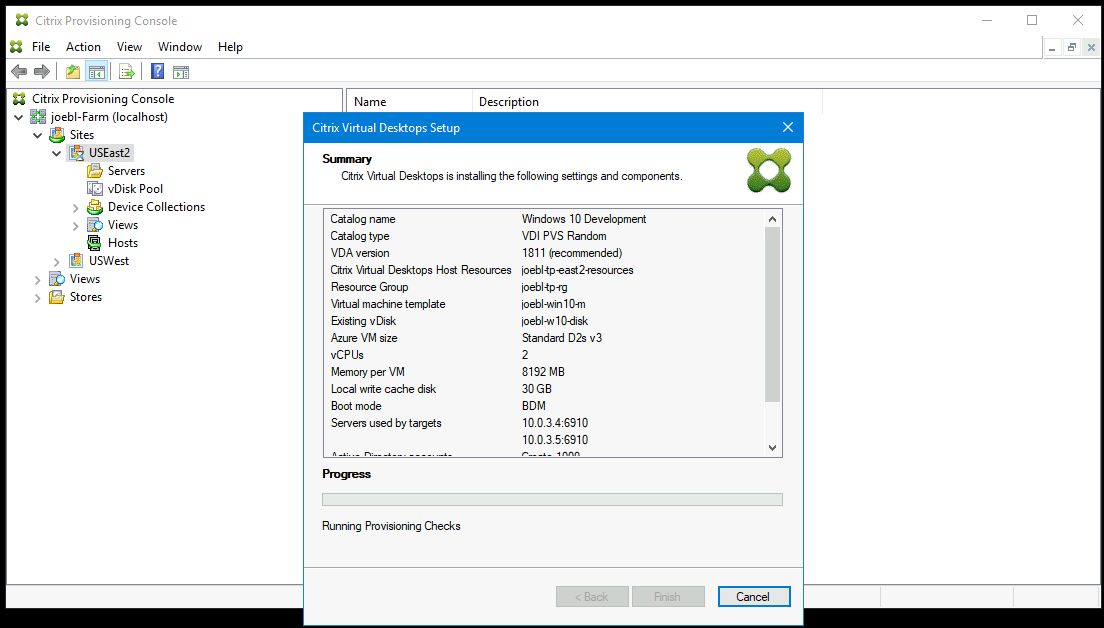
Verify the information on the summary page, and click Finish to begin the provisioning process.
Also, consider the following:
-
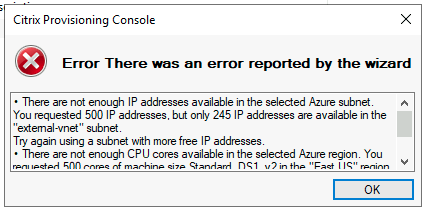
After clicking Finish, the Citrix Virtual Apps and Desktops Wizard does a pre-flight check. Citrix Provisioning runs tests to verify that enough resources (CPUs, NICs, and IP addresses) exist. An error message appears if the pre-flight check fails.
-
During the Citrix Virtual Apps and Desktops Wizard process, the newly created VM boots up to format the write cache disk, then shuts down. This process takes a few minutes. If the machine times out during this operation, the setup process fails.
-
By default, 200 VMs are created in a batch operation.
Manually creating target VMs on Azure
Citrix recommends using the Citrix Virtual Desktops Setup Wizard to create target VMs and integrate with Citrix Virtual Apps and Desktops and Citrix DaaS, as documented in the previous section. If you cannot use the Citrix Virtual Desktops Setup Wizard, then you can manually provision target VMs using the procedures outlined in this section.
The Citrix Provisioning Server and targets do not support either PXE or ISO boot on Azure, because Azure does not support them. Instead, target VMs boot using a small boot disk, the BDM Boot Disk, which is about ~20 MB and contains the Citrix Provisioning UEFI boot application.
Creating the boot disk
Create the boot disk using the Boot Device Manager (BDM) program installed with the server. Run as follows:
-
Run the BDM.exe program.
C:\Program Files\Citrix\Provisioning Services\BDM.exe. <!--NeedCopy--> -
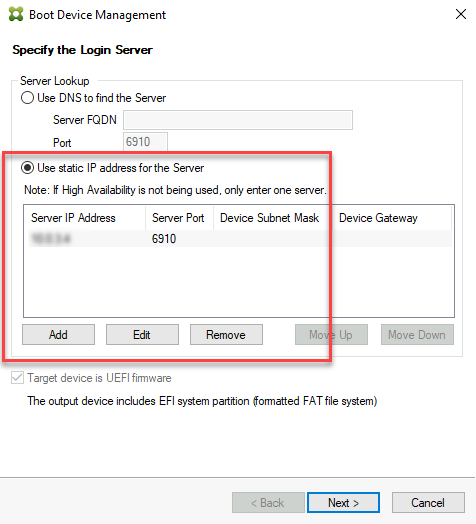
Specify the Login Server: Enter the Provisioning Server information.
-
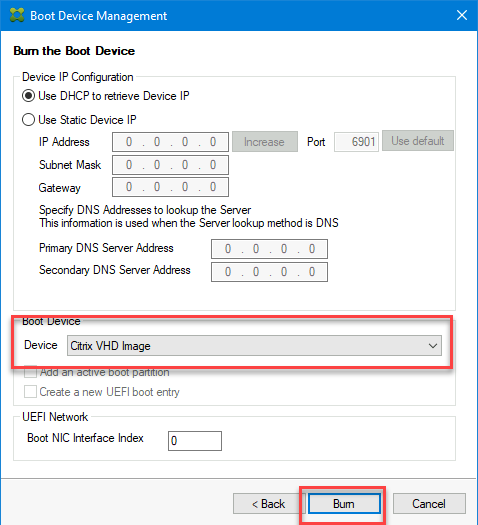
Create the boot disk VHD file: In the Device field, select Citrix VHD Image, and click Burn.
Target VMs can also use a DNS name to locate the Provisioning Server, as opposed to specifying its IP address. First, you create a DNS entry that maps to the IP addresses used by the Citrix Provisioning servers on the streaming network. Then, you configure the BDM Boot disk to contact your Citrix Provisioning servers using this name.
Defining the DNS name to locate the Provisioning Server is useful for High Availability (HA), because it allows you to return a list of IP addresses as opposed to configuring all IP addresses in the BDM boot disk. To use this feature, you create a DNS entry that maps to one or more IP addresses used by the provisioning servers on the streaming network. In this case, you run the BDM.exe program, and specify the DNS host name for the provisioning server DNS on the first page.
Creating the Target VMs
If you want to provision VMs yourself, use the following instructions to create the target VMs:
-
Create the BDM boot disk as outlined above, and upload the boot disk to an Azure managed disk. See Uploading VHD to Managed Disk for instructions on uploading a VHD to Azure.
-
Create target VMs on Azure using the BDM boot disk you created, an empty cache disk of the size you need, and connected to a subnet that has access to the provisioning servers. See Create Target VMs on Azure.
-
Manage the Target devices in Citrix Provisioning. You can manually add each target VM using the provisioning console or use the Import Wizard to bulk import manually provisioned VMs. Use the Azure portal, Azure command line, or Azure PowerShell commands to extract the MAC address assigned to the boot NIC of each manually provisioned target VM.
-
Start each VM once to ensure that the setup is finalized. During this boot, Citrix Provisioning formats the cache disk, and then shuts the VM down. Once it is shutdown, use the Azure portal, Azure command line, or Azure PowerShell commands to deallocate the VM.
Note:
You can choose the resource groups, VNet, and disk types if the network contacts the Citrix Provisioning server and the storage type chosen for the cache disk is standard SSD or better.
Azure server side encryption with customer-managed key
Citrix Provisioning on Azure now supports customer-managed encryption keys to encrypt all managed disks, which are BDM Boot disk and WBC disk, associated with each target device. With this support, you can manage your organizational and compliance requirements by encrypting the managed disks of your machine catalog using your own encryption key. For more information, see Server-side encryption of Azure Disk Storage.
A Disk Encryption Set (DES) represents a customer-managed key. Assign a DES ID to the boot disk of the template VM. This DES is applied to all disks created when targets are provisioned using Citrix Virtual Apps and Desktops Setup Wizard. The disks created also include BDM Boot disk and WBC disk. Also, if you select Encryption-At-Host for the target VM, then encryption starts on the VM host itself. The encryption is also applied to all target VMs provisioned using the Citrix Virtual Apps and Desktops Setup Wizard.
Integrate Manually Created Targets with Citrix Virtual Apps and Desktops and Citrix DaaS
Adding a Hosting Connection in Studio connects you to your resource location. When you specify your Azure credentials, Studio creates an Azure Application ID and secret. Citrix DaaS uses these Azure credentials to control the VMs in the resource location. The provisioning Export Devices Wizard uses data from this hosting connection to assist it in creating a Broker Catalog.
To integrate with Citrix Virtual Apps and Desktops and Citrix DaaS:
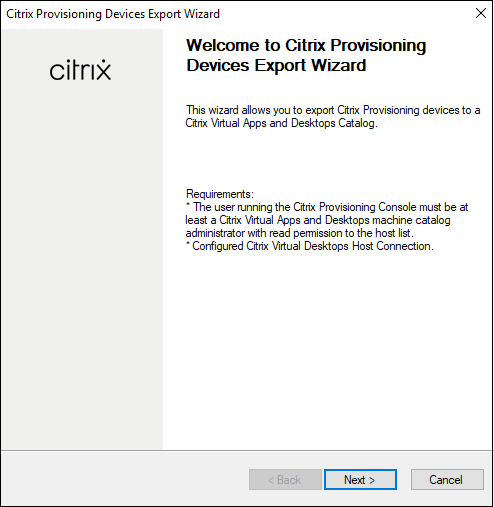
- Launch the Export Devices wizard from the Citrix Provisioning console.
-
Click Next to start the wizard.
-
On the Citrix Virtual Desktops Controller screen, select the type of delivery controller.
-
If you select Citrix Cloud:
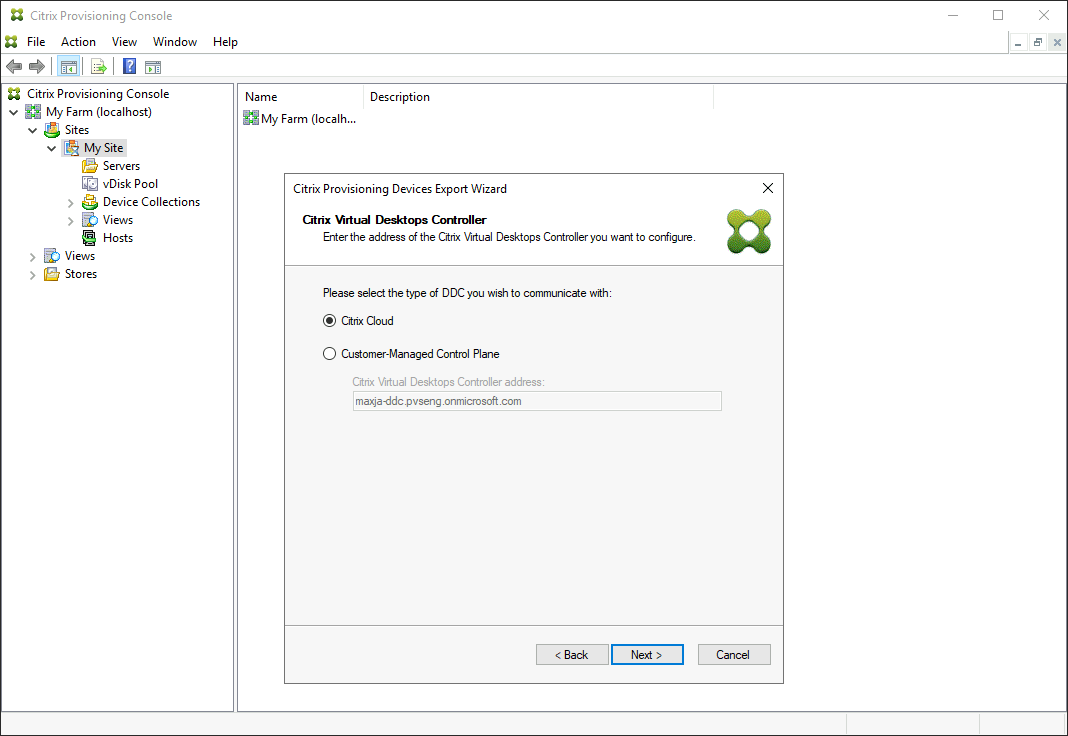
-
Enter Citrix Cloud credentials.
-
If you have more than one customer, select appropriate cloud customers.
-
-
If you select Customer-Managed Control Plane:
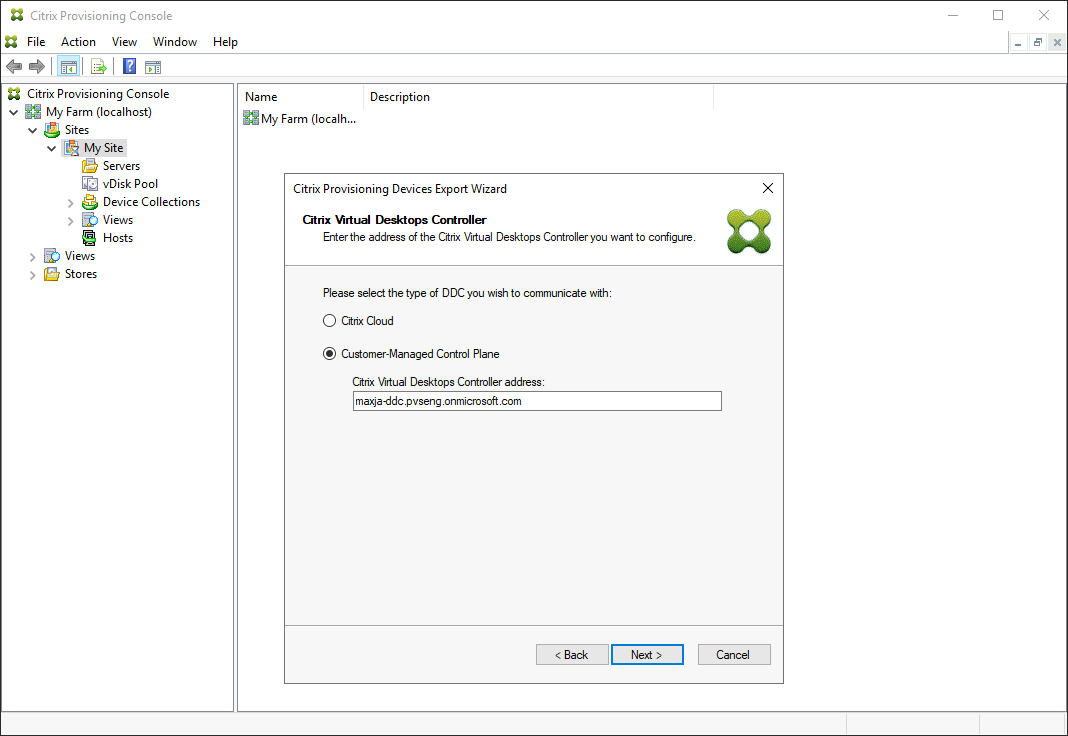
- Enter the controller hostname or address. The wizard authenticates to the Delivery Controller using the current logged in user.
-
-
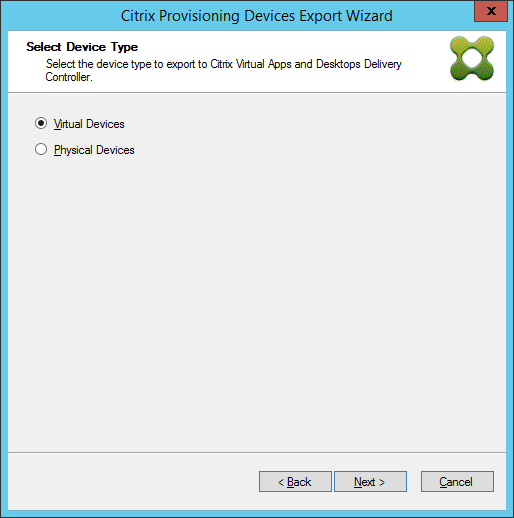
Click the Device Type to export. Click Next. When selecting Virtual Devices, the wizard displays the Host Resource screen which allows you to click the host or hypervisor. For physical devices, the wizard skips to the Active Directory and Collection selection screen.
- On the Citrix Virtual Desktops Host Resources screen, select Azure hosting unit. Click Next.
-
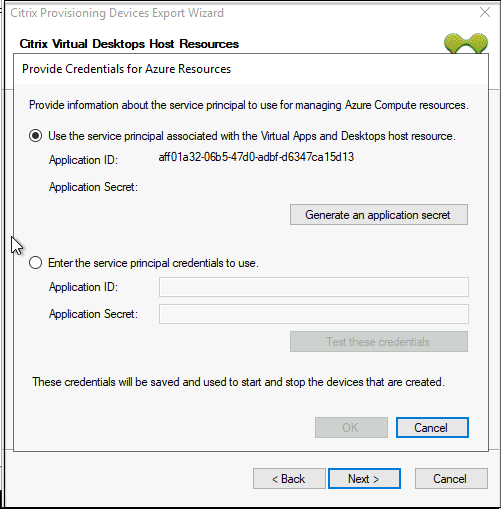
Establish a Service Principal (SPN) for working with the Azure APIs. An SPN has two components:
-
The Application ID, a GUID uniquely identifying the Service Principal.
-
The Application Secret.
You have two choices for specifying the SPN:
-
The hosting unit has a configured Application ID. The setup wizard can generate a new secret for this application. However, you need the credentials for the user that initially created the application ID stored in the hosting unit. Continue as follows:
-
Select Use the service principal associated with the Virtual Apps and Desktops host resource, and click Generate an application secret. The new secret has a validity of one day. The secret is also deleted at the end of running the Export Device Wizard.
-
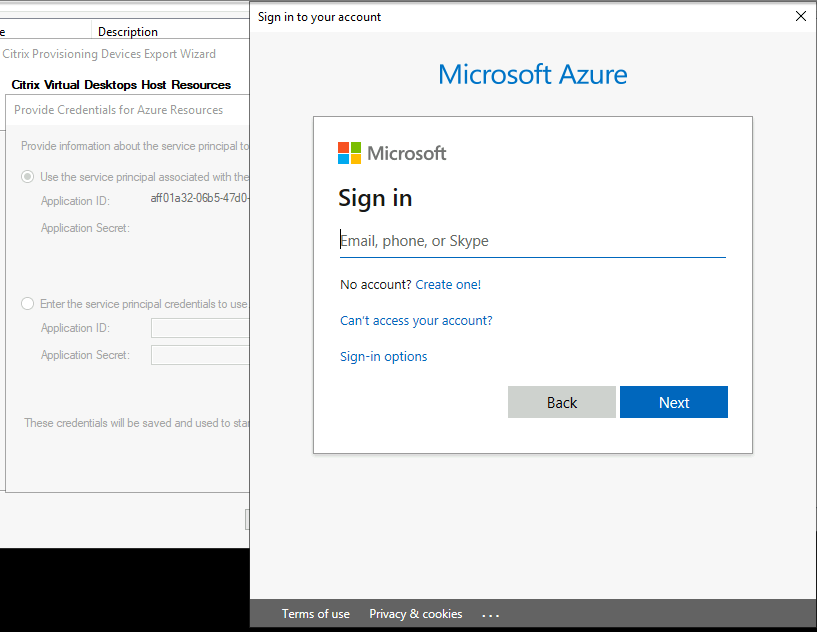
Sign into Azure using the same credentials used to create the application. If you use different credentials, you get an error.
This process can take a significant amount of time. You can press the cancel button to abort if you think it is hung. If you cancel, you are taken back to the screen to generate or enter authentication information.
-
Once successful, the secret is shown as a set of asterisks. Click OK to continue.
-
-
If you previously created your own SPN:
-
Select Enter the service principal credentials to use, and enter your application ID and secret. Click Test these credentials.
If the SPN is valid, a green check mark is displayed beside the Test button.
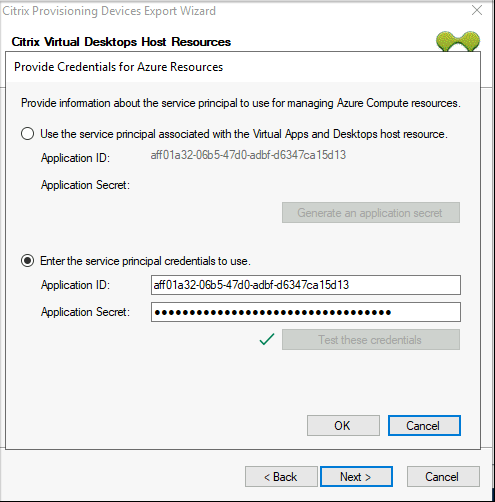
-
Click OK to continue.
-
-
-
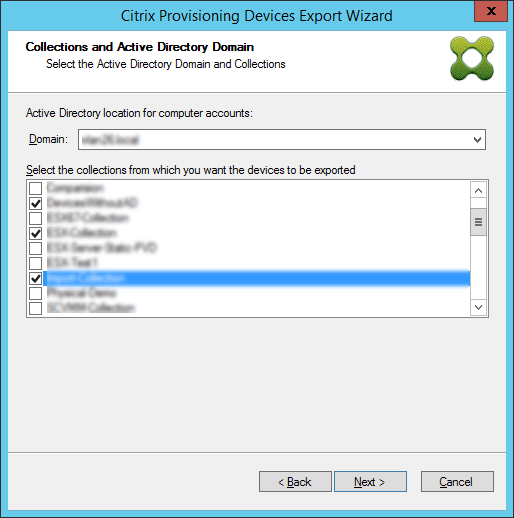
Click the Active Directory domain and collections that you want to export. Click Next.
-
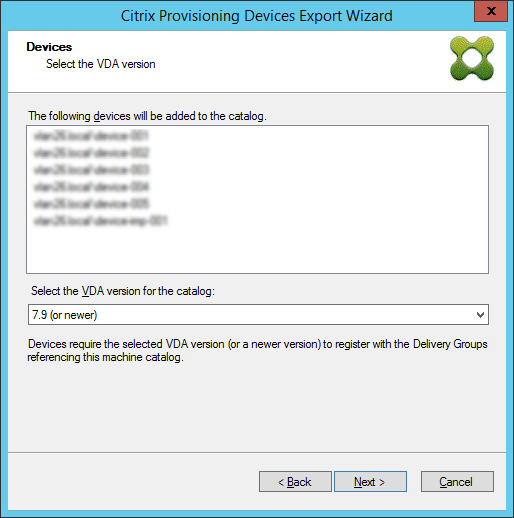
Use the list to select the VDA version. Devices are required to register with the Delivery Controller referencing the machine catalog. Click Next.
Tip:
All displayed devices are exported to a single Citrix Virtual Apps and Desktops catalog. You cannot select a device in this list.
-
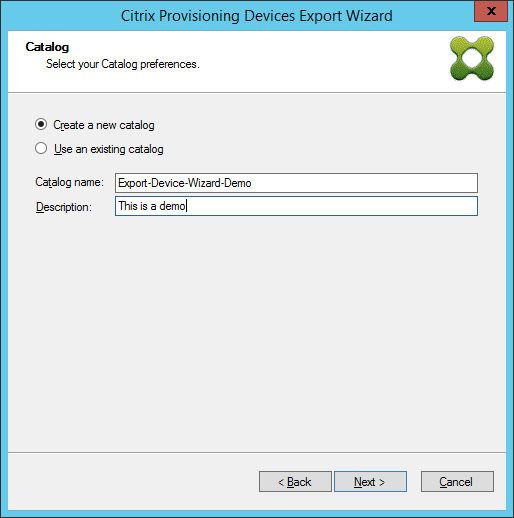
Click machine catalog preferences. If you are creating a catalog, specify the name and optionally include a description. Click Next.
-
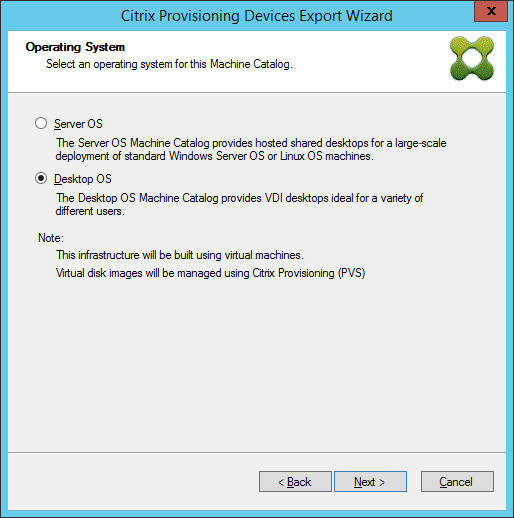
Click the operating system. Click Next.
-
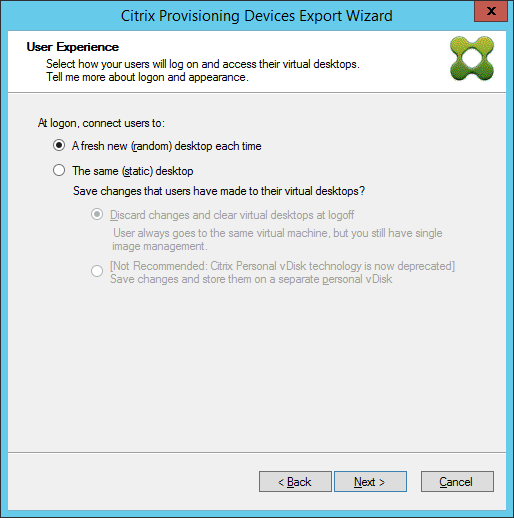
Set the user experience for the virtual desktop. Click Next.
-
Select Finish in the Summary screen to complete the wizard process.
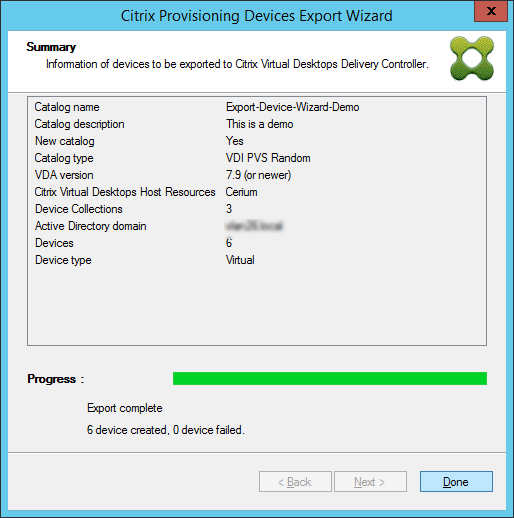
Note:
The Virtual Hosting Pool data is not added in the Summary screen.
Update Azure credentials
Use the information in this section to update the Azure credentials through the Host Properties in the Citrix Provisioning console.
Note:
The old secrets are not deleted in Azure when the credentials are updated.
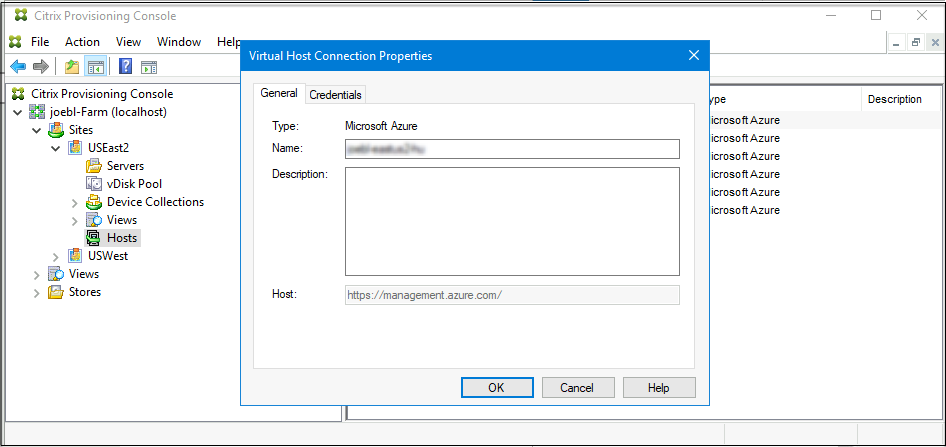
- In the Citrix Provisioning console, click the Hosts node.
- Right-click the virtual host record to expose a contextual menu.
-
In the contextual menu, click Properties. The General tab of the Virtual Host Connection Properties is displayed. Ensure that the Type is displayed as Microsoft Azure for Azure host type.
-
Click the Credentials tab. The Application ID and Application Secret are pre-populated and disabled.
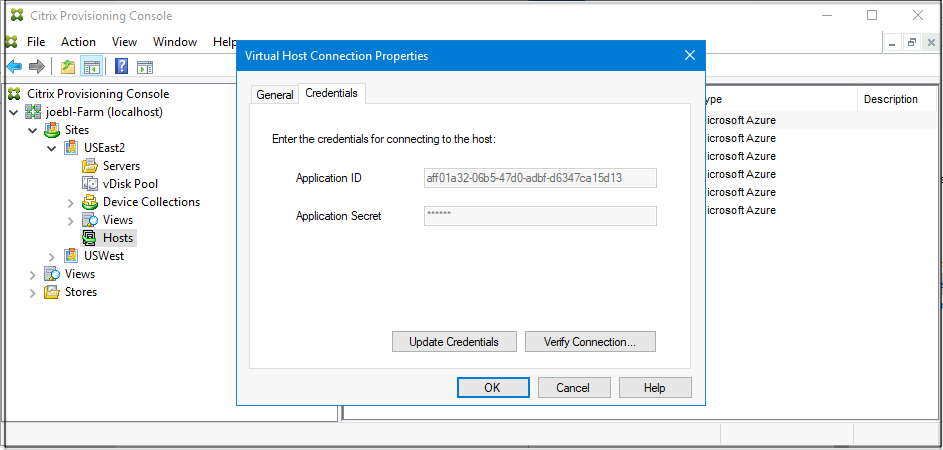
- Click Update Credentials to launch the Azure credentials dialog. You have two choices to update the credentials:
-
Use the service principal associated with the Virtual Apps and Desktops host resource
- Select the option. By default, this option is selected if the Credentials UID is stored in the database.
- Click Generate an application secret.
- Click OK when the new secret is generated. On the Host Properties dialog, the Application Secret is updated with the new secret. The Verify Connection button is disabled.
- On the Host Properties dialog, click OK to save the new credential in the database. If you click Cancel, the newly generated secret gets deleted in Azure.
Tip:
The generated secret is valid for one year. The secret is stored in the Citrix Provisioning database and used for power management operations. You can choose this wizard or Citrix Virtual Apps and Desktops Setup Wizard to update the secret when it expires.
-
Enter the service principal credentials to use
- Select this option. By default, this option is selected if the Credentials UID is not stored in the database.
- Enter your application ID and secret.
-
Click Test these credentials.
If the SPN is valid, a green check mark is displayed beside the Test button.
- Click OK. On the Host Properties dialog, the Application ID and Application Secret are updated with the new credential. The Verify Connection button is disabled.
- On the Host Properties dialog, click OK to save the new credential in the database.
-
Use the service principal associated with the Virtual Apps and Desktops host resource
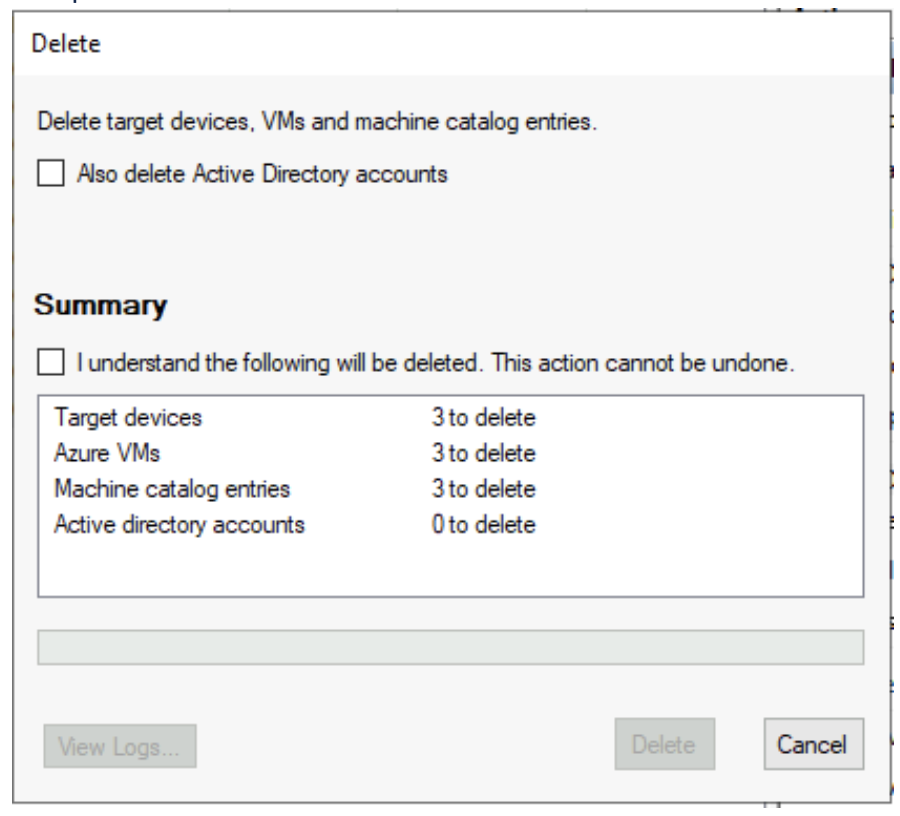
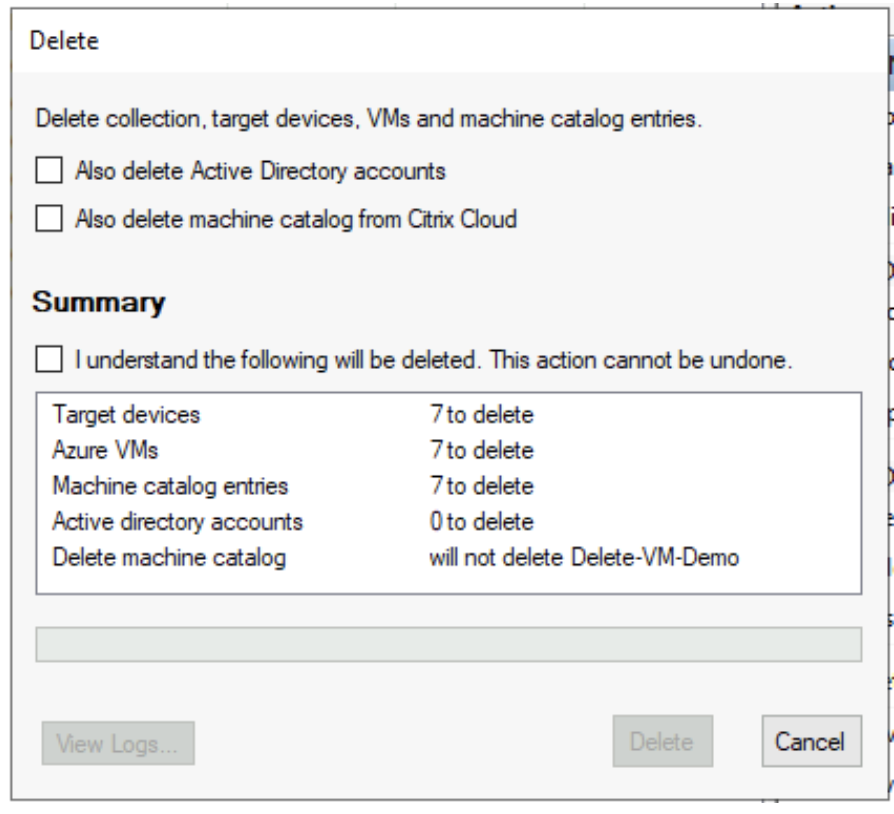
Delete target VMs on Azure
The delete feature removes the Azure target VMs provisioned through Citrix Virtual Desktops Setup Wizard from the:
- Hypervisor
- Provisioning Server database
- Active Directory account created or associated with the target device
- Machine catalog entries from the Citrix Cloud Connector.
In the Citrix Provisioning Console, you can delete target VMs by individually selecting the devices from the Device Collections or Views, or delete the entire device collection.
To delete the target VMs:
- Select the devices from the Device Collections or Views, and right-click to expose a contextual menu.
-
In the contextual menu, click Delete….
Note:
If any of the selected devices are active, an error appears. If you select the devices individually, the Delete… option is not available. If you select the entire device collection and click Delete…, an error message is displayed.
If any of the target devices is an Azure VM, the following UI is displayed:
-
If you select the devices individually:
-
If you select the entire device collection:
-
- By default, target devices are deleted from the Citrix Provisioning database, Azure, and the Citrix Virtual Apps and Desktops Machine Catalog. Select the check boxes to delete the device record on other associations. The Summary section is then updated.
- Click Delete.
-
Enter your Citrix Cloud credentials and select the customer.
The Summary text area of the Delete dialog is updated with the status of the deletion.
- When the delete process is complete, click Done to close the Delete dialog. You can also click View Logs… to see the status of the delete process or save the log file.
Troubleshooting deletion process
-
Delete… option is not visible when multiple target devices are selected.
Verify that the target devices are not active. If they are active, shutdown the devices from the Citrix Provisioning console, and then try again.
-
Delete dialog shows Azure VMs deleted, but there are still VMs in the resource group.
Give Azure some time to delete the VMs. If the VMs are still in the resource group, manually delete the VMs.
-
The Machine Entry is not deleted from the Citrix Virtual Apps and Desktops Catalog.
-
Make sure that DDC is responding. You can check by running the following command:
asnp citrix.* cd XdHyp:\HostingUnits dir <!--NeedCopy--> -
Make sure that the SID of the target VM is not missing. You can check by running the following command:
Import-Module 'C:\Program Files\Citrix\Provisioning Services Console\Citrix.PVS.SnapIn.dll'
Get-PvsDevice
<!--NeedCopy-->
Check for the
DomainObjectSID.
-
-
Active Directory record is not deleted.
If the AD account is deleted from the Active Directory, but the AD record is present on the Citrix Provisioning device, the delete operation fails to find that account and displays an error. Check the AD users and computers and verify that account is present or not.
In this article
- Supported features
- Limitations
- Requirements
- Licensing
- Architecture
- Set up Citrix Provisioning on Azure
- Configure service endpoint URLs
- Workflow for running the configuration wizard silently
- Create the master VM
- Create target VMs on Azure using the Citrix Virtual Apps and Desktops Setup Wizard
- Manually creating target VMs on Azure
- Update Azure credentials
- Delete target VMs on Azure