Citrix Provisioning™ on Google Cloud Platform
This article explains how to move your Citrix Provisioning workloads to the Google Cloud Platform (GCP).
Installing Citrix Provisioning in your Google project is the same as installing it in an on-premises provisioning farm.
Supported features
The following features are supported when provisioning workloads in GCP:
- UEFI boot of GCP VMs.
- Streaming 64-bit Windows Server 2016, 2019 and 2022 target VMs.
- Provisioning target VMs using the Citrix Virtual Apps and Desktops™ Setup wizard.
- Manual provisioning of target VMs using the GCP APIs or gcloud CLI directly.
- Using import wizard to import manually provisioned VMs into the Citrix Provisioning server.
- Using an export wizard to create and update Broker catalogs in Citrix DaaS (formerly Citrix Virtual Apps™ and Desktops service) instances.
- Creating virtual disk from a GCP master VM and updating using either Citrix Provisioning versioning or reverse imaging to the same master VM.
-
Manually configuring master VMs to start from the Citrix Provisioning server to do imaging tasks. The imaging wizard automatically configures Master VMs for this task or you can use the
BDM.exeprogram.Note:
Master VMs must be configured to enable UEFI boot time networking. See later section on Master VMs for details.
Limitations
The following features are not supported:
- Windows 10 and Windows 11 desktops. Sole tenant node is not supported. Therefore, only Windows server target VMs licensed by Google can be run.
- In this release, all provisioning target VMs are billed by Google as Server 2019 VMs. A future release will update this to use the license from the original master VM.
- PXE and ISO boot of master and target VMs.
- Legacy BIOS boot of streamed VMs. Only UEFI is supported.
- 32-bit OS support.
- Windows Server release before 2016 are not supported.
- Power management of target devices from the provisioning console.
- You also cannot start provisioned GCP VMs from the Citrix Provisioning console.
- Removal of VMs, catalogs, or AD accounts from Citrix Provisioning console is not supported when Citrix Provisioning is integrated with customer-managed Delivery Controller.
Requirements
To use Citrix Provisioning on GCP, you need the following:
- A GCP project.
- Citrix Provisioning server VM must either use a machine type of e2-standard-4 or above, and SSD persistent disk for boot disk and Provisioning Store disk.
- Access to a Citrix License Server.
- Access to SQL Server: This can be a separate VM running SQL Server 2019, including SQL Server 2019 Express, or Google Cloud SQL for SQL Server.
- To have a better provisioning scale and performance, make sure that the:
- vDisk has the latest update for Windows
- Citrix Provisioning Server has at least 8vCPUs, 32 GB RAM, and use SSD persistent disk and higher for the vDisk store.
Licensing
The initial product uses the existing licensing mechanism for provisioning. Refer to the Product Setup to access the license server installed in the test subscription for all internal users.
Use one of the following licenses:
- If you have a Citrix DaaS™ subscription, then use the included Cloud provisioning license.
- If you have a Citrix Virtual Apps and Desktops license with Hybrid Rights, then you can use this license directly.
- If you do not have either of these, then contact your Citrix representative to get a suitable trial license.
To install licenses, you can do one of the following:
- Install a license server in your project. This must be on a VM in the project connected to the same VPC and subnet as the provisioning server.
- If there is a VPN connection to your on-premises network, then you can use a license server installed in that network.
Architecture
This high-level architecture diagram shows the components that are either required or recommended to set up Citrix Provisioning on GCP.
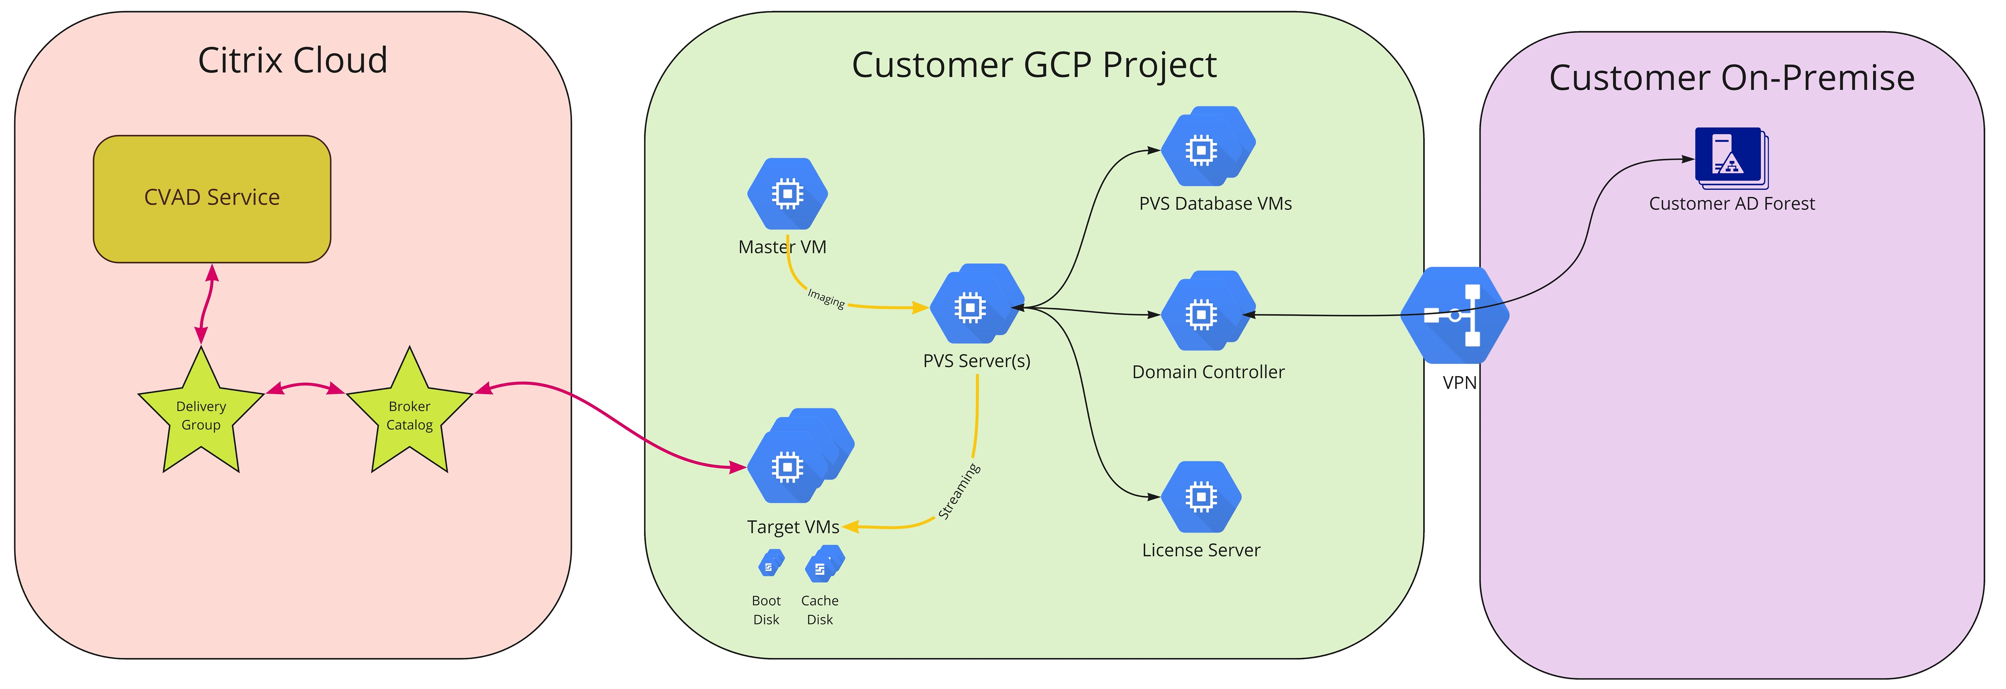
This section describes the main components.
Citrix Cloud™
Citrix Cloud has Citrix DaaS instance to integrate with Citrix Provisioning on GCP and includes the following:
- Broker
- Broker Catalogs that include the provisioning target VMs running on GCP.
- MCS HCL plug-in that power manages these GCP VMs.
The Broker starts power management by communicating directly to GCP through the MCS plug-in. As the VM boots, it streams the boot disk from the virtual disk maintained by the Citrix Provisioning server.
Active Directory classic version
Citrix Provisioning on GCP supports only classic Active Directory (AD). There are two ways this can be made available in GCP:
- The GCP Managed Microsoft AD feature can be used to create an AD domain managed by GCP.
- You can create a classic AD domain within your subscription by creating a VM that is configured as a domain controller.
SQL Server
This release supports SQL Server 2019, including SQL Server 2019 Express, installed on a separate server or on one of the Provisioning servers, and Google Cloud SQL for SQL Server.
Supported authentication types
See Supported authentication types for more information on the supported authentication types. Select the authentication type that best suits your needs.
Citrix Provisioning Server
Install the Citrix Provisioning server on a server-class GCP VM, similar to on-premises deployments. This must use a machine size of e2-standard-4 or above and use SSD persistent disk.
You can provide storage for virtual disks as:
- Local storage on the Citrix Provisioning server VM.
- On a separate VM that acts as a file server for sharing vDisks.
Target VMs boot using a small boot disk
The Citrix Provisioning server and target devices do not support PXE or ISO boot, because they are not available on GCP. Instead, target VMs boot use a small boot disk (BDM Boot Disk, which is about 20 MB). This small boot disk contains the Citrix Provisioning UEFI boot application. After the BDM boot application runs, it uses the Citrix Provisioning protocol to stream the virtual disk contents to the VM. Master VMs have their setup modified on the OS disk so that they boot from the provisioning server.
Provisioning of target VMs
The Citrix Virtual Apps and Desktops Setup wizard can handle all the required steps for provisioning target VMs including:
- Creation and upload of the boot disk, including configuration of provisioning servers to make contact.
- Creation of Active Directory computer accounts, or import of existing computer accounts.
- Creation of the target VM, including the network connection, boot disk, and Citrix Provisioning Write-Back Cache (WBC) disk to hold the cache.
- Configuring the provisioned target devices in the provisioning server database.
- Initial start and shutdown of the target VMs to enable the WBC disk to be formatted.
- Creation of a Citrix Virtual Apps and Desktops catalog and adding the provisioned target devices to the catalog.
Citrix Provisioning Master VM
Master VMs are created using normal GCP methods. However, they must be set up to enable UEFI networking, which is not currently possible in the GCP console (see later for details). After this is done, you can use the normal imaging tools to create a virtual disk from the master VM OS Disk (P2PVS and the Imaging wizard).
Set up Citrix Provisioning on GCP
This section explains the preinstallation tasks, steps for creating a Citrix Provisioning collection with a set of target devices streamed from your virtual disk, and links to the GCP documentation to guide you.
To set up GCP provisioning, begin by configuring your provisioning server and other infrastructure on GCP. Using the GCP Console, gcloud CLI, or GCP APIs and the instructions, set up the components along the same lines as your current on-premises setup. You can create scripts to automate the process.
Preinstallation tasks
Complete the following tasks before installing and configuring Citrix Provisioning.
Establish a virtual private cloud (VPC) and subnets for streaming on GCP
You can use the default VPC that is set up for you or create your own VPC. Provisioning on GCP also supports the use of shared VPCs where Provisioning target devices run in one or more Service Projects sharing the VPC.
(Recommended) Set up IAP Desktop access for secure VM access
For secure external access to VMs running in the subscriptions, we strongly recommend that you create your infrastructure VMs with NO public IP address and configure IAP Desktop to enable secure RDP connections as documented at Configure IAP Desktop.
Select and configure the database
Each Provisioning farm has a single database. You can provide the database on:
- A new or existing SQL Server or SQL Server Express Instance.
- Google Cloud SQL for SQL Server.
All Provisioning servers in a farm must be able to communicate with the database server.
There are three ways to create the database:
- Use the Configuration Wizard. To use this option, you need dbcreator permission.
- If you do not have permission to create databases, use the
DbScript.exeutility to create a SQL script that a database administrator can run to create the provisioning database. This utility is installed with the provisioning software. - If the database administrator creates an empty database by running the
DbScript.exeutility, then this database is chosen as the database for the new farm when running the configuration wizard. The login used when running the Configuration Wizard must be the owner of the database. Also, this login must have the View any definition permission. The database administrator sets this permission when the empty database is created.
Run the DbScript.exe utility to create or update the database
See Pre-installation tasks for information on running the DbScript.exe.
Configuration wizard user permissions
You must have the system privilege of a local administrator to run the configuration wizard.
For more information, see Configuration wizard user permissions.
Service account permissions
The service account for the Stream and SOAP services must have the following system privileges:
- Run as service
- Registry read access
- Access to
Program Files\Citrix\Citrix Provisioning - Read and write access to any virtual disk location.
For more information, see Service account permissions.
Set up Active Directory
Use one of the following methods to support Active Directory APIs and functionality on GCP:
-
Enable the GCP Managed AD service in your project by following the instructions at Running Active Directory on Google Cloud.
-
Create Active Directory domain controller VMs in your subscription and connect to an on-premises forest through a VPN connection if necessary.
Create a connector VM on GCP
Create VMs to act as cloud connectors in each unique combination of region and project you are using. Then, install a Citrix Virtual Apps and Desktops Cloud Connector in it. Once this is done, add hosting resources to your Citrix DaaS referencing the resource locations.
Create a Citrix License Server
Do one of the following:
- install the License Server on one of the Provisioning servers.
- create a dedicated VM or configure a connection to an existing on-premises License Server.
Create the Citrix Provisioning Server on GCP
Create VMs for the Provisioning servers. Size servers for the expected load, similar to on-premises Provisioning servers.
The Citrix Provisioning server VMs require the following resources:
-
Access to the SQL database previously configured.
-
Access to a license server VM on GCP.
-
The Active Directory requirements are the same as for the existing on-premises version of Citrix Provisioning.
-
Use of VPC and subnets previously set up to support the installation. As stated above, we strongly recommend NO public IP addresses, and access only using the IAP Desktop Service.
-
At least one NIC per server VM, on the same subnet that target devices handled by the server use.
-
Access to virtual disk storage. You can use:
-
Local storage on the Provisioning server VM.
-
On a file share implemented by the Google Netapp Cloud Volumes service.
-
On a separate VM providing a file share.
-
-
Minimum of 2 vCPUs, 8 GB RAM each for the Citrix Provisioning server VM. The Provisioning server VMs must have machine size e2-standard-4 or above and use SSD persistent disk.
Note:
In GCP, the number of virtual CPUs assigned to the VM as specified at About Machine Families controls the available network bandwidth for a VM.
Install the Citrix Provisioning software
To install the Citrix Provisioning server and console:
- Using an administrator account, log into the Citrix Provisioning server VM.
- In File Explorer, select the ISO file, right click, and mount it.
- In the mounted drive’s root folder, find the autorun.exe file, and run it. The Citrix Provisioning Installer starts.
-
Start by installing the Console. The installer prompts you to install prerequisites.
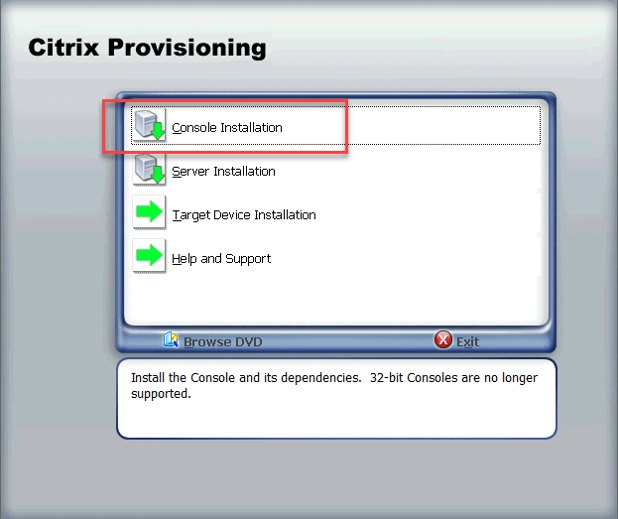
Note:
If prompted, reboot, mount the Citrix Provisioning ISO again, and restart the process.
-
Install the Citrix Provisioning server using the Server Installation link on the autorun program. By default, creating firewall rules for provisioning traffic is enabled.
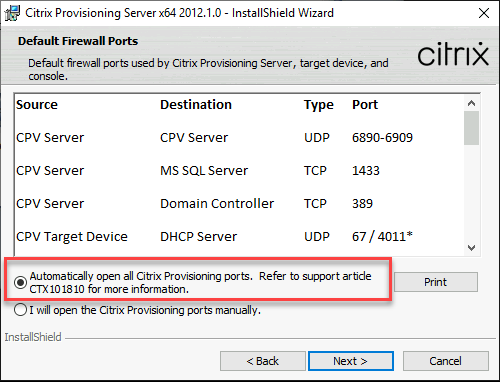
Note:
This process sets up the firewall running inside Windows. Any required firewall setup for the VPC must be done outside of this and must allow Citrix Provisioning traffic to flow. See Communication Ports Used by Citrix Technologies for information on ports that must be opened to ensure communication flow.
When the server installation completes, it runs the Citrix Provisioning Configuration Wizard where you set up the provisioning server.
-
Welcome: Read the Welcome dialog and click Next.
-
Farm configuration: Indicate whether a new farm is being created.
-
Database server: Enter the SQL Server host name or address and the name of the instance that you created for the Provisioning server to use, or enter the private FQDN of the Google Cloud SQL for SQL Server (leave instance blank). The Authentication drop-down lists the supported authentication types for the Provisioning Service Account to use when connecting to the database. Depending on the authentication mode that is selected, you can provide the necessary credentials for the Provisioning Service Account to connect to the database.
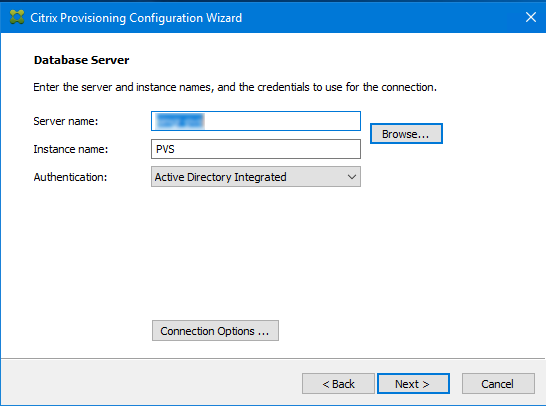
-
When you click next, enter the database administrator credentials that are used by the configuration wizard. Select Active Directory Integrated authentication if you want to use the current login.
-
New Farm: Enter the farm, site, and collection names. We recommend selecting Use Active Directory groups for security, and the Farm Administrator group.
-
New Store: Specify the store and location. If you are using a file share, then enter a UNC name.
-
License server: Enter the license server location.
-
User Account: Specify the user account to run the services under. If you use a network share for the store, use a domain account with access to the share. The account must be an administrator on the Provisioning server.
-
Network Communication: Choose the network interface to be used for streaming and management. If you only have a single NIC, accept the defaults.
-
Soap SSL Configuration: Accept the default values.
-
Problem Report Configuration: Enter your MyCitrix credentials to enable submission of cases.
-
Finish: Review the configuration settings, and click Finish. A dialog reports a warning about the Windows Firewall.
-
Click OK. A progress dialog opens to display progress as Citrix Provisioning is being configured. If failures occur, you receive a link to review the log.
-
When configuration is successful, click Done.
-
Workflow for running the configuration wizard silently
See Running the configuration wizard silently for information on running the configuration wizard silently.
Create the master VM
This section explains how to create the master VM, and prepare the image to connect to the Citrix Provisioning server at start time.
Note:
Be sure to use a Windows Server image from the GCP marketplace. Bring your own images are not supported currently.
To create the master VM:
-
Create a virtual machine with UEFI Networking enabled:
- Use the gcloud CLI or the GCP console.
- If you use the gcloud CLI, specify the option
--enable-uefi-networking. - If you use the GCP console, you cannot specify that UEFI networking must be enabled and this cannot be changed after the VM is created. We have provided a script
Update-PVSMaster.ps1that can be used to recreate a master VM with this flag set. However, this loses any IP configuration associated with the VM.
- If you use the gcloud CLI, specify the option
- Set these values:
- Networking interfaces to select the subnet setup for streaming.
- Specify no public IP address.
-
Log in to the VM using IAP Desktop and complete the Windows setup. Select the option to create a new administrator account initially.
-
Join the domain used by your Citrix Provisioning deployments.
- Deploy the VDA, using standard practices.
- Use the gcloud CLI or the GCP console.
-
Ensure that the VM is configured to allow networking at UEFI start time. If you have a VM that does not have this flag set, run the
Update-PVSMaster.ps1script to convert it. -
Install the Citrix Provisioning target device software.
- Mount the Citrix Provisioning ISO.
- Select to install the target drivers.
- Restart when prompted.
-
Run the imaging wizard, as you would do for an on-premises installation.
-
Specify the Server name or IP address, and select Use my Windows credentials.
-
Imaging Options: Select Create a vDisk.
-
Add Target Device: Specify the Target device name and the Collection name.
Important:
Use a different name than the current host name. The master VM can boot either from the local disk or from the virtual disk you create, but computer account password management is not synchronized between them. If you give the target the same name as the current host, you lose domain trust when switching between the two ways of starting the master VM.
-
New vDisk: Specify the virtual disk name.
-
Microsoft Volume Licensing: Select KMS Licensing.
-
What to Image: Select Image entire boot disk.
-
Optimize Hard Disk for Citrix Provisioning: Select Optimize the hard disk to ensure that unnecessary Windows features are disabled.
-
Summary: Verify that the settings are correct. Click Create when prompted. Restart the VM.
- When the Master VM finishes booting, log on again. The imaging wizard resumes where it is left. Select Cancel when a dialog displays to format the disk.
Note:
The imaging takes some time.
-
When imaging is complete, exit the imaging wizard.
- On the Citrix Provisioning Console:
- Update the vDisk to Production status, with Cache Type set to Cache in device RAM with overflow on hard disk.
- Right-click the master VM target definition, and select Active Directory > Create Computer Account.
-
Create target VMs using the Citrix Virtual Apps and Desktops Setup wizard
The Citrix Virtual Apps and Desktops Setup wizard lets you create multiple target VMs in a single invocation. The wizard guides you through the complete process of creating target VMs and integrating them with Citrix Virtual Apps and Desktops and Citrix DaaS.
Initial Setup
Do the following once before running the Citrix Virtual Apps and Desktops Setup wizard:
- If you want to use your own Service Key for accessing GCP, follow the guidance in Creating and managing service account keys to create and download a Service Key. If you plan on using the same service key that was created for use by Citrix DaaS, then use Service Key JSON file.
Create target VMs
To create target VMs using the Citrix Virtual Apps and Desktops Setup wizard:
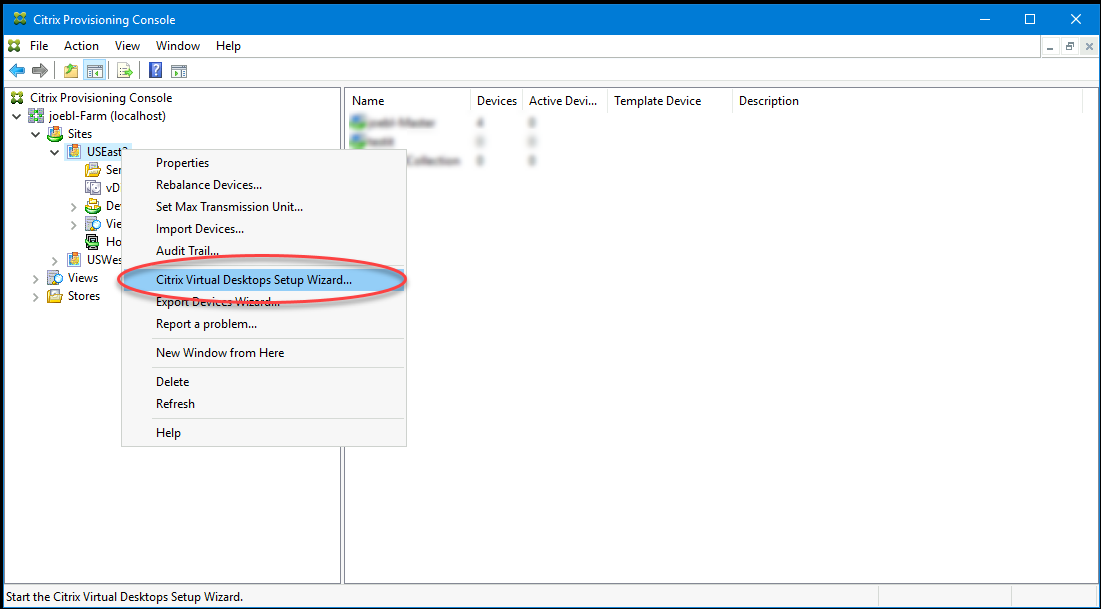
-
Run the provisioning console, right-click the site where you want to create target devices, and select Citrix Virtual Desktops™ Setup Wizard.
-
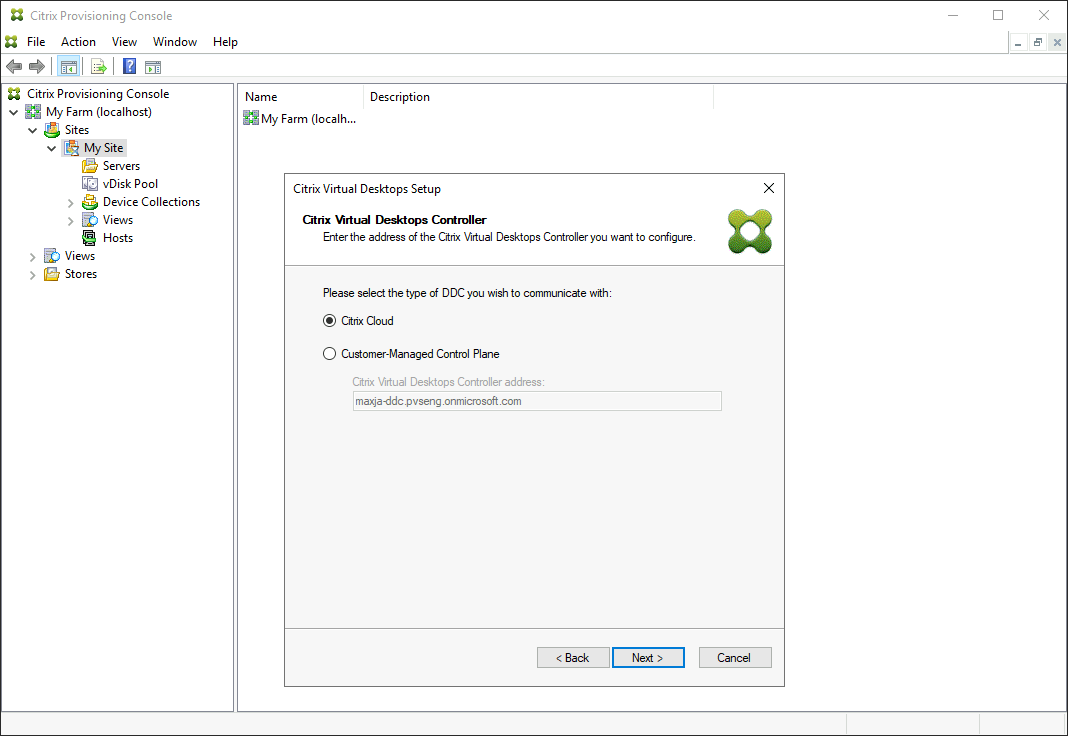
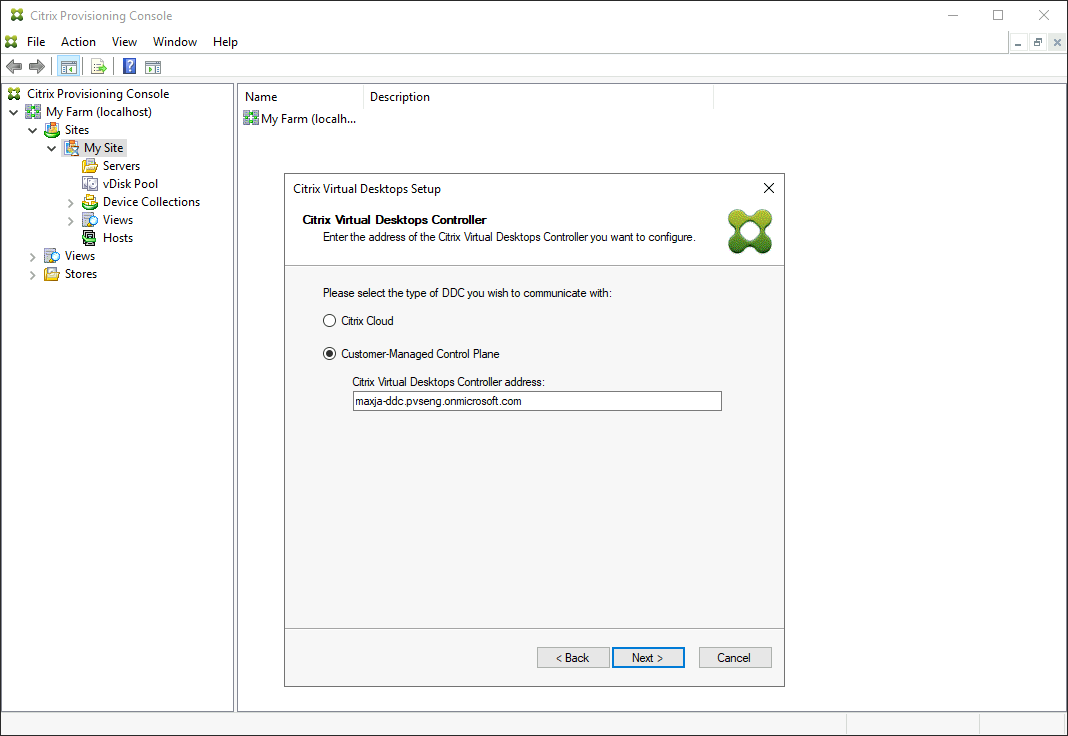
Click through the welcome page, select the type of Delivery Controller, and choose Next.
-
If you select Citrix Cloud:
-
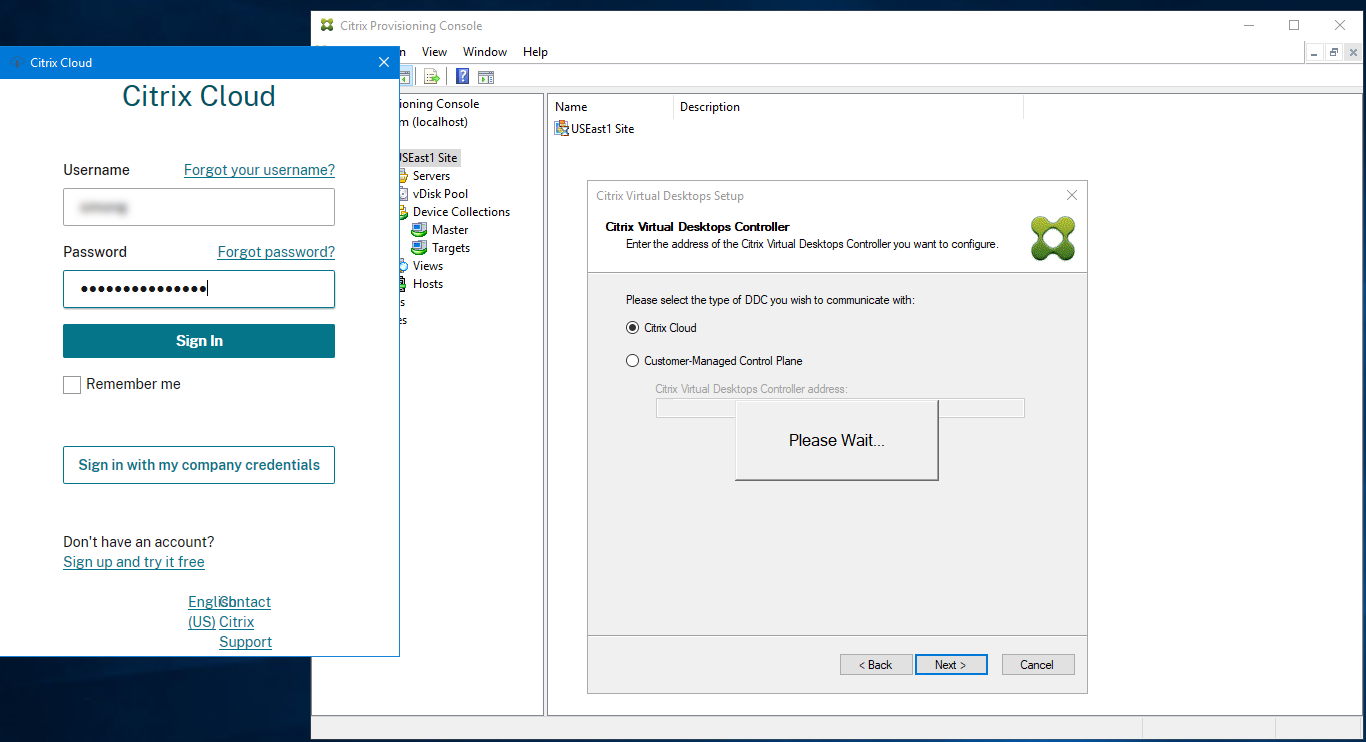
Enter Citrix Cloud credentials when prompted.
-
If you have more than one customer, select appropriate cloud customers.
-
-
If you select Customer-Managed Control Plane:
-
Enter the controller hostname or address. The wizard authenticates to the Delivery Controller using the current logged in user.
-
-
-
Choose a GCP hosting unit from the displayed list. The wizard displays the list that it retrieves them from the Cloud. Select the hosting unit to use based on the region and project you are provisioning to.
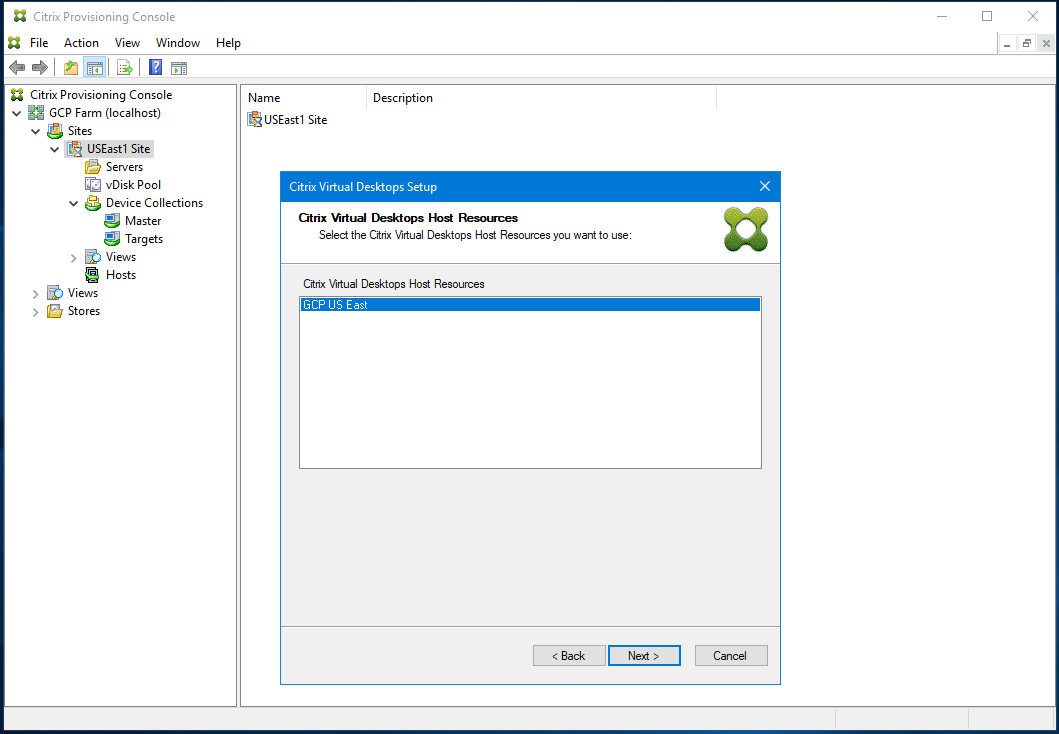
-
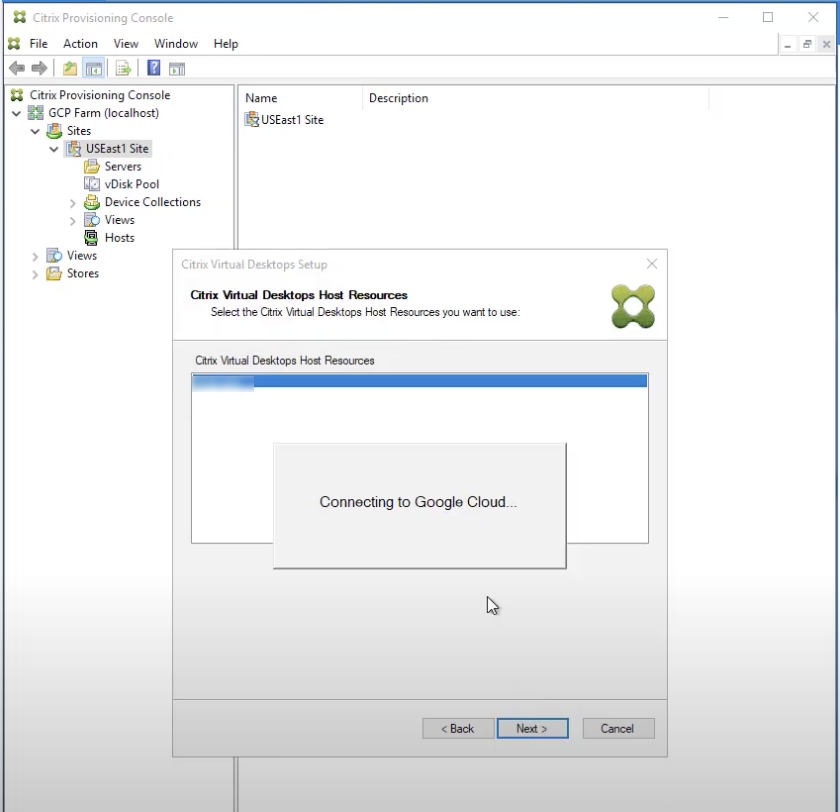
After you select the GCP hosting unit in Hosting Resources screen, and click Next. You receive a message Connecting to Google Cloud…. A new web browser opens up. Enter your google credentials to log in to your google cloud.
Note:
If you previously logged in to the google cloud and approved the permission for the app, the browser to enter your google credentials does not appear.
-
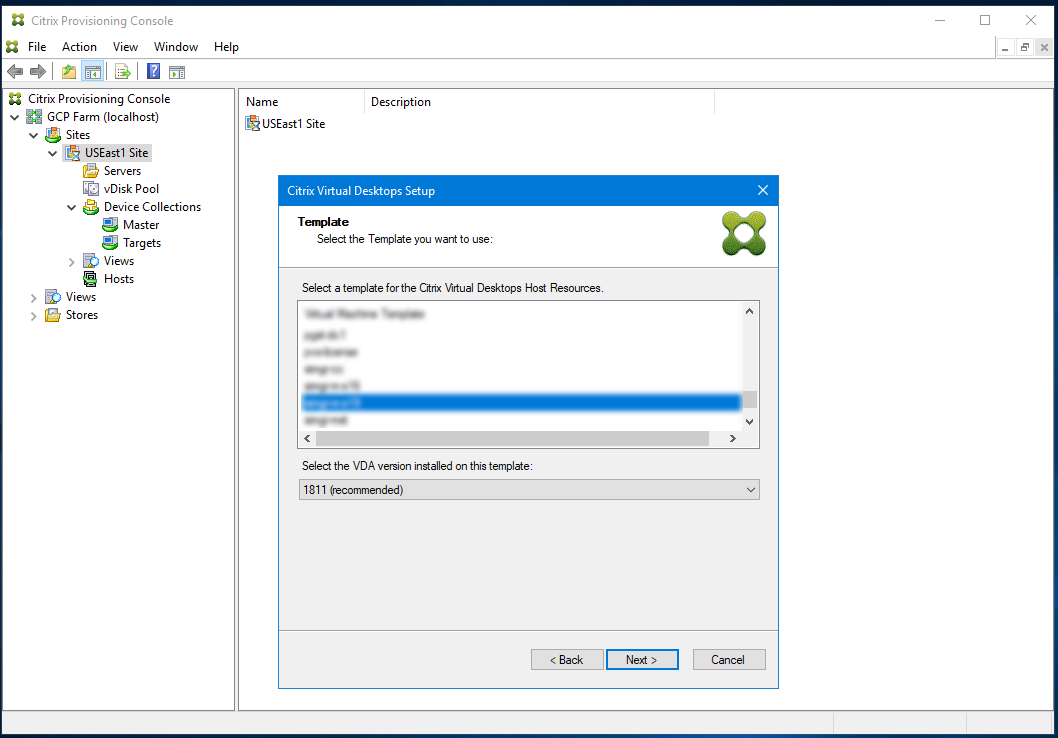
After a successful login, you receive a message Loading Google Cloud Templates..

-
Select a VM that can be used as a template for creating provisioned VMs in GCP. Choose the same VDA version that you use for on-premises Citrix Provisioning and MCS. Click Next.
-
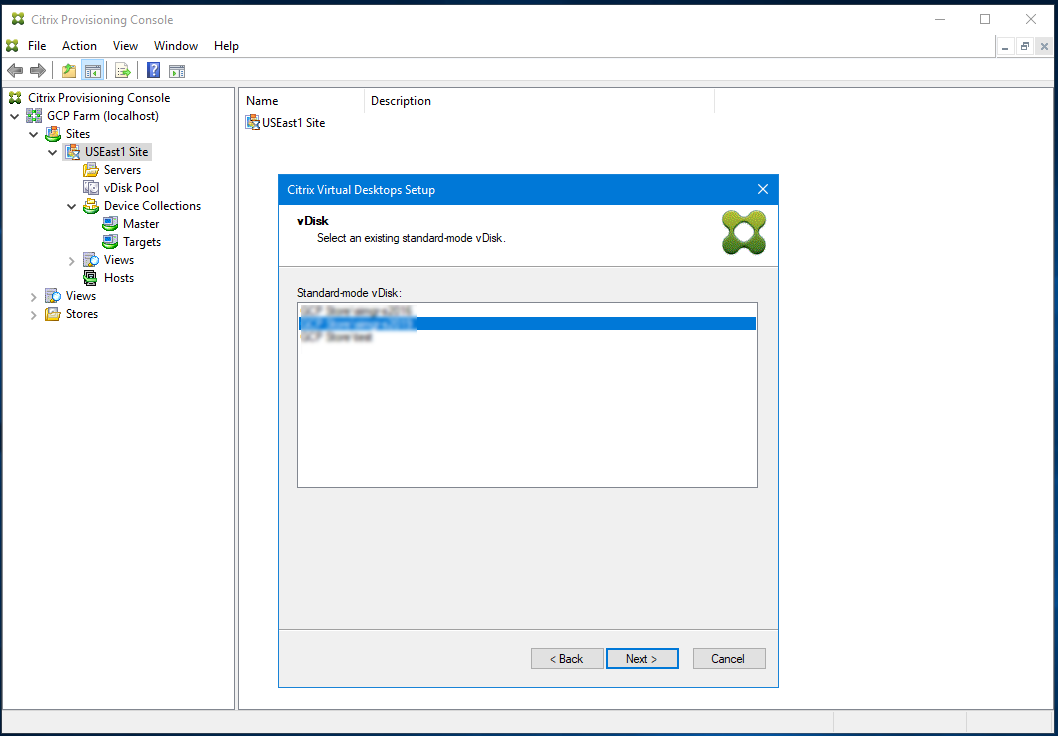
Choose the vDisk to use for the provisioned target devices.
-
Choose to create a catalog, or add the VMs to an existing catalog.
If you add to an existing catalog, a drop-down list of catalogs is supplied for you to choose from.
-
Choose the type of VDA and catalog:
-
Choose the number of VMs to create and the size of the local cache disk. The machine size from the template VM, the number of vCPUs, and memory size are displayed for your information.
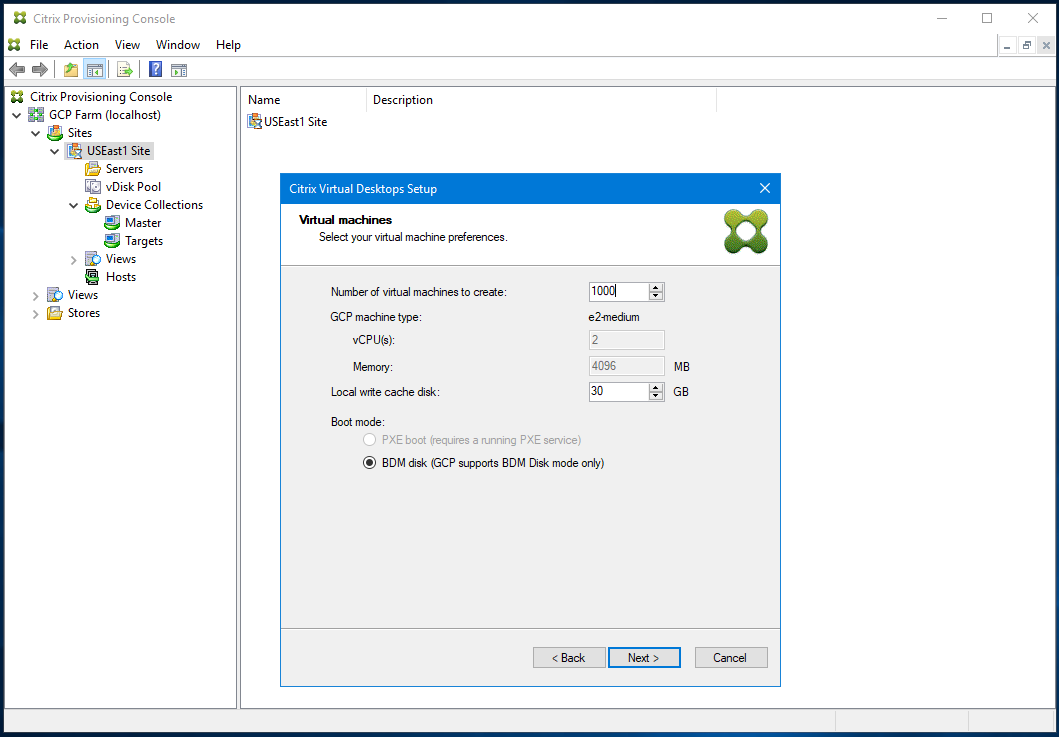
Note:
BDM Mode is the only supported boot mode on GCP.
-
Select Active Directory for the target devices.
Citrix Provisioning supports provisioning of target devices in untrusted domains.
If the domain is not trusted, under Domain Authentication, do the following:
- Select Domain requires additional credentials.
- Enter the domain name, username, and password for the untrusted domain.
- Click Test the credentials. This action validates the domain name and the credentials.
- After you get a green check mark, proceed to the next page.
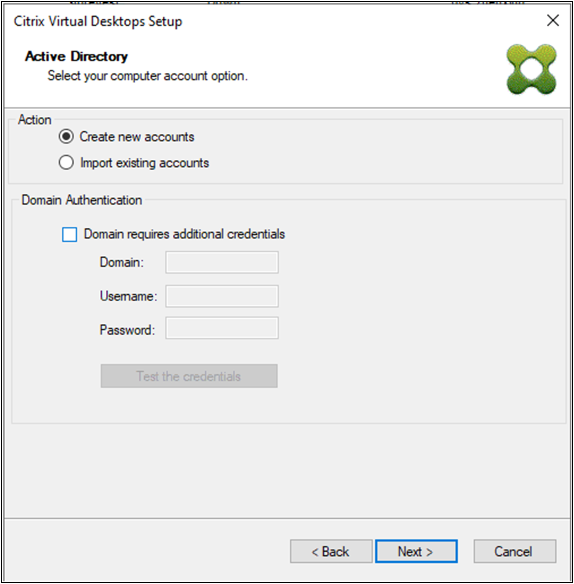
Note:
You must only include lower case letter, numbers, or hyphens in the naming scheme as this name is also used for the name of the VM that is created. Other letters (including uppercase letters) are not allowed.
In addition, if using a GCP Managed AD instance, you must create computer accounts underneath the
CloudOU. -
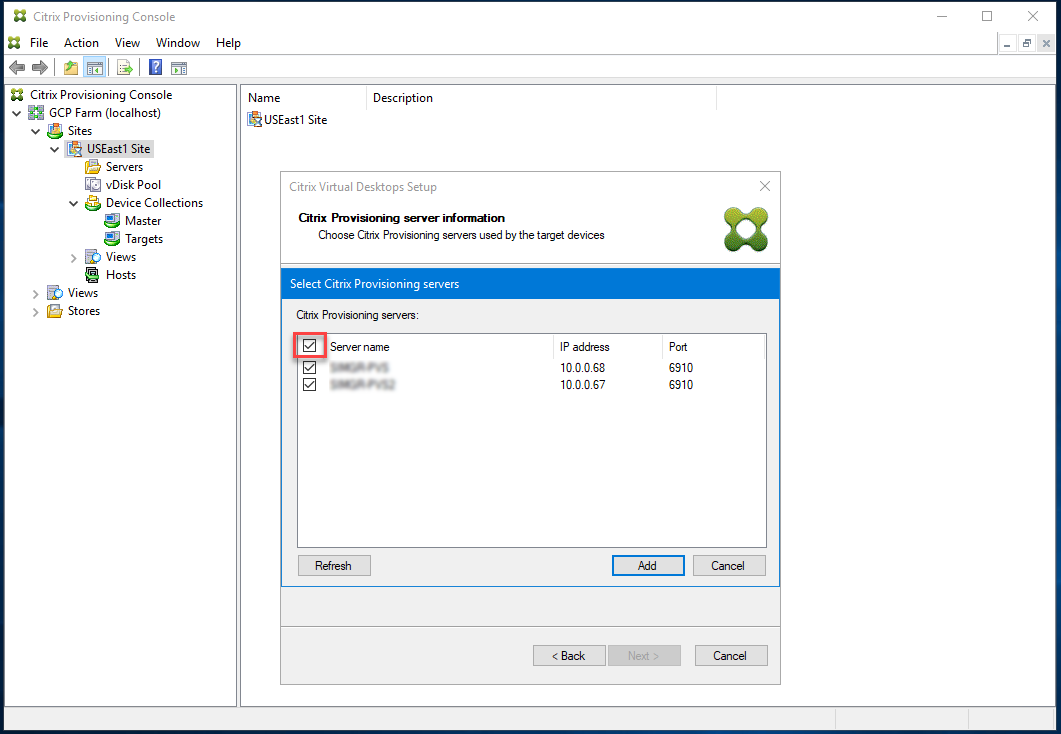
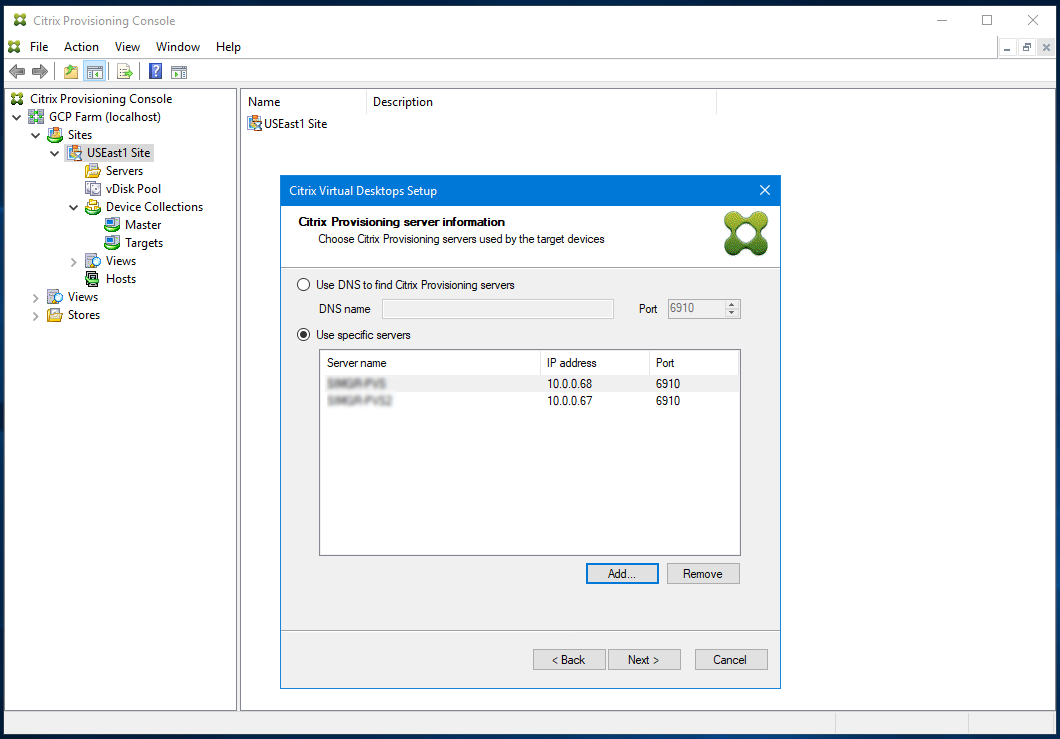
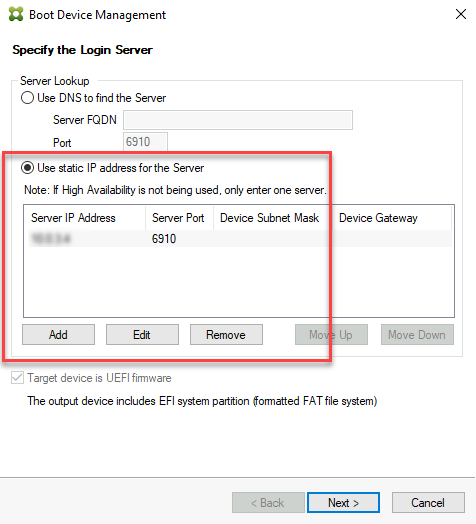
Set up the information about the provisioning servers that function as login servers for the target devices.
As with the on-premises product, you can use either a DNS FQDN that translates to a set of servers, or you can specify the desired servers by IP address. If you use an IP address, click Add to display the list of configured servers:
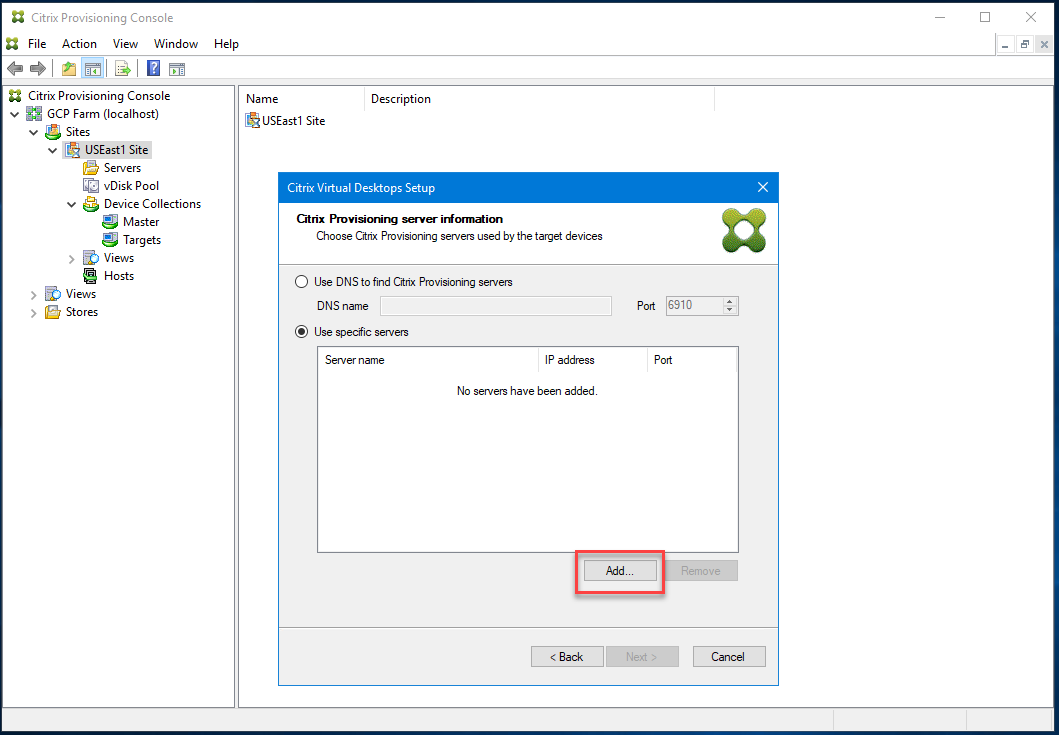
Note:
If you want to use a DNS name, then you must specify the fully qualified domain name as the default DNS suffix supplied by the GCP. DHCP server does not include the zone where you add the DNS name to be used.
-
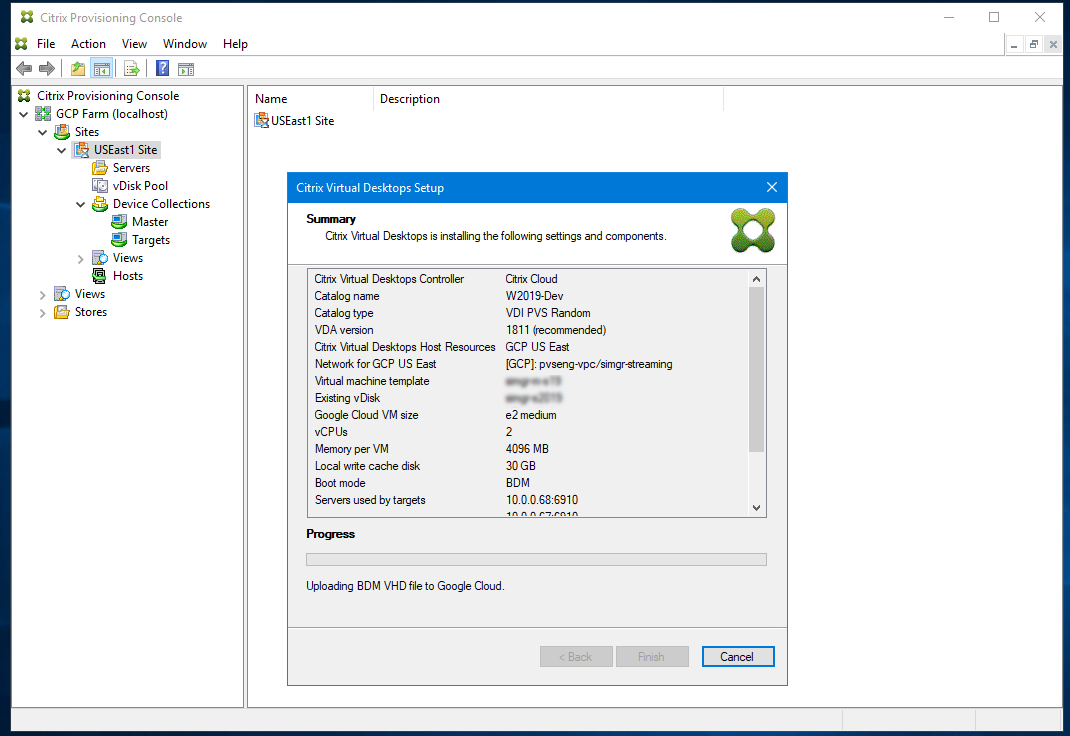
Verify the information on the summary page, and click Finish to begin the provisioning process.
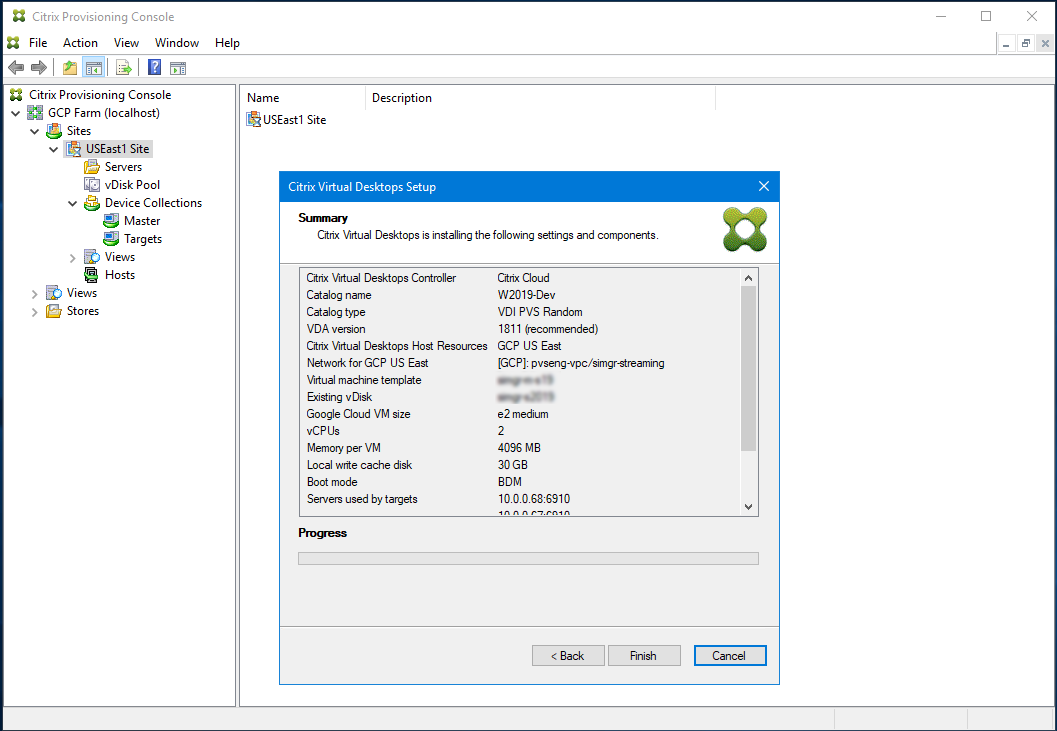
As the provisioning operation is proceeding, the progress bar at the bottom is updated.
Also, consider the following:
- During the Citrix Virtual Apps and Desktops Wizard process, the newly created VM boots up to format the write cache disk, then shuts down. This process takes a few minutes. If the machine times out during this operation, the setup process fails.
Manually creating target VMs on GCP
Citrix recommends using the Citrix Virtual Desktops Setup wizard to create target VMs and integrate with Citrix Virtual Apps and Desktops and Citrix DaaS, as documented in the previous section. If you cannot use the Citrix Virtual Desktops Setup wizard, then you can manually provision target VMs using the procedures outlined in this section.
The Citrix Provisioning server and target devices do not support either PXE or ISO boot on GCP, because GCP does not support them. Instead, target VMs boot using a small boot disk, the BDM Boot Disk, which is about ~20 MB and contains the Citrix Provisioning UEFI boot application.
Creating the boot disk
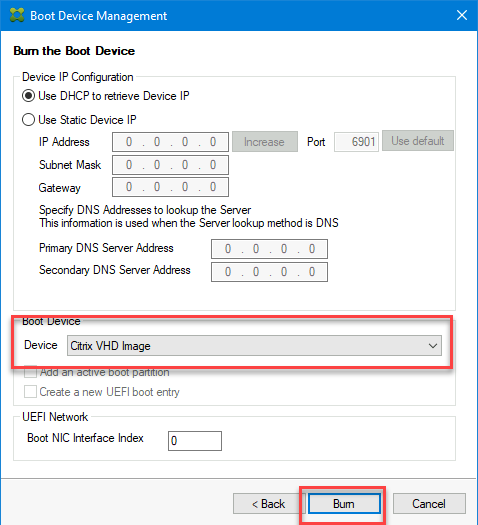
Create the boot disk using the Boot Device Manager (BDM) program installed with the server. Run as follows:
-
Run the BDM.exe program.
C:\Program Files\Citrix\Provisioning Services\BDM.exe. <!--NeedCopy--> -
Specify the Login server: Enter the Provisioning server information.
-
Create the boot disk VHD file: In the Device field, select Citrix VHD Image, and click Burn.
Target VMs can also use a DNS name to locate the Provisioning server, as opposed to specifying its IP address. To use this feature:
- Create a DNS entry that maps to the IP addresses used by the Citrix Provisioning servers on the streaming network.
- Configure the BDM boot disk to contact your Citrix Provisioning servers using this name.
Defining the DNS name to locate the Provisioning server is useful for High Availability (HA), because it allows you to return a list of IP addresses as opposed to configuring all IP addresses in the BDM boot disk. To use this feature:
- Create a DNS entry that maps to one or more IP addresses used by the provisioning servers on the streaming network.
- Run the BDM.exe program, and specify the DNS host name for the provisioning server DNS on the first page.
Creating the Target VMs
If you want to provision VMs yourself, use the following instructions to create the target VMs:
-
Create the BDM boot disk as outlined earlier, and upload the boot disk to a GCP disk. See Import virtual disks for instructions on uploading a VHD to GCP.
-
Create target VMs on GCP using the BDM boot disk that you created, an empty cache disk of the size you need, and connected to a subnet that has access to the provisioning servers.
-
Manage the Target devices in Citrix Provisioning. You can manually add each target VM using the provisioning console or use the Import Wizard to bulk import manually provisioned VMs. Use the GCP console to extract the MAC address assigned to the boot NIC of each manually provisioned target VM. If the IP address assigned to the VM is
n.m.o.p, then the MAC address is42:00:nn.mm.oo.pp(with each component of the IP address in hex). -
Start each VM once to ensure that the setup is completed. During this boot, Citrix Provisioning formats the cache disk, and then shuts the VM down. Once it is shut down, use the GCP console to deallocate the VM.
Integrate Manually Created Targets with Citrix Virtual Apps and Desktops and Citrix DaaS
Adding a Hosting Connection in Studio connects you to your resource location. The provisioning Export Devices Wizard uses data from this hosting connection to assist it in creating a Broker Catalog.
To integrate with Citrix Virtual Apps and Desktops and Citrix DaaS:
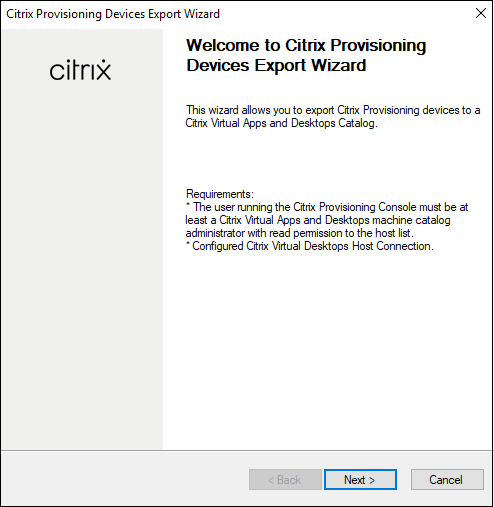
- Launch the Export Devices wizard from the Citrix Provisioning console.
-
Click Next to start the wizard.
-
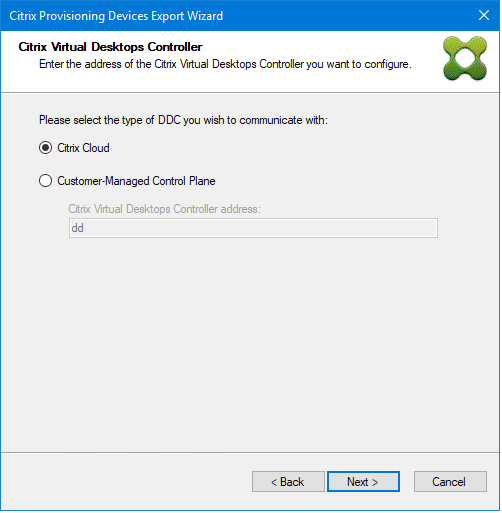
Click through the welcome page, select the type of Delivery Controller, and choose Next.
-
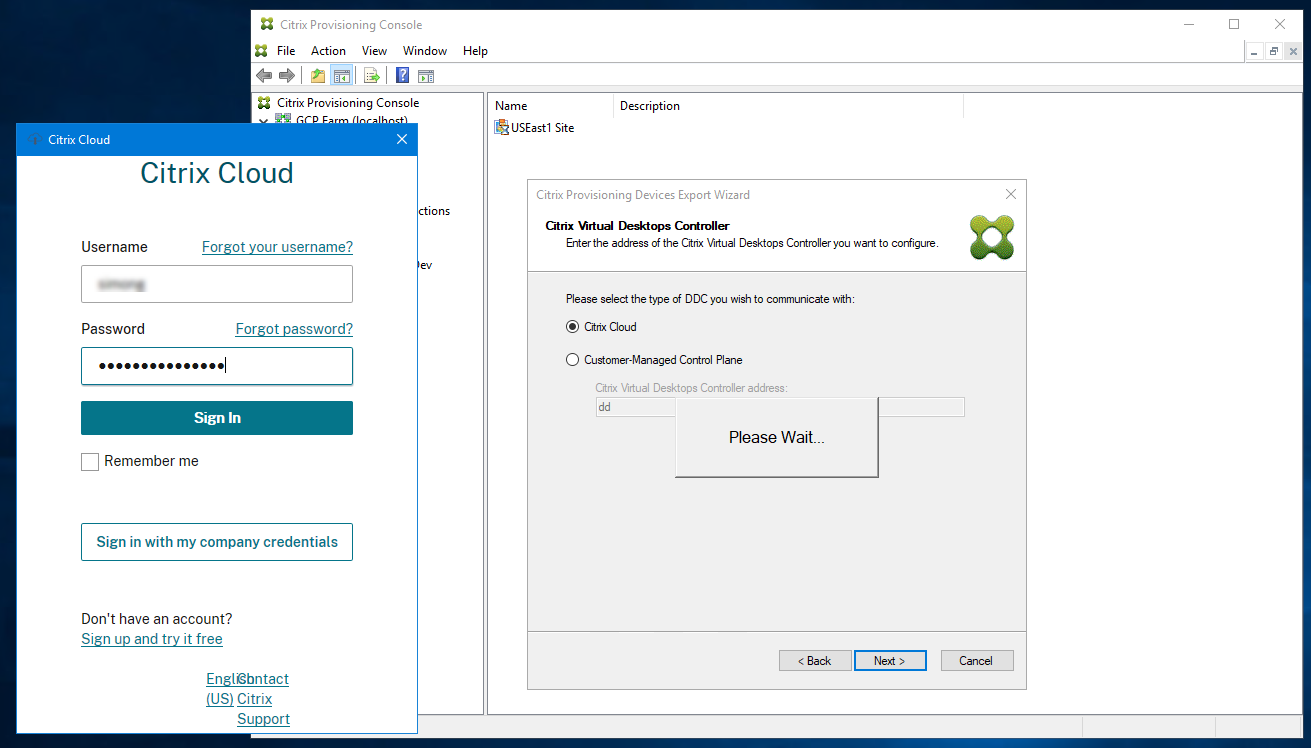
If you select Citrix Cloud:
-
Enter Citrix Cloud credentials when prompted
-
If you have more than one customer, select appropriate cloud customers.
-
-
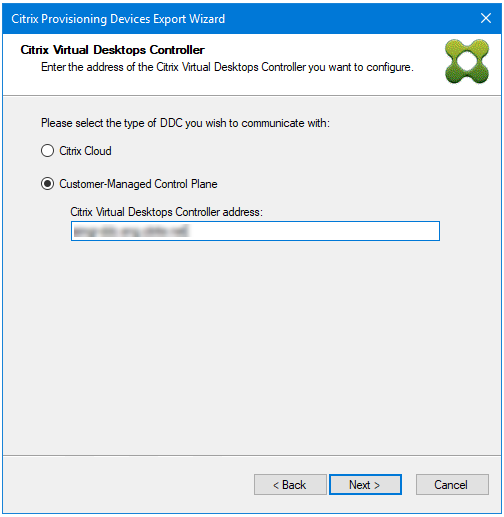
If you select Customer-Managed Control Plane:
-
Enter the controller hostname or address. The wizard authenticates to the Delivery Controller using the current logged in user.
-
-
-
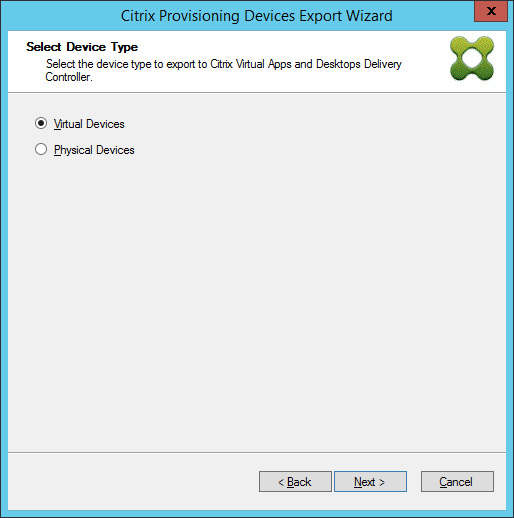
Click the Device Type to export. Click Next. When selecting Virtual Devices, the wizard displays the Host Resource screen which allows you to click the host or hypervisor. For physical devices, the wizard skips to the Active Directory and Collection selection screen.
-
On the Citrix Virtual Desktops Host Resources screen, select GCP hosting unit. Click Next.
-
You receive a message Connecting to Google Cloud…. A new web browser opens up. Enter your google credentials to log in to your google cloud.
Note:
If you previously logged in to the google cloud and approved the permission for the app, the browser to enter your google credentials does not appear.
-
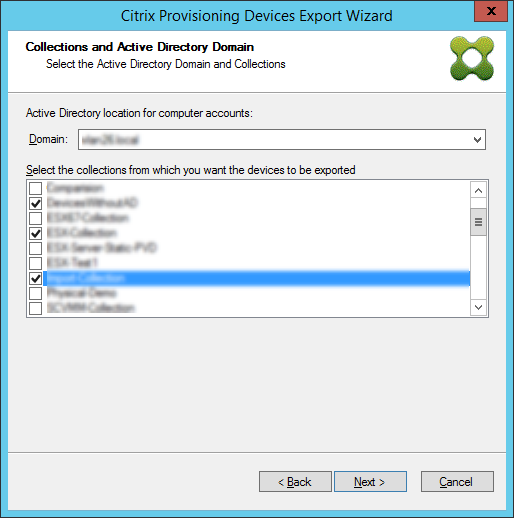
After a successful login, click the Active Directory domain and collections that you want to export. Click Next.
-
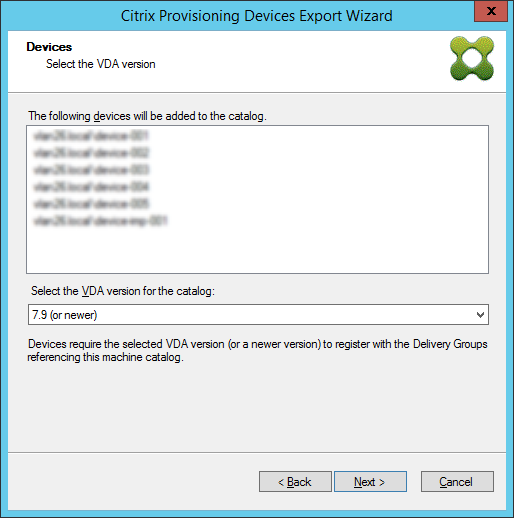
Use the list to select the VDA version. Devices are required to register with the Delivery Controller referencing the machine catalog. Click Next.
Tip:
All displayed devices are exported to a single Citrix Virtual Apps and Desktops catalog. You cannot select a device in this list.
-
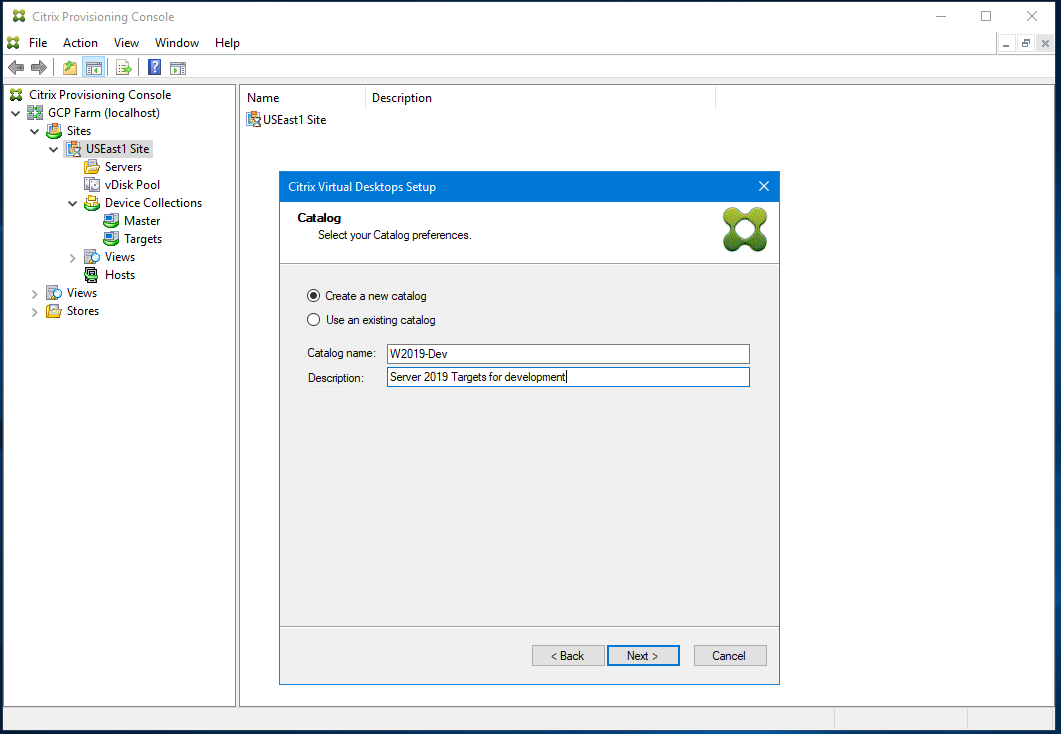
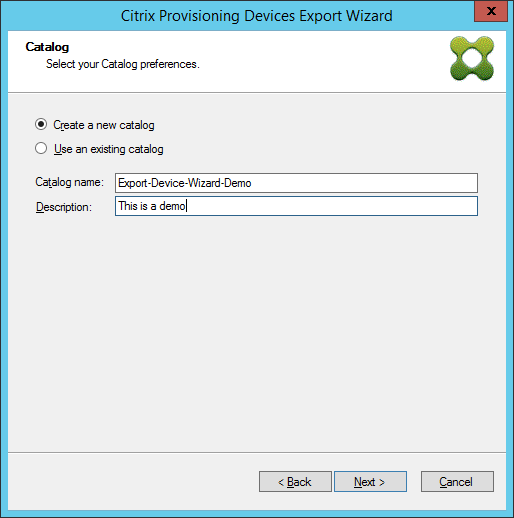
Click machine catalog preferences. When creating a catalog, specify the name and optionally include a description. Click Next.
-
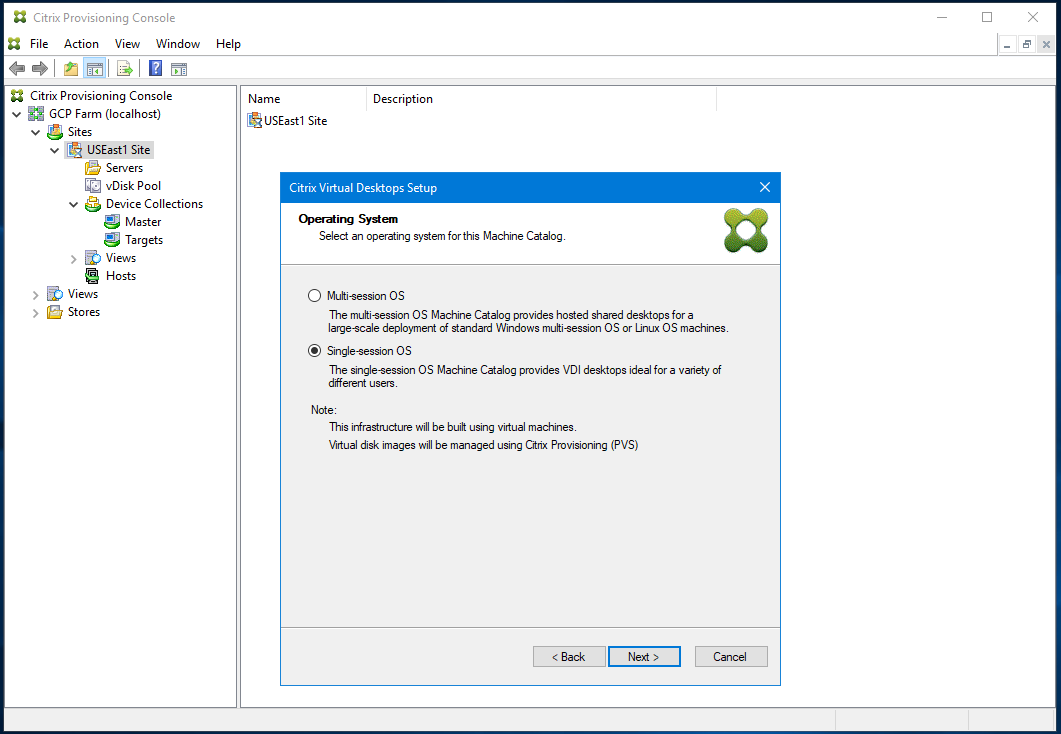
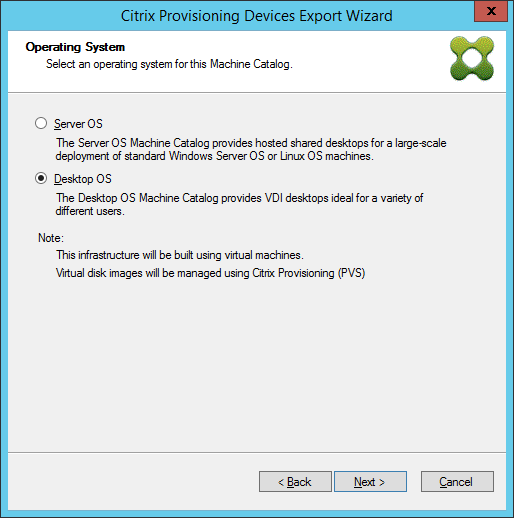
Click the operating system. Click Next.
-
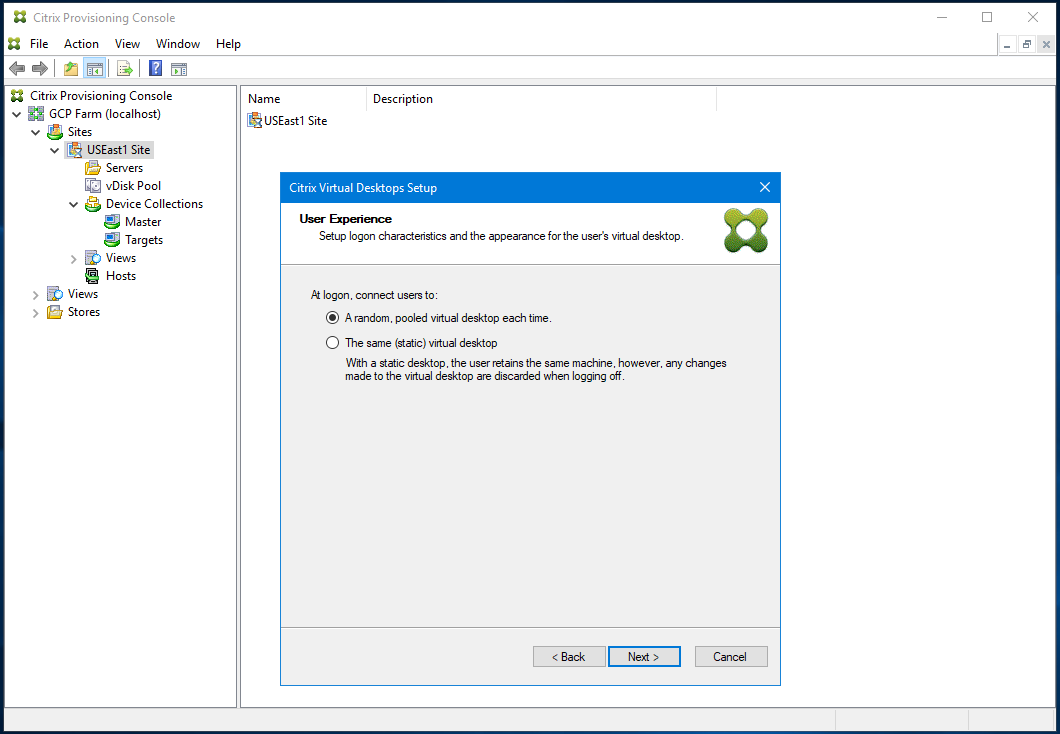
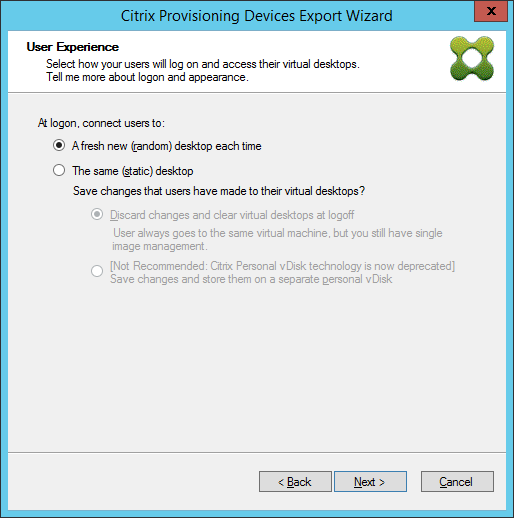
Set the user experience for the virtual desktop. Click Next.
-
Select Finish in the Summary screen to complete the wizard process.
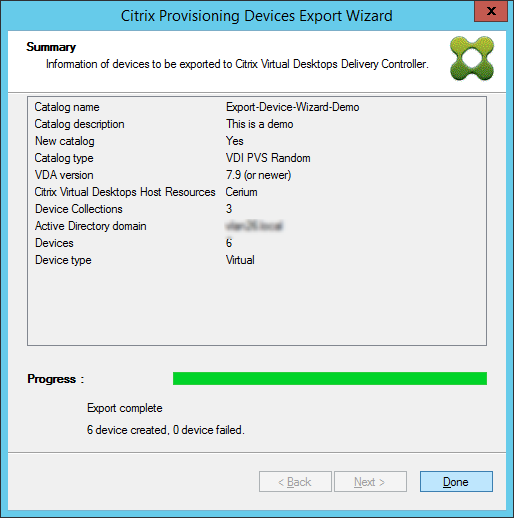
Note:
The Virtual Hosting Pool data is not added in the Summary screen.
Delete target VMs on GCP
In the Citrix Provisioning console, you can delete target VMs by individually selecting the devices from Device Collections or Views, or by deleting the entire device collection.
To delete target VMs:
- Right-click the target VMs from Device Collections or Views to open a contextual menu.
-
In the contextual menu, click Delete….
Note:
You cannot delete target VMs that are active. If any of the selected target VMs are active, you do not get Delete… option if you select the devices individually. Similarly, if you select the entire device collection and click Delete.., you get an error message.
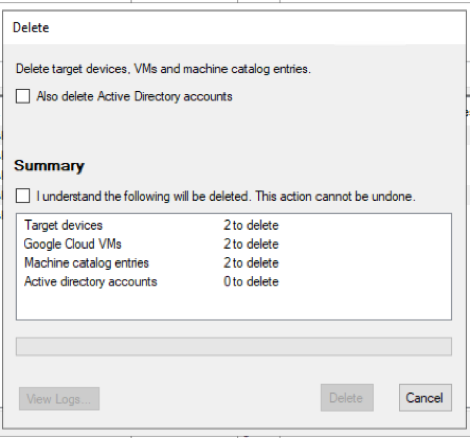
If any target VM is a GCP VM, the following UI appears:
-
If you select VMs individually:
-
If you select the entire device collection:

-
- By default, target VMs are deleted from the Citrix Provisioning database, GCP, and the Citrix Virtual Apps and Desktops machine catalog. Select the check boxes to delete the target VMs on other associations. The Summary section is updated accordingly.
-
After you click Delete, you see a message, Connecting to Google Cloud…. A new web browser opens. Enter your Google credentials to log in to your Google Cloud.
Note:
If you have previously logged in to Google cloud and approved the permission for the app, the dialog to enter your Google credentials does not appear.
-
The Summary text area of the Delete dialog is updated to reflect the status of the deletion process.
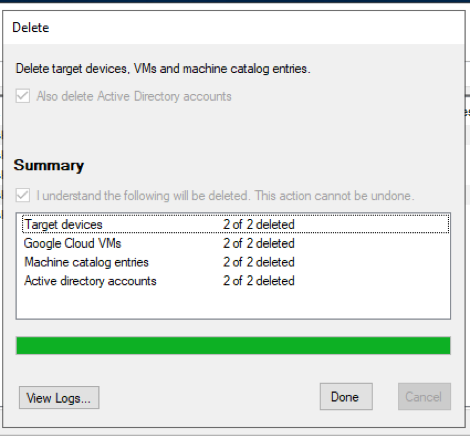
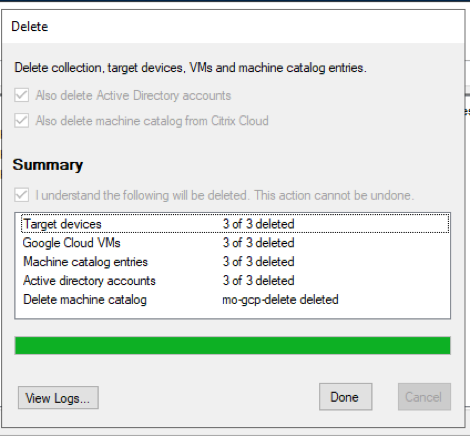
- When the process completes, click Done to close the Delete dialog. You can also click View Logs… to see the status of the deletion process or save the log file.
In this article
- Supported features
- Limitations
- Requirements
- Licensing
- Architecture
- Set up Citrix Provisioning on GCP
- Workflow for running the configuration wizard silently
- Create the master VM
- Create target VMs using the Citrix Virtual Apps and Desktops Setup wizard
- Manually creating target VMs on GCP
- Delete target VMs on GCP