VMware cloud and partner solutions
Citrix Provisioning™ supports the following VMware cloud and partner solutions:
Note:
The VMware cloud and partner solutions are supported from Citrix DaaS (formerly Citrix Virtual Apps and Desktops™ service) or if you have a Hybrid Rights License.
Azure VMware Solution (AVS) integration
Citrix Provisioning supports AVS. AVS provides cloud infrastructure containing vSphere clusters created by Azure infrastructure. Leverage Citrix Provisioning to use AVS for provisioning your VDA workload in the same way that you would using vSphere in on-premises enviornments.
Setting up the AVS cluster
To enable Citrix Provisioning to use AVS, do the following steps in Azure:
- Request a host quota
- Register the Microsoft.AVS resource provider
- Network Checklist
- Create an Azure VMware Solution private cloud
- Access an Azure VMware Solution private cloud
- Configure networking for your VMware private cloud in Azure
- Configure DHCP for Azure VMware Solution
- Add a network segment in Azure VMware Solution
- Verify Azure VMware Solution environment
Request host quota for Azure Enterprise Agreement customers
In the Azure portal’s Help + Support page select New support request, and include the following information:
- Issue type:Technical
- Subscription:Select your subscription
- Service:All services > Azure VMware Solution
- Resource:General question
- Summary:Need capacity
- Problem type:Capacity Management Issues
- Problem subtype:Customer Request for Additional Host Quota/Capacity
In the Description of the support ticket, incldue the following information in the Details tab:
- POC or Production
- Region Name
- Number of hosts
- Any other details
Note:
AVS requires a minimum of three hosts, and recommends that you use redundancy of N+1 hosts.
After specifying details for the support ticket, select Review + Create to submit the request to Azure.
Register the Microsoft.AVS resource provider
After requesting the host quota, register the resource provider:
- Sign in to the Azure portal.
- On the Azure portal menu, select All services.
- In the All services menu, enter the subscription, and select Subscriptions.
- Select the subscription from the subscription list.
- Select Resource providers and enter Microsoft.AVS in the search bar.
- If the resource provider is not registered, select Register.
Networking considerations
AVS offers networking services requiring specific network address ranges and firewall ports. See Networking planning checklist for Azure VMware Solution for more information.
Create an Azure VMware Solution private cloud
After conidering network requirements for your environment, create a ASV private cloud:
- Sign in to the Azure portal.
- Select Create a new resource.
-
In the Search the Marketplace text box type, Azure VMware Solution, and select Azure VMware Solution from the list.

In the Azure VMware Solution window:
- Select Create.
- Click the Basics tab.
- Enter values for the fields, using the information in the table below:
| Field | Value |
|---|---|
| Subscription | Select the subscription you plan to use for the deployment. All resources in an Azure subscription are billed together. |
| Resource group | Select the resource group for your private cloud. An Azure resource group is a logical container into which Azure resources are deployed and managed. Alternatively, you can create a new resource group for your private cloud. |
| Location | Select a location, such as east us. This is the region you defined during the planning phase. |
| Resource name | Provide the name of your Azure VMware Solution private cloud. |
| SKU | Select AV36. |
| Hosts | Shows the number of hosts allocated for the private cloud cluster. The default value is 3, which can be raised or lowered after deployment. |
| Address block | Provide an IP address block for the private cloud. The CIDR represents the private cloud management network and will be used for the cluster management services, such as vCenter Server and NSX-T Manager. Use /22 address space, for example, 10.175.0.0/22. The address should be unique and not overlap with other Azure Virtual Networks as well as with on-premises networks. |
| Virtual Network | Leave this blank because the Azure VMware Solution ExpressRoute circuit is established as a post-deployment step. |
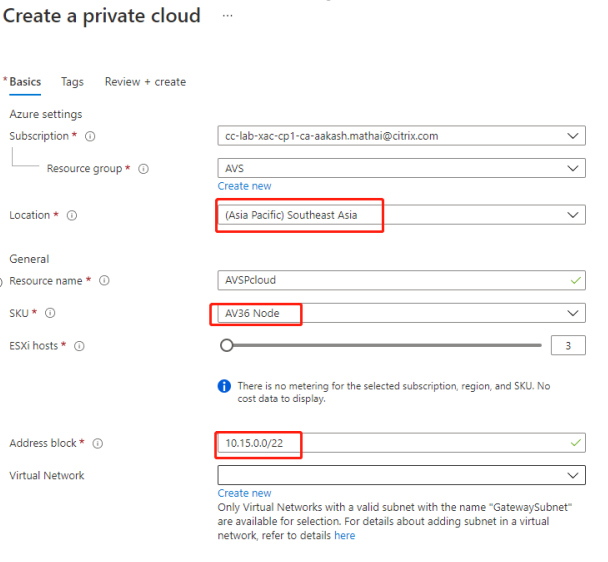
In the Create a private cloud screen:
- In the Location field, select the region that has the AVS; the resource group region is the same as the AVS region.
- In the SKU field, select AV36 Node.
- Specify an IP address in the Address Block field. For example, 10.15.0.0/22.
- Select Review + Create.
- After reviewing the information, click Create.
Tip:
Creating a private cloud can take 3-4 hours. Adding a single host to cluster can take 30-45 minutes.
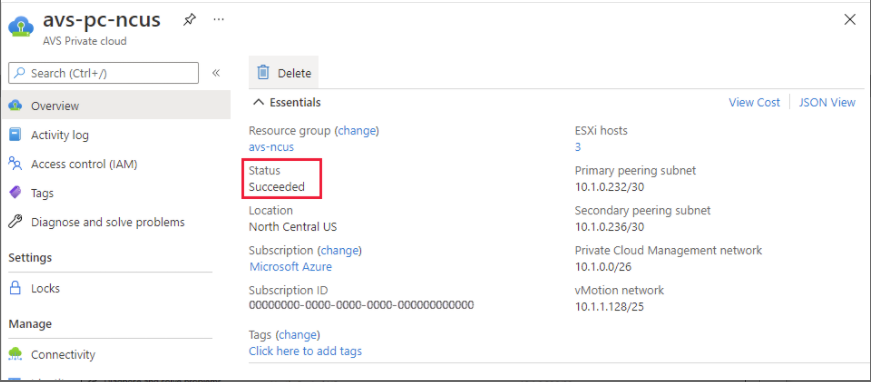
Verify that the deployment was successful. Navigate to the resource group you created and select your private cloud. Once the Status is Succeeded the deployment is complete.
Access an Azure VMware Solution private cloud
Once you have created a private cloud, create a Windows VM and connect to the local vCenter of your private cloud.
Create a new Windows virtual machine
- In the resource group, select + Add then search and select Microsoft Windows 10/2016/2019.
- Click Create.
- Enter the required information, then select Review + Create.
- Once validation passes, select Create to start the virtual machine creation process.
Connect to the local vCenter of your private cloud
-
Sign in to vSphere Client with VMware vCenter SSO as a cloud administrator.
-
In the Azure portal, select your private cloud, and then Manage> Identity.
The URLs and user credentials for private cloud vCenter and NSX-T Manager appear:
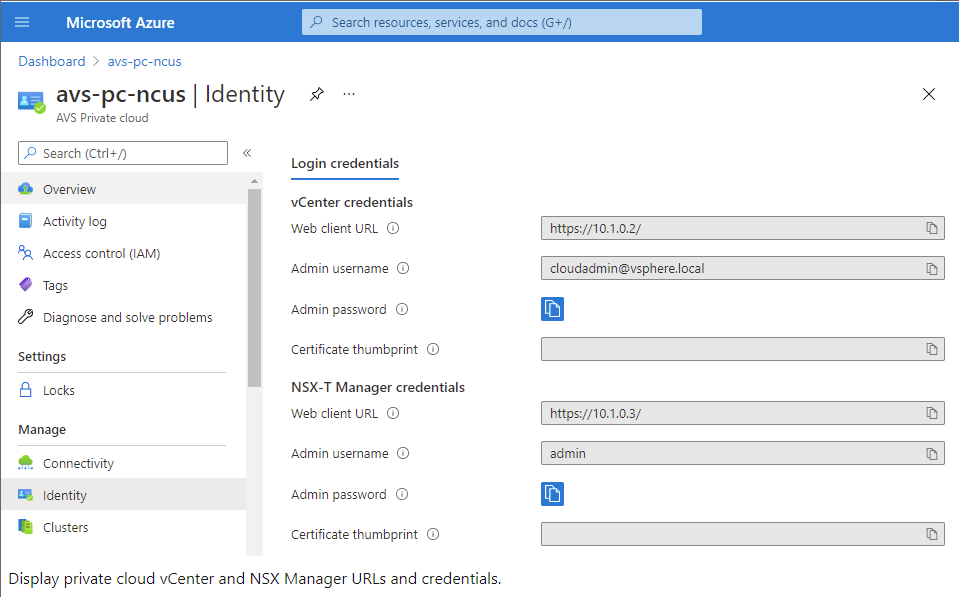
After confirming URLs and user credentials:
-
Navigate to the VM you created in the preceding step and connect to the virtual machine.
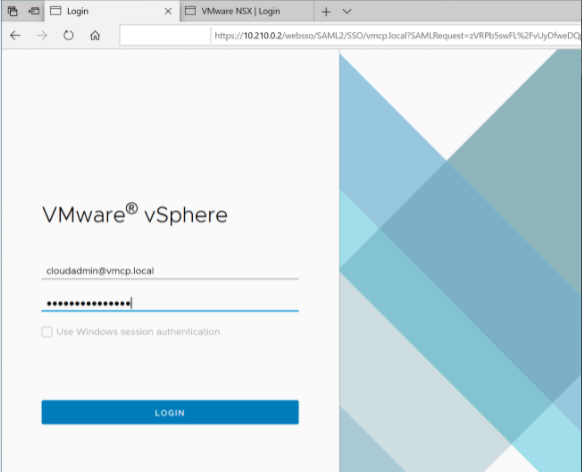
-
In the Windows VM, open a browser and navigate to the vCenter and NSX-T Manger URLs in two browser tabs. In the vCenter tab, enter the cloudadmin@vmcp.local user credentials from the previous step.
Configure networking for your VMware private cloud in Azure
After accessing an ASV private cloud, configure networking by creating a virtual network and gateway.
Create a virtual network
- Sign in to the Azure portal.
- Navigate to the previously created resource group.
- Select + Add to define a new resource.
- In the Search the Marketplace text box, type virtual network. Find the virtual network resource and select it.
- On the Virtual Network page, select Create to set up the virtual network for your private cloud.
- On the Create Virtual Network page, enter the details for your virtual network.
- On the Basics tab, enter a name for the virtual network, select the appropriate region, and click Next : IP Addresses.
- On the IP Addresses tab, under IPv4 address space, enter the previously created address.
Important:
Use an address that does not overlap with the address space you used when you created your private cloud.
After entering the address space:
- Select + Add subnet.
- On the Add subnet page, give the subnet a name and appropriate address range.
- Click Add.
- Select Review + create.
- Verify the information and click Create. Once the deployment is complete, the virtual network appears in the resource group.
Create a virtual network gateway
After creating a virtual network, create a virtual network gateway.
- In your resource group, select + Add to add a new resource.
- In the Search the Marketplace text box, type virtual network gateway. Find the virtual network resource and select it.
- On the Virtual Network gateway page, click Create.
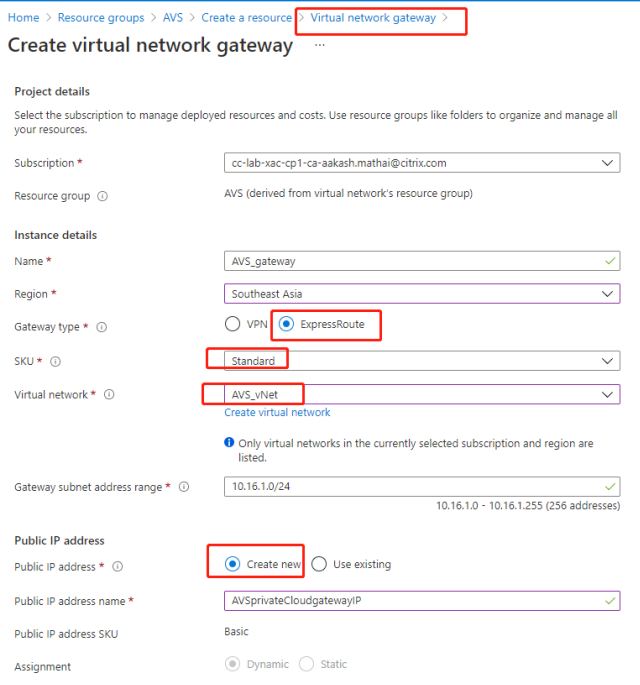
- On the Basics tab in the Create virtual network gateway page, provide values for the fields.
- Click Review + create.
After reviewing the virtual network gateway configuration, click Create to deploy your virtual network gateway. Once the deployment completes, connect your ExpressRoute connection to the virtual network gateway containing your Azure AVS private cloud.
Connect ExpressRoute to the virtual network gateway
After deploying a virtual network gateway, add a connection between it and your Azure AVS private cloud:
- Request an ExpressRoute authorization key.
- In the Azure portal, navigate to the Azure VMware Solution private cloud. Select Manage> Connectivity > ExpressRoute and then select + Request an authorization key.
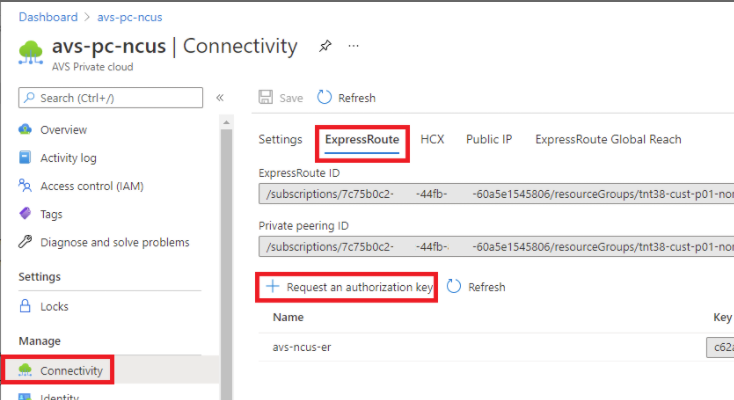
After requesting an authorization key:
- Enter a name for the key and click Create. It may take about 30 seconds to create the key. Once created, the new key appears in the list of authorization keys for the private cloud.
- Copy the authorization key and ExpressRoute ID. You’ll need them to complete the peering process. The authorization key disappears after some time, so copy it as soon as it appears.
- Navigate to the virtual network gateway you plan to use and select Connections> + Add.
- On the Add connection page, provide values for the fields, and select OK.
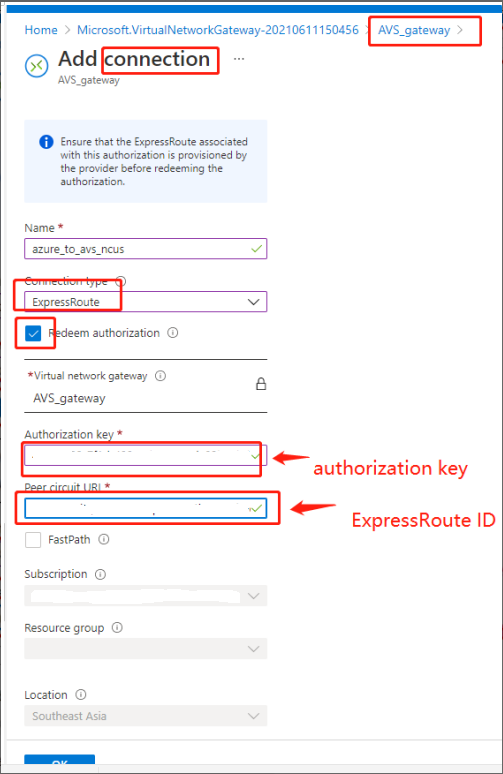
The connection is established between your ExpressRoute circuit and your virtual network:

Configure DHCP for Azure VMware Solution
After connecting ExpressRoute to the virutal gateway, configure DHCP.
Use NSX-T to host your DHCP server
In NSX-T Manager:
- Select Networking> DHCP, and then select Add Server.
- Select DHCP for the Server Type, provide the server name and IP address.
- Click Save.
- Select Tier 1 Gateways, select the vertical ellipsis on the Tier-1 gateway, and then select Edit.
- Select No IP Allocation Set to add a subnet.
- Select DHCP Local Server for the Type.
- For the DHCP Server, select Default DHCP, and then click Save.
- Click Save again and then select Close Editing.

Add a network segment in Azure VMware Solution
After settnig up DHCP, add a network segment.
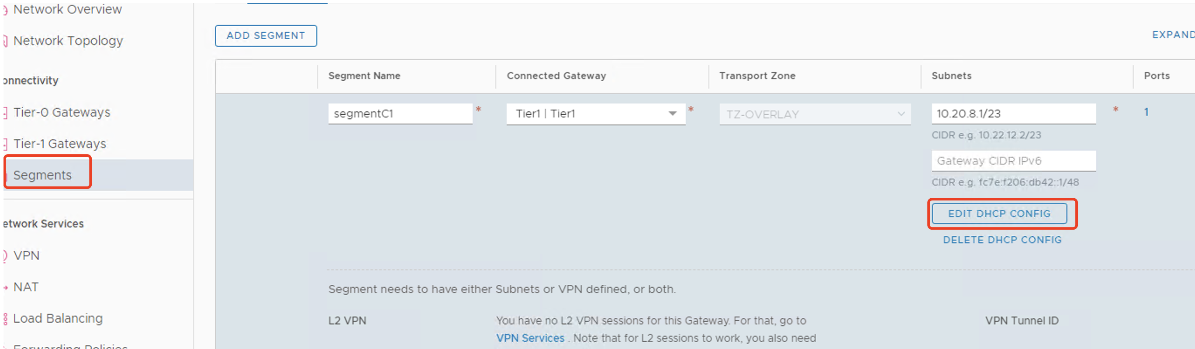
To add a network segment, in NSX-T Manager, select Networking> Segments, and then click Add Segment.
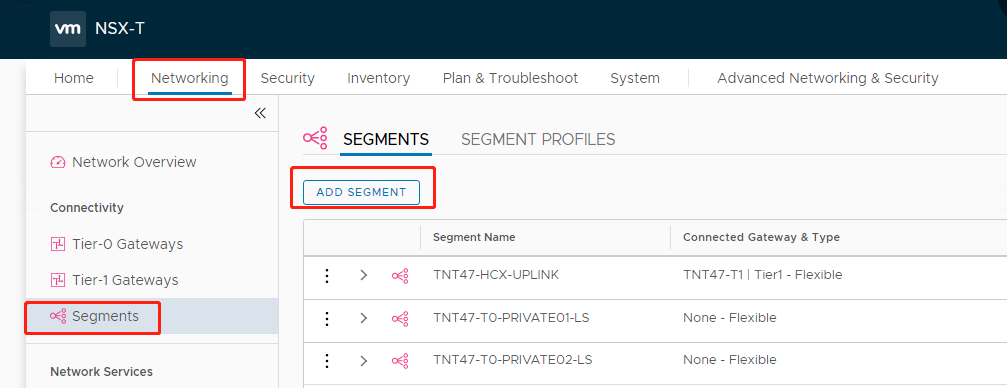
In the Segments profile screen:
- Enter a name for the segment.
- Select the Tier-1 Gateway (TNTxx-T1) as the Connected Gateway and leave the Type as Flexible.
- Select the pre-configured overlay Transport Zone(TNTxx-OVERLAY-TZ).
- Click Set Subnets.

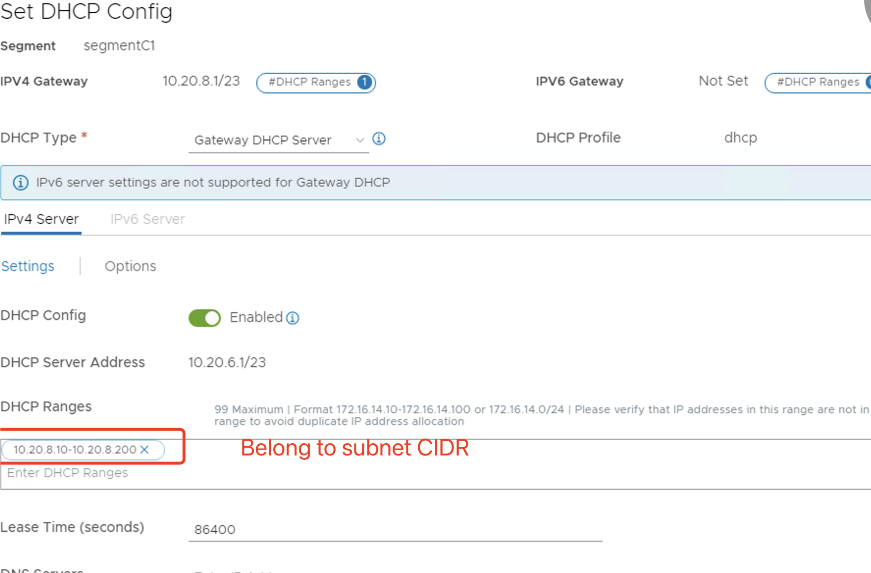
In the Subnets section:
- Enter the gateway IP address.
- Select Add.
Important:
This segment IP address must belong to the Azure gateway IP address, 10.15.0.0/22.
DHCP range should be belong to segment IP address:

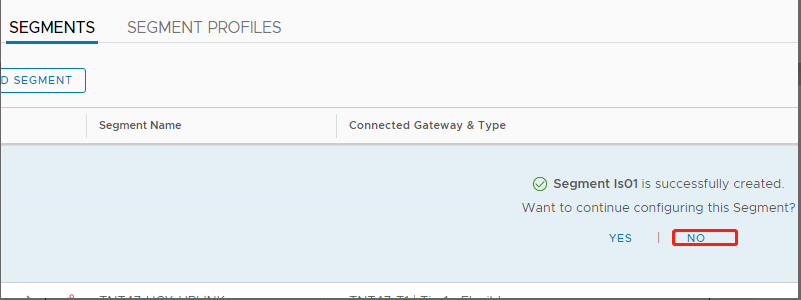
Select No to decline the option to continue configuring the segment:
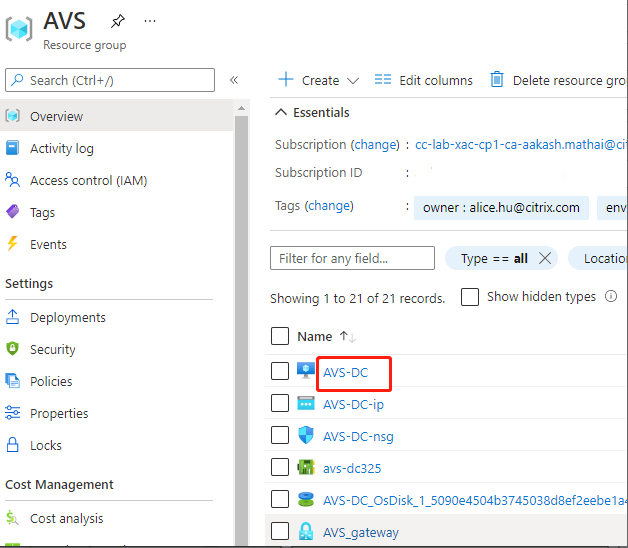
In vCenter, select Networking > SDDC-Datacenter:

Verify the Azure AVS environment
-
Setup a direct connection and connector in the Azure resource group:
-
Verify the connection with vCenter credentials.
VMware cloud on AWS
VMware cloud on AWS enables you to migrate VMware based on-premises Citrix workloads to AWS Cloud and your core Citrix Virtual Apps™ and Desktops environment to Citrix DaaS (formerly Citrix Virtual Apps and Desktops service).
Access the VMware cloud environment
- Log in to VMware cloud services using the URL.
- Click VMware Cloud on AWS. The page SDDC appears.
- Click OPEN VCENTER, and then click SHOW CREDENTIALS. Note the credentials for later use.
- Open a Web browser, and enter the URL for the vSphere Web Client.
- Enter the credentials as noted and click Login. The vSphere client webpage is similar to the on-premises environment.
For more and updated information on VMware Cloud on AWS, see VMware Cloud on AWS Documentation.
About VMware cloud environment
There are four views on the vSphere client webpage.
- Host and Cluster view: You cannot create a new Cluster, but the cloud admin can create multiple resource pools.
- VM and Template view: Cloud admin can create many folders.
- Storage View: Select WorkloadDatastore storage when you add hosting unit in the Citrix Studio because you have access to only Workload Datastore.
- Network View: The icons are different for VMware cloud networks and opaque networks.
For more and updated information on VMware Cloud on AWS, see VMware Cloud on AWS Documentation.
Set up Citrix Provisioning environment on VMware Cloud on AWS
- Set up a domain controller or request for credentials for domain vmconaws.local.
-
Use an existing template, or right-click Cluster and select New Virtual Machine to create the following three VMs:
- Citrix Provisioning Server
- Database Server
- Cloud Connector for connecting to Citrix DaaS™
- Create a host connection in Citrix Studio by selecting the VMware vSphere option, and select only WorkloadDatastore as Storage.
Google Cloud Platform (GCP) VMware Engine
Citrix Provisioning now allows you to migrate VMware based on-premises Citrix workloads to Google Cloud VMware Engine.
This article describes the procedure for configuring the GCP VMware Engine.
Access the VMware Engine portal
- In the Google Cloud Console, click the navigation menu.
- In the Compute section, click VMware Engine to open VMware Engine in a new browser tab.
Create first private cloud
Requirements
You must have access to Google Cloud VMware Engine, available VMware Engine node quota, and an appropriate IAM role. Prepare the following requirements before you continue to create your private cloud:
- Request API access and node quota. For more information, see Requesting API access and quota.
- Note the address ranges you want to use for VMware management appliances and the HCX deployment network. For more information, see Networking requirements.
- Get the VMware Engine Service Admin IAM role.
Create your first private cloud
- Access the VMware Engine portal.
- On the VMware Engine Home page, click Create a private cloud. The hosting location and hardware node types are listed.
- Select the number of nodes for the private cloud. At least three nodes are required.
- Enter a Classless Inter-Domain Routing (CIDR) range for the VMware management network.
-
Enter a CIDR range for the HCX deployment network.
Important:
The CIDR range must not overlap with any of your on-premises or cloud subnets. The CIDR range must be /27or higher.
- Select Review and create.
- Review the settings. To change any settings, click Back.
- Click Create to begin creating the private cloud.
As VMware Engine creates your new private cloud, it deploys several VMware components and sets up initial autoscale™ policies for clusters in the private cloud. Private cloud creation can take 30 minutes to 2 hours. After the provisioning is complete, you receive an email.
Setup Google Cloud VMware Engine VPN Gateway
To establish an initial connectivity to Google Cloud VMware Engine, you can use a VPN gateway. This is an OpenVPN-based client VPN using which you can connect to your SDDC’s vCenter and do any initial configuration required.
Before deploying VPN gateway, configure the Edge Services range for the region where your SDDC is deployed. To do this:
- Log on to the Google Cloud VMware Engine portal, and go to Network > Regional Settings. Click Add Region.
- Choose the region where your SDDC is deployed and enable Internet Access and Public IP Service.
-
Supply the Edge Services range noted during planning and click Submit. Enabling these services takes 10–15 minutes.
Once complete, the Edge Services show as Enabled on the Regional Settings page. Enabling these settings allow Public IPs to be allocated to your SDDC, which is a requirement for deploying a VPN gateway.
To deploy a VPN gateway:
- In the Google Cloud VMware Engine portal, go to Network > VPN Gateways. Click Create New VPN Gateway.
- Supply the name for the VPN gateway and the client subnet reserved during planning. Click Next.
- Select users to grant VPN access. Click Next.
- Specify the networks that must be accessible over VPN. Click Next.
- A summary screen is displayed. Verify the selections, and click Submit to create the VPN Gateway. The VPN Gateways page is displayed with the status of the new VPN gateway as Creating.
- After the status changes to Operational, click the new VPN gateway.
- Click Download my VPN configuration to download a ZIP file containing pre-configured OpenVPN profiles for the VPN gateway. Profiles for connecting through UDP/1194 and TCP/443 are available. Choose your preference and import it into Open VPN, and then connect.
- Go to Resources and select your SDDC.
Connect the VPN
Connect to VPN through Azure machine:
- Create an Azure machine in Azure portal.
- Download and install the installer OpenVPN.
- Open the OpenVPN.
- Upload the VPN file and connect the VPN.
Create first subnet
Access NSX-T Manager from the VMware Engine portal
The process of creating a subnet happens in NSX-T, which you access through VMware Engine. Do the following to access NSX-T Manager.
- Log on to the Google Cloud VMware Engine portal.
- From the main navigation, go to Resources.
- Click the Private cloud name corresponding to the private cloud where you want to create the subnet.
- On the details page of your private cloud, click the vSphere Management Network tab.
- Click the FQDN corresponding to the NSX-T Manager.
-
When prompted, enter your sign-in credentials. If you have set up vIDM and connected it to an identity source, such as Active Directory, use your identity source credentials.
Reminder:
You can retrieve generated credentials from the private cloud details page.
Set up DHCP service for the subnet
Before you can create a subnet, set up a DHCP service:
In NSX-T Manager:
- Go to Networking > DHCP. The networking dashboard shows that the service creates one Tier-0 and one Tier-1 gateway.
- To begin provisioning a DHCP server, click Add Server.
- Select DHCP for the Server Type. Provide the server name and IP address.
- Click Save to create the DHCP service.
Do the following to attach this DHCP service to the relevant Tier-1 gateway. A default Tier-1 gateway is already provisioned by the service:
- Select Tier 1 Gateways, select the vertical ellipsis on the Tier-1 gateway, and then select Edit.
- In the IP Address Management field, select No IP Allocation Set.
- Select DHCP Local Server for the Type.
- Select the DHCP server that you created for the DHCP Server.
- Click Save.
- Click Close Editing.
You can now create a network segment in NSX-T. For more information about DHCP in NSX-T, see the VMware documentation for DHCP.
Create a network segment in NSX-T
For workload VMs, you create subnets as NSX-T network segments for your private cloud:
- In NSX-T Manager, go to Networking > Segments.
- Click Add Segment.
- Enter a name for the segment.
- Select the Tier-1 as the Connected Gateway and leave the Type as Flexible.
- Click Set Subnets.
- Click Add Subnets.
- Enter the subnet range in the Gateway IP/Prefix Length. Specify the subnet range with .1 as the last octet. For example, 10.12.2.1/24.
- Specify the DHCP Ranges and click ADD.
- In Transport Zone, select TZ-OVERLAY | Overlay from the drop-down list.
- Click Save. You can now select this network segment in vCenter when creating a VM.
In a given region, you can set up at most 100 unique routes from VMware Engine to your VPC network using private services access. This includes, for example, private cloud management IP address ranges, NSX-T workload network segments, and HCX network IP address ranges. This limit includes all private clouds in the region.
Note:
There is a GCP configuration issue because of which you need to configure DHCP range setting several times. Therefore, make sure to configure the DHCP range setting after GCP configuration. Click EDIT DHCP CONFIG to configure the DHCP ranges.
Set up Citrix Provisioning environment on Google Cloud VMware Engine
- Install desktop and server VMs. Run Windows updates for both VMs. Turn them into templates.
- Create the following VMs:
- Domain controller with DNS. Be sure to use static DNS pointing to this VM to join the newly created domain.
- Citrix Provisioning Server
- SQL Server
- Connector VM
- UEFI PVS target VM
- EFI PVS target VM
- Create a host connection in Citrix Studio:
- Launch the Citrix Studio.
- Select the hosting node, and click Add Connection and Resources.
-
On the Connection screen, select Create a new Connection, and the following details:
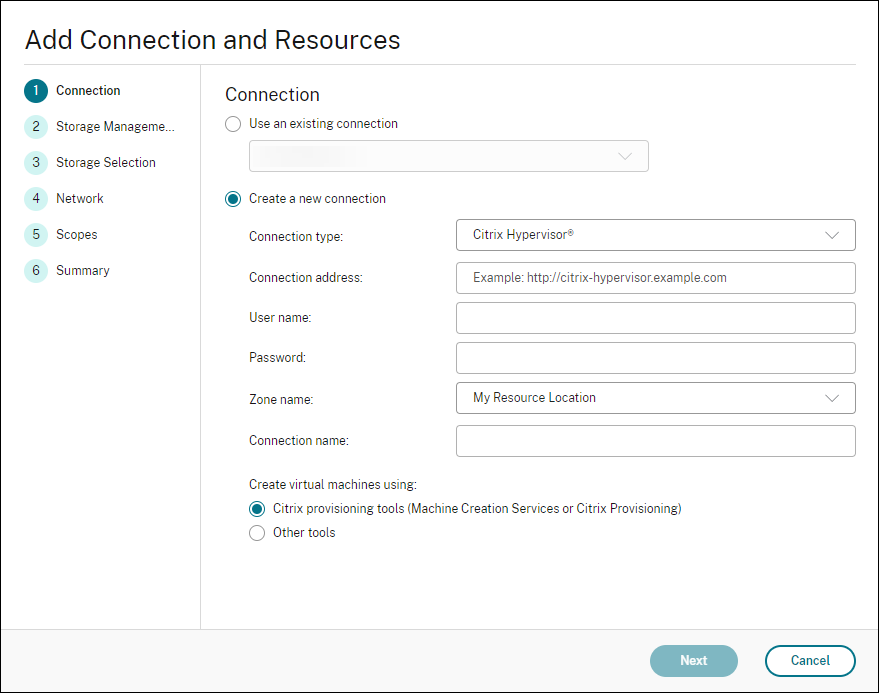
- Select Connection type as VMware vSphere.
- In the Connection address, enter the vCenter private IP address.
- Enter the vCenter credentials.
- Enter a connection name.
- Choose the tool to create virtual machines.
- On the Network screen, select the subnet created in NSX-T server.
- Click through the screens to complete the wizard.