Updating vDisks
It is often necessary to update an existing vDisk so that the image contains the most current software and patches. Each time the vDisk is updated, a new version of that vDisk is created. This file is seen as a Hyper-V Virtual Hard Drive, with the extension .vhdx. This new version is used to capture the changes without updating the base vDisk image.
Updating a vDisk involves the following:
- Create a version of the vDisk, manually or automatically.
- Boot the newly created version from a device (maintenance device or update device), make and save any changes to the vDisk, then shut down the device.
- Promote the new version to production.
The following illustrates the general promotion of a vDisk update:
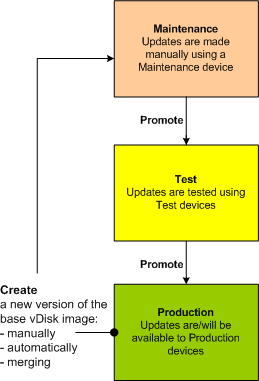
The availability of the updated version depends on the current promotion of that version, for example, maintenance, test, or production. It also depends on the type of device attempting to access it, for example, maintenance device, update device, test device, or production device.
Update scenarios
The following vDisk update scenarios are supported:
- Manual Update – Manually update a vDisk by creating a version; use a Maintenance device to capture updates to that version. On the vDisk Versions dialog, initiate a manual update by clicking New. The Access column on the vDisk Versions dialog indicates that the newly created version is in maintenance. A single maintenance device updates this version while in maintenance mode. Multiple maintenance devices can be assigned to a vDisk. However, only one device can boot and access that version of the vDisk at any given time. During that time that maintenance device has exclusive read/write access.
-
Automated Update – Creating automated updates saves administration time and physical resources. Updates are initiated on-demand or from a schedule and are configured using vDisk Update Management. If you are updating automatically, the Access column on the vDisk Versions dialog indicates that the newly created version is in maintenance. The device to which it is assigned is updated while in maintenance mode, where only one update device exists per vDisk.
Note:
vDisk Update Management is intended for use with standard image mode vDisks only. Private image mode vDisks can be updated using normal software distribution tool procedures. Registering a vDisk in private image mode for update management, or switching a vDisk that is already registered, generates errors.
- Merge – Merging VHDX differencing disk files can save disk space and increase performance, depending on the merge option selected. A merge update is initiated manually by selecting the Merge button on the vDisk Versions dialog, or automatically when the maximum vDisk versions count is reached.
VHDX chain of differencing disks
Versioning simplifies vDisk update and management tasks, providing a more flexible and robust approach to managing vDisks.
A vDisk consists of a VHDX base image file, any associated side-car files, and if applicable, a chain of referenced VHDX differencing disks. Differencing disks are created to capture the changes made to the base disk image, leaving the original base disk unchanged. Each differencing disk that is associated with a base disk represents a different version.
The following sections discuss the file naming convention used and the relationship between a base disk and all versions referencing it.
VHDX chain
Note:
vDisk versions are created and managed using the vDisk Versions dialog and by performing common vDisk versioning tasks.
Each time a vDisk is put into maintenance mode a new version of the VHDX differencing disk is created. The file name is numerically incremented. The following table illustrates these chain sequences:
| VHDX file name | Properties file name | Lock File file name | |
|---|---|---|---|
| Base Image | win7dev.vhdx | win7dev.pvp | win7dev.lok |
| Version 1 | win7dev.1.avhdx | win7dev.1.pvp | win7dev.1.lok |
| Version 2 | win7dev.2.avhdx | win7dev.2.pvp | win7dev.2.lok |
| Version 3 | win7dev.3.avhdx | win7dev.3.pvp | win7dev.3.lok |
| Version 4 | win7dev.4.vhdx | win7dev.4.pvp | win7dev.4.lok |
| Version N | win7dev.N.vhdx | win7dev.N.pvp | win7dev.N.lok |
For Version 4 and Version N merged base VHDX and AVHDX files are combined and use the VHDX extension.
Manually updating a vDisk image
Use the vDisk Versions dialog to create a version of the vDisk’s base image.
Note:
To automate an update process, configure for vDisk update management. See Automating vDisk Updates.
This procedure requires that:
- A maintenance device has been assigned to the vDisk being updated.
- No version of this vDisk is under maintenance.
Create a version
- In the Citrix Provisioning™ console, right-click on a vDisk to version within a device collection or vDisk pool, then select Versions from the context menu. The vDisk Versions dialog appears.
Note:
Verify that the vDisk is not in private image mode.
- Click New. The new version displays in the dialog. Access set to maintenance and the update type method set to manual.
- Boot the vDisk from a maintenance device, install or remove applications, add patches, and complete any other necessary updates, then shut down the maintenance device. Optionally, test that changes were made successfully.
Note:
When booting a test or maintenance device, use the boot menu to select from the vDisk, or version of that vDisk, from which to boot.
- Select the vDisk, then right-click. Select the Promote… menu option from the context menu that appears. For more details on promoting versions see Promoting Updated Versions.
- Select to promote this maintenance version into test or directly into production. If Production is selected, set the availability of this version in production to be either immediate or scheduled.
- Click OK to promote this version and end maintenance.
Merging VHDX differencing disks
Merging VHDX differencing disk files can save disk space and increase performance, depending on the merge method selected. Once a vDisk reaches five versions, Citrix® recommends merging the versions either to a new base image or to a consolidated differencing disk.
Merge methods include:
- Merging to a new base image
- Merging to a consolidated differencing disk
Note:
A merged vDisk only occurs when a maintenance version is not defined, or when it is in private image mode. A merged vDisk starts from the top of the chain down to the base disk image. A starting disk cannot be specified for the merged vDisk.
Merging to a new base image
Fully merging to a new base image combines a chain of differencing disks and base image disks into a new single base disk, which represents the next version in the chain with the file name extension VHDX. This method allows for the fastest disk access to the base image. Citrix recommends this process when performance is more important than disk space. Consider that a new base disk is created for every merge performed.
Tip:
After merging the base operation on a vDisk utilizing the VHDX file format, the merged base VHDX file is smaller than the original base VHDX file. This behavior occurs when files are deleted in a particular vDisk version. These files are no longer available in the merged base VHDX. For more information, see the Citrix Knowledge Center.
Merging to a consolidated differencing disk
A partial merge combines a chain of VHDX differencing disks up to, but not including, the base disk into a new differencing disk. The new differencing disk has the same parent base disk image. It is given the extension avhdx. This method consumes less disk space than the full merge and the merge process is quicker than performing a full merge.
Automatically consolidate differencing disks in the Farm Properties dialog’s vDisk Version tab. Select a maximum vDisk number, when that number is reached, a merge is automatically performed. The availability of that vDisk depends on the mode selected on the tab, production, maintenance, or test.
Note:
Citrix recommends consolidating a merged differencing disk when storage is limited or when the bandwidth between remote locations is limited. These scenarios make copying large images impractical.
Merging differencing disks
- Right-click on a vDisk in the Citrix Provisioning console, then select the Versions menu option. The vDisk Versions dialog appears.
- Click the Merge button. The Merge dialog appears.
- Select to perform Merged Updates or a Merged Base merge.
- To merge all differencing disks to a single differencing disk (not to the base disk image), select the Merged Updates option.
- To merge all differencing disks into a new base disk, select the Merged Base option.
- Select the access mode, production, maintenance, or test, for this version after the merge completes. If an access mode is not selected, the vDisk mode defaults to automatic range, specified in the Farm Properties vDisk Version tab.
- Click OK to begin the merge process.
The time it takes to complete the merge process varies based on the merge method selected and the number of differencing disks to merge. After the merge successfully completes, the new version displays in the vDisk Versions dialog. If you selected a full merge, the Type column displays either Merge Base, or Merge if a partial merge was selected.
Promoting updated versions
An updated version of the vDisk is not available to production devices until it is promoted to production. The update promotion stages include:
- maintenance
- test
- production
Each time a new version is created, the Access setting is automatically set to Maintenance, allowing maintenance devices to make updates. After you finish update, this version can be promoted from Maintenance to Test for read-only. This permits testing by test devices, or promotion directly to production, for use by all target devices.
After you complete an update using the manual method, the new version can be promoted to test or production from the vDisk Version dialog’s Promote button. If you selected production, a release date and time can be set, or accept the default, Immediate.
After you complete an update using the automated update method, the new version is promoted according to the Post Update setting. After completing the automatic update, promote the version using the vDisk Version dialog’s Promote button.
If issues exist in the new version, revert from test to maintenance, if no active sessions exist. You can alternately revert from production to either test or maintenance. Shut down any booted device before reverting to another version.
In order for production devices to access the new version after it is promoted to production, the following also applies:
- Access setting must be either Default or Override.
- If the update was scheduled for release, the date and time must be reached.
- The updated version must be available to all servers in the site.
- Boot production devices from a version set to Newest released on the vDisk Versions dialog.
Note:
When the Access field is blank, this version is considered released to production, however, it is not the version from which devices boot.
Updating vDisks on target devices
This article describes how to change a vDisk on multiple target devices without having to manually reconfigure them. It provides some general information about the process, then sets out a step-by-step procedure.
Setting vDisk class and type properties
For an automatic update to take place, the class of the target device and vDisk must match. For a newer vDisk to replace an older vDisk within a target device, the vDisk class and type of both vDisks must match. Multiple, duplicate vDisk instances can exist within your implementation. vDisks can be assigned to one or more target devices. For example, for the Citrix Provisioning server, Least Busy and First Available boot behaviors. Further qualify the old vDisk that replaced by the new vDisk.
Tip:
Never assign more than one vDisk with the same type from the same provisioning server to the same target device. This process applies to environments using the Automatic Disk Image Update feature.
Scheduling vDisk updates
Use the Apply vDisk updates to schedule updates. These updates are applied when detected by the server. You can alternately select Schedule the next vDisk update on the Auto Update tab of the vDisk. If you select Schedule the next vDisk update, you must specify the current date or a later date. Failing to do so prevents an update to the vDisk.
Timed update of vDisks
You can set a timer to update vDisks. The vDisk are assigned to all the devices with a matching class at a specified time, for example when devices are less active.
To set a timer, create a Windows timer on one of the servers from each site. This process calls the PowerShell Mcli-Run ApplyAutoUpdate command or the Mcli Run ApplyAutoUpdate command. The command scans the site and updates all eligible vDisks. The timer executes every day. These updates are automatically made whenever you add new disk versions.
Automatically adding a replacement vDisk
To add a replacement vDisk to a site automatically, place it in the store directory of the vDisk it replaces. When the update process is done, each store for the site is scanned for vDisks that are not defined in the site. A vDisk is automatically added to a site and assigned to a target device with a matching class:
- if a vDisk is found with the same Class and Type as an existing vDisk in the store directory.
- if a vDisk is labeled as major or minor, and the build number is higher than the existing vDisk.
The replacement vDisk must include all versions since and including the last merged base, or if no merged base exists, the base. All the VHDX, AVHDX, and the PVP files for the included versions must be in the store directory.
If the replacement vDisk has multiple versions, the manifest (XML) file must be included with the vDisk. To create the manifest file, perform a vDisk Export. To reduce the number of delivered files, delete obsolete versions in the vDisk Versions dialog before performing exporting the vDisk.
Automatically update a vDisk
-
For the original vDisk, select the Auto Update tab, then set the following vDisk properties:
a. Enable automatic updates.
b. Run the
ApplyAutoUpdateto determine if the update is immediately applied, or on a scheduled date.c. Enter a class and type for the vDisk.
d. Enter a major, minor, and build number for the vDisk.
Note:
The Serial Number field is set to a random Globally Unique Identifier (GUID) when the vDisk is created. It is for information only and you can edit it. It is not used for processing the automatic update.
-
For target devices using the updated vDisk, select the General tab. In Target Devices Properties set the Class equal to the value of the original vDisk.
-
Ensure that the replacement vDisk is in the same store as the original vDisk.
-
For the replacement disk, select the Auto Update tab, set the following vDisk properties:
a. Only enable automatic updates if this vDisk replaces another vDisk.
b. If automatic updates are enabled, determine if the update is immediately applied. You can alternately schedule when to check for updates by running ApplyAutoUpdate.
c. Enter the same class and type that you entered for the original vDisk.
d. Enter a major, minor, and build number for the vDisk that is higher than the original vDisk.
-
If the vDisk update is required for other farm sites, deliver the replacement vDisk to them. Follow the information described in step 4. This updated vDisk is required in the same store as the original vDisk of the other farm site. See ‘Automatically adding a replacement vDisk’ earlier in this article.
-
Configure the update check. Updated vDisks contain a higher major, minor, and build number that are eligible using one of the following ways:
-
Right-click on the vDisk Pool, select the Check for Automatic Updates menu option, then click OK on the confirmation dialog.
Or
-
Set a timer as described earlier in this article.
-
Automating vDisk updates
vDisk update management is intended for use with Standard Image Mode vDisks only. Private image mode vDisks are updated using normal software distribution tool procedures. Attempting to register a private image mode vDisk for vDisk update management, or switching a vDisk that is already registered, causes errors. In the console, the vDisk Update Management feature is used to configure the automation of vDisk updates using virtual machines (VMs). Automated vDisk updates occur on a scheduled basis, or at any time that the administrator invokes the update directly from the console. This feature supports updates detected and delivered from WSUS and SCCM Electronic Software Delivery (ESD) servers.
When the Site node is expanded in the console tree, the vDisk Update Management feature appears. When expanded, the vDisk Update Management feature includes the following managed components:
- Hosts
- vDisks
- Tasks
Configuring a site for vDisk Update Management requires the following:
- Designate a provisioning server within the site to process updates. See Enabling Automatic vDisk Updates.
-
Configuring a virtual host pool for automated vDisk updates. See Using the Virtual Host Connection Wizard.
Note:
Supported hypervisor types include XenServer (formerly Citrix Hypervisor), Microsoft SCVMM/Hyper-V, VMware vSphere/ESX, and Nutanix.
- Create and configure an ESD VM that used to update the vDisk. See Creating and Configuring ESD Update VMs.
- Configuring vDisks for automated updates. See the Using the Managed vDisk Setup Wizard.
-
Creating and managing update tasks. See Using the Update Task Wizard.
Note:
The user that configures vDisk update management tasks must have permissions to create, modify, and delete Active Directory accounts.
- Run the update task by right-clicking on the task object in the console, and then selecting the Run update now menu option. The update VM boots, install updates, and reboot as necessary. After the update task successfully completes, the virtual machine is automatically shut down. The update status can be checked from the console tree under vDisk Update Management>vDisks>(vDisk name)> Completed Update Status. The status can also be checked using the event viewer or in WSUS.
After configuring the site to use vDisk update management, managed vDisks are updated using the following methods:
- Scheduled – the image update service automatically updates a vDisk, on a scheduled basis as defined in the Update Task.
- User Invoked – select a managed vDisk from the Console’s Run update now menu option. This option requires you to manually start, then stop the Update Device after the update is complete.
Consider the following when automating vDisk updates:
- The vDisk update process starts either automatically (scheduled), or when an administrator right-clicks on a managed vDisk, then selects the Run update now menu option.
- Citrix Provisioning creates a version (VHDX) and places that version in maintenance mode (read/write).
- The virtual machine boots the assigned vDisk. If Scheduled update is configured, vDisk update management performs the boot automatically. For a User invoked update, the administrator invokes the update.
- All updates are automatically made and captured in the new version of the VHDX file.
- After you update the vDisk, the virtual machine is shut down automatically.
- The vDisk is promoted from maintenance to either test or production. The availability of the new vDisk version depends on the access mode that was selected when the Update Task Wizard was run. Or, when the mode is selected on the Update Task Properties’ Finish tab (maintenance, test, or production). After this version is made available in production, target devices will be able to access it the next time they boot that vDisk.
Enabling automatic vDisk updates
To enable automatic vDisk updates:
- Right-click on the Site in the console, then select the Properties menu option. The Site Properties dialog appears.
- On the vDisk Update tab, check the box next to Enable automatic vDisk updates on this site.
- Select the server to run vDisk updates for this site, then click OK.
Managed vDisks can now be automatically updated on this site. Next, virtual host connections must be configured to allow for automatic updates to be made. See Configuring Virtual Host Connections for Automated vDisk Updates.
Configuring virtual host connections for Automated vDisk updates
When you use vDisk update management, a designated hypervisor server is selected from within a virtual pool that is then used to communicate with Citrix Provisioning. Create the designated hypervisor by running the Virtual Host Connection Wizard. If you are running a vCenter server on alternate ports, the following registry modifications must be made to connect to it from Citrix Provisioning:
- Create a registry key named PlatformEsx under HKLM\Software\Citrix\Citrix Provisioning
- Create a string value in the PlatformEsx key named ServerConnectionString and set it to
http://{0}:PORT#/sdk. If you are using port 300,ServerConnectionString=http://{0}:300/sdk.
To configure virtual host connections:
- Under the vDisk Update Management node in the Citrix Provisioning console, right-click on Hosts, then select the Add host… option. The Virtual Host Connection Wizard appears.
- Click Next to begin. The Hypervisor page appears.
- Click the radio button next to the type of hypervisor used by this pool, then click Next. Options include Citrix XenServer, Nutanix, SCVMM/Hyper-V, or vSphere/ESX. The Name/Description page appears.
- Enter the name, and optionally a description, for the Virtual Host Connection then click Next.
- Enter the host name or the IP address of the server to contact. If an ESX hypervisor was selected, optionally specify the data center to use when connecting to the host. Note: It can take several minutes before a hostname/IP address can be reentered, if that hostname/IP was previously entered and then deleted.
- Click Next. The Credentials page appears.
- Enter the appropriate credentials required to connect to this host, then click Next. Specify the following: User name – the account name with appropriate permissions to access the virtual host pool server. Password – password used with this account name. The password must be a maximum of 32 characters. The Confirmation page appears.
- Review the settings to ensure accuracy, then click Finish. Virtual Host Pool properties can be viewed or modified on the Virtual Host Connection Properties dialog.
General tab
| Field | Description |
|---|---|
| Type | The type of virtual host connection that was selected when the Virtual Host Connection Wizard was run. This field cannot be modified. |
| Name | The name to use when referencing this virtual host connection by Citrix Provisioning. |
| Description | A brief description of this virtual host connection. |
| Host | The host name or IP address of the virtual host connection server used by Citrix Provisioning. To use a different port for the ESX server connection, in the server address field, enter the full connection string and include the correct port number. The format for the connection string is http://server_name:port/sdk. Note: If you are running a vCenter server on alternate ports, the following registry modifications must be made to connect to it from Citrix Provisioning: Create a new key HKLM\Software\Citrix\CitrixProvisioning\PlatformEsx. Or, create a string in the PlatformEsx key named ServerConnectionString and set it to http://{0}:PORT#/sdk. If you are using port 300, ServerConnectionString= http://{0}:300/sdk. |
| Data center | Optional. If an ESX hypervisor was selected, optionally specify the data center to use when connecting to the host. |
Credentials tab
| Field | Description |
|---|---|
| Update limit | The account user name required to connect to the virtual host server. |
| Password | The account password that is associated with the user name. The password must be a maximum of 32 characters. |
| Verify Connection Button | Click this button to verify that the user name and password entered are valid and allow communications to the virtual host pool server. |
Advanced tab
| Field | Description |
|---|---|
| Update limit | Controls the number of virtual machines that can concurrently process updates. Any additional updates are queued and start as virtual machines complete processing. |
| Update timeout | The maximum amount of time allowed to perform an update to an image. If the update has not completed before the timeout period, the update is canceled. |
| Shutdown timeout | The maximum amount of time to wait for the virtual machine to shut down. If the virtual machine has not shut-down before the time-out period, the virtual machine forces a shutdown by the server. |
| Port | Sets the IP port number. This field is not available with VMware vSphere/ESX. |
In this article
- Update scenarios
- VHDX chain of differencing disks
- VHDX chain
- Manually updating a vDisk image
- Merging VHDX differencing disks
- Merging to a new base image
- Merging to a consolidated differencing disk
- Merging differencing disks
- Promoting updated versions
- Updating vDisks on target devices
- Automating vDisk updates
- Configuring virtual host connections for Automated vDisk updates
- General tab
- Credentials tab
- Advanced tab