Upgrade
Citrix Provisioning supports upgrading to the latest product version from versions starting with 7.15.
You can upgrade from any Citrix Provisioning™ version to any latest version. However, upgrade 1912 LTSR CU5 to 1912 LTSR CU6 before upgrading to any later version.
Before upgrading a Citrix Provisioning farm:
- Select a maintenance window that has the least amount of traffic
- Back up the Citrix Provisioning database
- Back up all virtual disks
Tip:
- Mirror if you are in a high-availability scenario. For more information, see Database mirroring. No special action is required during the upgrade once the mirroring is set up.
- If you have targets booting from virtual disks in private image mode, or targets booting in maintenance mode, they might not connect or reconnect properly during the upgrade process. Citrix recommends not having any of these targets streaming while upgrading.
When upgrading Citrix Provisioning, consider the following:
- Upgrade to the latest licensing server. Note the following when upgrading the license server:
- License servers are backward compatible and provide the latest security fixes.
- If necessary, upgrade individual licenses. New features require that the Citrix license has a minimum subscription advantage (SA) date. Validate that your license files have the required license types. See Required license types. You might need to return and reallocate your licenses to have the expected licenses available to support all functions.
- Back up the Citrix Provisioning database. While Citrix always tests to ensure a successful database upgrade, unforeseen circumstances might arise. Citrix strongly recommends backing up the database before upgrading.
- Back up the Citrix Provisioning virtual disk. Citrix recommends backing up the virtual disk before upgrading. This process is only necessary if you plan to use reverse imaging with private images.
- When running the installer to update either the server or console components, if an older version of Citrix Provisioning is detected both components are automatically updated.
- Files located in C:\Program Files\Citrix\PowerShell SDK might be missing after upgrading. This issue occurs because the CDF version used by Citrix Provisioning does not match the version used by other components associated with Citrix Virtual Apps and Desktops. As a result, newer CDF files have a lower version number than previous ones. This issue does not affect the functionality of importing CPV device collections into CVAD machine catalogs. To resolve this issue:
- Close Citrix Studio.
- Mount the new Citrix Virtual Apps and Desktops™ ISO.
- In the mounted ISO, navigate to \x64\DesktopStudio.
- Right-click PVS PowerShell SDK x64 to expose a contextual menu.
- Select Repair.
- Run the Repair option. The installation adds the two CDF files as needed.
Upgrade the environment
To upgrade from a previous Citrix Provisioning farm, complete the following procedures:
- Upgrade consoles. The console is a separate executable that can be installed on upgraded servers (PVS_Console.exe or PVS_Console_64.exe). Citrix recommends upgrading the console, followed by the server software for each provisioning server in the farm. Remote consoles can be upgraded at any time.
- Upgrade the first provisioning server in the farm, which upgrades the Citrix Provisioning database.
- Upgrade the remaining provisioning servers within the farm.
- Upgrade vDisks.
Important:
When upgrading a virtual disk within a Citrix Virtual Apps™ and Desktops deployment, upgrade the master target device software before upgrading the VDA software.
Upgrade utilities
The Upgrade Wizard includes the following utilities:
- The UpgradeAgent.exe runs on the target device to upgrade previously installed product software.
- The UpgradeManager.exe runs on the provisioning server to control the upgrade process on the target device.
Upgrading at a glance
The information in this section provides step-by-step guidance for upgrading Citrix Provisioning components. For server upgrade information, see the server article. For information about upgrading vDisks, see vDisks.
Upgrade the console and server
Follow these steps to upgrade the console and server:
-
Run the console and server executables to initiate the upgrade process automatically. Citrix recommends that you upgrade the console first, followed by the server.
Tip:
To keep the Citrix Provisioning farm and target devices running during the upgrade process, use the rolling server upgrade procedure. This process upgrades one Provisioning Server at a time.
-
The rolling server upgrade performs an upgrade on one server at a time.
Note:
While upgrading the Provisioning Server, it cannot service any target device. Ensure that the remaining servers in the farm support the target devices (clients) during the failover process while the upgrading the server.
To perform the rolling upgrade, update the first Provisioning Server in the farm:
a. Open the services MSC file (services.msc) and halt the Citrix PVS Stream Service. This process causes all provisioning targets connected to this server to fail over to other servers in the farm. Once finished, upgrade the Provisioning Server and console components.
b. Upgrade the Citrix Provisioning database. This process is only done once:
- Use dbScript.exe to generate the SQL script. Choose the option to upgrade database and enter the name of the dB. Use that script in SQL Management or SQL command line to upgrade the provisioning database.
- Use the configuration wizard to upgrade the provisioning database; when using this method, consider:
- The Citrix Provisioning Configuration Wizard automatically starts when the Finish button is selected after successfully upgrading the Provisioning Server.
- Use the default settings so that the Citrix Provisioning Configuration Wizard uses the previously configured settings. On the Farm Configuration page, select the option Farm is already configured. After all configuration information is entered, review the information on the Finish page; click Finish to begin configuring the provisioning server. At this point, the provisioning database is not configured. A message appears indicating that the database was upgraded. Click OK to confirm the message and upgrade the database.
- Verify that Citrix Provisioning processes have started using services.msc. Boot a target device to confirm that it can connect to the provisioning server.
Considerations for provisioning database migration using a different SQL server
The Provisioning Console can fail to display the virtual disk attached to a site when migrating a database to a different SQL server. This condition exists when you use the configuration wizard to point to a different SQL server. Despite the console view, the database dbo.disk displays the updated virtual disk entries.
To migrate a database:
- Back up the database.
- Restore the database on the new SQL server.
- Run the configuration wizard and retain the default settings on all pages except the database configuration pages.
- On the Farm Configuration page, select Join existing farm.
- On the Database Server page, select the new database server and instance names. On the Farm Configuration page, the default option is the database imported into the new SQL server.
- In the configuration wizard, choose the defaults for all other options presented by the wizard.
Important:
During the migration to a different SQL server, do not create a site/store. In the preceding sequence, steps 4 and 5 point to the new SQL server, instance, and database.
Upgrade remaining Provisioning servers
After upgrading the first provisioning server, upgrade the remaining servers in the farm:
-
Open the services MSC file (services.msc) and halt the Citrix Provisioning Stream Service. This process causes all provisioning targets connected to this provisioning server to fail over to other provisioning servers in the farm. Once finished, upgrade the provisioning server and console components.
Tip:
Once the server is successfully upgraded, the Citrix Provisioning Configuration Wizard starts automatically after clicking Finish. The provisioning database is only updated after upgrading the first provisioning server.
-
Use the default settings. The Citrix Provisioning Configuration Wizard uses the previously configured settings. On the Farm Configuration page, make sure that the option Farm is already configured is selected. After all configuration information is entered, review the information on the Finish page; click Finish to being configuring the provisioning server.
-
Repeat these steps to finish upgrading all remaining provisioning servers in the farm.
Rebalance Citrix Provisioning clients
After upgrading and configuring all Citrix Provisioning servers, Citrix recommends that you rebalance all provisioning clients (target devices) within the farm. To rebalance provisioning clients:
- Start the Citrix Provisioning console and log into the farm.
- Navigate to the Servers tab.
- Highlight all the provisioning servers that were recently upgraded, right-click to expose a contextual menu.
- Select Rebalance clients.
Upgrade the Citrix Provisioning target device
Citrix Provisioning supports three methods for upgrading target devices:
- In-place upgrade
- Direct VHD\VHDX boot
- Manual upgrade using reverse imaging
Image Portability Service can be used to automate some common Citrix Provisioning operations that cannot be performed while streaming. For more information, see:
- Upgrade PVS: Upgrade PVS takes a VHD(X) from a Citrix Provisioning (PVS) store and upgrades the version of PVS on the image to the version specified in the job request.
-
Reverse Imaging: Reverse Imaging takes a VHD(X) from a Citrix Provisioning (PVS) store, and recreates the original platform image. This allows you to perform any upgrade tasks that you must perform with PVS streaming disabled. You can then use the Image Portability Service
Publishoperation to return the image to the PVS environment.
For information on migrating workloads using Image Portability Service, see Migrate workloads between Resource Locations using Image Portability Service.
Important:
- Citrix strongly recommends backing up the virtual disk if versioning is not used in the upgrade process.
When using Citrix Provisioning target installers:
- If the system is running, run the new target installer. It must be the same version installed on the target device. This process effectively allows the installer to take care of the upgrade.
In-place upgrades
For in-place upgrades, a maintenance version of the virtual disk is interchangeable with the private image. However, Citrix recommends that you take advantage of Citrix Provisioning versioning to perform an in-place upgrade.
To perform an in-place upgrade:
- Create a maintenance version of the virtual disk.
- Using the provisioning console, navigate to the device’s properties and set the device type to Maintenance.
- In the Boot menu, select option 1 to boot a client into virtual disk mode using the maintenance version.
- Log into Windows and run the new target device installer. Install the software and perform a full installation. The target device installer performs the upgrade. Do not run the imaging wizard. Reboot the target device when prompted.
- Once Windows has loaded, log in to the system and verify that the target device software is the expected version by viewing the status tray. If the status tray is hidden by Windows, locate it by clicking the up arrow on the status tray icon.
- Shut down the target device.
- If versioning is invoked, use the provisioning console to promote the maintenance version to test version functionality. Verify the new version and promote it to the production version when it is deemed production quality. Roll this version out to users by rebooting all the target devices using this virtual disk.
Upgrading using VHD\VHDX boot
When using method to upgrade a target device, consider:
- XenServer(formerly Citrix Hypervisor™) only supports .vhd
- Hyper-V 2012 and 2008 R2 only support .vhd
- Hyper-V 2012 R2 and 2016 supports both .vhd and .vhdx
-
Obtain the .vhdx file. Consider:
- If the virtual disk does not have a version, copy the .vhdx file to the Hyper-V server or import the file to XenServer using XenCenter® (Files > Import).
- If the virtual disk has a version, perform a base merge and create a .vhdx file in maintenance mode.
-
Perform a direct VHD boot using XenServer®:
a. Copy the .vhd file to a system running XenCenter and import the file to XenServer using Files > Import.
b. Create a VM using the imported .vhd file. Refer to the Importing and Exporting VMs section of the Citrix Virtual Apps and Desktops documentation for more information.
c. Boot the VM.
d. Upgrade the target device software. See the information at the beginning of this section for using the Citrix Provisioning target device installers.
-
Perform a direct VHD\VHDX boot using Hyper-V:
-
Copy the .vhdx file to the Hyper-V server, or
-
Create a Hyper-V VM using the “Use an existing virtual hard disk” and point to the .vhdx file. For Hyper-V 2012 R2 and 2016, ensure that the generated VM matches those VMs of the virtual disk:
- Generation 2 = UEFI VMs and systems
For more information, see Create a virtual machine in Hyper-V.
-
Boot the VM.
-
Upgrade the target device software. Upgrade the target device software. See the information at the beginning of this section for using the Citrix Provisioning target device installers.
-
-
Copy the .vhdx.vhd file back to the virtual disk store location where it was originally located:
- If the .vhdx.vhd file is taken from a based merge version, the file is ready for testing and verification.
- If the file is copied from the base virtual disk, import the virtual disk into the provisioning database using the Add or import Existing vDisk option. Run this option from the virtual disk Pool\Store level in the provisioning console.
Upgrading using manual reverse imaging with P2PVS
Use the information in this section to upgrade Citrix Provisioning using reverse imaging with P2PVS.
The following table illustrates supported upgrade methods:
| Reverse imaging method | Xen tools | VM tools | Hyper-V compatibility | NIC driver | Windows 10 upgrade | Antivirus updates | Firewall/Network security software |
|---|---|---|---|---|---|---|---|
| P2PVS reverse imaging | x | x | x | x | x | x | x |
| VHD boot from hypervisor | x | x | x | x | |||
| Direct VHD boot | x | x | x | x | x | x |
-
Boot the Citrix Provisioning target device into the virtual disk using private\maintenance mode.
-
Install PVS_UpgradeWizard.exe or PVS_UpgradeWizard_x64.exe from the Upgrade folder of the ISO image. This folder is located in the latest Citrix Provisioning release area (containing the latest P2PVS.exe file). The upgrade wizard can also be installed through the Citrix Provisioning meta-installer using the Target Device Installation > Install Upgrade Wizard option.
-
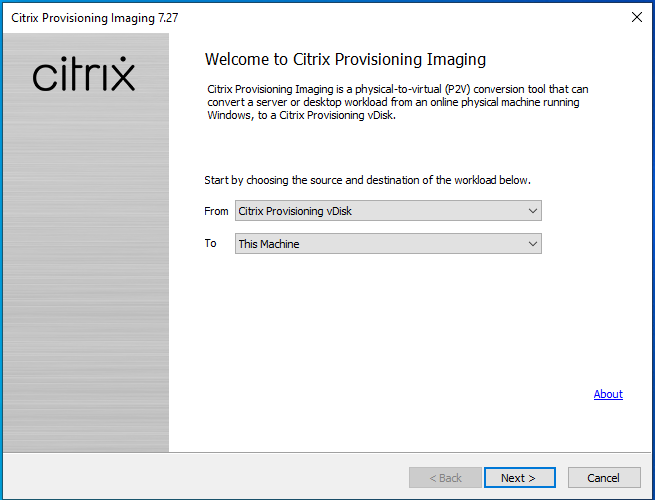
Run P2PVS.exe from the Citrix Provisioning upgrade wizard directory. By default, this file is located in C:\Program Files\Citrix\Citrix Provisioning Upgrade Wizard.
-
Click the From drop-down menu to choose the Citrix Provisioning virtual disk. Click Next.
-
In the partition screen, select the partitions undergoing reverse imaging. All system partitions, regardless of whether they have a drive letter or not, are used in reverse imaging. Click Next.
-
Click Convert on the final page to being reverse imaging.
Note:
When using reverse imaging, consider:
- reverse imaging for UEFI systems is destructive. All partitions on the local hard disk are destroyed and re-created to match those of the virtual disk.
-
Once reverse imaging finishes, reboot the VM from hard disk without network booting.
-
Upgrade the target device. Refer to the information at the beginning of this section for more information.
-
Image the OS to virtual disk again. You can accomplish this imaging by creating a virtual disk or using the existing one.
Using reverse imaging to upgrade Windows 10 machines
To upgrade a Windows 10 image using reverse imaging:
- Create a target device with a virtual hard disk that is the same size or bigger than the virtual disk.
- Network boot (PXE/ISO) the VM into the virtual disk using maintenance version or private image mode.
- Run P2PVS.exe from the Citrix Provisioning target device\ Upgrade Wizard directory. By default, this directory is C:\Program Files\Citrix\Citrix Provisioning, or C:\Program Files\Citrix\Citrix Provisioning Upgrade Wizard, respectively.
- Click the From drop-down menu and choose Citrix Provisioning vDisk and click Next.
- In the partition screen, select the partitions for reverse imaging. All system partitions, regardless of whether they have a drive letter or not, are used in reverse imaging. Click Next.
- Click Convert on the last page to begin reverse imaging.
- Once reverse imaging has completed successfully, set the VM to boot from HDD and reboot the VM.
- Uninstall the Citrix Provisioning target device.
-
Shut down the VM.
Note:
The amount of free space in the c:\ partition. Some used space can be freed up by deleting the Windows.old folder in C:. Refer to the Windows Support page for more information.
-
Judging by the free space on the C:\ partition, increase the size of the VM’s hard disk if needed.
Note:
If this operating system is Windows 10 1607 (code name Redstone 1 or Anniversary Update), Windows 10 update will create another system partition after the C:\ partition. Currently, it is not possible to increase the size of the C:\ partition.
- Boot the VM. Please note the local admin of the VM and remember the local admin password.
- Run Windows 10 update to upgrade Windows 10.
- Use local admin credentials to log in since the Windows 10 upgrade process can impact the active directory.
- Rejoin the VM to the active directory if needed.
- Install new drivers and more Windows updates if needed.
- Once updates are done, install Citrix Provisioning target device software.
- Use the Imaging Wizard or P2PVS to create a virtual disk. The old virtual disk can be used if the size of the VM’s virtual hard disk has not been increased in step 11.