Export and import the StoreFront configuration
Note:
You can only import StoreFront configurations which are exactly the same StoreFront version as the target StoreFront installation. Each Cumulative Update is considered to be different product version for this limitation.
You can export the entire configuration of a StoreFront deployment. This includes both single server deployments and server group configurations. If an existing deployment is already present on the importing server, the current configuration is erased and then replaced by the configuration contained within the backup archive. If the target server is a clean factory default installation, a new deployment is created using the imported configuration stored within the backup. The exported configuration backup is in the form of a single .zip archive if unencrypted, or a .ctxzip if you choose to encrypt the backup file when it is created.
Scenarios where configuration export and import can be used
- Only backup StoreFront deployments in a working and trusted state. Any changes to the configuration requires a new backup to be taken to replace the old one. You cannot modify existing backups as a file hash of the backup.zip file prevents modification.
- Backup BEFORE upgrading StoreFront for disaster recovery.
- Cloning existing testing StoreFront deployments to put into production
- Creating user acceptance environments by cloning production deployments into a test environment.
- Moving StoreFront during OS migrations such as upgrading the hosting from Window Server 2019 to Windows 2022. In-place OS upgrades are not supported.
- Building extra server groups in multigeo deployments such as in large enterprises with multiple datacenters.
Things to consider when exporting and importing a StoreFront configuration
- Do you currently use any Citrix published authentication SDK examples, such as Magic Word authentication or third party authentication customizations? If so, you must install these packages on ALL importing servers BEFORE importing a configuration containing extra authentication methods. The configuration import fails if required authentication SDK packages are not installed on any of the importing servers. If importing a configuration into a server group, install the authentication packages on all members of the group.
- You can encrypt or decrypt your configuration backups. The exporting and importing PowerShell cmdlets support both use cases.
- You can decrypt encrypted backups (.ctxzip) later, but StoreFront cannot re-encrypt unencrypted backup files (.zip). If an encrypted backup is required, perform the export again using a PowerShell credential object containing a password of your choice.
- The SiteID of the website in IIS where StoreFront is currently installed (exporting server) must match the SiteID of the target website in IIS (importing server) where you want to restore the backed up StoreFront configuration.
PowerShell cmdlets
Export-STFConfiguration
| Parameter | Description |
|---|---|
| -TargetFolder (String) | The export path to the backup archive. Example: “$env:userprofile\desktop\” |
| -Credential (PSCredential Object) | Specify a credential object to create an encrypted .ctxzip backup archive during export. The PowerShell credential object should contain the password to use for encryption and decryption. Do not use -Credential at the same time as the -NoEncryption parameter. Example: $CredObject |
| -NoEncryption (Switch) | Specify that the backup archive should be an unencrypted .zip. Do not use -NoEncryption at the same time as the -Credential parameter. |
| -ZipFileName (String) | The name for the StoreFront configuration backup archive. Do not add a file extension, such as .zip or .ctxzip. The file extension is added automatically depending on whether the -Credential or -NoEncryption parameter is specified during export. Example: “backup” |
| -Force (Boolean) | This parameter automatically overwrites backup archives with the same file name as existing backup files already present in the specified export location. |
Important:
The SiteID parameter found in StoreFront 3.5 was deprecated in version 3.6. It is no longer necessary to specify the SiteID when performing an import, as the SiteID contained within the backup archive is always be used. Ensure the SiteID matches the existing StoreFront website already configured within IIS on the importing server. SiteID 1 to SiteID 2 configuration imports are NOT supported.
Import-STFConfiguration
| Parameter | Description |
|---|---|
| -ConfigurationZip (String) | The full path to the backup archive you want to import. This should also include the file extension. Use .zip for unencrypted and .ctxzip for encrypted backup archives. Example: $env:userprofile\desktop\backup.ctxzip
|
| -Credential (PSCredential Object) | Specify a credential object to decrypt an encrypted backup during import. Example: $CredObject
|
| -HostBaseURL (String) | If this parameter is included, the Host base URL you specify is used instead of the Host base URL from the exporting server. Example: https://<importingserver>.example.com
|
Unprotect-STFConfigurationBackup
| Parameter | Description |
|---|---|
| -TargetFolder (String)
-Credential (PSCredential Object) |
The export path to the backup archive. Example: $env:userprofile\desktop
Use this parameter to create an unencrypted copy of the encrypted backup archive. Specify the PowerShell credential object containing the password to use for decryption. Example: $CredObject
|
| -EncryptedConfigurationZip (String) | The full path of the encrypted backup archive you want to decrypt. You must specify the file extension .ctxzip. Example: $env:userprofile\\desktop\\backup.ctxzip
|
| -OutputFolder (String)
-Force (Boolean) |
The path to create an unencrypted copy (.zip) of the encrypted (.ctxzip) backup archive. The original encrypted copy of the backup is retained so it can be reused. Do not specify a file name and file extension for the unencrypted copy. Example: $env:userprofile\desktop
This parameter automatically overwrites backup archives with the same file name as existing backup files already present in the specified export location. |
Configuration export and import examples
Import the StoreFront cmdlets into the current PowerShell session
Open the PowerShell Integrated Scripting Environment (ISE) on the StoreFront server and run:
$env:PSModulePath = [Environment]::GetEnvironmentVariable('PSModulePath','Machine')
$SDKModules = 'C:\Program Files\Citrix\Receiver StoreFront\PowerShellSDK\Modules\Citrix.StoreFront'
Import-Module "$SDKModules\Citrix.StoreFront.psd1" -verbose
Import-Module "$SDKModules.Authentication\Citrix.StoreFront.Authentication.psd1" -verbose
Import-Module "$SDKModules.Roaming\Citrix.StoreFront.Roaming.psd1" -verbose
Import-Module "$SDKModules.Stores\Citrix.StoreFront.Stores.psd1" -verbose
Import-Module "$SDKModules.WebReceiver\Citrix.StoreFront.WebReceiver.psd1" -verbose
<!--NeedCopy-->
Single server scenarios
Create an unencrypted backup of an existing configuration on Server A and restore it onto the same deployment
Export the configuration of the server you wish to back up.
Export-STFConfiguration -targetFolder "$env:userprofile\desktop\" -zipFileName "backup" -NoEncryption
<!--NeedCopy-->
Copy the backup.zip file to a safe location. You can use this backup for disaster recovery to restore the server to its previous state.
Import-STFConfiguration -configurationZip "$env:userprofile\desktop\backup.zip" -HostBaseURL "https://storefront.example.com"
<!--NeedCopy-->
Back up an existing configuration on Server A and restore it onto Server B to create a clone of an existing server
Export the configuration of the server you wish to back up.
Export-STFConfiguration -targetFolder "$env:userprofile\desktop\" -zipFileName "backup" -NoEncryption
<!--NeedCopy-->
Copy the backup.zip file to the desktop of server B.
Import-STFConfiguration -configurationZip "$env:userprofile\desktop\backup.zip" -HostBaseURL "https://serverB.example.com"
<!--NeedCopy-->
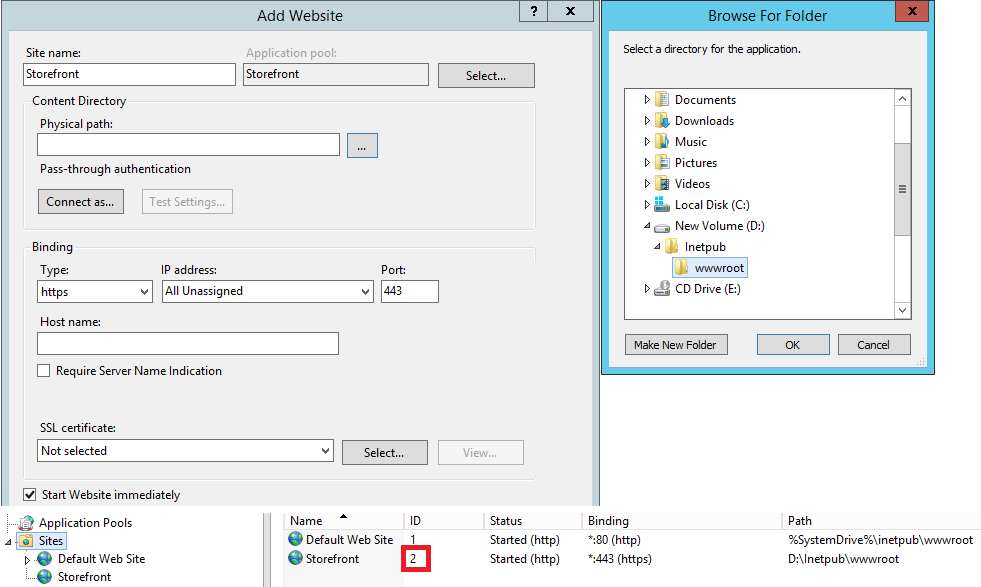
StoreFront is already deployed onto a custom website in IIS. Restore the configuration onto another custom website deployment
Server A has StoreFront deployed on a custom website location rather than the usual default website within IIS. The IIS SiteID for the second website created in IIS is 2. The StoreFront website’s physical path can be on another nonsystem drive such as d:\ or on the default c:\ system drive but should use an IIS SiteID greater than 1.
A new website called StoreFront has been configured within IIS, which uses SiteID = 2. StoreFront is already deployed on the custom website in IIS with its physical path on drive d:\inetpub\wwwrooot.
- Export a copy of the Server A configuration.
- On Server B, configure IIS with a new website called StoreFront, which also uses SiteID 2.
-
Import the Server A configuration onto Server B. The site ID contained in the backup is used and must match the target website where you want to import the StoreFront configuration.
Import-STFConfiguration -configurationZip "$env:userprofile\desktop\backup.ctxzip" -HostBaseURL "https://serverB.example.com"
<!--NeedCopy-->
Server group scenarios
Scenario 1: Backup an existing server group configuration and restore it later onto the same server group deployment
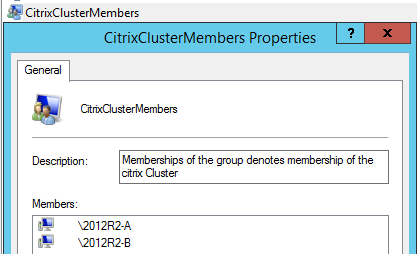
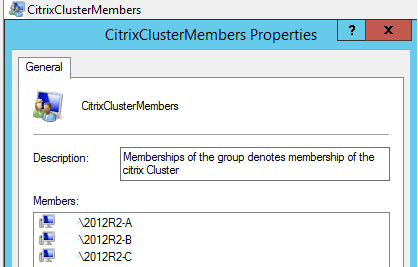
A previous configuration backup was taken while only two StoreFront servers, 2012R2-A and 2012R2-B, were members of the server group. Within the backup archive is a record of the CitrixClusterMembership at the time the backup was taken containing only the two original servers 2012R2-A and 2012R2-B. The StoreFront server group deployment has subsequently increased in size since the original backup was taken due to business demand, so an additional node 2012R2-C has been added to the server group. The underlying StoreFront configuration of the server group held in the backup has not changed. The current CitrixClusterMembership of three servers must be maintained even if an old backup containing only the two original server group nodes is imported. During import the current cluster membership is preserved and then written back once the configuration has been successfully imported onto the primary server. The import also preserves the current CitrixClusterMembership if server group nodes were removed from the server group since the original backup was taken.
-
Export the Server Group 1 configuration from 2012R2-A, which is the primary server used to manage the entire server group.
-
Later you add an additional server, 2012R2-C to the existing server group.
-
The configuration of the server group must be restored to a known previously working state. StoreFront backs up the current CitrixClusterMembership of three servers during the import process, and then restores it after the import has succeeded.
-
Import the Server Group 1 configuration back onto node 2012R2-A.
Import-STFConfiguration -configurationZip "$env:userprofile\desktop\backup.ctxzip" -HostBaseURL "https://servergroup1.example.com" <!--NeedCopy--> -
Propagate the newly imported configuration to the entire server group, so all servers have a consistent configuration after import.
Scenario 2: Backup an existing configuration from Server Group 1 and use it to create a new Server Group on a different factory default installation. You can then add other new server group members to the new primary server
Server Group 2 is created containing two new servers, 2012R2-C and 2012R2-D. The Server Group 2 configuration will be based on the configuration of an existing deployment, Server Group 1, which also contains two servers 2012R2-A and 2012R2-B. The CitrixClusterMembership contained within the backup archive is not used when creating a new server group. The current CitrixClusterMembership is always backed up and then restored after the import is successful. When creating a new deployment using an imported configuration, the CitrixClusterMembership security group contains only the importing server until additional servers are joined to the new group. Server Group 2 is a new deployment and intended to coexist alongside Server Group 1. Specify the -HostBaseURL parameter. Server Group 2 will be created using a new factory default StoreFront installation.
-
Export the Server Group 1 configuration from 2012R2-A, which is the primary server used to manage the entire server group.
-
Import the Server Group 1 configuration onto node 2012R2-C, which will be the primary server used to manage the newly created Server Group 2.
Import-STFConfiguration -configurationZip "$env:userprofile\desktop\backup.ctxzip" -HostBaseURL "https://servergroup2.example.com" <!--NeedCopy--> -
Join any additional servers that will be part of the new Server Group 2 deployment. Propagation of the newly imported configuration from Server Group 1 to all new members of Server Group 2 is automatic, as this forms part of the normal join process when a new server is added.
Scenario 3: Backup an existing configuration from Server Group A and use it to overwrite the existing Server Group B configuration
Server Group 1 and Server Group 2 already exist in two separate data centers. Many StoreFront configuration changes are made on Server Group 1, which you should apply to Server Group 2 in the other data center. You can port the changes from Server Group 1 to Server Group 2. Do not use the CitrixClusterMembership within the backup archive on Server Group 2. Specify the -HostBaseURL parameter during import, as the Server Group 2 host base URL should not be changed to the same FQDN that is currently in use by Server Group 1. Server Group 2 is an existing deployment.
-
Export the Server Group 1 configuration from 2012R2-A, which is the primary server used to manage the entire server group.
-
Import the Server Group 1 configuration onto the factory default installation on node 2012R2-C, which will be the primary server of the new Server Group 2.
Import-STFConfiguration -configurationZip "$env:userprofile\desktop\backup.zip" -NoEncryption -HostBaseURL "https://servergroup2.example.com"
<!--NeedCopy-->
Create an encrypted backup of your server configuration
A PowerShell credential object comprises both a Windows account username and a password. PowerShell credential objects ensure that your password stays protected in memory.
Note:
To encrypt a configuration backup archive, you need only the password to perform encryption and decryption. The username stored within the credential object is not used. You must create a credential object containing the same password within the PowerShell session that is used on both the exporting and importing servers. Within the credential object you can specify any user.
PowerShell requires that you specify a user when creating a new credential object. This example code obtains the currently logged on Windows user for convenience.
Create a PowerShell Credential Object within your Powershell session on the exporting server.
$User = [System.Security.Principal.WindowsIdentity]::GetCurrent().Name
$Password = "Pa55w0rd"
$Password = $Password | ConvertTo-SecureString -asPlainText -Force
$CredObject = New-Object System.Management.Automation.PSCredential($User,$Password)
<!--NeedCopy-->
Export the configuration to backup.ctxzip which is an encrypted zip file.
Export-STFConfiguration -targetFolder "$env:userprofile\desktop\" -zipFileName "backup" -Credential $CredObject
<!--NeedCopy-->
Create an identical PowerShell Credential Object within your Powershell session on the importing server.
Import-STFConfiguration -configurationZip "$env:userprofile\desktop\backup.ctxzip" -Credential $CredObject -HostBaseURL "https://storefront.example.com"
<!--NeedCopy-->
Unprotect an existing encrypted backup archive
$User = [System.Security.Principal.WindowsIdentity]::GetCurrent().Name
$Password = "Pa55w0rd"
$Password = $Password | ConvertTo-SecureString -asPlainText -Force
$CredObject = New-Object System.Management.Automation.PSCredential($User,$Password)

Unprotect-STFConfigurationExport -encryptedConfigurationZip "$env:userprofile\desktop\backup.ctxzip" -credential $CredObject -outputFolder "c:\StoreFrontBackups" -Force
<!--NeedCopy-->