Manage the resources made available in stores
Use the Manage delivery controllers screen to add, modify, and delete resource feeds provided by Citrix Virtual Apps and Desktops, Citrix Desktops as a Service, and Citrix Secure Private Access.
View resource feeds
- From within the Citrix StoreFront management console, in the left pane select the Stores node.
- Select a store in the results pane
- In the Actions pane, click Manage delivery controllers.
View resource feeds using the PowerShell SDK
With the PowerShell SDK, use the command Get-STFStoreFarm to list all resource feeds or a specific resource feed.
Add resource feeds
Add resource feeds for Citrix Virtual Apps and Desktops
-
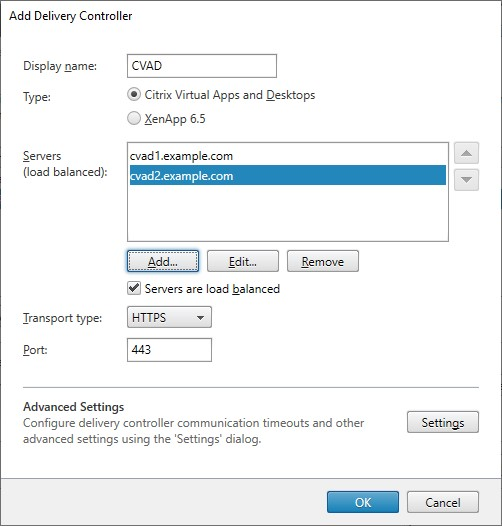
In the Manage delivery controllers screen, click Add.
-
Enter a Display name that helps you to identify the feed.
-
Select the Type as Citrix Virtual Apps and Desktops.
-
Under Servers click Add and enter the name of the delivery controller. Repeat for each delivery controller. Citrix recommends that you have at least two servers for load balancing or failover.
-
Citrix recommends that you select the option Servers are load balanced. This causes StoreFront to distribute the load between all delivery controllers or connectors by selecting a server from the list at random during each launch. If this option is not selected, then the servers list is treated as a failover list in priority order. In this case 100% of launches occur on the first active Delivery Controller or connector in the list. If that server goes offline, 100% of launches occur using the second in the list, and so on.
-
From the Transport type list, select the type of connections for StoreFront to use for communications with the servers.
- To send data over unencrypted connections, select HTTP. If you select this option, you must make your own arrangements to secure connections between StoreFront and your servers.
- To send data over encrypted connections (recommended), select HTTPS. If you select this option for Citrix Virtual Apps and Desktops servers, ensure that the Citrix XML Service is set to share its port with Microsoft Internet Information Services (IIS) and that IIS is configured to support HTTPS.
Note:
If you’re using HTTPS to secure connections between StoreFront and your servers, ensure that the names you specify in the servers list match exactly (including the case) the names on the certificates for those servers.
-
Specify the port for StoreFront to use for connections to the servers. The default port is 80 for HTTP connections and 443 for HTTPS connections. The specified port must be the port used by the Citrix XML Service.
-
Press OK
-
If you have configured Security keys (recommended), then you must add the key using PowerShell. This is only available in CU2 or higher. For example:
$store = Get-STFStoreService -VirtualPath [Path to store]
$farm = Get-STFStoreFarm -StoreService $store -FarmName [Resource feed name]
Set-STFStoreFarm -Farm $farm -XMLValidationEnabled $true -XMLValidationSecret [Security key]
Add resource feeds for Citrix Desktops as a Service
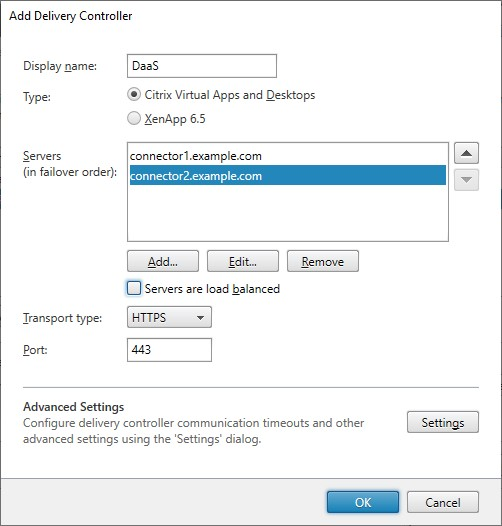
- In the Manage delivery controllers screen, click Add.
- Enter a Display name that helps you to identify the feed.
- Select the Type as Citrix Virtual Apps and Desktops.
- Under Servers click Add and enter the name of a cloud connector. Repeat for each server or connector. Citrix recommends that you have at least two connectors for redundancy. From CU1, if you have multiple resource locations, Citrix recommends that you add the cloud connectors from all resource locations so that in the event of an outage StoreFront can use the local host cache to launch VDAs at the appropriate location.
- If you have connectors from multiple locations, Citrix recommends that you put the connectors with the lowest latency to the StoreFront server at the top of the list and clear the option Servers are load balanced. As the connectors are only proxying information to DaaS delivery controllers, there is limited benefit from using load balancing.
-
From the Transport type list, select the type of connections for StoreFront to use for communications with the servers.
- To send data over unencrypted connections, select HTTP. If you select this option, you must make your own arrangements to secure connections between StoreFront and your cloud connectors.
- To send data over encrypted connections (recommended), select HTTPS. If you select this option for you must ensure that the cloud connectors are configured for HTTPS.
Note:
If you’re using HTTPS to secure connections between StoreFront and your servers, ensure that the names you specify in the servers list match exactly (including the case) the names on the certificates for those servers.
-
Specify the port for StoreFront to use for connections to the servers. The default port is 80 for HTTP connections and 443 for HTTPS connections.
-
Press OK.
-
If you have configured Security keys (recommended), then you must add the key using PowerShell. This is only available in CU2 or higher. For example:
$store = Get-STFStoreService -VirtualPath [Path to store]
$farm = Get-STFStoreFarm -StoreService $store -FarmName [Resource feed name]
Set-STFStoreFarm -Farm $farm -XMLValidationEnabled $true -XMLValidationSecret [Security key]
Add resource feeds for XenApp 6.5
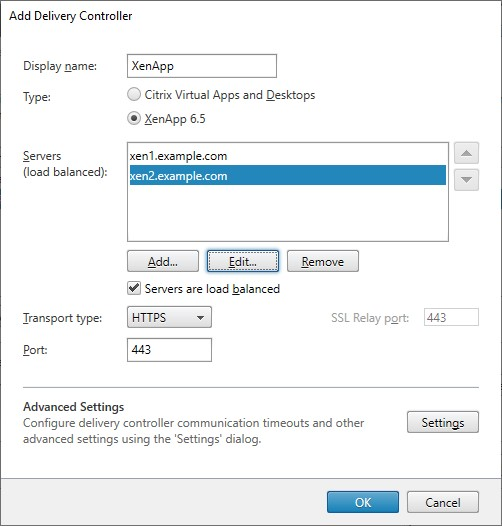
- Enter a Display name that helps you to identify the feed.
- Select the Type as Citrix Secure Private Access.
- Enter the Citrix Secure Private Access server name.
- From the Transport type list, select the type of connections for StoreFront to use for communications with the servers.
- To send data over unencrypted connections, select HTTP. If you select this option, you must make your own arrangements to secure connections between StoreFront and your servers.
- To send data over secure HTTP connections using Secure Sockets Layer (SSL) or Transport Layer Security (TLS), select HTTPS.
- To send data over secure connections to Citrix Virtual Apps servers using the SSL Relay to perform host authentication and data encryption, select SSL Relay. You must also enter an SSL relay port
- Specify the port for StoreFront to use for connections to the servers. The default port is 80 for HTTP or SSL relay connections and 443 for HTTPS connections.
- Press OK.
Create a resource feed using the PowerShell SDK
To add a resource feed, use the command Add-STFStoreFarm
- For Citrix Virtual Apps and Desktops or Citrix Desktops as a Service, set
FarmTypetoXenDesktop. - For XenApp 6.5, set
FarmTypetoXenApp.
Modify a resource feed
In the Manage delivery controllers screen, select a resource feed and click Edit.
Modify a resource feed using the PowerShell SDK
To modify a resource feed using PowerShell, use command Set-STFStoreFarm
Delete a resource feed
In the Manage delivery controllers screen, select a resource feed and click Remove.
Delete a resource feed using the PowerShell SDK
To delete a resource feed using PowerShell, use command Remove-STFStoreFarm
Health check and server bypass behavior
To improve performance when some of the servers providing resources become unavailable, StoreFront temporarily bypasses servers that fail to respond. While a server is being bypassed, StoreFront ignores that server and does not use it to access resources. This avoids delays trying to connect to servers that are unavailable.
Use these parameters to specify the duration of the bypass behavior:
- Background health-check polling period - Specifies how often StoreFront checks whether each server is available. Default is 1 minute. To configure this see Background health check polling period.
- Bypass duration - When the background health check is enabled, this should be set to at least the polling period but beyond that the value has no impact. If background health-check is disabled (not recommended) then the servers will be bypassed until the duration expires. Defaults to 60 minutes.
- All failed bypass duration - Only used when background health-check is disabled (not recommended). Specifies a reduced duration in minutes that StoreFront uses instead of Bypass duration if all servers for a particular Delivery Controller are being bypassed. The default is 0 minutes meaning that StoreFront does not bypass any servers.
To change the bypass parameters
Normally there is no need to modify these settings.
- From within the Citrix StoreFront management console, in the left pane select the Stores node.
- Select a store in the results pane.
- In the Actions pane, click Manage Delivery Controllers.
- Select a controller, click Edit, and then click Settings on the Edit Delivery Controller screen.
- Under Advanced Settings click Settings.
- In the Configure Advanced Settings dialog:
- On the All failed bypass duration row, click in the second column and enter a time, in minutes, for which a Delivery Controller is considered offline after all its servers fail to respond.
- On the Bypass duration row, click in the second column and enter a time, in minutes, for which a single server is considered offline after it fails to respond.
Map users to resource feeds
By default, users accessing a store see an aggregate of all the resources available to them from all the resource feeds configured for that store. To provide different resources for different users, you can configure separate stores or even separate StoreFront deployments. Alternatively, you can provide access to particular deployments on the basis of users’ membership of Microsoft Active Directory groups. This enables you to configure different experiences for different user groups through a single store.
For example, you can group common resources for all users on one deployment and finance applications for the Accounts department on another deployment. In such a configuration, a user who is not a member of the Accounts user group sees only the common resources when accessing the store. A member of the Accounts user group is presented with both the common resources and the finance applications.
Alternatively, you can create a deployment for power users that provides the same resources as your other deployments, but with faster and more powerful hardware. This enables you to provide an enhanced experience for business-critical users, such as your executive team. All users see the same desktops and applications when they log on to the store, but members of the Executives user group are preferentially connected to resources provided by the power user deployment.
Note:
This filters entire resource feeds. In addition, within a resource feed, applications may be filtered by user group within Citrix Virtual Apps and Desktops Studio configuration.
To configure specific resource feeds for particular user groups:
-
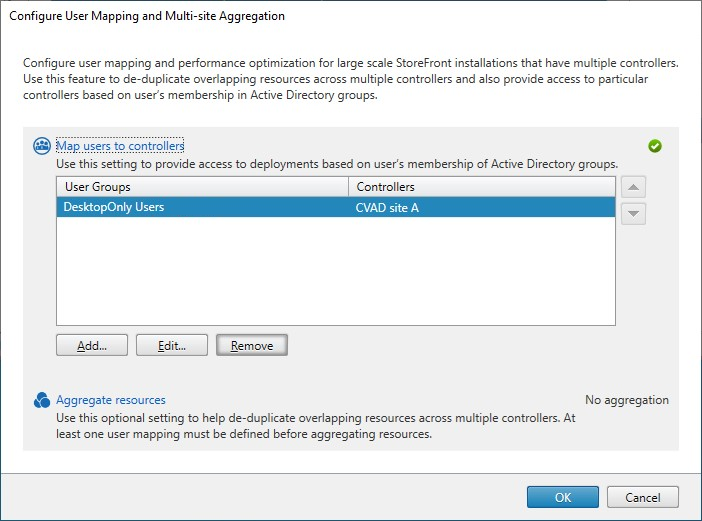
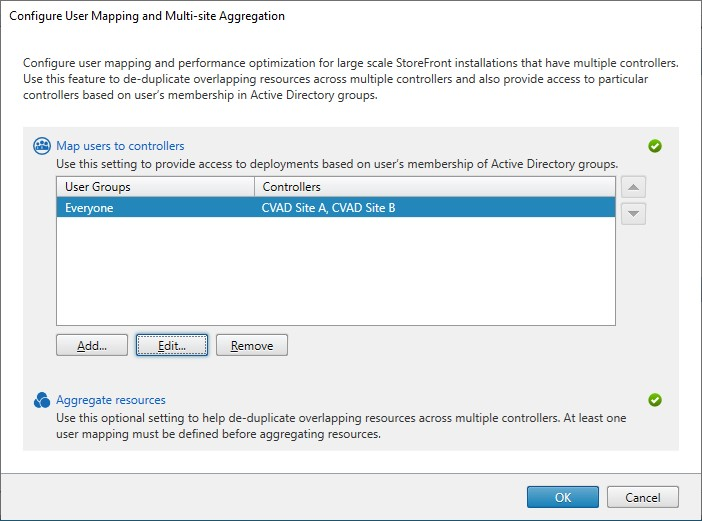
From the Manage delivery controllers screen, under User Mapping and Multi-Site Aggregation Configuration, click Configure. This option is only available if two or more resource feeds are configured.
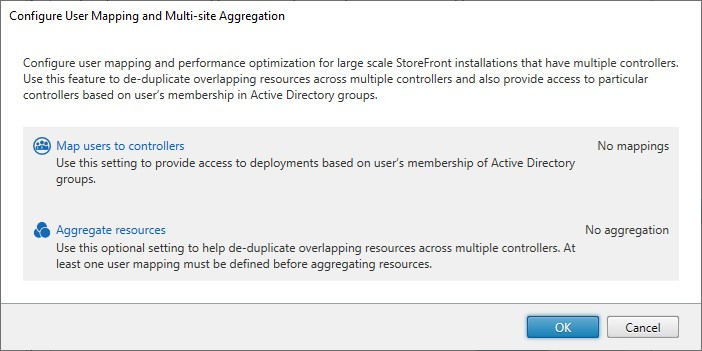
This opens the Configure User Mapping and Multi-site Aggregation screen.
-
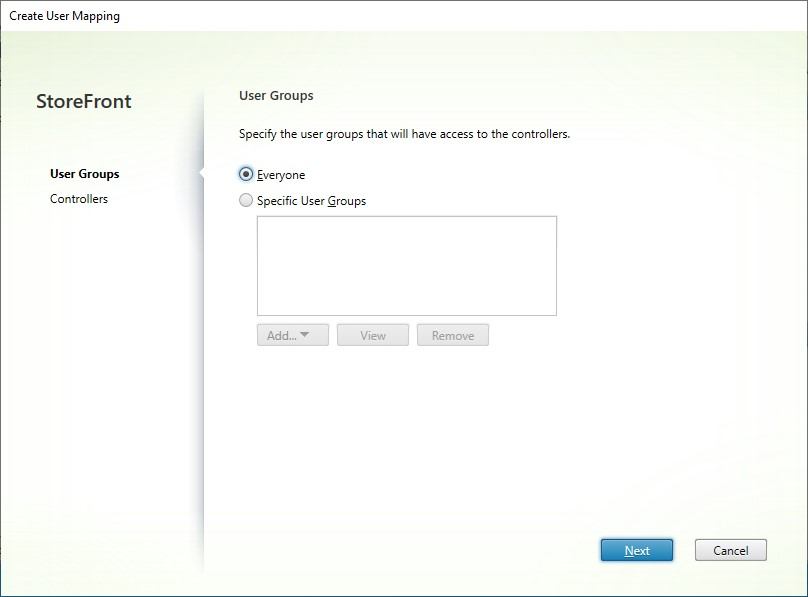
Click Map users to controllers. This opens the Create User Mapping screen to create your first mapping. You will be able to create further mappings later.
-
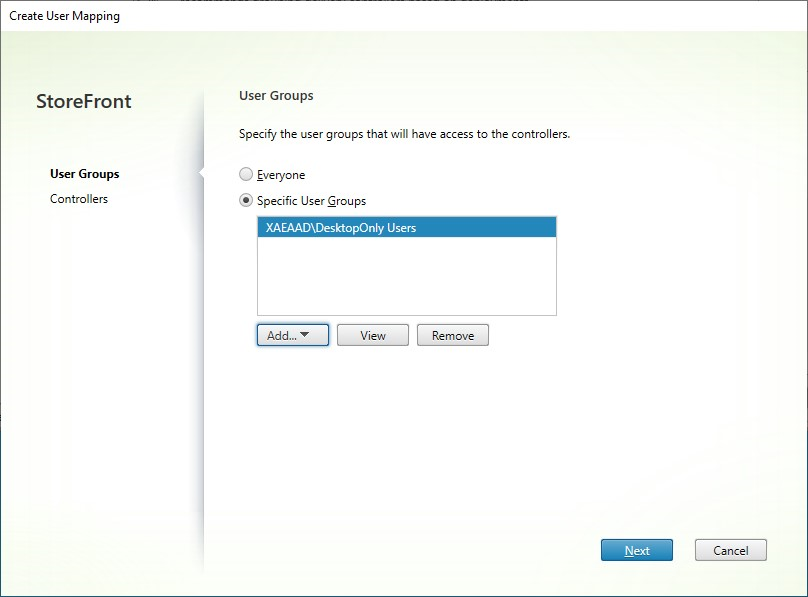
Either choose Everyone or choose Specific User Groups and add one or more group.
-
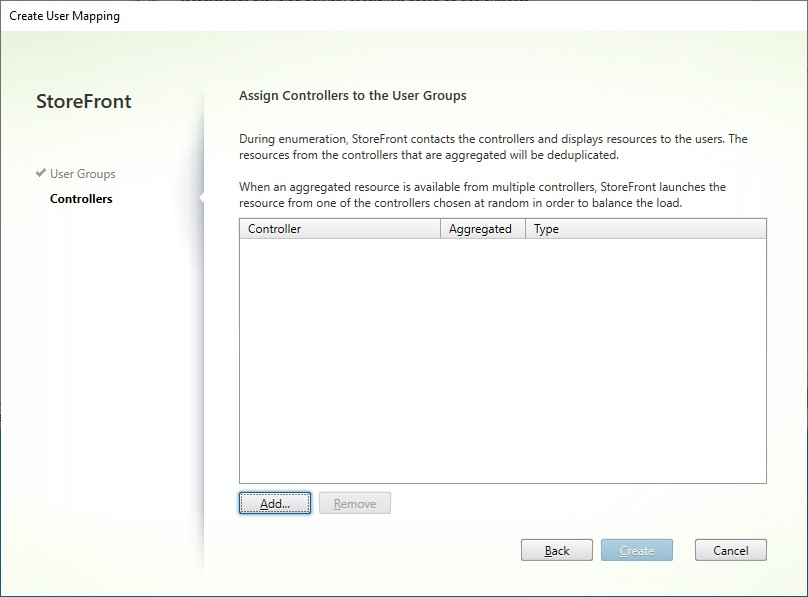
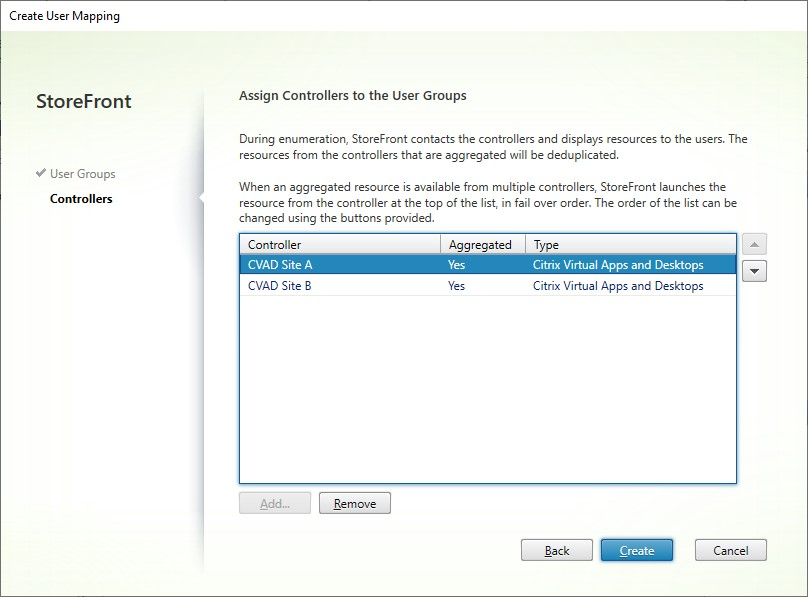
Click Next. This takes you to the Controllers tab.
-
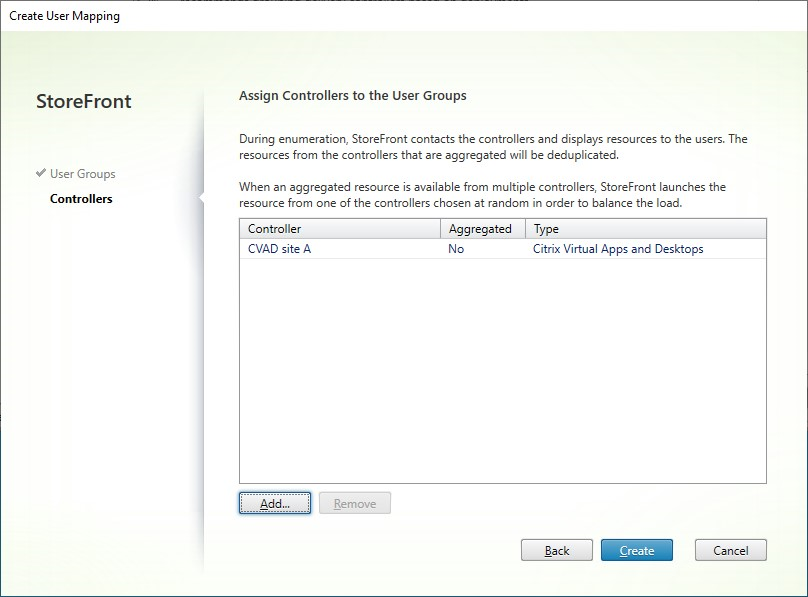
Click Add and add one ore more controller.
-
Click Create.
-
Click Add… to create further mappings as required.
Map users to resources using PowerShell SDK
You can map users to resources using the PowerShell SDK
-
For each resource feed, create an EquivalentFarmset. All resource feeds must be part of a farmset, otherwise they will not be available to any user. Call New-STFEquivalentFarmset with the following parameters:
-
Name- a unique name for the EquivalentFarmSet -
PrimaryFarms- the name of non-aggregated resource feed (farm).
-
-
For each set of users who require access to a different set of resource feeds, create mappings between those users and each of the EquivalentFarmSets. To create the UserFarmMapping, call Add-STFUserFarmMapping with the following parameters:
-
StoreService- The Store service to add the UserFarmMapping to. -
Name- A unique name for the mapping. -
GroupMembers- A hashtable containing the names and SIDs of the user groups that are part of the mapping. The name is used for display only; the SID defines the group. To add all users, create a single entry in the hashtable with nameEveryoneand valueEveryone. -
EquivalentFarmSet- A EquivalentFarmSet created in the previous step.
You must ensure that every resource feed (farm) is included in at least one UserFarmMapping, otherwise no users will be able to access that resource.
-
Multi-Site Aggregation
By default, StoreFront enumerates all the deployments providing desktops and applications for a store and treats all those resources as distinct. This means that if the same resource is available from several deployments, users see an icon for each resource, which might be confusing if the resources have the same name. When you set up highly available multi-site configurations, you can group Citrix Virtual Apps and Desktops deployments that deliver the same desktop or application so that identical resources can be aggregated for users. Grouped deployments do not need to be identical, but resources must have the same name and path on each server to be aggregated.
With multi-site aggregation, when a desktop or application is available from multiple Citrix Virtual Apps and Desktops deployments configured for a particular store, StoreFront aggregates all instances of that resource and presents users with a single icon. When a user launches an aggregated resource, StoreFront determines the most appropriate instance of that resource for the user, taking into account:
- Server availability.
- Whether the user already has an active session.
-
PrimaryandSecondarykeywords. - The user’s zone preference.
- The order of the delivery feeds you specified in your configuration.
StoreFront dynamically monitors servers that fail to respond to requests on the basis that such servers are either overloaded or temporarily unavailable. Users are directed to resource instances on other servers until communications are re-established. Where supported by the servers providing the resources, StoreFront attempts to reuse existing sessions to deliver additional resources. If a user already has an active session on a deployment that also provides the requested resource, StoreFront reuses the session if it is compatible with that resource. Minimizing the number of sessions for each user reduces the time taken to start additional desktops or applications and can allow for more efficient use of product licenses.
You can override the specified deployment ordering for individual Citrix Virtual Apps and Desktops resources to define preferred deployments to which users are connected when they access a particular desktop or application. This enables you to, for example, specify that users are preferentially connected to a deployment specifically adapted to deliver a particular desktop or application, but use other deployments for other resources. To do this, append the string KEYWORDS:Primary to the description of the desktop or application on the preferred deployment and KEYWORDS:Secondary to the resource on other deployments. Where possible, users are connected to the deployment providing the primary resource, regardless of the deployment ordering specified in your configuration. Users are connected to deployments providing secondary resources when the preferred deployment is unavailable.
As part of the StoreFront resource feed configuration you can specify which zones those resources are in. If users access StoreFront via a GSLB, you can configure the GSLB to insert a zone preference header. StoreFront then tries to launch applications hosted on the preferred deployment before contacting other deployments.
After checking the other factors, StoreFront uses the ordering specified in your configuration to determine the deployment to which the user is connected. If multiple equivalent deployments are available to the user, you can specify that users are connected either to the first available deployment or randomly to any deployment in the list. Connecting users to the first available deployment enables you to minimize the number of deployments in use for the current number of users. Randomly connecting users provides a more even distribution of users across all the available deployments.
-
On the Manage Delivery Controllers screen, under User Mapping and Multi-Site Aggregation Configuration click Configure. This option is only available if two or more resource feeds are configured.
-
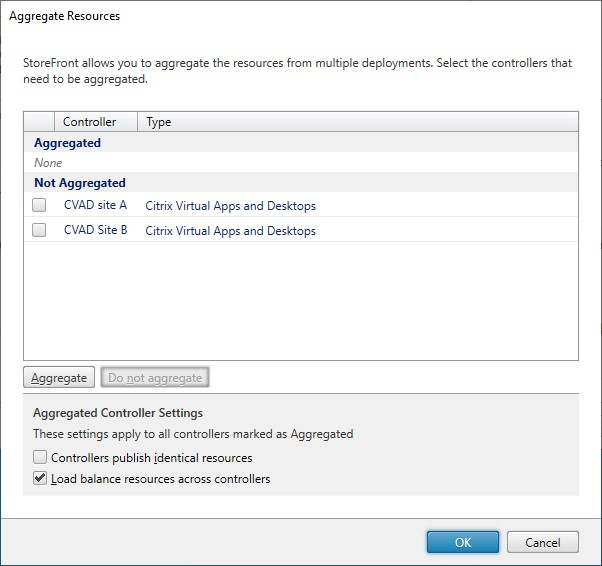
Click Aggregate resources. This shows the Aggregate Resources screen.
-
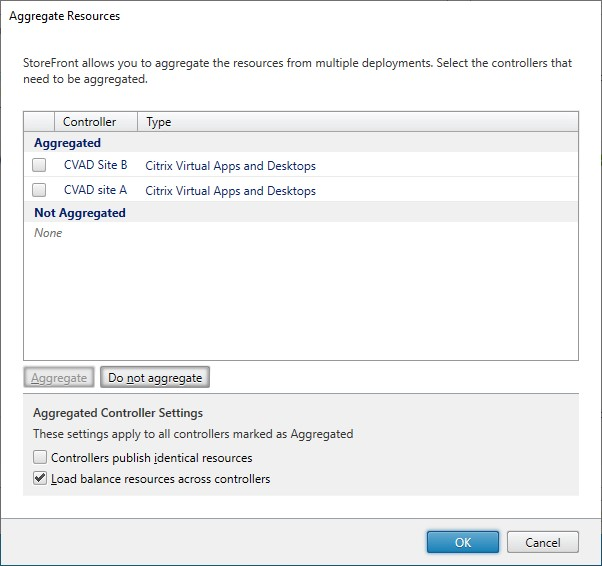
Choose the resource feeds that have the same resources and click Aggregate.
-
Select Aggregated Controller Settings options as required:
-
Controllers publish identical resources - When selected, StoreFront enumerates resources from only one of the controllers in the aggregated set. When not selected, StoreFront enumerates resources from all controllers in the aggregated set (to accumulate the user’s entire set of available resources). Selecting this option gives a performance improvement when enumerating resources, but we do not recommend it unless you are certain that the list of resources is identical across all aggregated feeds.
-
Load balance resources across controllers - When selected, launches are distributed evenly among the available controllers. When not selected, launches are directed to the first controller specified in the user mapping dialog screen, failing over to subsequent controllers if the launch fails.
-
-
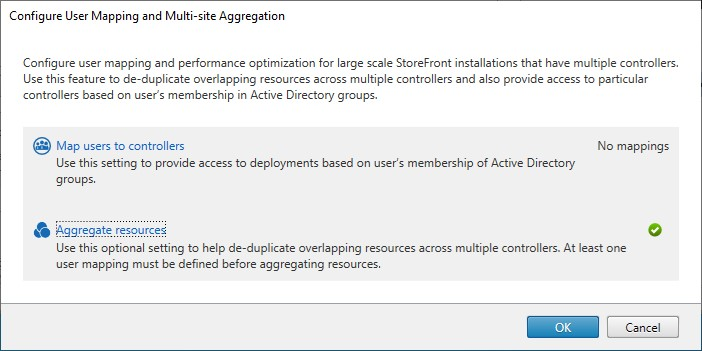
Click OK to take you back to the Configure User Mapping and Multi-site Aggregation screen. Aggregate resources is now ticked.
-
When resources are aggregated, by default, no users have access to the resources so you must add the user mappings. Click Map users to controllers This opens the Create user mapping screen.
-
Either choose Everyone or choose Specific User Groups and add one or more group. For instance you may wish to choose a group representing users in a particular location.
-
Add the aggregated resource feeds. You must add all of the aggregated resource feeds, any not included become Not Aggregated. You may also include non-aggregated resources.
-
If you did not tick Load balance resources across controllers then you can choose the order in which StoreFront should prefer to launch resources.
-
Press Create to return to Configure User Mapping and multi-site Aggregation.
-
Add further mappings as required. Ensure that every resource feed is mapped to a user group, otherwise those resources will not be usable by anyone.
-
Click OK.
Advanced configurations using PowerShell SDK
You can configure many common multi-site and high availability operations with the StoreFront management console. You can also configure StoreFront using the PowerShell SDK, which provides the following extra functionality:
- Ability to specify multiple groupings of deployments for aggregation.
- The management console allows only a single grouping of deployments, which is sufficient for most cases.
- For stores with many deployments with disjointed sets of resources, multiple groupings might give performance improvements.
- Ability to specify complex preference orders for aggregated deployments. The management console allows aggregated deployments to be load balanced or to be used as a single failover list. Using PowerShell you can have multiple groups of feeds that are load balanced and fail over between different groups.
Warning:
After configuring advanced multi-site options by using PowerShell, it is no possible to modify the options using the management console.
-
Decide what aggregation groups you wish to use. Within an aggregation group, applications with the same display name are aggregated into a single icon. Each aggregation group needs a name. With the management console you can only create one aggregation group. Through PowerShell you can define multiple aggregation groups.
-
For each aggregation group, create one or more EquivalentFarmset listing the resource feeds (known in the SDK as farms) that you wish to aggregate. If different resource feeds within the aggregation group will be assigned to different users then you must create a separate EquivalentFarmSet for each set of users but sharing the same
AggregationGroupName. To create the EquivalentFarmSet, call New-STFEquivalentFarmset with the following parameters:-
Name- a unique name for the EquivalentFarmset. -
AggregationGroupName- the name of the aggregation group the farmset is part of. -
LoadBalanceMode- eitherLoadBalancedorFailover. -
PrimaryFarms- The farms you wish to be aggregated. IfLoadBalanceModeisFailoverthen ensure farms are listed in the required order. If there are multiple EquivalentFarmSets for an aggregation group then this order is combined with the IndexNumber defined in the UserFarmMapping when evaluating which resource feed to use to launch a resource. -
BackupFarms- A list of farms to use in case none of the primary farms are available. This functionality is depreciated. Instead add additional EquivalentFarmSets with a higher IndexNumber.
-
-
For each resource feed not part of an aggregation group, create an EquivalentFarmset without specifying an
AggregationGroupName. All resource feeds must be part of a farmset. Call New-STFEquivalentFarmset with the following parameters:-
Name- a unique name for the EquivalentFarmSet -
PrimaryFarms- the name of non-aggregated farm.
-
-
For each set of users who require access to a different set of resource feeds, create mappings between those users and each of the EquivalentFarmSets. To create the UserFarmMapping, call Add-STFUserFarmMapping with the following parameters:
-
StoreService- The Store service to add the UserFarmMapping to. -
Name- A unique name for the mapping. -
GroupMembers- A hashtable containing the names and SIDs of the user groups that are part of the mapping. The name is used for display only; the SID defines the group. To add all users, create a single entry in the hashtable with nameEveryoneand valueEveryone. -
EquivalentFarmSet- A EquivalentFarmSet created in the previous step. -
IndexNumber- Sets the order in which resource feeds are evaluated. This sets the order of preference of which resource feed to use to launch a resource.
You must ensure that every resource feed (farm) is included in at least one UserFarmMapping, otherwise no users would be able to access that resource.
-
Zone preference
If you have multiple CVAD deployments in different regions, you can configure your NetScaler ADC to notify StoreFront of the user’s preferred CVAD deployments. For more information, see Global Server Load Balancing (GSLB) Powered Zone Preference.
You must manually configure StoreFront to tell it which CVAD deployment contains which zones:
- From within the Citrix StoreFront management console, in the left pane select the Stores node.
- Select a store in the results pane.
- In the Actions pane, click Manage Delivery Controllers.
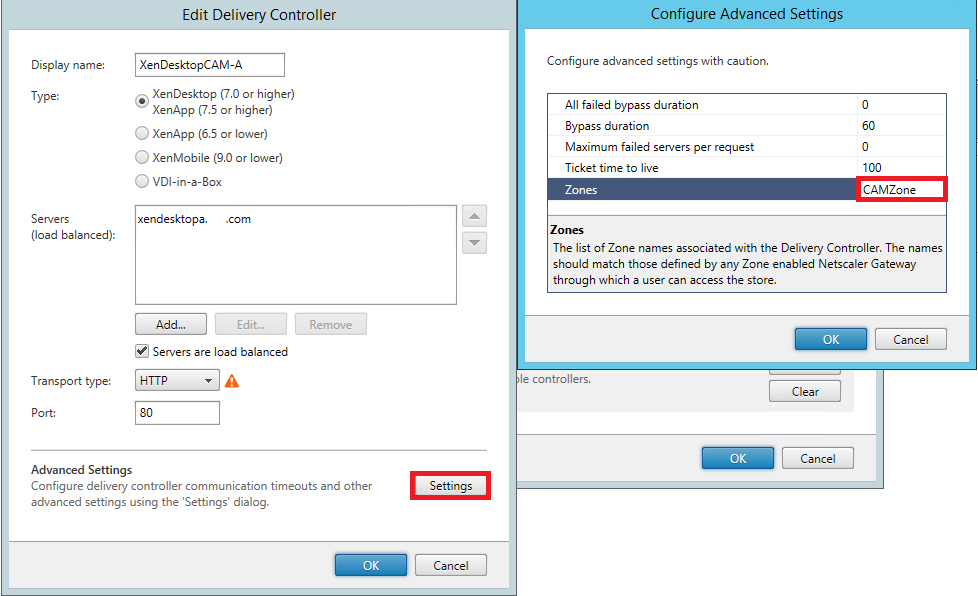
- Select a controller, click Edit, and then click Settings on the Edit Delivery Controller screen.
- Under Advanced Settings click Settings.
- In the Configure Advanced Settings dialog, on the Zones row, click in the second column.
- Click Add…, enter the zone name and press OK. Repeat for each zone in the deployment.
- In the Configure Advanced Settings dialog, click OK.
When the user launches an aggregated resource, StoreFront goes through the list of zones in the X-Citrix-ZonePreference header and looks for a resource feed configured with that zone name. If there is a match it sends the launch request to that CVAD deployment. If there is no match then it tries other deployments.
If the CVAD deployment contains multiple zones, it is not possible to direct the launch request to a specific zone within that deployment.