Deployment and Configuration Guide - Citrix virtualization on Google Cloud
Note:
The contents of this document are being restructured and incorporated into the Solution Hub for Citrix DaaS on Google Cloud. The original document contents are being left here during the transition for completeness and referenceability.
Introduction
This step-by-step Deployment and Configuration guide is for technical professionals who deploy and manages Citrix infrastructure on the Google Cloud. You can think of this guide as a double click down from the Citrix Virtualization on Google Cloud Reference Architecture document, also available on Citrix TechZone. The Reference Architecture helps you decide the virtualization system’s architecture. To help guide you on this journey of understanding, we are breaking down each of the major steps into goals, followed by step-by-step guides on one way to accomplish our prime goal: build a Citrix virtualization system on Google Cloud.
As you take this journey with us, we encourage you to share your comments, contributions, questions, suggestions, and feedback along the way. Drop us a line via email to Citrix on Google SME working group.
If you are interested in training on Citrix virtualization and Google Cloud, Citrix offers self-paced and instructor lead versions. For more information, see the following Citrix Education website at https://training.citrix.com/learning. Or contact your Citrix Customer Success Manager for more information.
Deployment Overview
The following list provides an overview of the goals and tasks necessary to create a Citrix virtualization system on Google Cloud:
- Define the deployment architecture
- Prepare Google Cloud Project
- Configure network services
- Create virtual machines
- Configure access to virtual machine consoles
- Deploy Active Directory
- Create/initialize Citrix Cloud resource location
- Configure Citrix DaaS™
- Test launch virtual app and desktop resource
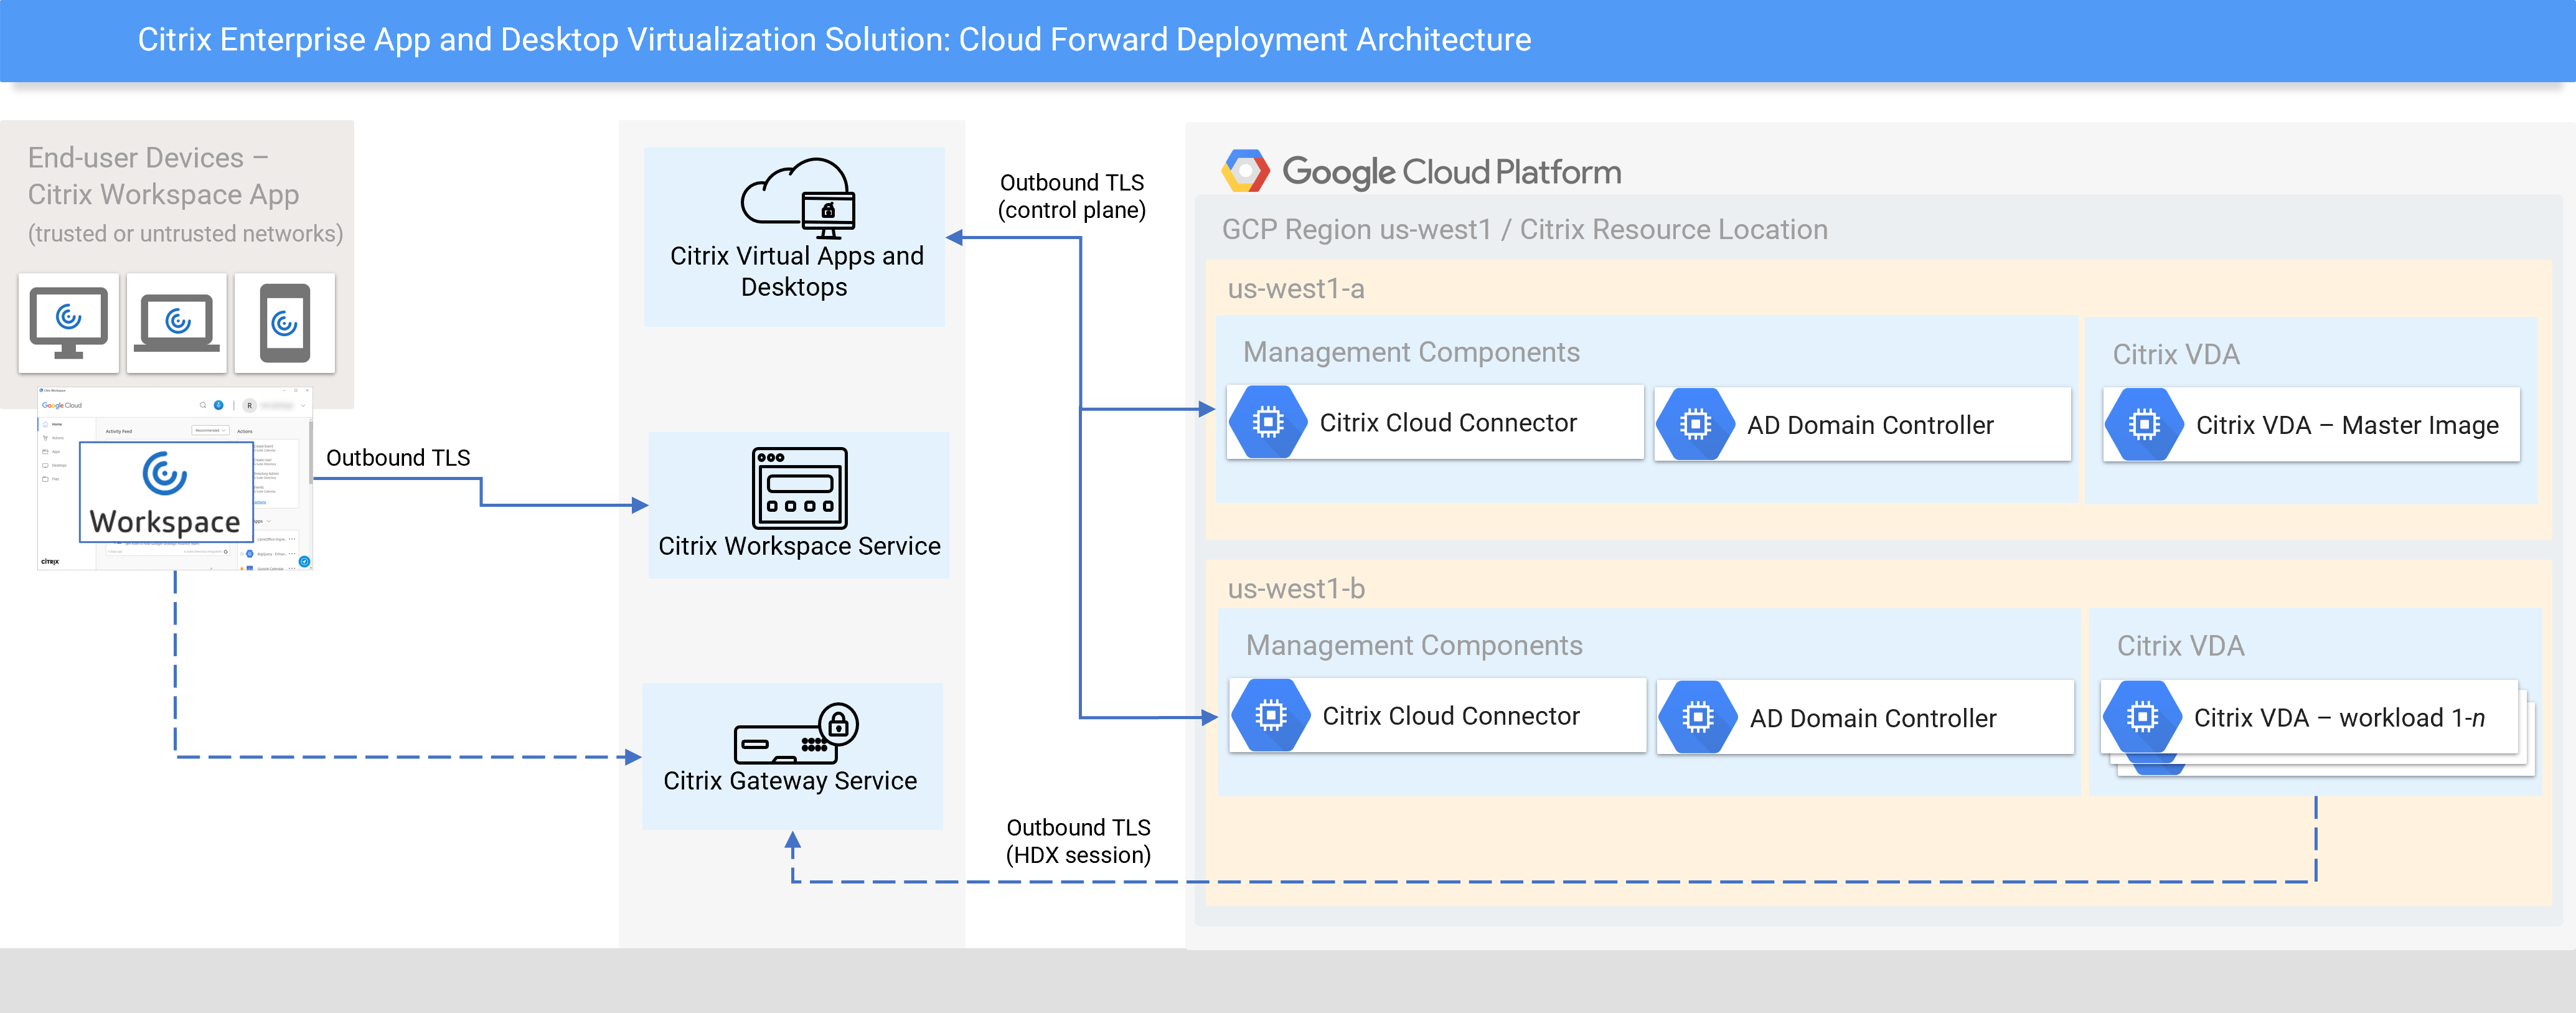
1. Define the deployment architecture
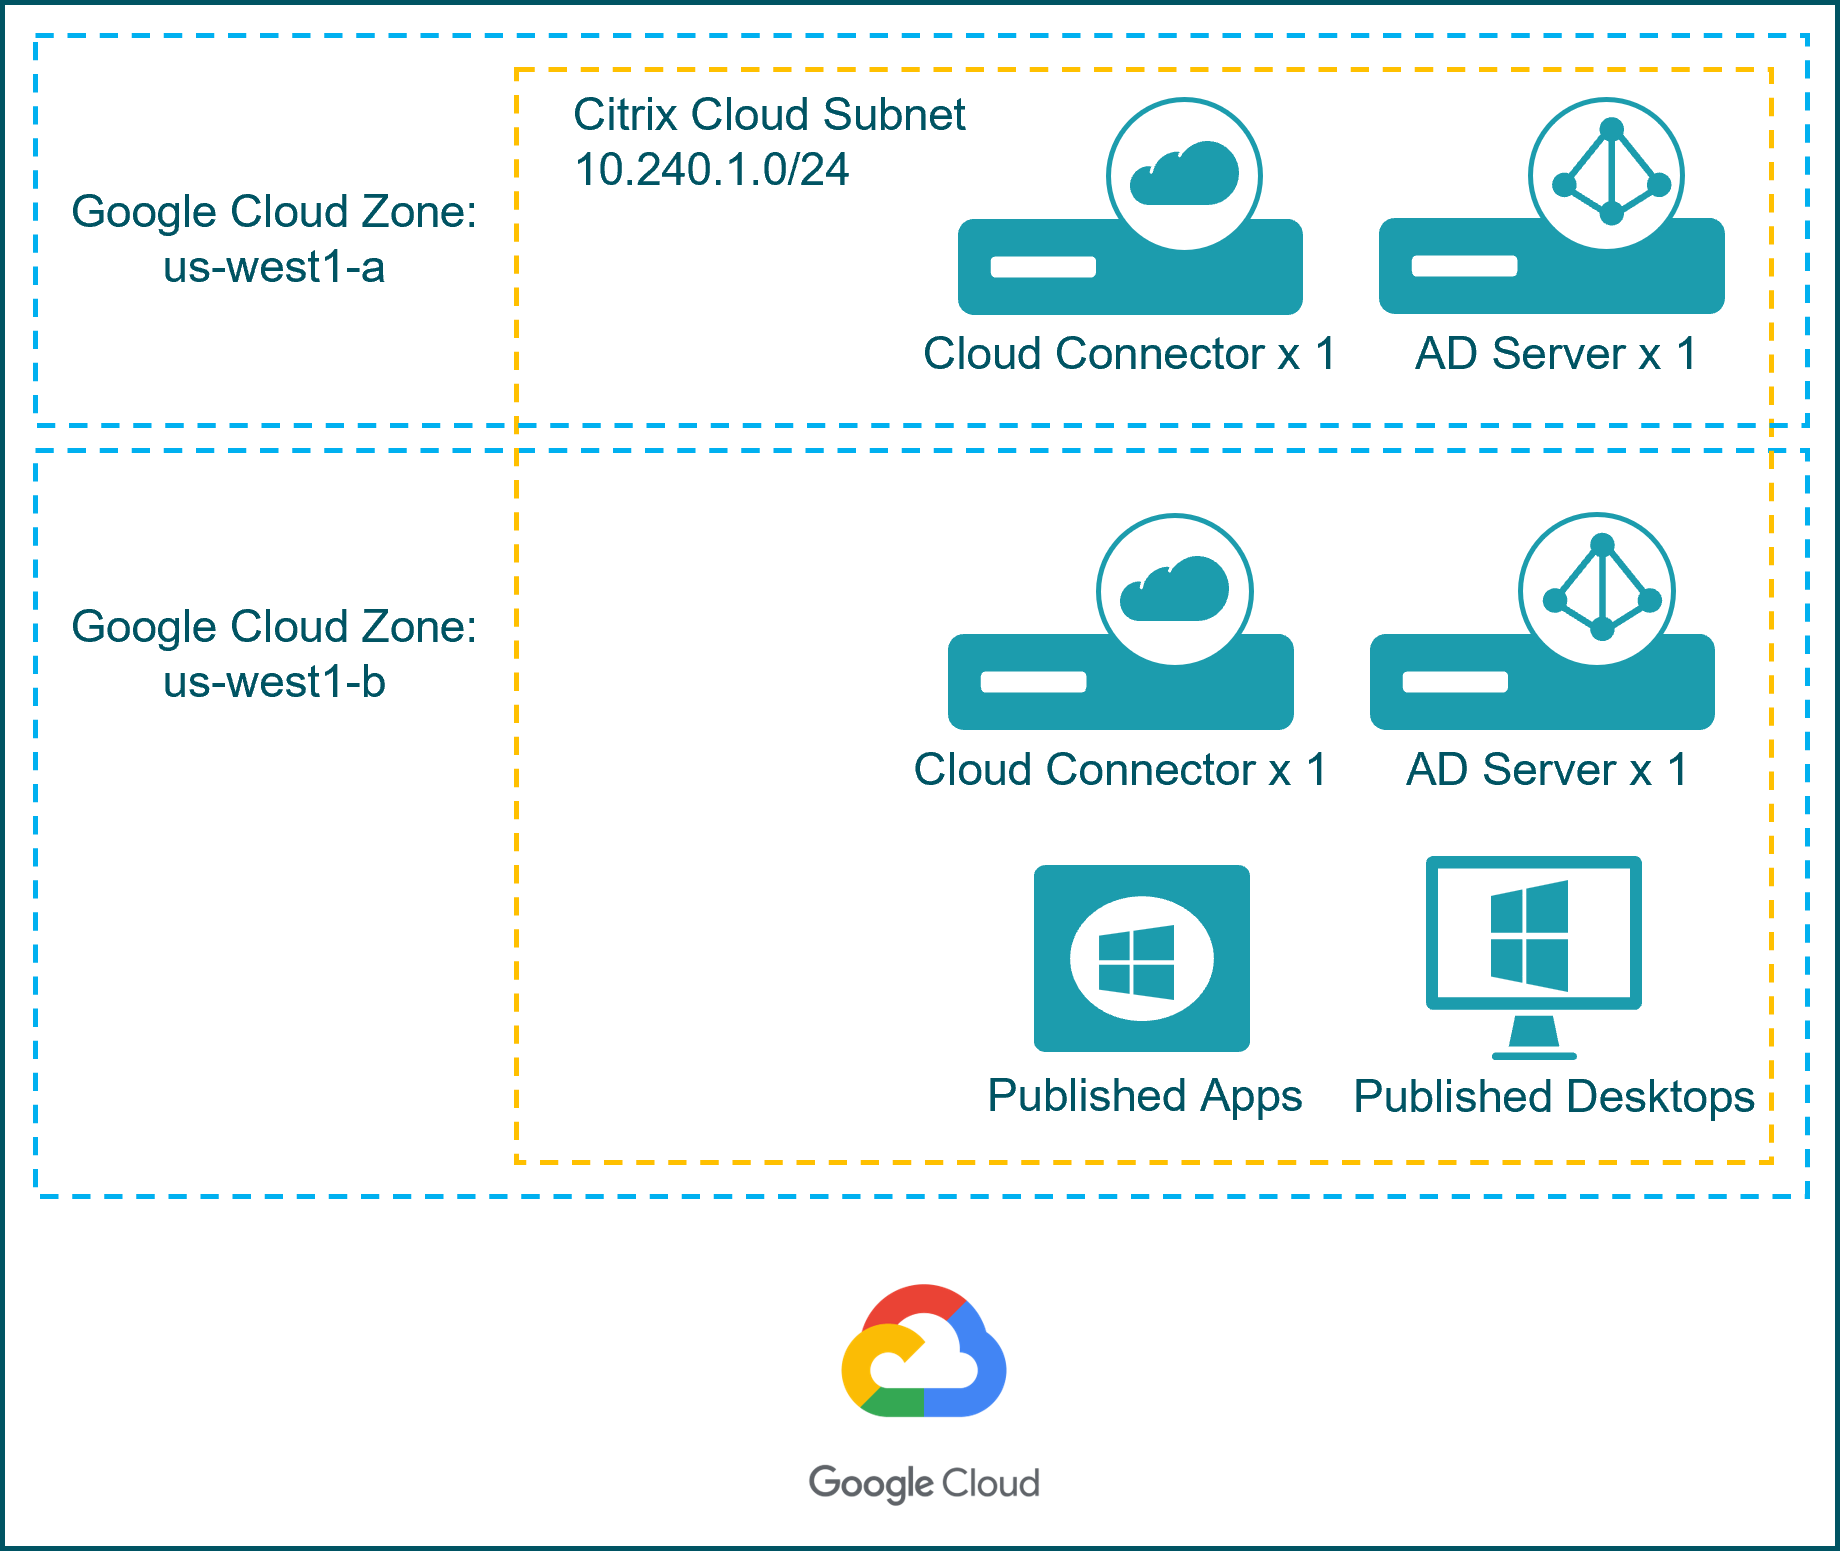
Before you build a Citrix virtualization system on ANY platform, you need to figure out the deployment architecture. The flexibility of the Citrix technology stack can be a challenge. However, we break down the most important design decisions to consider in the Citrix Virtualization on Google Cloud Reference Architecture document. In this guide, we are building a Citrix solution based on the Cloud Forward design as illustrated:
2. Prepare Google Cloud Project
The goal is this section is to prepare the Google Cloud project which is being used as your Citrix Cloud Virtual Apps and Desktops Service Resource Location. You can either create a new or gain access to an existing Google Cloud project.
When complete, you have:
-
A brief introduction to the main components of Google Cloud
-
Access to a Google Cloud project
-
Assign the Project Owner role to your user
-
Prepared the Google Cloud
Note
This section provides a walk-through for creating a resource location on Google Cloud. While these requirements were complete and correct at the time of writing, you want to refer to the product documentation for the most current requirements.
Google Cloud Primer
Google Cloud consists of services and resources hosted in data centers around the globe which varies according to geographic regions. Google Cloud infrastructure services are available in locations across North America, South America, Europe, Asia, and Australia. These locations are divided into regions and zones. A zone is an isolated location within a region. The zone determines what computing resources are available and where your data is stored and accessed. A region can have three or more zones. For example, the us-west1 region denotes a region on the west coast of the United States that has three zones us-west1-a, us-west1-b, and us-west1-c.
Google Billing accounts are a prerequisite for creating a Google Project. The Google billing is linked to a Google payments profile. In a GCP environment, billing accounts can be linked to one or more projects which are aligned to an organization. It’s recommended that the proper billing structure is in place in your organization before proceeding forward. Billing in GCP is based on usage, similar to other public cloud vendors. Google does not charge for virtual machines while they are in terminated state. However, Google charges for storing the preserved state of suspended virtual machines. Google offers committed use discounts (1 or 3 years) for virtual machine usage which is ideal for workloads with predictable resource needs. Also, Google offers sustained use discounts which automatically apply the discount for specific Compute Engine used more than 25% a month. However, the sustained use discounts aren’t applicable to the E2 and A2 machine instances. Google also provides sizing recommendations for VMs instances using built-in intelligence.
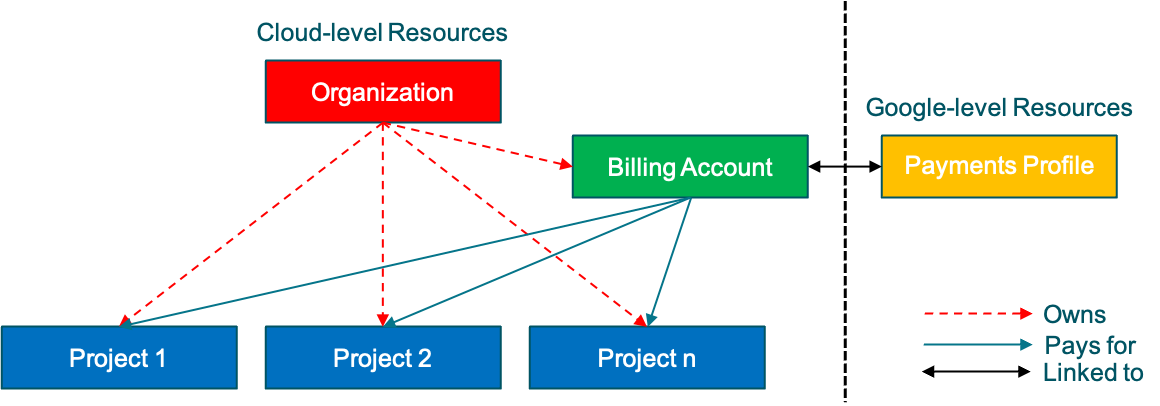
GCP organizes the resources into a project. All GCP projects are assigned to a single user project creator role by default. Create extra project members and identity access and management roles to control access to the GCP project. A project consists of a set of users, a set of APIs, billing, authentication, and monitoring settings for the APIs. The GCP project has the following components:
-
A project name, which you can provide or assigned automatically
-
A project ID, which you can provide or assigned automatically
-
A project number, non-customizable and assigned automatically
2.1 Create or Access Google Project
The goal of this task is to ultimately gain access to the Google Cloud Project that contains your Citrix virtualization assets. If someone else in your organization is responsible for creating projects, they need to assign you the Identity Access Management (IAM) “Owner” role to complete the rest of this goal. If you’re creating the project, the following steps guide you through the process.
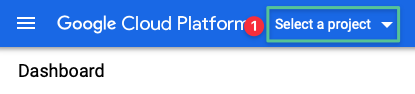
You can complete the following steps from within the Google Cloud Console (https://console.cloud.google.com). Make sure that you’re logged into this console with a valid user account.
-
Click Select a project from the drop-down list
-
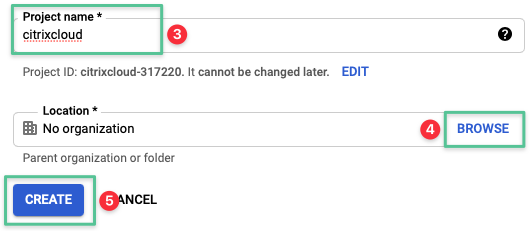
Click New Project
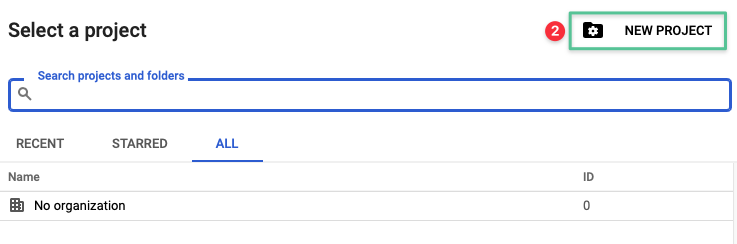
-
Input a unique project name: citrixcloud
-
Click Browse and select your organization
-
Click Create
-
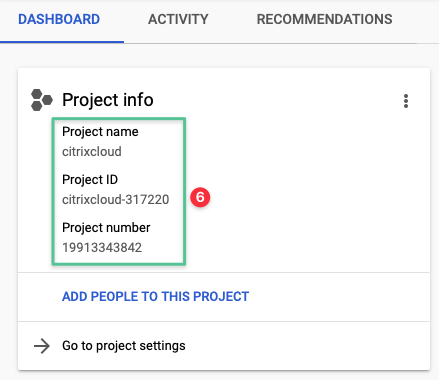
Validate the project is successfully created
2.2 Enable Google Cloud APIs
Citrix Cloud™ interacts with your Google Cloud project by using several different APIs. These APIs aren’t necessarily enabled by default, but they’re necessary for Citrix Virtual Delivery Agent (VDA) fleet creation and lifecycle management. For Citrix Cloud to function, the following Google APIs must be enabled on your project:
-
Compute Engine API
-
Cloud Resource Manager API
-
Identity and Access Management (IAM) API
-
Cloud Build API
-
* Cloud Domain Name System (DNS) API
Note
The *Cloud DNS API is required to configure DNS services for your project, which are necessary to configure Active Directory on the Google Cloud. If your infrastructure team manages the Active Directory and DNS infrastructure components, you can effectively skip this step. The other four APIs are used by Citrix Cloud and must be enabled.
The Google APIs can be enabled from the APIs and Services/Dashboard or APIs and Services/Library pages if you prefer to use the graphical console. Enabling APIs can also be completed quickly by using the Google Cloud Shell as described:
-
Click the Google Shell icon located in the top right-hand corner of the Google Console:

-
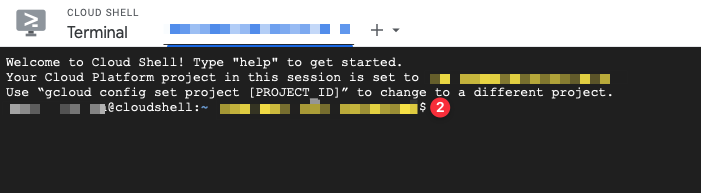
The following Cloud Shell appears within the Google Console:
-
Paste the following four commands into the Cloud Shell, if the Cloud Shell prompts, click Authorize:
gcloud services enable compute.googleapis.comgcloud services enable cloudresourcemanager.googleapis.comgcloud services enable iam.googleapis.comgcloud services enable cloudbuild.googleapis.comgcloud services enable dns.googleapis.com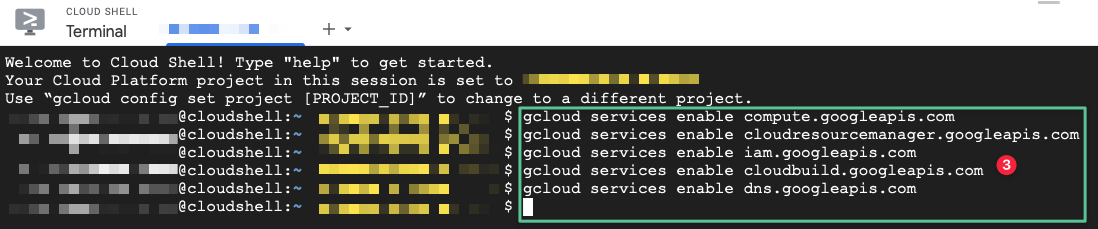
2.3 Create/update service accounts
Google Identity and Access Management (IAM) allows you to grant granular access to specific Google Cloud resources. The WHO has access to WHICH resources, and WHAT they can do with those resources. Service accounts live inside projects, similar to other resources you deploy on Google Cloud.
Citrix Cloud uses two separate service accounts within the Google Cloud project:
-
Cloud Build Service Account – provisioned automatically once the Google APIs are enabled, the Cloud Build service account is identifiable with an email address that begins with the Project ID, for e.g.,
<project-id>@cloudbuild.gserviceaccount.com. The Cloud Build Account requires the following three roles:-
Cloud Build Service Account (assigned by default)
-
Compute Instance Admin
-
Service Account User
-
-
Citrix Cloud Service Account - the Service Account is used by Citrix Cloud to authenticate to Google Cloud using a pre-generated key. The Service Account enables Citrix Cloud to access the Google project, provision, and manage machines. The Service Account is created manually and identifiable with an email address, for e.g.,
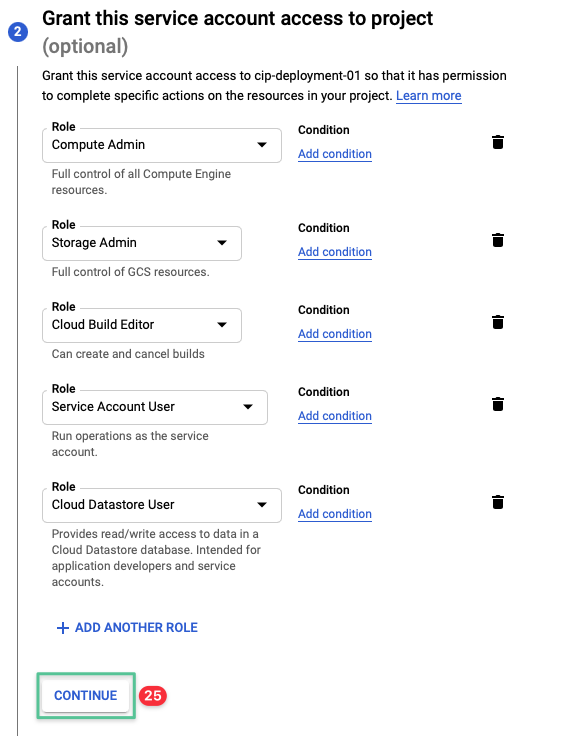
<my-service-account><project-id>.iam.gserviceaccount.com. By applying the principle of least privilege, grant the following roles to the Service Account:-
Compute Admin
-
Storage Admin
-
Cloud Build Editor
-
Service Account User
-
Cloud Datastore User
-
2.3.1 Update the roles assigned to the Cloud Build Service Account
-
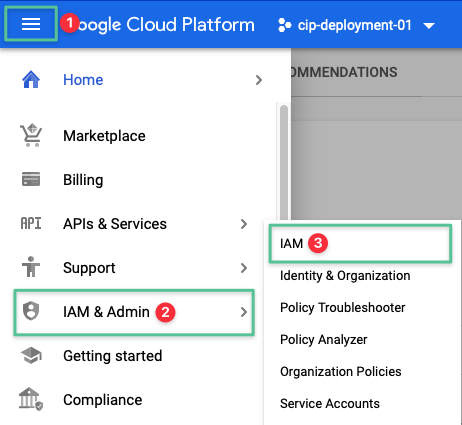
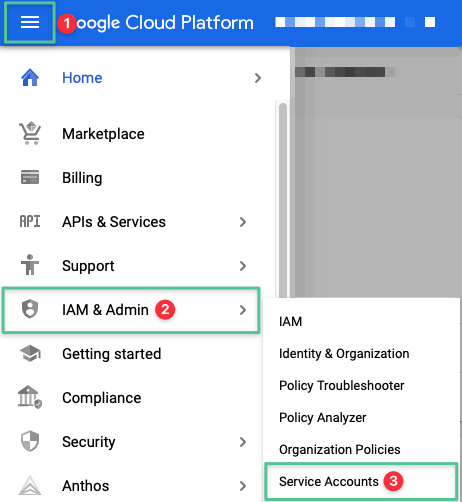
Click the hamburger icon, located in the top left-hand corner of the Google Console
-
Navigate to IAM & Admin
-
Click IAM
-
Locate the Cloud Build service account, identifiable with an email address that begins with the Project ID, for e.g.,
<project-id>@cloudbuild.gserviceaccount.com. The Cloud Build Service Account role is applied by default.Note
If you are unable to view the Cloud Build account, then you must enable the Cloud Build account manually by the following steps:
- Click the hamburger menu
- Scroll down until you locate CI/CD menu section
- Click Cloud Build
- Click Settings
- Locate Service Accounts, under the Status column, click the drop-down menu and change from DISABLED to ENABLED
- Return to the IAM & Admin menu section and locate the Cloud Build Service Account
-
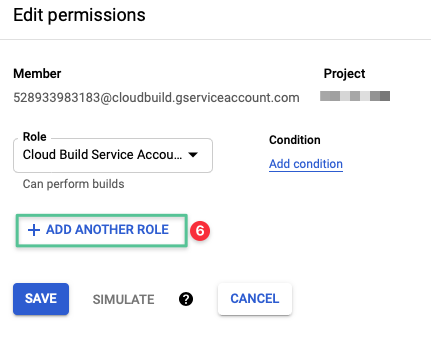
Click the pencil icon to edit the Cloud Build account roles

-
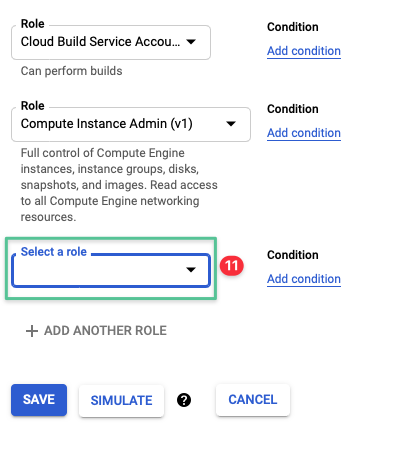
Click Add Another Role
-
Click Select a role drop-down menu
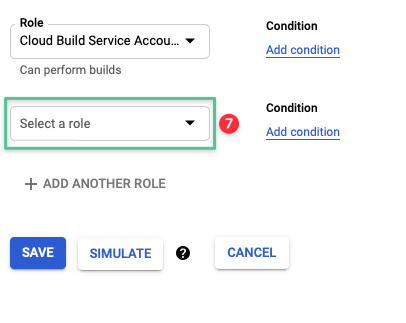
-
Click the drop-down and input Compute Instance Admin
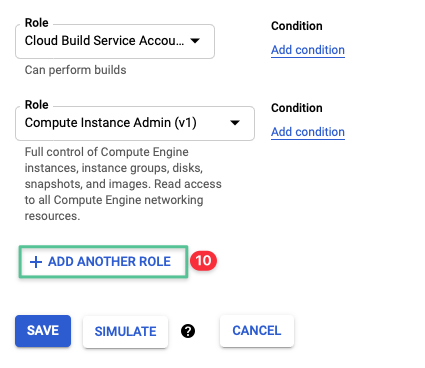
-
Click Compute Instance Admin (v1) from the list

-
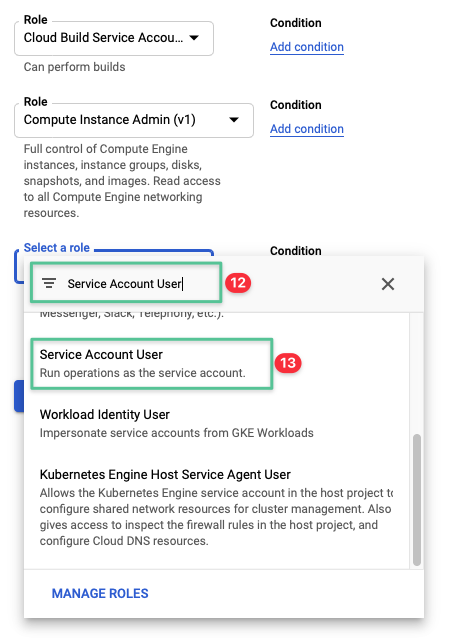
Click Add Another Role
-
Click Select a role drop-down menu
-
Click the drop-down and input Service Account User
-
Click Service Account User from the list
-
Click Save
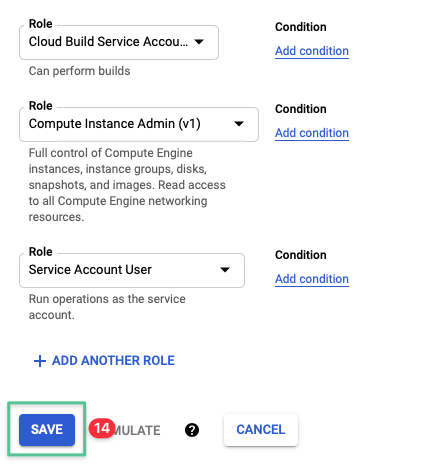
-
Validate the roles are assigned successfully

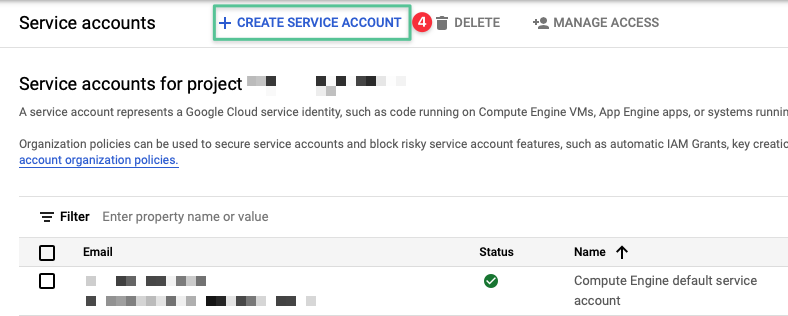
2.3.2 Create and assign roles to Citrix Cloud Service Account
-
Click the hamburger icon, located in the top left-hand corner of the Google Console
-
Navigate to IAM & Admin
-
Click Service Accounts
-
Click + Create Service Account
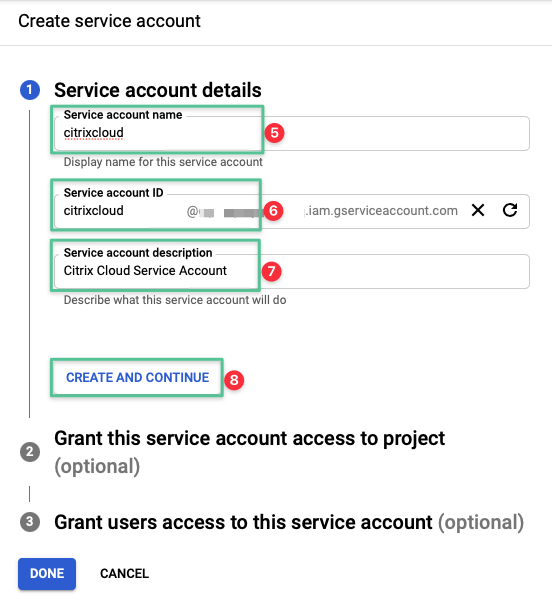
-
Input a unique Service account name: citrixcloud
-
The Service account ID auto populates based on the Service account name entered
-
Provide a description for the Service account name: Citrix Cloud Service Account
-
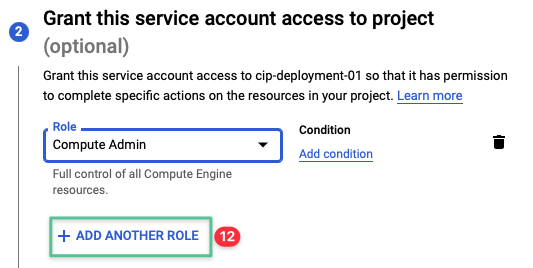
Click Create and Continue
-
Click Select a role drop-down menu
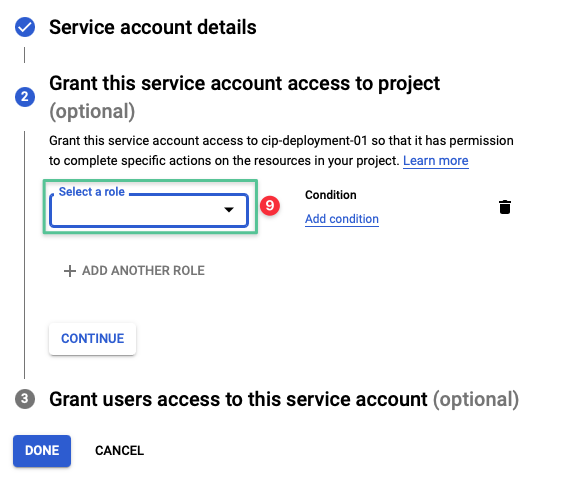
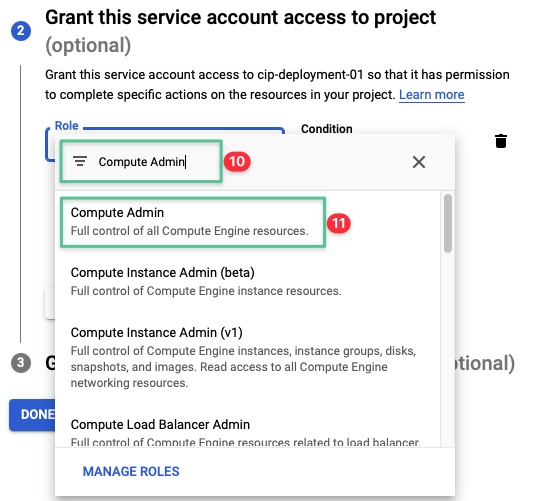
-
Click the drop-down list and input Compute Admin
-
Click Compute Admin from the list
-
Click Add Another Role
-
Click Select a role drop-down menu
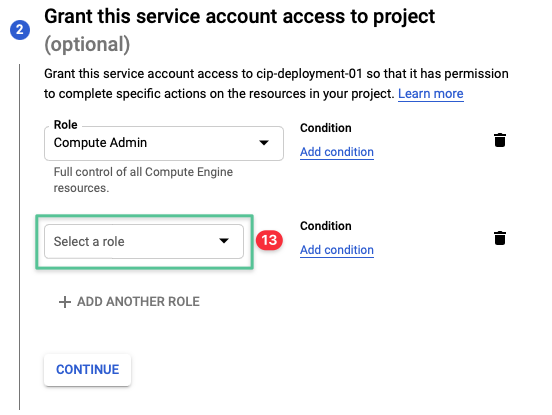
-
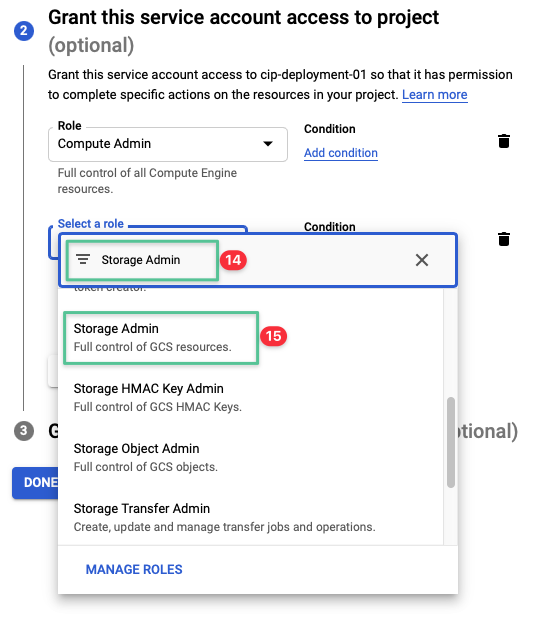
Click the drop-down list and input Storage Admin
-
Click Storage Admin from the list
-
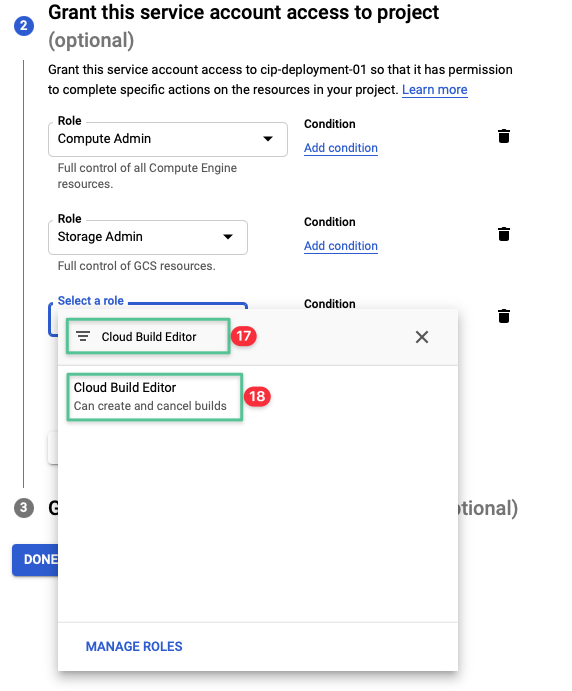
Click Select a role drop-down menu
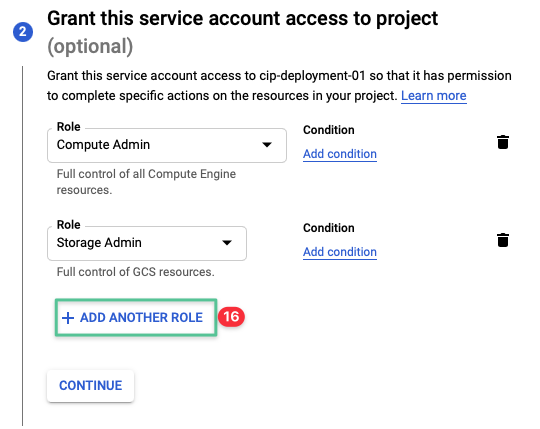
-
Click the drop-down and input Cloud Build Editor
-
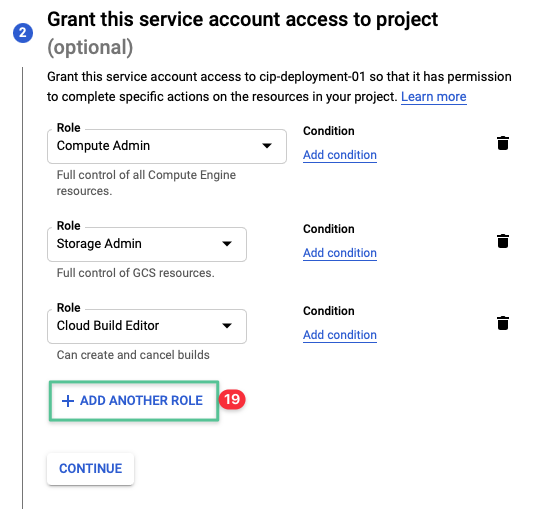
Click Cloud Build Editor from the list
-
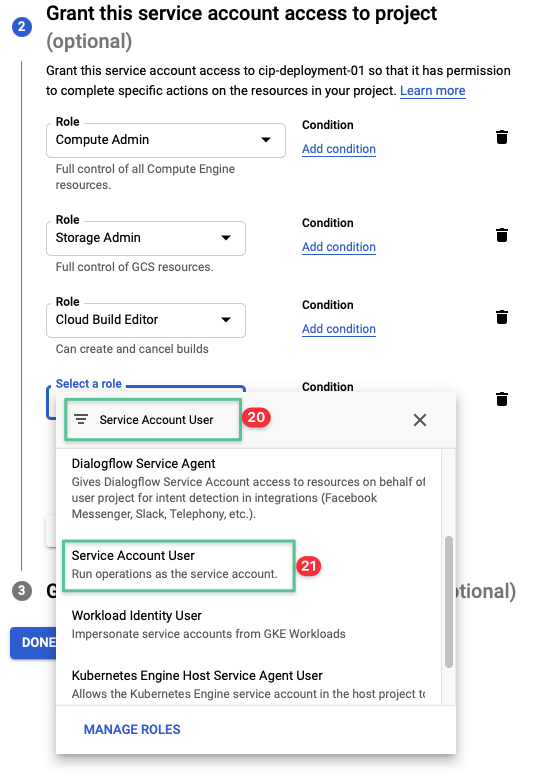
Click Add Another Role
-
Click the drop-down and input Service Account User
-
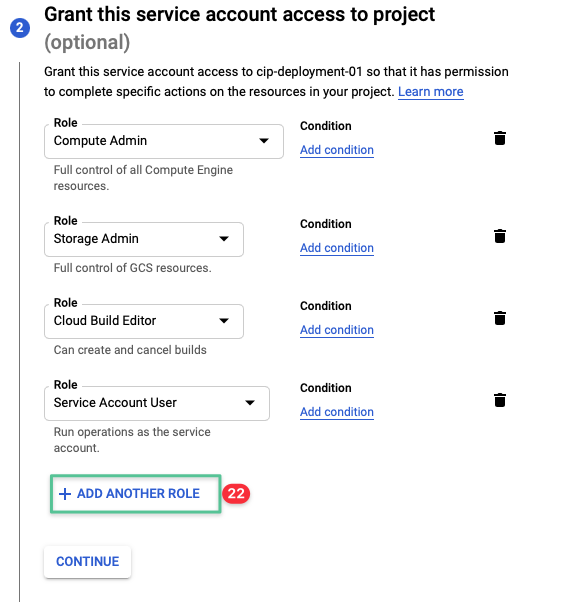
Click Service Account User from the list
-
Click Add Another Role
-
Click the drop-down and input Cloud Datastore User
-
Click Cloud Datastore User from the list
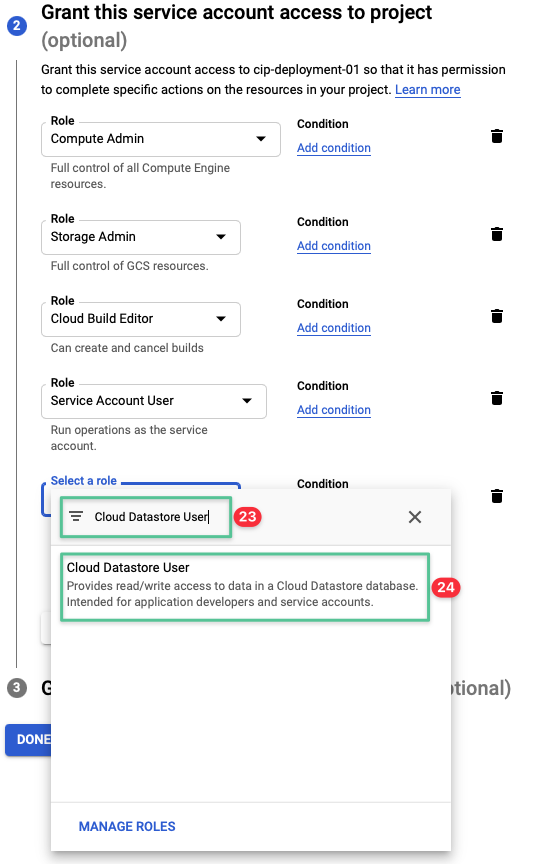
-
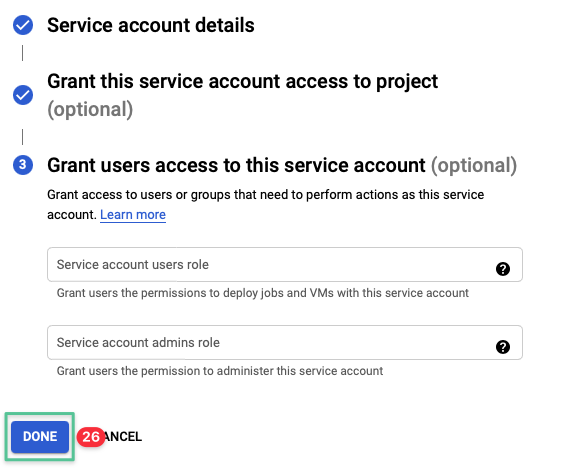
Click Continue
-
Click Done
-
Navigate to IAM main console
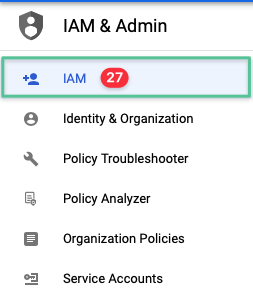
-
Identify the Service Account created
-
Validate the five roles are assigned successfully

Note
If you plan to deploy Citrix VDAs onto a Google Cloud Shared Virtual Private Cloud (VPC), there are some additional permissions the Citrix Cloud service account requires that are NOT covered here. To prepare for deploying VDAs on Shared VPCs, review Shared Virtual Private Cloud.
2.3.3 Generate and save Citrix Cloud service account keys
In this task, you generate and download the service account keys. The service account keys are used to establish the connection between the Citrix Cloud and Google later in this document. Make sure you treat the JSON file securely.
-
Click the hamburger icon, located in the top left-hand corner of the Google Console
-
Navigate to IAM & Admin
-
Click Service Accounts

-
Click the previously created Service Account
-
There are likely no keys created yet

-
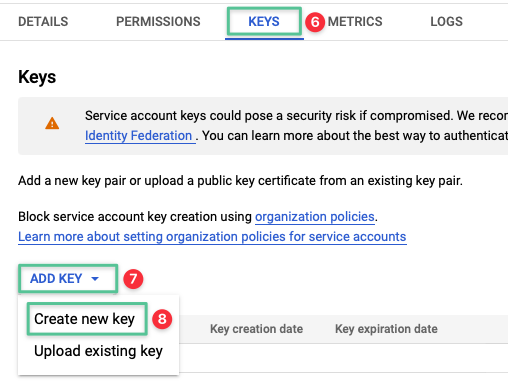
Click Keys tab
-
Click Add Key
-
Select Create new key
-
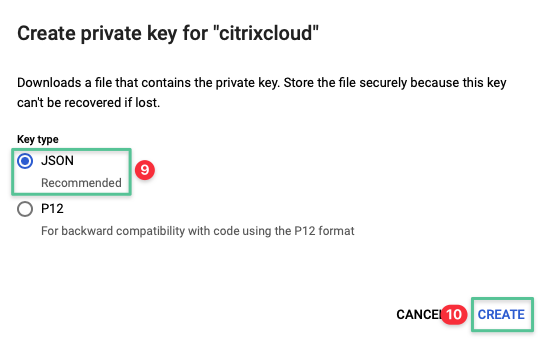
Select key type JSON (default)
-
Click Create
-
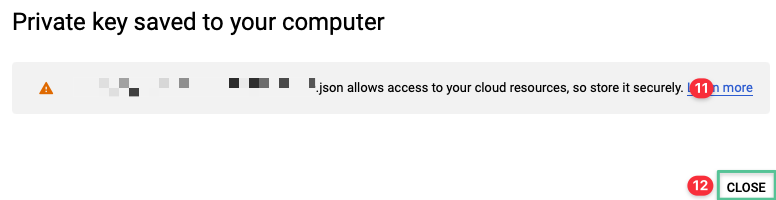
The JSON private key automatically downloads. Locate the JSON file and store it securely - it is required when creating the hosting connection between Citrix Cloud and Google Cloud in upcoming steps.
-
Click Close
3. Configure/verify network and network services
This segment covers the networking services required to host a Citrix Cloud Resource Location on Google Cloud. Completion of the last goal leaves you with an empty project on the Google Cloud, into which we are building a Citrix virtualization system. This section aims to layer in the networking-related services needed to complete our prime goal. Building and configuring a network becomes complex relative to the size of the organization’s underlying system requirements. In essence, a Citrix virtualization system on Google Cloud requires the following to function:
-
A Virtual Private Cloud (VPC) to interconnect Citrix VDAs and Citrix Cloud Connectors.
-
A method for Citrix Cloud Connectors (and optionally VDAs) to interact with Citrix Cloud’s managed web services (APIs). Both only require outbound connectivity, which is commonly provided by Google’s Cloud NAT service.
-
A method for Citrix Cloud Connectors to communicate with Google Cloud APIs. A Google Cloud VPC feature called Google private access must be enabled to allow communication.
-
A method for Citrix Cloud Connectors and VDAs to communicate with Active Directory and other network resources, including the Internet. A common way to provide DNS in a Citrix virtualization system is with the Google Cloud DNS service.
-
A network layer securing using Google VPC firewall.
Your organization can have a different way of deploying the necessary functionalities we describe here. If the goals are completed and functionally verified, you should be well on your way to building the Citrix virtualization environment.
3.1 Create/access a network for VDAs and Cloud Connectors
On the Google Cloud, virtual machine resources need a VPC network for communication. A VPC lives inside a specific Google Cloud project and can be optionally shared between multiple projects as needed. Google calls the latter featureShared VPC. Citrix Cloud supports deploying Citrix VDAs on Shared VPC networks, the setup, and configuration is not detailed this simplified guide.
A VPC is a project global construct, meaning it can span not only zones inside regions, but also span regions around the globe. At minimum one subnet is required in each region where virtual machines are deployed.
For this deployment guide a VPC network is used to provide the internal (private) connectivity between the three Google zones (us-west1-a, us-west1-b and us-west1-c). A VPC is a virtual version of a physical network implemented within the Google network. A VPC is considered a global resource and it is not associated with any Google region or zone. A VPC network can be created using auto mode or custom mode. The auto mode VPC network creates a single subnet per region automatically when the network is created. As new regions become available, new subnets in those regions are automatically added to the auto mode network. A custom mode VPC network requires all subnets to be created manually. Note also that there is a cost associated with traffic flows on Google Cloud. The VPC ingress traffic is free. The egress traffic to the same zone, to a different GCP service in the same region, and to Google products are all free. However, there is a cost for the egress traffic between zones in the same region or regions within the US.
The goal of this task is to create a functional VPC that is used build a Citrix Cloud Resource Location on the Google Cloud. This task can be considered complete when the Citrix Cloud service account (created earlier) can deploy a virtual machine on a functional VPC.
3.1.1 Create a VPC network and subnet
-
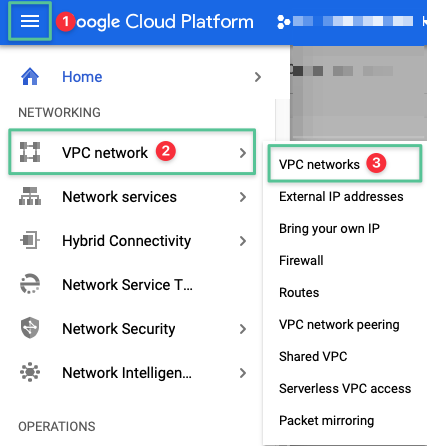
Click the hamburger icon, located in the top left-hand corner of the Google Console
-
Navigate to VPC network
-
Click VPC networks
-
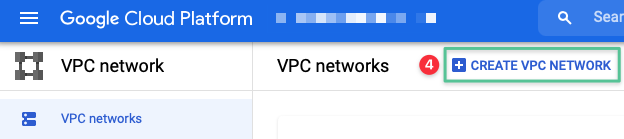
Click Create VPC Network
-
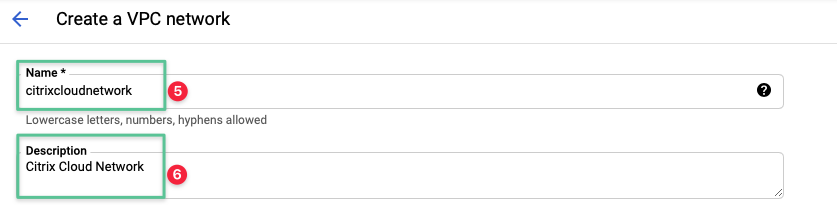
Input a unique name for the VPC network: citrixcloudnetwork
-
Input a description for the VPC network: Citrix Cloud Network
-
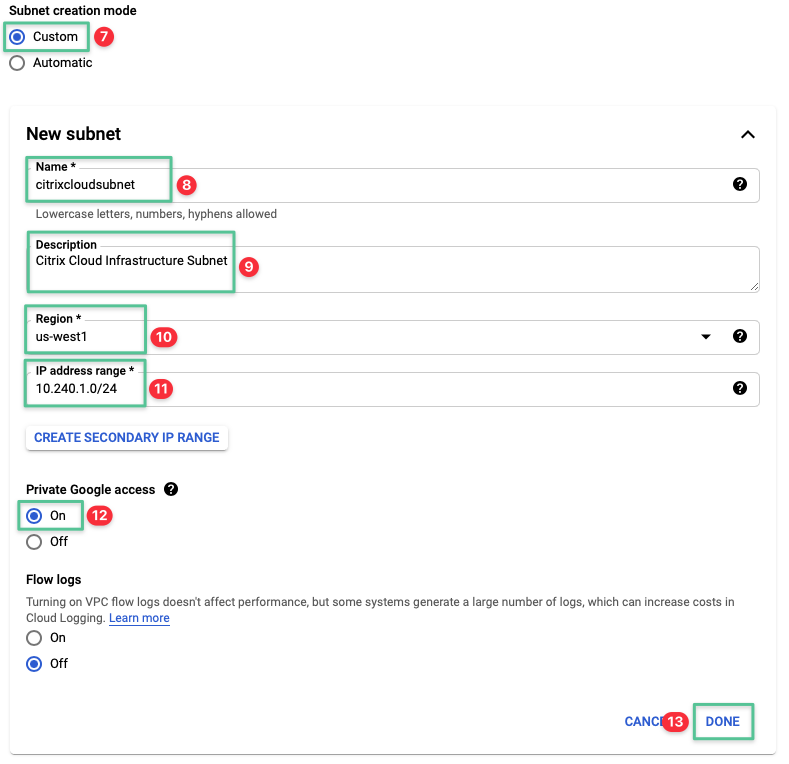
Select Custom
-
Input a unique name for the Subnet name: citrixcloudsubnet
-
Input a description for the Subnet: Citrix Cloud Infrastructure Subnet
-
Select us-west1 region
-
Input the following IP address range: 10.240.1.0/24
-
Select On for the Private Google access section. Private Google access allows Citrix Cloud Connectors to communicate with Google Cloud APIs.
-
Click Done
-
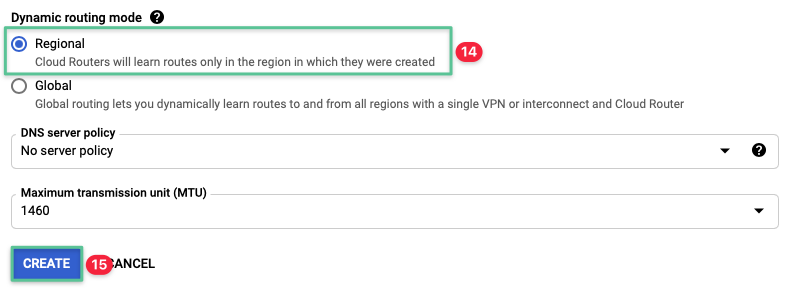
Select Regional under the Dynamic routing mode section
-
Click Create to complete the VPC network creation process
-
Validate the VPC network created successfully

3.1.2 Configure outbound connectivity to Citrix Cloud
Citrix Cloud is built based on a suite of APIs which are securely accessed over the Internet. The Citrix Cloud Connector virtual machines must be able to communicate to Citrix Cloud to function. While there are many ways to accomplish this goal, for this guide we are going to use Google Cloud NAT. Cloud NAT service is used to allow communication between Citrix Cloud and Google Cloud. Cloud NAT allows certain resources without external IP addresses to create outbound connections to the internet. If there is a requirement to establish a connection between the on-premises data center and GCP, then Cloud Interconnect provides a low latency and high availability connection. Cloud Interconnect enables internal IP address communication, which means internal IP addresses are directly accessible from both networks. However, the traffic between the on-premises network and the GCP network does not traverse the public internet. You can choose either deploying a dedicated or partner interconnect to provide connectivity between on-premises data center and GCP.
Before you configure Cloud NAT, you must configure the Cloud Router as Cloud NAT uses it.
Note
The roles/compute.networkAdmin role gives you permissions to perform the following:
- create a NAT gateway on Cloud Router
- reserve and assign NAT IP addresses
- specify the subnet traffic allowed to use network address translation by the NAT gateway
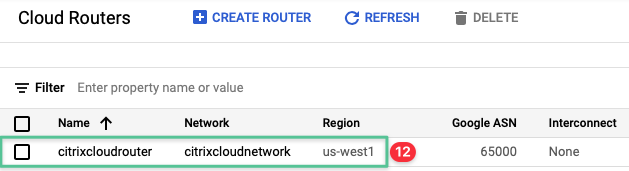
3.1.2.1 Step 1: Deploy a Google Cloud Router
-
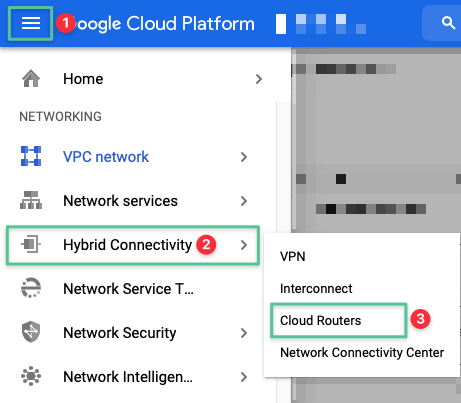
Click the hamburger icon, located in the top left-hand corner of the Google Console
-
Navigate to Hybrid Connectivity
-
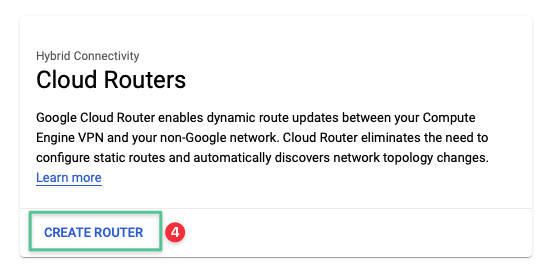
Click Cloud Routers
-
Click Create Router
-
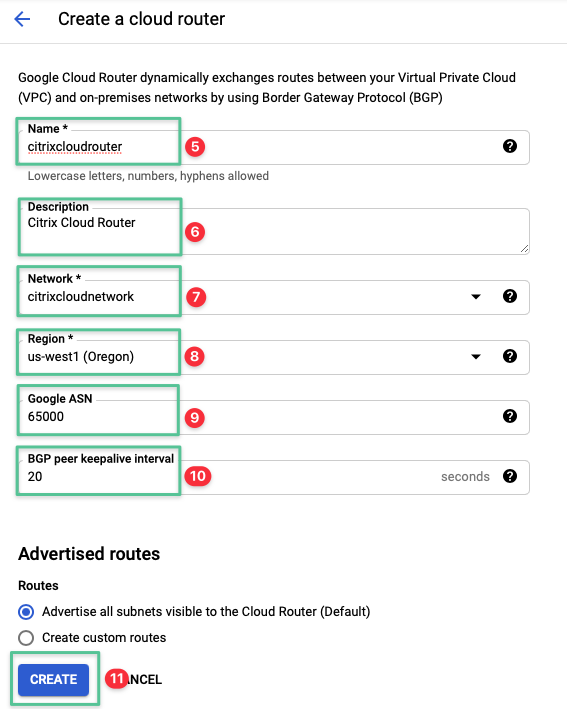
Input a unique name for the Cloud Router: citrixcloudrouter
-
Input a description for the Cloud Router: Citrix Cloud Router
-
Select the network created in the Virtual Private Cloud section: citrixcloudnetwork
-
Select the region us-west1
-
Input the Google ASN value. You can use any private ASN value (from 64512 through 65534, from 4200000000 through 4294967294)
-
Input the BGP peer keepalive interval value 20 (default)
-
Click Create
-
Validate the Cloud Router is created successfully
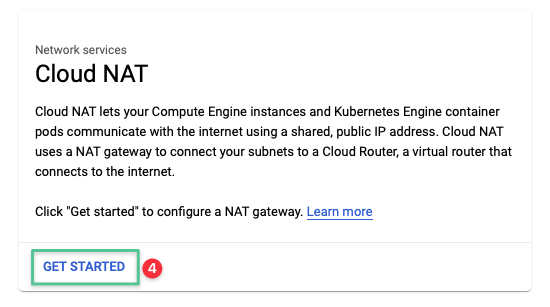
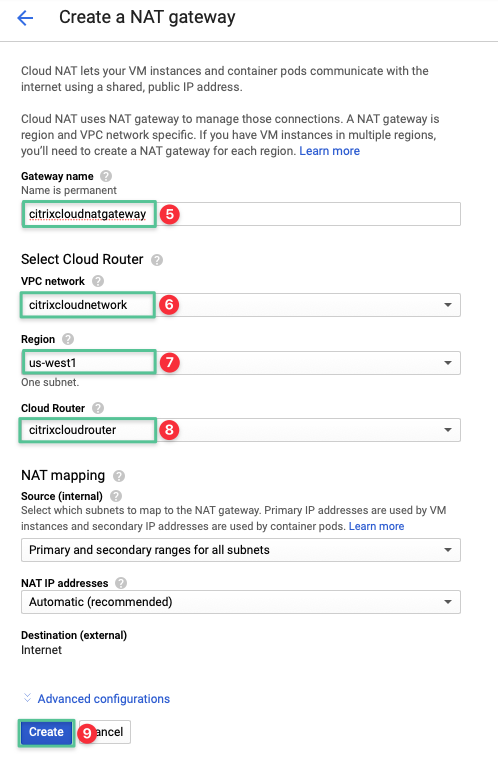
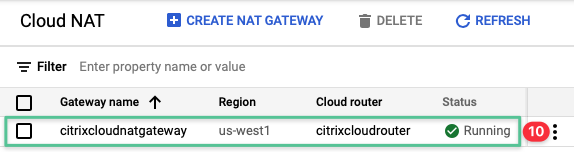
3.1.2.2 Step 2: Deploy Google Cloud NAT
-
Click the hamburger icon, located in the top left-hand corner of the Google Console
-
Navigate to Network Services
-
Click Cloud NAT

-
Click Get Started
-
Input a unique name for the Cloud NAT: citrixcloudnatgateway
-
Select the VPC network created in the Virtual Private Cloud section: citrixcloudnetwork
-
Select the region us-west1
-
Select the Cloud Router deployed in Step 1
-
Click Create
-
Validate the Cloud NAT is created successfully
3.1.2.3 Configure DNS Services via Google Cloud DNS
Domain Name System (DNS) services are a baseline requirement for any connected network to provide name resolution and a minimum requirement for Microsoft Active Directory functionality. To support a functional Citrix Cloud Resource Location, Citrix Cloud Connectors and VDAs must locate and communicate with both Active Directory and Citrix Cloud. Google Cloud DNS is a high-performance and resilient global Domain Name System (DNS) service that publishes the domain names to the global DNS. Cloud DNS consists of public zones and private managed DNS zones. A public zone is visible to the public internet, while a private zone is visible only from a more specified Virtual Private Cloud (VPC). You are deploying Cloud DNS to provide name resolution to the ctx.lab domain with a private forwarding zone type. The following private DNS servers IP addresses are manually configured as you progress through this document:
- 10.240.1.2
- 10.240.1.3
-
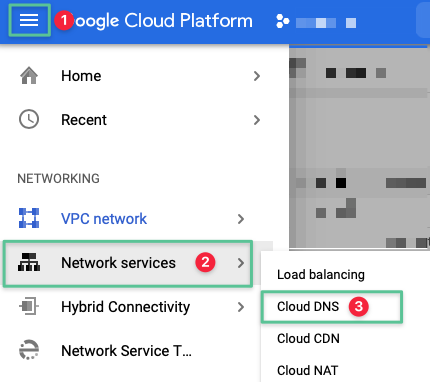
Click the hamburger icon, located in the top left-hand corner of the Google Console
-
Navigate to Network services
-
Click Cloud DNS
-
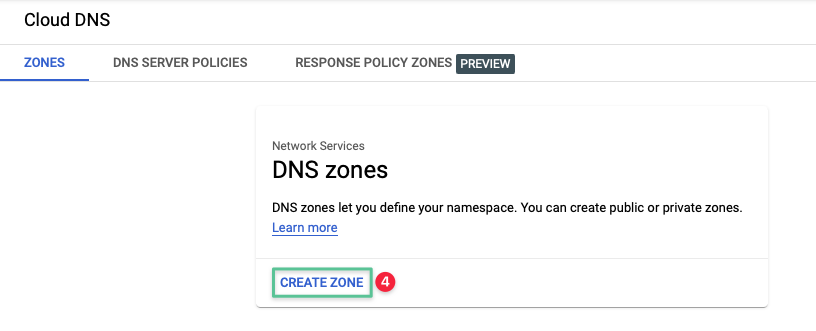
Click Create Zone
-
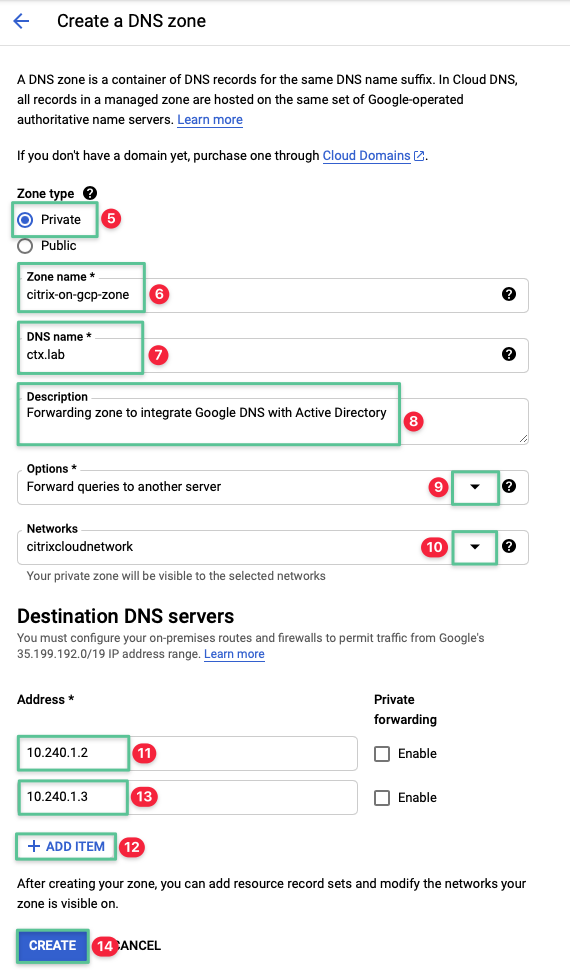
Select Private under the Zone type
-
Input a unique name for the Zone name: citrix-on-gcp-zone
-
Input a unique DNS name: ctx.lab
-
Input a unique Description: Forwarding zone to integrate Google DNS with Active Directory
-
Click the Options drop-down and select Forward queries to another server
-
Under the Networks section, click the drop-down and select the network created in the Virtual Private Cloud section: citrixcloudnetwork.
-
Enter the first DNS IP Address: 10.240.1.2
-
Click Add Item
-
Enter the second DNS IP Address: 10.240.1.3
-
Click Create
-
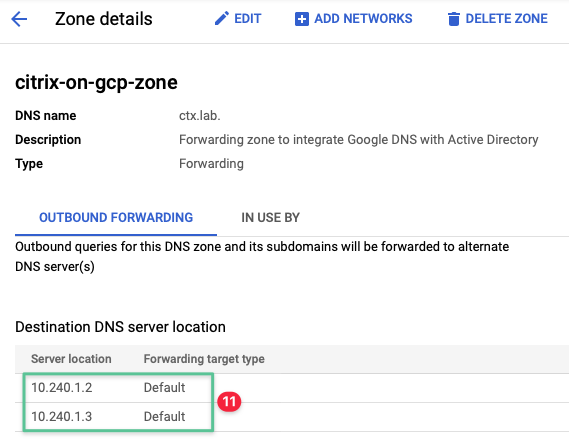
Validate the DNS Zone created successfully
3.2 Configure network layer security using Google Cloud VPC firewall
Every production and/or Internet connected system needs to have multiple layers of security implemented for obvious reasons. VPC Firewall is one of the many security features provided by Google Cloud. VPC firewall rules allow ingress and egress traffic to be allowed or denied. VPC firewall rules are based on a flexible set of defined policies. The VPC firewall rules are attached to the VPC and virtual machines. The VPC firewall rules are defined at the network level, and connections are allowed or denied on a per instance basis. The VPC firewall protects instances within the same VPC network and between an instance and other VPC networks.
A Citrix Cloud Resource Location needs some basic firewall rules to function. The following table summarizes the protocol, ports, and network tags that are required/allowed for this deployment to be functional. The tasks which follow guides you through creating firewall rules to match:
| Description | Traffic Flow | Target Network Tags | Source IP Range | Protocol and Ports |
|---|---|---|---|---|
| Allow internal traffic between Domain Controller and other VM instances | Ingress | dc | 10.240.1.0/24 | TCP: 88, 135, 389, 445, 464, 636, 3268, 3269, 5985, 9389, 49152-65535 UDP: 88, 123, 389, 464 |
| Allow forwarding from Google DNS | Ingress | dns | 35.199.192.0/19 10.240.1.0/24 | TCP: 53 UDP: 53 |
| Allow traffic from Cloud Connector to VDA | Ingress | vda | 10.240.1.0/24 | TCP: 80, 443, 1494, 2598, 8008 UDP: 1494, 2598, 16500-16509 |
| Allow traffic from VDA and Cloud Connector | Ingress | cc | 10.240.1.0/24 | TCP: 80 |
We use the target network tags to apply these rules to the virtual machines we are creating later in this guide.
3.2.1.1 Create a firewall rule to allow internal traffic to Active Directory
-
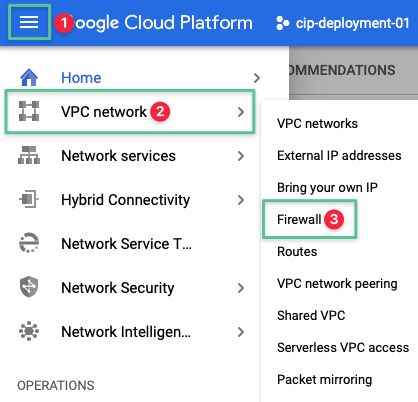
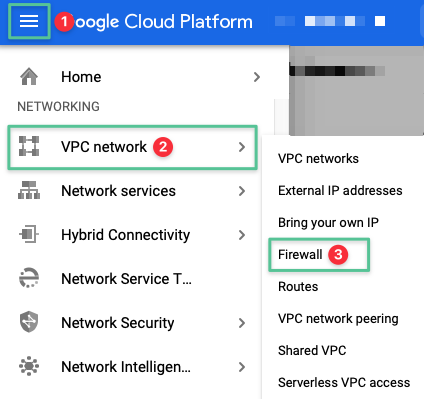
Click the hamburger icon, located in the top left-hand corner of the Google Console
-
Navigate to VPC network
-
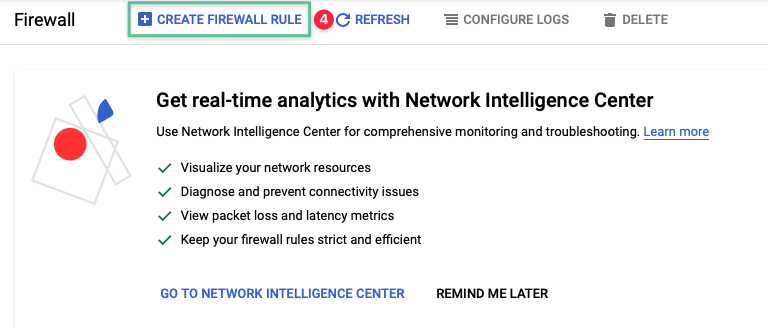
Click Firewall
-
Click Create Firewall Rule option
-
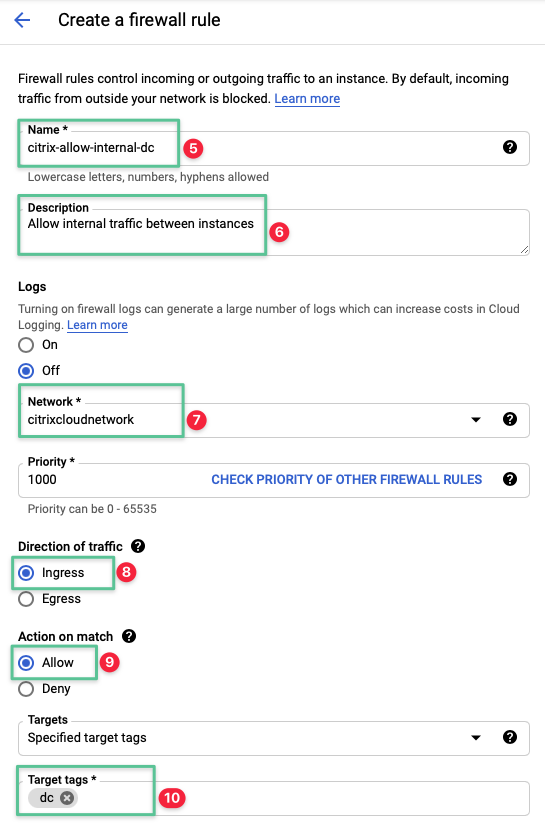
Input a unique name for the firewall rule: citrix-allow-internal-dc
-
Input a description: Allow internal traffic between instances
-
Select the Network created in the Virtual Private Cloud section: citrixcloudnetwork
-
Set the Direction of Traffic option to Ingress
-
Set the Allow on match option to Allow
-
Input the network target tags that are configured under the deploying the Google Compute Instance: dc
-
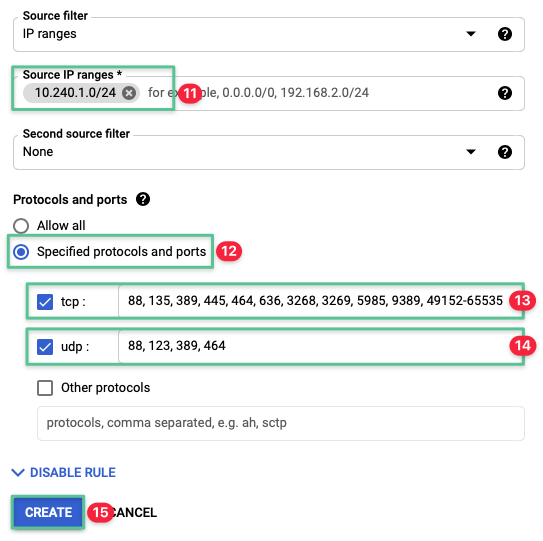
Set the Source IP ranges to 10.240.1.0 / 24
-
Select the Specified protocol and ports option
-
Select the tcp check box and enter the allowed ports: 88, 135, 389, 445, 464, 636, 3268, 3269, 5985, 9389, 49152-65535
-
Select the udp check box and enter the allowed ports: 88, 123, 389, 464
-
Click Create
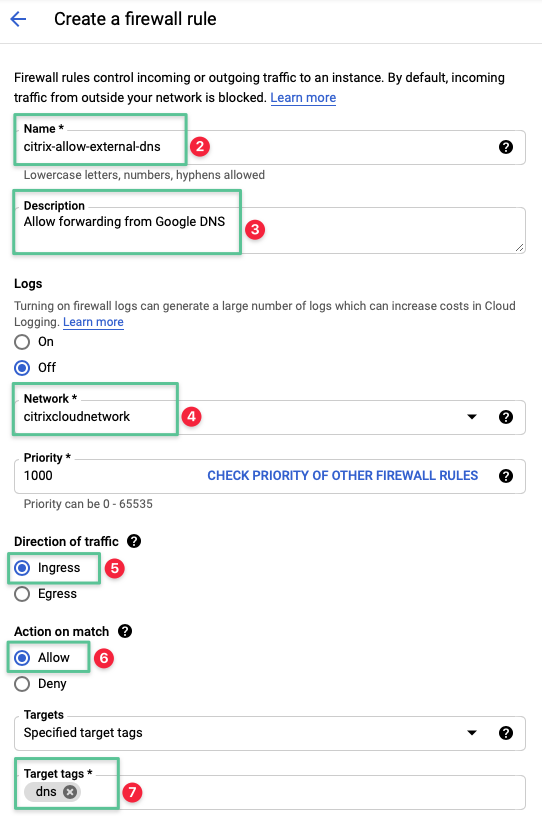
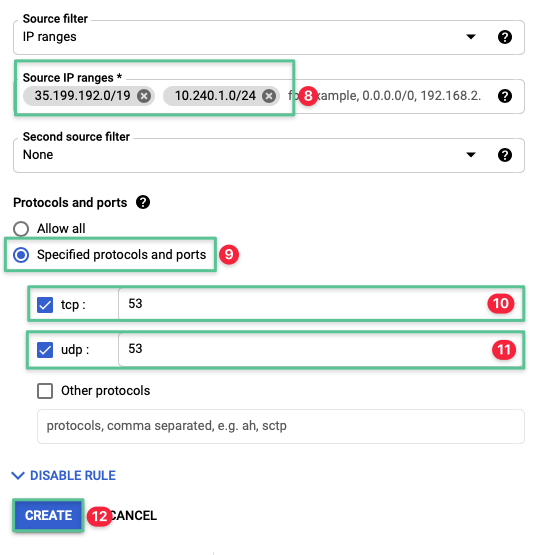
3.2.1.2 Create a firewall rule to allow forwarding from Google Cloud DNS
-
Click Create Firewall Rule option

-
Input a unique name for the firewall rule: citrix-allow-external-dns
-
Input a description: Allow forwarding from Google DNS
-
Select the Network created in the Virtual Private Cloud section: citrixcloudnetwork
-
Set the Direction of Traffic option to Ingress
-
Set the Allow on match option to Allow
-
Input the network target tags that is configured under the deploying the Google Compute Instance: dns
-
Set the Source IP ranges to 35.199.192.0/19 and 10.240.1.0 / 24
-
Select the Specified protocol and ports option
-
Select the tcp check box and enter the allowed ports: 53
-
Select the udp check box and enter the allowed ports: 53
-
Click Create
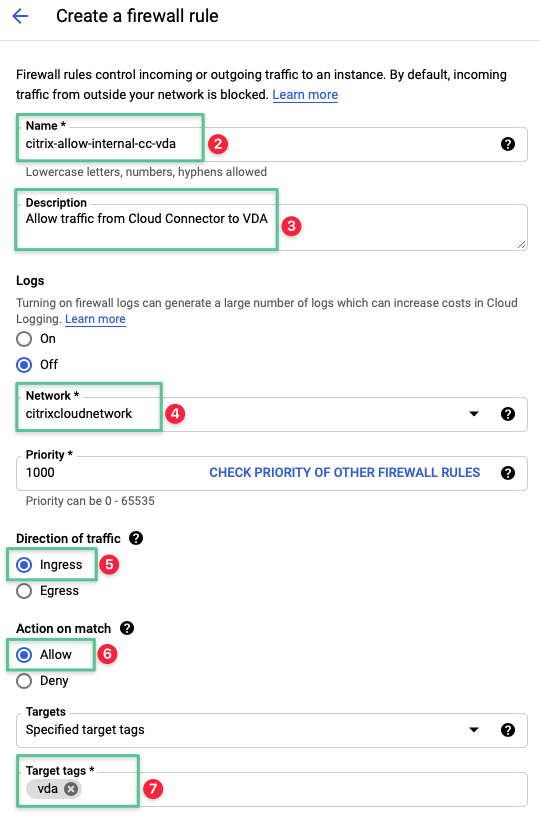
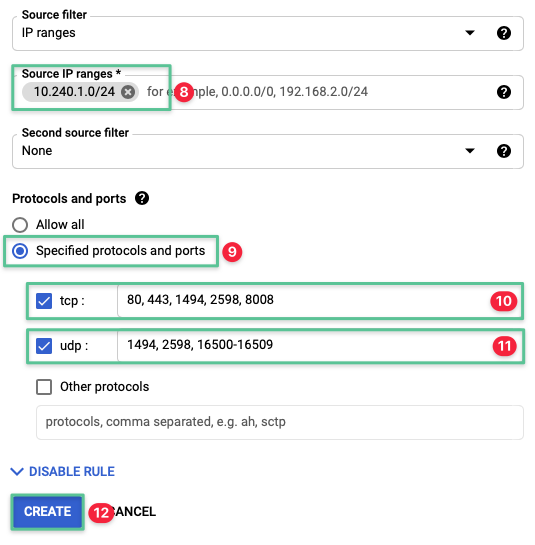
3.2.1.3 Create a firewall rule to allow traffic from Cloud Connector to VDA
-
Click create Firewall Rule option

-
Input a unique name for the firewall rule: citrix-allow-internal-cc-vda
-
Input a description: Allow traffic from Cloud Connector to VDA
-
Select the Network created in the Virtual Private Cloud section: citrixcloudnetwork
-
Set the Direction of Traffic option to Ingress
-
Set the Allow on match option to Allow
-
Input the network target tags that are configured under the deploying the Google Compute Instance: vda
-
Set the Source IP ranges to 10.240.1.0 / 24
-
Select the Specified protocol and ports option
-
Select the tcp check box and enter the allowed ports: 80, 443, 1494, 2598, 8008
-
Select the udp check box and enter the allowed ports: 1494, 2598, 16500-16509
-
Click Create
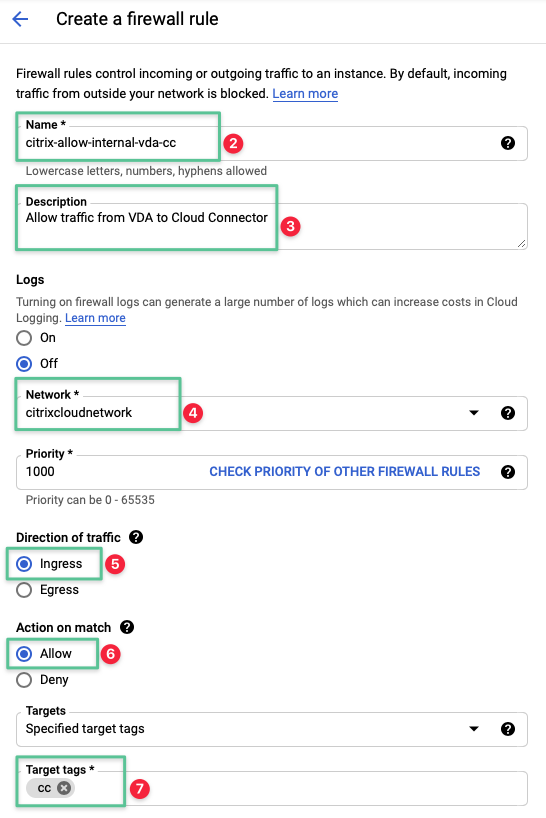
3.2.1.4 Create a firewall rule to allow traffic from VDA to Cloud Connector
-
Click Create Firewall Rule option
-
Input a unique name for the firewall rule: citrix-allow-internal-vda-cc
-
Input a description: Allow traffic from VDA to Cloud Connector
-
Select the Network created in the Virtual Private Cloud section: citrixcloudnetwork
-
Set the Direction of Traffic option to Ingress
-
Set the Allow on match option to Allow
-
Input the network target tags that is configured under the deploying the Google Compute Instance: cc
-
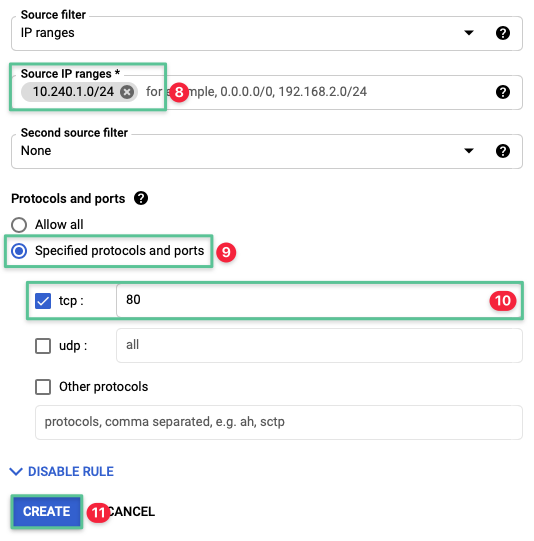
Set the Source IP ranges to 10.240.1.0 / 24
-
Select the Specified protocol and ports option
-
Select the tcp check box and enter the allowed ports: 80
-
Click Create
4. Create virtual machines
Now that you have a functional Google Cloud project and core network services in place. The next step is to create the virtual machine resources needed to have a functional Citrix Cloud resource location. As described in the Reference Architecture: Citrix Virtualization on Google Cloud, a functional resource location requires the following:
-
Active Directory domain services
-
Citrix Cloud Connectors
-
One or more Citrix VDAs
Applying the Cloud Forward design pattern, these resources are deployed on virtual machine instances attached to a VPC. The virtual machine instances are deployed in a highly available manner by splitting between Google Cloud zones in the region. In this section of the guide, we provide additional information on Google Cloud resource and service types, followed by creating the virtual machine instances.
Google Cloud virtual machine resources Google Cloud provides reliable, high performance block storage for use by virtual machine instances. Block storage is presented to virtual machines as Persistent Disks. The persistent disks, available either as standard hard drive or solid-state drives (SSD). The persistent disks are durable network storage devices that your instance can access as though they were physical disks in a desktop or a server. Google Compute Engine instances by default have a single root persistent disk with an operating system. Extra disks can be added later for instances where applications require more local storage. The choices for disk expansion are Standard or SSD persistent disks, Local SSDs, and Cloud Storage Buckets. The Local SSD is not recommended for Citrix Virtual Apps deployment because data stored on the local SSD are temporary. The persistent disks are located independently from the virtual machine instances. You can choose to detach or move persistent disks to retain data even after the VM instance is deleted. The persistent disks performance scales automatically with size. You can resize the persistent disks or add more persistent disks to an instance to meet performance to storage space requirements. The persistent disk has no per I/O cost, so estimate the monthly I/O budget is unnecessary. SSD persistent disks have a read IOPS of 40,000 and write IOPS of 30,000 per instance. Compared to standard persistent disks, which only have a read IOPS of 3,000 and write IOPS of 15,000. The SSD persistent disk is recommended for deploying Citrix Virtual Apps workloads. When estimating storage capacity, remember that Virtual Apps and Desktops deployments have two storage needs: (1) storage for Virtual Apps servers and applications and (2) storage for user profiles. Deploying a Virtual Apps server master image requires 50 GB of storage which can vary based on installed applications and the Windows Server operating system version. For example, the Windows Server 2016 OS boot size is 50 GB while the Windows Server 2012 R2 is 32 GB. Citrix recommends creating a new Virtual Apps master image to minimize the required capacity instead of migrating an existing on-premise image.
On the Google Cloud, the service that runs virtual machine instances is referred to as the Google Compute Engine. Compute Engine offers predefined virtual machines configurations for every requirement. The offerings range from small micro instances to high memory and high CPU configurations. The following compute resources are relevant to any Virtual Apps deployment on GCP:
-
General purpose or Workload Optimized - you can choose between general purpose or workload optimized based on workloads requirments.
-
Predefined Machine Type – has a predefined number of vCPUs and memory and is charged at a set price described in the pricing page.
-
Custom Machine Type – provide the flexibility to configure the vCPU and memory for specific needs and potentially reducing the cost.
Microsoft licensing requires that the Citrix Virtual Desktop instances are not deployed in a non-Microsoft public cloud. You can implement Citrix Virtual Desktop on GCP by using either Sole Tenant Nodes (STNs) or Google Cloud VMware Engine (GCVE). STNs and GCVE are beyond the scope of this deployment guide.
Microsoft License Mobility enables the deployment of Windows Server applications (Citrix Virtual Apps), such as Remote Desktop Services (RDS), in GCP while using your existing Microsoft licenses. You are recommended to review your Microsoft licensing agreements with Microsoft before starting this deployment. Microsoft Windows Server instances require an internet network connection to activate with the GCP KMS host kms.windows.googlecloud.com. The standard grace period for Windows Server instances to register with the KMS host is 30 days. After 30 days, the instances will stop functioning. Alternatively, you can also bring your own Windows KMS licensing into GCP and host the required licenses. In this guide, we are not deploying a Microsoft RDS server. Instead, we are using the 30-days grace period for validation.
4.1 Create virtual machine instances
The Cloud Forward design pattern requires three different types of virtual machine instances to be deployed (Active Directory, Citrix Cloud Connector™, Citrix VDA). Using the details in the table, repeat the steps outlined to create and start each virtual machine. Once complete, generate and store credentials to log in to each virtual machine instance the first time.
| VM Type | Compute Sizing | VPC Network | Google Zone | Hostname | IP Address | Network Tags |
|---|---|---|---|---|---|---|
| Active Directory Domain #1 | N1-Standard-2 | Citrix Cloud Network | us-west1-a | dc1.ctx.lab | 10.240.1.2 | dc dns |
| Active Directory Domain #2 | N1-Standard-2 | Citrix Cloud Network | us-west1-b | dc2.ctx.lab | 10.240.1.3 | dc dns |
| Cloud Connector #1 | N2-Standard-4 | Citrix Cloud Network | us-west1-a | cc1.ctx.lab | 10.240.1.4 | cc |
| Cloud Connector #2 | N2-Standard-4 | Citrix Cloud Network | us-west1-b | cc2.ctx.lab | 10.240.1.5 | cc |
| Server VDA Master Image | N2-Standard-4 | Citrix Cloud Network | us-west1-a | mcs.ctx.lab | Ephemeral (Automatic) | vda |
-
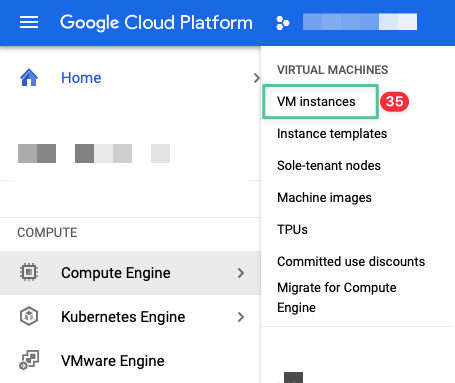
Click the hamburger icon, located in the top left-hand corner of the Google Console
-
Navigate to Compute Engine
-
Click VM Instances

-
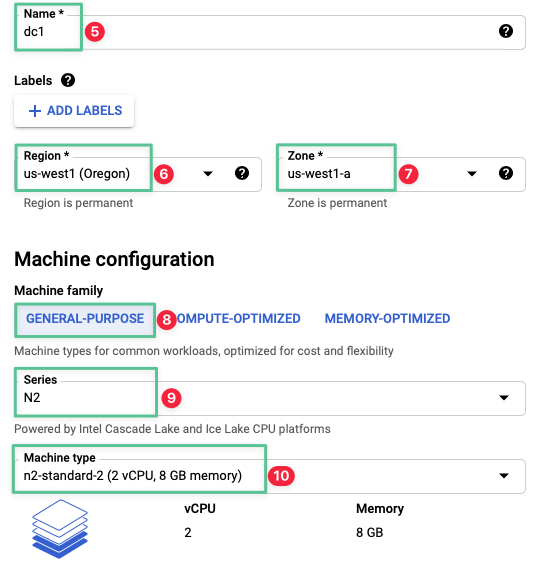
Click Create Instance

-
Input a name: dc1
-
Select the region: us-west1
-
Select the zone: us-west1-a
-
Select the General-purpose tab
-
Select N2 series
-
Select n2-standard-2 (follow the corresponding compute sizing listed for each virtual machine in the table at the beginning of this section.)
-
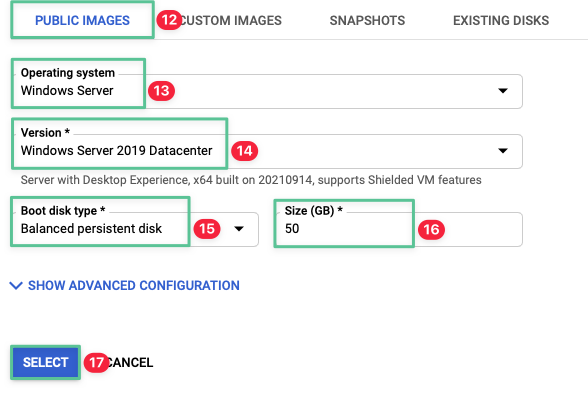
At Boot disk click Change

-
Click Public Image tab
-
Select Windows Server operating system
-
Select Windows Server 2019 Datacenter (for this deployment we are using the evaluation license)
-
Select Balanced persistent disk
-
Provide the required size in GB: 50
-
Click Select
-
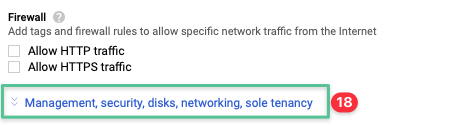
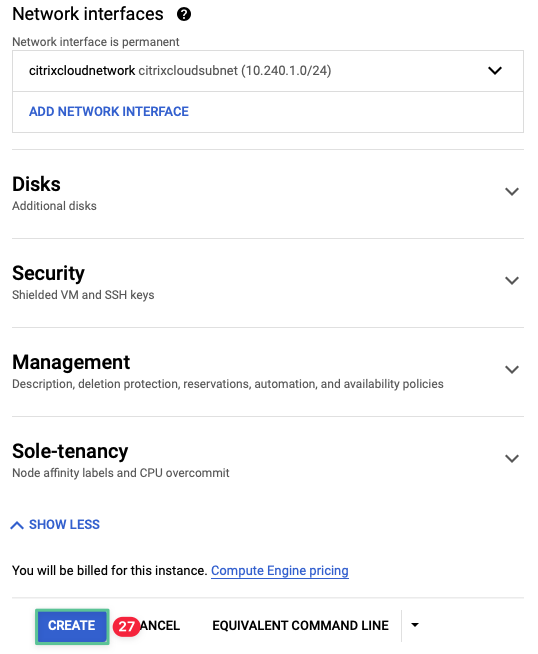
Expand the management, security, disks, networking, sole tenancy blade
-
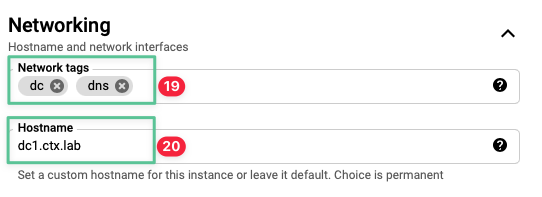
Expand Networking section and input the corresponding virtual machine network tags: dc dns
-
Input a host name as listed in the table at the beginning of this section: dc1.ctx.lab
-
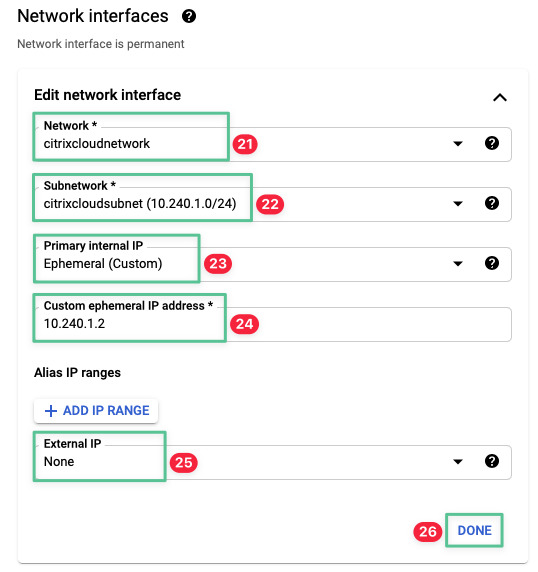
Select the network created in the Virtual Private Cloud section: citrixcloudnetwork
-
The Subnetwork should auto populate
-
Select Ephemeral IP Address (Custom) under the Primary internal IP section
-
Input the IP Address 10.240.1.2 under the Custom ephemeral IP address
Note
The Server VDA master image requires the IP address to be assigned automatically. To allow the Server VDA master image to obtain an IP address automatically select Ephemeral (Automatic).
-
Set the External IP to None
-
Click Done
-
Click Create
-
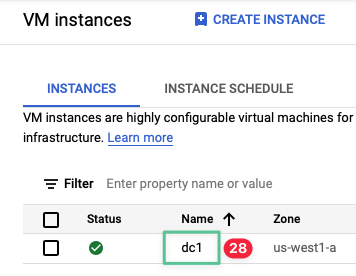
Once the machine has been created and powered on, the next step is to create a default username and password.
Note
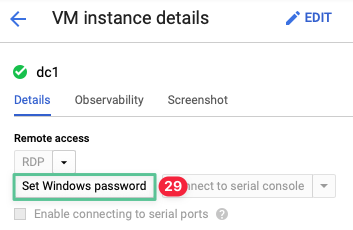
The Set Windows password function in Google Cloud sets/resets a strong password using the username you specify. If the account exists, it resets the password. If it does not, Google Cloud creates the user in the local security database of the Windows instance, then creates the password. The user Google Cloud creates (or updates) is a local administrator on the instance.
There are multiple ways to access the Set Windows password function - here’s one of them, and it starts by clicking the VM instance to view instance details.
-
Under the VM instance details section, click Set Windows password
-
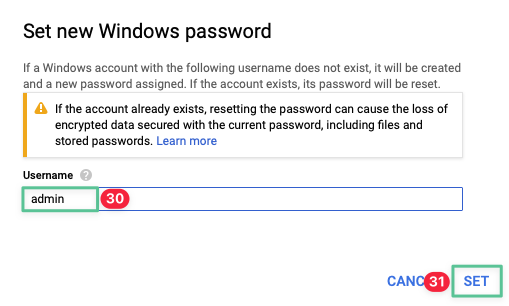
Input the username admin
-
Click Set
Note
If during creation of the password you are prompted an error “Windows password could not be set. Try again. If you just created this instance, allow 10 minutes for it to be ready.”, we recommend allowing the suggested time before trying to create the password.
-
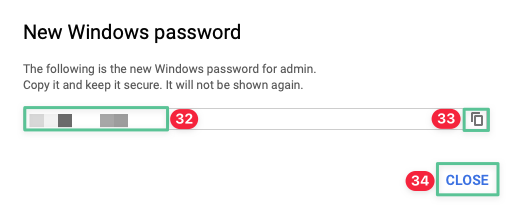
By default, a unique new password is auto generated by Google Cloud and cannot be changed from the console. If a custom password is required, you need do the password change within the Windows operating system.
-
You can either copy it down manually or Click on the copy icon. Store the password securely as it is required to log in to the virtual machine console in the upcoming section.
-
Click Close
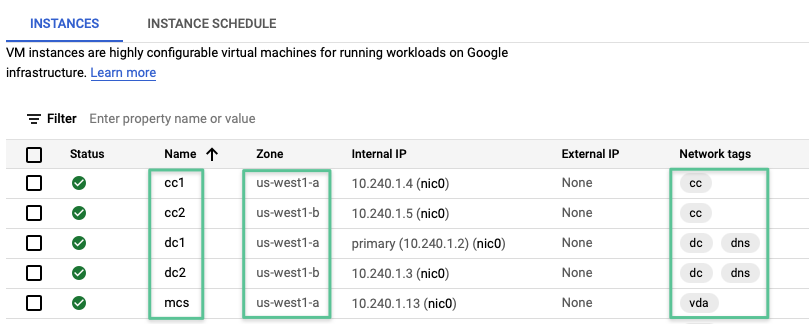
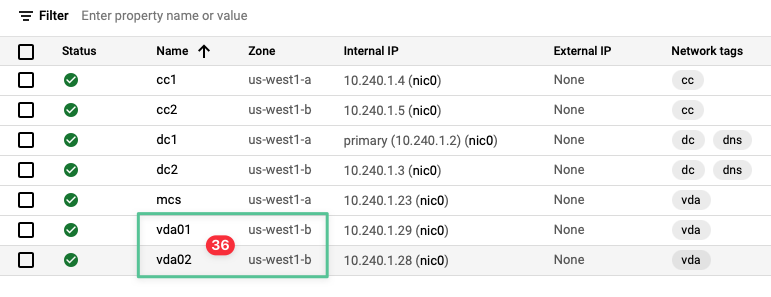
After following steps 1 through 35 to build each VM as indicated in the table at the beginning of this section. The results should be similar to the image:
-
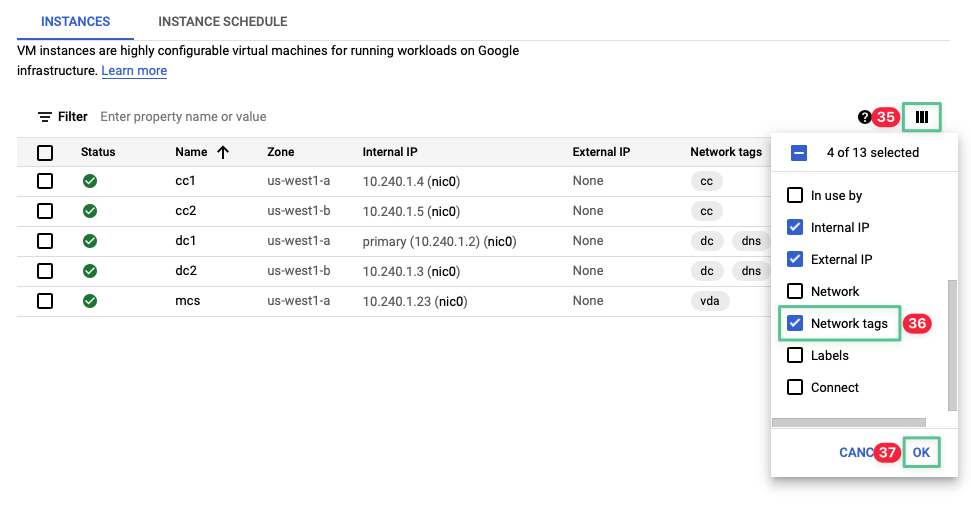
If you are unable to view the Network tags column, click the column display option icon
-
Select Network tags from the list
-
Click OK
5. Configure access to virtual machine consoles
Now that we have gone through the process of creating the Windows virtual machine instances. The next step is to identify a way to remotely access the consoles of these virtual machines to configure them. Google Cloud handles remote console access by relying upon network connectivity to the virtual machine instance, and a remote console service running inside the virtual machine. For Windows virtual machines, that means using an RDP client to connect to the RDP listener running inside the instances. SSH handles the connection for non-Windows machines.
The tools and techniques you use to gain access to the VM consoles can differ based on the operating system and network location of your workstation. They can also differ based on how your organization handles security. The goal of this section is ensuring you can establish remote console connections to the virtual machines in your Google Cloud project.
Some common techniques for establishing remote console access include the following:
-
Using an RDP client to establish a direct connection between an administrative workstation and VMs on the same network
-
Using public IP addresses on one or more VMs, and establishing RDP connections to the public addresses from an administrative workstation via the Internet
-
Establishing a connection to a jump box or bastion host, then accessing the VM within the Google Cloud project using the preferred RDP client. Administrators often connect to the jump box via an external IP address.
-
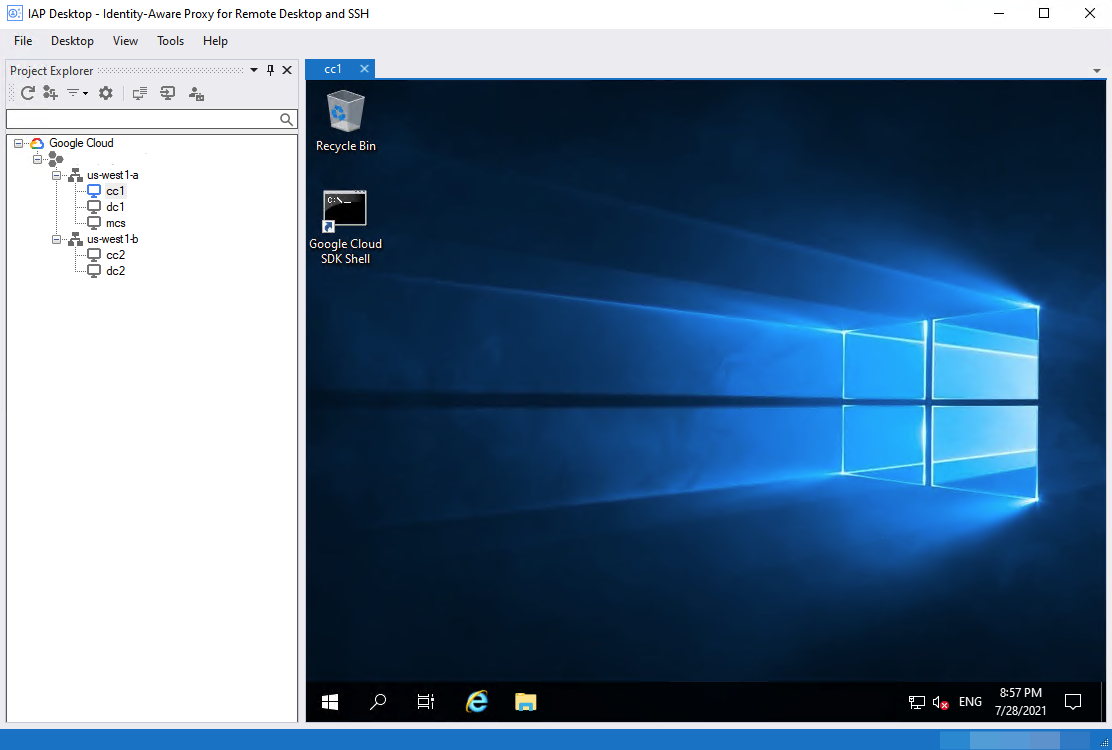
Using the Google Cloud Identity Aware Proxy (IAP) TCP forwarding feature, plus a tool like IAP Desktop
If your administrative workstation is already on the same network as the VMs in your Google Cloud project, you can connect to them via an IP address, assuming you have allowed RDP access via your firewall rules. If your administrative workstation is NOT on the same network, then you can consider using a jump box with an external IP address assigned. If you do this, however, make sure you restrict access to the RDP listener (TCP 3389) to only allow access from the public IP address of your administrative workstation.
The most secure way to provide remote console access is to use the Google Cloud Identity Aware Proxy TCP forwarding feature, plus IAP Desktop. Google Cloud Identity Aware Proxy (IAP) TCP forwarding feature allows you to control who can access the administrative interfaces such as SSH and RDP to the VMs in your project via the public Internet. IAP prevents these services from being directly exposed to the Internet. IAP also allows you to control WHO can access these services based on Google Cloud IAM roles as IAP does authentication and authorization before allowing access. The IAP Desktop is a Windows only open-source tool that puts a user-friendly UI on top of the IAP and RDP client.
This deployment guide uses the IAP service and IAP Desktop app to securely access the virtual machines for configuration. You can still use the IAP service with a non-Windows endpoint using the Google Cloud SDK and gcloud command, but that is outside of the scope of this guide.
Configuring Identity Aware Proxy is a three-step process: the first step is to configure the Firewall to allow ingress TCP traffic, the second step is to configure the Identity Aware Proxy, and the third step is to use IAP Desktop for remote console access.
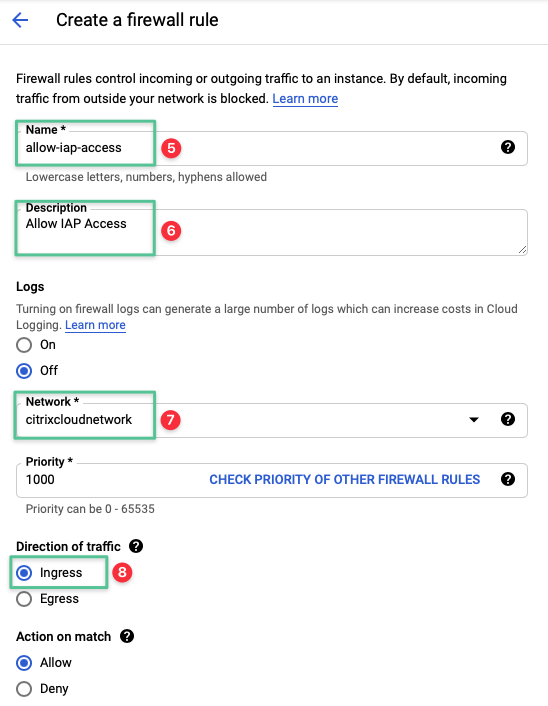
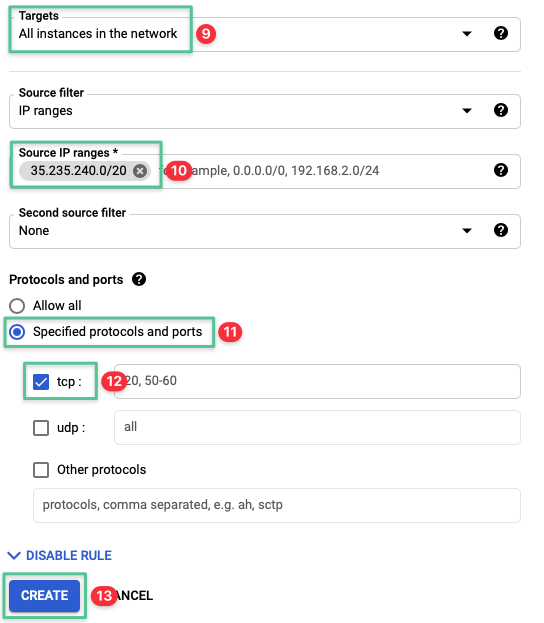
5.1 Configure the Google Cloud firewall to allow ingress TCP traffic
-
Click the hamburger icon, located in the top left-hand corner of the Google Console
-
Navigate to VPC network
-
Click Firewall
-
Click Create Firewall Rule

-
Input a unique name for the Firewall rule: allow-iap-access
-
Input a description for the Firewall rule: Allow IAP Access
-
Select the VPC network created in the Virtual Private Cloud section: citrixcloudnetwork
-
Select Ingress traffic
-
In the Targets field, select All instances in the network
-
Set the Source IP ranges to 35.235.240.0/20
-
Select Specified protocols and ports
-
Select the tcp check box
-
Click Create
-
Validate the Firewall rule is created

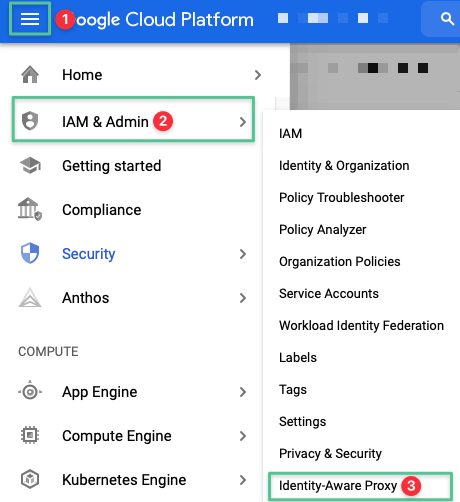
5.2 Enable and Configure the Identity Aware Proxy
-
Click the hamburger icon, located in the top left-hand corner of the Google Console
-
Navigate to IAM & Admin
-
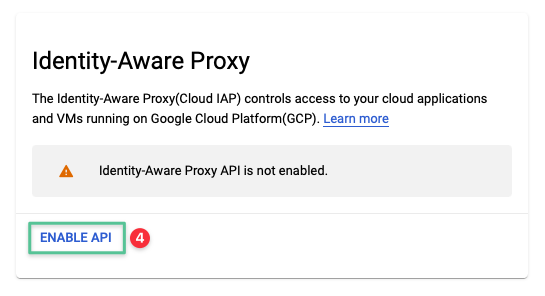
Click Identity-Aware Proxy
-
If prompted, click Enable API
-
Click Go to Identity-Aware Proxy

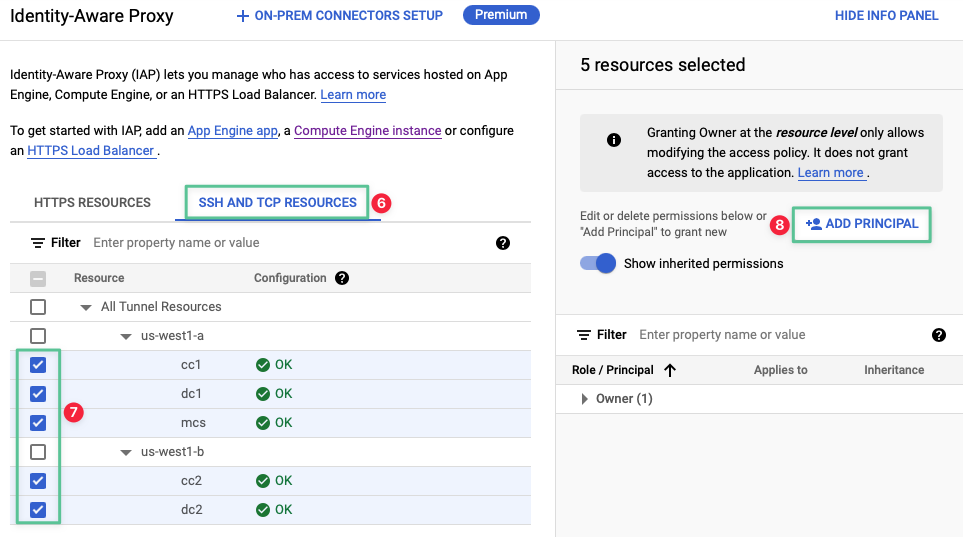
The following screen appears after clicking:
-
Click SSH and TCP Resources tab
-
To update member permissions on resources, select all the VM instances created earlier.
-
Click Add Principal
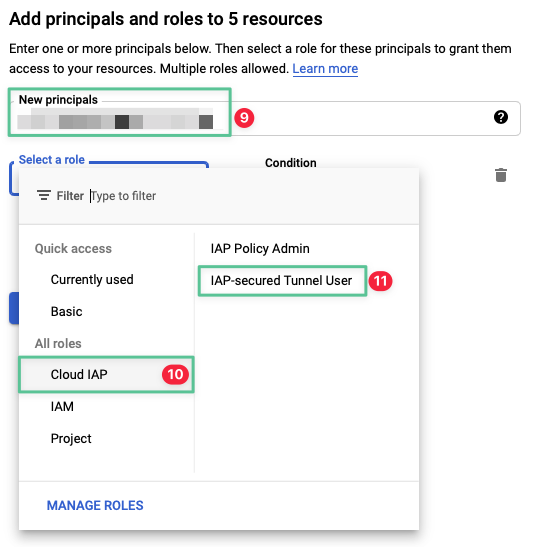
-
To grant users, groups, or service accounts access to the resources, specify their email addresses in the New principals field. If you are the only user testing this feature, you can enter your email address.
-
To grant the members access to the resources through the Cloud IAP TCP forwarding feature, in the Role drop-down, select Cloud IAP
-
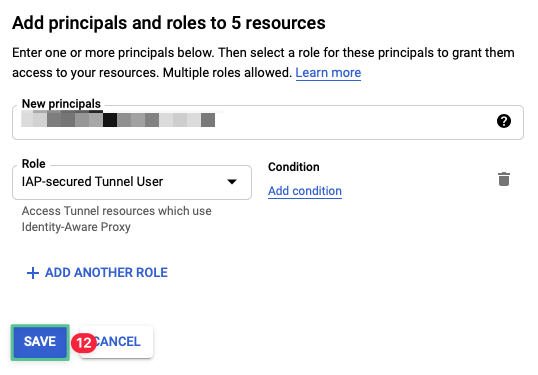
Select IAP-secured Tunnel User
-
Click Save
5.3 Install, configure, and use IAP Desktop for remote console access
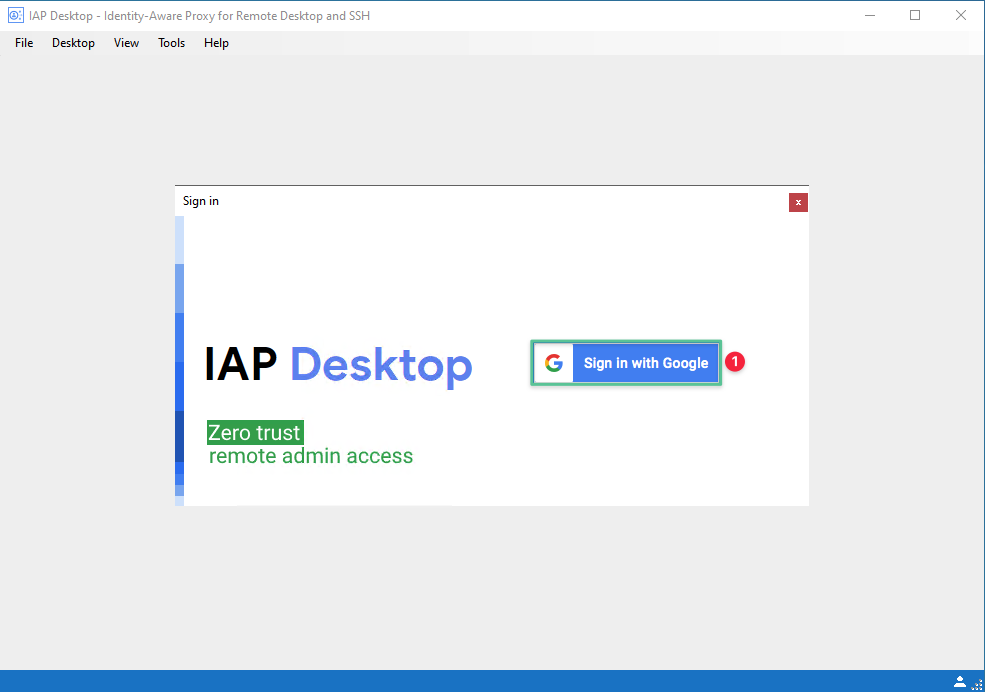
Once the Identity Aware Proxy has been enabled, the next step is to connect to the deployed virtual machine instances using IAP Desktop, available on GitHub. Once you have downloaded and installed the IAP Desktop, launch it and follow the steps to configure it.
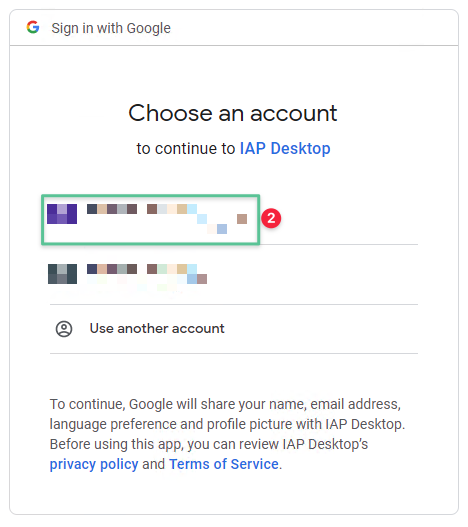
-
Click Sign in with Google
-
Select the account associated with the Google Cloud. Depending on your account configuration, you must provide Username, Password, and a token.
-
Upon a successful authentication, you are prompted with the following permission window. Select the See, edit, configure and delete your Google Cloud Platform data
-
Click Continue

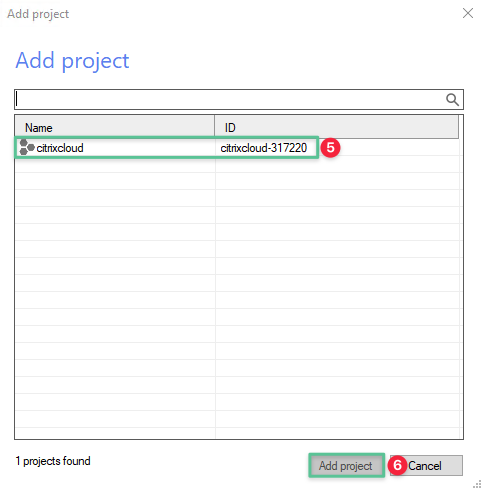
-
Select the Google Cloud Project
-
Click Add Project
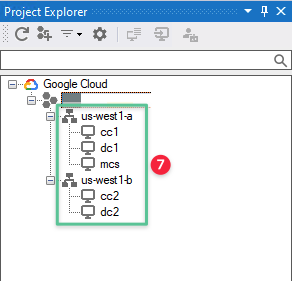
-
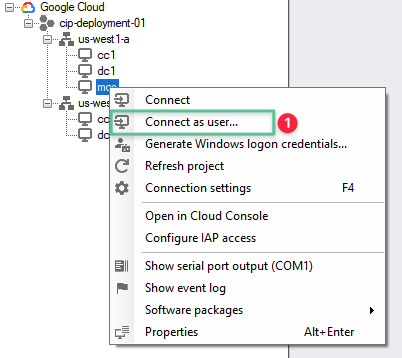
All the machines created under the Deploying Google Compute Instance section earlier are enumerated:
-
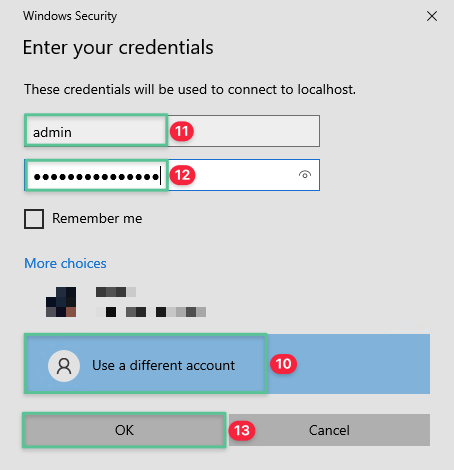
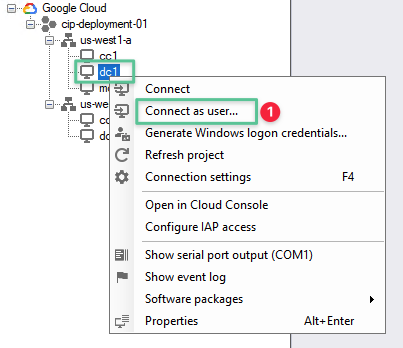
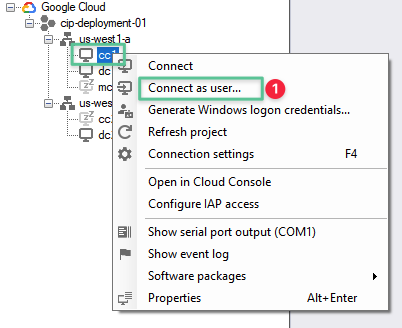
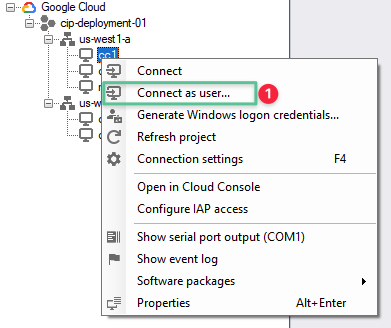
To log in to the virtual machine instance, right Click on the target virtual machine
-
Select Connect as user…

-
Click User a different account
-
Enter the username admin
-
Enter the unique password previously auto generated for the machine you are connecting
-
Click OK
-
Upon successful authentication, you can log in to the virtual machine
Once you have completed this goal (using IAP, a jump box, or some other technique), you have a functional method for connecting to the remote consoles of your virtual machines. In the next section, you use this method to configure the virtual machines into a functional Citrix Cloud resource location.
6. Deploy Active Directory into Google Cloud
As we discuss extensively in the Reference Architecture, Microsoft Active Directory Domain Services (ADDS) is a core infrastructure component required to support a Citrix virtualization system. Microsoft Active Directory enables you to manage authentication and authorization for the Citrix Cloud workloads. For an optimal user experience, Citrix leading practices strongly recommend deploying Active Directory in the same region as your Citrix Cloud Connectors and VDAs.
Microsoft Active Directory can be deployed to Google Cloud in multiple ways, including:
-
Deploying a new Microsoft Active Directory on the Google Cloud
-
Extending an existing Microsoft Active Directory to Google Cloud
-
Using Google Managed Service for Microsoft Active Directory, a highly available, hardened service running on the Google Cloud
This guide deploys a new Microsoft Active Directory on Google Cloud and integrates this new AD instance with Citrix Cloud.
6.1 Install the Active Directory Domain Services Role
Note
Step 1 through 21 is required to be performed on both DC1 and DC2 virtual machines.
-
Log in to the DC1 virtual machine using the local administrator credentials generated in the previous step

-
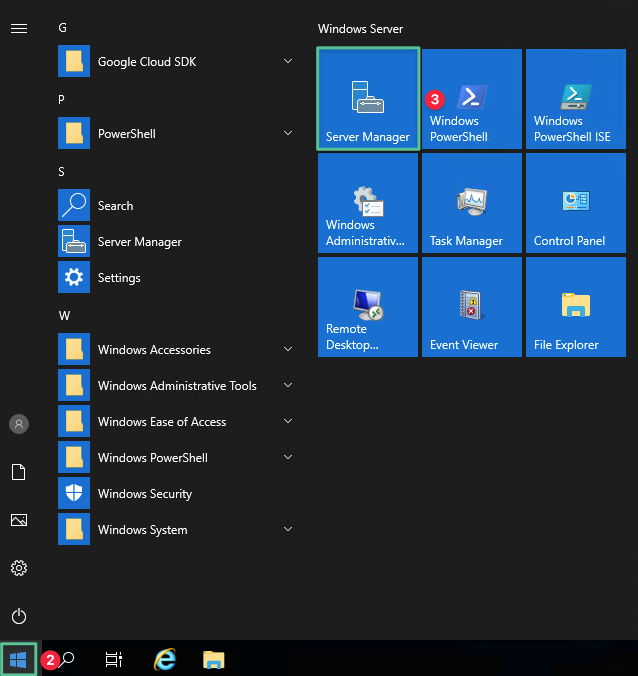
Click Start menu
-
Click Server Manager
-
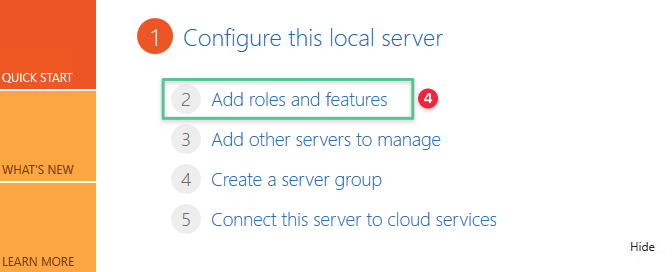
Click Add roles and features
-
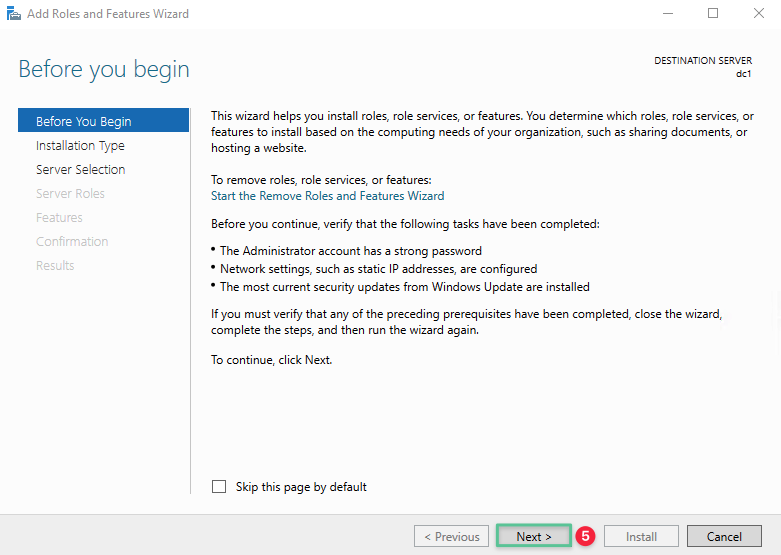
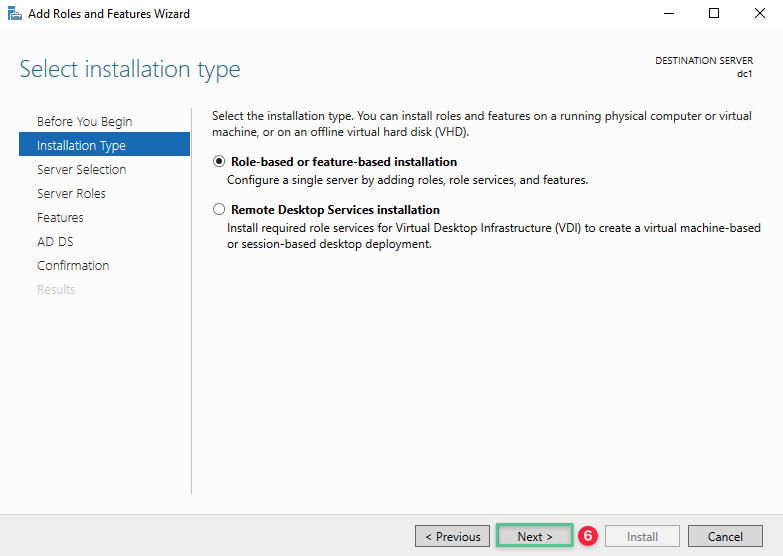
Click Next
-
Accept the default option, click Next
-
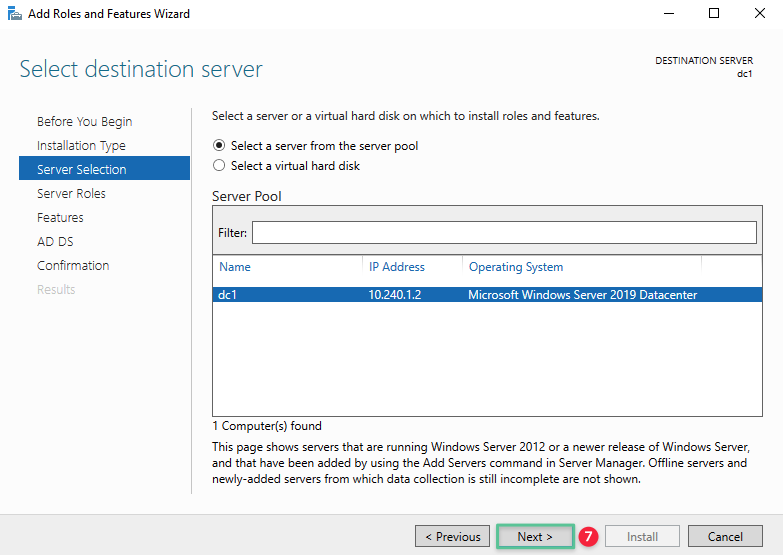
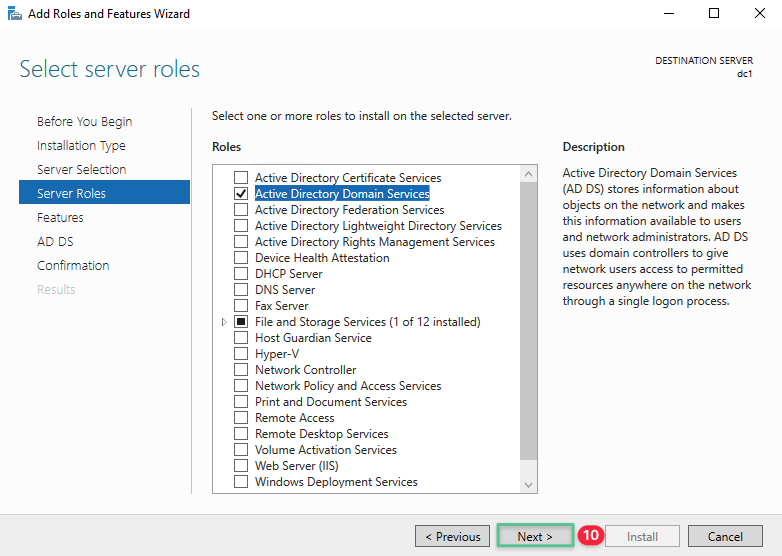
Select the destination server on which the role is installed. Confirm the IP address displayed is that of the selected server. Else, close the Server Manager and retry. Click Next.
-
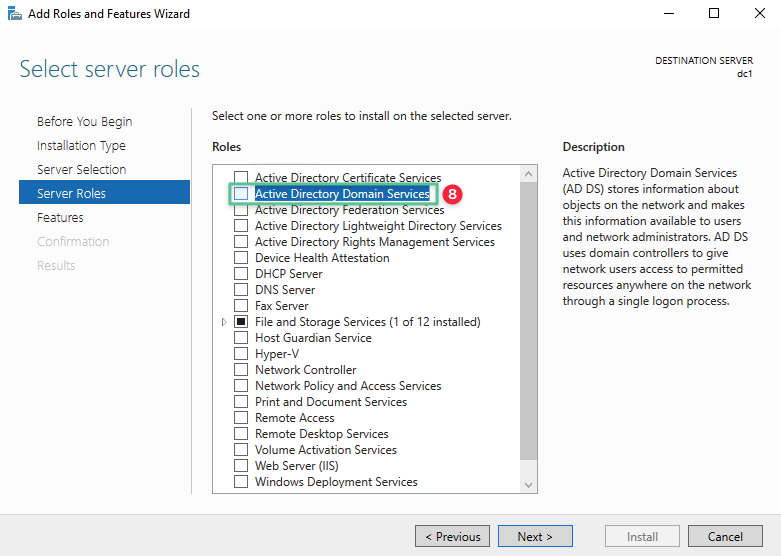
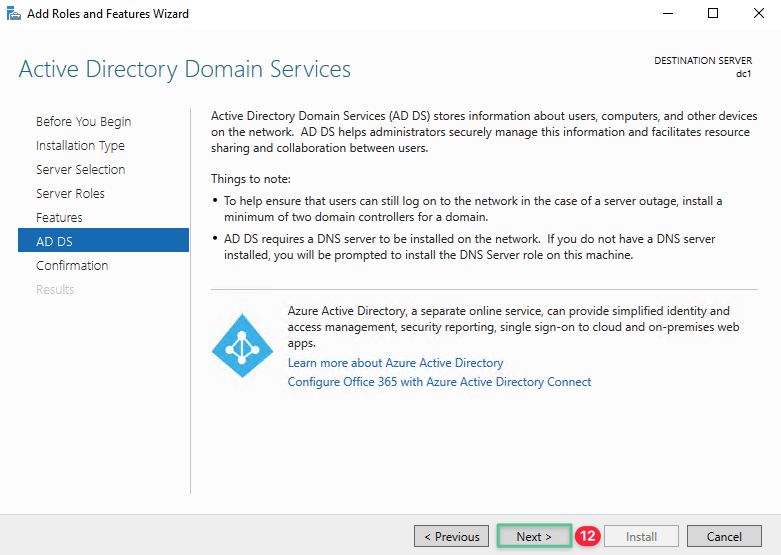
The basic requirement to promote this server into a domain controller is Active Directory Domain Services.
-
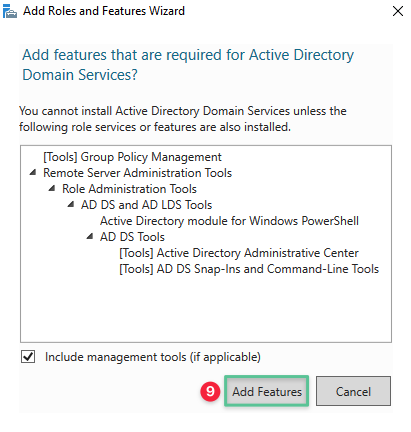
When prompted, click Add Features
-
Click Next
-
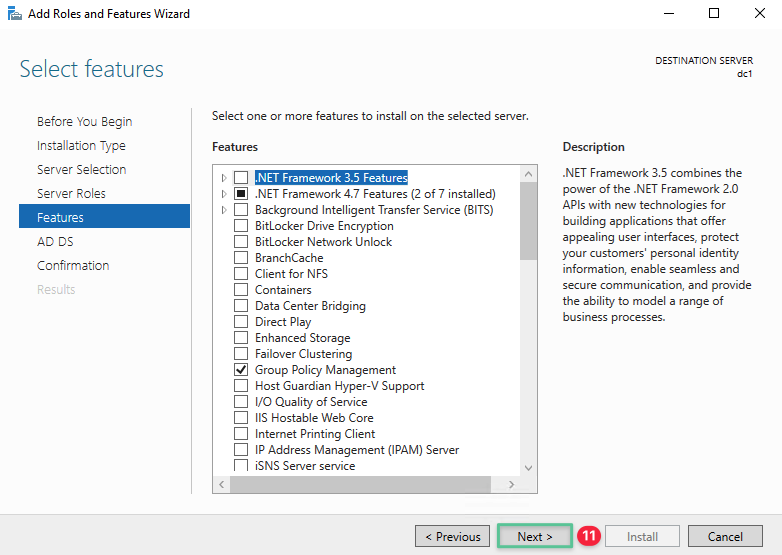
The features for this role are ready to be installed. The basic features required for this service are selected by default. Click Next.
-
Click Next to continue
-
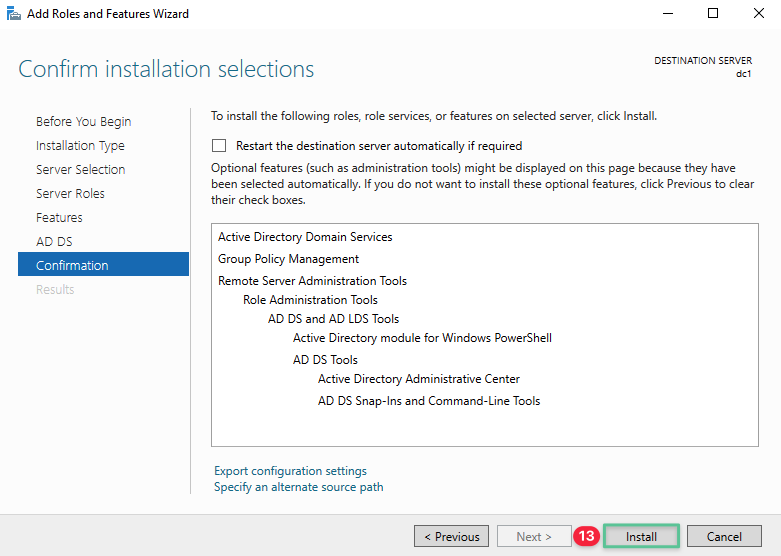
Click Install
Note
Select the “Restart the destination server automatically if required” option.
-
At this point the installation starts
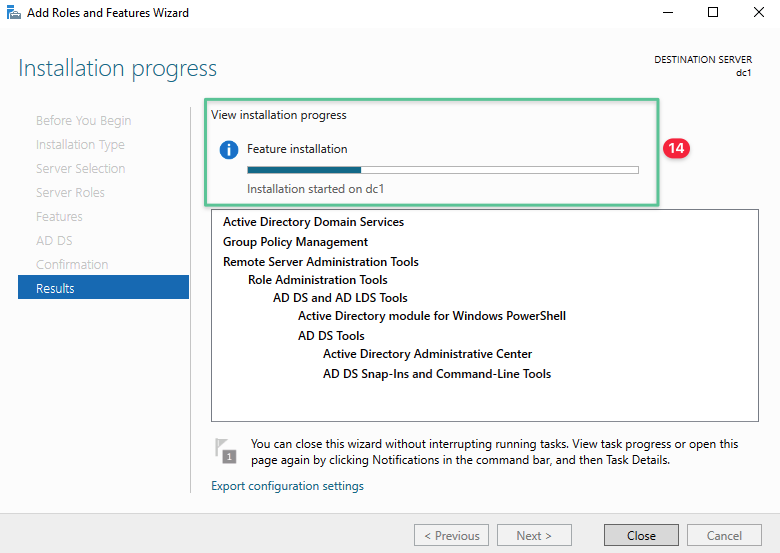
-
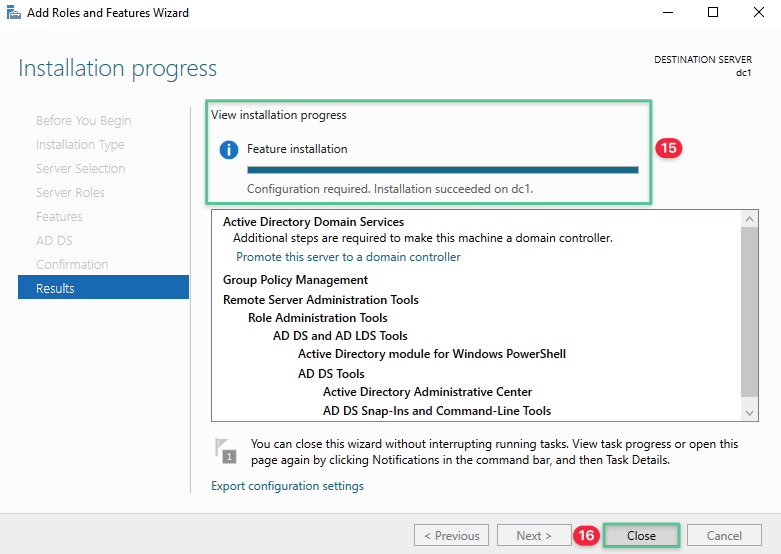
Upon successful installation, the installation process displays Configuration required. Installation succeeded on dc1
-
Click Close to exit out of the Add Roles and Features installation process
-
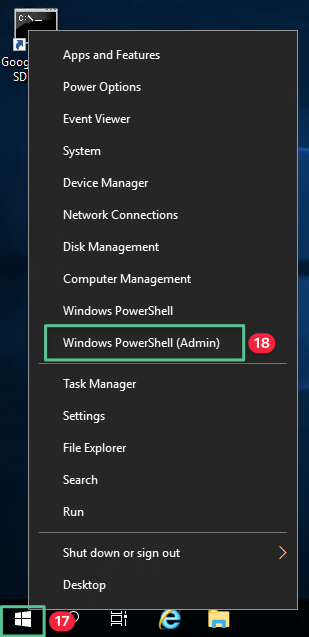
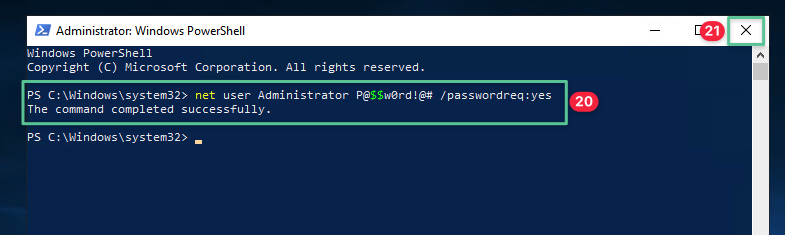
Before you start the process of promoting the server to Domain Controller, you must configure a complex local administrator password to meet the password complexity requirement.
-
Right-click the Windows menu and select Windows PowerShell (Admin)
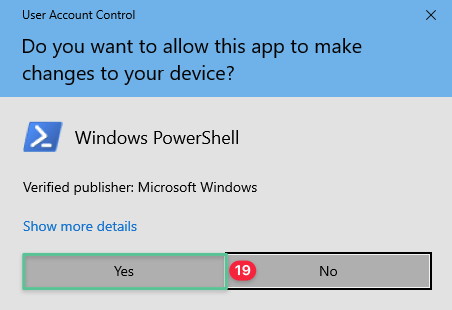
-
User Account Control prompts you for permission, Click Yes
-
Input the following command in the Windows PowerShell console, press Enter to execute the command: net user Administrator P@$$w0rd!@# /passwordreq:yes
-
Click the close Windows icon to exit out of the Windows PowerShell console
6.2 Configure the Primary Domain Controller
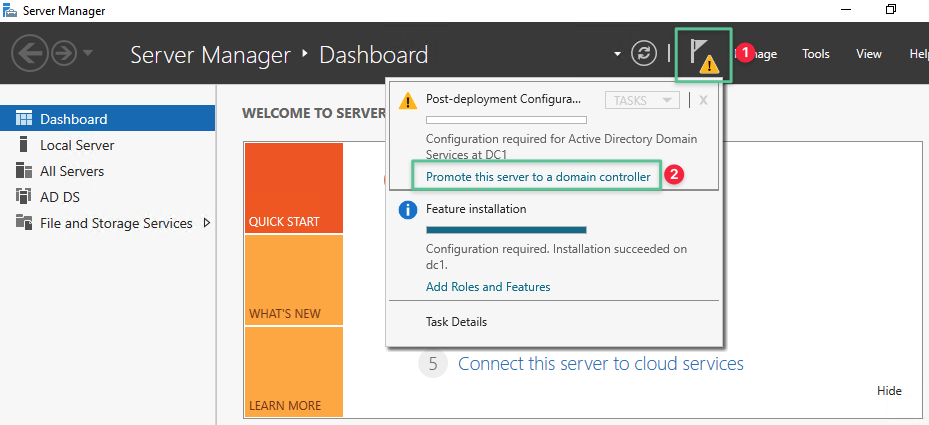
-
Click the Notification icon
-
Click Promote this server to a domain controller
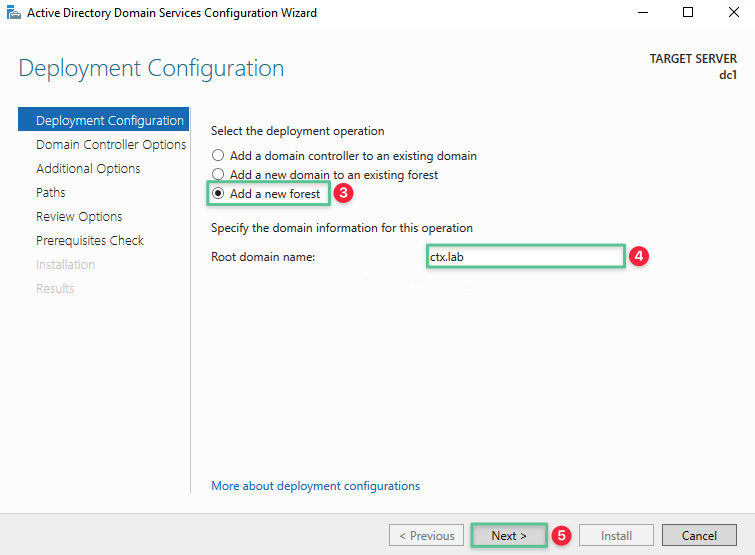
-
Select Add a new forest
-
Input a unique Root domain name: ctx.lab
-
Click Next
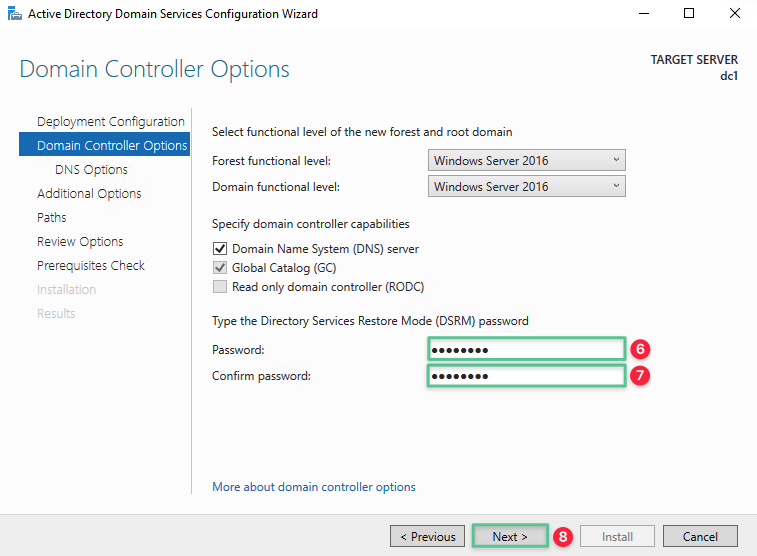
-
Specify a new Directory Services Restore Mode (DSRM) password that meets Microsoft Windows password complexity requirement: P@$$w0rd!@#
note
DSRM mode allows an administrator to repair or restore an Active Directory.
-
Repeat the password: P@$$w0rd!@#
-
Click Next
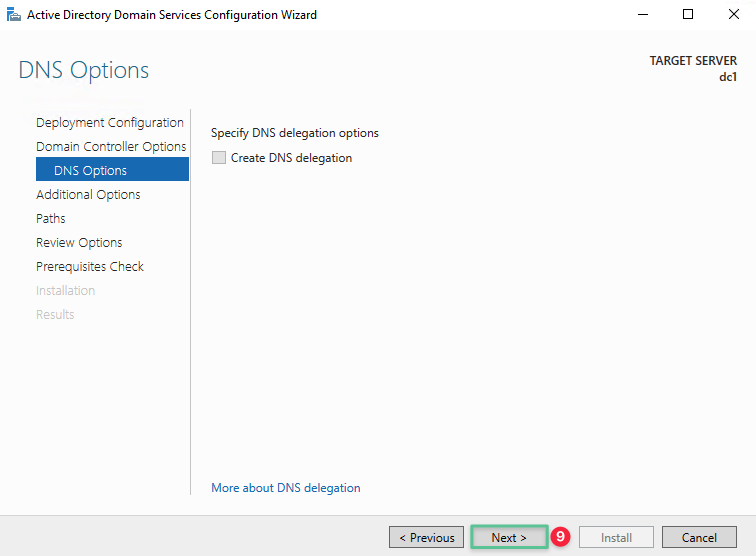
-
Click Next
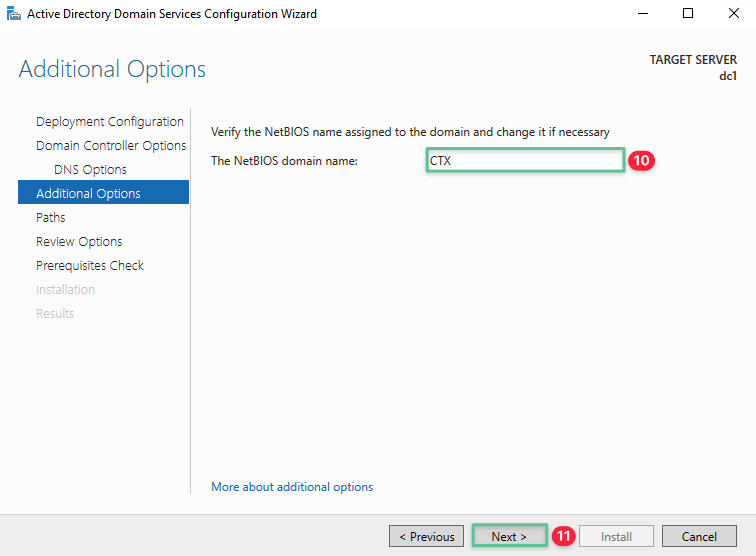
-
The NetBIOS domain name automatically populates, you can change the name if necessary
-
Click Next
-
Accept the default folder path and click Next

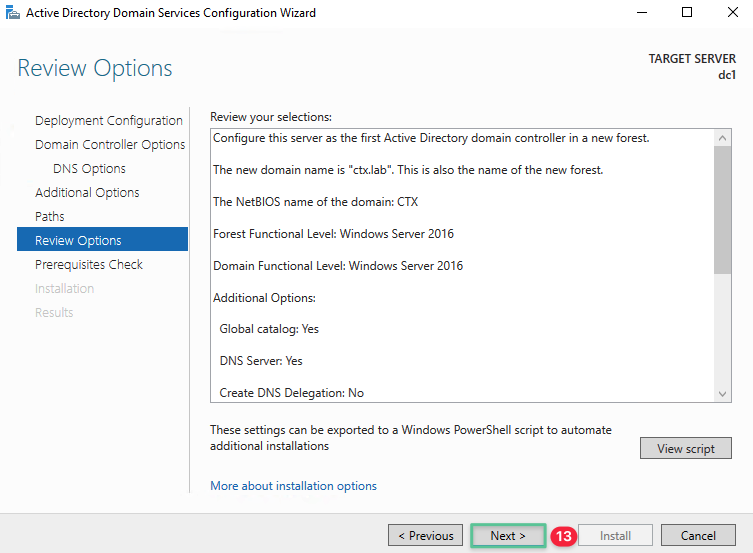
-
Review your selections and click Next
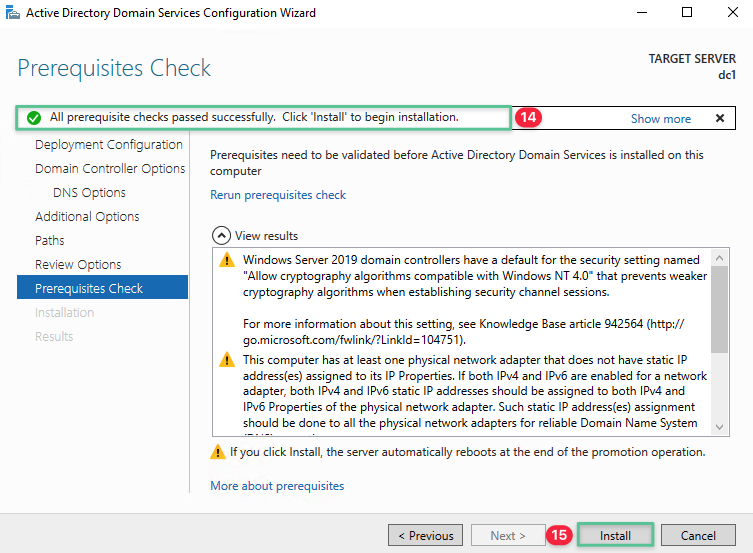
-
The Domain Controller promotion wizard does a prerequisite validation and upon successful it displays All prerequisite checks passed successfully. Once completed, click Install
-
Click Install to complete the Domain Controller promotion process.
6.3 Configure the Secondary Domain Controller
Note
Complete Step 1 through 21 listed under the Installing the Active Directory Domain Services Role section before proceeding with configuring the Secondary Domain Controller. Once completed, continue to log in to the DC2 virtual machine using the generated local administrator credentials.
-
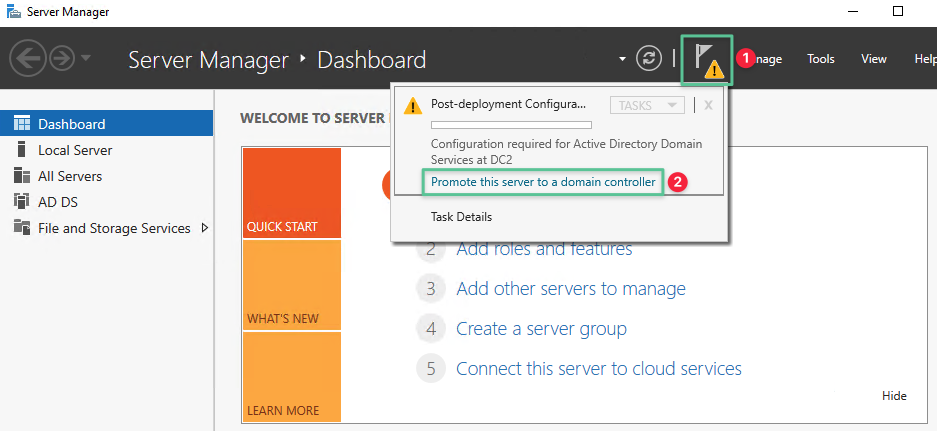
Click the Notification icon
-
Click Promote this server to a domain controller
-
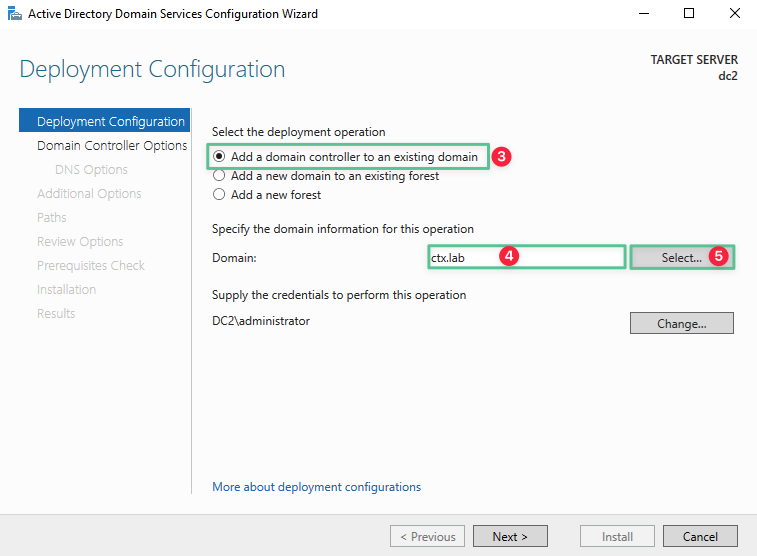
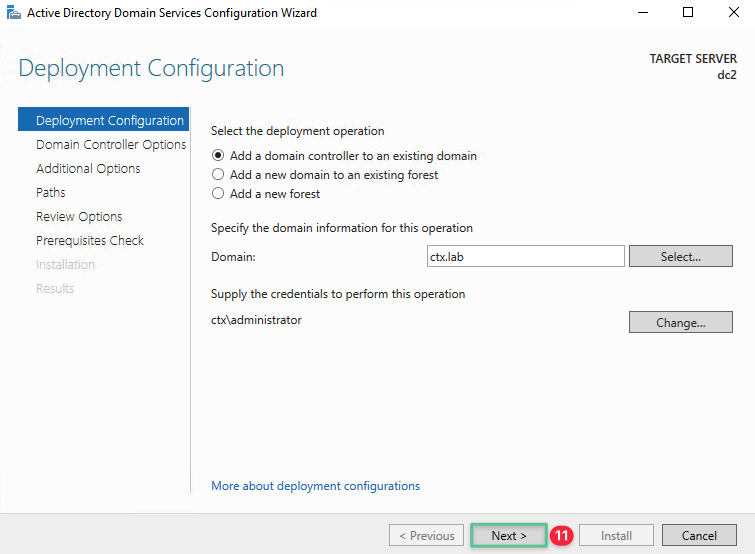
Select option Add a domain controller to an existing domain
-
Enter the Primary Domain Controller fully qualified domain name (FQDN): dc1.ctx.lab
-
Click Select
-
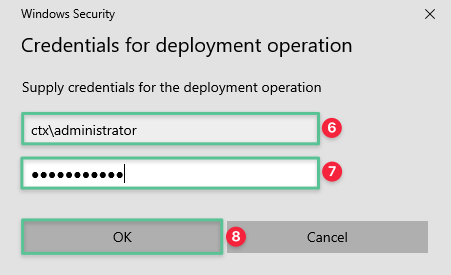
Input the Domain Administrator username: ctx\administrator
-
Input the Domain Administrator password: P@$$w0rd!@#
-
Click OK
-
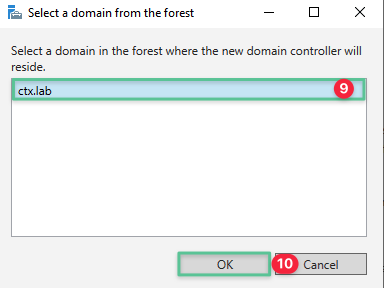
Another window pops up. Select the ctx.lab domain
-
Click OK
-
Back at the Deployment Configuration page, click Next
-
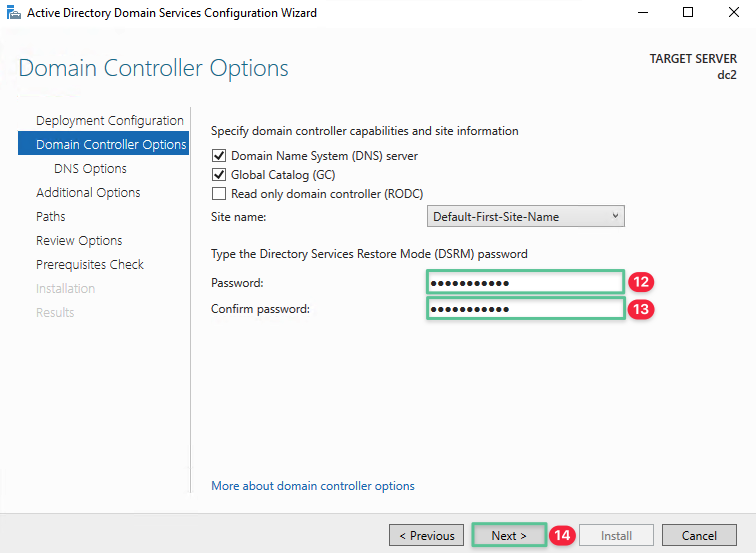
Specify a new Directory Services Restore Mode (DSRM) password that meets the Microsoft Windows password complexity requirement: P@$$w0rd!@#
Note
DSRM mode helps gain access to the Active Directory environment if all domain administrator accounts lose access or if the Domain Controller fails.
-
Repeat the password: P@$$w0rd!@#
-
Click Next
-
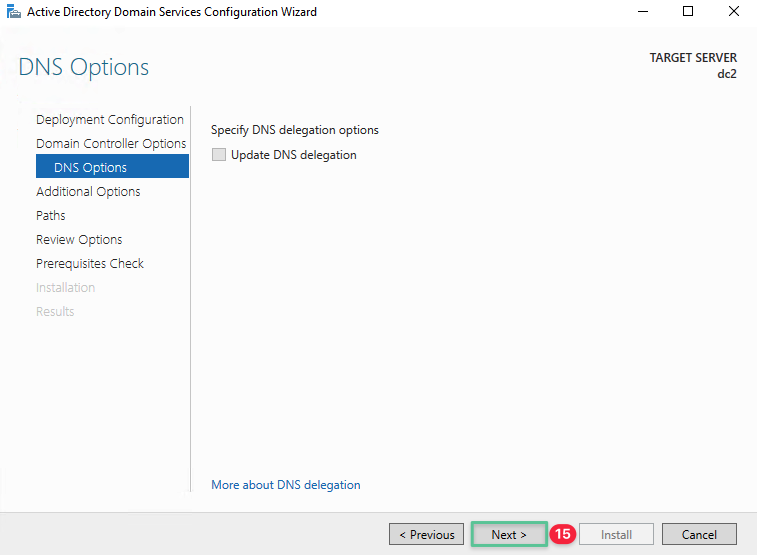
Click Next
-
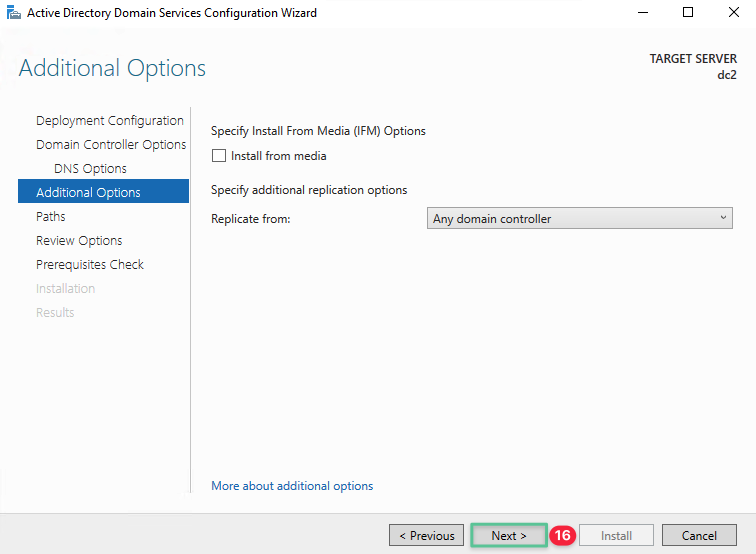
Click Next
-
Accept the default folder path and click Next

-
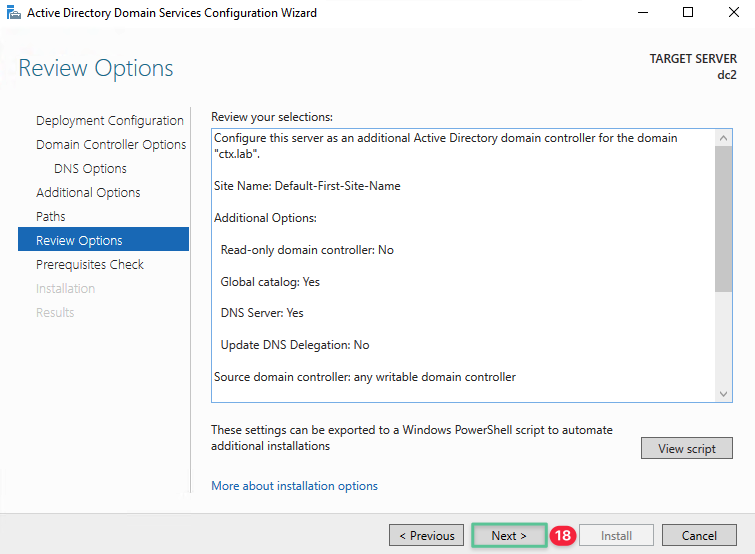
Review your selection and click Next
-
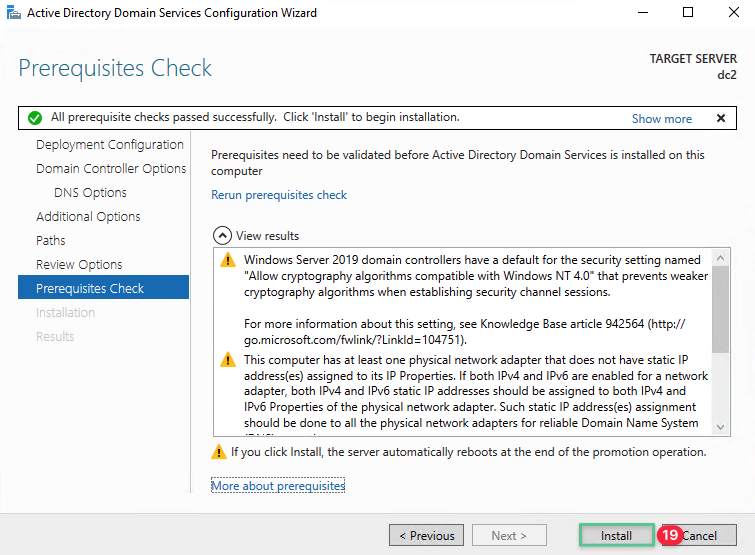
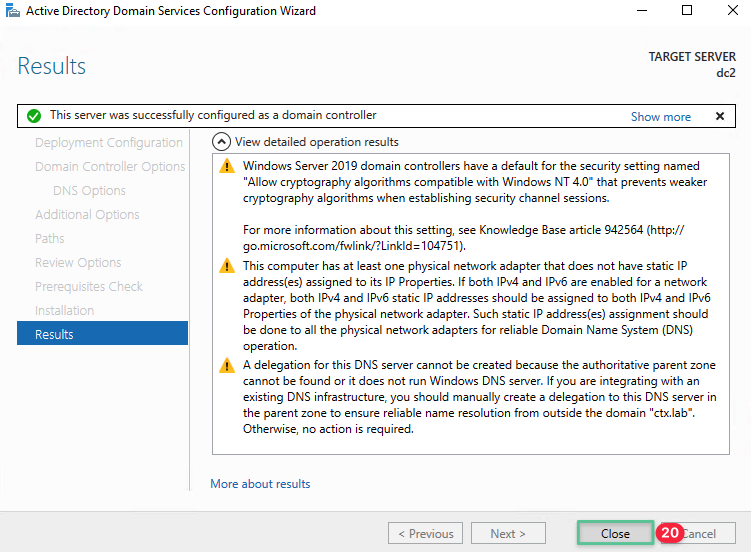
The Domain Controller promotion wizard does a prerequisite validation, and upon successful validation, it displays All prerequisite checks passed successfully. Once completed, click Install
-
Click Close to restart the Secondary Domain Controller to apply the configuration
6.4 Create a new test User Account
A domain user account is recommended to be used to assign and launch any resources published by the Citrix infrastructure. In this step, we create a domain user account to use to test the system in a goal we cover later in this document.
-
Log in to the DC1 virtual machine using the following domain credentials:
Username: ctx\administrator
Password: P@$$w0rd!@#
-
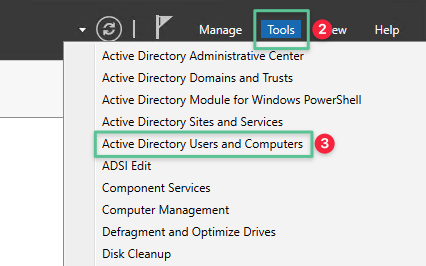
Click the Tools menu located in the top right-hand corner of the Server Manager console
-
Select Active Directory Users and Computers
-
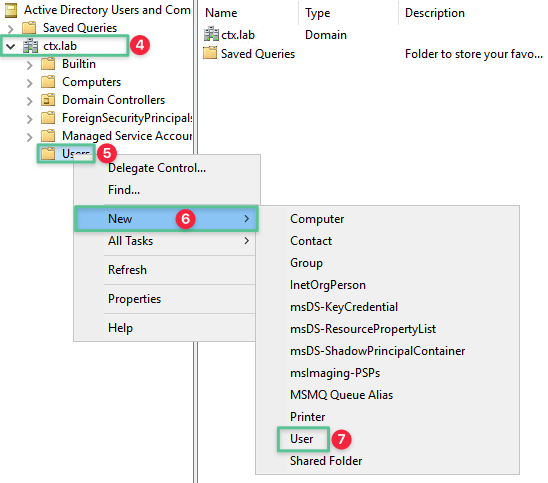
Expand the ctx.lab domain
-
Select Users
-
Select New
-
Select and click User
-
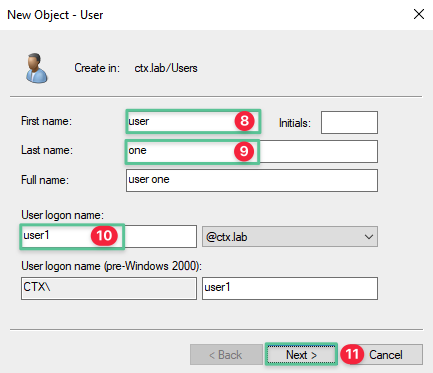
Input First Name: user
-
Input Last Name: one
-
Input User logon name: user1
-
Click Next
-
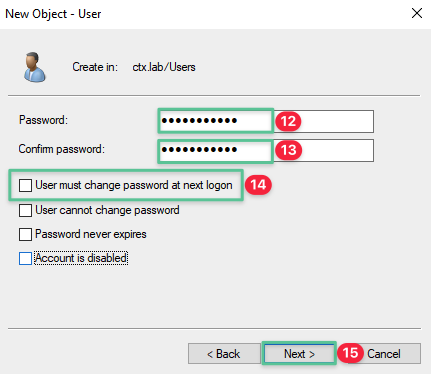
Input password: P@$$w0rd!@#
-
Repeat the password: P@$$w0rd!@#
-
Uncheck User must change password at next logon
-
Click Next
-
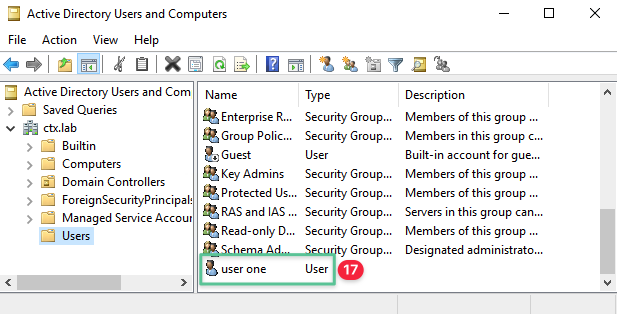
Review the user details and click Finish
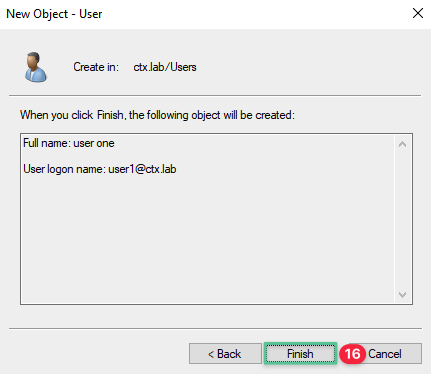
-
Confirm that the user creation is successful
6.5 Add extra VMs to Active Directory
Before we can begin configuring the other VMs in our environment, they need to be joined to Active Directory. Repeat the steps on the other Windows VM instances in your Google Cloud project to prepare them for further configuration.
Note
Steps 1 – 13 are required to be performed on both the Citrix Cloud Connector servers and the Server VDA master image machine. Assuming you followed our naming guidance earlier in this document, that means you are repeating this process on cc1, cc2, and mcs instances.
-
Log in to the CC1 virtual machine using the local administrator credentials generated in the previous step
-
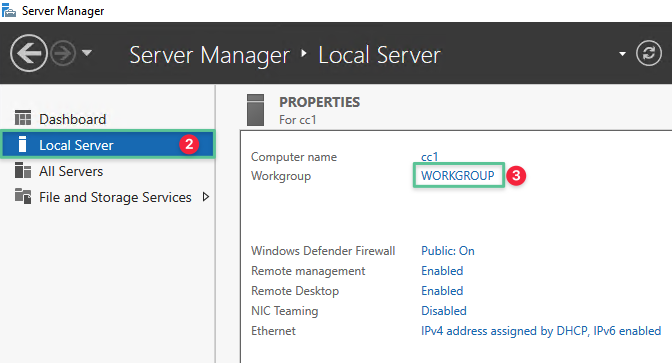
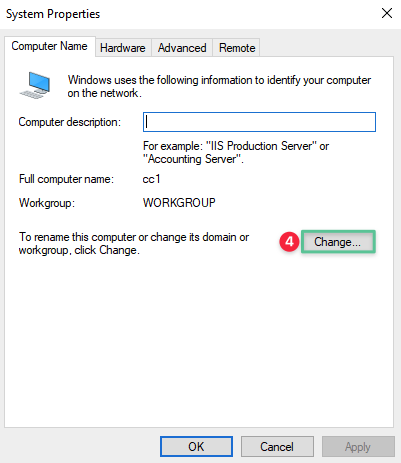
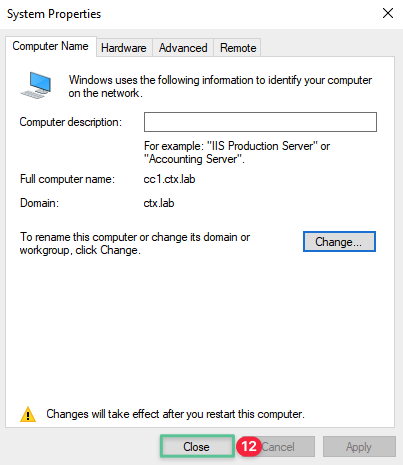
Launch Server Manager and click Local Server
-
Click Workgroup
-
Click Change
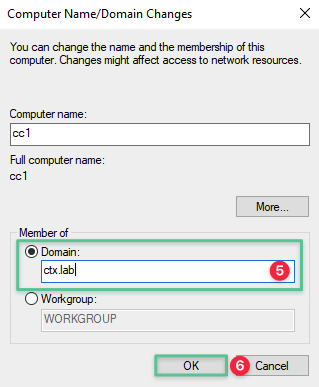
-
Select the Domain option and input the domain name: ctx.lab
-
Click OK
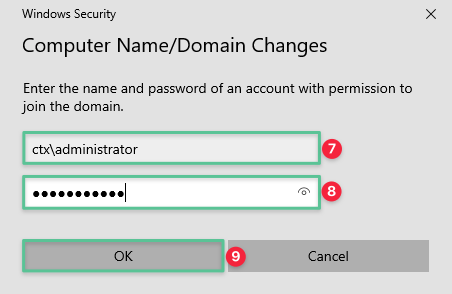
-
Input the domain administrator username: ctx\administrator
-
Input the domain administrator password: P@$$w0rd!@#
-
Click OK
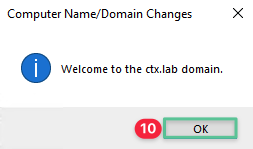
-
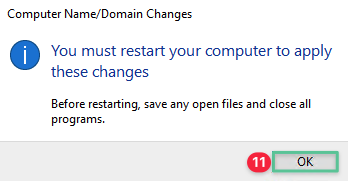
Upon successful authentication, you receive a messaging welcoming you to the domain. Click OK
-
Click OK again to restart the computer
-
Click Close
-
Click Restart Now
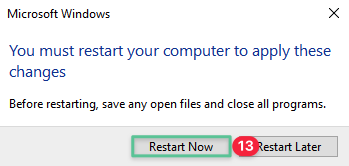
Repeat step 1 through 13 for the second Cloud Connector (CC2) and the Server VDA Master Image.
7. Create and initialize Citrix Cloud resource location
This section aims to access the Citrix Cloud Console, integrate it with your Google Cloud project and resources, and prepare to publish applications and desktops.
Citrix Cloud is a platform that hosts and administers Citrix services. It connects to your resources through connectors on any cloud or infrastructure you choose (on-premises, public cloud, private cloud, or hybrid cloud). It allows you to create, manage, and deploy workspaces with apps and data to your end-users from a single console.
This deployment guide requires you to have a Citrix Cloud account with an active DaaS subscription. After signing up for Citrix Cloud, you can request service trials for Citrix DaaS within the console. You need both a Citrix Cloud account and an active subscription before you can complete this goal.
Citrix Cloud Resource Location
Resource locations contain the resources required to deliver cloud services to your subscribers. You manage these resources from the Citrix Cloud console. To create a resource location, install at least two Cloud Connectors in your domain. The resource location is wherever the resources reside, whether that is a public or private cloud. In the case of this deployment guide, the resources reside on the Google Cloud Platform. The proximity to subscribers or data influences the choice of location. This guide deploys a single Server VDA resource location in Google Cloud region us-west1. A single Citrix Cloud Connector is installed each in the us-west1-a and us-west1-b zone for high availability.
7.1 Create Citrix Cloud resource location
The goal of this first task is to create the resource location we are installing Citrix Cloud Connectors into. These tasks can be completed from any web browser.
-
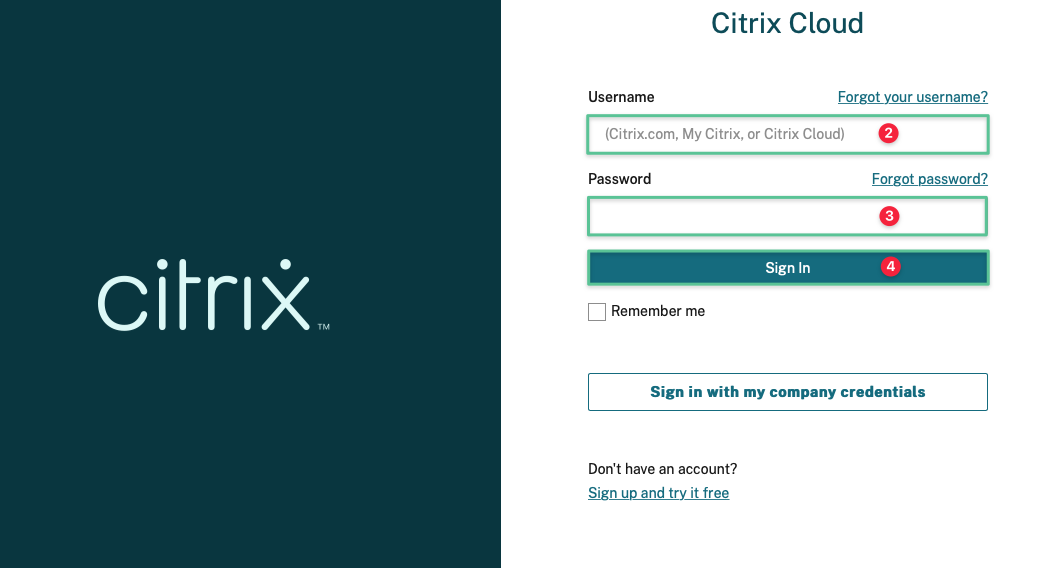
Navigate to https://cloud.citrix.com
-
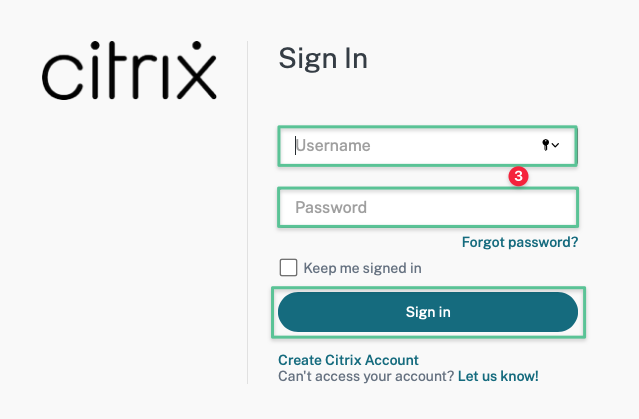
Log in to the Citrix Cloud console using your username
-
Input your password
-
Click Sign In
-
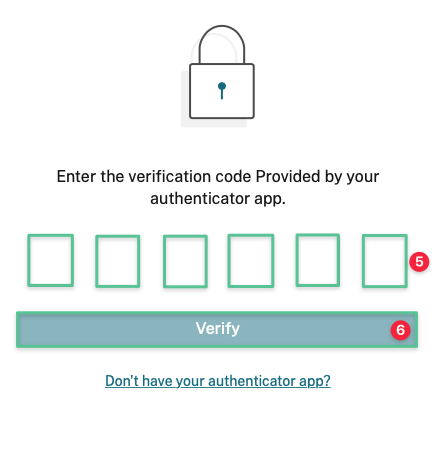
Enter the verification code provided by your authenticator app
-
Click Verify
-
If you’re an administrator on multiple Citrix Cloud tenants, select the appropriate account when prompted.

-
Click Edit or Add New under the Resource Location section.
Note
A single Resource Location is created by default.

-
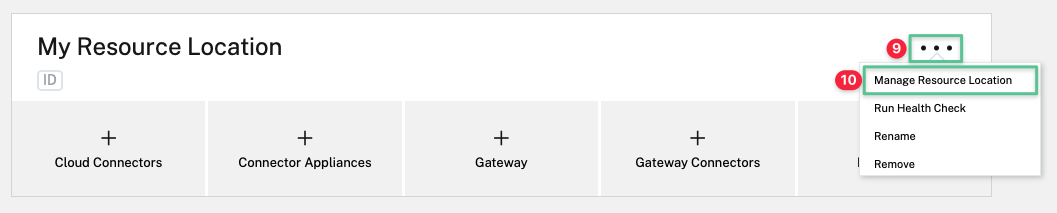
Click the three horizontal ellipses on the top left corner of the My Resource Location
-
Select Manage Resource Location
-
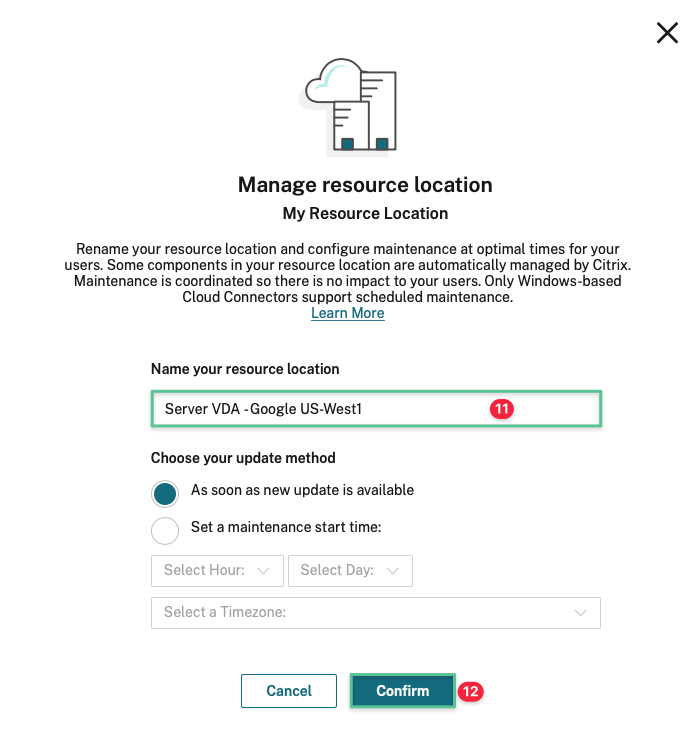
Input a unique name for the resource location: Server VDA – Google US-West1
-
Click Confirm
Note
By default, Citrix Cloud installs updates on each connector, one at a time, when these updates become available. To ensure that updates are installed quickly without unduly affecting your users’ Citrix Cloud experience, you can schedule these updates for a preferred schedule.
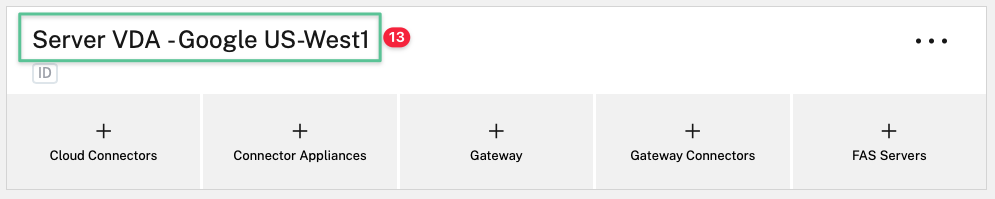
-
The result should be similar to the image:
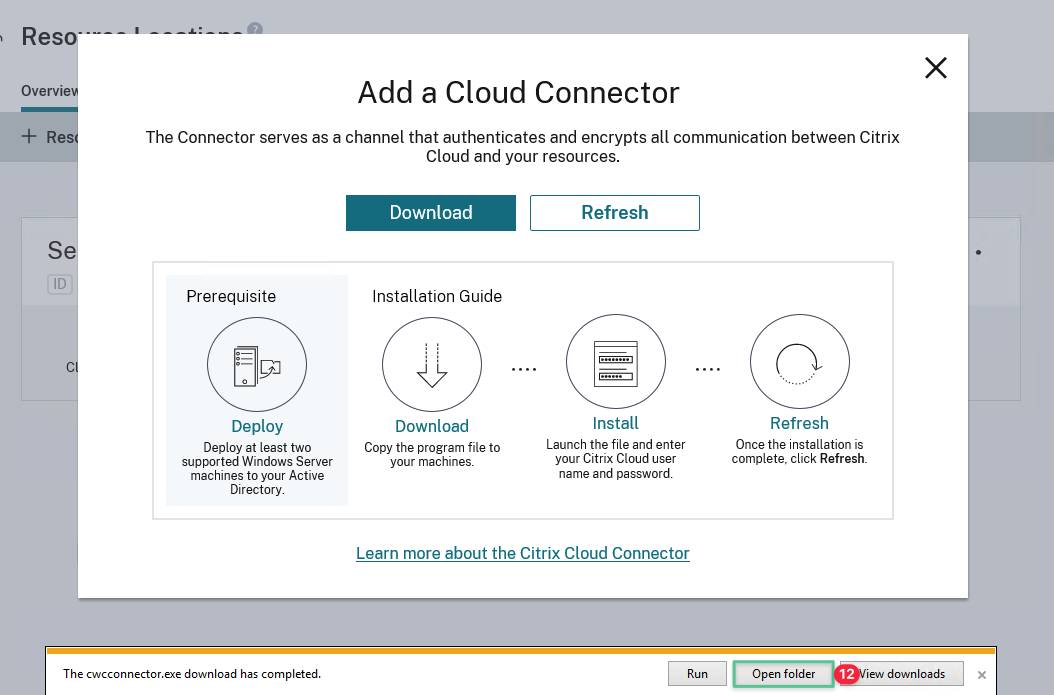
Citrix Cloud Connector
The Citrix Cloud Connector serves as a communication channel between Citrix Cloud and your resource locations. The Cloud Connector authenticates and encrypts all communication between Citrix Cloud and the resource locations. All Cloud Connector outbound only communication is initiated using the standard HTTPS port (443) and the TCP protocol. For continuous availability and to manage load Citrix recommends at least two Cloud Connectors in each resource location. Since each Cloud Connector is stateless, the load can be automatically distributed across all available Cloud Connectors.
7.2 Install Citrix Cloud Connectors
The next step is to install the Citrix Cloud Connector software on your cloud connector VM instances. Installing Cloud Connectors into a resource location effectively initialize the resource location and make it usable by Citrix Cloud and its related services. Complete the following steps on each VM instance you intend to use as Cloud Connectors. You want to log into each remote console using a domain user account that is a local Administrator on the VM instance. If you’ve been following this guide, you can use the domain credential to log in to each of the Cloud Connector virtual machines:
Username: ctx\administrator
Password: P@$$w0rd!@#
Note
Step 1 through 19 is required to be performed on both the Citrix Cloud Connector VMs – CC1 and CC2.
-
Log in to the CC1 virtual machine using the domain credentials provided
-
Navigate to https://cloud.citrix.com and log in to the Citrix Cloud console using your username
-
Input your password
-
Click Sign In

-
Enter the verification code provided by your authenticator app
-
Click Verify

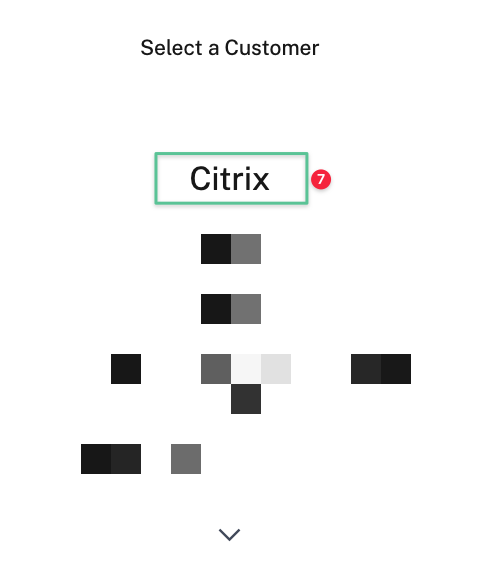
-
Select your Citrix Cloud account if a Select a Customer screen is presented
-
Click Edit or Add New under the Resource Location section.
Note
A single Resource Location is created by default.

-
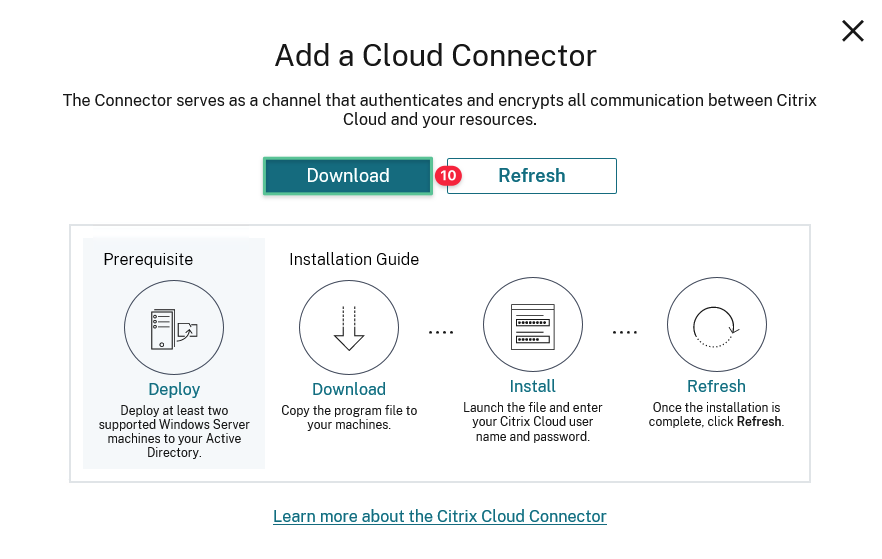
Click Cloud Connectors

-
Click Download
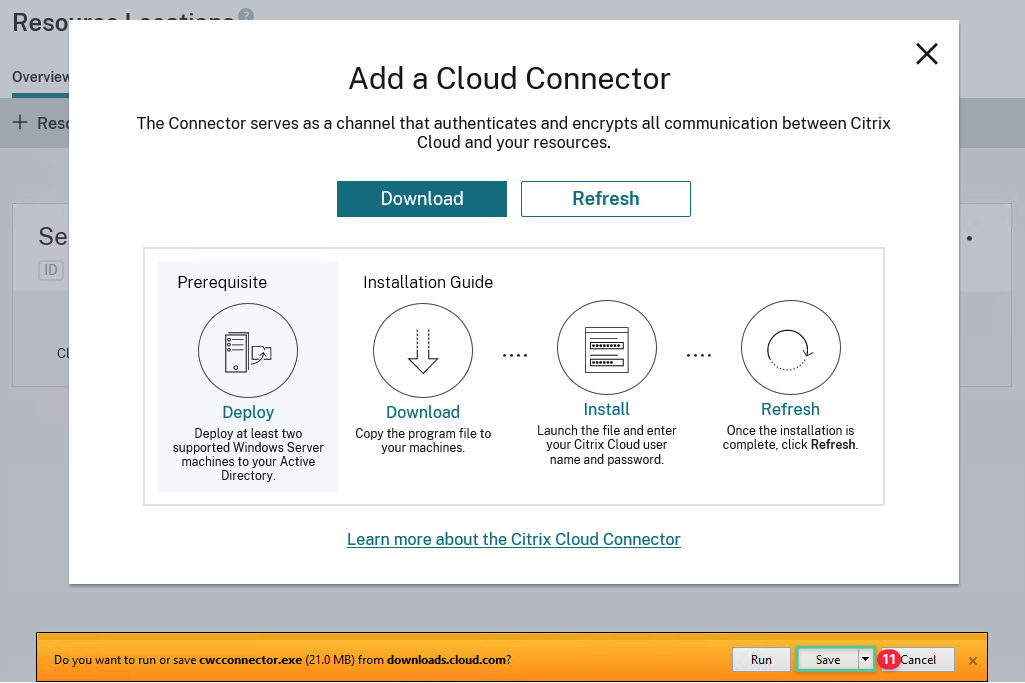
-
Click Save
-
Click Open Folder
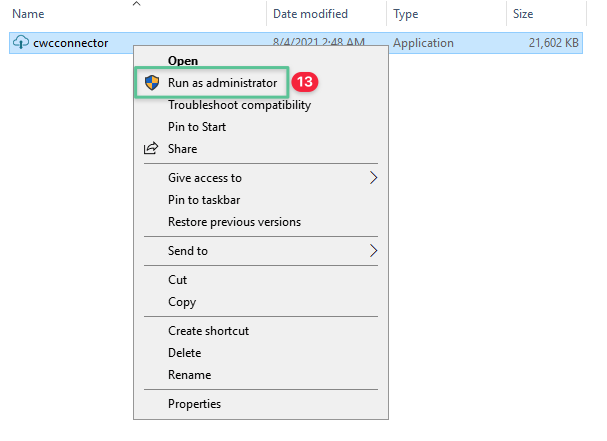
-
Right-click the executable and select Run as administrator
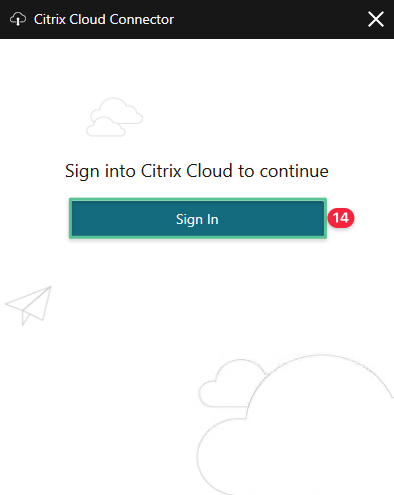
-
Click Sign In, provide username and password if prompted
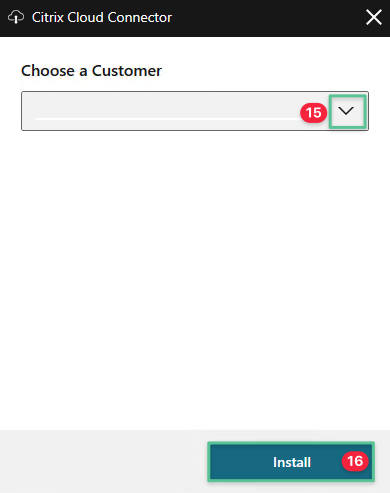
-
Click the drop-down and select the corresponding Citrix Cloud Organization ID
-
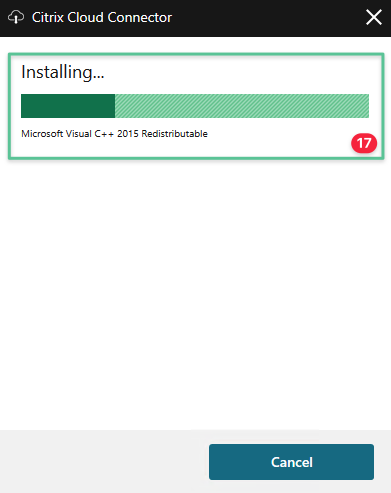
Click Install
-
The installation begins and displays the progress
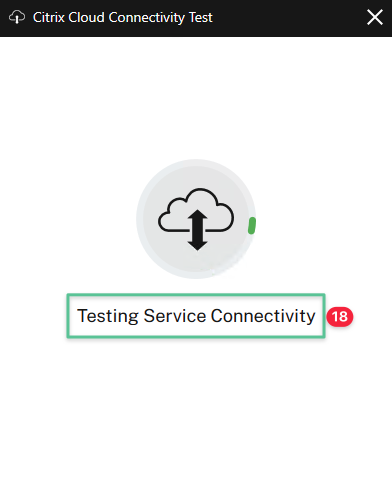
-
Once the installation completes, the installer does a final connectivity check to verify communication between the Cloud Connector and Citrix Cloud.
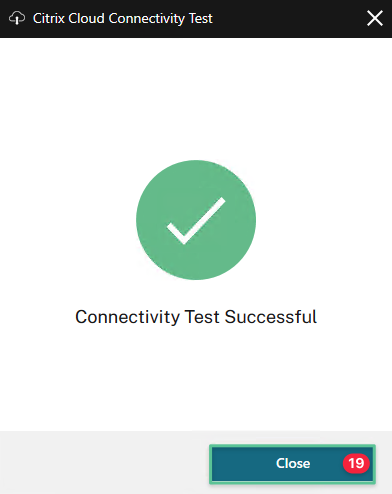
-
The following screen is displayed once the connectivity test is successful. Click Close
Repeat the step 1 through 19 for the second Cloud Connector (CC2).
7.3 Verify Citrix Cloud resource location
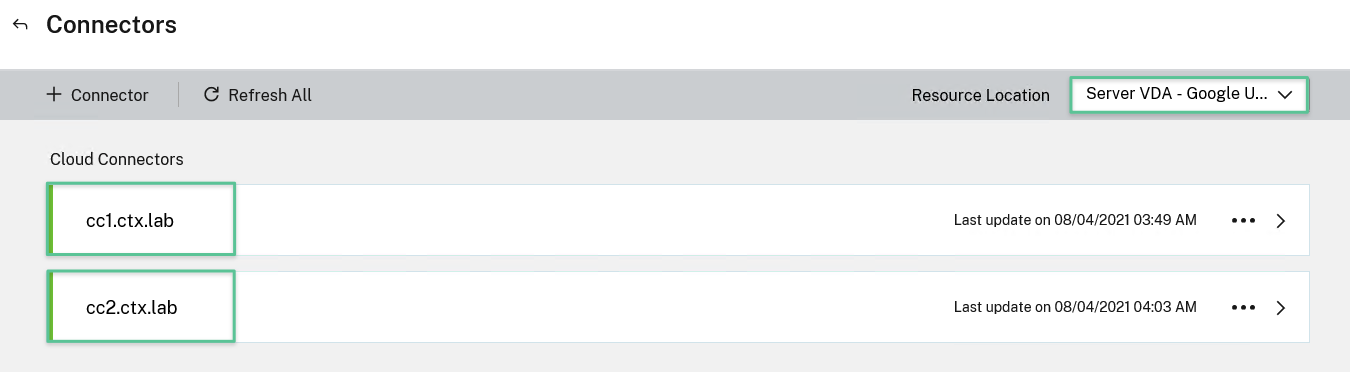
Once you’ve installed Citrix Cloud Connectors into your Citrix Cloud tenant, you should be ready to begin configuring the Virtual Apps and Desktops service. You can verify readiness to begin configuring the CVAD service by checking the following:
Navigate and click the appropriate resource location. You should see your Cloud Connectors, they should be listed in the correct resource location, and they should show a green status:
Now that you’ve successfully created and initialized your Citrix Cloud resource location on the Google Cloud, it’s time to configure the Virtual Apps and Desktops service.
8. Configure Citirx DaaS
Citrix DaaS offers a virtual app and desktop solution, provided as a cloud service. Citrix DaaS provides IT control of virtual machines, applications, and security while providing anywhere access for any device. End users can use applications and desktops independently of the device’s operating system and interface. Citrix DaaS delivers secure virtual apps and desktops through any public cloud and / or on-premises hypervisors. Citrix DaaS is typically deployed in a single site with one or more resource locations, which is considered as a zone. Citrix manages the user access and management services and components in Citrix Cloud. The applications and desktops that are being delivered to users reside on machines in one or more resource locations.
Citrix DaaS needs a bit of preparation to start serving users. The goal of this section is to configure CVADS to establish a connection with Google Cloud and deploy published applications and desktops for users.
8.1 Access the Virtual Apps and Desktops Service console
-
Navigate to https://cloud.citrix.com and log in to the Citrix Cloud console using your username and password. Provide the token when prompted
-
Click the hamburger menu located on the top right section

-
Select My Services
-
Click Virtual Apps and Desktops
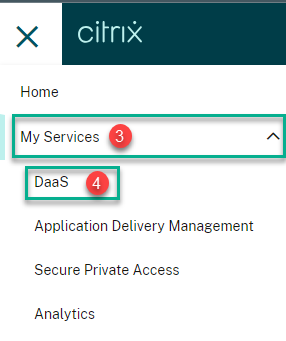
-
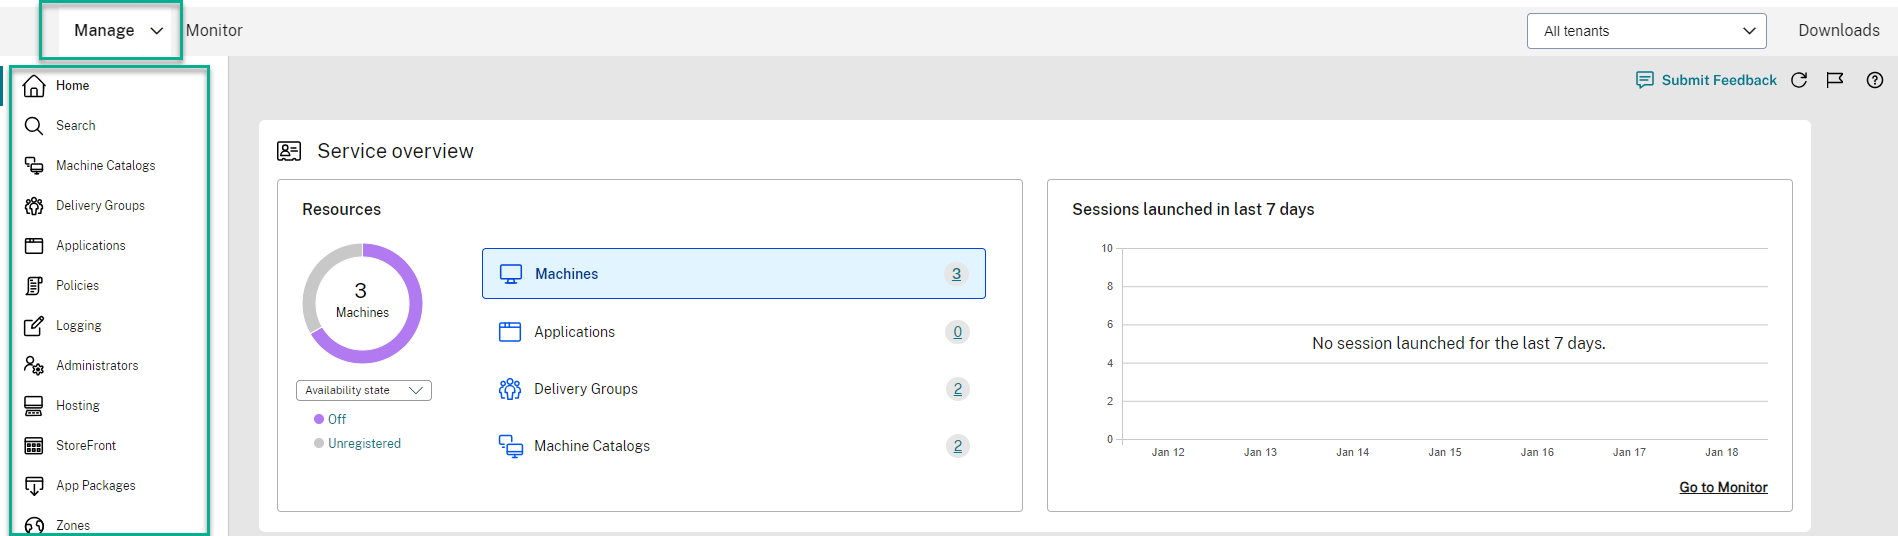
Click Manage to access the Virtual Apps and Desktops Service console
-
You can now view the Virtual Apps and Desktops Service options
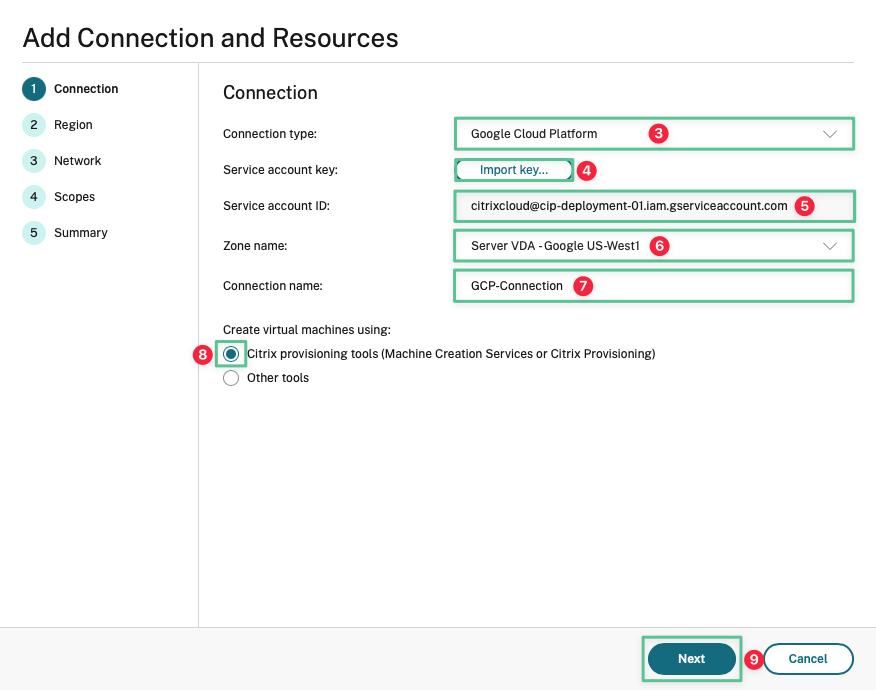
8.2 Configure the Hosting Connection and Resources
The next step is to configure a hosting connection to allow Citrix Cloud to manage app and desktop resources on Google Cloud. The JSON key created earlier is used to establish the hosting connection with Citrix Cloud. The hosting connection configuration is completed using the CVADS console:
-
Click Hosting
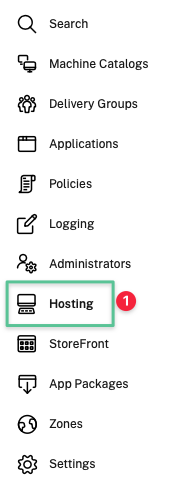
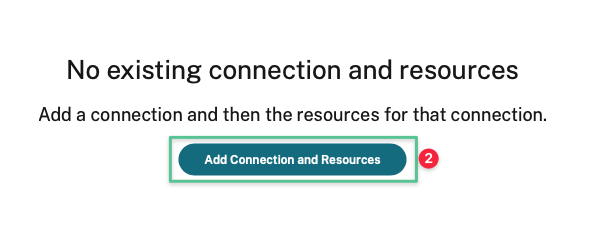
-
Click Add Connection and Resources
-
Click the drop-down and select Google Cloud Platform
-
Click Import Key and select the JSON key you generated under the Generating JSON Key section.
-
Service Account ID field auto-populates once you import the key
-
Select the zone name: Server VDA – Google US-West1
-
Input a unique connection name: GCP-Connection
-
Select Citrix provisioning tools (Machine Creation Services™ or Citrix Provisioning)
-
Click Next
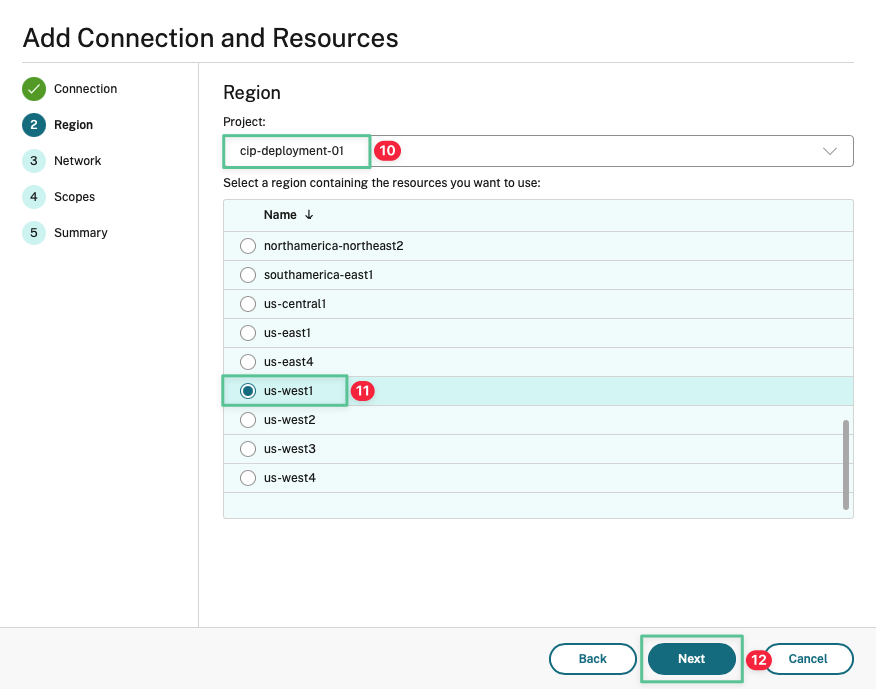
-
The project field defaults to your Google Project. If not, click the drop-down list and select the corresponding Google Project
-
Select the region: us-west1
-
Click Next
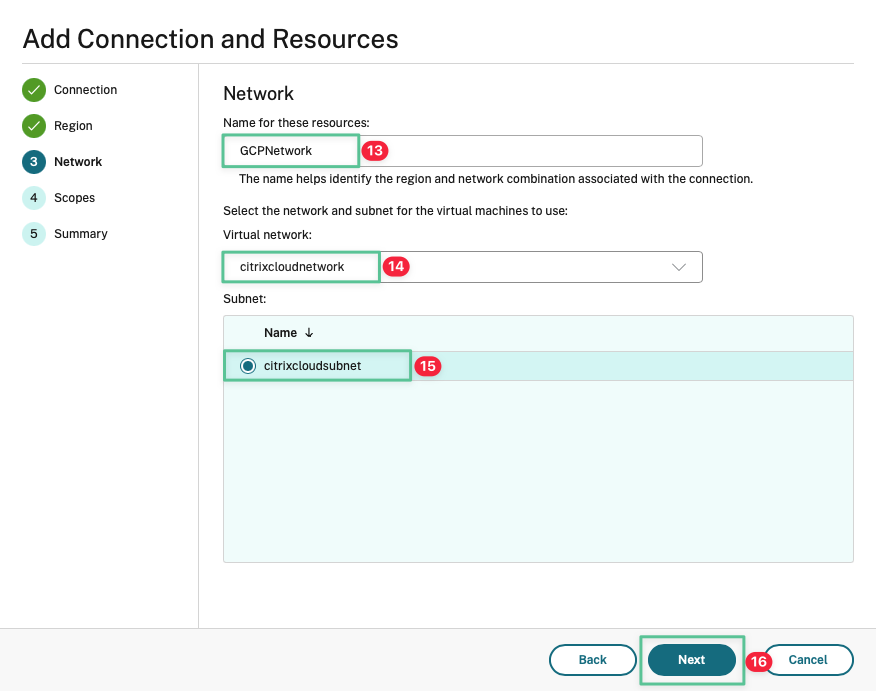
-
Input a unique name for the network resource being created: GCPNetwork
-
Select the Virtual Network created in the Virtual Private Cloud section: citrixcloudnetwork
-
Confirm the subnet
-
Click Next
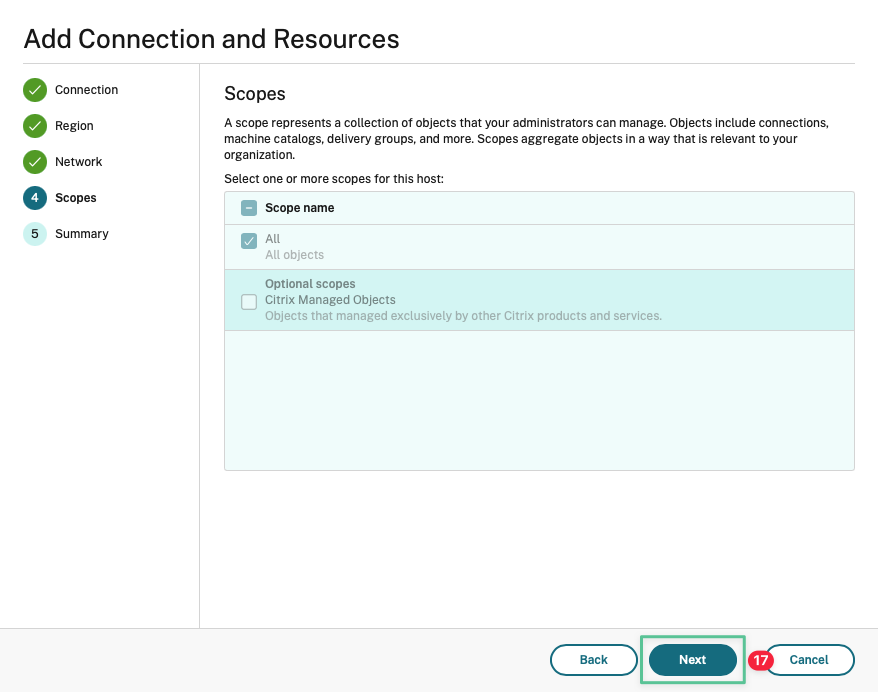
-
Accept the default option and click Next
-
Review and confirm the connection parameters
-
Click Finish
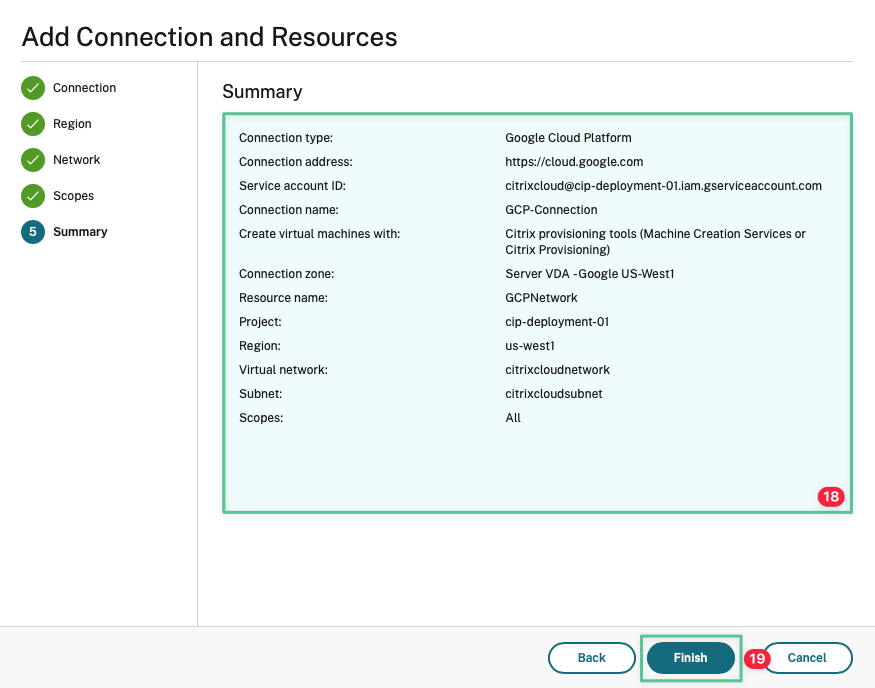
The result should be similar to the image:
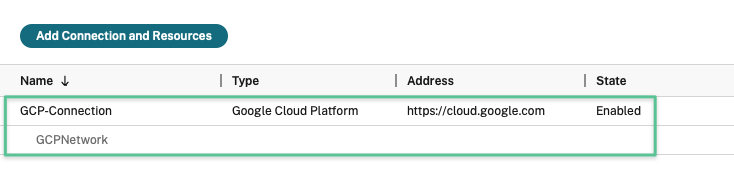
Now that you’ve got a functional hosting connection, the next step is to prepare the Citrix Virtual Delivery Agent to execute the workloads.
8.3 Prepare the ‘master image’ for your first catalog of Citrix VDAs
For this Deployment and Configuration Guide, we’re going to build your first non-persistent multi session Server OS. Image Management Reference Architecture provides an overview of the functionality and design architecture for an image management to ensure efficient delivery of application and desktop workloads. Before the machine catalog can be provisioned, the Virtual Delivery Agent (VDA) software must be installed on the master image. The VDA software allows the machine and the resources it is hosting to be made available to users. Also, the VDA enables the machine to register with the Citrix Cloud Connector.
-
Log in to MCS virtual machine using the following domain credentials
Username: ctx\administrator
Password: P@$$w0rd!@#
-
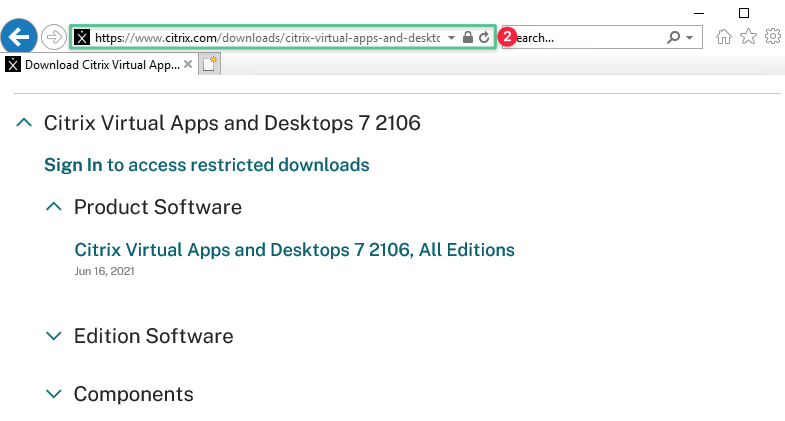
-
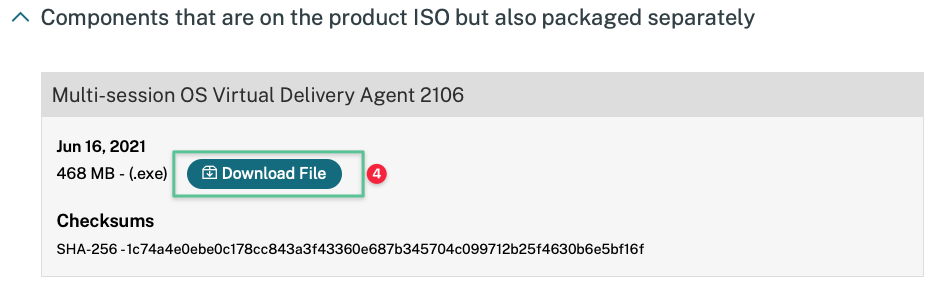
You need a Citrix account to log in and download the Multi-session OS Virtual Delivery Agent. If you do not have a Citrix account, you can choose Create Citrix Account
-
Upon successful login, download the Multi-session OS Virtual Delivery Agent
-
Click Save

-
Click Open Folder

-
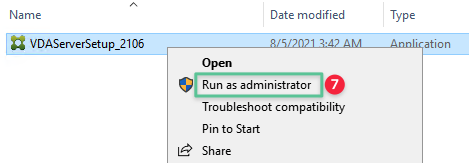
Right-click the VDA server software installer and select Run as administrator
-
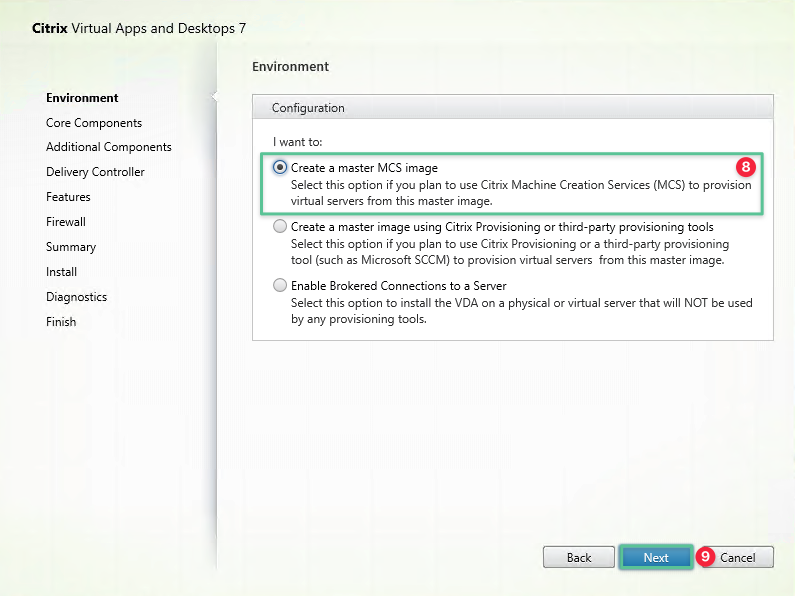
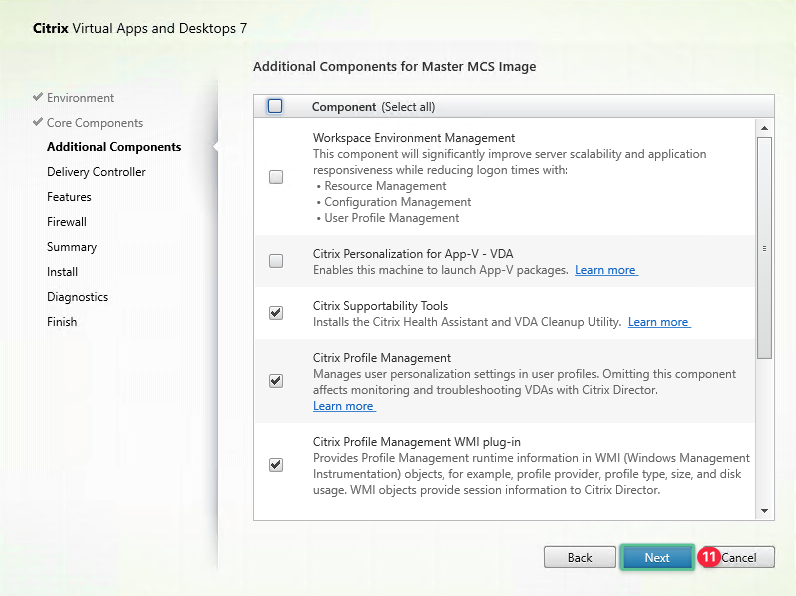
Select Create a master MCS image
-
Click Next
-
Accept the default options and click Next

-
Click Next
-
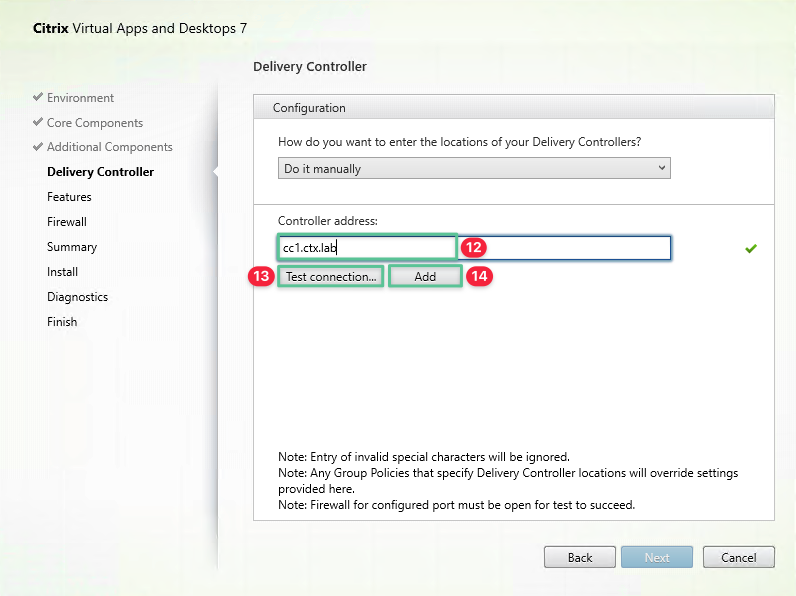
Input the first Cloud Connector fully qualified domain name: cc1.ctx.lab
-
Click Test connection to validate the communication between the VDA and Cloud Connector and ensure that a green check mark is displayed
-
Click Add
-
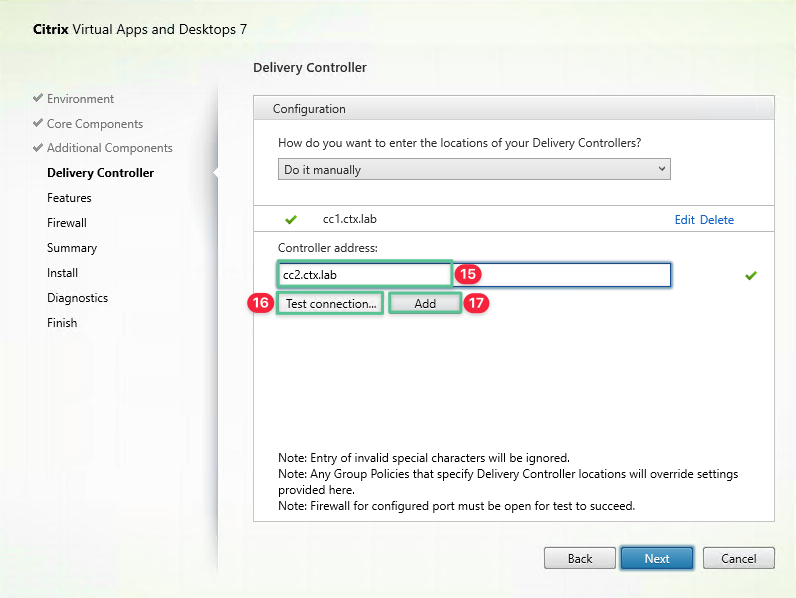
Input the second Cloud Connector fully qualified domain name: cc2.ctx.lab
-
Click Test connection to validate the communication between the VDA and Cloud Connector and ensure that a green check mark is displayed
-
Click Add
-
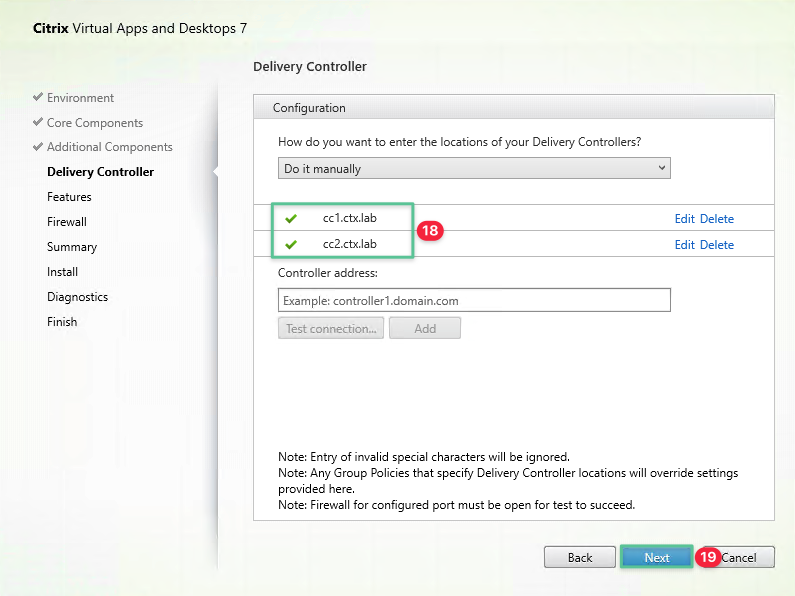
Confirm both the Cloud Connectors are added successfully
-
Click Next
-
Click Next
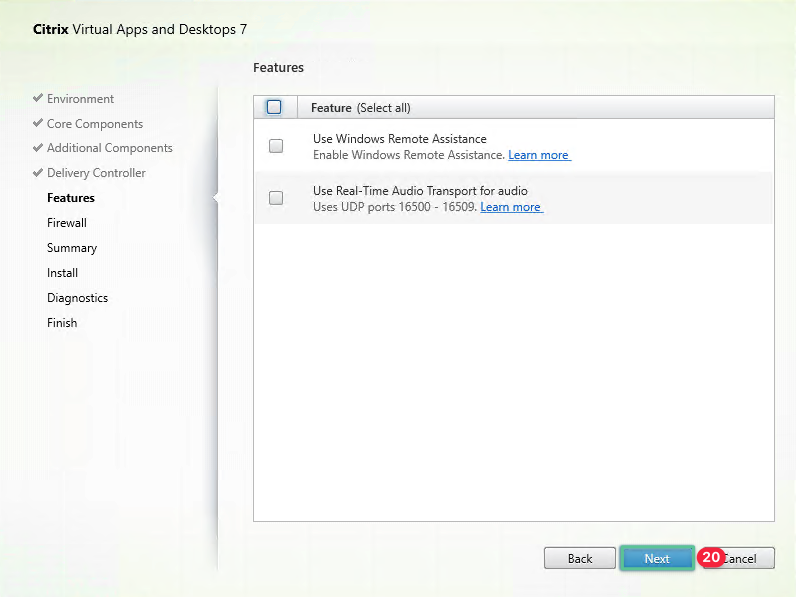
-
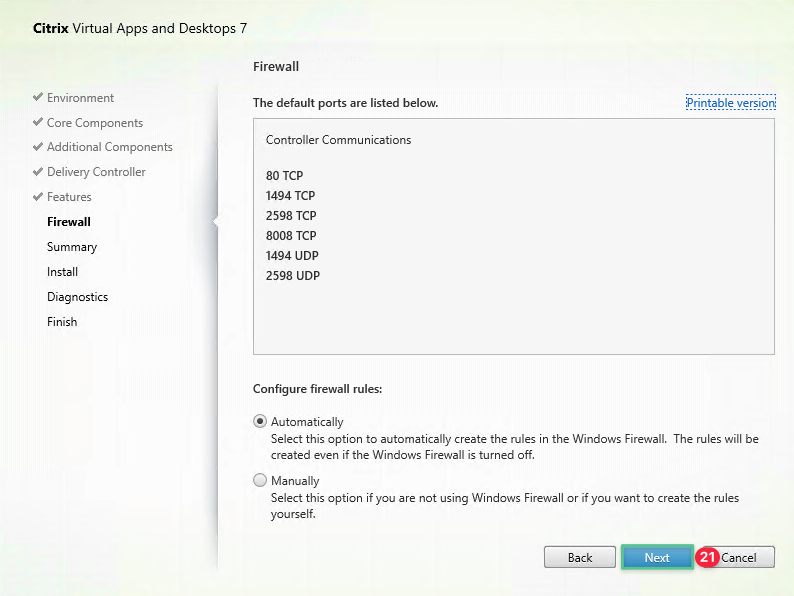
Accept the default firewall setting. Click Next
-
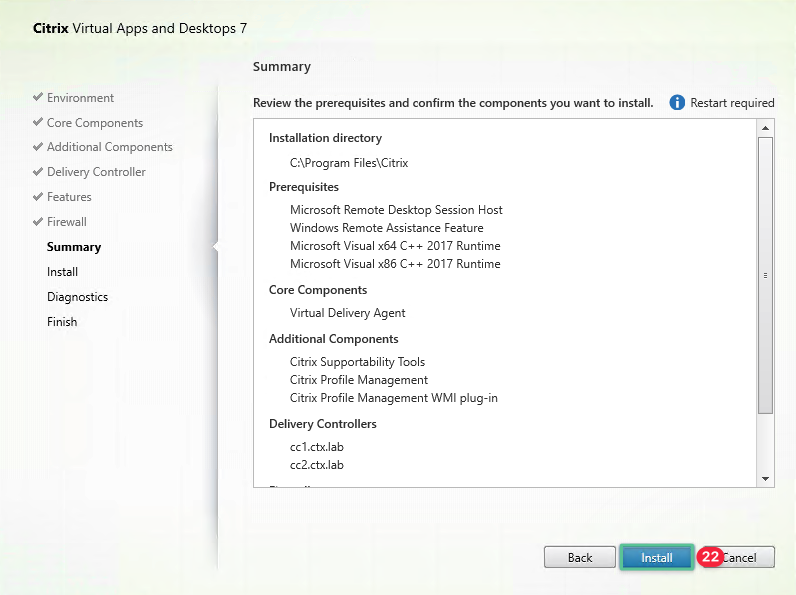
Review the summary screen. Click Install
Note
The installer requires multiple reboots
-
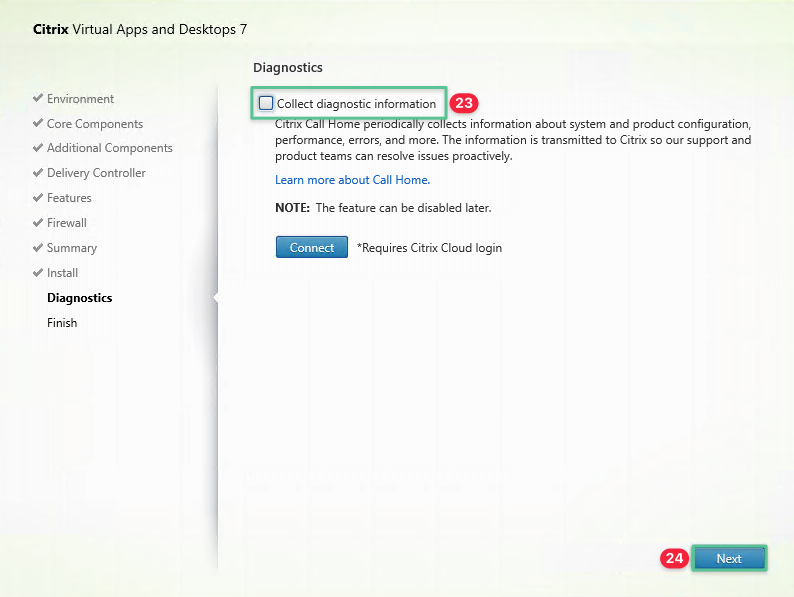
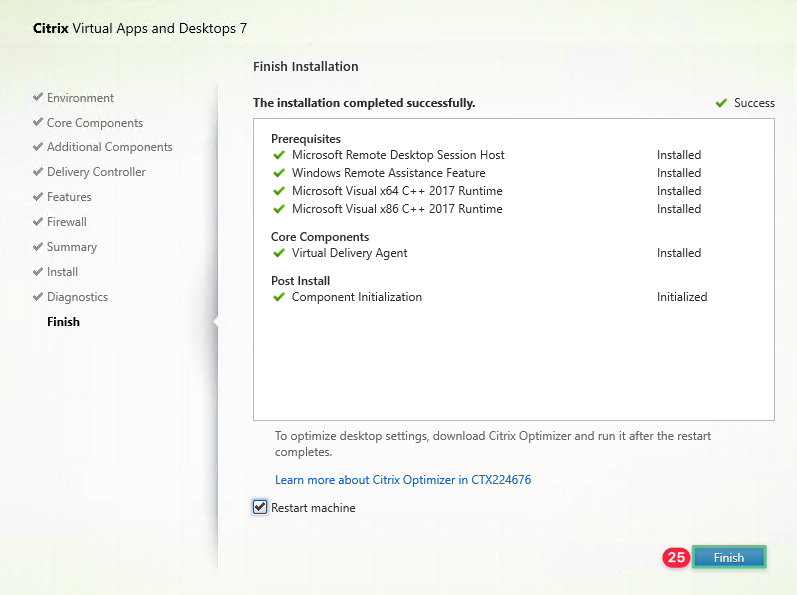
Uncheck the Collect diagnostic information option
-
Click Next
-
Click Finish. The installer reboots the machine to complete the installation process. Continue to shut down the machine.
8.4 Create Machine Catalogs
-
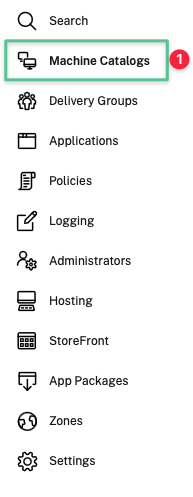
Click Machine Catalogs
-
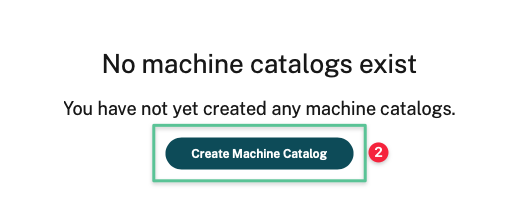
Click Create Machine Catalog
-
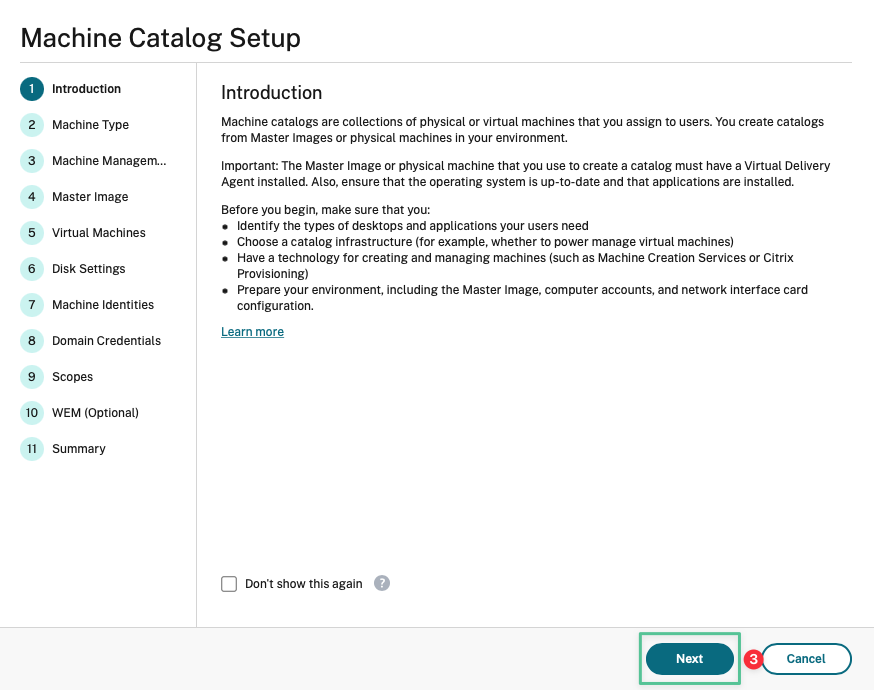
Click Next
-
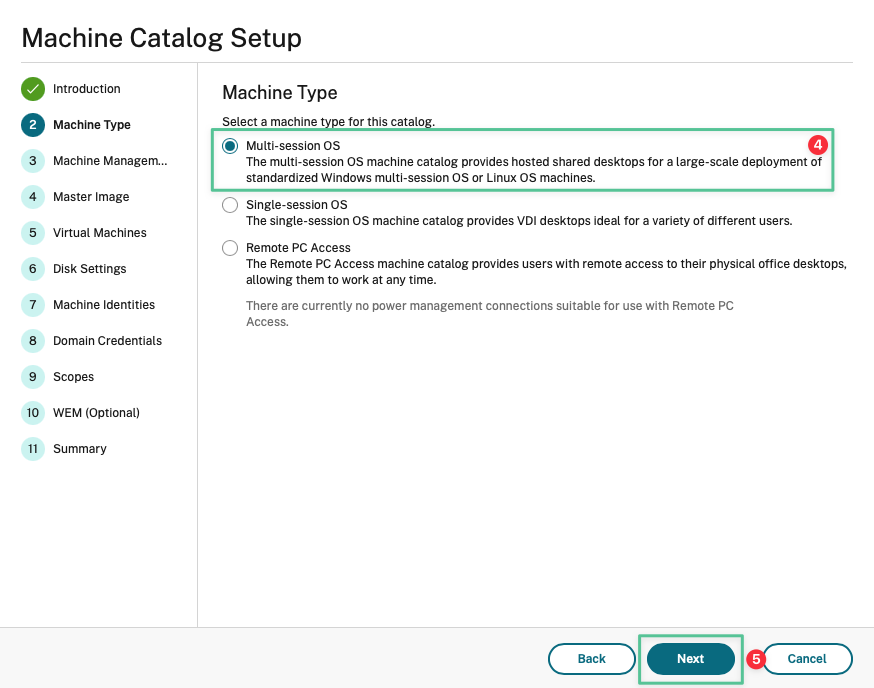
Select Multi-session OS
-
Click Next
-
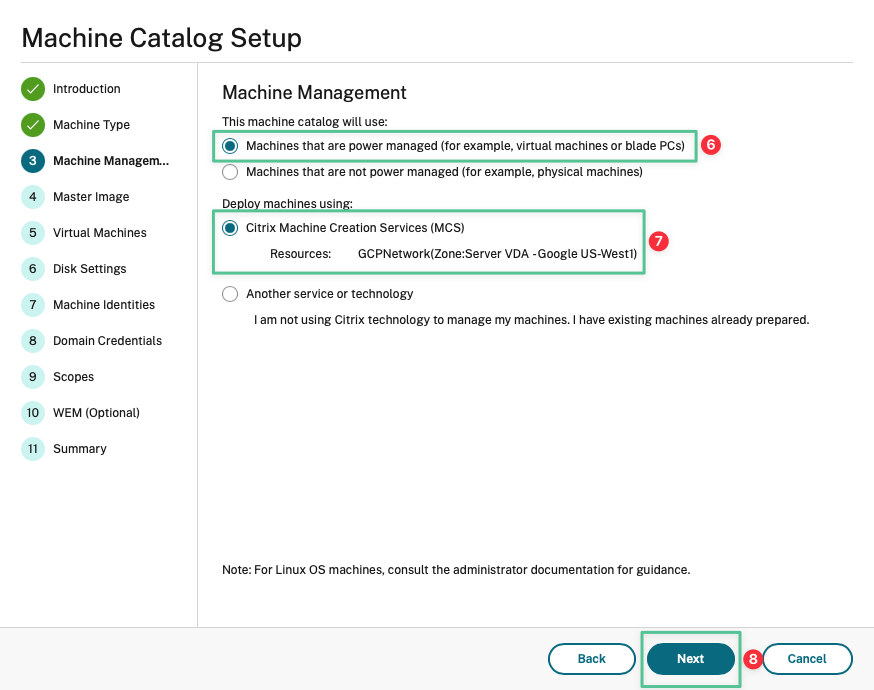
Select Machines that are power managed (for example, virtual machines or blade PCs)
-
Select Citrix Machine Creation Services (MCS)
-
Click Next
-
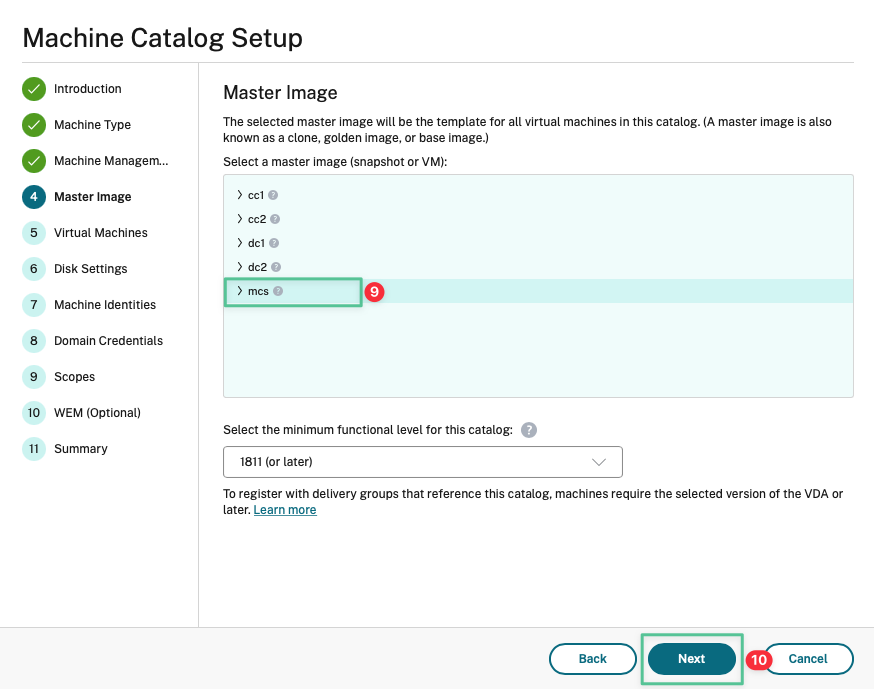
Click your master image: mcs
-
Click Next
-
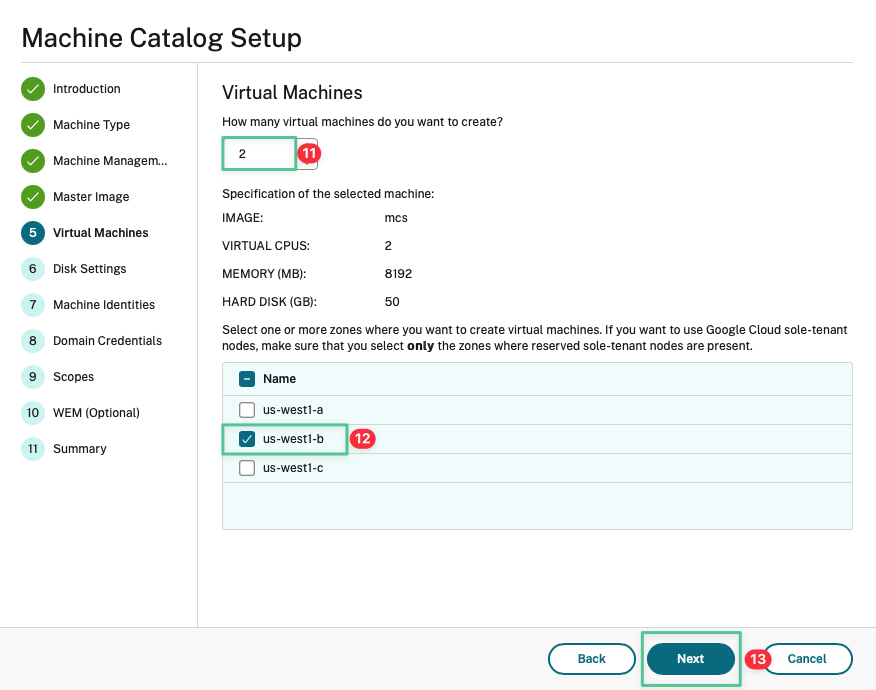
How many virtual machines do you want to create: 2
-
Select us-west1-b
-
Click Next
-
Click Next
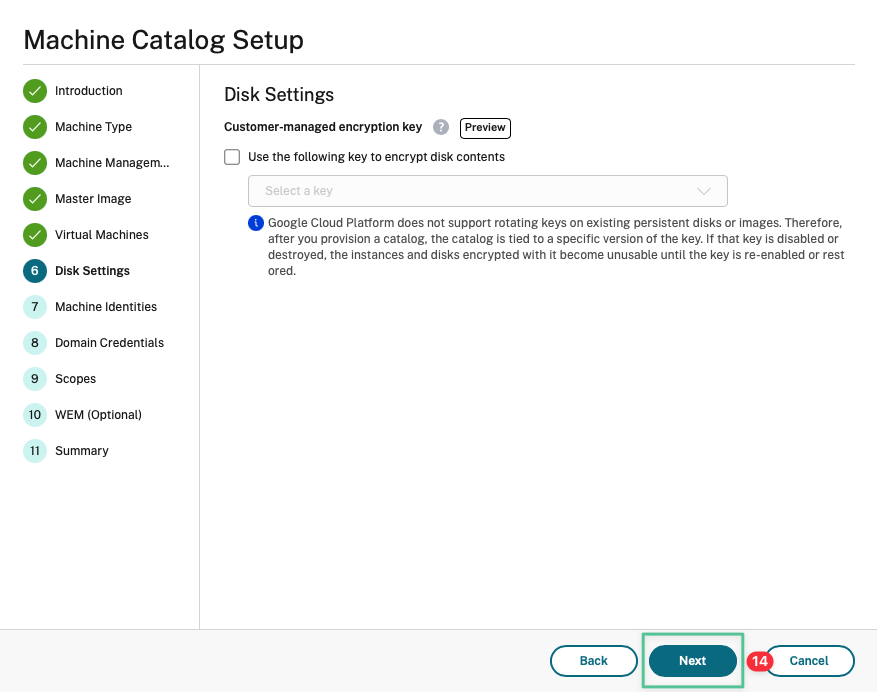
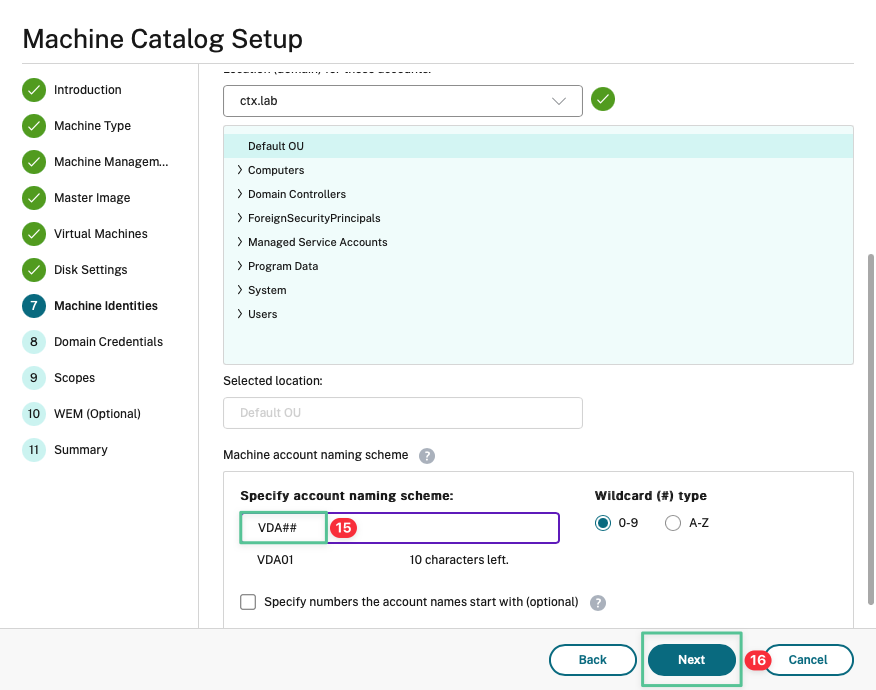
-
Input the account naming scheme: VDA##
-
Click Next
-
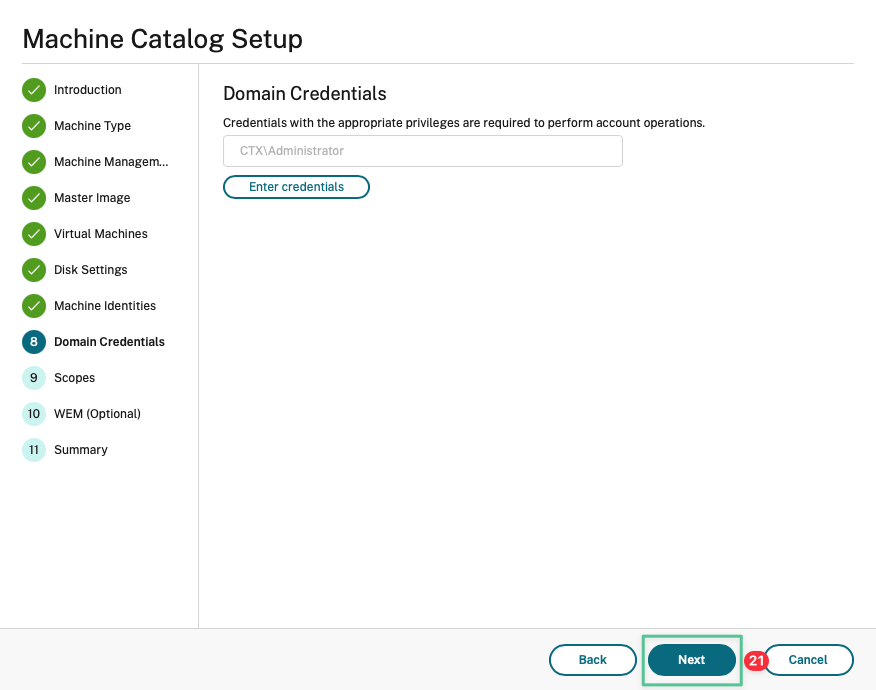
Click Enter credentials
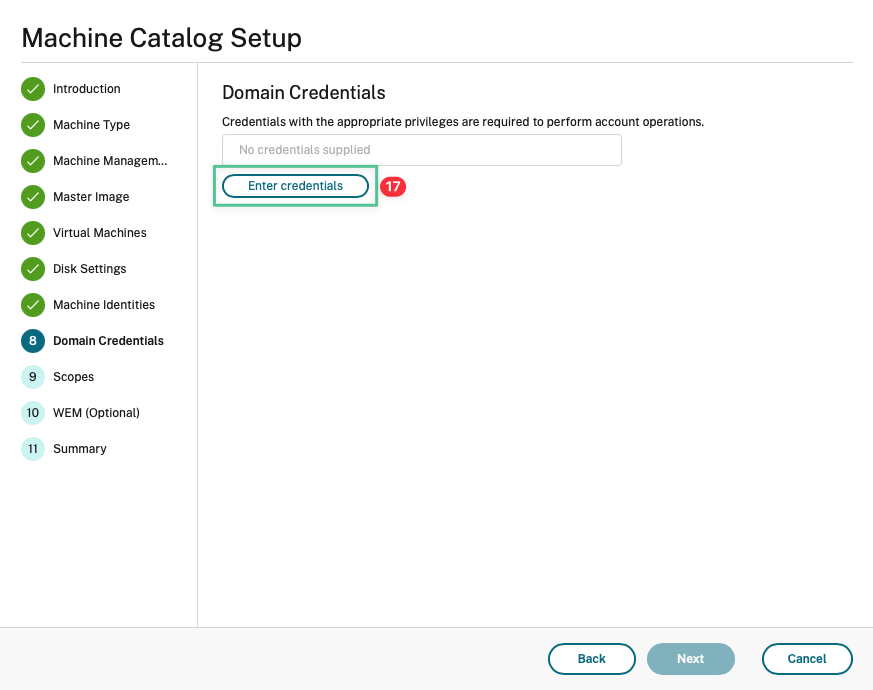
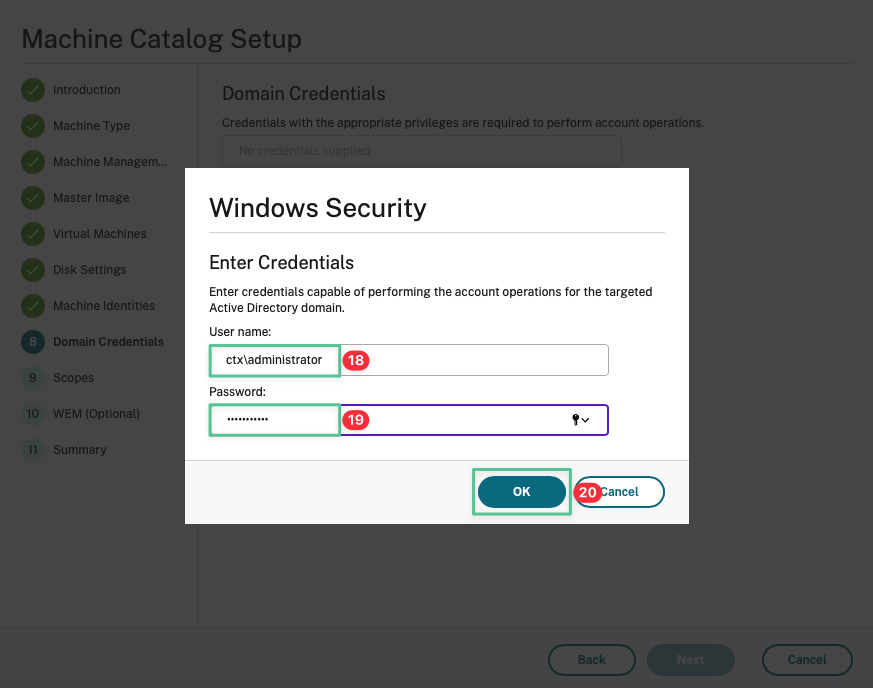
-
Input username: ctx\administrator
-
Input password: P@$$w0rd!@#
-
Click Next
-
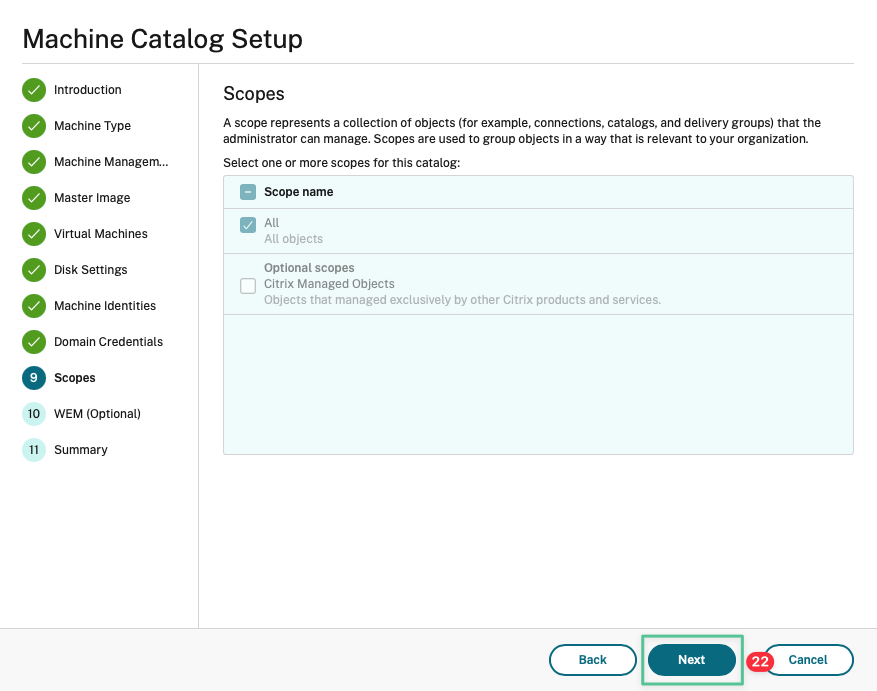
Click Next
-
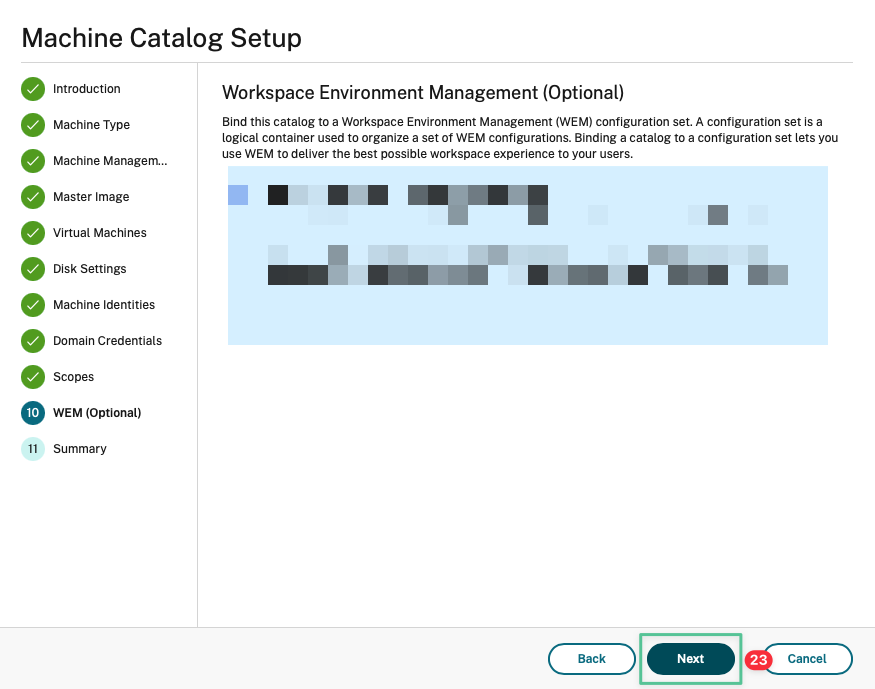
Click Next
-
Click Next
-
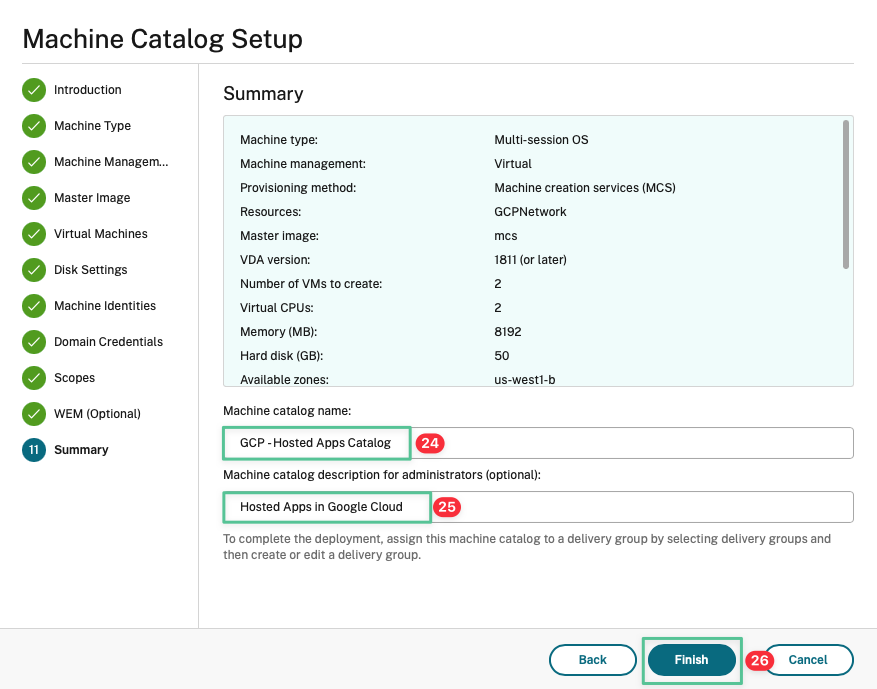
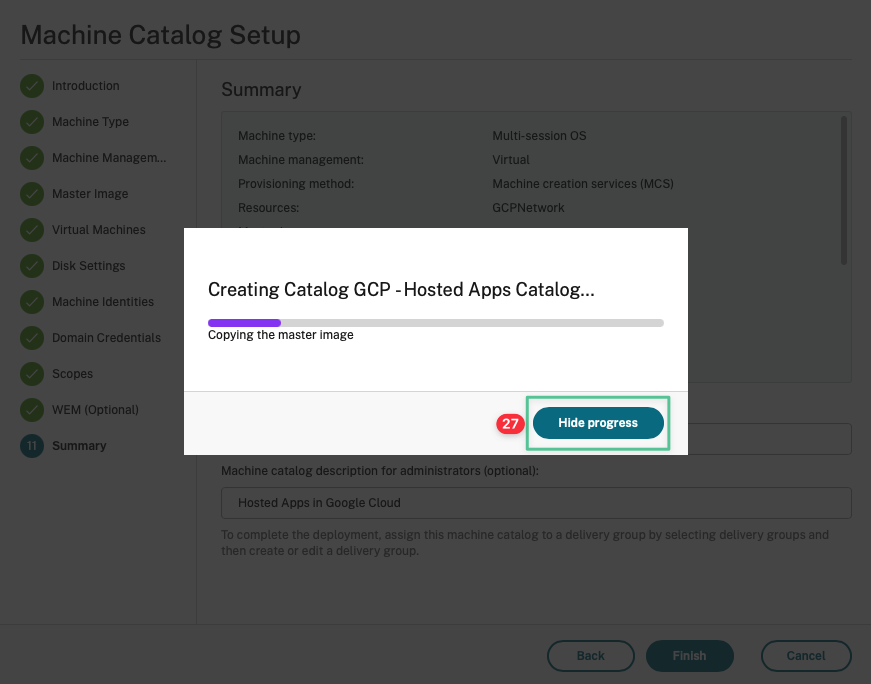
Input a unique Machine catalog name: GCP – Hosted Apps Catalog
-
Input a description for administrators: Hosted Apps in Google Cloud
-
Click Finish
-
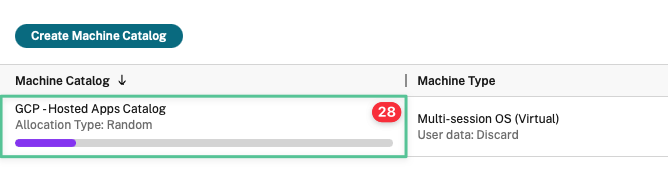
Click Hide progress to return to the Citrix Cloud Console
-
Allow the Machine Catalog creation process to complete
-
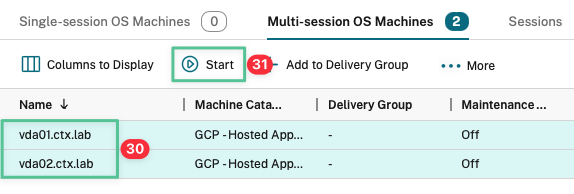
Double click on the Machine Catalog to view the virtual machines

-
Select both the virtual machines
-
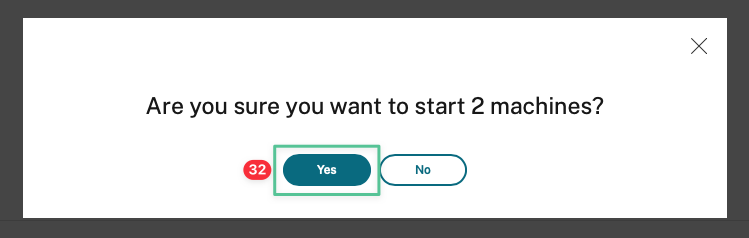
Click Start to power on the machines
-
Click Yes
-
The Power State column displays On
-
The Registration State column displays Registered

-
Navigate to Google Cloud Console. Select Compute Engine and VM Instances
-
The vda01 and vda02 virtual machines are now successfully created in the us-west1-b zone.
8.5 Create Delivery Groups
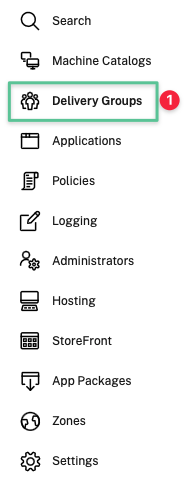
-
Click Delivery Groups
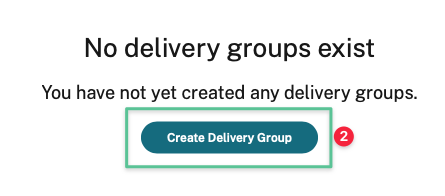
-
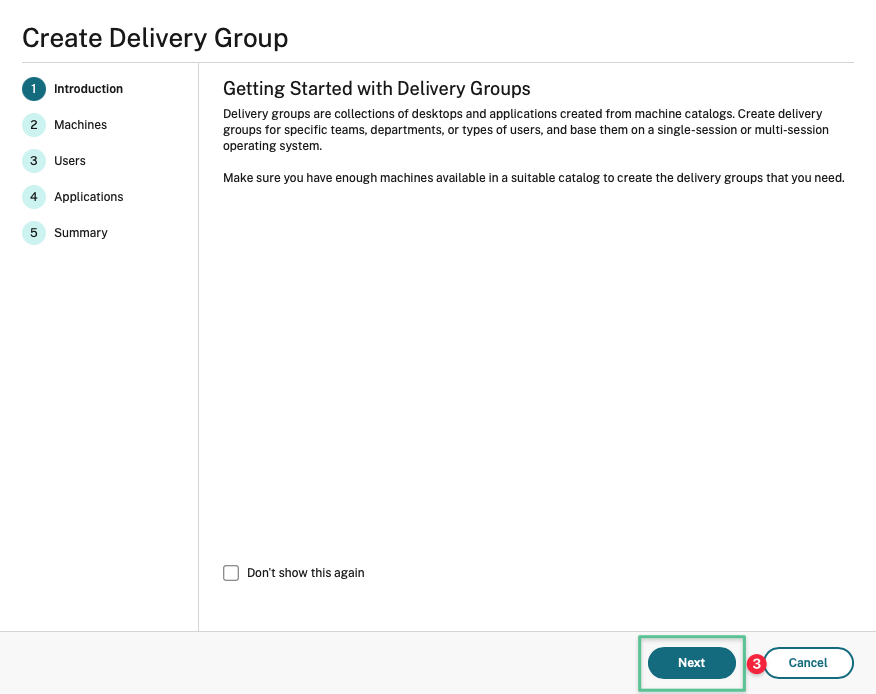
Click Create Delivery Group
-
Click Next
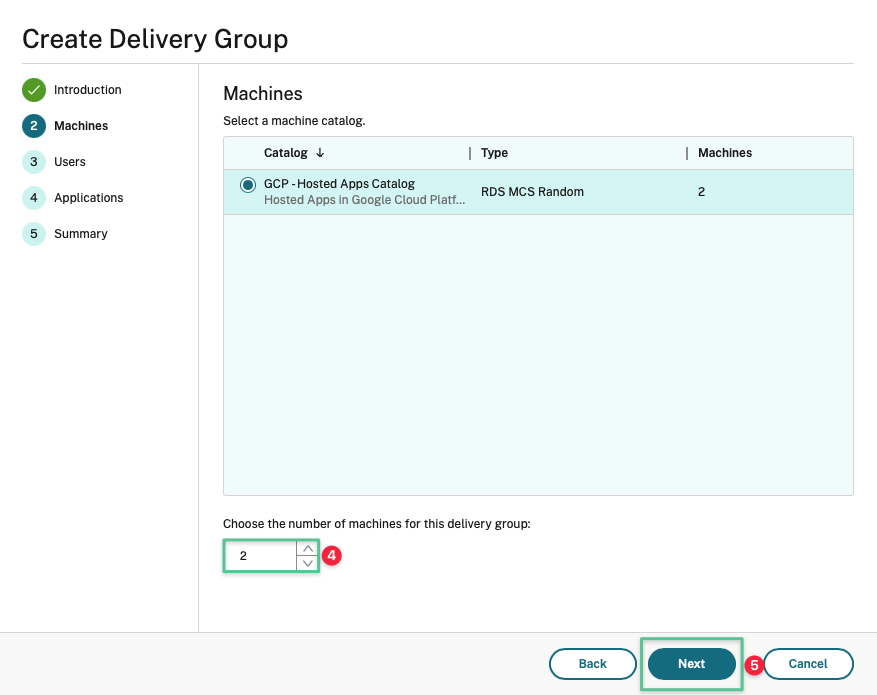
-
Increase the value to 2
-
Click Next
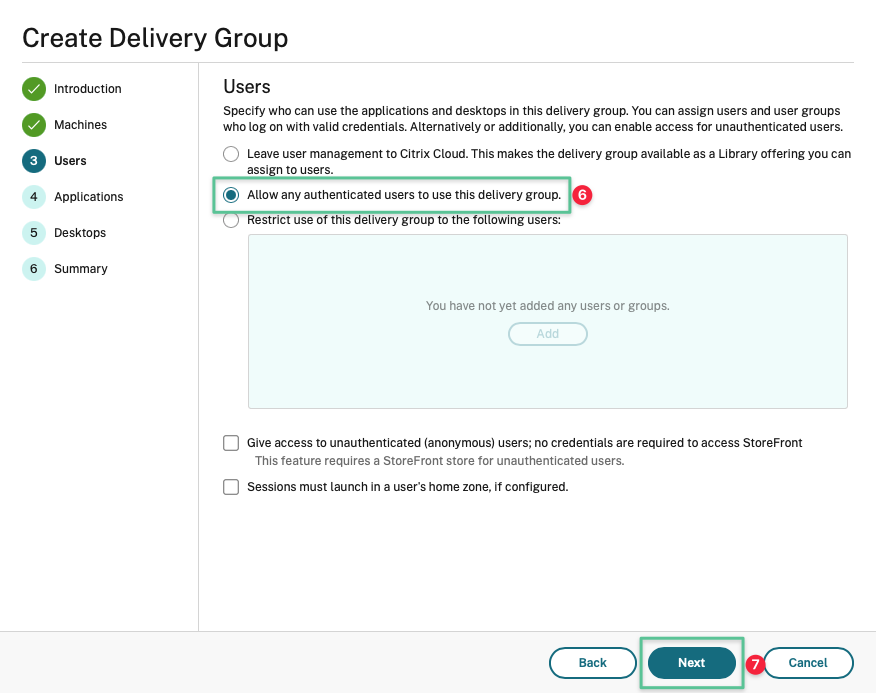
-
Select the Allow any authenticated users to use this delivery group option
-
Click Next
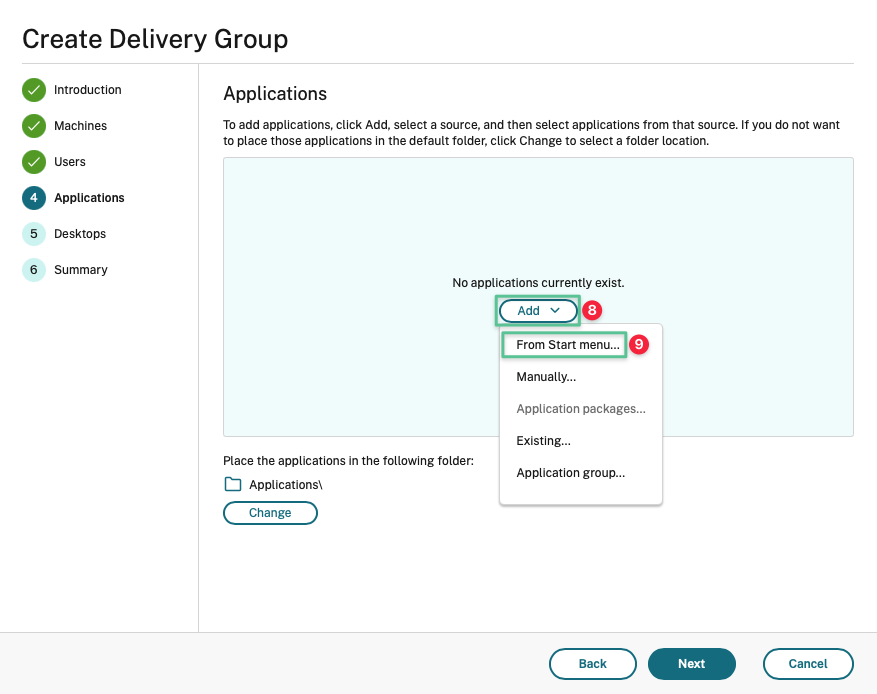
-
Click Add drop-down menu
-
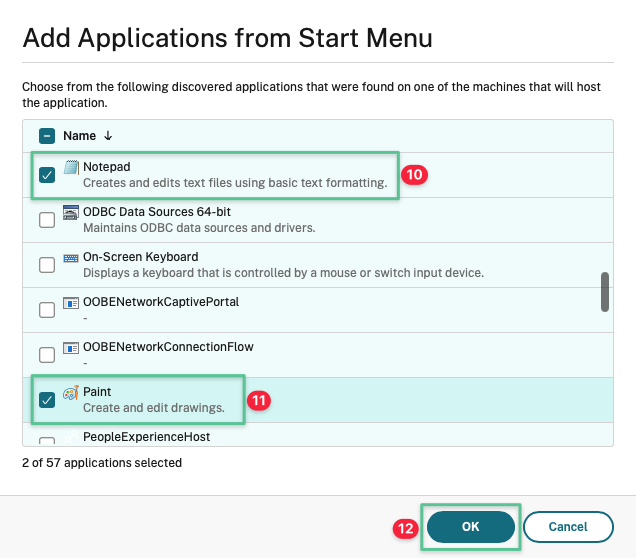
Select and click From Start menu…
-
Allow the applications to be enumerated from the Server VDAs, scroll down, and select Notepad
-
Select Paint
-
Click OK
-
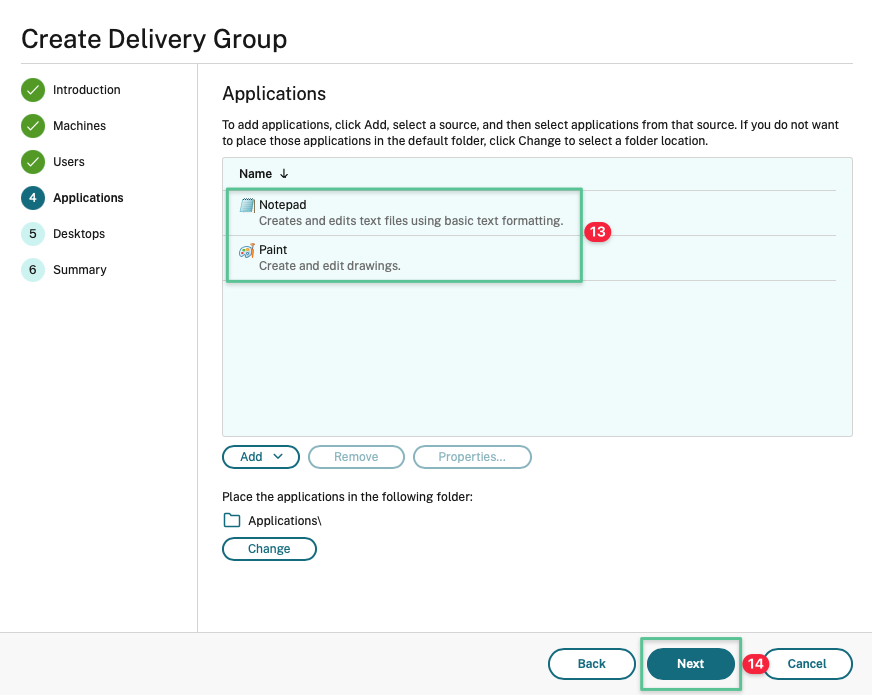
Review your application selection
-
Click Next
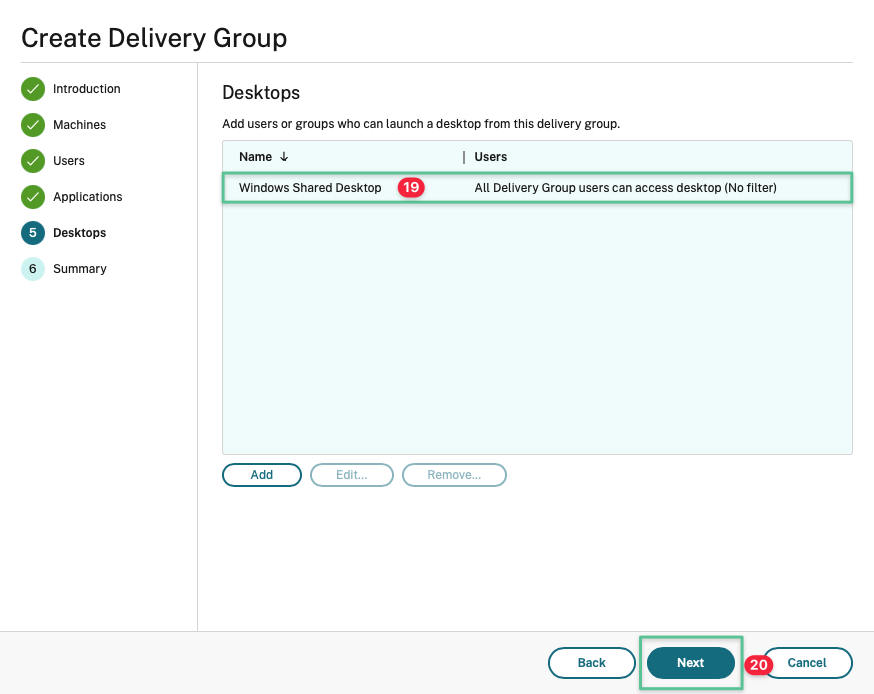
-
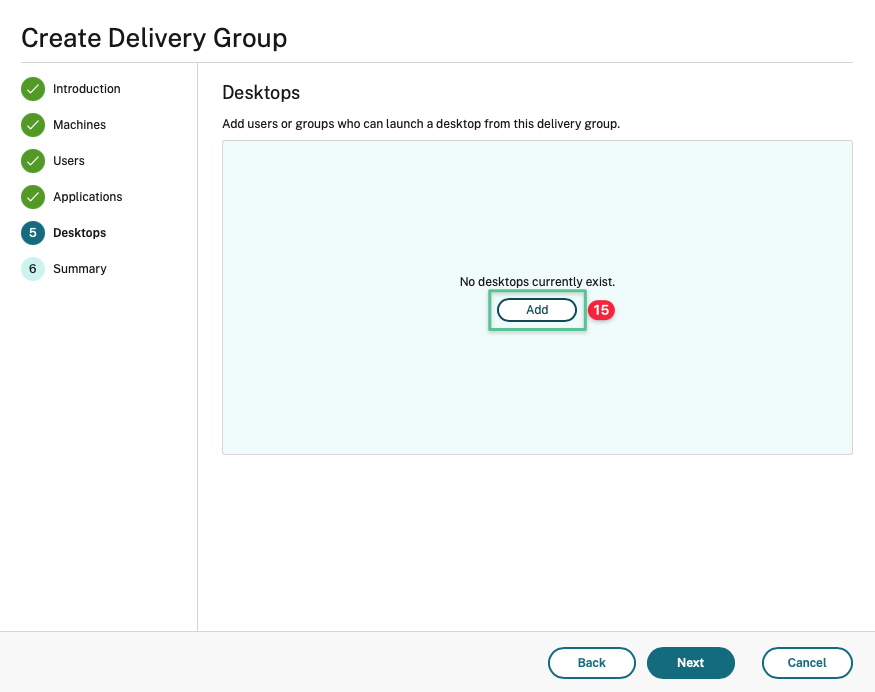
Click Add to configure Published Desktop
-
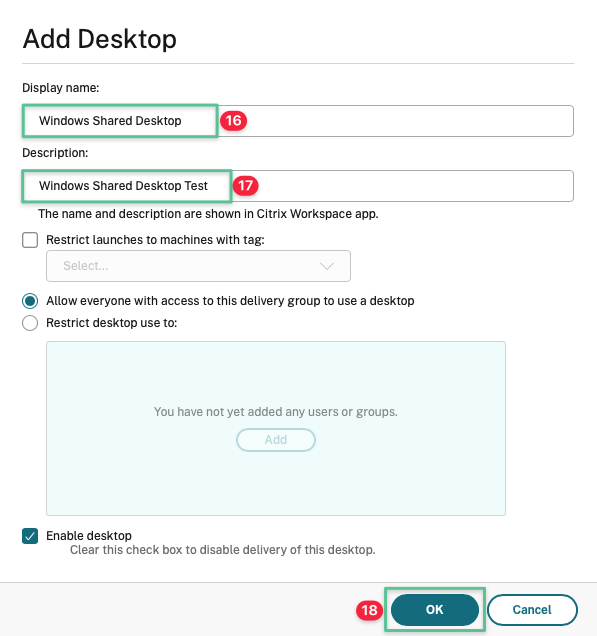
Input a unique Display name: Windows Shared Desktop
-
Input a description: Windows Shared Desktop Test
-
Click OK
-
Review the Desktops configuration
-
Click Next
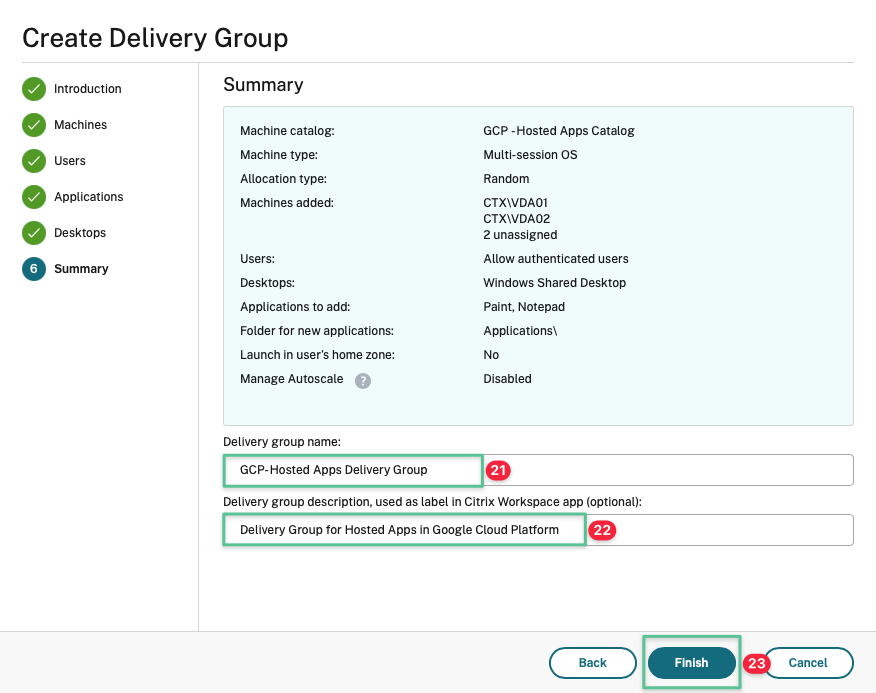
-
Input unique Delivery Group name: GCP-Hosted Apps Delivery Group
-
Input Delivery group description: Delivery Group for Hosted Apps in Google Cloud
-
Click Finish
-
Double click on the Delivery Group to view the virtual machines

-
The Delivery Group column displays the configured Delivery Group name
-
The Power State column displays On
-
The Registration State column displays Registered

8.6 Configure Workspace UI and session proxy settings
This deployment guide uses the Citrix Gateway service to provide secure remote access with diverse Identity and Access Management (IdAM) capabilities. You access the Citrix Gateway Service using a customizable URL. Upon successful authentication, you access your virtualized resources via the Citrix Workspace™ Service. Citrix Workspace is a service that, upon successful authentication, provides you with available resources (apps and desktops) that you can launch.
-
Navigate to https://cloud.citrix.com and log in to the Citrix Cloud console using your username and password. Provide the token when prompted
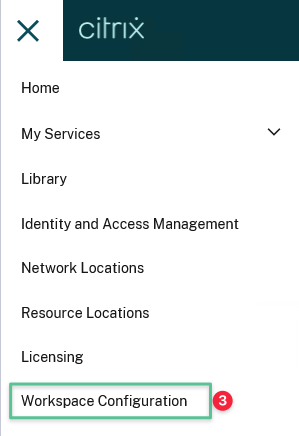
-
Click the hamburger menu located on the top right section
-
Select Workspace Configuration
-
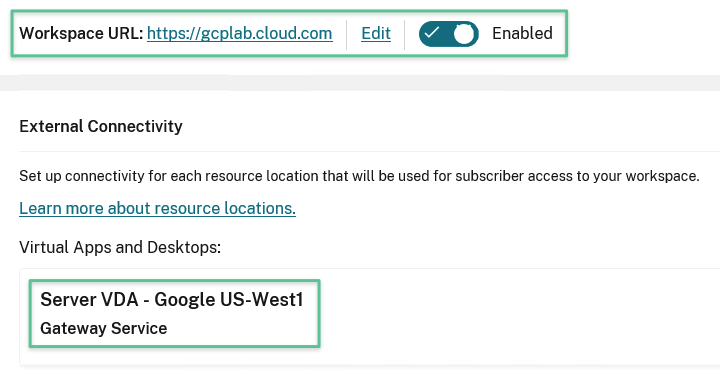
If disabled, toggle on the Enable button
-
Click Edit to customize the Workspace URL
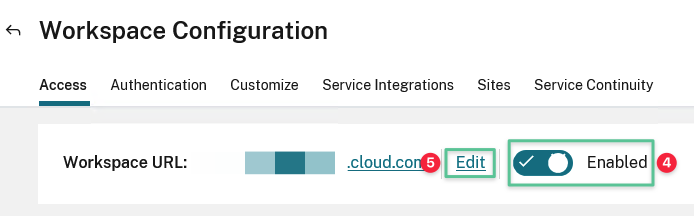
-
Input a unique Workspace URL of your choice: gcplab.cloud.com
Note
Do not enter the URL shown in this example. Choose your own unique Workspace URL and the Citrix Cloud validates if the URL is available.
-
Agree to the changes, which can take up to 10 minutes to be accessible
-
Click Save
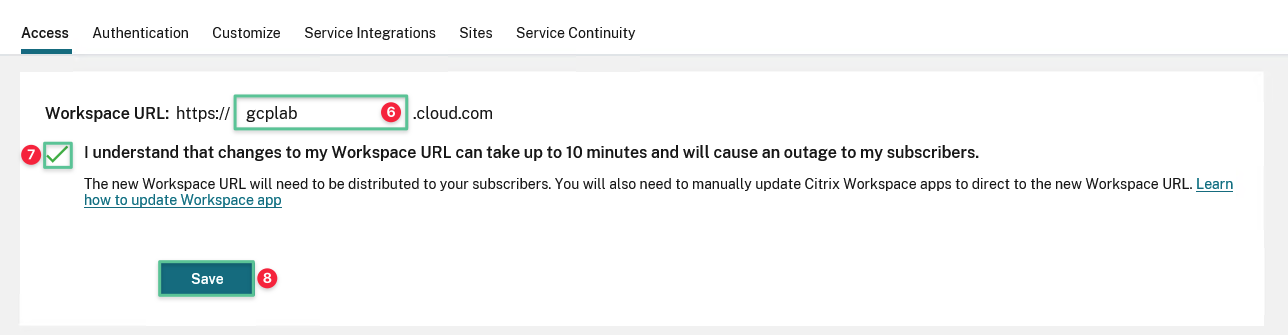
The result should be similar to the image:
9. Test published resource launch
-
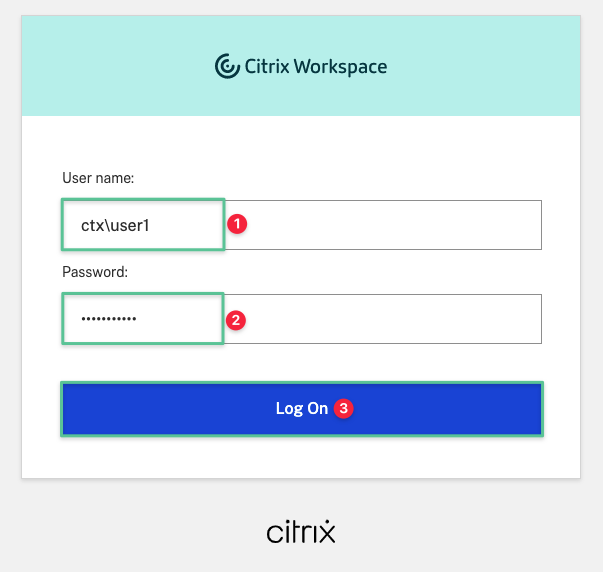
Navigate to the Workspace URL you customized in the Configuring Citrix Workspace Service section. At the login screen input the username: ctx\user1
-
Input the password: P@$$w0rd!@#
-
Click Log On
-
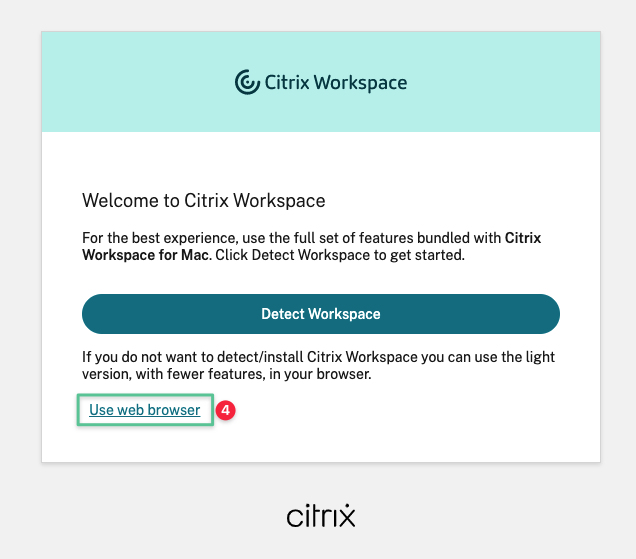
You are recommended to download and install the latest Citrix Workspace app or click Use web browser to use the HTML5 to start the application in a new browser tab
-
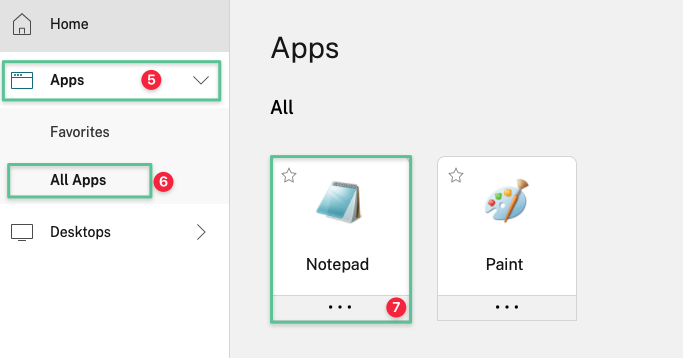
Expand Apps
-
Click All Apps
-
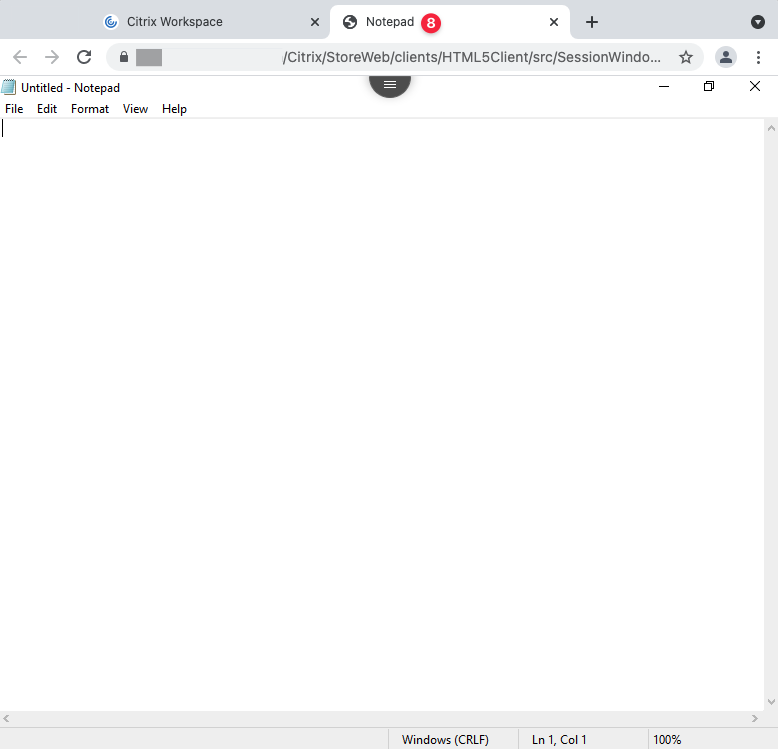
Choose the application you would like to launch (e.g., Notepad)
-
The publish application should launch on a separate browser tab
-
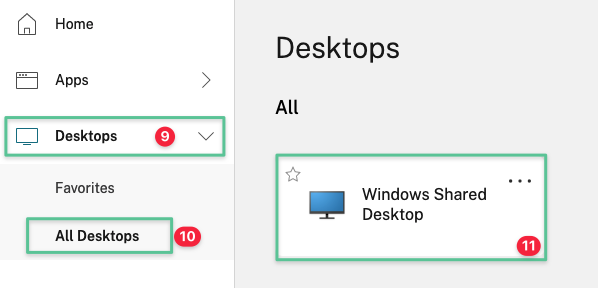
Expand Desktops
-
Click All Desktops
-
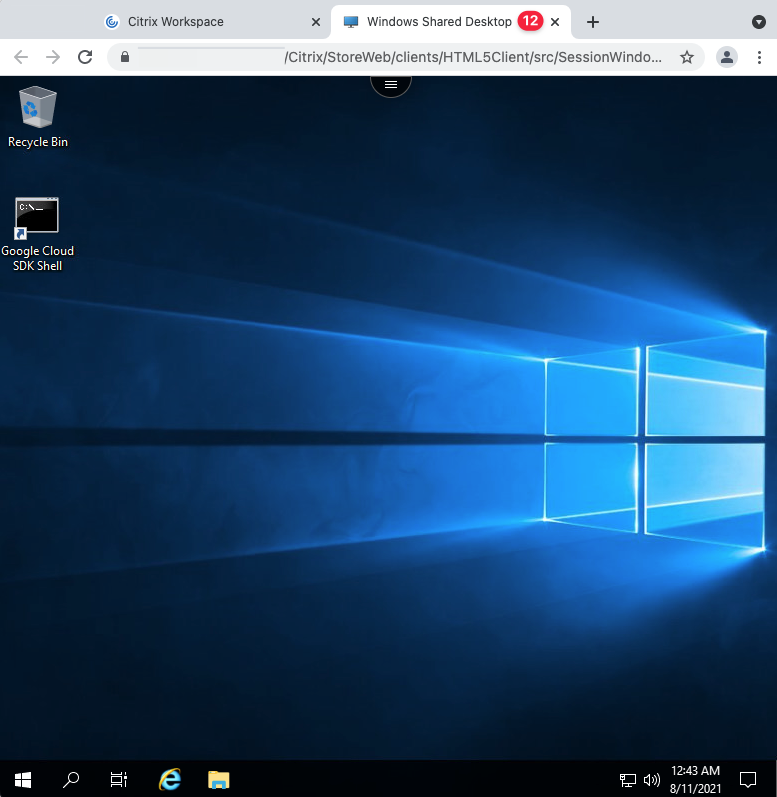
Click Windows Shared Desktop to launch
-
The published desktop should launch on a separate browser tab
In this article
- Introduction
- Deployment Overview
- 1. Define the deployment architecture
- 2. Prepare Google Cloud Project
- 3. Configure/verify network and network services
- 4. Create virtual machines
- 5. Configure access to virtual machine consoles
- 6. Deploy Active Directory into Google Cloud
- 7. Create and initialize Citrix Cloud resource location
- 8. Configure Citirx DaaS
- 9. Test published resource launch