Logon screen information
Logon screen information is a tile shown on the UniconOS logon screen, before anyone signs in.
It lists the device name, IP address, organizational unit (OU), and firmware version, plus up to ten entries of your own, such as a helpdesk phone number or an asset tag. Users and helpdesk staff can identify a device without signing in first.
The tile is off by default. An administrator turns it on centrally in Scout Board.
Note:
This is a separate feature from the device information overlay, which appears on the desktop after sign-in.
Turning it on
Open the device configuration of the base configuration, an OU, or a device:
- Base configuration: click Devices > Device management > Device configuration.
- OU or device: open its context menu and click Device configuration. For details, see Device configuration.
Then turn on the tile:
-
For an OU or a device, clear Use parent device configuration. Edit stays disabled until you do.
-
Click Edit.
-
In the list of sections, click User authentication.
-
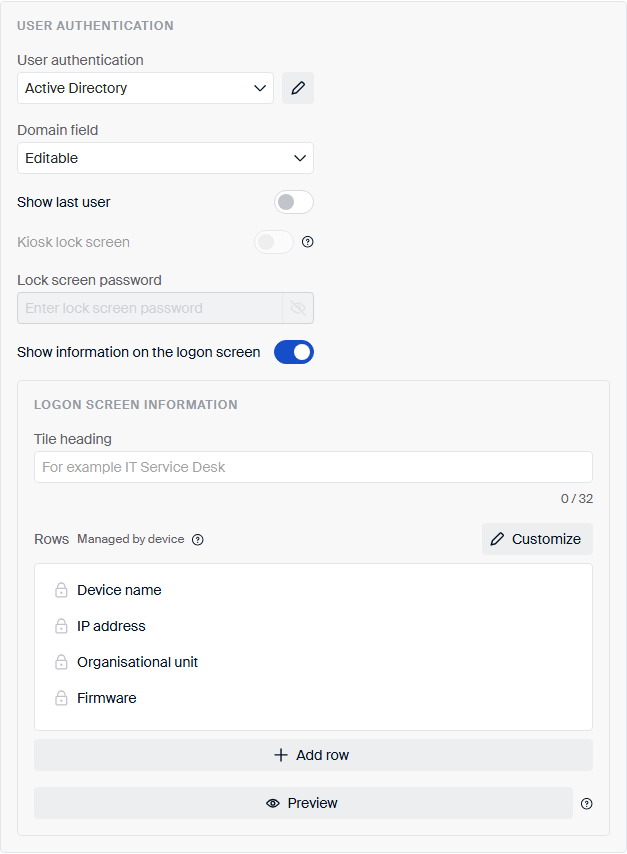
Turn on Show information on the logon screen. The switch is below Lock screen password.
-
Set up the tile as described in Configuring the tile.
-
Click Apply. On a device, click Apply settings.
Note:
Clearing Use parent device configuration takes effect at once. It stays in effect even if you discard your other changes. The OU or device gets its own copy of the whole configuration, so later changes on the parent no longer reach it, for any setting. Selecting the checkbox again deletes that copy after you confirm.
Configuration labels can carry these settings too. In a label, search for User authentication to add the whole section, or for Logon screen information to add only the tile. A label overrides only the settings it carries. If a label carries the tile without the sign-in type, Scout Board can’t tell whether the tile will appear. It shows a note that lists the sign-in types that show the tile.
The legacy Scout Console has no controls for this feature. Console users can set the same
/setup/terminal.ini keys as advanced file entries.
Note:
Administrators need the Security right to see the User authentication section, and Edit user authentication to change its values.
Configuring the tile
The tile has a heading and a list of rows. You set both in the Logon screen information section:
- Tile heading: optional, up to 32 characters. A counter under the field shows how many you have used. A line break in a pasted heading becomes a space. If you leave it empty, the device shows Device information in its display language.
- Rows: device fields first, then your custom entries, below a divider labeled Custom entries - always rendered below. Drag a row by its handle to reorder it. The list order is the display order. You can’t drag a row across the divider.
Scout Board offers these device fields. The table also shows the label each field has on the device tile:
| Scout Board label | Label on the device | Shows |
|---|---|---|
| Device name | Device | The device’s host name |
| IP address | IP address | The device’s IPv4 address on its own network |
| Organisational unit | Organisational unit | The OU name and number, for example Sales (42)
|
| Firmware | Firmware | The operating system name and version |
| Scout server | Scout server | The name of the Scout server that manages the device |
If the OU name can’t be looked up, the Organisational unit row shows only the OU number.
By default, the rows are Managed by device. The tile shows the device name, IP address, OU, and firmware, and the rows are locked. The device chooses these rows, so a field that a later firmware version adds appears on its own.
Click Customize to unlock the rows and build your own list. Click Reset to device default to go back to Managed by device. This also removes your custom entries.
Click Add row to add a device field that isn’t in the list yet, or a Custom entry …. A counter shows how many of the 10 custom entries are left. Adding a device field also unlocks the rows.
Every row has a drag handle and a Remove button. Custom entries also have an Edit button. To reorder with the keyboard, press Space on the handle, move with the arrow keys, and press Space again to drop the row.
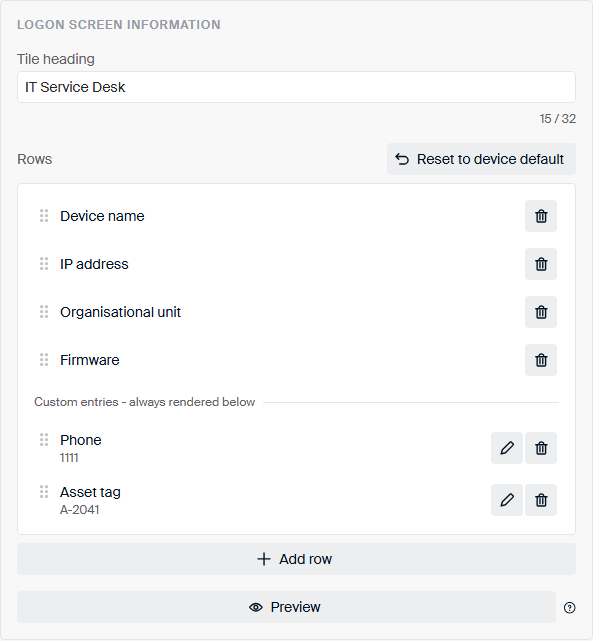
If you remove every device field, Scout Board shows “No device fields. Only your custom entries are shown.” The tile then shows only your custom entries. The default fields don’t come back.
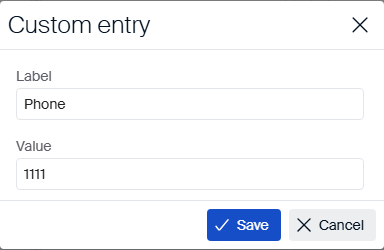
In the Custom entry dialog, enter a Label and a Value:
-
Label: required, up to 32 characters, and no
=. -
Value: required, up to 128 characters. It can contain
;and=.
Custom entries are static text. There is no placeholder syntax, and the value is shown exactly as you typed it.
If an entry breaks one of these rules, the dialog shows an error such as “The label is longer than 32 characters.” and doesn’t save the entry. It doesn’t shorten the text for you. The Scout Board API rejects such entries with HTTP 400.
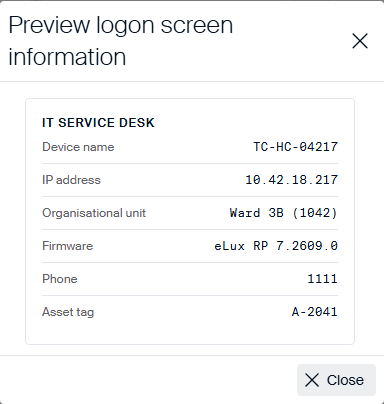
Click Preview to see the tile with sample values, not the device’s real data. The preview labels the host name row Device name, but the device shows Device. About six rows fit on a 1366 x 768 screen.
If User authentication is set to None, Evidian, or Citrix, Scout Board shows a warning such as “None sign-in does not draw this tile. Anything set here is saved but has no effect on the device.” It doesn’t block saving.
On the device
- The tile appears on the logon screen, in the branding area on the left, under the product logo.
- It appears only for these sign-in types: Active Directory, Active Directory + Smartcard, OpenID Connect, Entra ID, Imprivata, and SAML.
- The logon screen must be at least 1200 pixels wide after display scaling. Below that, the logon screen has no branding area to hold the tile. For example, a 1920 x 1080 screen at 200% scaling counts as 960 pixels, so no tile is shown.
- A device field with no value is left out. For example, a device that isn’t in an OU has no Organisational unit row. If no rows are left, no tile appears — a heading on its own doesn’t show anything.
- Built-in labels and the default heading are translated; your own heading and custom entries aren’t, and appear exactly as entered. The heading — default or your own — is always shown in capital letters; custom entries are not.
- Long values wrap.
- Devices get changes with their next configuration update from Scout.
- The device needs UniconOS 2609 or later. Earlier versions don’t show a tile.
- For devices that connect through the Scout Cloud Gateway, the IP address row shows the device’s own network address, which can differ from the address Scout shows for the device.
Advanced file entries
For Console users, set these in /setup/terminal.ini, section Layout:
| Key | Value |
|---|---|
EnableLoginInfo |
true or false (default) |
LoginInfoFields |
Comma-separated device fields, in display order. Default: hostname,ip,ou,os. |
LoginInfoTitle |
The tile heading. If empty, the device shows Device information. |
LoginInfoCustomField1 through LoginInfoCustomField10
|
Label=Value, split at the first =. |
In LoginInfoFields, use these case-sensitive names: hostname, ip, ou, os, and scoutServer.
Use - for no device fields.
Configure the tile in one place only. The Scout Board panel and advanced file entries write the same
keys. Scout sends advanced file entries after the panel’s values, and the device keeps the last one,
so an entry overrides the panel wherever file, section, and key match. Scout also sends all ten
LoginInfoCustomFieldN keys every time, so an entry replaces whatever the panel put in that slot.
Scout Board’s length and count limits apply to the panel and the Scout Board API. Scout doesn’t check advanced file entries for them.
An entry with no = shows as a full-width line without a label, for example “Please quote the
device name when raising a ticket”. The panel doesn’t offer label-less entries.
See Advanced file entries for how to set a file entry.