GPU acceleration for Windows Desktop OS
With HDX 3D Pro you can deliver graphically intensive applications as part of hosted desktops or applications on Desktop OS machines. HDX 3D Pro supports physical host computers (including desktop, blade, and rack workstations) and GPU Passthrough and GPU virtualization technologies offered by XenServer®, vSphere, and Hyper-V (passthrough only) hypervisors.
Using GPU Passthrough, you can create VMs with exclusive access to dedicated graphics processing hardware. You can install multiple GPUs on the hypervisor and assign VMs to each of these GPUs on a one-to-one basis.
Using GPU virtualization, multiple virtual machines can directly access the graphics processing power of a single physical GPU. The true hardware GPU sharing provides desktops suitable for users with complex and demanding design requirements. GPU virtualization for NVIDIA GRID cards (see NVIDIA GRID) uses the same NVIDIA graphics drivers that are deployed on non-virtualized operating systems. GPU virtualization is also supported for 5th and 6th Generation Intel CPUs with Intel Iris Pro graphics with Intel GVT-g. For more information on these families of Intel processors, see 5th Generation Intel Core Processors and 6th Generation Intel Core i5 Processors. GPU virtualization is also supported for AMD FirePro S-Series server cards, see AMD Professional Graphics virtualization solution.
HDX™ 3D Pro offers the following features:
-
Adaptive H.264-based deep compression for optimal WAN and wireless performance. HDX 3D Pro uses CPU-based full-screen H.264 compression as the default compression technique for encoding. Hardware encoding is used with NVIDIA cards that support NVENC.
-
Lossless compression option for specialized use cases. HDX 3D Pro also offers a CPU-based lossless codec to support applications where pixel-perfect graphics are required, such as medical imaging. True lossless compression is recommended only for specialized use cases because it consumes significantly more network and processing resources.
When using lossless compression:
-
The lossless indicator, a system tray icon, notifies the user if the screen displayed is a lossy frame or a lossless frame. This helps when the Visual Quality policy setting specifies Build to lossless. The lossless indicator turns green when the frames sent are lossless.
-
The lossless switch enables the user to change to Always Lossless mode anytime within the session. To select or deselect Lossless anytime within a session, right-click the icon or use the shortcut ALT+SHIFT+1.
For lossless compression: HDX 3D Pro uses the lossless codec for compression regardless of the codec selected through policy.
For lossy compression: HDX 3D Pro uses the original codec, either the default or the one selected through policy.
Lossless switch settings are not retained for subsequent sessions. To use lossless codec for every connection, select Always lossless in the Visual quality policy setting.
-
-
You can override the default shortcut, ALT+SHIFT+1, to select or deselect Lossless within a session. Configure a new registry setting at HKLM\SOFTWARE\Citrix\HDX3D\LLIndicator.
- Name: HKLM_HotKey, Type: String
- The format to configure a shortcut combination is C=0
|1, A=0|1, S=0|1, W=0|1, K=val. Keys must be comma “,” separated. The order of the keys does not matter. - A, C, S, W and K are keys, where C=Control, A=ALT, S=SHIFT, W=Win, and K=a valid key. Allowed values for K are 0-9, a-z, and any virtual key code. For more information on virtual key codes, see Virtual-Key Codes on MSDN.
- For example:
- For F10, set K=0x79
- For Ctrl + F10, set C=1, K=0x79
- For Alt + A, set A=1, K=a or A=1, K=A or K=A, A=1
- For Ctrl + Alt + 5, set C=1, A=1, K=5 or A=1, K=5, C=1
- For Ctrl + Shift + F5, set A=1, S=1, K=0x74
Caution:
Editing the registry incorrectly can cause serious problems that may require you to reinstall your operating system. Citrix® cannot guarantee that problems resulting from the incorrect use of Registry Editor can be solved. Use Registry Editor at your own risk. Be sure to back up the registry before you edit it.
-
Multiple and high resolution monitor support. For desktop OS machines, HDX 3D Pro supports user devices with up to four monitors. Users can arrange their monitors in any configuration and can mix monitors with different resolutions and orientations. The number of monitors is limited by the capabilities of the host computer GPU, the user device, and the available bandwidth. HDX 3D Pro supports all monitor resolutions and is limited only by the capabilities of the GPU on the host computer.
HDX 3D Pro also provides limited support for dual-monitor access to Windows XP desktops. For more information about this, see VDAs on machines running Windows XP or Windows Vista.
- Dynamic resolution. You can resize the virtual desktop or application window to any resolution. Note: The only supported method to change the resolution is by resizing the VDA session window. Changing resolution from within the VDA session (using Control Panel > Appearance and Personalization > Display > Screen Resolution) is not supported.
- Support for NVIDIA GRID architecture. HDX 3D Pro supports NVIDIA GRID cards (see NVIDIA GRID) for GPU passthrough and GPU sharing. NVIDIA GRID vGPU enables multiple VMs to have simultaneous, direct access to a single physical GPU, using the same NVIDIA graphics drivers that are deployed on non-virtualized operating systems.
- Support for VMware vSphere and VMware ESX using Virtual Direct Graphics Acceleration (vDGA) - You can use HDX 3D Pro with vDGA for both RDS and VDI workloads.
- Support for VMware vSphere/ESX using NVIDIA GRID vGPU and AMD MxGPU.
- Support for Microsoft HyperV using Discrete Device Assignment in Windows Server 2016.
- Support for Data Center Graphics with Intel Xeon Processor E3 Family. HDX 3D Pro supports multi-monitors (up to 3), console blanking, custom resolution, and high frame-rate with the supported family of Intel processors. For more information, see https://www.citrix.com/intel and https://www.intel.com/content/www/us/en/servers/data-center-graphics.html.
-
Support for AMD RapidFire on the AMD FirePro S-series server cards. HDX 3D Pro supports multi-monitors (up to 6), console blanking, custom resolution, and high frame-rate. Note: HDX 3D Pro support for AMD MxGPU (GPU virtualization) works with VMWare vSphere vGPUs only. XenServer and Hyper-V are supported with GPU passthrough. For more information, see AMD Virtualization Solution.
- Access to a high-performance video encoder for NVIDIA GPUs and Intel Iris Pro graphics processors. This feature is controlled by a policy setting (enabled by default) and allows the use of hardware encoding for H.264 encoding (where available). If such hardware is not available, the VDA will fall back to CPU-based encoding using the software video codec. For more information, see Graphics policy settings.
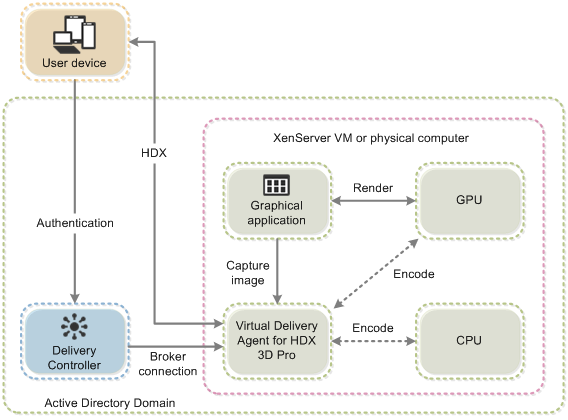
As shown in the following figure:
- When a user logs on to Citrix Receiver™ and accesses the virtual application or desktop, the Controller authenticates the user and contacts the VDA for HDX 3D Pro to broker a connection to the computer hosting the graphical application.
The VDA for HDX 3D Pro uses the appropriate hardware on the host to compress views of the complete desktop or of just the graphical application.
- The desktop or application views and the user interactions with them are transmitted between the host computer and the user device through a direct HDX connection between Citrix Receiver and the VDA for HDX 3D Pro.
Install the VDA for HDX 3D Pro
When you use the installer’s graphical interface to install a VDA for Windows Desktop OS, select Yes on the HDX 3D Pro page. When using the command line interface, include the /enable_hdx_3d_pro option with the XenDesktop VdaSetup.exe command.
To upgrade HDX 3D Pro, uninstall both the separate HDX 3D for Professional Graphics component and the VDA before installing the VDA in HDX 3D Pro mode. Similarly, to switch from the standard VDA mode for Windows Desktop OS to the 3D Pro mode, uninstall the standard VDA and then install the VDA in HDX 3D Pro mode.
| Standard Mode | HDX 3D Pro mode |
|---|---|
| Generally best for virtual desktops without graphics hardware acceleration, and for Remote PC Access. | Generally best for data center desktops with graphics hardware acceleration, unless more than four monitors are required. |
| Any GPU can be used for Remote PC Access, with some app compatibility limitations: On Windows 7, 8, and 8.1, GPU acceleration for DirectX feature levels up to 9.3. Some DirectX 10, 11, 12 applications may not run if they do not tolerate fallback to DirectX 9. On Windows 10, GPU acceleration is provided for windowed DirectX 10, 11, and 12 apps. DX 9 apps are rendered by WARP. DX apps cannot be used in full-screen mode. OpenGL application acceleration in remote sessions if supported by the GPU vendor (currently only NVIDIA). | Supports GPU acceleration with any GPU, however console blanking, non-standard screen resolutions and true multi-monitor support require NVIDIA GRID, Intel Iris Pro, or AMD RapidFire graphics. Leverages graphics vendor’s driver for broadest application compatibility: All 3D APIs (DirectX or OpenGL) that the GPU supports. Full-screen 3D app support with Intel Iris Pro (Win10 only) and NVIDIA GRID and AMD RapidFire. Support for custom driver extensions and APIs. For example, CUDA or OpenCL. |
| Arbitrary monitor resolutions (limit determined by Windows OS and performance) and up to eight monitors. | Supports up to four monitors. |
| H.264 hardware encoding available with Intel Iris Pro graphics processors. | H.264 hardware encoding available with Intel Iris Pro graphics processors and NVIDIA cards. |
Install and upgrade NVIDIA drivers
The NVIDIA GRID API provides direct access to the frame buffer of the GPU, providing the fastest possible frame rate for a smooth and interactive user experience. If you install NVIDIA drivers before you install a VDA with HDX 3D Pro, NVIDIA GRID is enabled by default.
To enable NVIDIA GRID on a VM, disable Microsoft Basic Display Adapter from the Device Manager. Run the following command and then restart the VDA: NVFBCEnable.exe -enable -noreset
If you install NVIDIA drivers after you install a VDA with HDX 3D Pro, NVIDIA GRID is disabled. Enable NVIDIA GRID by using the NVFBCEnable tool provided by NVIDIA.
To disable NVIDIA GRID, run the following command and then restart the VDA: NVFBCEnable.exe -disable -noreset
Install Intel graphics drivers
You can install the Intel graphics drivers before installing the VDA. The following step is only required if you install Intel drivers after you install a VDA with HDX 3D Pro or if the Intel driver has been updated.
In order to enable the Intel drivers required for multi-monitor support, run the following command using the GfxDisplayTool.exe, then restart the VDA: GfxDisplayTool.exe -vd enable
GfxDisplayTool.exe is included with the VDA installer. The GfxDisplayTool.exe is in C:\Program Files\Citrix\ICAServices.
Note:
Uninstalling NVIDIA or Intel drivers within ICA® sessions is not supported.
Optimize the HDX 3D Pro user experience
To use HDX 3D Pro with multiple monitors, ensure that the host computer is configured with at least as many monitors as are attached to user devices. The monitors attached to the host computer can be either physical or virtual.
Do not attach a monitor (either physical or virtual) to a host computer while a user is connected to the virtual desktop or application providing the graphical application. Doing so can cause instability for the duration of a user’s session.
Let your users know that changes to the desktop resolution (by them or an application) are not supported while a graphical application session is running. After closing the application session, a user can change the resolution of the Desktop Viewer window in the Citrix Receiver - Desktop Viewer Preferences.
When multiple users share a connection with limited bandwidth (for example, at a branch office), Citrix recommends that you use the Overall session bandwidth limit policy setting to limit the bandwidth available to each user. This ensures that the available bandwidth does not fluctuate widely as users log on and off. Because HDX 3D Pro automatically adjusts to make use of all the available bandwidth, large variations in the available bandwidth over the course of user sessions can negatively impact performance.
For example, if 20 users share a 60 Mbps connection, the bandwidth available to each user can vary between 3 Mbps and 60 Mbps, depending on the number of concurrent users. To optimize the user experience in this scenario, determine the bandwidth required per user at peak periods and limit users to this amount at all times.
For users of a 3D mouse, Citrix recommends that you increase the priority of the Generic USB Redirection virtual channel to 0. For information about changing the virtual channel priority, see CTX128190.