AppDisks™
Overview
Managing applications and managing the images they are installed on can be a challenge. The Citrix AppDisks feature is a solution. AppDisks separate applications and groups of applications from the operating system, enabling you to manage them independently.
You can create different AppDisks containing applications designed for individual user groups, and then assemble the AppDisks on a master image of your choice. Grouping and managing applications this way gives you finer control of applications, and reduces the number of master images you maintain. This simplifies IT administration and enables you to be more responsive to user needs. You deliver the applications in AppDisks through Delivery Groups.
If your deployment also includes Citrix AppDNA, you can integrate the AppDisks feature with it; AppDNA allows XenApp and XenDesktop® to perform automatic analysis of applications on a per-AppDisk basis. Using AppDNA helps make the most of the AppDisks feature. Without it, application compatibility is not tested or reported.
AppDisks differ from other application-provisioning technologies in two ways: isolation and change management.
- Microsoft App-V allows incompatible applications to exist together by isolating them. The AppDisks feature does not isolate applications. It separates applications (and supporting files and registry keys) from the OS. To the OS and the user, AppDisks look and behave as if they are installed directly on a master image.
- Change management (updating master images and testing the compatibility of updates with installed applications) can be a significant expense. AppDNA® reports help identify issues and suggest remediation steps. For example, AppDNA can identify applications that have common dependencies such as .NET, so you can install them on a single common base image. AppDNA can also identify applications that load early in the OS startup sequence, so that you can then ensure they behave as expected.
Good to know:
-
After updating an image, some applications may fail to work properly due to an ability to verify previously installed licenses. For example, after an image upgrade, launching Microsoft Office may display an error message similar to:
“Microsoft Office Professional Plus 2010 cannot verify the license for this application. A repair attempt failed or was canceled by the user, the application will not shut down.”
To resolve this issue, uninstall Microsoft Office and install the new version on the base image.
- In some cases, downloading Metro apps from the Windows Store to a published catalog’s virtual machine fails after a long time.
- Citrix recommends that you always put all Microsoft Office components in the same AppDisk. For example, one AppDisk with Microsoft Office with Project, and another AppDisk with Microsoft Office with Project and Visio.
- On some systems, SCCM crashes when updating an image. This scenario occurs when updates are made to the base image, then applied, which results in failure of the SCCM client. To resolve this issue, install the SCCM client instance in the base image first.
- In some cases, an application installed on the AppDisk may fail to appear in the Windows Start menu after it is assigned to a Delivery Group and assigned a user’s virtual machine. See How applications appear in the Start Menu for more information.
- Users are unaware of the separation of applications and the OS, or any other aspect of the AppDisks feature. Applications behave as if they are installed on the image. AppDisks containing complex applications may result in a slight delay in desktop startup.
- You may only use AppDisks with Hosted Shared and Pooled desktops.
- You can use AppDisks with hosted shared desktops.
- You may be able to share AppDisks across master images and OS platforms (on a per-application basis); however, this will not work for all applications. If you have applications with an install script for a desktop OS that prevents them from working on a server OS, Citrix recommends packaging the applications separately for the two OSs.
- In many cases, AppDisks work on different OSs. For example, you can add an AppDisk that was created on a Windows 7 VM to a Delivery Group containing Windows 2008 R2 machines, as long as both OSs have the same bitness (32 bit or 64 bit) and both support the application. However, Citrix recommends you do not add an AppDisk created on a later OS version (such as Windows 10) to a Delivery Group containing machines running an earlier OS version (such as Windows 7), because it might not work correctly.
- If you need to provide access to an AppDisk’s applications to only a subset of users in a Delivery Group, Citrix recommends using Group Policy to hide an application in an AppDisk from some users. That application’s executable file remains available, but will not run for those users.
- In Russian and Chinese environments running the Windows 7 OS, the reboot dialog fails to disappear automatically; in such cases, after logging on to a delivered desktop the reboot dialog appears and should disappear quickly.
- When using the Upload-PvDDiags script tool, log information related to the PVD user layer is missing when the user’s drive designation is not set to ‘P’.
- In environments set to display Basque language, a Windows 7 OS may fail to properly display the appropriate language on the reboot prompt screen. When you set the language to Basque, make sure that you have already installed French or Spanish as the parent language, then install Basque and set it as the current language.
- When shutting down a computer, the PVD update reminder pops up even if the PVD disk is set to read-only mode.
- During an in-place upgrade, a registry file (DaFsFilter) could be deleted, which causes the upgrade to fail.
Tip:
When creating an AppDisk, use a VM with only the OS installed (that is, do not include other apps); the OS should contain all updates prior to creating the AppDisk.
Deployment overview
The following list summarizes the steps to deploy AppDisks. Details are provided later in this article.
- From your hypervisor management console, install a Virtual Delivery Agent (VDA) on a VM.
- Create an AppDisk, which includes completing steps from your hypervisor management console and in Studio.
- From your hypervisor management console, install applications on the AppDisk.
- Seal the AppDisk (from the hypervisor management console or in Studio). Sealing allows XenApp® and XenDesktop to record the AppDisk’s applications and supporting files in an Application Library (AppLibrary).
- In Studio, create or edit a Delivery Group and select the AppDisks to include; this is called assigning the AppDisks (even though you use the Manage AppDisks action in Studio). When VMs in the Delivery Group start up, XenApp and XenDesktop coordinate with the AppLibrary, then interact with Creation Services (MCS) or Provisioning Services (PVS), and the Delivery Controller™ to stream the boot devices after AppDisks are configured on them.
Requirements
Using AppDisks has requirements in addition to those listed in the System requirements article.
The AppDisks feature is supported only in deployments containing (at minimum) versions of the Delivery Controller and Studio provided in the XenApp and XenDesktop 7.8 download, including the prerequisites that the installer automatically deploys (such as .NET 4.5.2).
AppDisks can be created on the same Windows OS versions that are supported for VDAs. The machines selected for Delivery Groups that will use AppDisks must have at least VDA version 7.8 installed.
Citrix recommends that you install or upgrade all machines with the most recent VDA version (and then upgrade Machine Catalogs and Delivery Groups, if needed). When creating a Delivery Group, if you select machines that have different VDA versions installed, the Delivery Group will be compatible with the earliest VDA version. (This is called the group’s functional level.) For more information about functional level, see the Create Delivery Groups article.
To provision VMs that will be used to create AppDisks, you can use:
- MCS provided with the 7.8 Controller (minimum).
- PVS version provided on the download page with your XenApp and XenDesktop version.
- Supported hypervisors:
- XenServer®
- VMware (minimum version 5.1)
- Microsoft System Center Virtual Machine Manager
AppDisks cannot be used with other host hypervisors and cloud service types supported for XenApp and XenDesktop.
Creating AppDisks is not supported with machines in MCS catalogs that use caching of temporary data.
Note:
You can attach AppDisks to MCS-provisioned machines using write caching, but they cannot be used to create AppDisks.
Remote PC Access catalogs do not support AppDisks.
The Windows Volume Shadow Service must be enabled on the VM where you are creating an AppDisk. This service is enabled by default.
Delivery Groups used with AppDisks can contain machines from pooled random Machine Catalogs containing server OS or desktop OS machines. You cannot use AppDisks with machines from other catalog types, such as pooled static or dedicated (assigned).
Machines on which Studio is installed must have .NET Framework 3.5 installed (in addition to any other installed .NET versions).
AppDisks can affect storage. For details, see Storage and performance considerations.
If you use AppDNA:
- Review the AppDNA documentation and the AppDisk FAQ.
- The AppDNA software must be installed on a different server from a Controller. Use the AppDNA version supplied with this XenApp and XenDesktop release. For other AppDNA requirements, see its documentation.
- On the AppDNA server, make sure there is a firewall exception for the default port 8199.
- Do not disable an AppDNA connection while creating an AppDisk.
- When you create the XenApp or XenDesktop Site, you can enable compatibility analysis with AppDNA on the Additional Features page of the Site creation wizard. You can also enable/disable it later by selecting Configuration > AppDNA in the Studio navigation pane.
- Clicking on the View Issue Report link in Studio displays the AppDNA report, however the OS combinations that AppDNA uses by default are Window 7 64-bit for desktop delivery groups and Windows Server 2012 R2 for server delivery groups. If your delivery groups contain different versions of Windows, the default image combinations in the reports that Studio shows will be incorrect. To work around this issue, manually edit the solution in AppDNA after Studio has created it.
- There is a dependency between Studio and AppDNA server versions.
- From version 7.12, Studio must be the same, or a higher version than the AppDNA server.
- For versions 7.9 and 7.11, Studio and AppDNA server versions must match.
- The following table summarizes which versions work together (Yes = versions work together, – = versions do not work together):
| Product Version | Studio 7.9 | Studio 7.11 | Studio 7.12 | Studio 7.13 | Studio 7.14 | Studio 7.15 |
|---|---|---|---|---|---|---|
| AppDNA 7.9 | Yes | – | – | – | – | – |
| AppDNA 7.11 | – | Yes | – | – | – | – |
| AppDNA 7.12 | – | – | Yes | Yes | Yes | Yes |
| AppDNA 7.13 | – | – | Yes | Yes | Yes | Yes |
| AppDNA 7.14 | – | – | – | – | Yes | Yes |
| AppDNA 7.15 | – | – | – | – | – | Yes |
Storage and performance considerations
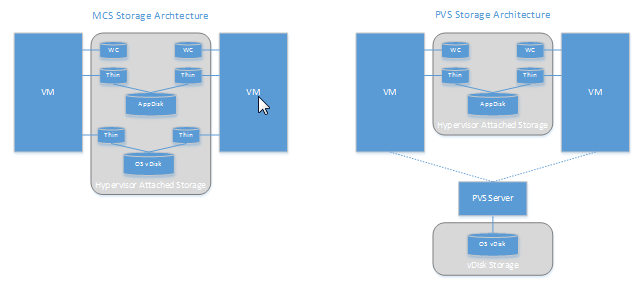
Separating applications and the OS using two disks, and storing those disks in different areas can affect your storage strategy. The following graphic illustrates the MCS and PVS storage architectures. “WC” indicates the write cache, and “Thin” indicates the thin disk used to store differences between a VM’s AppDisk and OS virtual disks.
In MCS environments:
-
You can continue to balance the size of the AppDisks and OS virtual disks (vDisks) using your organization’s existing sizing guidelines. If AppDisks are shared between multiple Delivery Groups, the overall storage capacity can be reduced.
-
OS vDisks and AppDisks are located in the same storage areas, so plan your storage capacity requirements carefully to avoid any negative effect on capacity when you deploy AppDisks. AppDisks incur overhead, so be sure your storage accommodates that overhead and the applications.
-
There is no net effect on IOPS because the OS vDisks and AppDisks are located in the same storage area. There are no write cache considerations when using MCS.
In PVS environments:
-
You must allow for the increased capacity and IOPS as applications move from AppDisk storage to the hypervisor-attached storage.
-
With PVS, OS vDisks and AppDisks use different storage areas. The OS vDisk storage capacity is reduced, but the hypervisor-attached storage is increased. So, you should size your PVS environments to accommodate those changes.
-
AppDisks in the hypervisor-attached storage require more IOPS while the OS vDisks require fewer.
-
Write cache: PVS uses a dynamic VHDX file on an NTFS formatted drive; when blocks are written to the write cache, the VHDX file is dynamically extended. When AppDisks are attached to their associated VM, they are merged with the OS vDisks to provide a unified view of the file system. This merging typically results in additional data being written to the write caches, which increases the size of the write cache file. You should account for this in your capacity planning.
In either MCS or PVS environments, remember to decrease the size of the OS vDisk to take advantage of the AppDisks you create. If you don’t, plan to use more storage.
When many users in a Site turn on their computers simultaneously (for example, at the beginning of the workday), the multiple startup requests apply pressure on the hypervisor, which can affect performance. For PVS, applications are not located on the OS vDisk, so fewer requests are made to the PVS server. With the resulting lighter load on each target device, the PVS server can stream to more targets. However, be aware that the increased target-server density might negatively affect boot storm performance.
Create an AppDisk
There are two ways to create an AppDisk, install applications on it, and then seal it. Both methods include steps you complete from your hypervisor management console and in Studio. The methods differ in where you complete most the steps.
Regardless of which method you use:
- Allow 30 minutes for AppDisk creation portion.
- If you use AppDNA, following the guidance in the Requirements section above. Do not disable an AppDNA connection while creating an AppDisk.
- When you add applications to an AppDisk, be sure to install applications for all users. Re-arm any applications that use Key Management Server (KMS) activation. For details, see the application’s documentation.
- Files, folders, and registry entries created in user-specific locations during AppDisk creation are not retained. Also, some applications run a first-time-use wizard to create user data during installation. Use a profile management solution to retain this data and prevent the wizard from appearing each time the AppDisk starts.
- If you are using AppDNA, analysis starts automatically after the creation process completes. During this interval, the AppDisk’s status in Studio is “Analyzing.”
PVS considerations
AppDisks on machines from Machine Catalogs created by Provisioning Services require additional configuration during AppDisk creation. From the Provisioning Services console:
- Create a new version of the vDisk associated with the device collection that contains the VM.
- Place the VM into maintenance mode.
- During AppDisk creation, select the maintenance version on the boot screen every time the VM restarts.
- After you seal the AppDisk, place the VM back into production, and delete the vDisk version you created.
Create an AppDisk primarily in Studio
This procedure includes three tasks: create the AppDisk, create applications on the AppDisk, and then seal the AppDisk.
Create an AppDisk
- Select AppDisks in the Studio navigation pane and then select Create AppDisk in the Actions pane.
- Review the information on the Introduction page of the wizard and then click Next.
- On the Create AppDisk page, select the Create new AppDisk radio button. Select either a predefined disk size (small, medium, or large) or specify a disk size in GB; the minimum size is 3 GB. The disk size should be large enough to hold the applications you will add. Click Next.
- On the Preparation Machine page, select a random pooled catalog to be used as the master image on which the AppDisk will be built. Note: The display lists all the Machine Catalogs in the Site, separated by type; only those catalogs that contain at least one available machine can be selected. If you choose a catalog that does not contain random pooled VMs, the AppDisk creation will fail. After you select a VM from a random pooled catalog, click Next.
- On the Summary page, type a name and description for the AppDisk. Review the information you specified on previous wizard pages. Click Finish.
Remember: If you are using PVS, follow the guidance in the PVS considerations section above.
After the wizard closes, the Studio display for the new AppDisk indicates “Creating.” After the AppDisk is created, the display changes to “Ready to install applications.”
Install applications on the AppDisk
From your hypervisor management console, install applications on the AppDisk. (Tip: If you forget the VM name, select AppDisks in the Studio navigation pane and then select Install Applications in the Actions pane to display its name.) See the hypervisor documentation for information about installing applications. (Remember: You must install applications on the AppDisk from your hypervisor management console. Do not use the Install Applications task in the Studio Actions pane.)
Seal the AppDisk
- Select AppDisks in the Studio navigation pane.
- Select the AppDisk you created, and then select Seal AppDisk in the Actions pane.
After you create the AppDisk, install applications on it, and then seal it, assign it to a Delivery Group.
Canceling AppDisk preparation and sealing
In some cases, an administrator may need to cancel AppDisk creation or sealing:
-
Access the VM.
-
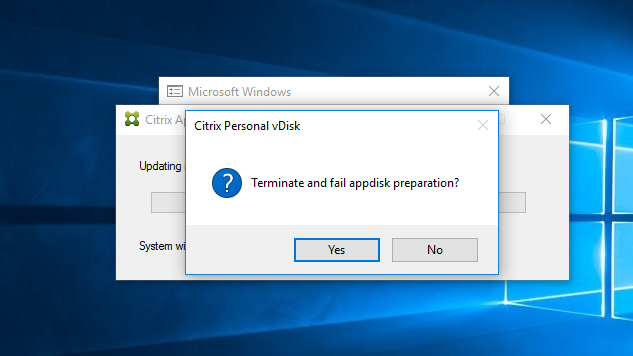
Close the dialog:
-
After closing the dialog, a popup message appears requesting verification to cancel the selected operation; click Yes.
Note:
If you cancel AppDisk preparation, rebooting the machine returns it to the initial state, otherwise you need to create a clean VM.
Create an AppDisk on the hypervisor and import it to Studio
In this procedure, you complete the AppDisk creation and preparation tasks from the hypervisor management console and then import AppDisk into Studio.
Prepare, install applications, and seal an AppDisk on the hypervisor
- From the hypervisor management console, create a VM and install a VDA.
- Power off the machine and take a snapshot of it.
- Create a new machine from the snapshot and then add a new disk to it. This disk (which will become the AppDisk) must be large enough to hold all the applications you will install on it.
- Start the machine and select Start > Prepare AppDisk. If this Start menu shortcut is not available on the hypervisor, open a command prompt at C:\Program Files\Citrix\personal vDisk\bin and type: CtxPvD.Exe –s LayerCreationBegin. The machine restarts and prepares the disk. A second restart occurs after several minutes when the preparation completes.
- Install the applications you want to make available to users.
- Double-click the Package AppDisk shortcut on the machine’s desktop. The machine restarts again and the sealing process starts. When the “in process” dialog closes, power off the VM.
Use Studio to import the AppDisk you created on the hypervisor
- Select AppDisks in the Studio navigation pane and then select Create AppDisk in the Actions pane.
- On the Introduction page, review the information and then click Next.
- On the Create AppDisk page, select the Import existing AppDisk radio button. Select the resource (network and storage) where the AppDisk you created resides on the hypervisor. Click Next.
- On the Preparation Machine page, browse to the machine, select the disk, and then click Next.
- On the Summary page, type a name and description for the AppDisk. Review the information you specified on previous wizard pages. Click Finish. Studio imports the AppDisk.
After you import the AppDisk into Studio, assign it to a Delivery Group.
Assign an AppDisk to a Delivery Group
You can assign one or more AppDisks to a Delivery Group when you create the Delivery Group or later. The AppDisks information you provide is essentially the same.
If you are adding AppDisks to a Delivery Group that you are creating, use the following guidance for the AppDisks page in the Create Delivery Group wizard. (For information about other pages in that wizard, see the Create Delivery Groups article.)
To add (or remove) AppDisks in an existing Delivery Group:
- Select Delivery Groups in the Studio navigation pane.
- Select a Delivery Group and then select Manage AppDisks in the Actions pane. See the following guidance for the AppDisks page.
- When you change the AppDisk configuration in a Delivery Group, a restart of the machines in the group is required. On the Rollout Strategy page, follow the guidance in Create a restart schedule.
AppDisks page
The AppDisks page (in the Create Delivery Group wizard or in the Manage AppDisks flow) lists the AppDisks already deployed for the Delivery Group and their priority. (If you are creating the Delivery Group, the list will be empty.) For more information, see the AppDisk priority section.
- Click Add. The Select AppDisks dialog box lists all AppDisks in the left column. AppDisks that are already assigned to this Delivery Group have enabled checkboxes and cannot be selected.
- Select one or more checkboxes for available AppDisks in the left column. The right column lists the applications on the AppDisk. (Selecting the Applications tab above the right column lists applications in a format similar to a Start menu; selecting the Installed packages tab lists applications in a format similar to the Programs and Features list.)
- After selecting one or more available AppDisks, click OK.
- Click Next on the AppDisks page.
AppDisk priority in a Delivery Group
When a Delivery Group has more than one AppDisk assigned, the AppDisks page (in the Create Delivery Group, Edit Delivery Group, and Manage AppDisks displays) lists the AppDisks in descending priority. Entries at the top of the list have the higher priority. Priority indicates the order in which the AppDisks are processed.
You can use the up and down arrows adjacent to the list to change the AppDisk priority. If AppDNA is integrated with your AppDisk deployment, it automatically analyzes the applications and then sets the priority when the AppDisks are assigned to the Delivery Group. Later, if you add or remove AppDisks from the group, clicking Auto-Order instructs AppDNA to re-analyze the current list of AppDisks and then determine the priorities. The analysis (and priority reordering, if needed) may take several moments to complete.
Managing AppDisks
After you create and assign AppDisks to Delivery Groups, you can change the AppDisk’s properties through the AppDisks node in the Studio navigation pane. Changes to applications in an AppDisk must be done from the hypervisor management console.
Important:
You can use the Windows Update service to update applications (such as the Office suite) on an AppDisk. However, do not use the Windows Update Service to apply operating system updates to an AppDisk. Apply operating system updates to the master image, not the AppDisk; otherwise, the AppDisk will not initialize correctly.
- When applying patches and other updates to applications in an AppDisk, apply only those that the application requires. Do not apply updates for other applications.
- When installing Windows updates, first deselect all entries and then select the subset required by the applications on the AppDisks you’re updating.
Antivirus considerations for AppDisk creation
In some cases, you may run into problems trying to create an AppDisk due to scenarios where the base VM has an antivirus (A/V) agent installed. In such cases, AppDisk creation may fail when certain processes are flagged by the A/V agent. These processes, CtxPvD.exe and CtxPvDSrv.exe must be added to the exception list for the A/V agent used by the base VM.
This section provides information about adding exceptions for the following antivirus applications:
- Windows Defender (for Windows 10)
- OfficeScan (version 11.0)
- Symantec (version 12.1.16)
- McAfee (version 4.8)
Windows Defender
If your base VM uses Windows Defender (version 10):
-
Log into your computer with local administrator privileges.
-
Select the Windows Defender icon and right click to display the Open button:

-
In the Windows Defender console, select Settings in the upper right portion of the interface:
localized image](/en-us/xenapp-and-xendesktop/7-15-ltsr/media/wd-main-page.png)
-
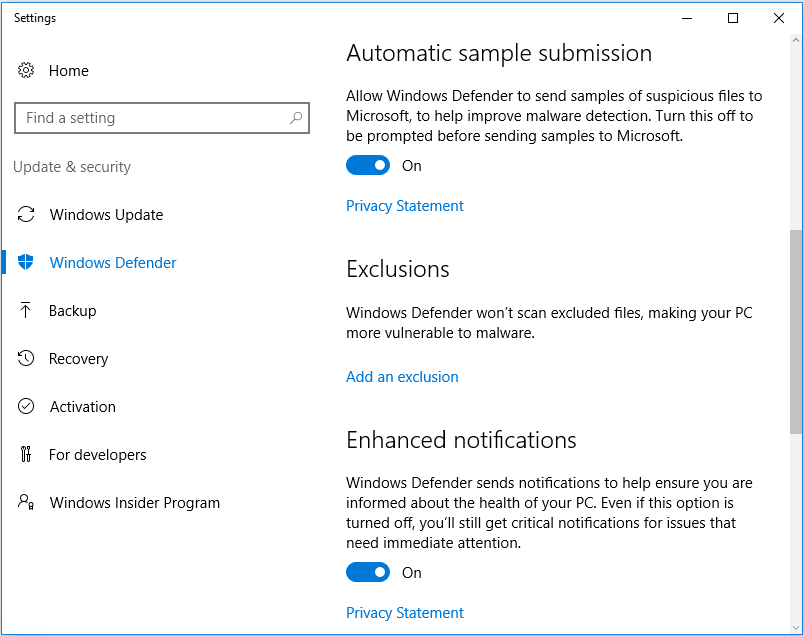
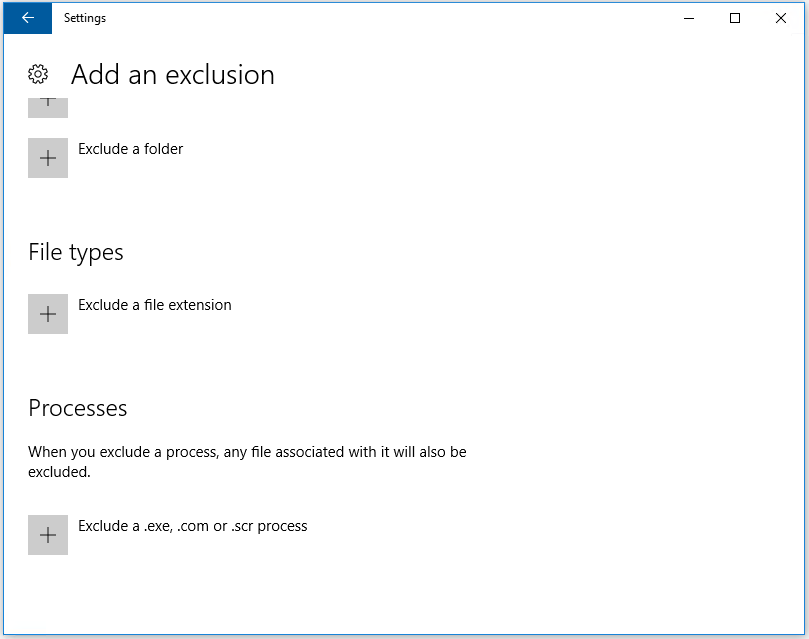
In the Exclusions portion of the Settings screen, click Add an exclusion:
-
In the Add an exclusion screen, select Exclude a .exe, .com, or .scr process:
-
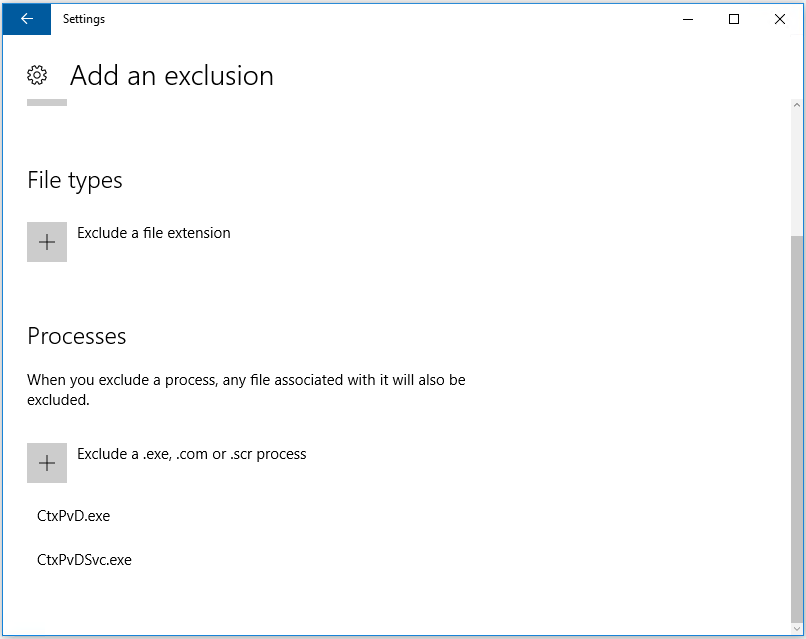
In the Add exclusion screen, enter the name of the exclusion; both CtxPvD.exe and CtxPvDSvc.exe must be added to prevent conflicts when creating an AppDisk. After entering the exclusion name, click OK:

After adding the exclusions, they appear in the list of excluded processes in the Settings screen:
OfficeScan
If your base VM uses OfficeScan (version 11):
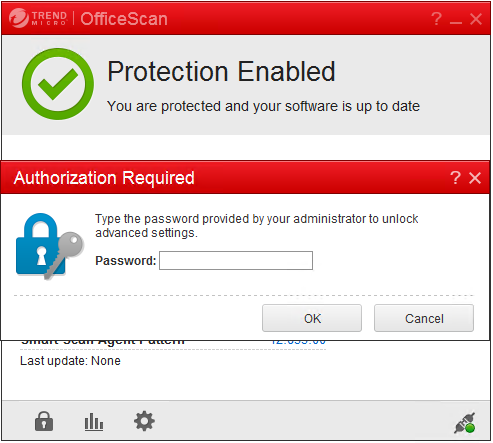
- Launch the OfficeScan console.
-
Click the lock icon in the lower left portion of the interface, and enter your password:
-
Click the Settings icon to display configuration options.
-
In the Settings screen, select the Protection tab.
-
In the Protection tab, scroll down until you locate the Exclusions section.

- In the Files section, click Add, and enter the following AppDisk processes to the exception list:
C:\Program Files\Citrix\personal vDisk\bin\CtxPvD.exe
C:\Program Files\Citrix\personal vDisk\bin\CtxPvDSvc.exe
<!--NeedCopy-->
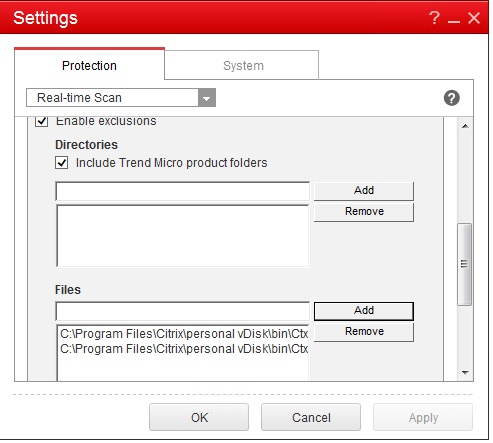
Click Apply, then OK to add the exclusions.
Symantec
If your base VM uses Symantec (version 12.1.16):
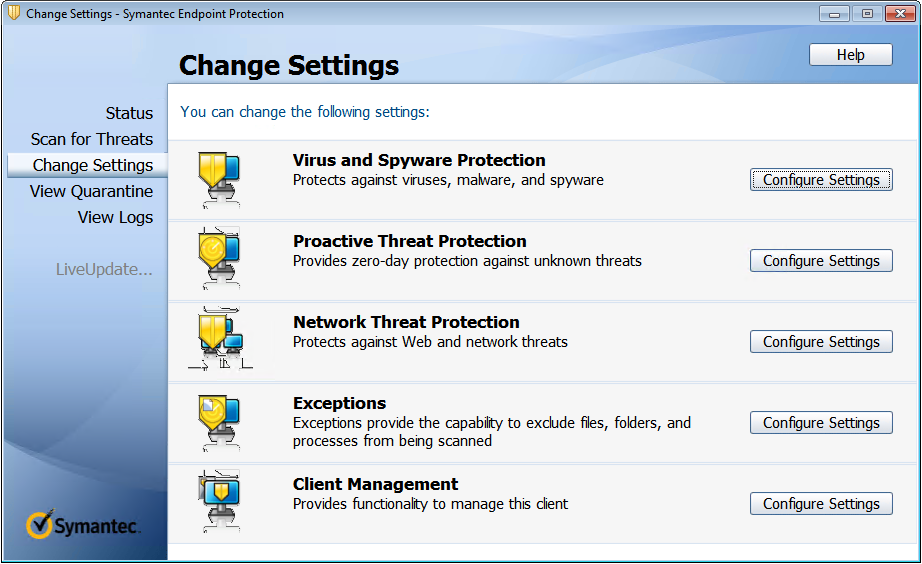
- Launch the Symantec console.
- Click Change Settings.
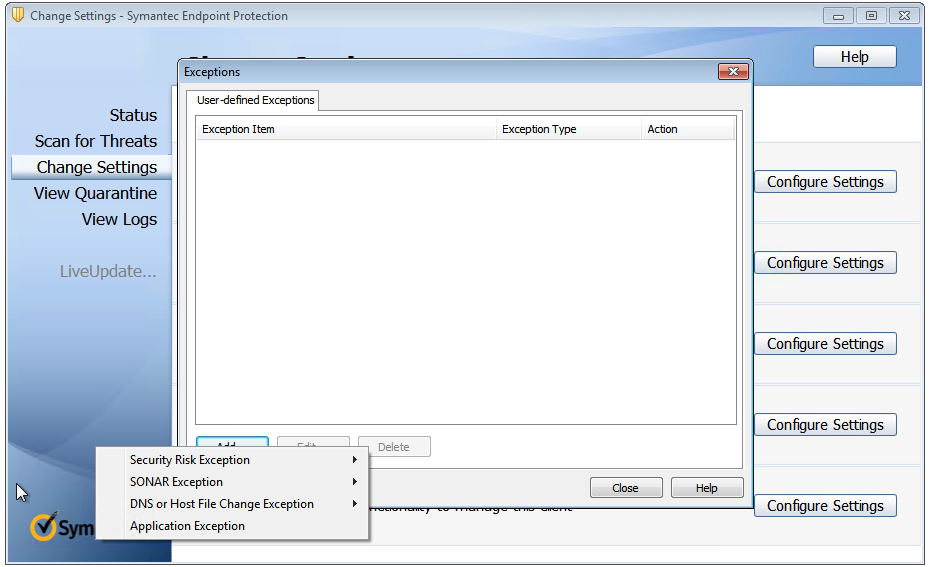
-
In the Exceptions section, click Configure Settings:
-
In the Configure Settings screen, click Add.
-
After clicking Add, a context menu appears to allow you to specify the application type. Select Application Exception:
- In the Exceptions screen, enter the following AppDisk file paths and set the action to Ignore:
C:\Program Files\Citrix\personal vDisk\bin\CtxPvD.exe
C:\Program Files\Citrix\personal vDisk\bin\CtxPvDSvc.exe
<!--NeedCopy-->
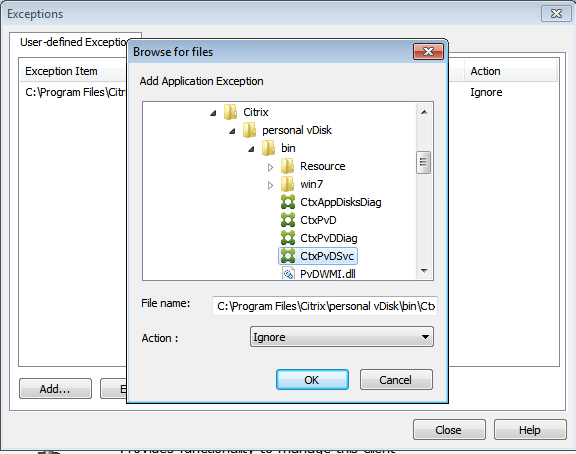
The noted exceptions are added to the list. Close the window to apply your changes:

McAfee
If your base VM uses McAfee (verson 4.8):
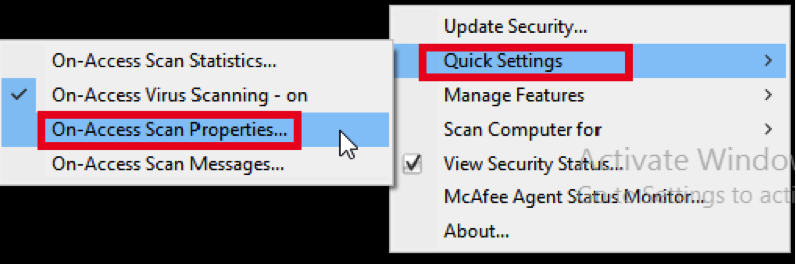
- Right click the McAfee icon, and expand the Quick Settings option.
-
In the expanded menu, select On-Access Scan Properties:
-
In the On-Access Scan Properties screen, click All Processes:
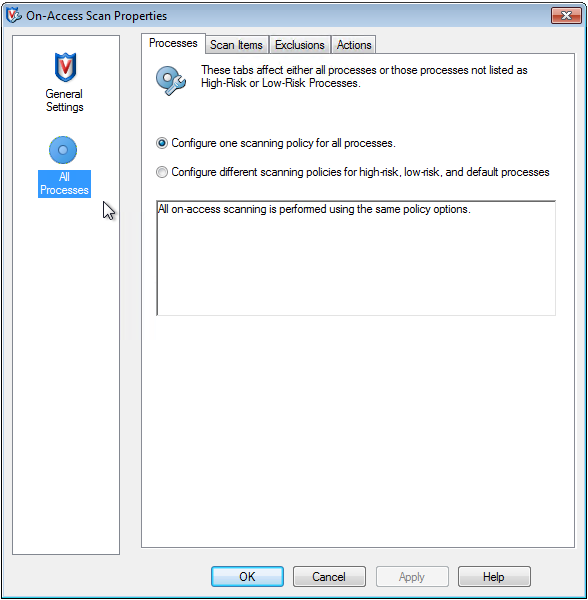
-
Select the Exclusions tab.
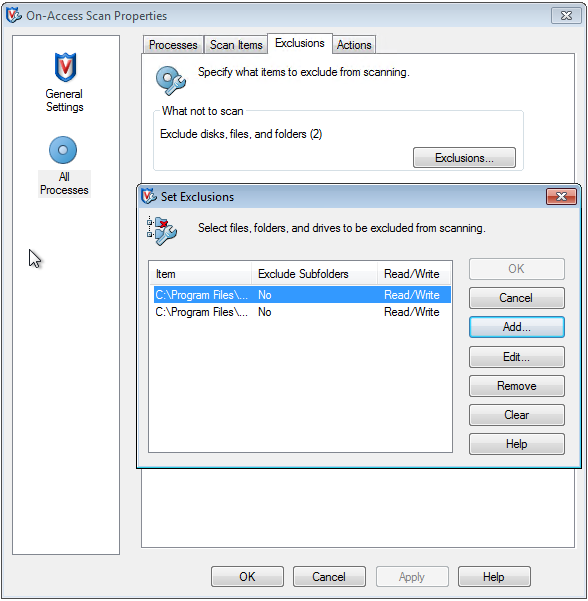
-
Click the Exclusions button.
-
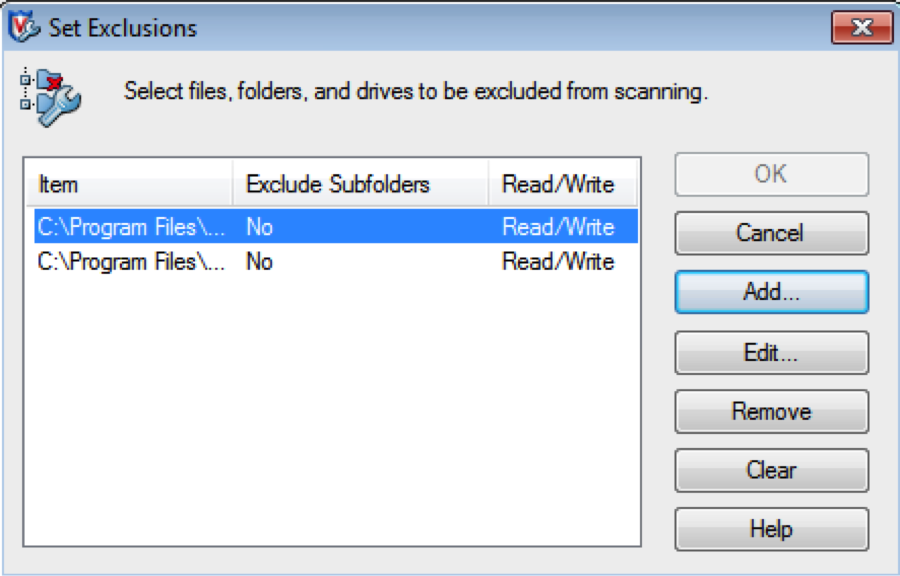
In the Set Exclusions screen, click Add:
- In the Add Exclusion Item screen, select By name/location (can include wildcards * or ?). Click Browse to locate the exclusion executables:
   C:\Program Files\Citrix\personal vDisk\bin\CtxPvD.exe
   C:\Program Files\Citrix\personal vDisk\bin\CtxPvDSvc.exe
<!--NeedCopy-->
Click OK. The Set Exclusions screen now displays the added exclusions. Click OK to apply the changes:
Note:
After configuring these exclusions, create the AppDisk.
How applications appear in the Start menu
If a new AppDisk is created and an app is made available for all users the disk is attached to the desktop and a shortcut appears for the app in the Start menu. When an AppDisk is created and installed for the current user only and the disk is attached to the desktop, the shortcut for the app fails to appear in the Start menu.
To create a new app and make it available for all users
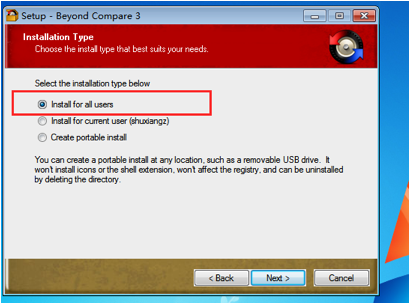
-
Install an app on the AppDisk (for example, Beyond Compare is the selected app):
-
Attach the disk to the desktop; the shortcut for the newly installed app (Beyond Compare) appears in the Start menu:

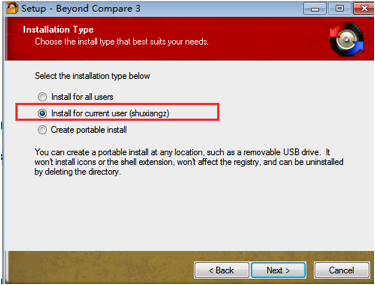
To install an app for the current user only
-
Install an app on the AppDisk and make it available for the current user:
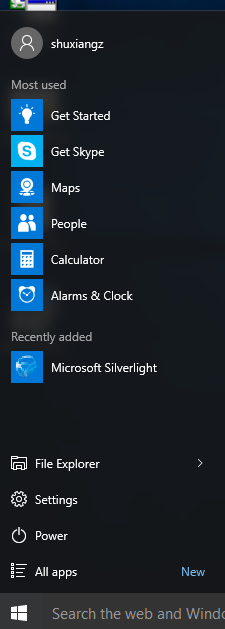
-
Attach the disk to the desktop; note that the shortcut does not appear in the Start menu:
AppDisk logging updates
This release provides an enhancement to the AppDisk logging and support paradigm. With this update, AppDisk users can now obtain diagnostic information and optionally upload it to the Citrix Insight Services (CIS) website.
How does it work?
This new functionality uses a script-based PowerShell tool which identifies all of the log files created by AppDisk/PVD, collects output from PowerShell commands containing information about the system (and processes), compresses everything into a single organized file, and finally provides the option to either save the compressed folder locally, or upload it to CIS (Citrix Insight Services).
Note:
CIS gathers anonymous diagnostic information that it uses to improve AppDisk/PVD functionality. Access the Citrix Insight Services (CIS) website to manually upload the diagnostic bundle. You must login with your Citrix credentials to access this site.
Using PowerShell scripts to collect AppDisk/PVD log files
The AppDisk/PVD installer adds two new scripts for diagnostic data collection:
- Upload-AppDDiags.ps1 – performs AppDisk diagnostic data collection
- Upload-PvDDiags.ps1 – performs PvD diagnostic data collection
Note:
These scripts are added in C:\Program Files\Citrix\personal vDisk\bin\scripts. You must execute these PowerShell scripts as an administrator.
Use Upload-AppDDiags.ps1 to initiate AppDisk diagnostic data collection and optionally manually upload the data to the CIS website.
SYNTAX
     Upload-AppDDiags [[-OutputFile] <string>] [-help] [<CommonParameters>]
         -OutputFile
             Local path for zip file instead of uploading to CIS
 EXAMPLES
     Upload-AppDDiags
         Upload diagnostic data to Citrix CIS website using credentials entered by interactive user.
     Upload-AppDDiags -OutputFile C:\MyDiags.zip
         Save AppDisk diagnostic data to the specified zip file. You can access https://cis.citrix.com/ to upload it later.
Tip:
When there is no –OutputFile argument, upload occurs. If –OutputFile is specified, the script creates a zip file that the you can upload manually at a later time.
Use Upload-PvDDiags.ps1 to initiate PvD diagnostic data collection and optionally manually upload the data to the CIS website.
SYNTAX
 Upload-PvDDiags [[-OutputFile] <string>] [-help] [<CommonParameters>]
     -OutputFile
         Local path for zip file instead of uploading to CIS
 EXAMPLES
     Upload-PvDDiags
         Upload PvD diagnostic data to Citrix CIS website using credentials entered by interactive user.
     Upload-PvDDiags -OutputFile C:\MyDiags.zip
         Save PvD diagnostic data to the specified zip file. You can access https://cis.citrix.com/ to upload it later.
Tip:
When there is no –OutputFile argument, upload occurs. If –OutputFile is specified, the script creates a zip file that the you can upload manually at a later time.