Manage Delivery Groups
Introduction
This article describes the procedures for managing Delivery Groups. In addition to changing settings specified when creating the group, you can configure other settings that are not available when you create a Delivery Group.
See Applications for information about managing applications in Delivery Groups, including how to add and remove applications in a Delivery Group, and change application properties.
Managing Delivery Groups requires the Delegated Administration permissions of the Delivery Group Administrator built-in role. See Delegated Administration for details.
Change user settings in a Delivery Group
The name of this page may appear as either User Settings or Basic Settings.
- Select Delivery Groups in the Studio navigation pane.
- Select a group and then select Edit Delivery Group in the Actions pane.
- On the User Settings (or Basic Settings) page, change any of the settings in the following table.
- Click Apply to apply any changes you made and keep the window open, or click OK to apply changes and close the window.
| Setting | Description |
|---|---|
| Description | The text that StoreFront™ uses and that users see. |
| Enable Delivery Group | Whether or not the Delivery Group is enabled. |
| Time zone | Adjusts time zone. |
| Enable Secure ICA® | Secures communications to and from machines in the Delivery Group using SecureICA, which encrypts the ICA protocol. The default level is 128-bit. The level can be changed using the SDK. Citrix® recommends using additional encryption methods such as TLS encryption when traversing public networks. Also, SecureICA does not check data integrity. |
Add or remove users in a Delivery Group
For detailed information about users, see the Users section in the Create Delivery Groups article.
- Select Delivery Groups in the Studio navigation pane.
- Select a group and then select Edit Delivery Group in the Actions pane.
- On the Users page, to add users, click Add, and then specify the users you want to add. To remove users, select one or more users and then click Remove. You can also select/clear the check box that enables or disables access by unauthenticated users.
- Click Apply to apply any changes you made and keep the window open, or click OK to apply changes and close the window.
Import or export user lists
For Delivery Groups containing physical Desktop OS machines, you can import user information from a .csv file after you create the Delivery Group. You can also export user information to a .csv file. The .csv file can contain data from a previous product version.
The first line in the .csv file must contain comma-separated column headings (in any order), which can include: ADComputerAccount, AssignedUser, VirtualMachine, and HostId. Subsequent lines in the file contain comma-separated data. The ADComputerAccount entries can be common names, IP addresses, distinguished names, or domain and computer name pairs.
To import or export user information:
- Select Delivery Groups in the Studio navigation pane.
- Select a Delivery Group, and then select Edit Delivery Group in the Actions pane.
- On the Machine Allocation page, select Import list or Export list, and then browse to the file location.
- Click Apply to apply any changes you made and keep the window open, or click OK to apply changes and close the window.
Change the delivery type of a Delivery Group
The delivery type indicates what the group can deliver: applications, desktops, or both.
Before changing an application only or desktops and applications type to a desktops only type, delete all applications from the group.
- Select Delivery Groups in the Studio navigation pane.
- Select a group and then select Edit Delivery Group in the Actions pane.
- On the Delivery Type page, select the delivery type you want.
- Click Apply to apply any changes you made and keep the window open, or click OK to apply changes and close the window.
Change StoreFront addresses
- Select Delivery Groups in the Studio navigation pane.
- Select a group and then select Edit Delivery Group in the Actions pane.
- On the StoreFront page, select or add StoreFront URLs that will be used by the Citrix Receiver™ that is installed on each machine in the Delivery Group.
- Click Apply to apply any changes you made and keep the window open, or click OK to apply changes and close the window.
You can also specify StoreFront server address by selecting Configuration > StoreFront in the Studio navigation pane.
Add, change, or remove a tag restriction for a desktop
Adding, changing, and removing tag restrictions can have unanticipated effects on which desktops are considered for launch. Review the considerations and cautions in the Tags article.
- Select Delivery Groups in the Studio navigation pane.
- Select a group and then select Edit Delivery Group in the Actions pane.
- On the Desktops page, select the desktop and click Edit.
- To add a tag restriction, select Restrict launches to machines with the tag and then select the tag.
- To change or remove a tag restriction, either select a different tag or remove the tag restriction entirely by clearing Restrict launches to machines with this tag.
- Click Apply to apply any changes you made and keep the window open, or click OK to apply changes and close the window.
Upgrade a Delivery Group or revert an upgrade
Upgrade a Delivery Group after you upgrade the VDAs on its machines and the machine catalogs containing the machines used in the Delivery Group.
Before you start the Delivery Group upgrade:
- If you use Provisioning Services, upgrade the VDA version in the Provisioning Services console.
- Start the machines containing the upgraded VDA so that they can register with a Delivery Controller. This process tells Studio what needs upgrading in the Delivery Group.
- If you must continue to use earlier VDA versions, newer product features may not be available. For more information, see the Upgrade articles.
To upgrade a Delivery Group:
- Select Delivery Groups in the Studio navigation pane.
- Select a group and then select Upgrade Delivery Group in the Actions pane. The Upgrade Delivery Group action appears only if Studio detects upgraded VDAs.
Before starting the upgrade process, Studio tells you which, if any, machines cannot be upgraded and why. You can then cancel the upgrade, resolve the machine issues, and then start the upgrade again.
After the upgrade completes, you can revert the machines to their previous states by selecting the Delivery Group and then selecting Undo in the Actions pane.
Manage Remote PC Access Delivery Groups
If a machine in a Remote PC Access machine catalog is not assigned to a user, Studio temporarily assigns the machine to a Delivery Group associated with that catalog. This temporary assignment enables the machine to be assigned to a user later.
The Delivery Group-to-machine catalog association has a priority value. Priority determines which Delivery Group that machine is assigned to when it registers with the system or when a user needs a machine assignment: the lower the value, the higher the priority. If a Remote PC Access machine catalog has multiple Delivery Group assignments, the software selects the match with the highest priority. You can set this priority value using the PowerShell SDK.
When first created, Remote PC Access machine catalogs are associated with a Delivery Group. This means that machine accounts or Organizational Units added to the catalog later can be added to the Delivery Group. This association can be switched off or on.
To add or remove a Remote PC Access machine catalog association with a Delivery Group:
- Select Delivery Groups in the Studio navigation pane.
- Select a Remote PC Access group.
- In the Details section, select the Machine Catalogs tab and then select a Remote PC Access catalog.
- To add or restore an association, select Add Desktops. To remove an association, select Remove Association.
Shut down and restart machines in a Delivery Group
This procedure is not supported for Remote PC Access machines.
- Select Delivery Groups in the Studio navigation pane.
- Select a group and then select View Machines in the Actions pane.
- Select the machine and then select one of the following in the Actions pane (some options may not be available, depending on the machine state):
- Force shut down. Forcibly powers off the machine and refreshes the list of machines.
- Restart. Requests the operating system to shut down and then start the machine again. If the operating system cannot comply, the machine remains in its current state.
- Force restart. Forcibly shuts down the operating system and then restarts the machine.
- Suspend. Pauses the machine without shutting it down, and refreshes the list of machines.
- Shut down. Requests the operating system to shut down.
For non-force actions, if the machine does not shut down within 10 minutes, it is powered off. If Windows attempts to install updates during the shutdown, there is a risk that the machine will be powered off before the updates finish.
Citrix recommends that you prevent Desktop OS machine users from selecting Shut down within a session. See the Microsoft policy documentation for details.
You can also shut down and restart machines on a connection; see the Connections and resources article.
Power manage machines in a Delivery Group
You can power manage only virtual Desktop OS machines, not physical ones (including Remote PC Access machines). Desktop OS machines with GPU capabilities cannot be suspended, so power-off operations fail. For Server OS machines, you can create a restart schedule, which is also described in this article.
In Delivery Groups containing pooled machines, virtual Desktop OS machines can be in one of the following states:
- Randomly allocated and in use
- Unallocated and unconnected
In Delivery Groups containing static machines, virtual Desktop OS machines can be:
- Permanently allocated and in use
- Permanently allocated and unconnected (but ready)
- Unallocated and unconnected
During normal use, static Delivery Groups typically contain both permanently allocated and unallocated machines. Initially, all machines are unallocated (except for those manually allocated when the Delivery Group was created). As users connect, machines become permanently allocated. You can fully power manage the unallocated machines in those Delivery Groups, but only partially manage the permanently allocated machines.
Pools and buffers: For pooled Delivery Groups and static Delivery Groups with unallocated machines, a pool (in this instance) is a set of unallocated or temporarily allocated machines that are kept in a powered-on state, ready for users to connect; a user gets a machine immediately after logon. The pool size (the number of machines kept powered-on) is configurable by time of day. For static Delivery Groups, use the SDK to configure the pool.
A buffer is an additional standby set of unallocated machines that are turned on when the number of machines in the pool falls below a threshold that is a percentage of the Delivery Group size. For large Delivery Groups, a significant number of machines might be turned on when the threshold is exceeded, so plan Delivery Group sizes carefully or use the SDK to adjust the default buffer size.
Power state timers: You can use power state timers to suspend machines after users have disconnected for a specified amount of time. For examples, machines will suspend automatically outside of office hours if users have been disconnected for at least 10 minutes. Random machines or machines with personal vDisks automatically shut down when users log off, unless you configure the ShutdownDesktopsAfterUse Delivery Group property in the SDK.
You can configure timers for weekdays and weekends, and for peak and nonpeak intervals.
Partial power management of permanently allocated machines: For permanently allocated machines, you can set power state timers, but not pools or buffers. The machines are turned on at the start of each peak period, and turned off at the start of each off-peak period. You do not have the fine control that you have with unallocated machines over the number of machines that become available to compensate for machines that are consumed.
To power manage virtual Desktop OS machines:
- Select Delivery Groups in the Studio navigation pane.
- Select a group, and then select Edit Delivery Group in the Actions pane.
- On the Power Management page, select Weekdays in the Power manage machines drop-down. By default, weekdays are Monday to Friday.
- For random Delivery Groups, in Machines to be powered on, select Edit and then specify the pool size during weekdays. Then, select the number of machines to power on.
- In Peak hours, set the peak and off-peak hours for each day.
- Set the power state timers for peak and non-peak hours during weekdays: In During peak hours > When disconnected, specify the delay (in minutes) before suspending any disconnected machine in the Delivery Group, and select Suspend. In During off-peak hours > When disconnected, specify the delay before turning off any logged-off machine in the Delivery Group, and select Shutdown. This timer is not available for Delivery Groups with random machines.
- Select Weekend in the Power manage machines drop-down, and then configure the peak hours and power state timers for weekends.
- Click Apply to apply any changes you made and keep the window open, or click OK to apply changes and close the window.
Use the SDK to:
- Shut down, rather than suspend, machines in response to power state timers, or if you want the timers to be based on logoffs, rather than disconnections.
- Change the default weekday and weekend definitions.
- Disable power management; see CTX217289.
Create a restart schedule for machines in a Delivery Group
This section describes how to configure a single restart schedule in Studio. Alternatively, you can use PowerShell to configure multiple restart schedules for different subsets of machines in a Delivery Group. See the next section for details.
A restart schedule specifies when to periodically restart all the machines in a Delivery Group.
- Select Delivery Groups in the Studio navigation pane.
- Select a group and then select Edit Delivery Group in the Actions pane.
- On the Restart Schedule page, if you do not want to restart machines in the Delivery Group automatically, select the No radio button and skip to the last step in this procedure. No restart schedule or rollout strategy will be configured. If a schedule was previously configured, this selection cancels it.
- If you do want to restart machines in the Delivery Group automatically, select the Yes radio button.
- For Restart frequency, choose either Daily or the day of the week the restarts will occur.
- For Begin restart at, using a 24-hour clock, specify the time of day to begin the restart.
- For Restart duration, choose whether all machines should be started at the same time, or the total length of time to begin restarting all machines in the Delivery Group. An internal algorithm determines when each machine is restarted during that interval.
- In the left Notification drop-down, choose whether to display a notification message on the affected machines before a restart begins. By default, no message is displayed. If you choose to display a message 15 minutes before the restart begins, you can choose (in the Repeat notification drop-down) to repeat the message every five minutes after the initial message. By default, the message is not repeated.
- Enter the notification text in the Notification message box; there is no default text. If you want the message to include the number of minutes before restart, include the variable %m% (for example: Warning: Your computer will be automatically restarted in %m% minutes.) If you select a repeat notification interval and your message includes the %m% placeholder, the value decrements by five minutes in each repeated message. Unless you chose to restart all machines at the same time, the notification message displays on each machine in the Delivery Group at the appropriate time before the restart, calculated by the internal algorithm.
- Click Apply to apply any changes you made and keep the window open, or click OK to apply changes and close the window.
You cannot perform an automated power-on or shutdown from Studio, only a restart.
Create multiple restart schedules for machines in a Delivery Group
You can use PowerShell cmdlets to create multiple restart schedules for machines in a Delivery Group. Each schedule can be configured to affect only those machines in the group that have a specified tag. This tag restriction functionality allows you to easily create different restart schedules for different subsets of machines in one Delivery Group.
For example, let’s say you use one Delivery Group for all machines in the company. You want to restart every machine at least once every week (on Sunday night), but the machines used by the accounting team should be restarted daily. You can set up a weekly schedule for all machines, and a daily schedule for just the machines used by the accounting team.
Schedule overlap:
Multiple schedules might overlap. In the example above, the machines used by accounting are affected by both schedules, and might be restarted twice on Sunday.
The scheduling code is designed to avoid restarting the same machine more often than needed, but it cannot be guaranteed. If both schedules coincide precisely in start and duration times, it is more likely that the machines will be restarted only once. However, the more the schedules differ in start and/or duration times, the more likely two restarts will occur. Also, the number of machines affected by the schedules can also influence the chances of an overlap. In the example, the weekly schedule that restarts all machines could initiate restarts significantly faster than the daily schedule (depending on the configured duration for each).
Requirements:
Support for creating multiple restart schedules and using tag restrictions in a restart schedule is currently available only through the PowerShell command line, using RebootScheduleV2 PowerShell cmdlets that are new in XenApp and XenDesktop 7.12. (These are referred to as the “V2” cmdlets throughout this article.)
Using the V2 cmdlets requires:
- Delivery Controller version 7.12 (minimum).
- If you use the latest SDK plug-in with a Controller earlier than 7.12, any new schedules you create will not work as intended.
- In a mixed site (where some, but not all Controllers have been upgraded), the V2 cmdlets will not work until the database is upgraded and at least one Controller has been upgraded and is being used (by specifying the –adminaddress <controller> parameter with the V2 cmdlets).
- Best practice: Do not create any new schedules until all Controllers in the site are upgraded.
- PowerShell SDK snap-in provided with XenApp and XenDesktop 7.12 (minimum). After you install or upgrade your components and site, run asnp Citrix.* to load the latest cmdlets.
Studio currently uses earlier V1 RebootSchedule PowerShell cmdlets, and will not display schedules that are created with the V2 cmdlets.
After you create a restart schedule that uses a tag restriction, and then later use Studio to remove the tag from an affected machine during a restart interval (cycle) or add the tag to additional machines during a restart cycle, those changes will not take effect until the next restart cycle. (The changes will not affect the current restart cycle.)
PowerShell cmdlets:
Use the following RebootScheduleV2 cmdlets from the command line to create multiple schedules and use tag restrictions in the schedules.
- New-BrokerRebootScheduleV2 (replaces New-BrokerRebootSchedule)
- Get-BrokerRebootScheduleV2 (replaces Get-BrokerRebootSchedule)
- Set- BrokerRebootScheduleV2 (replaces Set-BrokerRebootSchedule)
- Remove-BrokerRebootScheduleV2 (replaces Remove-BrokerRebootSchedule)
- Rename-BrokerRebootScheduleV2 (new; not a replacement)
For complete cmdlet syntax and parameter descriptions, enter Get-Help –full <cmdlet-name>.
Terminology reminder: In the PowerShell SDK, the DesktopGroup parameter identifies the Delivery Group.
If you’re familiar with the Studio interface for creating a restart schedule, all of those parameters are available when using the V2 cmdlet to create or update a schedule. Additionally, you can:
- Restrict the schedule to machines that have a specified tag.
- Specify an interval before sending the first warning message, during which no new sessions will be brokered to the affected machines.
Configuration:
If you configure a restart schedule that uses a tag restriction, you must also add (apply) that tag to the machines that you want the schedule to affect. (For more information, see Tags.)
- From Studio, select Delivery Groups in the navigation pane.
- Select the Delivery Group containing the machines that will be affected by the schedule.
- Select View Machines and then select the machines where you’ll add a tag.
- Select Manage Tags in the Actions pane.
- If the tag already exists, enable the check box next to the tag name. If the tag does not exist, click Create and then specify the name for the tag. After the tag is created, enable the check box next to the newly-created tag name.
- Click Save in the Manage Tags dialog box.
After creating and adding (applying) tags, use the –RestrictToTag parameter to specify the tag name when creating or editing the schedule with the V2 cmdlet.
If you created a restart schedule with an earlier XenApp or XenDesktop® version:
Studio currently uses the V1 RebootSchedule cmdlets. If you have a restart schedule that was created before you upgraded to 7.12 (minimum), you can continue to manage it in Studio with V1 cmdlets, but you cannot use Studio to add a tag restriction to that schedule, or to create additional schedules (because Studio does not support the V2 cmdlets). As long as you use the V1 cmdlets for your existing schedule, Studio will display correct information about the restart schedule.
Alternatively, you can edit your existing schedule from the command line, using the new V2 RebootSchedule cmdlets. When using the new V2 cmdlets, you can use the tag restriction parameters in that schedule, and create additional restart schedules. However, after you use V2 cmdlets to change your existing schedule, Studio will not display complete schedule information (because it recognizes only V1 information). You cannot see whether a tag restriction is used, or the schedule’s name and description.
New-BrokerRebootScheduleV2 (replaces New-BrokerRebootSchedule)
Get-BrokerRebootScheduleV2 (replaces Get-BrokerRebootSchedule)
Set- BrokerRebootScheduleV2 (replaces Set-BrokerRebootSchedule)
Remove-BrokerRebootScheduleV2 (replaces Remove-BrokerRebootSchedule)
Rename-BrokerRebootScheduleV2 (new; not a replacement)
Prevent users from connecting to a machine (maintenance mode) in a Delivery Group
When you need to temporarily stop new connections to machines, you can turn on maintenance mode for one or all machines in a Delivery Group. You might do this before applying patches or using management tools.
- When a Server OS machine is in maintenance mode, users can connect to existing sessions, but cannot start new sessions.
- When a Desktop OS machine (or a PC using Remote PC Access) is in maintenance mode, users cannot connect or reconnect. Current connections remain connected until they disconnect or log off.
To turn maintenance mode on or off:
- Select Delivery Groups in the Studio navigation pane.
- Select a group.
- To turn on maintenance mode for all machines in the Delivery Group, select Turn On Maintenance Mode in the Actions pane. To turn on maintenance mode for one machine, select View Machines in the Actions pane. Select a machine, and then select Turn On Maintenance Mode in the Actions pane.
- To turn maintenance mode off for one or all machines in a Delivery Group, follow the previous instructions, but select Turn Off Maintenance Mode in the Actions pane.
Windows Remote Desktop Connection (RDC) settings also affect whether a Server OS machine is in maintenance mode. Maintenance mode is on when any of the following occur:
- Maintenance mode is set to on, as described above.
- RDC is set to Don’t allow connections to this computer.
- RDC is not set to Don’t allow connections to this computer, and the Remote Host Configuration User Logon Mode setting is either Allow reconnections, but prevent new logons or Allow reconnections, but prevent new logons until the server is restarted.
You can also turn maintenance mode on or off for a connection (which affects the machines that use that connection), or for a machine catalog (which affects the machines in that catalog).
Change assignments of machines to users in a Delivery Group
You can change the assignments of Desktop OS machines, not Server OS machines or machines created through Provisioning Services.
- Select Delivery Groups in the Studio navigation pane.
- Select a group.
- Select Edit Delivery Group in the Actions pane. On the Desktops or Desktop Assignment Rules page (only one of those pages will be available, depending on the type of machine catalog the Delivery Group uses), specify the new users.
- Click Apply to apply any changes you made and keep the window open, or click OK to apply changes and close the window.
Change the maximum number of machines per user
- Select Delivery Groups in the Studio navigation pane.
- Select a group and then select Edit Delivery Group in the Actions pane.
- On the Desktop Assignment Rules page, set the maximum desktops per user value.
- Click Apply to apply any changes you made and keep the window open, or click OK to apply changes and close the window.
Load manage machines in Delivery Groups
You can load manage Server OS machines only.
Load Management measures the server load and determines which server to select under the current environment conditions. This selection is based on:
Server maintenance mode status: A Server OS machine is considered for load balancing only when maintenance mode is off.
Server load index: Determines how likely a server delivering Server OS machines is to receive connections. The index is a combination of load evaluators: the number of sessions and the settings for performance metrics such as CPU, disk, and memory use. You specify the load evaluators in load management policy settings.
You can monitor the load index in Director, Studio search, and the SDK.
In Studio, the Server Load Index column is hidden by default. To display it, select a machine, right-select a column heading and then choose Select Column. In the Machine category, select Load Index.
In the SDK, use the Get-BrokerMachine cmdlet. For details, see CTX202150.
A server load index of 10000 indicates that the server is fully loaded. If no other servers are available, users might receive a message that the desktop or application is currently unavailable when they launch a session.
Concurrent logon tolerance policy setting: The maximum number of concurrent requests to log on to the server. (This setting is equivalent to load throttling in XenApp versions earlier than 7.5.)
If all servers are at or higher than the concurrent logon tolerance setting, the next logon request is assigned to the server with the lowest pending logons. If more than one server meets these criteria, the server with the lowest load index is selected.
Remove a machine from a Delivery Group
Removing a machine deletes it from a Delivery Group but does not delete it from the machine catalog that the Delivery Group uses. Therefore, that machine is available for assignment to another Delivery Group.
Machines must be shut down before they can be removed. To temporarily stop users from connecting to a machine while you are removing it, put the machine into maintenance mode before shutting it down.
Keep in mind that machines may contain personal data, so use caution before allocating the machine to another user. You may want to reimage the machine.
- Select Delivery Groups in the Studio navigation pane.
- Select a group and the select View Machines in the Actions pane.
- Make sure that the machine is shut down.
- Select Remove from Delivery Group in the Actions pane.
You can also remove a machine from a Delivery Group through the connection the machine uses. For details, see Connections and resources.
Restrict access to machines in a Delivery Group
Any changes you make to restrict access to machines in a Delivery Group supersede previous settings, regardless of the method you use. You can:
Restrict access for administrators using Delegated Administration scopes. You can create and assign a scope that permits administrators to access all applications, and another scope that provides access to only certain applications. See the Delegated Administration article for details.
Restrict access for users through SmartAccess policy expressions that filter user connections made through NetScaler® Gateway.
- Select Delivery Groups in the Studio navigation pane.
- Select group and then select Edit Delivery Group in the Actions pane.
- On the Access Policy page, select Connections through NetScaler Gateway.
- To choose a subset of those connections, select Connections meeting any of the following filters. Then define the NetScaler Gateway site, and add, edit, or remove the SmartAccess policy expressions for the allowed user access scenarios. For details, see the NetScaler Gateway documentation.
- Click Apply to apply any changes you made and keep the window open, or click OK to apply changes and close the window.
Restrict access for users through exclusion filters on access policies that you set in the SDK. Access policies are applied to Delivery Groups to refine connections. For example, you can restrict machine access to a subset of users, and you can specify allowed user devices. Exclusion filters further refine access policies. For example, for security you can deny access to a subset of users or devices. By default, exclusion filters are disabled.
For example, for a teaching lab on a subnet in the corporate network, to prevent access from that lab to a particular Delivery Group, regardless of who is using the machines in the lab, use the following command: Set-BrokerAccessPolicy -Name VPDesktops_Direct -ExcludedClientIPFilterEnabled $True -
You can use the asterisk (*) wildcard to match all tags that start with the same policy expression. For example, if you add the tag VPDesktops_Direct to one machine and VPDesktops_Test to another, setting the tag in the Set-BrokerAccessPolicy script to VPDesktops_* applies the filter to both machines.
If you are connected using a web browser or with the unified Citrix Receiver user experience feature enabled in the store, you cannot use a client name exclusion filter.
Log off or disconnect a session
- In the Studio navigation pane, select Delivery Groups.
- Select a delivery group and then select View Machines in the Actions pane.
- In the middle pane, select the machine, select View Sessions in the Actions pane, and then select a session.
- Alternatively, in the middle pane, select the Session tab and then select a session.
- To log off a user from a session, select Log off in the Actions pane. The session closes and the user is logged out. The machine becomes available to other users unless it is allocated to a specific user.
- To disconnect a session, select Disconnect in the Actions pane. Applications continue to run in the session and the machine remains allocated to that user. The user can reconnect to the same machine.
You can configure power state timers for Desktop OS machines to automatically handle unused sessions. See the Power manage machines section for details.
Send a message to a Delivery Group
- In the Studio navigation pane, select Delivery Groups.
- Select a delivery group and then select View Machines in the Actions pane.
- In the middle pane, select a machine to which you want to send a message.
- In the Actions pane, select View Sessions.
- In the middle pane, select all sessions and then select Send Message in the Actions pane.
- Type your message and click OK. You can specify the level of severity if needed. Options include Critical, Question, Warning, and Information.
Alternatively, you can send a message by using Citrix Director. For more information, see Send messages to users.
Configure session prelaunch and session linger in a Delivery Group
These features are supported on Server OS machines only.
The session prelaunch and session linger features help specified users access applications quickly, by starting sessions before they are requested (session prelaunch) and keeping application sessions active after a user closes all applications (session linger).
By default, session prelaunch and session linger are not used: a session starts (launches) when a user starts an application, and remains active until the last open application in the session closes.
Considerations:
- The Delivery Group must support applications, and the machines must be running a VDA for Windows Server OS, minimum version 7.6.
- These features are supported only when using Citrix Receiver for Windows, and also require additional Citrix Receiver configuration. For instructions, search for session prelaunch in the product documentation for your Citrix Receiver for Windows version.
- Note that Citrix Receiver for HTML5 is not supported.
- When using session prelaunch, if a user’s machine is put into “suspend” or “hibernate” mode, prelaunch will not work (regardless of session prelaunch settings). Users can lock their machines/sessions, but if a user logs off from Citrix Receiver, the session is ended and prelaunch no longer applies.
- When using session prelaunch, physical client machines cannot use the suspend or hibernate power management functions. Client machine users can lock their sessions but should not log off.
- Prelaunched and lingering sessions consume a license, but only when connected. Unused prelaunched and lingering sessions disconnect after 15 minutes by default. This value can be configured in PowerShell (New/Set-BrokerSessionPreLaunch cmdlet).
- Careful planning and monitoring of your users’ activity patterns are essential to tailoring these features to complement each other. Optimal configuration balances the benefits of earlier application availability for users against the cost of keeping licenses in use and resources allocated.
- You can also configure session prelaunch for a scheduled time of day in Citrix Receiver.
How long unused prelaunched and lingering sessions remain active
There are several ways to specify how long an unused session remains active if the user does not start an application: a configured timeout and server load thresholds. You can configure all of them; the event that occurs first causes the unused session to end.
-
Timeout: A configured timeout specifies the number of minutes, hours, or days an unused prelaunched or lingering session remains active. If you configure too short a timeout, prelaunched sessions will end before they provide the user benefit of quicker application access. If you configure too long a timeout, incoming user connections might be denied because the server doesn’t have enough resources.
You cannot disable this timeout from Studio, but you can in the SDK (
New/Set-BrokerSessionPreLaunchcmdlet). If you disable the timeout, it will not appear in the Studio display for that Delivery Group or in the Edit Delivery Group pages. -
Thresholds: Automatically ending prelaunched and lingering sessions based on server load ensures that sessions remain open as long as possible, assuming server resources are available. Unused prelaunched and lingering sessions will not cause denied connections because they will be ended automatically when resources are needed for new user sessions.
You can configure two thresholds: the average percentage load of all servers in the Delivery Group, and the maximum percentage load of a single server in the Delivery Group. When a threshold is exceeded, the sessions that have been in the prelaunch or lingering state for the longest time are ended, sessions are ended one-by-one at minute intervals until the load falls below the threshold. (While the threshold is exceeded, no new prelaunch sessions are started.)
Servers with VDAs that have not registered with the Controller and servers in maintenance mode are considered fully loaded. An unplanned outage causes prelaunch and lingering sessions end automatically to free capacity.
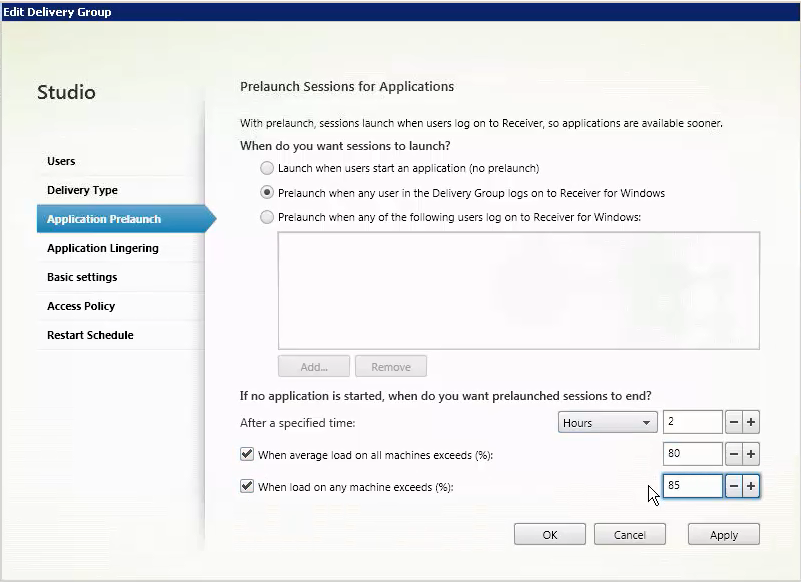
To enable session prelaunch
-
Select Delivery Groups in the Studio navigation pane.
-
Select a Delivery Group, and then click Edit Delivery Group in the Actions pane.
-
On the Application Prelaunch page, enable session prelaunch by choosing when sessions should launch:
- When a user starts an application. This is the default setting; session prelaunch is disabled.
- When any user in the Delivery Group logs on to Citrix Receiver for Windows.
- When anyone in a list of users and user groups logs on to Citrix Receiver for Windows. Be sure to also specify users or user groups if you choose this option.
-
A prelaunched session is replaced with a regular session when the user starts an application. If the user does not start an application (the prelaunched session is unused), the following settings affect how long that session remains active.
- When a specified time interval elapses. You can change the time interval (1-99 days, 1-2376 hours, or 1-142,560 minutes).
- When the average load on all machines in the Delivery Group exceeds a specified percentage (1-99%).
- When the load on any machine in the Delivery Group exceeds a specified percentage (1-99%).
Recap: A prelaunched session remains active until one of the following events occurs: a user starts an application, the specified time elapses, or a specified load threshold is exceeded.
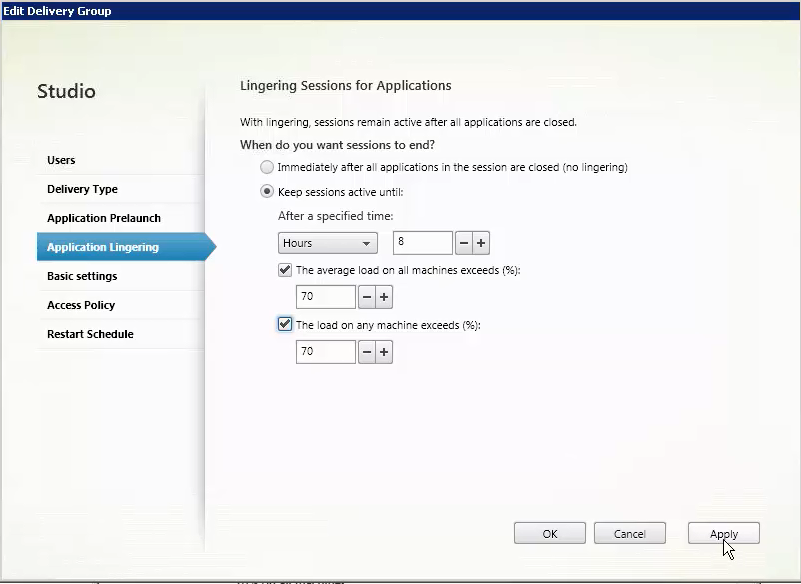
To enable session linger
-
Select Delivery Groups in the Studio navigation pane.
-
Select a Delivery Group, and then click Edit Delivery Group in the Actions pane.
-
On the Application Lingering page, enable session linger by selecting the Keep sessions active until radio button.
-
Several settings affect how long a lingering session remains active if the user does not start another application.
- When a specified time interval elapses. You can change the time interval (1-99 days, 1-2376 hours, or 1-142,560 minutes).
- When the average load on all machines in the Delivery Group exceeds a specified percentage (1-99%).
- When the load on any machine in the Delivery Group exceeds a specified percentage (1-99%).
Recap: A lingering session remains active until one of the following events occurs: a user starts an application, the specified time elapses, or a specified load threshold is exceeded.
Troubleshoot
-
VDAs that are not registered with a Delivery Controller are not considered when launching brokered sessions, which results in underutilization of otherwise available resources. There are various reasons a VDA might not be registered, many of which an administrator can troubleshoot. Studio provides troubleshooting information in the catalog creation wizard, and after you add a catalog to a Delivery Group.
After you create a Delivery Group, Studio displays details about machines associated with that group. The details pane for a Delivery Group indicates the number of machines that should be registered but are not. In other words, there might be one or more machines that are powered on and not in maintenance mode, but are not currently registered with a Controller. When viewing a “not registered, but should be” machine, review the Troubleshoot tab in the details pane for possible causes and recommended corrective actions.
For messages about functional level, see see VDA versions and functional levels. For more information about VDA registration troubleshooting, see CTX136668.
- In the Studio display for a Delivery Group, the “Installed VDA version” in the Details pane might differ from the actual version installed on the machines. The machine’s Windows Programs and Features display shows the actual VDA version.
- For machines with “Power State Unknown” status, see CTX131267 for guidance.
In this article
- Introduction
- Change user settings in a Delivery Group
- Add or remove users in a Delivery Group
- Change the delivery type of a Delivery Group
- Change StoreFront addresses
- Add, change, or remove a tag restriction for a desktop
- Upgrade a Delivery Group or revert an upgrade
- Manage Remote PC Access Delivery Groups
- Shut down and restart machines in a Delivery Group
- Power manage machines in a Delivery Group
- Create a restart schedule for machines in a Delivery Group
- Create multiple restart schedules for machines in a Delivery Group
- Prevent users from connecting to a machine (maintenance mode) in a Delivery Group
- Change assignments of machines to users in a Delivery Group
- Change the maximum number of machines per user
- Load manage machines in Delivery Groups
- Remove a machine from a Delivery Group
- Restrict access to machines in a Delivery Group
- Log off or disconnect a session
- Send a message to a Delivery Group
- Configure session prelaunch and session linger in a Delivery Group
- Troubleshoot