Install VDAs
There are two types of VDAs for Windows machines: VDA for Server OS and VDA for Desktop OS. (For information about VDAs for Linux machines, see the Linux Virtual Delivery Agent documentation.)
Important:
Before you start an installation, review Prepare to install. For example, the machine should have the latest Windows updates. If required updates are not present (such as KB2919355), installation fails.
Before installing VDAs, you should have already installed the core components. You can also create the Site before installing VDAs.
This article describes the installation wizard sequence when installing a VDA. Command-line equivalents are provided. For details, see Install using the command line.
If the installation of a VDA or a Delivery Controller™ fails, an MSI analyzer parses the failing MSI log, displaying the exact error code. The analyzer suggests a CTX article, if it’s a known issue. The analyzer also collects anonymized data about the failure error code. This data is included with other data collected by CEIP. If you end enrollment in CEIP, the collected MSI analyzer data is no longer sent to Citrix.
Step 1. Download the product software and launch the wizard
If you’re using the full-product installer:
- If you haven’t downloaded the XenApp and XenDesktop® ISO yet:
- Use your Citrix account credentials to access the XenApp® and XenDesktop download page. Download the product ISO file.
- Unzip the file. Optionally, burn a DVD of the ISO file.
- Use a local administrator account on the image or machine where you’re installing the VDA. Insert the DVD in the drive or mount the ISO file. If the installer does not launch automatically, double-click the AutoSelect application or the mounted drive.
- The installation wizard launches.
If you’re using a standalone package:
- Use your Citrix account credentials to access the XenApp and XenDesktop download page. Download the appropriate package:
- VDAServerSetup.exe: Server OS VDA <version>
- VDAWorkstationSetup.exe: Desktop OS VDA <version>
- VDAWorkstationCoreSetup.exe: Desktop OS Core Services VDA <version>
- Right-click the package and choose Run as administrator.
- The installation wizard launches.
Step 2. Choose which product to install
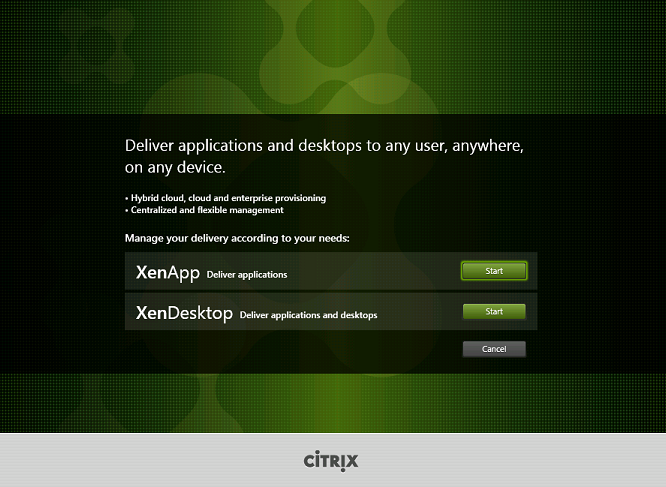
Click Start next to the product to install: XenApp or XenDesktop. (If the machine already has a XenApp or XenDesktop component installed, this page does not appear.)
Command-line option: /xenapp to install XenApp; XenDesktop is installed if option is omitted
Step 3. Select the VDA

Select the Virtual Delivery Agent entry. The installer knows whether it’s running on a Desktop or Server OS, so it offers only the appropriate VDA type.
For example, when you run the installer on a Windows 10 machine, the VDA for Desktop OS option is available. The VDA for Server OS option is not offered.
Step 4. Specify how the VDA will be used
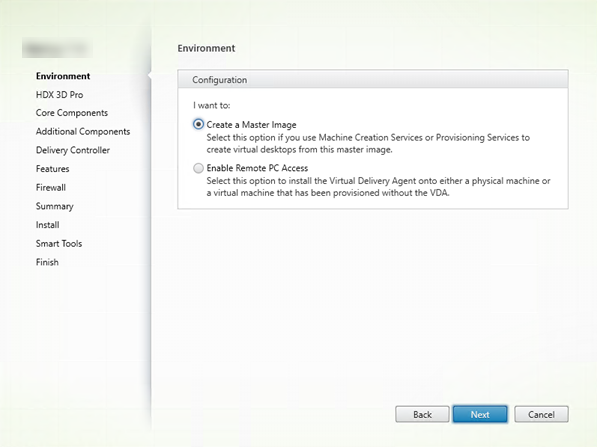
On the Environment page, specify how you plan to use the VDA. Choose one of the following:
- Master image: (default) You are installing the VDA on a machine image. You plan to use Citrix tools (Machine Creation Services™ or Provisioning Services) to create VMs from that master image.
-
Enable connections to a server machine (if installing on a server) or Remote PC Access (if installing on a desktop machine): You are installing the VDA on a physical machine or on a VM that was provisioned without a VDA. If you choose the Remote PC Access option, the following components are not installed/enabled:
- App-V
- Profile Management
- Machine Identify Service
- Personal vDisk
Click Next.
Command-line options: /masterimage, /remotepc
If you are using the VDAWorkstationCoreSetup.exe installer, this page does not appear in the wizard and the command-line options are not valid.
Step 5. Choose whether to enable HDX™ 3D Pro mode
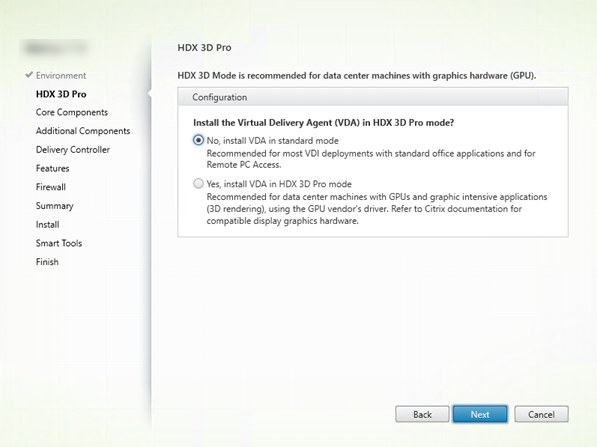
The HDX 3D Pro page appears only when installing a VDA for Desktop OS.
- The standard VDA mode is recommended for most desktops, including those enabled with Microsoft RemoteFX. The standard VDA mode is the default.
- The HDX 3D Pro VDA mode optimizes the performance of graphics-intensive programs and media-rich applications. HDX 3D Pro VDA mode is recommended if the machine accesses a graphics processor for 3D rendering.
- For Remote PC Access, the VDA is usually configured with the standard VDA mode. For Remote PC Access configured with HDX 3D Pro, monitor blanking is supported with
- Intel Iris Pro graphics and Intel HD graphics 5300 and above (5th Generation Intel Core Processors and 6th Generation Intel Core i5 Processors)
- NVIDIA Quadro and NVIDIA GRID GPUs
- AMD RapidFire
| Standard mode | HDX 3D Pro mode |
|---|---|
| Usually best for virtual desktops without graphics hardware acceleration, and for Remote PC Access. | Usually best for data center desktops with graphics hardware acceleration, unless more than four monitors are necessary. |
| Any GPU can be used for Remote PC Access, with some app compatibility limitations: On Windows 7, 8, and 8.1, GPU acceleration for DirectX feature levels up to 9.3. Some DirectX 10, 11, 12 applications may not run if they do not tolerate fallback to DirectX 9; on Windows 10, GPU acceleration is provided for windowed DirectX 10, 11, and 12 apps. DX 9 apps are rendered by WARP. DX apps cannot be used in full-screen mode; OpenGL application acceleration in remote sessions if supported by the GPU vendor (currently only NVIDIA). | Supports GPU acceleration with any GPU. However, console blanking, non-standard screen resolutions and true multi-monitor support require NVIDIA GRID, Intel Iris Pro, or AMD RapidFire graphics. Leverages graphics vendor’s driver for broadest application compatibility: all 3D APIs (DirectX or OpenGL) that the GPU supports; full-screen 3D app support with Intel Iris Pro (Win10 only), NVIDIA GRID, and AMD RapidFire; support for custom driver extensions and APIs. For example, CUDA or OpenCL. |
| Arbitrary monitor resolutions (limit determined by Windows OS and performance) and up to eight monitors. | Supports up to four monitors. |
| H.264 hardware encoding available with Intel Iris Pro graphics processors. | H.264 hardware encoding available with Intel Iris Pro graphics processors and NVIDIA cards. |
Click Next.
Command-line option: /enable_hdx_3d_pro
Step 6. Select the components to install and the installation location
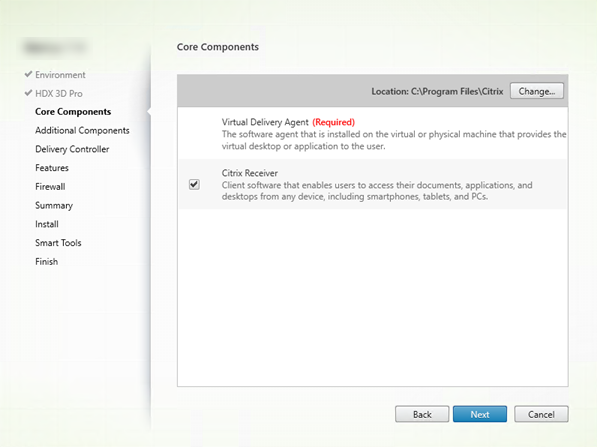
On the Core components page:
- Location: By default, components are installed in C:\Program Files\Citrix. This default is fine for most deployments. If you specify a different location, that location must have execute permissions for network service.
- Components: By default, Citrix Receiver for Windows is installed with the VDA (unless you are using the VDAWorkstationCoreSetup.exe installer). Clear the check box if you do not want that Citrix Receiver installed. If you are using the VDAWorkstationCoreSetup.exe installer, Citrix Receiver for Windows is never installed, so this check box is not displayed.
Click Next.
Command-line options: /installdir, “/components vda” to prevent Citrix Receiver for Windows installation
Step 7. Install additional components
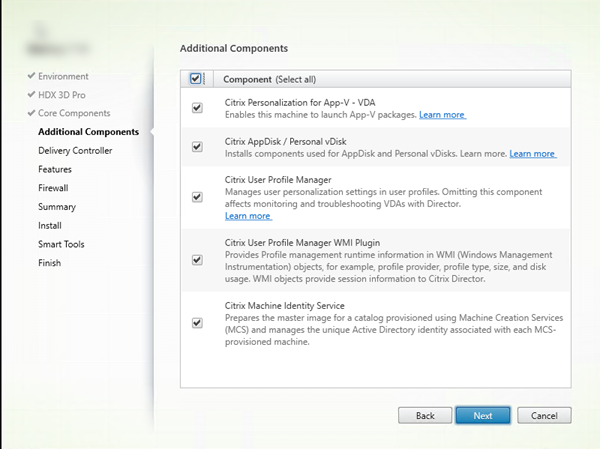
The Additional Components page contains check boxes to enable or disable installation of other features and technologies with the VDA. This page does not appear if:
- You are using the VDAWorkstationCoreSetup.exe installer. Also, the command-line options for the additional components are not valid with that installer.
- You are upgrading a VDA and all the additional components are already installed. (If some of the additional components are already installed, the page lists only components that are not installed.)
Citrix Personalization for App-V:
Install this component if you use applications from Microsoft App-V packages. For details, see App-V.
Command-line option: /exclude “Citrix Personalization for App-V – VDA” to prevent component installation
Citrix AppDisk / Personal vDisk:
Valid only when installing a VDA for Desktop OS on a VM. Installs components used for AppDisk and Personal vDisk. For more information, see AppDisks and Personal vDisk.
Command-line option: /exclude “Personal vDisk” to prevent AppDisk and Personal vDisk component installation
Citrix Profile Management:
This component manages user personalization settings in user profiles. For details, see Profile Management.
Excluding Citrix Profile management from the installation affects the monitoring and troubleshooting of VDAs with Citrix Director. On the User details and EndPoint pages, the Personalization panel and the Logon Duration panel fail. On the Dashboard and Trends pages, the Average Logon Duration panel display data only for machines that have Profile management installed.
Even if you are using a third-party user profile management solution, Citrix recommends that you install and run the Citrix Profile management Service. Enabling the Citrix Profile management Service is not required.
Command-line option: /exclude “Citrix User Profile Manager” to prevent component installation
Citrix Profile Management WMI Plugin:
This plug-in provides Profile management runtime information in WMI (Windows Management Instrumentation) objects (for example, profile provider, profile type, size, and disk usage). WMI objects provide session information to Director.
Command-line option: /exclude “Citrix User Profile Manager WMI Plugin” to prevent component installation
Citrix Machine Identity Service:
This service prepares the master image for a MCS-provisioned catalog. The service also manages each provisioned machine’s unique Active Directory identity.
Command-line option: /exclude “Machine Identity Service” to prevent component installation
Default values in the graphical interface:
- If you select “Create a master image” on the Environment page (Step 4), items on the Additional Components page are enabled by default.
- If you select “Enable Remote PC Access” or “Enable connections to a server machine” on the Environment page, items on the Additional Components page are disabled by default.
Step 8. Delivery Controller addresses
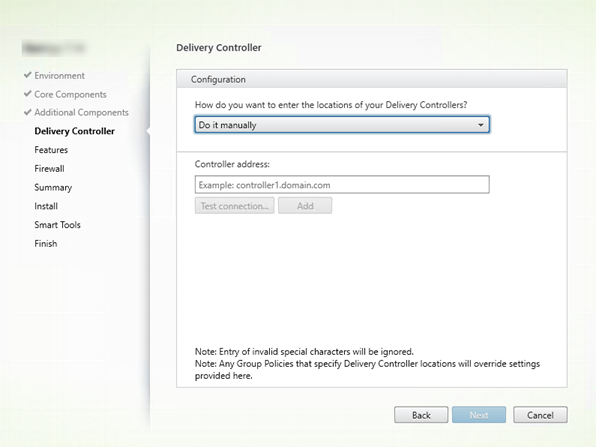
On the Delivery Controller page, choose how you want to enter the addresses of installed Controllers. Citrix recommends that you specify the addresses while you’re installing the VDA (“Do it manually”). The VDA cannot register with a Controller until it has this information. If a VDA cannot register, users cannot access applications and desktops on that VDA.
- Do it manually: (default): Enter the FQDN of an installed Controller and then click Add. If you’ve installed additional Controllers, add their addresses.
- Do it later (Advanced): If you choose this option, the wizard asks you to confirm that’s what you want to do before continuing. To specify addresses later, you can either rerun the installer or use Citrix Group Policy. The wizard also reminds you on the Summary page.
- Choose locations from Active Directory: Valid only when the machine is joined to a domain and the user is a domain user.
- Let Machine Creation Services do it automatically: Valid only when using MCS to provision machines.
Click Next. If you selected “Do it later (Advanced),” you are prompted to confirm that you will specify Controller addresses later.
Other considerations:
- The address cannot contain the characters { | } ~ [ \ ] ^ ‘ : ; < = > ? & @ ! “ # $ % ( ) + / ,
- If you specify addresses during VDA installation and in Group Policy, the policy settings override settings provided during installation.
- Successful VDA registration requires that the firewall ports used to communicate with the Controller are open. That action is enabled by default on the Firewall page of the wizard.
- After you specify Controller locations (during or after VDA installation), you can use the auto-update feature to update the VDAs when Controllers are added or removed. For details about how VDAs discover and register with Controllers, see Delivery Controllers.
Command-line option: /controllers
Step 9. Enable or disable features
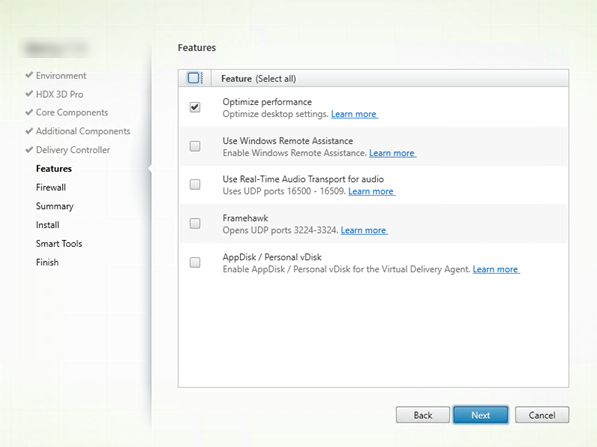
On the Features page, use the check boxes to enable or disable features you want to use.
Optimize performance:
Valid only when installing a VDA on a VM, not a physical machine. When this feature is enabled (default), the optimization tool is used for VDAs running in a VM on a hypervisor. VM optimization includes disabling offline files, disabling background defragmentation, and reducing event log size. For details, see CTX224676.
Command-line option: /optimize
If you are using the VDAWorkstationCoreSetup.exe installer, this feature does not appear in the wizard and the command-line option is not valid. If you are using another installer in a Remote PC Access environment, disable this feature.
Use Windows Remote Assistance:
When this feature is enabled, Windows Remote Assistance is used with the user shadowing feature of Director. Windows Remote Assistance opens the dynamic ports in the firewall. (Default = disabled)
Command-line option: /enable_remote_assistance
Use Real-Time Audio Transport for audio:
Enable this feature if voice-over-IP is widely used in your network. The feature reduces latency and improves audio resilience over lossy networks. It allows audio data to be transmitted using RTP over UDP transport. (Default = disabled)
Command-line option: /enable_real_time_transport
Framehawk:
When this feature is enabled, bidirectional UDP ports 3224-3324 are opened. (Default = disabled)
You can change the port range later with the “Framehawk display channel port range” Citrix policy setting. You must then open local firewall ports. A UDP network path must be open on any internal (VDA to Citrix Receiver or NetScaler Gateway) and external (NetScaler Gateway to Citrix Receiver) firewalls. If NetScaler Gateway is deployed, Framehawk datagrams are encrypted using DTLS (default UDP port 443). For details, see the Framehawk article.
Command-line option: /enable_framehawk_port
AppDisk / Personal vDisk:
Valid only when installing a VDA for Desktop OS on a VM. This check box is available only if the Citrix AppDisk / Personal vDisk check box is selected on the Additional Components page. When this check box is enabled, AppDisks and Personal vDisks can be used. For details, see AppDisks and Personal vDisks.
Command-line option: /baseimage
If you are using the VDAWorkstationCoreSetup.exe installer, this feature does not appear in the wizard and the command-line option is not valid.
Click Next.
Step 10. Firewall ports
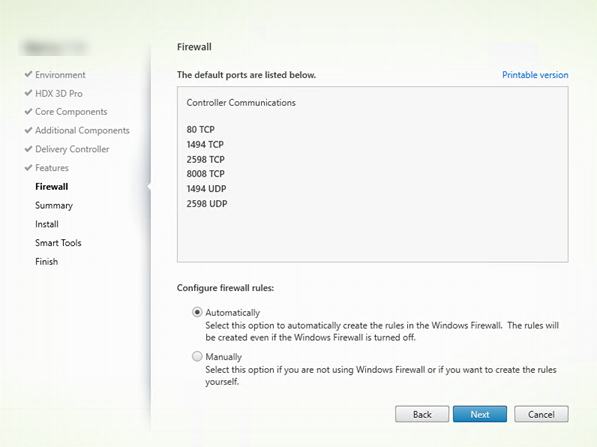
On the Firewall page, by default, the ports are opened automatically if the Windows Firewall Service is running, even if the firewall is not enabled. This default setting is fine for most deployments. For port information, see Network ports.
Click Next.
Command-line option: /enable_hdx_ports
Step 11. Review prerequisites and confirm installation
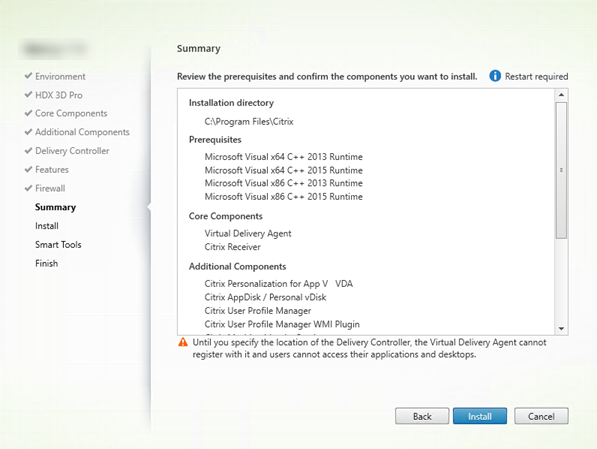
The Summary page lists what will be installed. Use the Back button to return to earlier wizard pages and change selections.
When you’re ready, click Install.
If prerequisites aren’t already installed/enabled, the machine may restart once or twice. See Prepare to install.
Step 12. Participate in Call Home
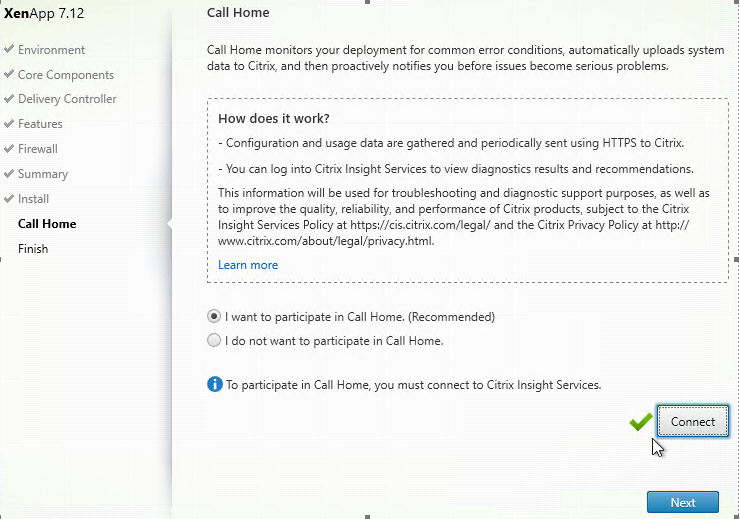
On the Call Home page, choose whether to participate in Call Home. If you choose to participate (the default), click Connect. When prompted, enter your Citrix account credentials.
After your credentials are validated (or if you choose not to participate), click Next.
Step 13. Complete this installation
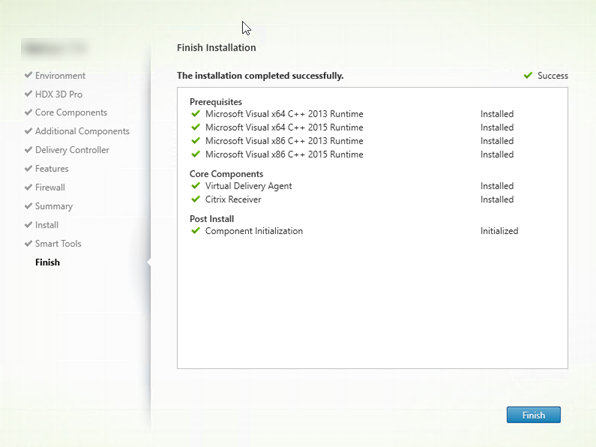
The Finish page contains green check marks for all prerequisites and components that installed and initialized successfully.
Click Finish. By default, the machine restarts automatically. (Although you can disable this automatic restart, the VDA cannot be used until the machine restarts.)
Next: Install other VDAs and continue configuration
Repeat the steps above to install VDAs on other machines or images, if needed.
After you install all VDAs, launch Studio. If you haven’t created a Site yet, Studio automatically guides you to that task. After that’s done, Studio guides you to create a machine catalog and then a Delivery Group. See:
Later, if you want to customize an installed VDA:
- From the Windows feature for removing or changing programs, select Citrix Virtual Delivery Agent or Citrix Remote PC Access/VDI Core Services VDA. Then right-click and select Change.
- Select Customize Virtual Delivery Agent Settings. When the installer launches, you can change:
- Controller addresses
- TCP/IP port to register with the Controller (default = 80)
- Whether to open Windows Firewall ports automatically
Troubleshoot
If your deployment uses Microsoft System Center Configuration Manager, a VDA installation might appear to fail with exit code 3, even though the VDA installed successfully. To avoid the misleading message, you can wrap your installation in a CMD script or change the success codes in your Configuration Manager package. For more information, see the forum discussion at https://discussions.citrix.com/topic/350000-sccm-install-of-vda-71-fails-with-exit-code-3/.
In the Studio display for a Delivery Group, the “Installed VDA version” entry in the Details pane might not be the version installed on the machines. The machine’s Windows Programs and Features display shows the actual VDA version.
In this article
- Step 1. Download the product software and launch the wizard
- Step 2. Choose which product to install
- Step 3. Select the VDA
- Step 4. Specify how the VDA will be used
- Step 5. Choose whether to enable HDX™ 3D Pro mode
- Step 6. Select the components to install and the installation location
- Step 7. Install additional components
- Step 8. Delivery Controller addresses
- Step 9. Enable or disable features
- Step 10. Firewall ports
- Step 11. Review prerequisites and confirm installation
- Step 12. Participate in Call Home
- Step 13. Complete this installation
- Next: Install other VDAs and continue configuration
- Troubleshoot