Upgrade a deployment
Introduction
You can upgrade certain deployments to newer versions without having to first set up new machines or Sites. That process is called an in-place upgrade. See Upgrade for a list of the versions you can upgrade.
You can also use the current XenApp installer to upgrade a XenApp 6.5 worker server to a current VDA for Windows Server OS. This is a supplementary activity to migrating XenApp 6.5. See Upgrade a XenApp 6.5 worker to a new VDA for Windows Server OS.
To start an upgrade, you run the installer from the new version to upgrade previously installed core components (Delivery Controller™, Citrix Studio, Citrix Director, Citrix License Server) and VDAs. Then you upgrade the databases and the Site.
Be sure to review all the information in this article before beginning the upgrade.
(If you are upgrading to 7.16 or a later release, see the guidance in Upgrade a deployment.)
Upgrade sequence
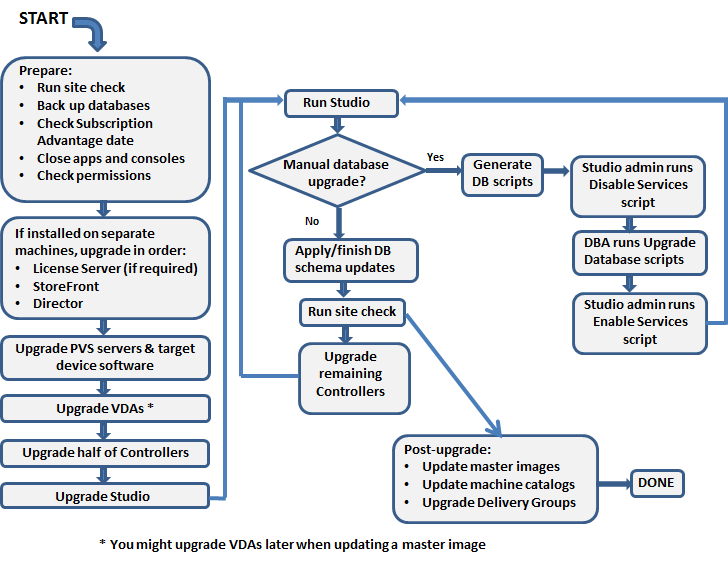
The following diagram summarizes the upgrade sequence. Details are provided in Upgrade procedure below. For example, if you have more than one core component installed on a server, running the installer on that machine will upgrade all components that have new versions. You might want to upgrade the VDA used in a master image, and then update the image. Then, update the catalog that uses that image and the Delivery Group that uses that catalog. Details also cover how to upgrade the Site databases and the Site automatically or manually.
Which product component versions can be upgraded
Using the product installer, you can upgrade:
- Citrix License Server, Studio, and StoreFront™
- Delivery Controllers 7.0 and later.
- VDA 5.6 or later
- Unlike earlier VDA releases, you must use the product installer to upgrade VDAs; you cannot use MSIs.
- If the installer detects Receiver for Windows (Receiver.exe) on the machine, it is upgraded to the Receiver version included on the product installation media.
- VDA 5.6 through VDA 7.8: If the installer detects Receiver for Windows Enterprise (CitrixReceiverEnterprise.exe) on the machine, it is upgraded to Receiver for Windows Enterprise 3.4.
- Director 1 or later
- Database: This Studio action upgrades the schema and migrates data for the Site database (plus the Configuration Logging and Monitoring databases, if you’re upgrading from an earlier 7.x version)
- Personal vDisk
Note: To upgrade from XenDesktop 5.6, first upgrade to 7.6 LTSR (with the latest CU), and then upgrade to this release.
Using the guidance in the feature/product documentation, upgrade the following if needed:
-
Provisioning Services (for XenApp 7.x and XenDesktop 7.x, Citrix recommends using the latest released version; the minimum supported version is Provisioning Services 7.0).
- Upgrade the Provisioning Services server using the server rolling upgrade, and the clients using vDisk versioning. Citrix recommends upgrading servers before target devices. For more information, see Upgrading Provisioning Servers
- Provisioning Services 7.x does not support creating new desktops with XenDesktop 5 versions. So, although existing desktops will continue to work, you cannot use Provisioning Services 7.x to create new desktops until you upgrade XenDesktop. Therefore, if you plan a mixed environment of XenDesktop 5.6 and 7.x Sites, do not upgrade Provisioning Services to version 7.
- Host hypervisor version.
- StoreFront.
- Profile Management.
- Federated Authentication Service
Limitations
The following limitations apply to upgrades:
- Selective component install: If you install or upgrade any components to the new version but choose not to upgrade other components (on different machines) that require upgrade, Studio will remind you. For example, let’s say an upgrade includes new versions of the Controller and Studio. You upgrade the Controller but you do not run the installer on the machine where Studio is installed. Studio will not let you continue to manage the Site until you upgrade Studio.
You do not have to upgrade VDAs, but Citrix recommends upgrading all VDAs to enable you to use all available features.
- XenApp version earlier than 7.5: You cannot upgrade from a XenApp version earlier than 7.5. You can migrate from XenApp 6.x; see Migrate XenApp 6.x. Although you cannot upgrade a XenApp 6.5 farm, you can replace the XenApp 6.5 software on a Windows Server 2008 R2 machine with a current VDA for Server OS. See Upgrade a XenApp 6.5 worker to a new VDA.
- XenDesktop version earlier than 5.6: You cannot upgrade from a XenDesktop version earlier than 5.6.
- XenDesktop® Express Edition: You cannot upgrade XenDesktop Express edition. Obtain and install a license for a currently supported edition, and then upgrade it.
- Early Release or Technology Preview versions: You cannot upgrade from a XenApp® or XenDesktop Early Release or Technology Preview version.
- Windows XP/Vista: If you have VDAs installed on Windows XP or Windows Vista machines, see VDAs on machines running Windows XP or Windows Vista.
- Product selection: When you upgrade from an earlier 7.x version, you do not choose or specify the product (XenApp or XenDesktop) that was set during the initial installation.
- Mixed environments/sites: If you must continue to run earlier version Sites and current version Sites, see Mixed environment considerations.
Preparation
Before beginning an upgrade:
-
Decide which installer and interface to use: Use the full-product installer from the XenApp or XenDesktop ISO to upgrade core components. You can upgrade VDAs using the full-product installer or one of the standalone VDA installers. All installers offer graphical and command line interfaces. For more information, see Installers.
You cannot upgrade by importing or migrating data from a version that can be upgraded. (Note: Some much earlier versions must be migrated instead of upgraded; see Upgrade and migrate for a list of which versions can be upgraded.)
If you originally installed a desktop VDA with the VDAWorkstationCoreSetup.exe installer, Citrix recommends using that installer to upgrade it. If you use the full-product VDA installer or the VDAWorkstationSetup.exe installer to upgrade the VDA, the components that were originally excluded might be installed, unless you expressly omit/exclude them from the upgrade.
For example, if you installed a version 7.13 VDA using VDAWorkstationCoreSetup.exe, and then used the full-product installer to upgrade that VDA to version 7.14, the components that were excluded from the original installation (such as Profile management or Personal vDisk) might be installed during the upgrade, if you accept the default settings or do not use the /exclude command-line option.
-
Check your Site’s health: Ensure the Site is in a stable and functional state before starting an upgrade. If a Site has issues, upgrading will not fix them, and can leave the Site in a complex state that is difficult to recover from. To test the Site, select the Site entry in the Studio navigation pane. In the Site configuration portion of the middle pane, click Test site.
-
Back up the Site, monitoring, and Configuration Logging databases: Follow the instructions in CTX135207. If any issues are discovered after the upgrade, you can restore the backup.
Optionally, back up templates and upgrade hypervisors, if needed.
Complete any other preparation tasks dictated by your business continuity plan.
-
Ensure your Citrix licensing is up to date: Before upgrading, be sure your Customer Success Services / Software Maintenance / Subscription Advantage date is valid for the new product version. If you are upgrading from an earlier 7.x product version, the date must be at least 2017.0801. (This date applies to the 7.15 LTSR release, not to cumulative updates (CUs) that follow.)
-
Ensure that your Citrix License Server is compatible: Ensure that your Citrix License Server is compatible with the new version. There are two ways to do this:
-
Before upgrading any other Citrix components, run the installer on the machine containing the License Server. If an upgrade is needed, the installer initiates it.
-
From the XenDesktop Setup directory on the installation media, run the command:
.\LicServVerify.exe -h \<License-Server-fqdn> -p 27000 –v. The resulting display indicates whether the License Server is compatible. If the License Server is incompatible, run the installer on that machine to upgrade it.
-
-
Back up any StoreFront modifications: If you have made modifications to files in
C:\inetpub\wwwroot\Citrix\<StoreName>\App_Data, such as default.ica and usernamepassword.tfrm, back them up for each store. After the upgrade you can restore them to reinstate your modifications. -
Close applications and consoles: Before starting an upgrade, close all programs that might potentially cause file locks, including administration consoles and PowerShell sessions. (Restarting the machine ensures that any file locks are cleared, and that there are no Windows updates pending.)
Before starting an upgrade, stop and disable any third-party monitoring agent services.
-
Ensure you have proper permissions: In addition to being a domain user, you must be a local administrator on the machines where you are upgrading product components.
The Site database and the Site can be upgraded automatically or manually. For an automatic database upgrade, the Studio user’s permissions must include the ability to update the SQL Server database schema (for example, the db_securityadmin or db_owner database role). For details, see the Databases article. If the Studio user does not have those permissions, initiating a manual database upgrade will generate scripts. The Studio user runs some of the scripts from Studio; the database administrator runs other scripts using a tool such as SQL Server Management Studio.
Mixed environment considerations
When your environment contains Sites/farms with different product versions (a mixed environment), Citrix recommends using StoreFront to aggregate applications and desktops from different product versions (for example, if you have a XenDesktop 7.13 Site and a XenDesktop 7.14 Site). For details, see the StoreFront documentation.
- In a mixed environment, continue using the Studio and Director versions for each release, but ensure that different versions are installed on separate machines.
- If you plan to run XenDesktop 5.6 and 7.x Sites simultaneously and use Provisioning Services for both, either deploy a new Provisioning Services for use with the 7.x Site, or upgrade the current Provisioning Services and be unable to provision new workloads in the XenDesktop 5.6 Site.
Within each Site, Citrix recommends upgrading all components. Although you can use earlier versions of some components, all the features in the latest version might not be available. For example, although you can use current VDAs in deployments containing earlier Controller versions, new features in the current release may not be available. VDA registration issues can also occur when using non-current versions.
- Sites with Controllers at version 5.x and VDAs at version 7.x should remain in that state only temporarily. Ideally, you should complete the upgrade of all components as soon as possible.
- Do not upgrade a standalone Studio version until you are ready to use the new version.
VDAs on machines running Windows XP or Windows Vista
You cannot upgrade VDAs installed on machines running Windows XP or Windows Vista to a 7.x version. You must use VDA 5.6 FP1 with certain hotfixes; see CTX140941 for instructions. Although earlier-version VDAs will run in a 7.x Site, they cannot use many of its features, including:
- Features noted in Studio that require a newer VDA version.
- Configuring App-V applications from Studio.
- Configuring StoreFront addresses from Studio.
- Automatic support for Microsoft Windows KMS licensing when using Machine Creation Services. See CTX128580.
- Information in Director:
- Logon times and logon end events impacting the logon duration times in the Dashboard, Trends, and User Detail views.
- Logon duration breakdown details for HDX™ connection and authentication time, plus duration details for profile load, GPO load, logon script, and interactive session establishment.
- Several categories of machine and connection failure rates.
- Activity Manager in the Help Desk and User Details views.
Citrix recommends reimaging Windows XP and Windows Vista machines to a supported operating system version and then installing the latest VDA.
VDAs on machines running Windows 8.x and Windows 7
To upgrade VDAs installed on machines running Windows 8.x or Window 7 to Windows 10, Citrix recommends reimaging Windows 7 and Windows 8.x machines to Windows 10 and then installing the supported VDA for Windows 10. If reimaging is not an option, uninstall the VDA before upgrading the operating system; otherwise, the VDA will be in an unsupported state.
Mixed VDA support
When you upgrade the product to a later version, Citrix recommends you upgrade all the core components and VDAs so you can access all the new and enhanced features in your edition.
In some environments, you may not be able to upgrade all VDAs to the most current version. In this scenario, when you create a machine catalog, you can specify the VDA version installed on the machines. By default, this setting specifies the latest recommended VDA version; you need to consider changing this setting only if the machine catalog contains machines with earlier VDA versions. However, mixing VDA versions in a machine catalog is not recommended.
If a machine catalog is created with the default recommended VDA version setting, and any of the machines in the catalog has an earlier VDA version installed, those machines will not be able to register with the Controller and will not work.
For more information, see VDA versions and functional levels.
Controllers on earlier OSs
Citrix recommends that all Delivery Controllers in a Site have the same OS. The following upgrade sequence minimizes the interval when different Controllers have different OSs.
- Take a snapshot of all Delivery Controllers in the Site and then back up the site database.
- Install new Delivery Controllers on clean servers with supported operating systems.
- Add the new Controllers to the Site.
- Remove the Controllers that are running on operating systems that are not valid for the newer release.
For information about adding and removing Controllers, see Delivery Controllers.
Upgrade procedure
To run the product installer graphical interface, log on to the machine and then insert the media or mount the ISO drive for the new release. Double-click AutoSelect. To use the command-line interface, see Install using the command line.
-
If more than one core component is installed on the same server (for example, the Controller, Studio, and License Server) and several of those components have new versions available, they will all be upgraded when you run the installer on that server.
If any core components are installed on machines other than the Controller, run the installer on each of those machines. The recommended order is: License Server, StoreFront, and then Director.
If you have not yet determined whether your License Server is compatible with the new version (see Preparation), it is essential that you run the installer on the License Server before upgrading any other core components.
If you wish to preserve manual modifications to StoreFront stores, back up the store files before upgrading StoreFront (see Preparation).
-
If you use Provisioning Services, upgrade the PVS servers and target devices, using the guidance in the Provisioning Services documentation.
-
Run the product installer on machines containing VDAs. (See Step 12 if you use master images and Machine Creation Services.)
-
Run the product installer on half of the Controllers. (This also upgrades any other core components installed on those servers.) For example, if your Site has four Controllers, run the installer on two of them.
- Leaving half of the Controllers active allows users to access the Site. VDAs can register with the remaining Controllers. There may be times when the Site has reduced capacity because fewer Controllers are available. The upgrade causes only a brief interruption in establishing new client connections during the final database upgrade steps. The upgraded Controllers cannot process requests until the entire Site is upgraded.
- If your Site has only one Controller, the Site is inoperable during the upgrade.
-
If Studio is installed on a different machine than one you’ve already upgraded, run the installer on the machine where Studio is installed.
-
From the newly upgraded Studio, upgrade the Site database. For details, see Upgrade the databases and the Site.
-
From the newly upgraded Studio, select Citrix Studio site-name in the navigation pane. Select the Common Tasks tab. Select Upgrade remaining Delivery Controllers.
-
After completing the upgrade and confirming completion on the remaining Controllers, close and then reopen Studio. Studio might prompt for an additional Site upgrade to register the Controller’s services to the Site, or to create a zone ID if it does not yet exist.
-
In the Site Configuration section of the Common Tasks page, select Perform registration. Registering the Controllers makes them available to the Site.
-
After you select Finish when the upgrade completes, you are offered the opportunity to enroll in the Citrix telemetry programs, which collect information about your deployment. That information is used to improve product quality, reliability, and performance.
-
After upgrading components, the database, and the Site, test the newly-upgraded Site. From Studio, select Citrix Studio site-name in the navigation pane. Select the Common Tasks tab and then select Test Site. These tests were run automatically after you upgraded the database, but you can run them again at any time.
The Test Site functionality might fail for a Controller installed on Windows Server 2016, when a local SQL Server Express is used for the Site database, if the SQL Server Browser service is not started. To avoid this, complete the following tasks.
-
Enable the SQL Server Browser service (if required) and then start it.
-
Restart the SQL Server (SQLEXPRESS) service.
-
-
If you use Machine Creation Services and want to use upgraded VDAs: After you upgrade and test the deployment, update the VDA used in the master images (if you haven’t done that already). Update master images that use those VDAs. See Update or create a new master image. Then update machine catalogs that use those master images, and upgrade Delivery Groups that use those catalogs.
Upgrade the databases and the Site
After upgrading the core components and VDAs, use the newly upgraded Studio to initiate an automatic or manual database and Site upgrade.
Remember: Check the Preparation section above for permission requirements.
- For an automatic database upgrade, the Studio user’s permissions must include the ability to update the SQL Server database schema.
- For a manual upgrade, the Studio user runs some of the generated scripts from Studio. The database administrator runs other scripts, using either the SQLCMD utility or the SQL Server Management Studio in SQLCMD mode. Otherwise, inaccurate errors can result.
Citrix strongly recommends that you back up the database before upgrading. See CTX135207. During a database upgrade, product services are disabled. During that time, Controllers cannot broker new connections for the site, so plan carefully.
After the database upgrade completes and product services are enabled, Studio tests the environment and configuration, and then generates an HTML report. If problems are identified, you can restore the database backup. After resolving issues, you can upgrade the database again.
Upgrade the database and site automatically:
Launch the newly upgraded Studio. After you choose to start the site upgrade automatically and confirm that you are ready, the database and site upgrade proceeds.
Upgrade the database and site manually:
-
Launch the newly upgraded Studio. Choose to upgrade the site manually. The wizard checks for License Server compatibility and requests confirmation. After you confirm that you have backed up the database, the wizard generates and displays the scripts and a checklist of upgrade steps.
-
Run the following scripts in the order shown.
- DisableServices.ps1: PowerShell script to be run by the Studio user on a Controller to disable product services.
- UpgradeSiteDatabase.sql: SQL script to be run by the database administrator on the server containing the Site database.
- UpgradeMonitorDatabase.sql: SQL script to be run by the database administrator on the server containing the Monitor database.
- UpgradeLoggingDatabase.sql: SQL script to be run by the database administrator on the server containing the Configuration Logging database. Run this script only if this database changes (for example, after applying a hotfix).
- EnableServices.ps1: PowerShell script to be run by the Studio user on a Controller to enable product services.
-
After completing the checklist tasks. click Finish upgrade.
Dbschema upgrade
When you update your deployment to a new CU, several of your database schemas are upgraded. Consult the following table for information about which database schemas are being upgraded in the process:
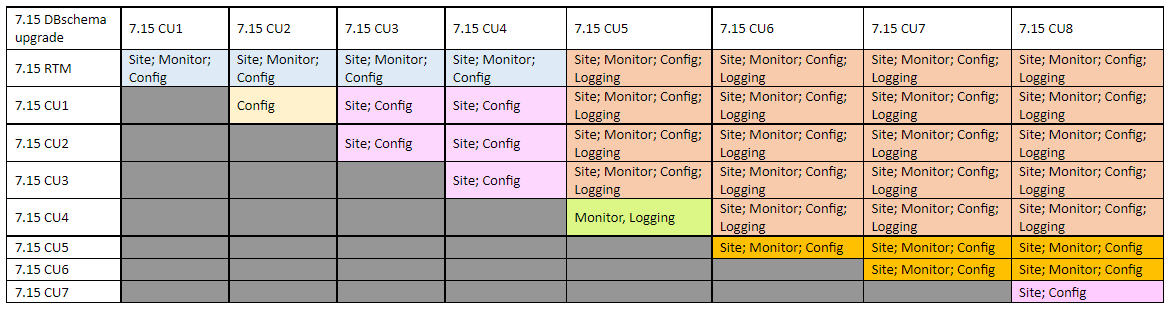
Definition of terms:
- Site = Site Datastore; Dbschema update is made to the Site Datastore.
- Monitor = Monitor Datastore; Dbschema update is made to the Monitor Datastore.
- Config = Configuration table; Desktop Studio version, License Server version, or both are updated in the Configuration table.
- Logging = Logging Datastore; Dbschema update is made to the Logging Datastore.
In this article
- Introduction
- Upgrade sequence
- Which product component versions can be upgraded
- Limitations
- Preparation
- Mixed environment considerations
- VDAs on machines running Windows XP or Windows Vista
- VDAs on machines running Windows 8.x and Windows 7
- Mixed VDA support
- Controllers on earlier OSs
- Upgrade procedure
- Upgrade the databases and the Site
- Dbschema upgrade