PIVスマートカード認証の構成
この記事では、スマートカード認証機能を有効にするためにDirectorサーバーとActive Directoryで必要な構成について説明します。
注:
スマートカード認証は、同じActive Directoryドメインからのユーザーに対してのみサポートされています。
Directorサーバー構成
Directorサーバーで、次の構成手順を実行します。
-
クライアント証明書マッピング認証をインストールして有効にします。 Microsoftのドキュメント「Client Certificate Mapping Authentication」の「Client Certificate Mapping authentication using Active Directory」の説明に従います。
-
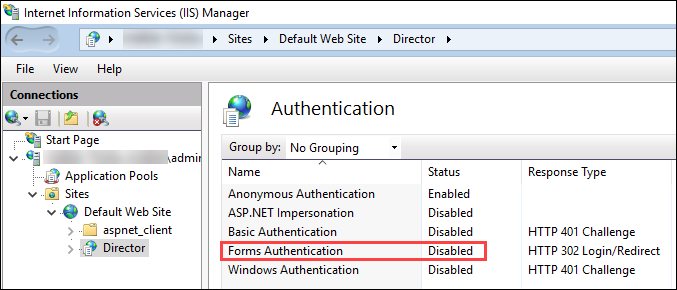
Directorサイトでフォーム認証を無効にします。
IISマネージャーを起動します。
[サイト] > [デフォルトのWebサイト] > [Director]に移動します。
[認証] を選択します。
[フォーム認証] を右クリックし、[無効化] を選択します。
-
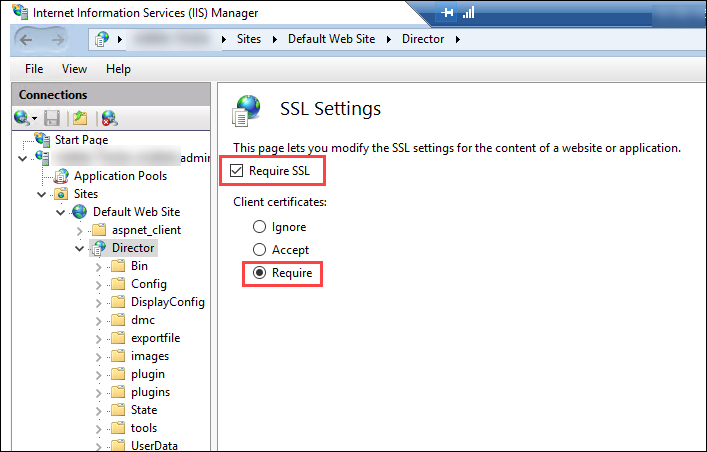
クライアント証明書認証として、Director URLに、より安全なhttpsプロトコル(HTTPではなく)を構成します。
-
IISマネージャーを起動します。
-
[サイト] > [デフォルトのWebサイト] > [Director]に移動します。
-
[SSL設定] を選択します。
-
[SSLを必須にする]および[クライアント証明書] > [必須]を選択します。
-
-
web.configを更新します。 テキストエディターを使用してweb.configファイル(c:\inetpub\wwwroot\Directorにある)を開きます。
<system.webServer>親要素の下で、最初の子要素として次のスニペットを追加します:
  <defaultDocument>
   <files>
       <add value="LogOn.aspx"/>
   </files>
</defaultDocument>
Active Directory構成
デフォルトでは、Directorアプリケーションは、アプリケーションプールIDプロパティを使用して実行されます。 スマートカード認証には委任が必要であり、この委任には、DirectorアプリケーションIDにサービスホスト上のTCB(Trusted Computing Base)特権が必要となります。
アプリケーションプールID用に別個のサービスアカウントを作成することをCitrixではお勧めします。 MicrosoftのMSDNの記事「Protocol Transition with Constrained Delegation Technical Supplement」内の説明に従って、サービスアカウントを作成し、TCB特権を割り当てます。
新しく作成したサービスアカウントをDirectorアプリケーションプールに割り当てます。 次の図は、サンプルサービスアカウントDomain Poolのプロパティダイアログです。

このアカウント用に以下のサービスを構成します:
- Delivery Controller™:HOST、HTTP
- Director:HOST、HTTP
- Active Directory:GC、LDAP
構成するには、
-
ユーザーアカウントのプロパティダイアログで、[追加] をクリックします。
-
[サービスの追加] ダイアログで、[ユーザーまたはコンピューター] をクリックします。
-
Delivery Controllerホスト名を選択します。
-
[使用可能なサービス] 一覧から、[HOST]および[HTTP]サービスタイプを選択します。
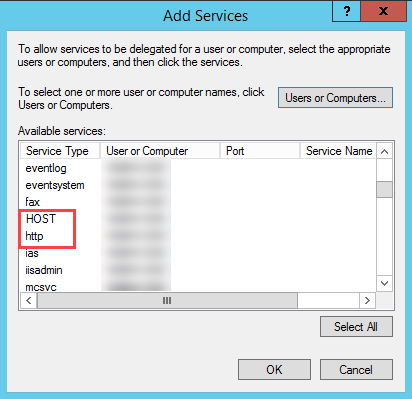
同様に、DirectorおよびActive Directoryのホストのサービスタイプを追加します。
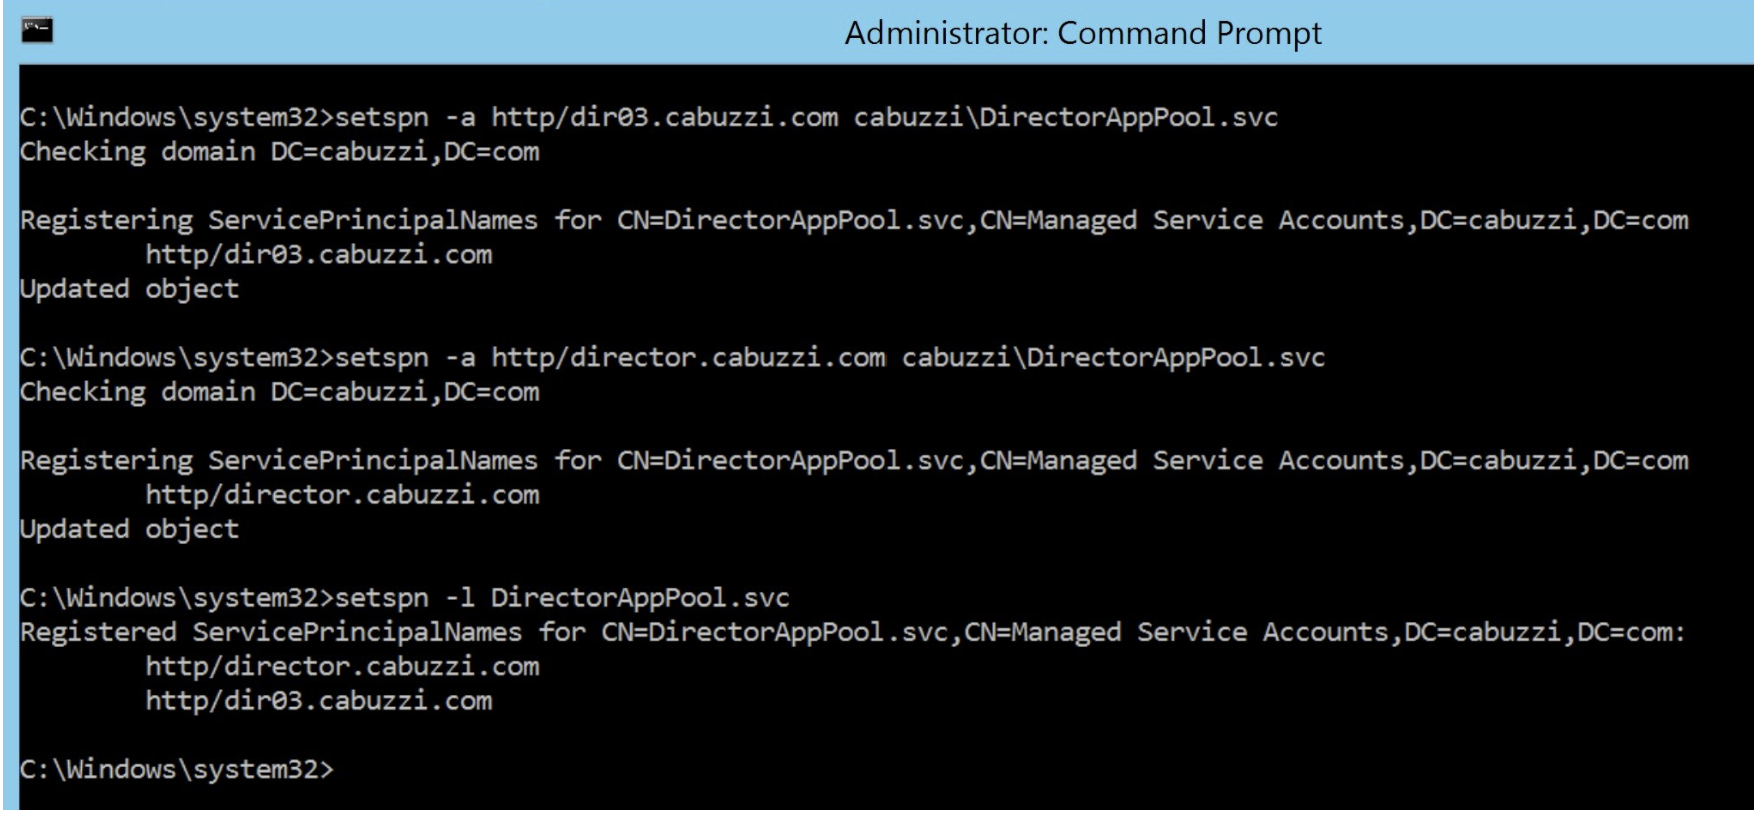
サービスプリンシパル名レコードの作成
各Directorサーバーのサービスアカウントと、Directorサーバーのプールへのアクセスに使用される負荷分散された仮想IP(VIP)を作成する必要があります。 新しく作成したサービスアカウントへの委任を構成するには、サービスプリンシパル名(SPN)レコードを作成する必要があります。
-
次のコマンドを使用して、DirectorサーバーのSPNレコードを作成します:
setspn -a http/<directorServer>.<domain_fqdn> <domain>\<DirectorAppPoolServiceAcct> <!--NeedCopy--> -
次のコマンドを使用して、負荷分散VIPのSPNレコードを作成します:
setspn -S http/<DirectorFQDN> <domain>\<DirectorAppPoolServiceAcct> <!--NeedCopy--> -
作成されたSPNを表示またはテストするには、次のコマンドを使用します:
   setspn –l <DirectorAppPoolServiceAcct>

 <!--NeedCopy-->
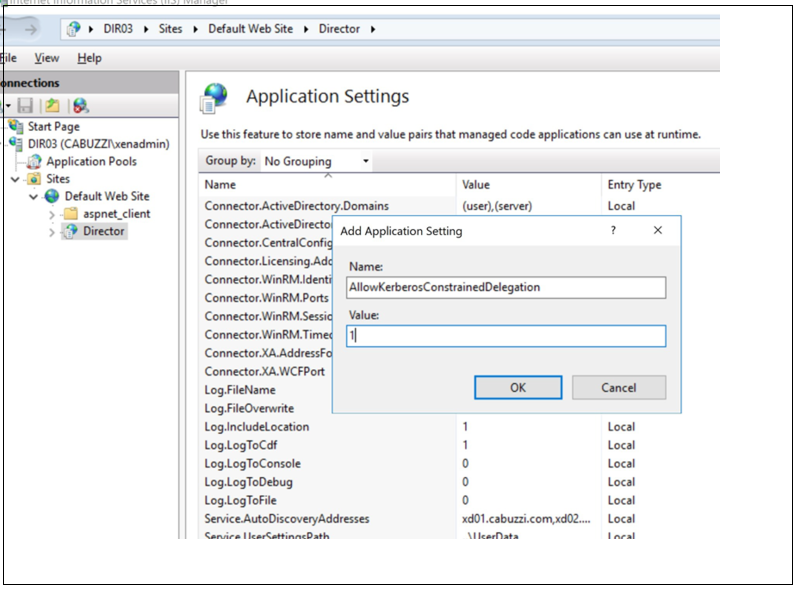
- 左側のペインでDirector仮想ディレクトリを選択し、[アプリケーション設定]をダブルクリックします。 [アプリケーション設定]ウィンドウで、[追加]をクリックし、AllowKerberosConstrainedDelegationが1に設定されていることを確認します。
-
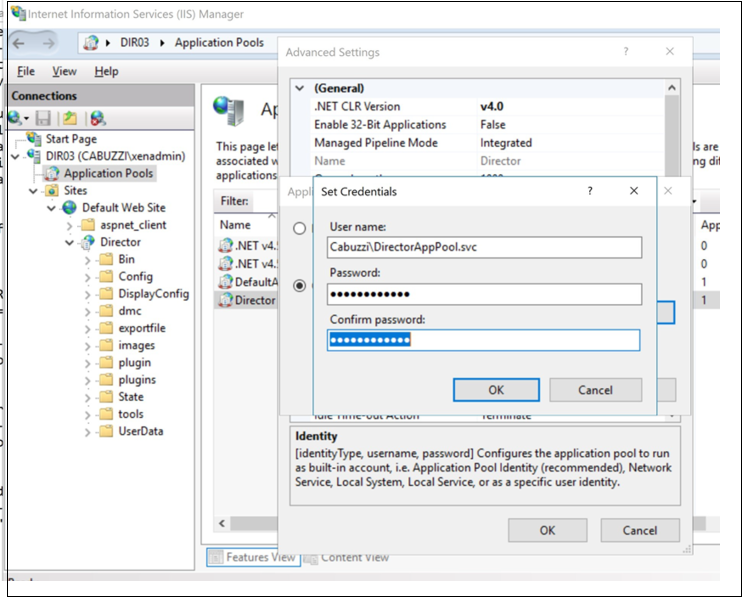
左側のペインで[アプリケーションプール]を選択し、Directorアプリケーションプールを右クリックして[詳細設定]を選択します。
-
IDを選択し、省略記号(「…」)をクリックして サービスアカウントのドメイン\ログオンとパスワードの資格情報を入力します。 IISコンソールを閉じます。
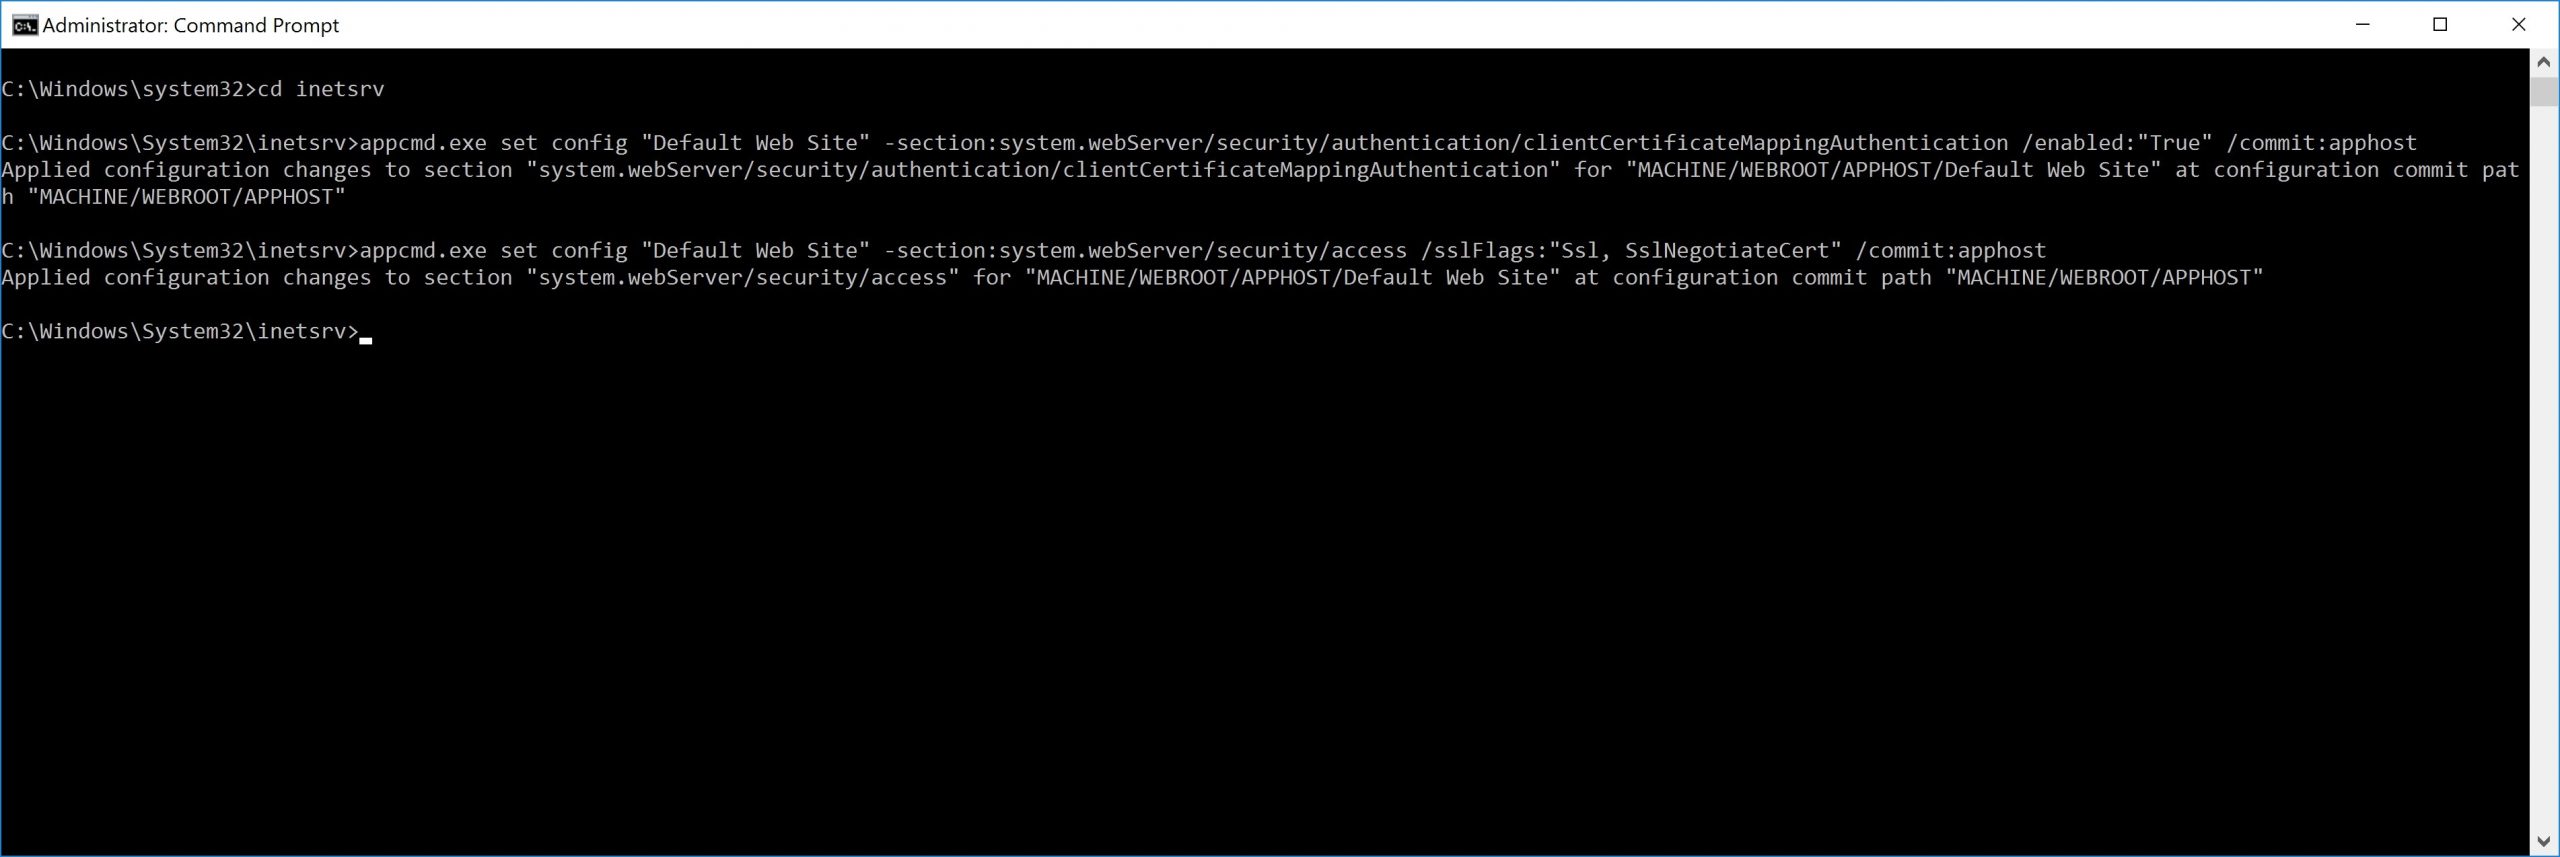
- 管理者特権のコマンドプロンプトから、ディレクトリをC:\Windows\System32\inetsrvに変更し、次のコマンドを入力します:
     appcmd.exe set config “Default Web Site” -section:system.webServer/security/authentication/clientCertificateMappingAuthentication /enabled:”True” /commit:apphost

<!--NeedCopy-->
      appcmd.exe set config “Default Web Site” -section:system.webServer/security/access /sslFlags:”Ssl, SslNegotiateCert” /commit:apphost
<!--NeedCopy-->
Firefoxブラウザー構成
Firefoxブラウザーを使用するには、OpenSC 0.17.0で使用可能なPIVドライバーをインストールします。 インストールと構成の手順については、「Installing OpenSC PKCS#11 Module in Firefox, Step by Step」を参照してください。 Directorでスマートカード認証機能を使用する方法については、Directorの記事で「DirectorでのPIVスマートカード認証の使用」のセクションを参照してください。